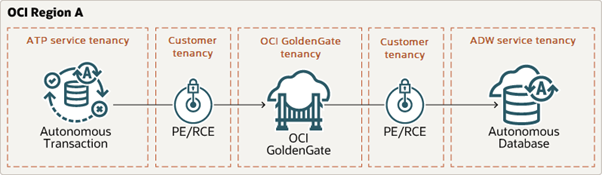
In a recent blog, we saw how useful the OCI CLI is to automate the creation and management of OCI GoldenGate deployments. In addition, OCI GoldenGate provides a set of REST APIs that can be used to automate development and monitoring activities such as creating an extract process, listing credentials, or getting the status of a given process. In this blog, we will continue with the use case started in Using Oracle Cloud Infrastructure (OCI) Command Line Interface (CLI) with OCI GoldenGate, and go through several examples of how to use GoldenGate REST APIs with OCI GoldenGate. As a reminder, our end goal is to create and run an end-to-end replication process between an Autonomous Transaction Processing (ATP) instance and an Autonomous Data Warehouse (ADW) running in OCI.
Set Up the Environment
In this blog (and the previous one), we use the sample data provided in one of our LiveLabs (link): Archive.zip. You can refer to the LiveLabs instructions to set up your ATP and ADW instances and load them with sample data.
Accessing Cloud Shell
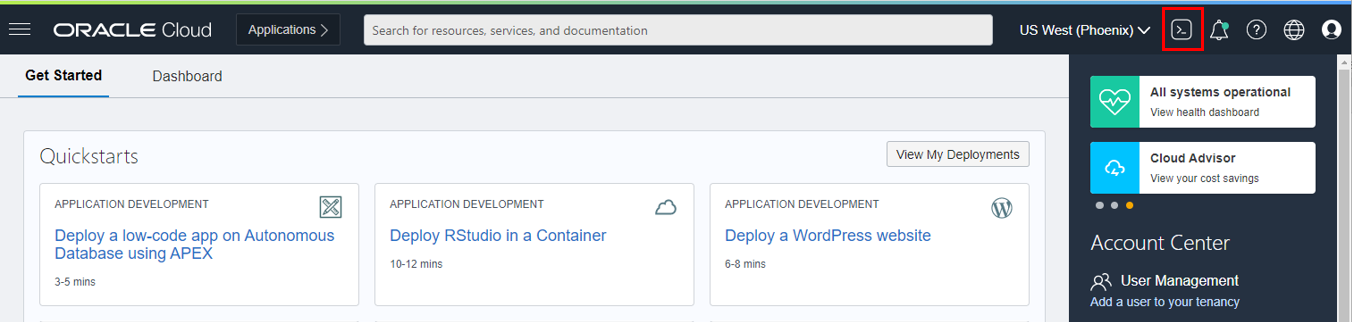
I use Cloud Shell as it is easy to use, integrated with the OCI Console, and comes pre-configured with curl and jq to run REST commands quickly. To access Cloud Shell, log into the Oracle Cloud Console and click the Cloud Shell icon next to your Region.
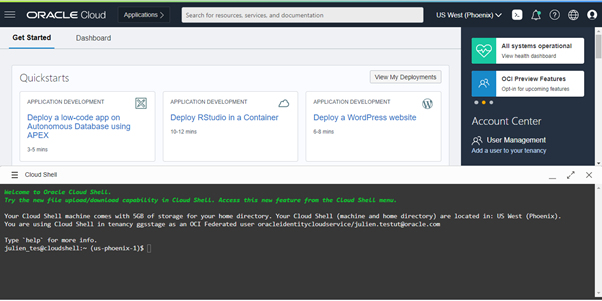
The Cloud Shell window opens at the bottom of the Oracle Cloud Console and loads the environment. It takes a few minutes the first time you connect or when you have not used it for some time. If you use it frequently, it boots up very quickly.
Next, you should create a .netrc file to store your OCI GoldenGate credentials to avoid providing them in the curl commands. You can get more information about .netrc in Everything curl.
OCI GoldenGate REST APIs
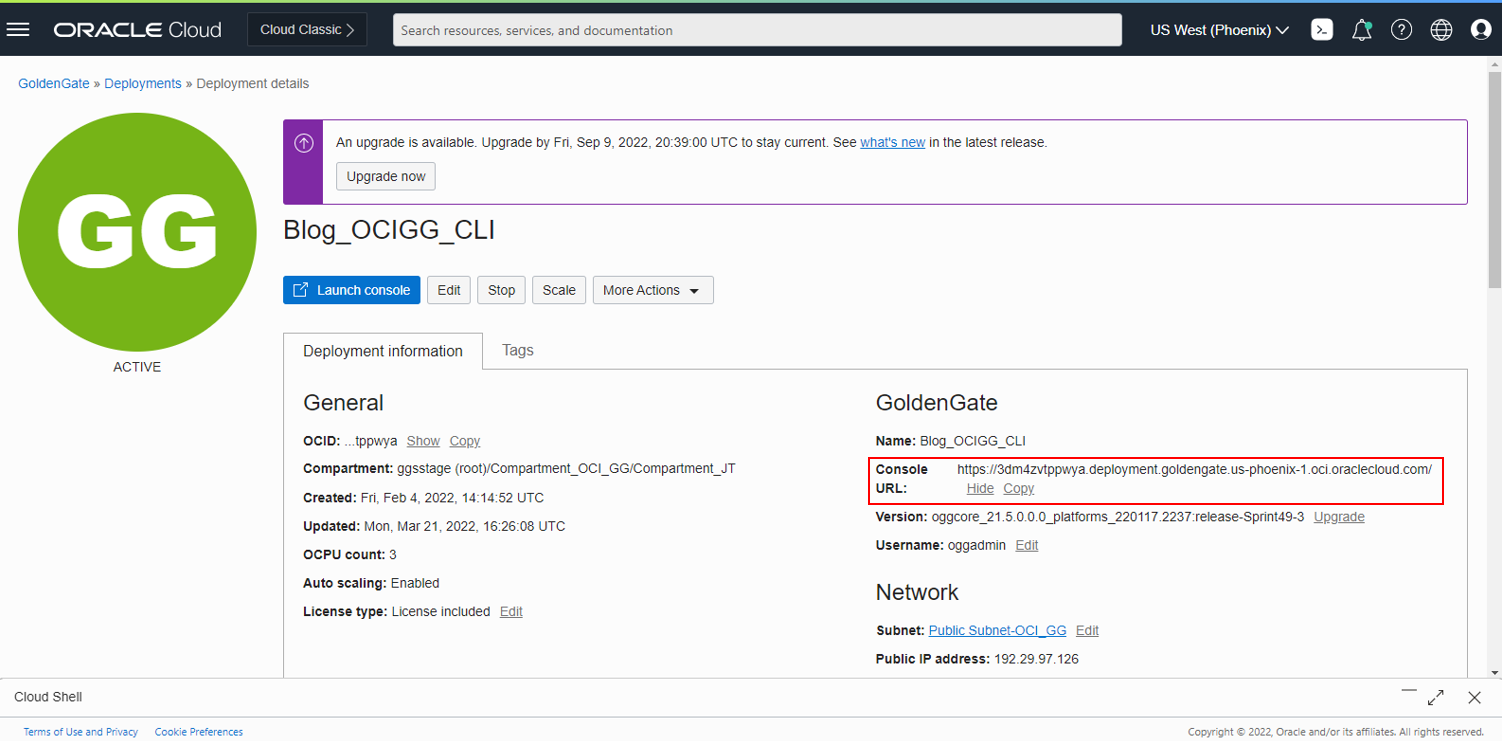
You can now start running REST commands on your OCI GoldenGate deployments. You can review the complete list of REST APIs available in the GoldenGate documentation. The first information to gather is your OCI GoldenGate Deployment endpoint, as it will be used to invoke REST commands:
-
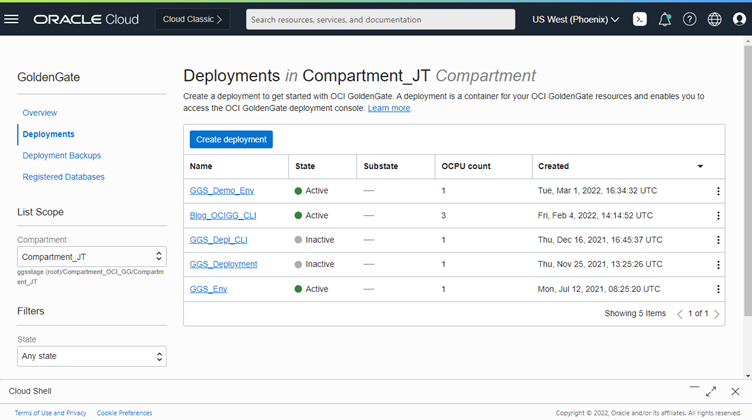
Click on Oracle Database in the OCI Console, and click GoldenGate
-
Click Deployments to access the list of your Deployments
-
Then click on the Deployment you want to connect to, and copy its Console URL
-
Save it in a notepad
List GoldenGate Connections
In my previous blog, I used the OCI CLI to create database registrations. This operation automatically creates new credentials in GoldenGate Deployments. You can list these connections using the REST APIs. To list connections, use the command GET /services/v2/connections (doc link) from Cloud Shell:
curl -n -H “Content-Type: application/json” -H “Accept: application/json” -X GET https://<deployment URL>/services/v2/connections | jq .response.items[].name

Add Trandata on Source
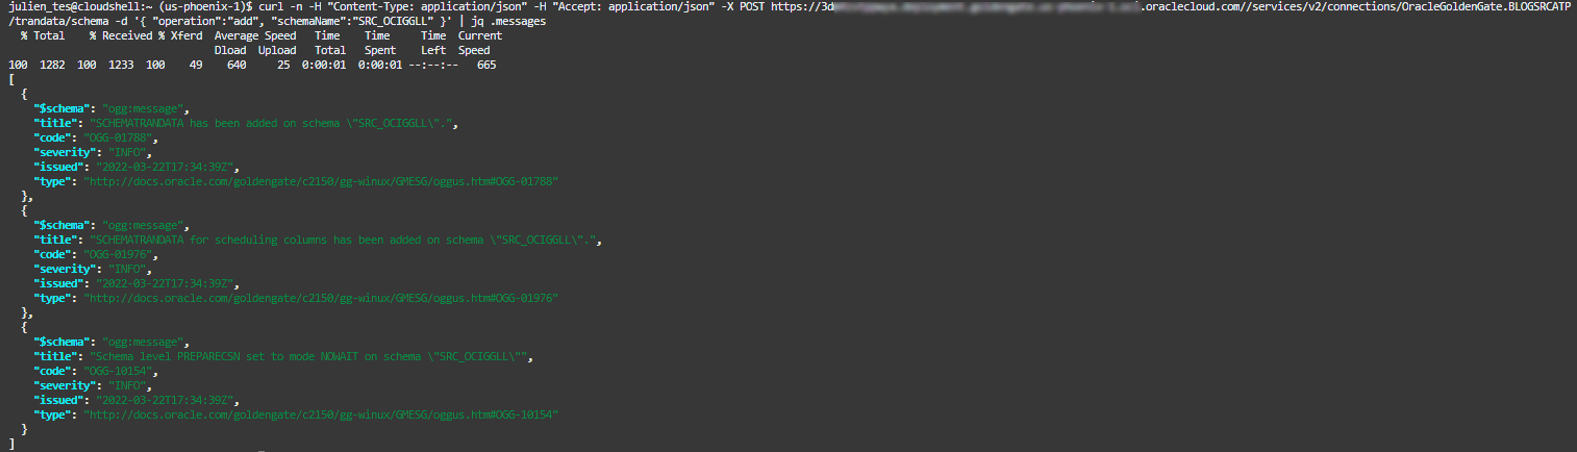
Now that you got the list of connections, you can add trandata for the SRC_OCIGGLL schema in the source system represented by OracleGoldenGate.BLOGSRCATP. This allows GoldenGate to use supplemental logging to capture the latest changed data. You can accomplish this using the command POST /services/v2/connections/{connection}/trandata/schema (doc link):
curl -n -H “Content-Type: application/json” -H “Accept: application/json” -X POST https://<deployment URL>/services/v2/connections/OracleGoldenGate.BLOGSRCATP/trandata/schema -d ‘{ “operation”:”add”, “schemaName”:”<schema name>” }’ | jq .messages
Note: It is also possible to add trandata at the table level using POST /services/{version}/connections/{connection}/trandata/table (doc link).
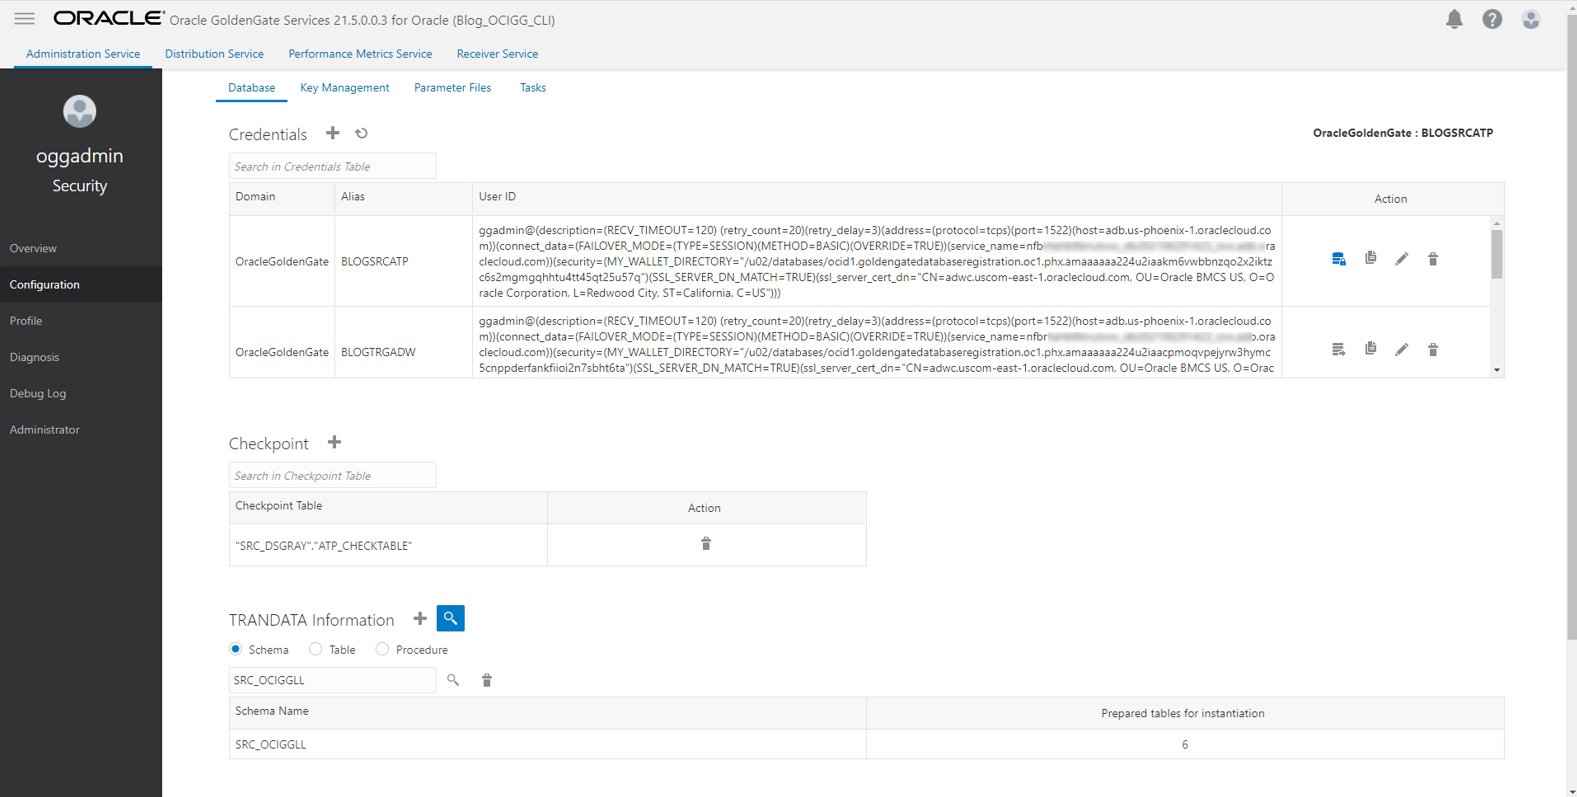
You can verify in the GoldenGate Console that trandata was added correctly:
-
Go to Configuration
-
Click Connect to the database next to BLOGSRCATP
-
Search for SRC_OCIGGLL in the TRANDATA information section:
Add Checkpoint to Target
Next, you need to add a Checkpoint on the target system represented by the OracleGoldenGate.BLOGTRGADW Connection. To do this, use the command POST /services/{version}/connections/{connection}/tables/checkpoint (doc link). A checkpoint table ensures that GoldenGate can recover if a process stops expectedly or unexpectedly.
curl -n -H “Content-Type: application/json” -H “Accept: application/json” -X POST https://<deployment URL>/services/v2/connections/OracleGoldenGate.BLOGTRGADW/tables/checkpoint -d ‘{“operation”:”add”, “name”:”SRCMIRROR_OCIGGLL.CHECKTABLE” }’ | jq .

Create an Extract
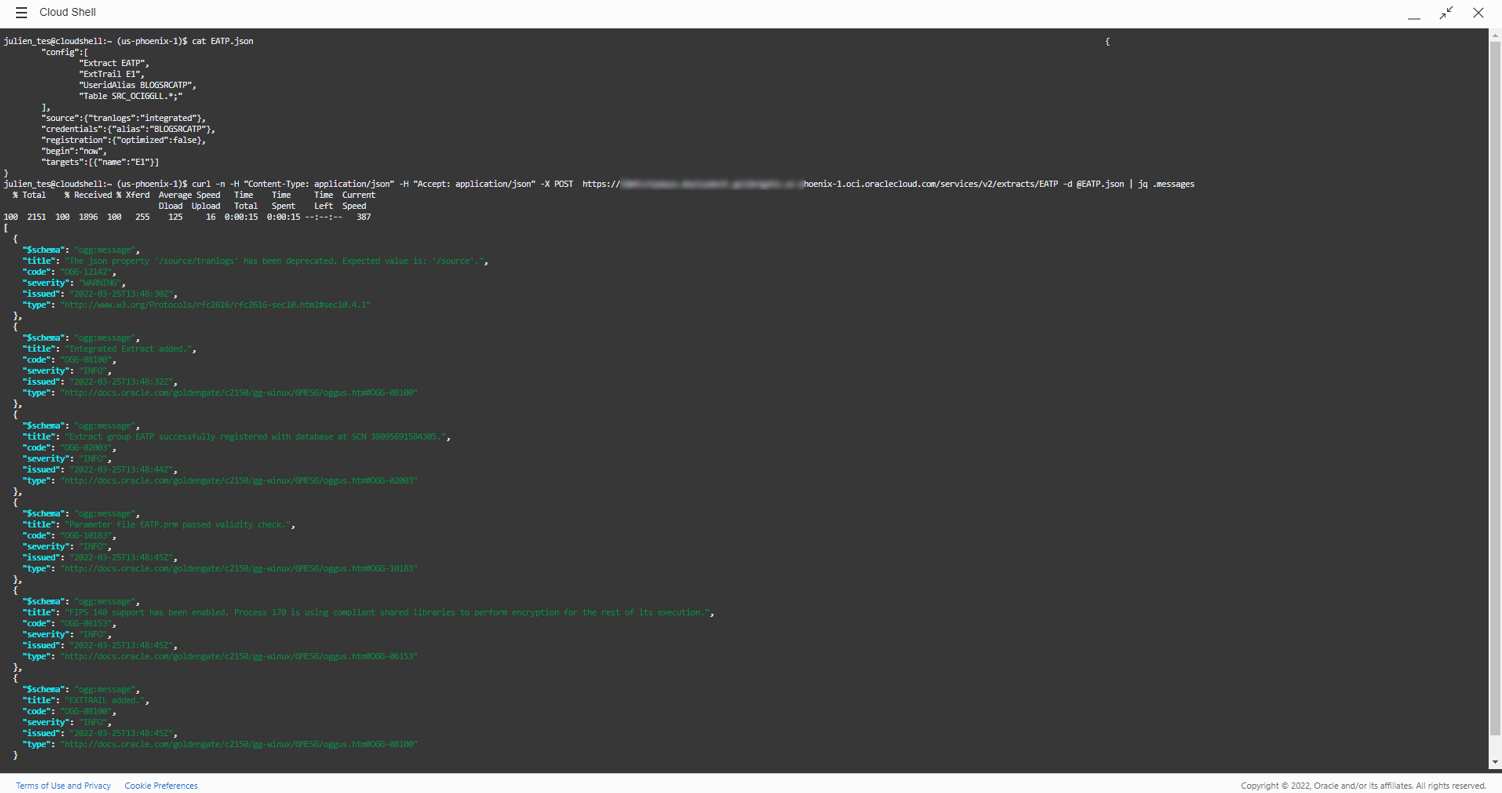
You can now create an Extract called EATP to capture changed records from the source ATP database. Leverage the following command: POST /services/v2/extracts/EATP (doc link) and use a JSON file to store the Extract configuration information (EATP.json). It is also possible to enter the JSON content inline in the REST command.
Here is the content of the JSON file for Extract EATP:
{
        "config":[
                "Extract EATP",
                "ExtTrail E1",
                "UseridAlias BLOGSRCATP",
                "Table SRC_OCIGGLL.*;"
        ],
        "source":{"tranlogs":"integrated"},
        "credentials":{"alias":"BLOGSRCATP"},
        "registration":{"optimized":false},
        "begin":"now",
        "targets":[{"name":"E1"}]
}
It specifies the name of the Extract (EATP), the trail file that will be used to store the changed records (E1), the credential alias (BLOGSRCATP), and the tables that GoldenGate will be capturing from (SRC_OCIGGLL.*).
This JSON can be uploaded to Cloud Shell (doc link), and then used in the REST command:
curl -n -H “Content-Type: application/json” -H “Accept: application/json” -X POST https://<deployment URL>/services/v2/extracts/EATP -d @EATP.json | jq .messages
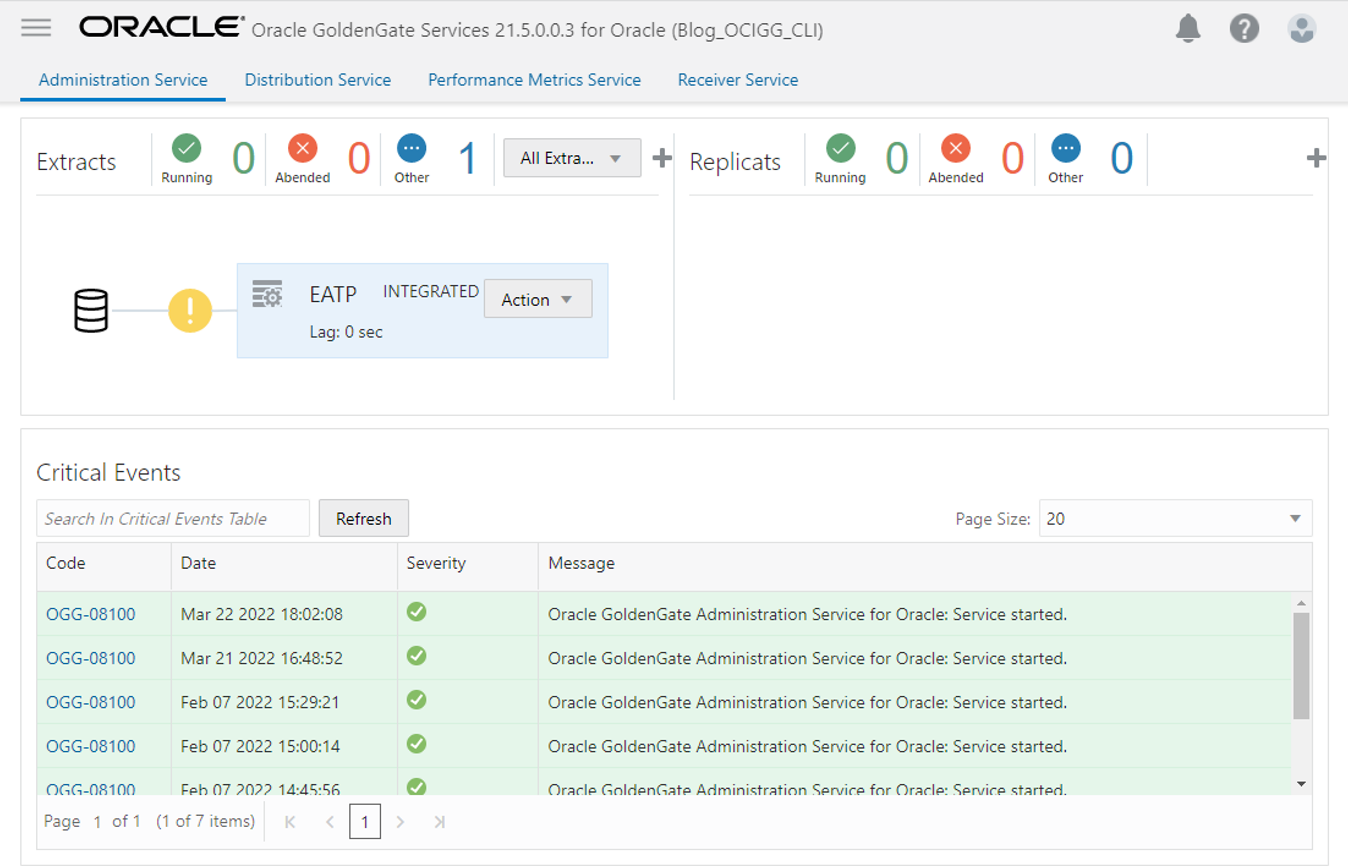
In the OCI GoldenGate Console, you can verify that the Extract has been created correctly.
Start an Extract
Use the POST /services/v2/commands/execute command (doc link), and issue the start command to kick off Extract EATP.
curl -n -H “Content-Type: application/json” -H “Accept: application/json” -X POST https://<deployment URL>/services/v2/commands/execute -d ‘{ “name”:”start”, “processName”:”EATP”}’ | jq .messages

Create a Replicat
Similarly, create a Replicat to apply changes to the target ADW instance and keep it in sync with the source ATP database. Use the following command: POST /services/v2/replicats/RADW (doc link) and use a JSON file to store the Extract configuration information (RADW.json) as we did for Extract EATP.
Here is the content of the JSON file for Replicat RADW:
{
        "config":[
                "REPLICAT RADW",
                "UseridAlias BLOGTRGADW",
                "MAP SRC_OCIGGLL.*, TARGET SRCMIRROR_OCIGGLL.*;"
        ],
        "source":{"name": "E1"},
        "credentials":{"alias":"BLOGTRGADW"},
        "checkpoint":{"table":"SRCMIRROR_OCIGGLL.CHECKTABLE"},
        "mode":{
                "type":"nonintegrated",
                "parallel": false
        },
        "registration":"none",
        "begin":"now",
        "status":"stopped"
}
It specifies the name of the Replicat (RADW), the credential alias (BLOGTRGADW) to connect to the target database, how to map the source data with the target (MAP statement), the trail file (E1), the checkpoint table (“SRCMIRROR_OCIGGLL.CHECKTABLE”) we created earlier, and the type of Replicat (Non-Integrated: nonintegrated).
Upload the file to Cloud Shell, and use it in the following command:
curl -n -H “Content-Type: application/json” -H “Accept: application/json” -X POST https://<deployment URL>/services/v2/replicats/RADW -d @RADW.json | jq .messages
Start a Replicat
Next, start the Replicat using the POST /services/v2/commands/execute command (doc link), and issue the start command to kick off Replicat RADW.
curl -n -H “Content-Type: application/json” -H “Accept: application/json” -X POST https://<deployment URL>/services/v2/commands/execute -d ‘{ “name”:”start”, “processName”:”RADW”}’ | jq .messages
You should now see both your Extract and Replicat running (green icons) in the OCI GoldenGate Console:

Retrieve Extracts and Replicats Statistics
Now is the time to test the end-to-end process and insert some data in one of our source tables! You can use the following insert statements and run them in the source ATP database:
Insert into SRC_OCIGGLL.SRC_CITY (CITY_ID,CITY,REGION_ID,POPULATION) values (1000,'Houston',20,743113);
Insert into SRC_OCIGGLL.SRC_CITY (CITY_ID,CITY,REGION_ID,POPULATION) values (1001,'Dallas',20,822416);
Insert into SRC_OCIGGLL.SRC_CITY (CITY_ID,CITY,REGION_ID,POPULATION) values (1002,'San Francisco',21,157574);
Insert into SRC_OCIGGLL.SRC_CITY (CITY_ID,CITY,REGION_ID,POPULATION) values (1003,'Los Angeles',21,743878);
Insert into SRC_OCIGGLL.SRC_CITY (CITY_ID,CITY,REGION_ID,POPULATION) values (1004,'San Diego',21,840689);
Insert into SRC_OCIGGLL.SRC_CITY (CITY_ID,CITY,REGION_ID,POPULATION) values (1005,'Chicago',23,616472);
Insert into SRC_OCIGGLL.SRC_CITY (CITY_ID,CITY,REGION_ID,POPULATION) values (1006,'Memphis',23,580075);
Insert into SRC_OCIGGLL.SRC_CITY (CITY_ID,CITY,REGION_ID,POPULATION) values (1007,'New York City',22,124434);
Insert into SRC_OCIGGLL.SRC_CITY (CITY_ID,CITY,REGION_ID,POPULATION) values (1008,'Boston',22,275581);
Insert into SRC_OCIGGLL.SRC_CITY (CITY_ID,CITY,REGION_ID,POPULATION) values (1009,'Washington D.C.',22,688002);
You can access the Extracts and Replicats statistics using the following commands:
- POST /services/v2/extracts/{extract}/command -d ‘{“command”:”STATS”}’ (doc link)
- POST /services/v2/replicats/{replicat}/command -d ‘{“command”:”STATS”}’ (doc link)
You can, for example, run this command for Extract EATP and visualize the number of inserts performed on table SRC_OCIGGLL.SRC_ORDERS:
curl -n -H “Content-Type: application/json” -H “Accept: application/json” -X POST https://<deployment URL> /services/v2/extracts/EATP/command -d ‘{“command”:”STATS”}’ | jq -r ‘.response.replyData.stats[] | select(.sourceTable==”SRC_OCIGGLL.SRC_ORDERS”)’
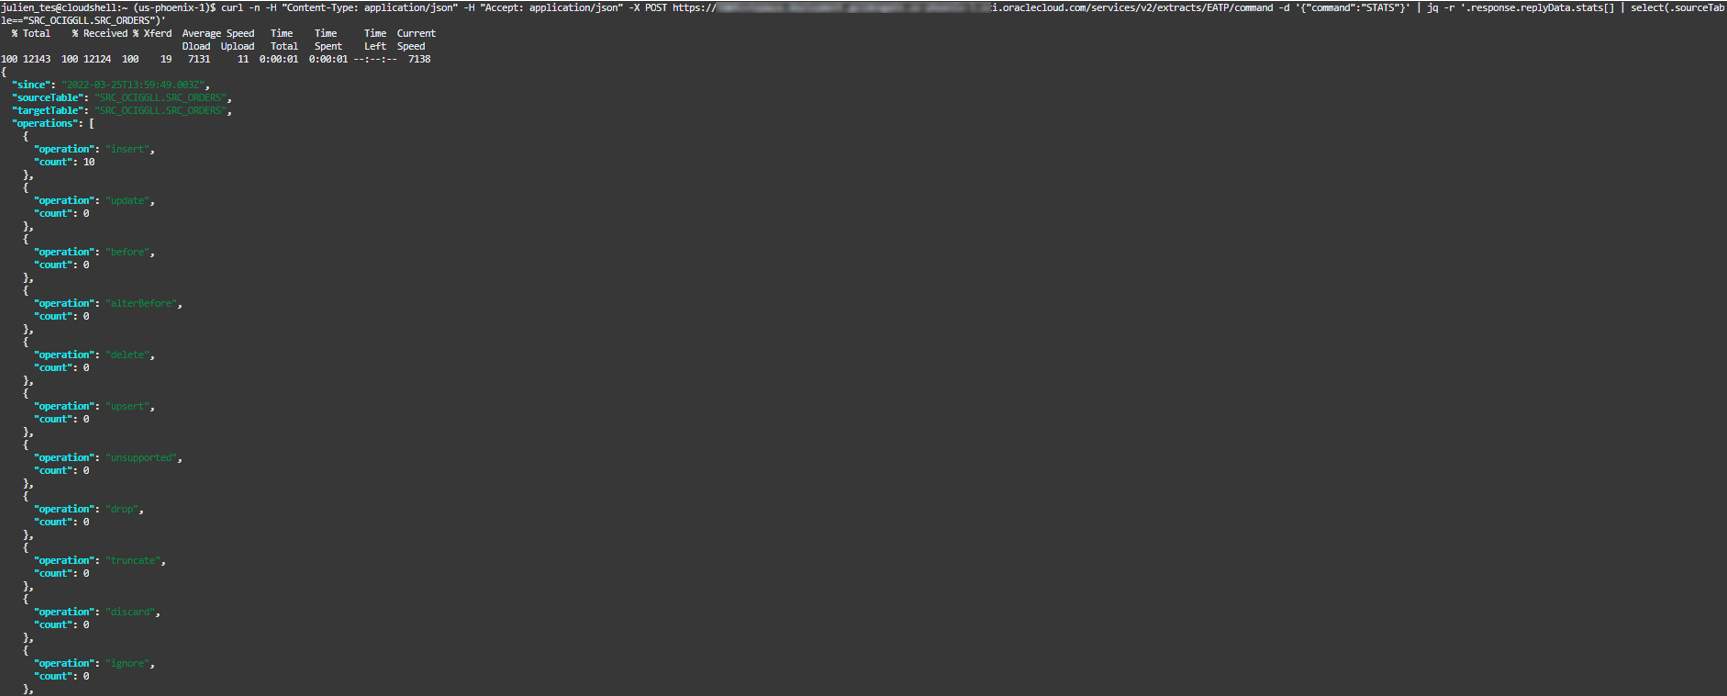
The response shows ten inserts if you used the sample data and insert statements I provided. The stats returned are first the hourly, daily, and then total numbers for the Extract or Replicat.
Retrieve Extracts and Replicats Reports
REST APIs also provide access to report files in addition to statistics for each GoldenGate processes. You can use the following commands for Extracts and Replicats:
- GET /services/v2/extracts/{extract}/info/reports/{report} (doc link)
- GET /services/v2/replicats/{replicat}/info/reports/{report} (doc link)
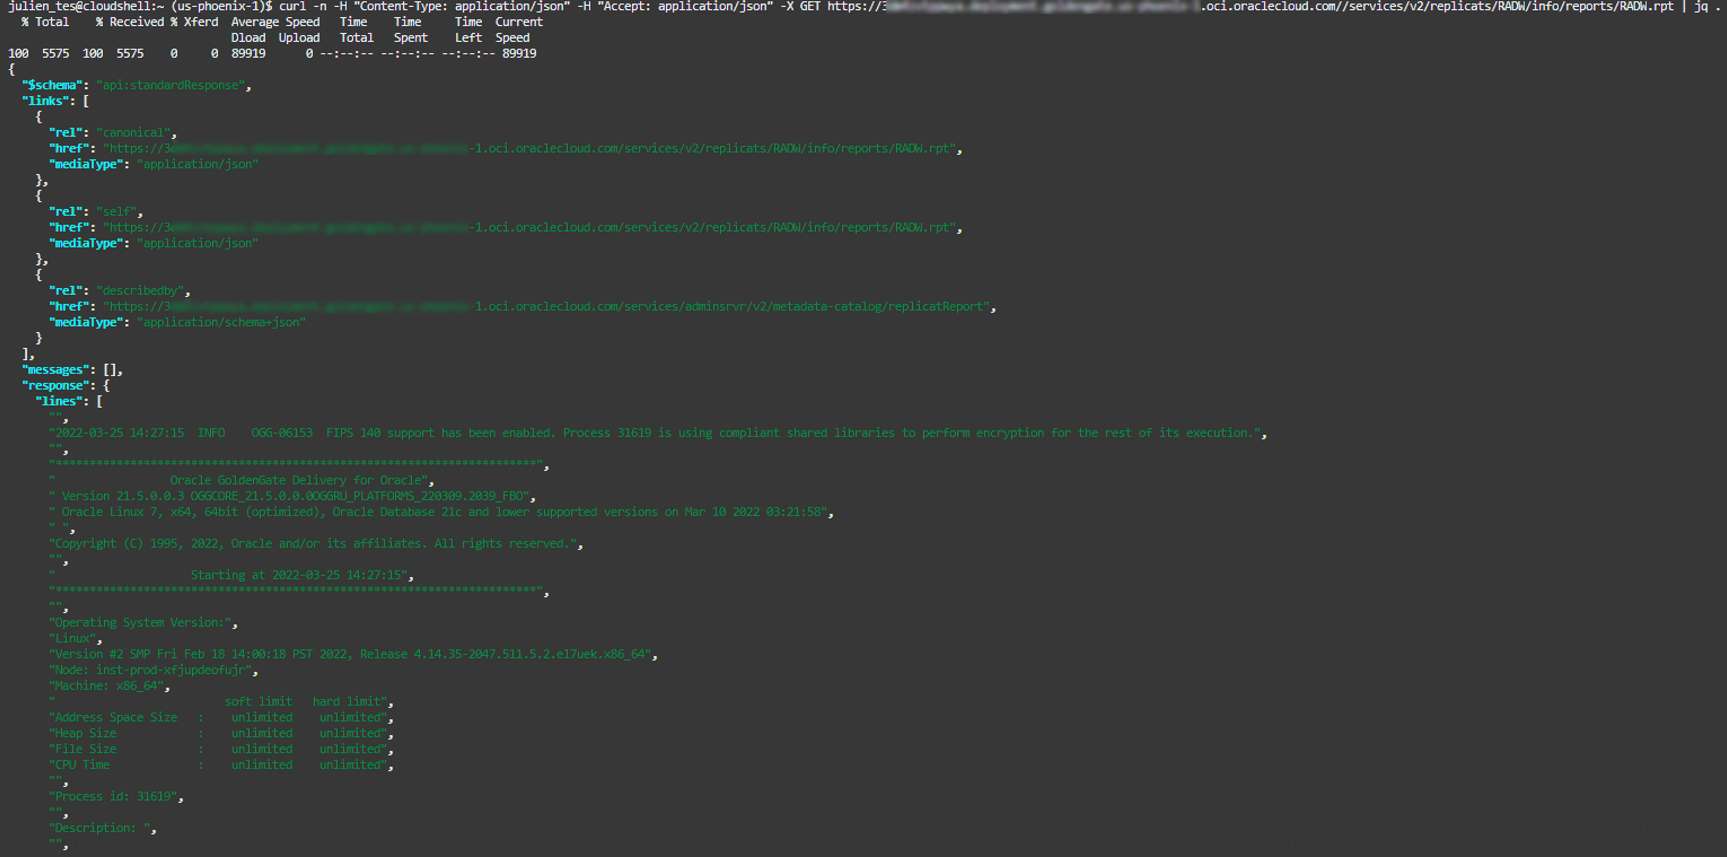
You can, for example, run this command for Replicat RADW, and see the content of its report file:
curl -n -H “Content-Type: application/json” -H “Accept: application/json” -X GET https://<deployment URL>/services/v2/replicats/RADW/info/reports/RADW.rpt | jq .
Conclusion
We have seen how powerful and convenient the REST APIs provided with OCI GoldenGate and GoldenGate microservices can be. From configuring source & target endpoints to creating and running Extracts and Replicats, or monitoring runtime processes. In addition to the OCI CLI, REST APIs can help you automate most OCI GoldenGate activities. Stay tuned for new blogs coming up soon!