In Using REST APIs with Oracle Cloud Infrastructure (OCI) GoldenGate and Using Oracle Cloud Infrastructure (OCI) Command Line Interface (CLI), we saw how valuable the OCI CLI and GoldenGate REST API are for automating the creation, management, development, and monitoring activities of OCI GoldenGate deployments. In this blog, we continue with the use case started in the two previous articles, and use Admin Client in place of the GoldenGate REST API to create, execute, and monitor processes.
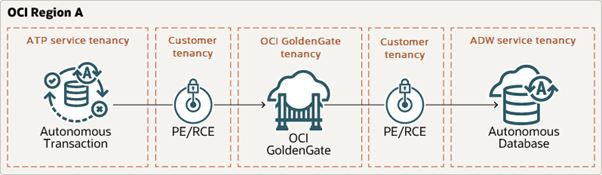
As a reminder, our end goal is to create and run an end-to-end replication process between an Autonomous Transaction Processing (ATP) instance and an Autonomous Data Warehouse (ADW) running in OCI.
Set Up the Environment
In this blog (and the previous ones), we use the sample data provided in one of our LiveLabs (link): Archive.zip. You can refer to the LiveLabs instructions to set up your ATP and ADW instances and load them with sample data.
Accessing Cloud Shell
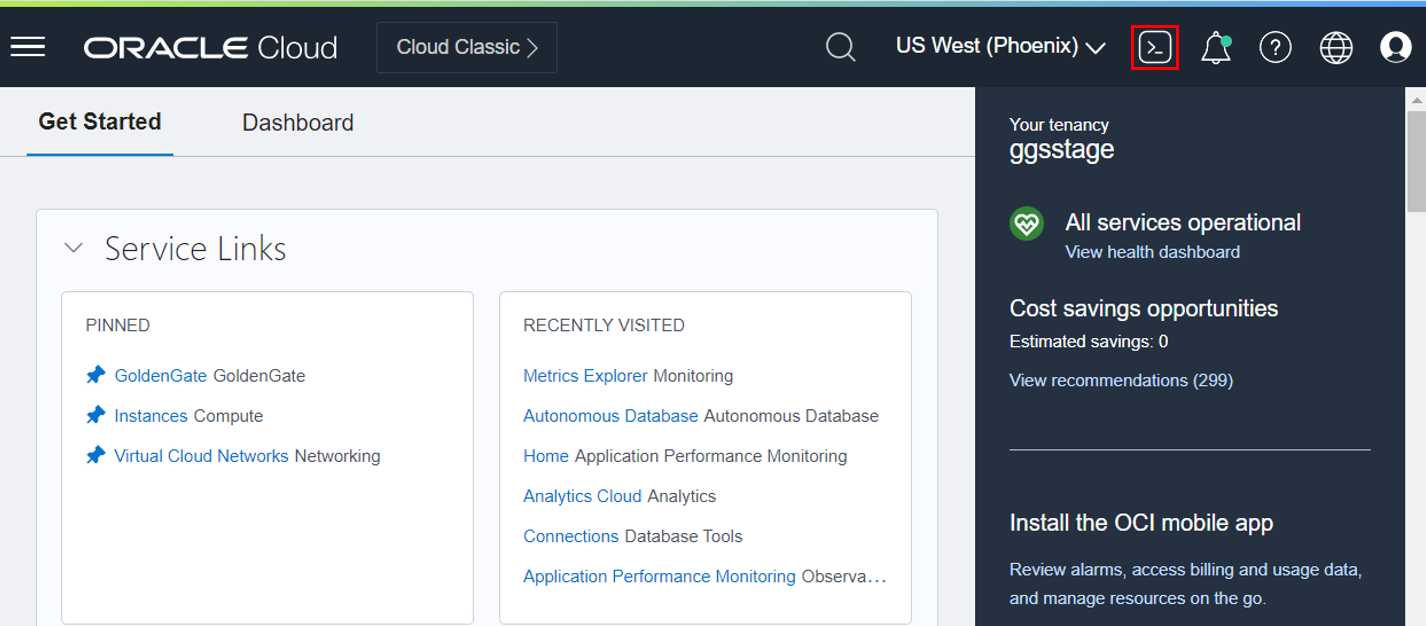
I use Cloud Shell as it is easy to use, integrated with the OCI Console, and it now comes pre-configured with access to GoldenGate clients such as Admin Client or Logdump. To access Cloud Shell, log into the Oracle Cloud Console and click the Cloud Shell icon next to your Region.
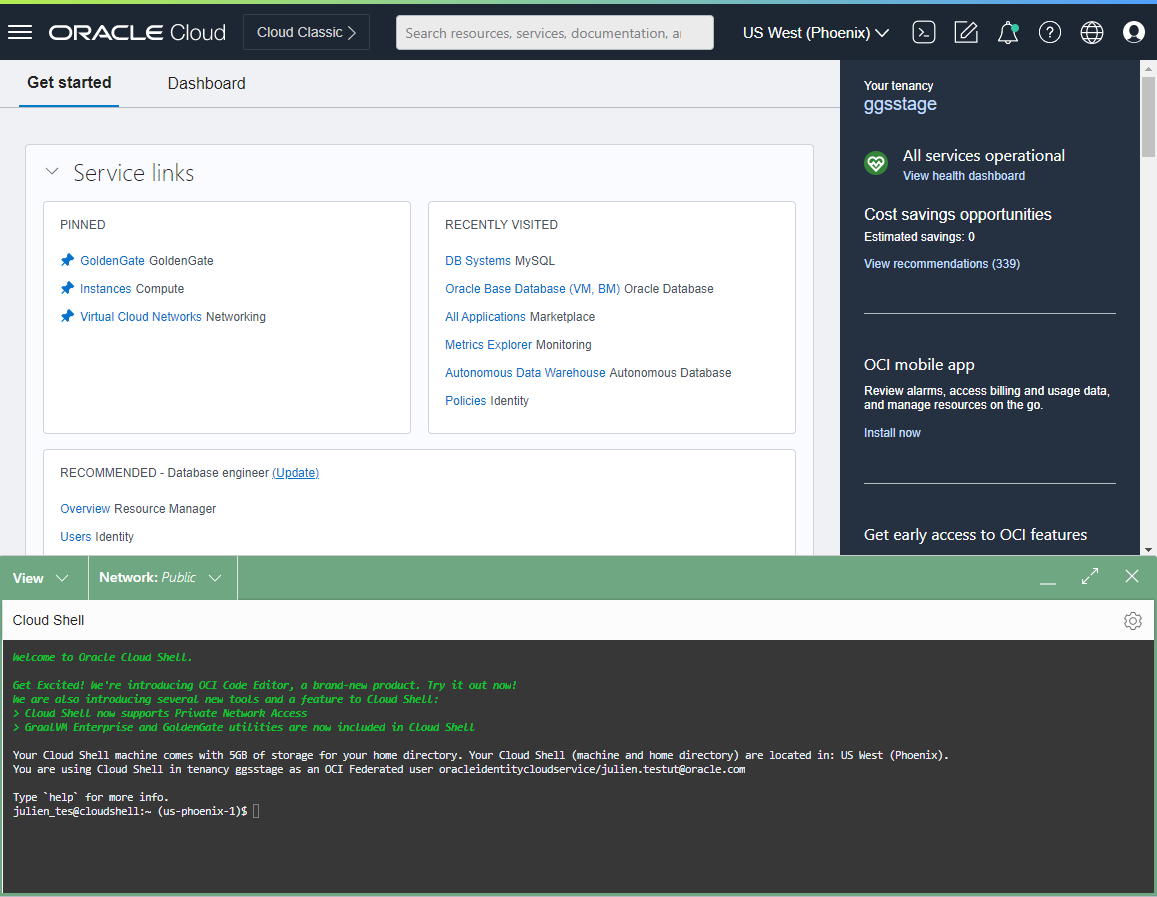
The Cloud Shell window opens at the bottom of the Oracle Cloud Console and loads the environment. It takes a few minutes the first time you connect or when you have not used it for some time. If you use it frequently, it boots up very quickly.
What is Admin Client?
Admin Client is a command line interface (CLI) for GoldenGate, which can be used with OCI GoldenGate deployments. You can use Admin Client to create, modify, and remove processes, instead of using the web user interface. You can get more information about Admin Client in the GoldenGate documentation.
Admin Client Commands
First, you need to retrieve your OCI GoldenGate Deployment endpoint. It will be used in Admin Client to connect to it and execute commands:
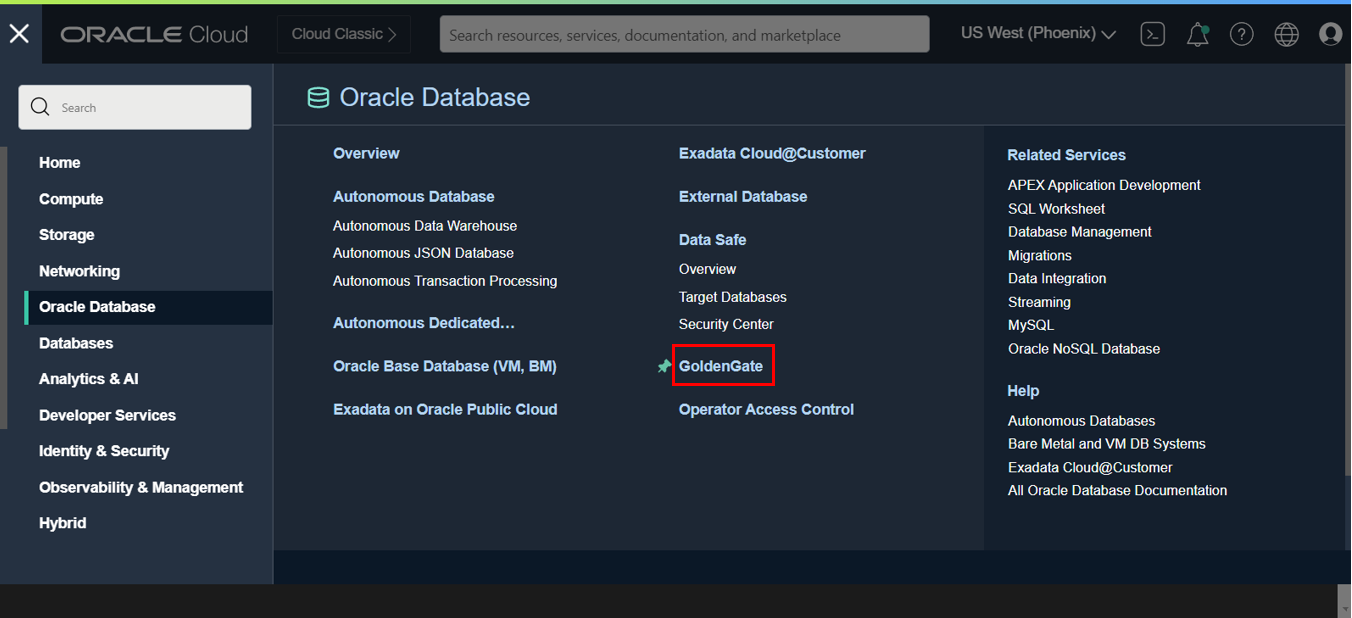
- Click on Oracle Database in the OCI Console, and click GoldenGate
-
Click Deployments to access the list of your Deployments
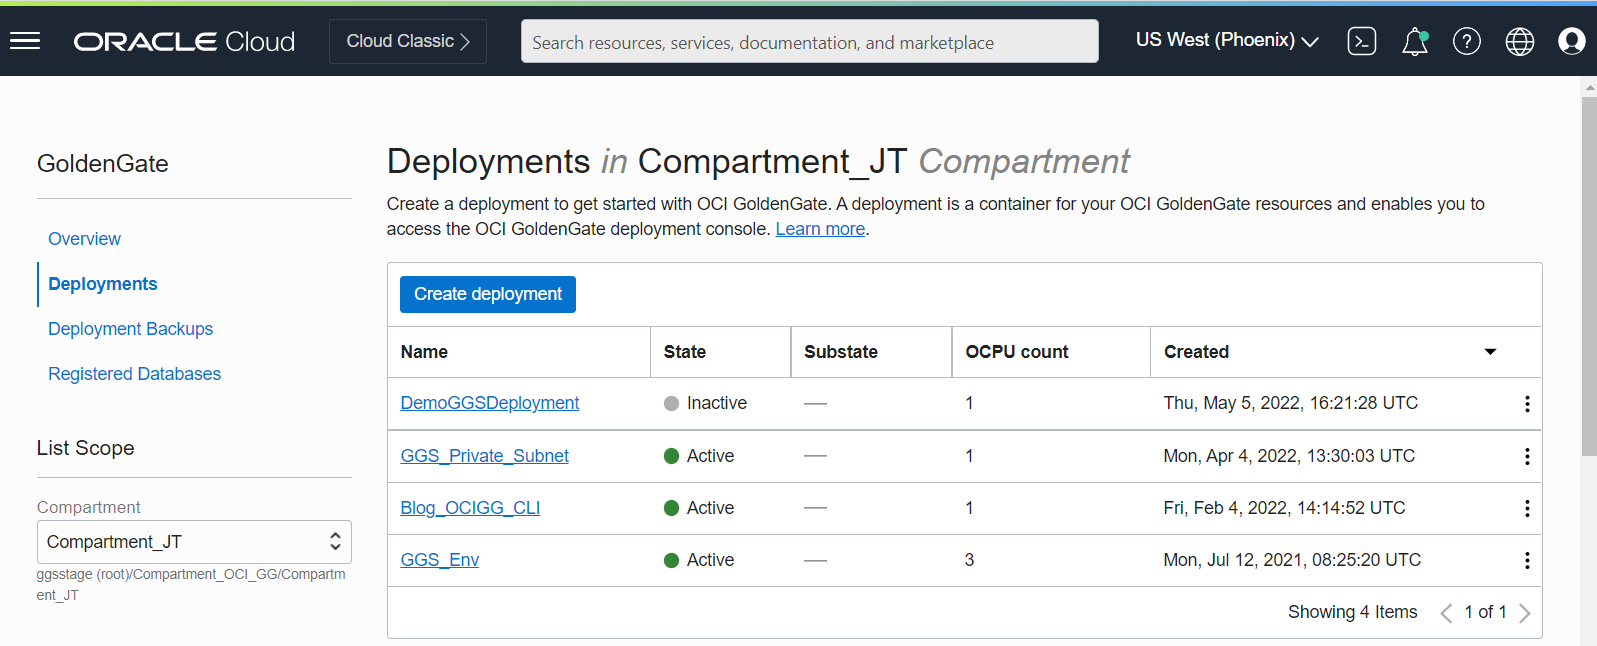
-
Then click on the Deployment you want to connect to. Copy its Console URL if your deployment has a public endpoint (doc link) or its Private IP address if it does not.
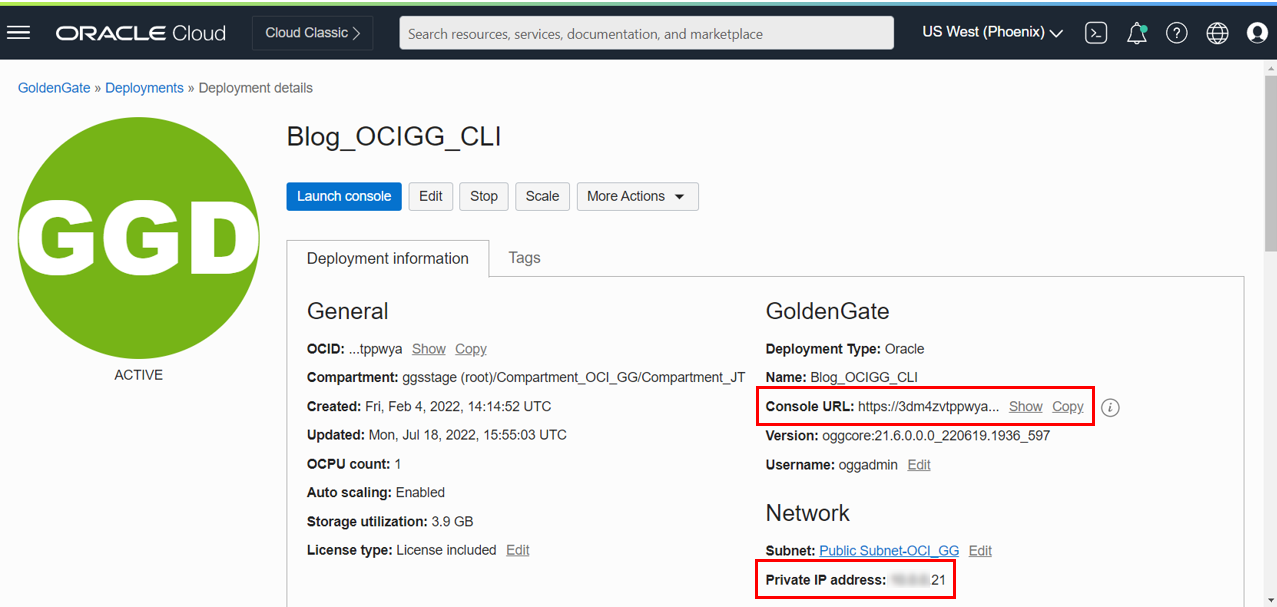
-
Save it in a notepad as you will need it later
Connect to OCI GoldenGate Deployment
If your deployment has a public endpoint (doc link), then you can connect to your deployment directly.
If your deployment does not have a public endpoint, you can either use the private network support in Cloud Shell (link), or manually create an SSH tunnel to its private IP address to connect to it. In this article, I will connect to a deployment without a public endpoint, and cover both ways to access a private deployment using an SSH tunnel or not.
Using Private Network in Cloud Shell
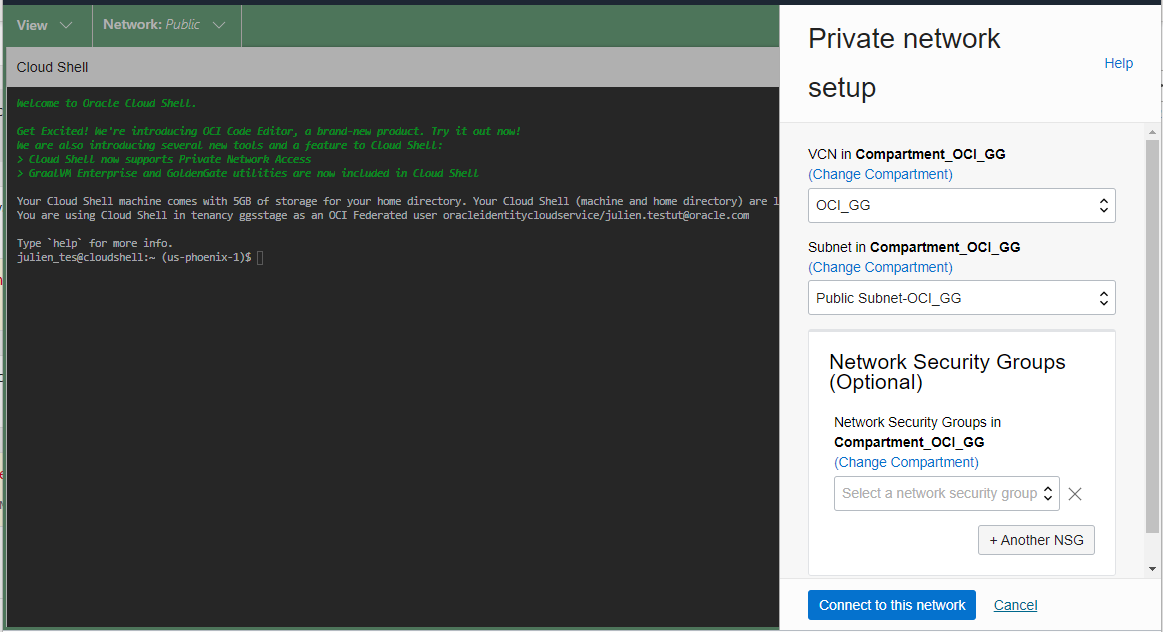
Go to your Cloud Shell panel, click on Network, and select Private Network Setup.

Select the VCN and Subnet used by your OCI GoldenGate deployment, and optionally specify a Network Security Group. Click Connect to this network.
Wait for the connection to be established, and proceed with connecting to your private OCI GoldenGate deployment using Admin Client.
Using an SSH Tunnel in Cloud Shell
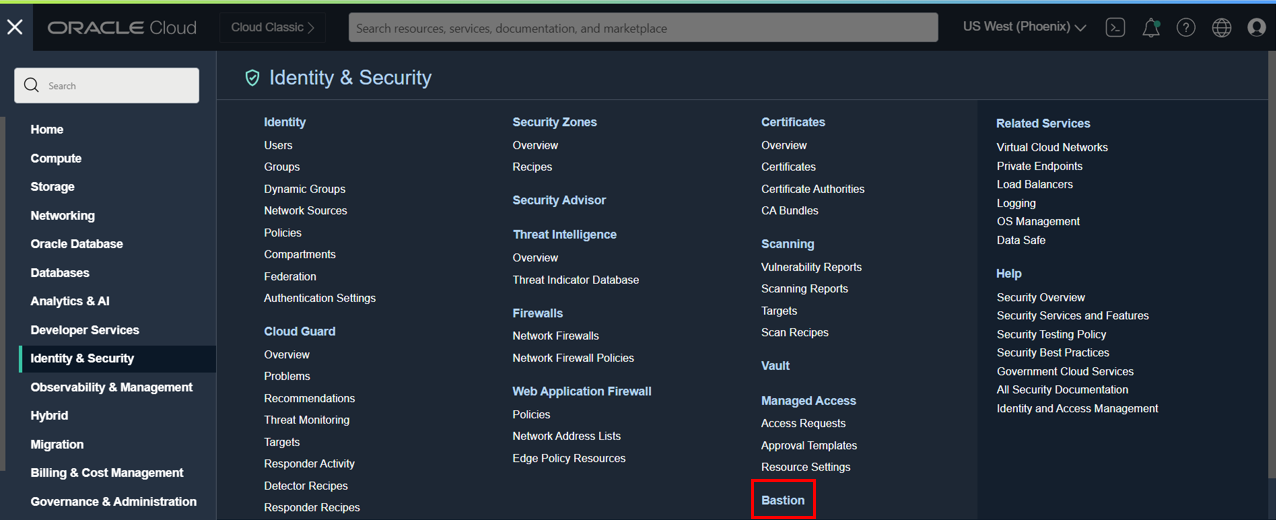
As an alternative you can use an SSH tunnel. To create an SSH tunnel, I will use the OCI Bastion service. Go to OCI Console, click Identity & Security, and select Bastion.
Create a Bastion using the same subnet as your OCI GoldenGate deployment, and enter 0.0.0.0/0 as the CIDR block allowlist to allow connections from Cloud Shell.
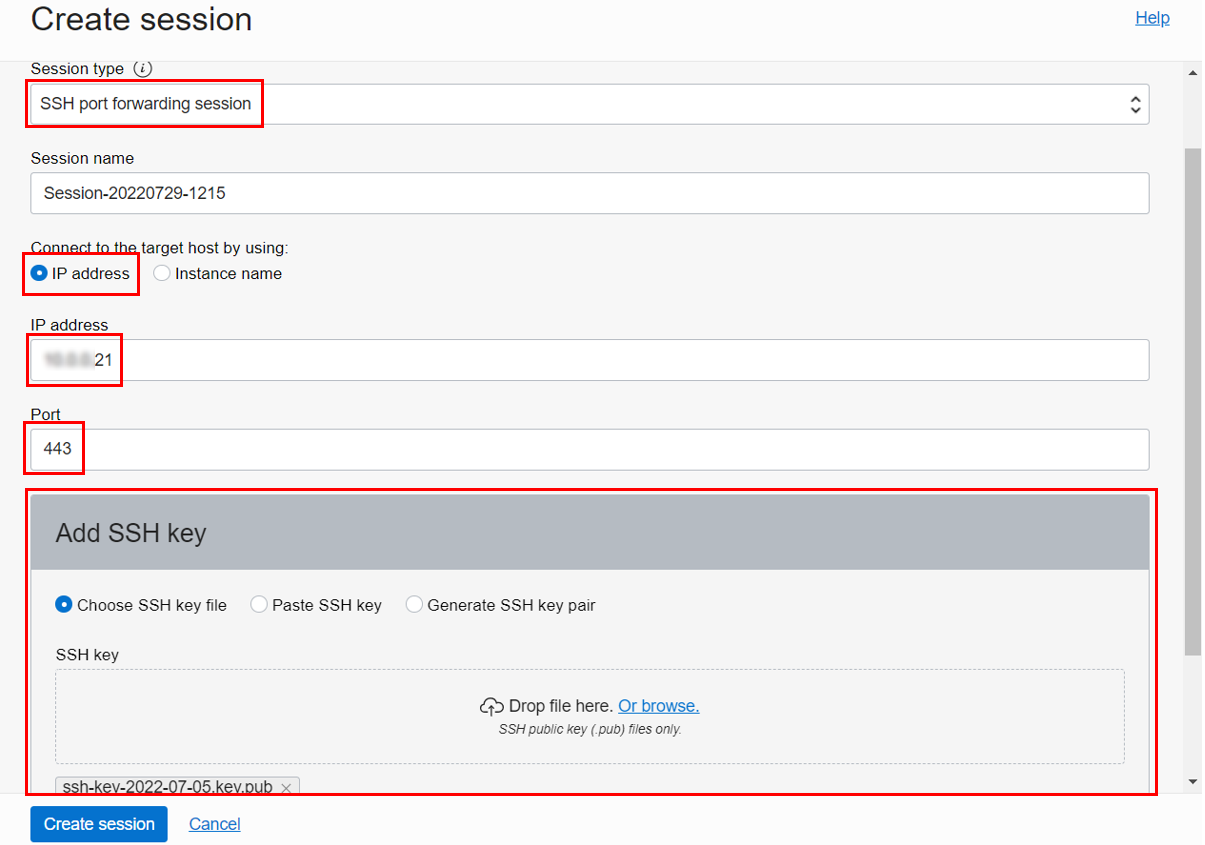
Next, click Create session, select SSH port forwarding session as the Session type, enter the private IP address you copied earlier, and specify 443 as the Port. Finally, generate an SSH key or use an existing one. Click Create session.
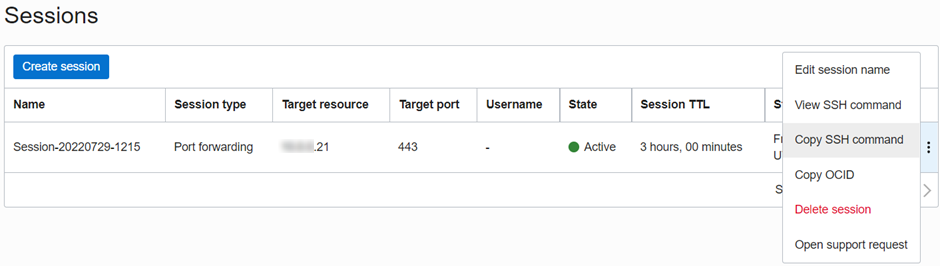
Once the Bastion session is active, click Copy SSH command.
Go to your Cloud Shell panel. Upload your private SSH key file (doc link), and paste the SSH command. Next, replace privateKey with the file you uploaded and localPort with port 4430 (or another valid port). Add an amperstand (&) at the end of the command to run it in the background. Ignore the warning ‘bind: Cannot assign requested address’.
ssh -i <privateKey> -N -L <localPort>:<deployment private IP address>:443 -p 22 ocid1.bastionsession.oc1.phx.ama…4ea@host.bastion.us-phoenix-1.oci.oraclecloud.com &
Note: Run the command first without & if you did not connect to your Bastion yet, add it to the list of SSH known hosts, then stop the command. Rerun it with the & character.
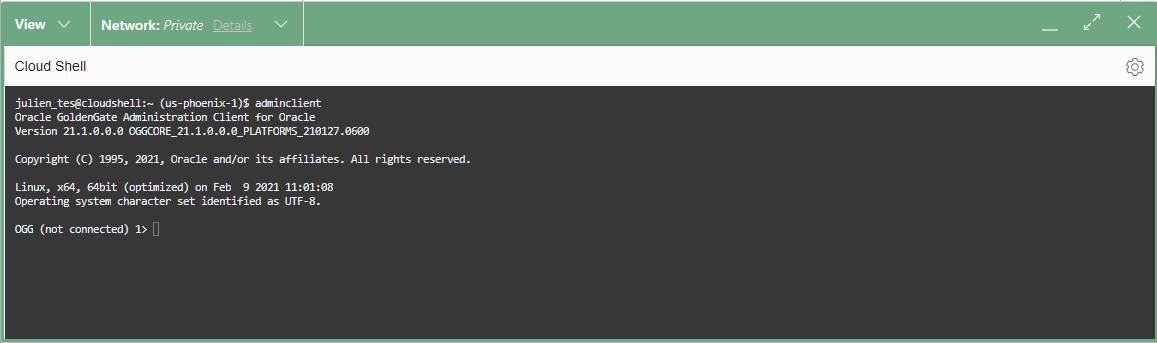
Start Admin Client
Finally, enter the following command at the command prompt: adminclient
Next, use the CONNECT command along with the following URL: https://<private IP>, and your username to connect: CONNECT https://<private IP> as <username> !
Enter your password when prompted.
Note: If you use an SSH tunnel, replace <private IP> with localhost and add the port (localPort) you used in the SSH command: CONNECT https://localhost:4430 as <username> !
It is always a best practice not to specify passwords on the command line, but you can also run the CONNECT command with a password (CONNECT https://<private IP> as <username> password <password> !). Once logged in, it is also possible to securely store Admin Client connection credentials using the ADD CREDENTIALS command. After setting up connection credentials with the ADD CREDENTIALS command, the user does not need to re-enter a password when connecting.
Note: Do not forget to add an exclamation point (!) at the end of the command, otherwise, you will run into the following error: ‘Error: Network error – Certificate validation error: Unacceptable certificate from localhost: Application verification failure’

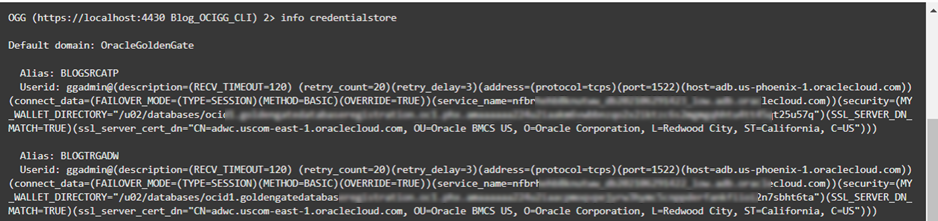
List GoldenGate Connections
In my previous blog, I used the OCI CLI to create two database registrations: BLOGSRCATP and BLOGTRGADW. This operation automatically creates new credentials in GoldenGate Deployments. You can list these credentials using the INFO CREDENTIALSTORE (doc link) command in Admin Client:
Add Trandata on Source
Before extracting data from the BLOGSRCATP source, we need to add trandata for the SRC_OCIGGLL schema. Adding trandata allows GoldenGate to use supplemental logging to capture the latest changed data. You can accomplish this by first logging into the database using DBLOGIN USERIDALIAS <credential alias> (doc link) and then ADD SCHEMATRANDATA <schema> (doc link):
DBLOGIN USERIDALIAS BLOGSRCATP
ADD SCHEMATRANDATA SRC_OCIGGLL

Note: It is also possible to add trandata at the table level using ADD TRANDATA (doc link).
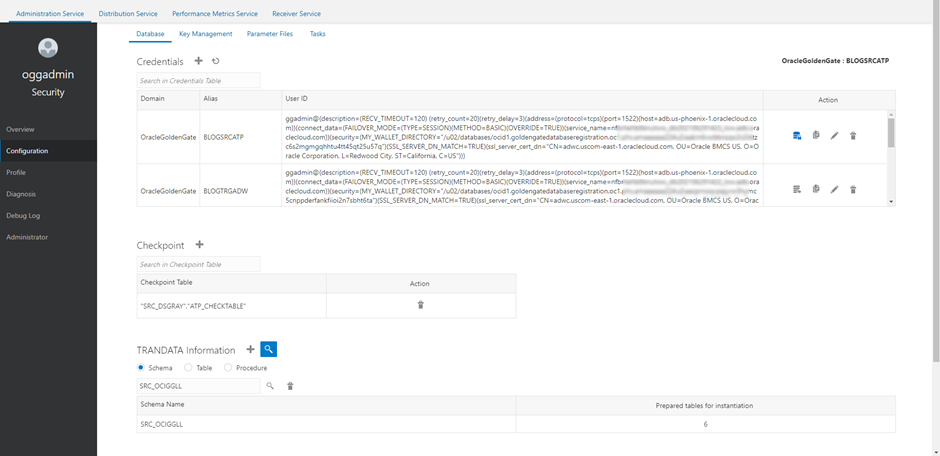
You can verify in the GoldenGate Console that trandata was added correctly:
- Go to Configuration
- Click Connect to the database next to BLOGSRCATP
- Search for SRC_OCIGGLL in the TRANDATA information section:
Add Checkpoint to Target
Next, you need to add a Checkpoint on the target database BLOGTRGADW. To do this, use DBLOGIN USERIDALIAS <credential alias> (doc link) followed by ADD CHECKPOINTTABLE “<schema>”.”CHECKTABLE” (doc link). A checkpoint table ensures that GoldenGate can recover if a process stops expectedly or unexpectedly.
DBLOGIN USERIDALIAS BLOGTRGADW
ADD CHECKPOINTTABLE “SRCMIRROR_OCIGGLL”.”CHECKTABLE”

Create an Extract
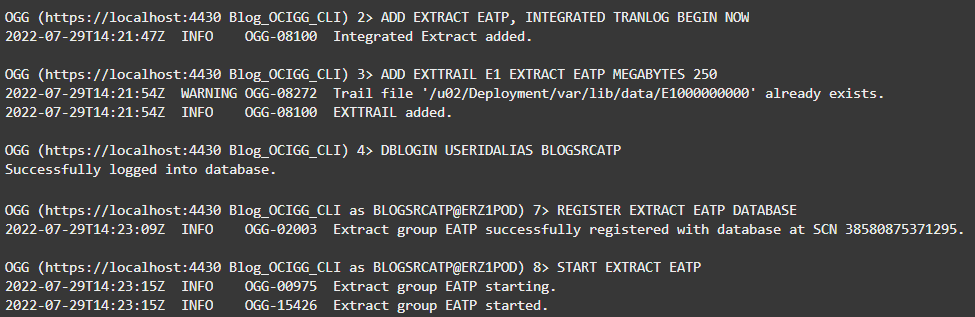
You can now create an Extract called EATP to capture changed records from the source ATP database. Several commands are required to create an Extract:
- ADD EXTRACT EATP, INTEGRATED TRANLOG BEGIN NOW (doc link)
- Adds an Integrated Extract named EATP that will start processing data now
- ADD EXTTRAIL E1 EXTRACT EATP MEGABYTES 250 (doc link)
- Adds a trail called E1 associated with Extract EATP with a maximum file size of 250 megabytes in the sequence
- DBLOGIN USERIDALIAS BLOGSRCATP (doc link)
- Logs into the database associated with credential BLOGSRCATP
- REGISTER EXTRACT EATP DATABASE (doc link)
- Registers Extract EATP with the database GoldenGate is connected to and enables integrated capture
- START EXTRACT EATP (doc link)
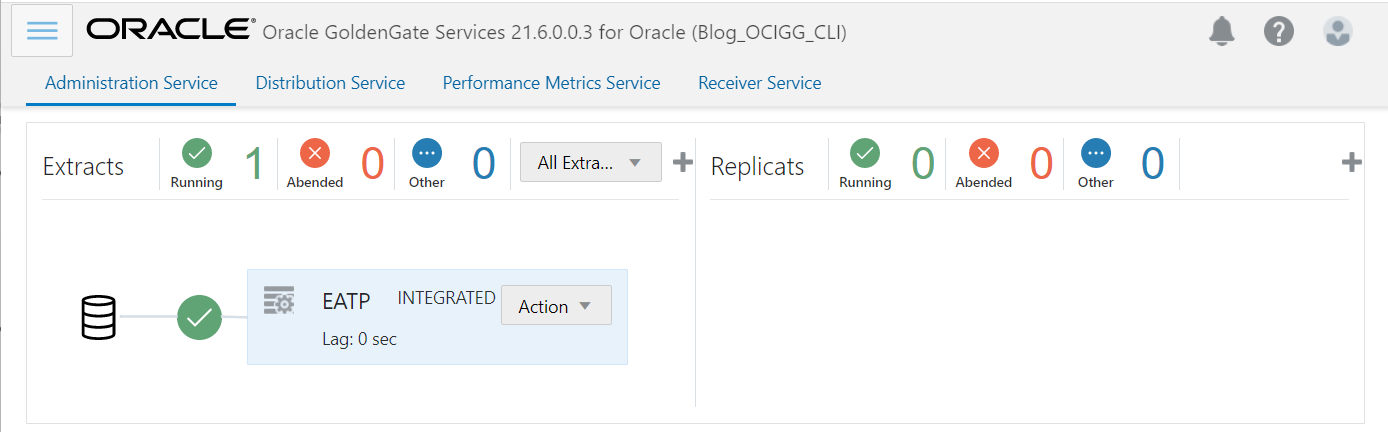
In the OCI GoldenGate Console, you can verify that the Extract has been created and started.
Create a Replicat
Similarly, create a Replicat to apply changes to the target ADW instance, and keep it in sync with the source ATP database. Use the following commands:
- ADD REPLICAT RADW EXTTRAIL E1 BEGIN NOW CHECKPOINTTABLE “SRCMIRROR_OCIGGLL”.”CHECKTABLE” (doc link)
- Adds a Replicat named RADW using a trail called E1 starting with an initial checkpoint set to now and a Checkpoint table called “SRCMIRROR_OCIGGLL”.”CHECKTABLE”
- DBLOGIN USERIDALIAS BLOGTRGADW (doc link)
- Logs into the database associated with credential BLOGTRGADW
- START REPLICAT RADW (doc link)

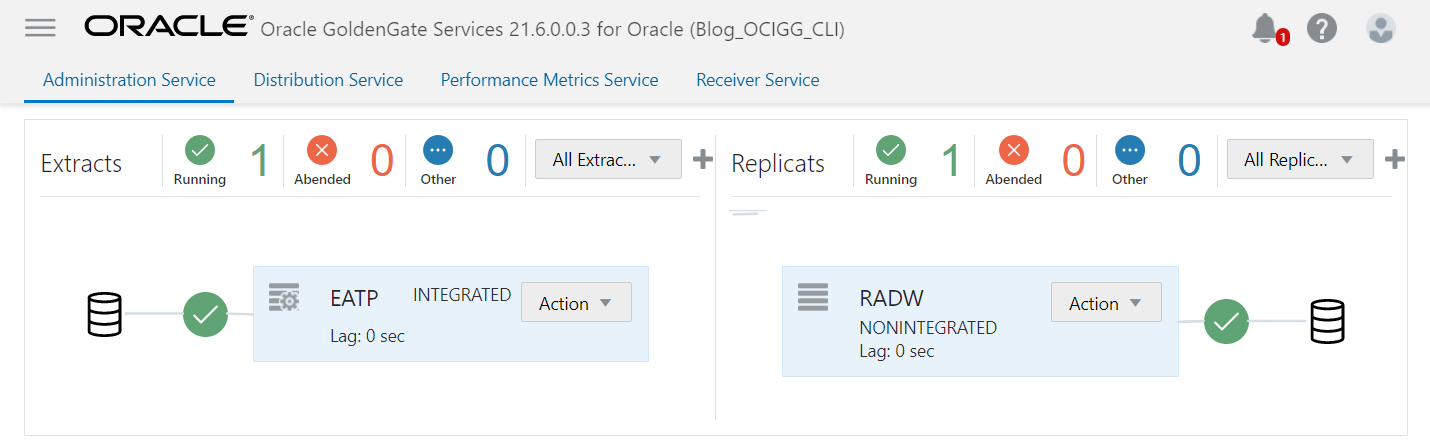
You should now see both your Extract and Replicat running (green icons) in the OCI GoldenGate Console:
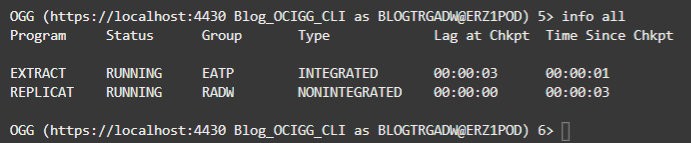
You can also use the INFO ALL command (doc link) to see the status of your Extract and Replicat in Admin Client:
Retrieve Extracts and Replicats Statistics
Now is the time to test the end-to-end process and insert some data into one of our source tables! You can use the following insert statements and run them in the source ATP database:
Insert into SRC_OCIGGLL.SRC_CITY (CITY_ID,CITY,REGION_ID,POPULATION) values (1000,'Houston',20,743113);
Insert into SRC_OCIGGLL.SRC_CITY (CITY_ID,CITY,REGION_ID,POPULATION) values (1001,'Dallas',20,822416);
Insert into SRC_OCIGGLL.SRC_CITY (CITY_ID,CITY,REGION_ID,POPULATION) values (1002,'San Francisco',21,157574);
Insert into SRC_OCIGGLL.SRC_CITY (CITY_ID,CITY,REGION_ID,POPULATION) values (1003,'Los Angeles',21,743878);
Insert into SRC_OCIGGLL.SRC_CITY (CITY_ID,CITY,REGION_ID,POPULATION) values (1004,'San Diego',21,840689);
Insert into SRC_OCIGGLL.SRC_CITY (CITY_ID,CITY,REGION_ID,POPULATION) values (1005,'Chicago',23,616472);
Insert into SRC_OCIGGLL.SRC_CITY (CITY_ID,CITY,REGION_ID,POPULATION) values (1006,'Memphis',23,580075);
Insert into SRC_OCIGGLL.SRC_CITY (CITY_ID,CITY,REGION_ID,POPULATION) values (1007,'New York City',22,124434);
Insert into SRC_OCIGGLL.SRC_CITY (CITY_ID,CITY,REGION_ID,POPULATION) values (1008,'Boston',22,275581);
Insert into SRC_OCIGGLL.SRC_CITY (CITY_ID,CITY,REGION_ID,POPULATION) values (1009,'Washington D.C.',22,688002);
You can access the Extracts and Replicats statistics using the following commands:
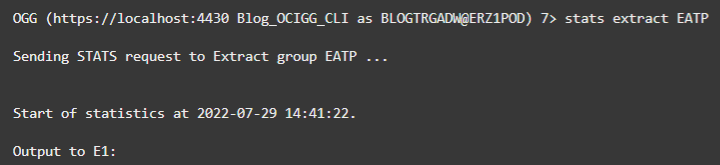
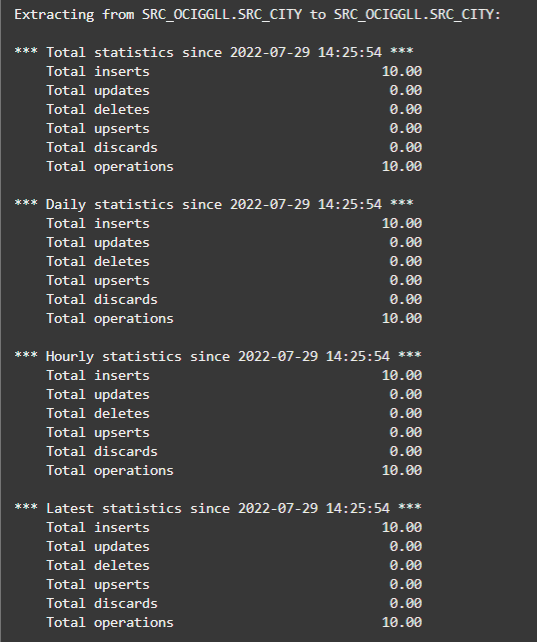
The response shows ten inserts if you used the sample data and insert statements I provided.
Retrieve Extracts and Replicats Reports
You can also access the report files in addition to statistics for each GoldenGate process. You can use the following commands for Extracts and Replicats:
- VIEW REPORT <extract or replicat name> (doc link)
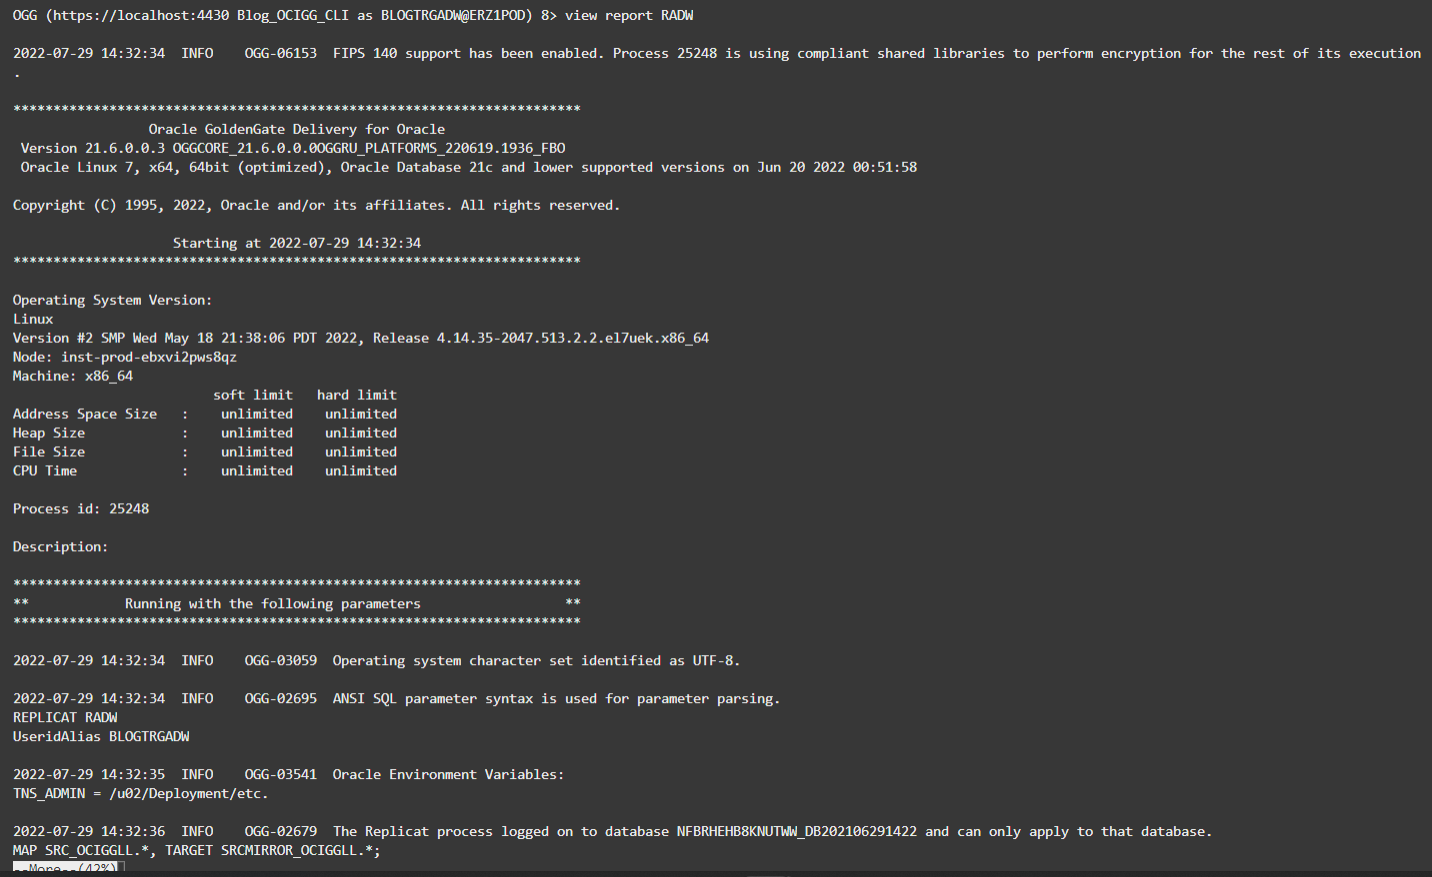
You can, for example, run this command for Replicat RADW, and see the content of its report file:
- VIEW REPORT RADW
In this article we ran each command manually, but it is also possible to create an obey file and pass it to Admin Client to run everything automatically: adminclient < my_obey_file.obey.
Conclusion
Admin Client and other utilities are a great addition to Cloud Shell for OCI GoldenGate users. We have seen in this article how useful the CLI utilities can be to create, modify and execute GoldenGate processes. Admin Client complements the OCI CLI, the GoldenGate REST API, and its web user interface. Stay tuned for new blogs coming up soon!