In this blog,We implement Type 2 Slowly Changing Dimension (SCD) in Oracle Cloud Infrastructure (OCI) Data Integration.
A Type-2 Slowly Changing Dimension (SCD) is a dimension that stores and manages both current and historical data over time in a data warehouse. When the value of chosen attributes of record changes,record is made inactive and a new record is created with modified data as active record. Type-2 SCD is considered and implemented as one of the most critical ETL tasks in tracking the history of dimension records.
Let’s begin a complete end-to-end Type-2 SCD implementation.
The Implementation of Type-2 SCD involves
- Identifying the new record and insert into table.
- Identifying the existing record if there is a change in the data and update to inactive state.
- Identifying the existing record if there is a change in the data and create new a record with modified data and mark it to active state.
There are several ways to implement Type-2 SCD. In this example, we use left-outer join and split operator to implement the Type-2 SCD.
For this example, we use Employees table as source which provides employees information
| EMPLOYEE_ID | EMPLOYEE_NAME | SALARY |
|---|---|---|
| 100 | Steven King | 24000 |
| 101 | Neena Kochhar | 17000 |
| 102 | Lex De Haan | 17000 |
The data should be loaded into target table Employees_TGT, DDL for Employee_TGT looks as below ( here, We are leveraging Oracle database identity column for the surrogate identifier)
CREATE TABLE BETA.EMPLOYEES_TGT (
EMPLOYEE_KEY NUMBER(8, 0)
GENERATED BY DEFAULT AS IDENTITY,
EMPLOYEE_ID NUMBER(6),
EMPLOYEE_NAME VARCHAR2(20),
SALARY NUMBER(8, 2),
START_DATE DATE,
END_DATE DATE,
ACTIVE_FLAG VARCHAR2(1),
PRIMARY KEY ( EMPLOYEE_KEY ) );
Target table Employee_TGT mappings
| Source Table | Source Column Name | Target Column name | SCD Behavior |
|---|---|---|---|
| Employees | EMPLOYEE_ID | Employee_ID | Business/Natural key to identify the changed records |
| Employees | EMPLOYEE_NAME | Employee_Name | Overwrite on change |
| Employees | SALARY | Salary | SCD Type2 column,Add row on a change |
| – | – | Employee_Key | Surrogate primary key column, Generates and insert a sequential value into the column for each record inserted into table. |
| – | – | Start_Date | Effective start date to indicate the start of the effective date range for the dimension. |
| – | – | End_Date | Effective end date to indicate the end of the effective date range for the dimension. The default value is “31-DEC-9999” only for active records. |
| – | – | Active_Flag | To identify if the dimension record is active or not. Values are ‘Y’ and ‘N’ |
Below image shows the data flow created for building a Type-2 slowly changing dimension
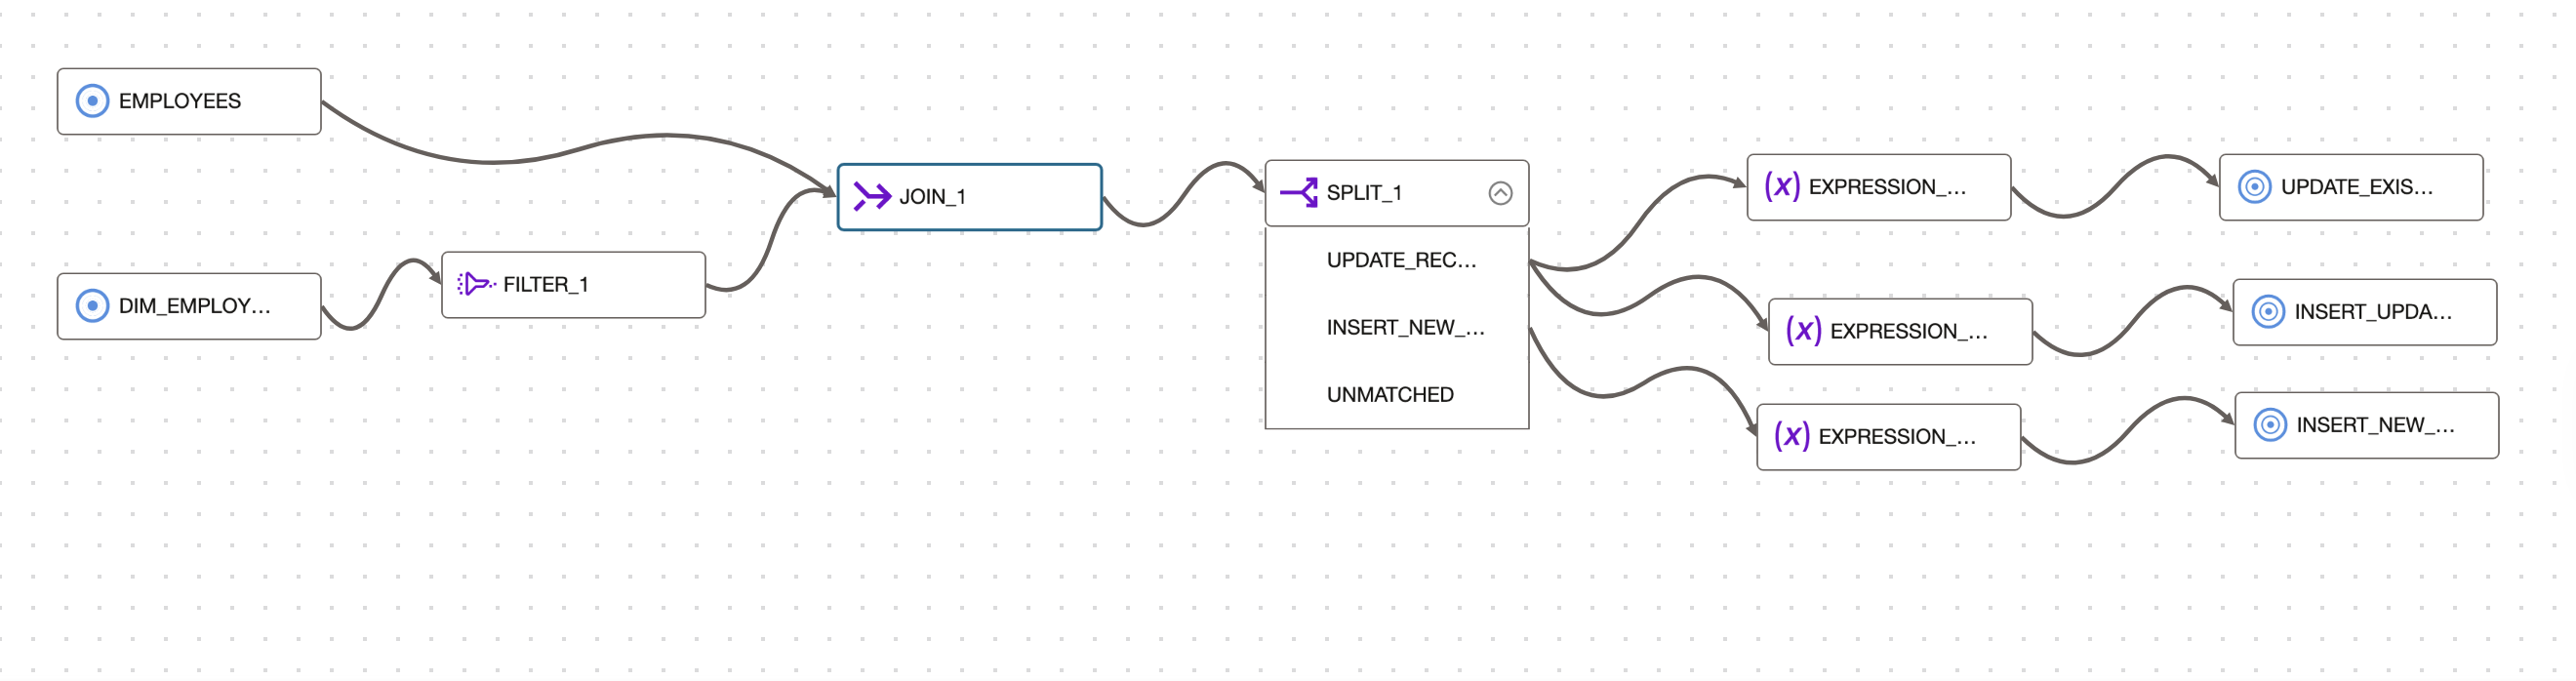
Figure 1: Design of Dataflow for building a Type-2 SCD
We follow below steps to build Type-2 SCD
Join Source Table and Dimension Table
We add 2 source operators from operator panel to dataflow canvas and select Employees as source table in the first source operator and Employees_TGT as dimension table in the second source operator.
Instead of bringing the complete target data for reprocessing, We first apply a filter on dimension table to select only active records and then use left outer join to get only the target data matching with the source along with additional records from the source.
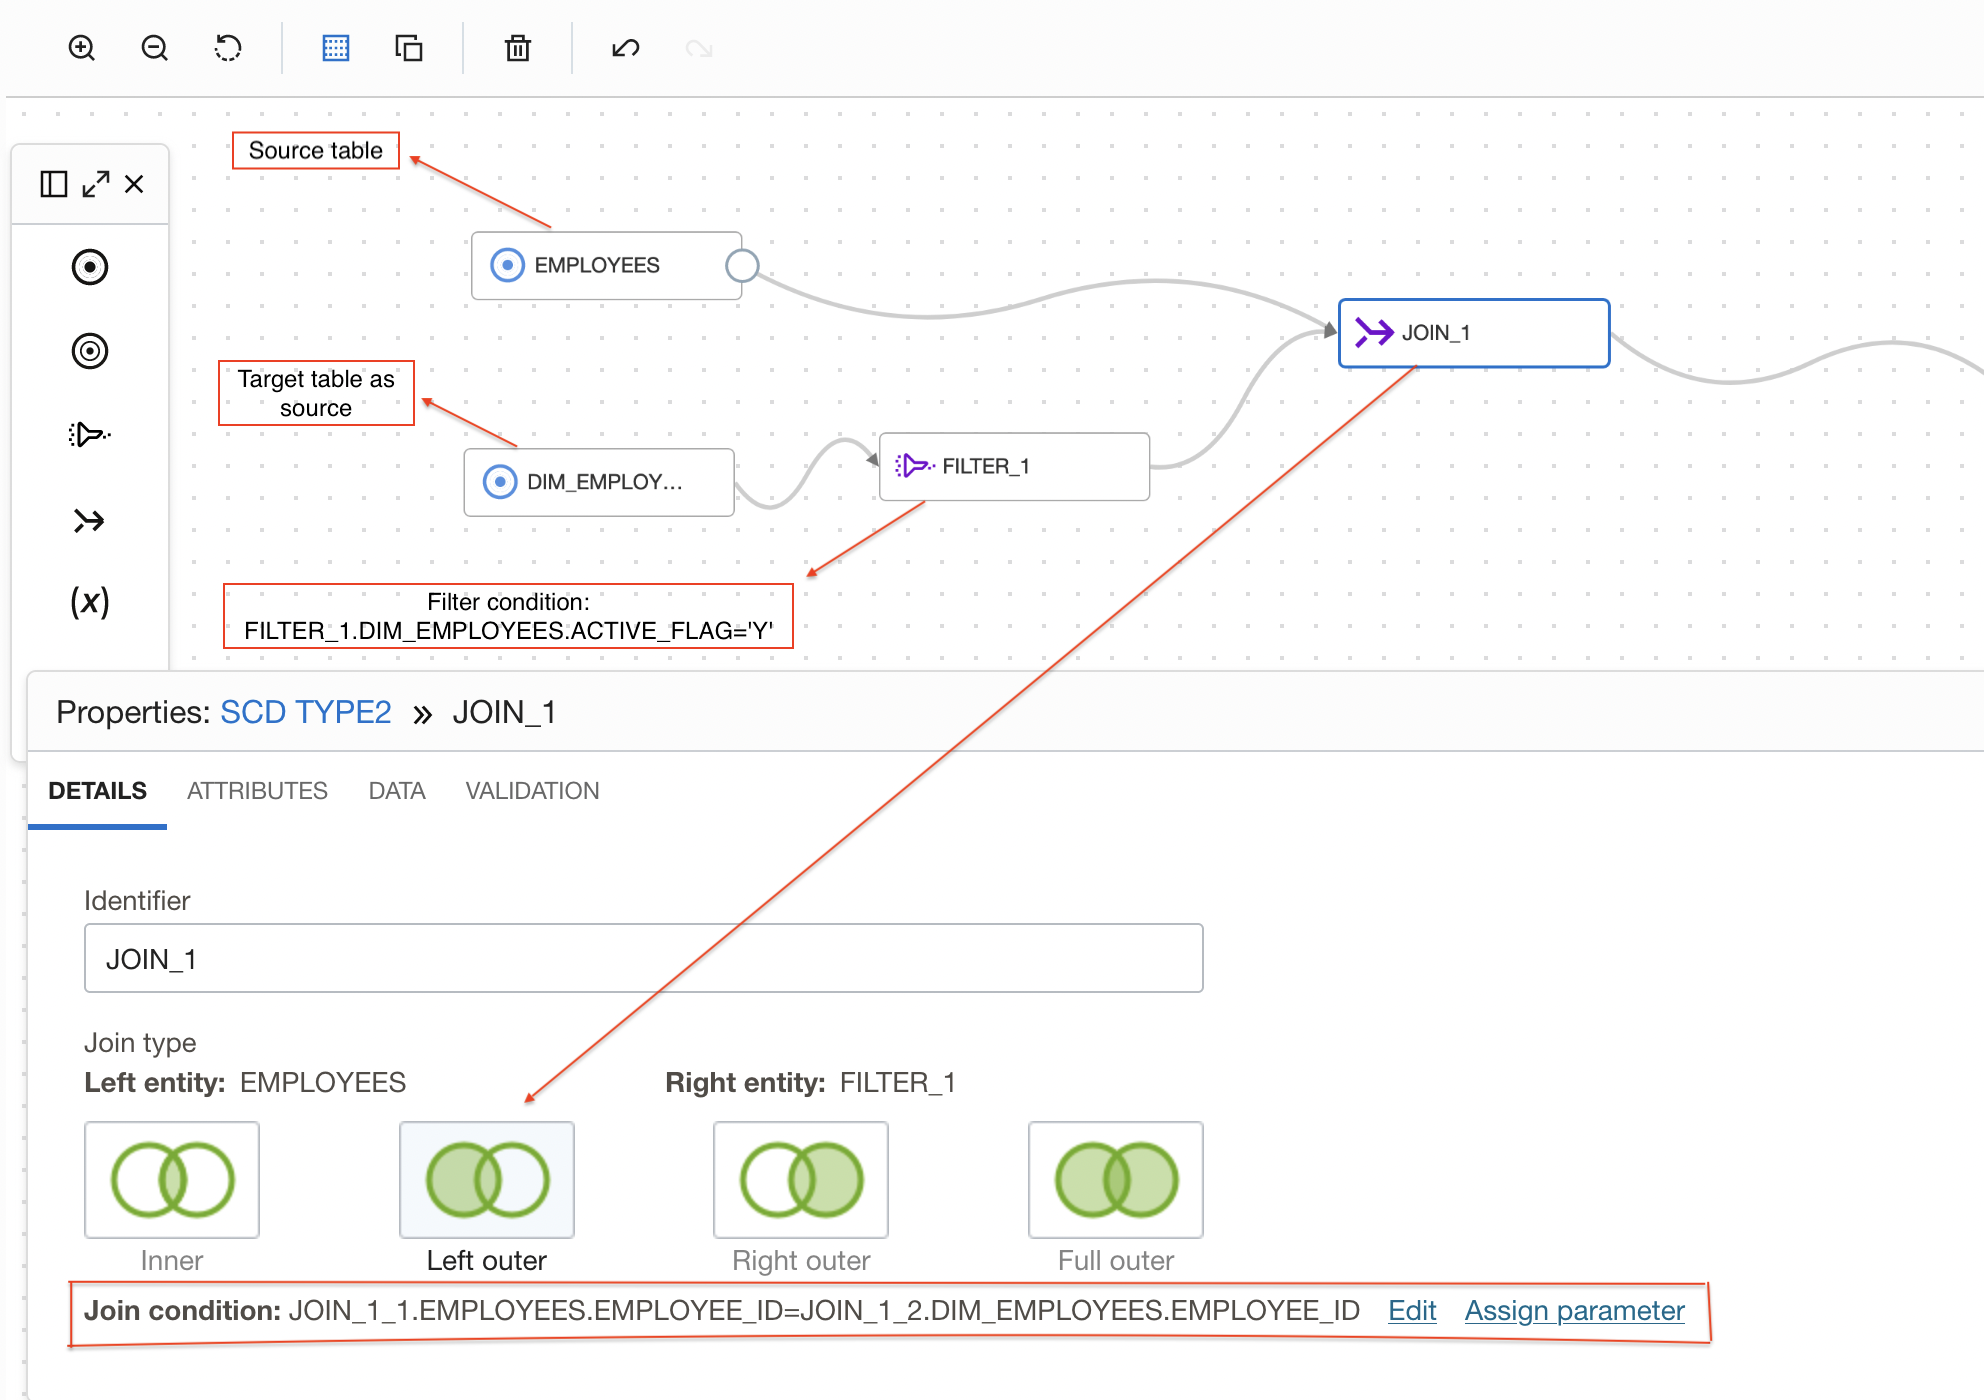
Figure 2: Joining source table and dimension table
Split join results
After join, we use a split operator to identify the updated, inserted, and changed records based on the SCD Type-2 column and route the data to different targets based on the expression specified in the split.
We will be comparing the incoming records with the target records on basis of SCD type-2 column. Here, SALARY is the SCD type-2 column in the target.
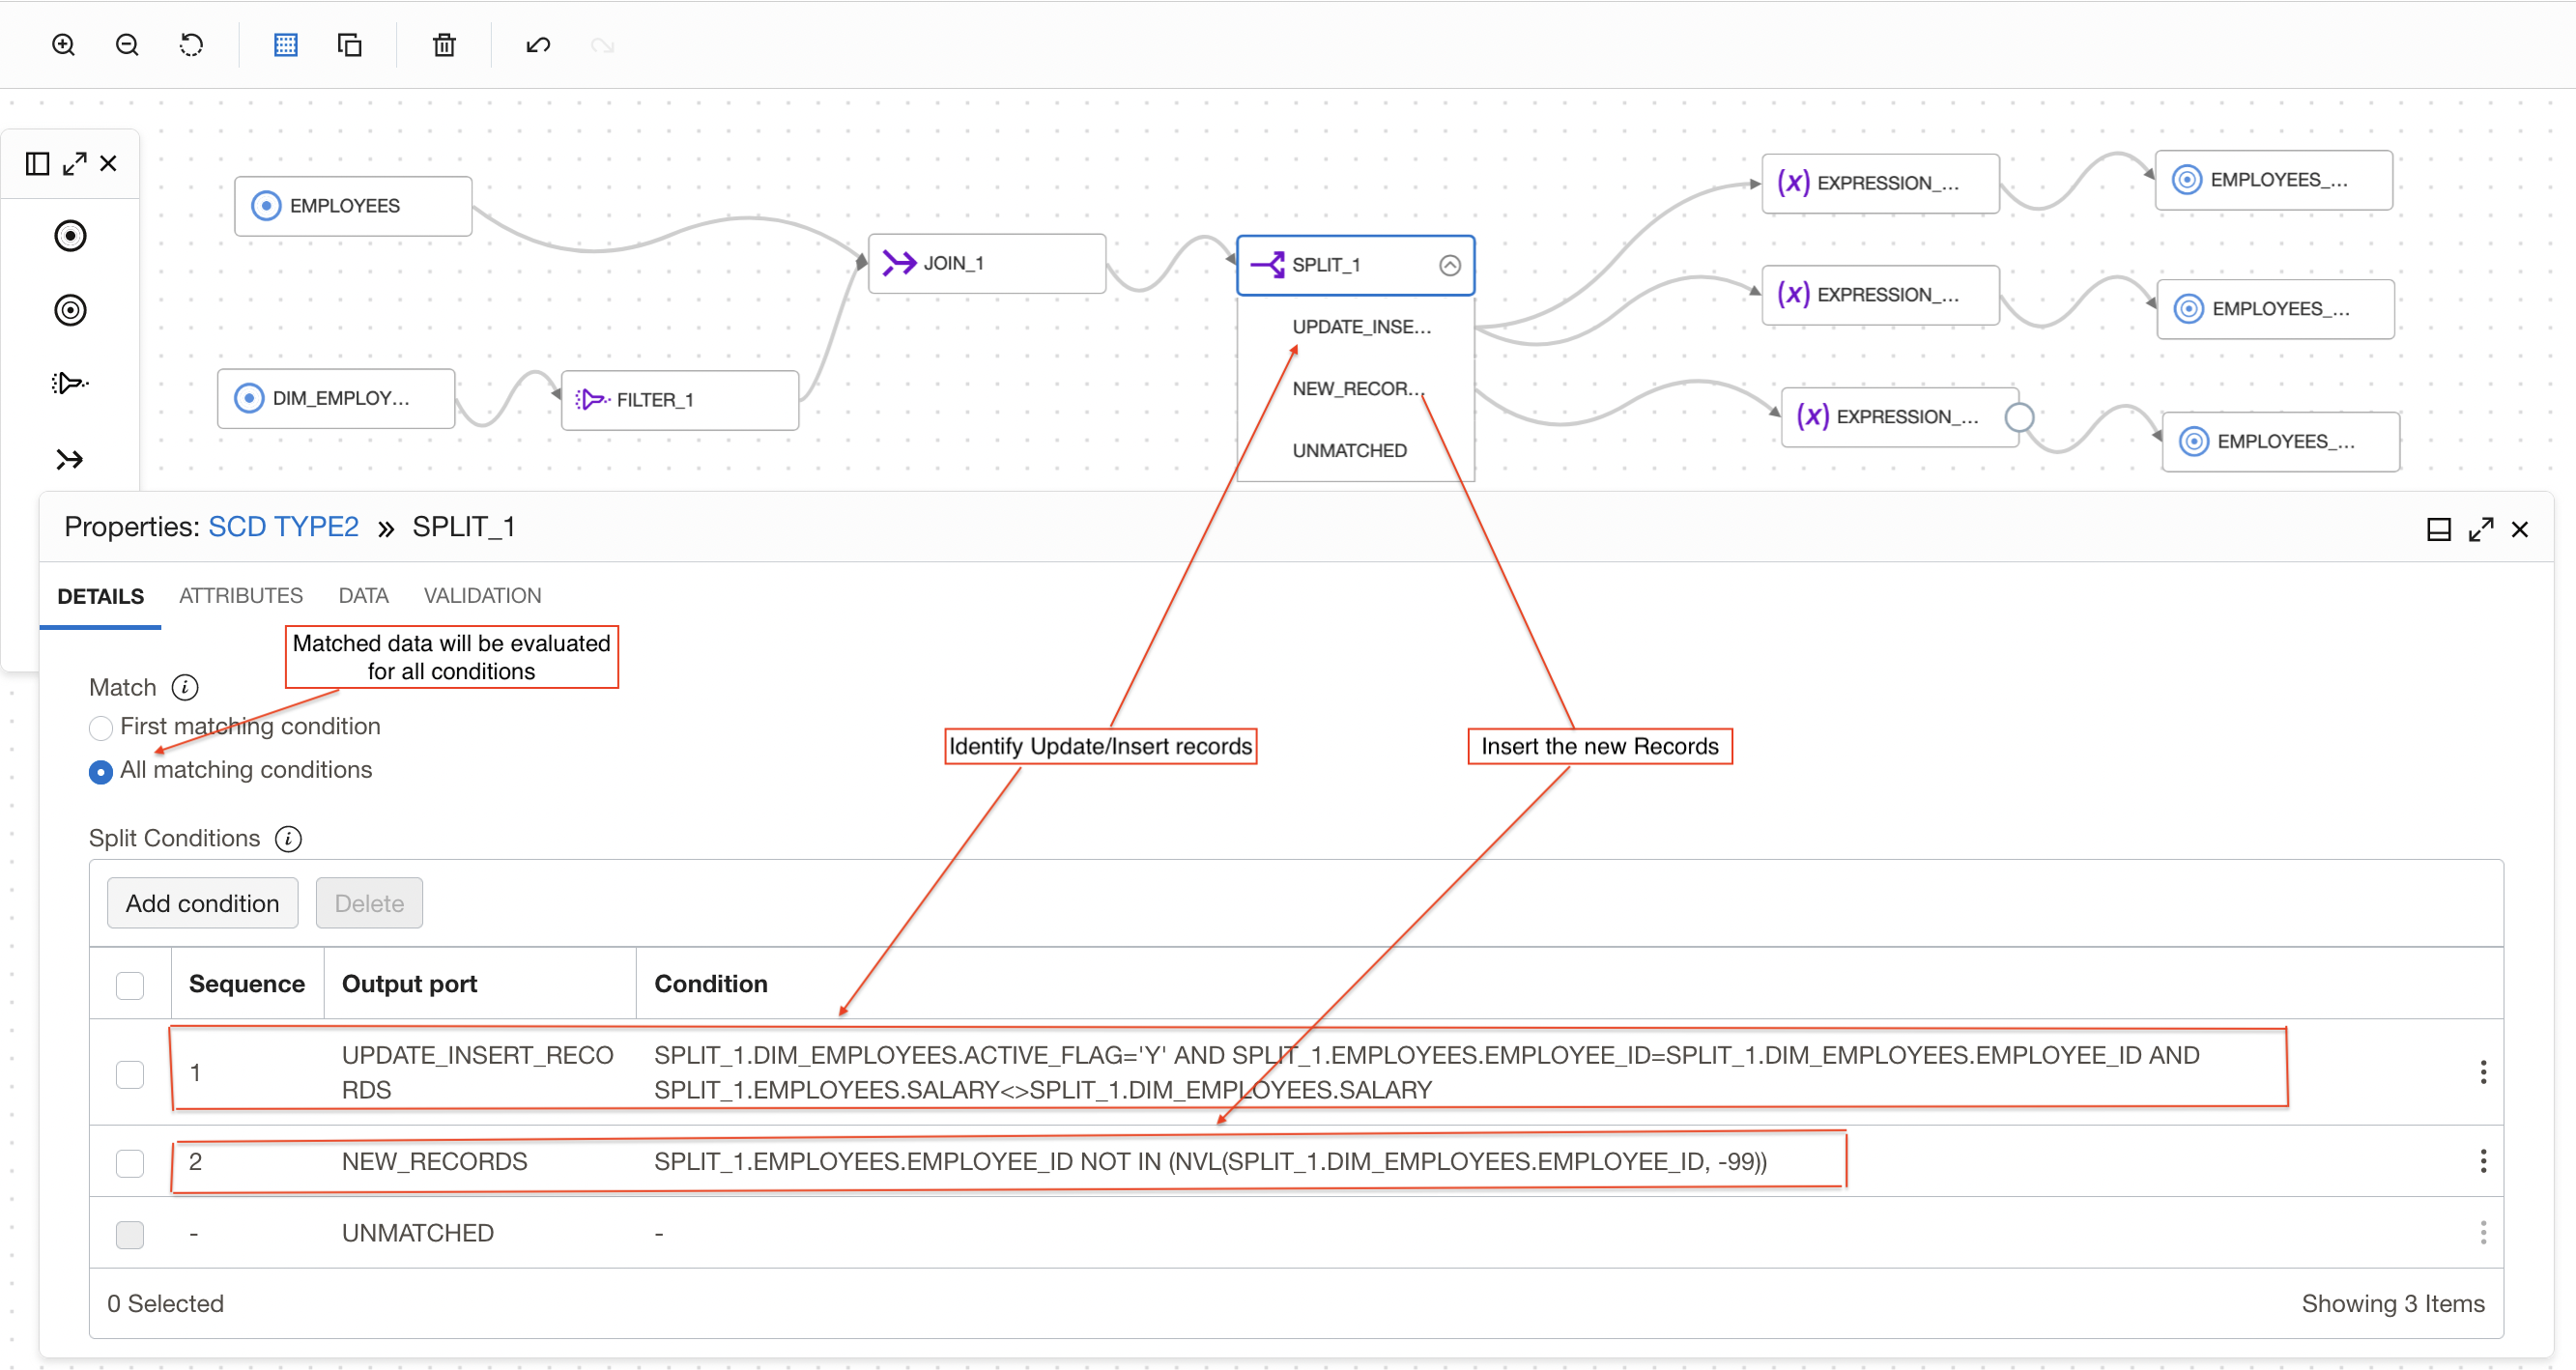
Figure 3: Split join output to identify the records
In Split operator, We added two conditions to Identify Update and Insert records.
First condition is to find the Update records –
- If there is a matching record found for employee_id read from the source in the target table and data i.e salary is changed then we route this record to update operation. Following condition is used to achieve this
SPLIT_1.DIM_EMPLOYEES.ACTIVE_FLAG=’Y’ AND SPLIT_1.EMPLOYEES.EMPLOYEE_ID=SPLIT_1.DIM_EMPLOYEES.EMPLOYEE_ID AND SPLIT_1.EMPLOYEES.SALARY<>SPLIT_1.DIM_EMPLOYEES.SALARY
Second condition is to find the new records –
- If there is no matching record found for employee_id read from the source in the target table then we route this record for insert operation ( We have used NVL function to handle null values of employee_id in the target table). Following condition is used to achieve this
SPLIT_1.EMPLOYEES.EMPLOYEE_ID NOT IN (NVL(SPLIT_1.DIM_EMPLOYEES.EMPLOYEE_ID, -99))
Update(inactive) the existing records
Records identified for the UPDATE operation will be updated to Target table using Merge as Integration Strategy. We add an Expression operator EXPRESSION_1 to canvas and connect to UPDATE_RECORDS output of Split operator, we use this expression operator to derive active Flag and effective end date columns.
We update active flag as ‘N’ and effective end date as (Current date – 1) .
Figure 4: Use Expression operator to create derived fields for updating existing records
We add a Target operator to canvas and connect this target operator to Expression_1 operator. We select the dimension table Employee_TGT with Merge as Integration Strategy and EMPLOYEE_KEY as Merge key.
Figure 5: Select target table to update existing records
Under Map tab of Target operator, we map below columns to respective target columns. We need below 3 columns to update the record to Inactive.
EMPLOYEE_KEY: To uniquely identify the dimension column
END_DATE: Audit column to know when record is expired or set inactive
ACTIVE_FLAG: Audit column to know record status
First we will reset all mappings (by default all Target table columns will be mapped using auto map by name) so we first remove all the mapping and then map these 3 columns. We also set Load order for this target as 0(This allows this target i.e. update record to inactive to load first).

Figure 6: Target mapping for updating existing records
Insert the new version of existing records
Records identified for the UPDATE operation will have to have a new version(active) of record inserted. These records will be inserted to target table using Insert as Integration Strategy.
We add an Expression operator EXPRESSION_2 to canvas and connect to UPDATE_RECORDS output of Split operator.
We use this expression operator to derive 3 columns
- Active Flag having value as ‘Y’ for new version
- Start date to indicate when record is set active
- End date with value “31-DEC-9999” to indicate active records.
Figure 7: Use Expression operator to create derived fields to insert new version of existing records
We add a target operator and configure it to insert the updated version of records. Since we need to select same connection and dimension table Employee_TGT so we use duplicate operator functionality of OCI DI and create a copy of first target operator.
Once we create a copy of target operator, we connect this target operator to Expression_2 operator and name it as INSERT_UPDATED_VERSION. We also choose INSERT as Integration Strategy
Since we need to create a new version of existing record, we map all the columns from source along with 3 derived columns of Expression_2 operator to respective target columns.
First we reset the mapping of EMPLOYEE_KEY, ACTIVE_FLAG, START_DATE and END_DATE columns and then map these columns manually to derived columns of Expression operator.
We won’t map EMPLOYEE_KEY as this column is identity column for the surrogate primary key column. When we insert a new row into this identity column, Oracle auto-generates and insert a sequential value into the column.
We also set Load order for this target as 1 (This allows this target to be loaded second).
Figure 8: Creating new target operator and mapping columns to insert new version of existing records
Insert the new records
Records identified for the New Insert operation will be inserted to target table using Insert as Integration Strategy.
We add an Expression operator EXPRESSION_3 to canvas and connect to INSERT_NEW_RECORDS output of Split operator.
We use this expression operator to derive 3 columns
- Active Flag having value as ‘Y’ for new version
- Start date to indicate when record is set active
- End date with value “31-DEC-9999” to indicate active records.
Figure 9: Use Expression operator to create derived fields to insert new records
We add a target operator and configure it to insert the updated version of records. Since we need to select same connection and dimension table Employee_TGT so we use duplicate operator functionality of OCI DI and create a copy of first target operator.
Once we create a copy of target operator, we connect this target operator to Expression_2 operator and name it as INSERT_UPDATED_VERSION. We also choose INSERT as Integration Strategy
Since we need to insert a new record, we map all the columns from source table along with 3 derived columns of Expression_3 operator to respective target columns.
First we reset the mapping of EMPLOYEE_KEY, ACTIVE_FLAG, START_DATE and END_DATE columns and then map these columns manually to derived columns of Expression operator.
We won’t map EMPLOYEE_KEY as this column is identity column for the surrogate primary key column. When we insert a new row into this identity column, Oracle auto-generates and insert a sequential value into the column.
We also set Load order for this target as 2 (This allows this target to be loaded third).
Figure 10: Creating new target operator and mapping columns to insert new records
Once the flow is completed, save the data flow, create an Integration Task, publish to an application, and run the corresponding task for implementing type-2 SCD.
Verifying data in the target table after initial data load
The 1st run inserts all the 3 records from the source table into the target assuming that there are no records in the target table. In the 1st run, for all the records, ACTIVE_FLAG = ‘Y’, START_DATE = <<current date>>, and END_DATE = ’31-DEC-9999′.

Figure 11: Job status after the initial data load
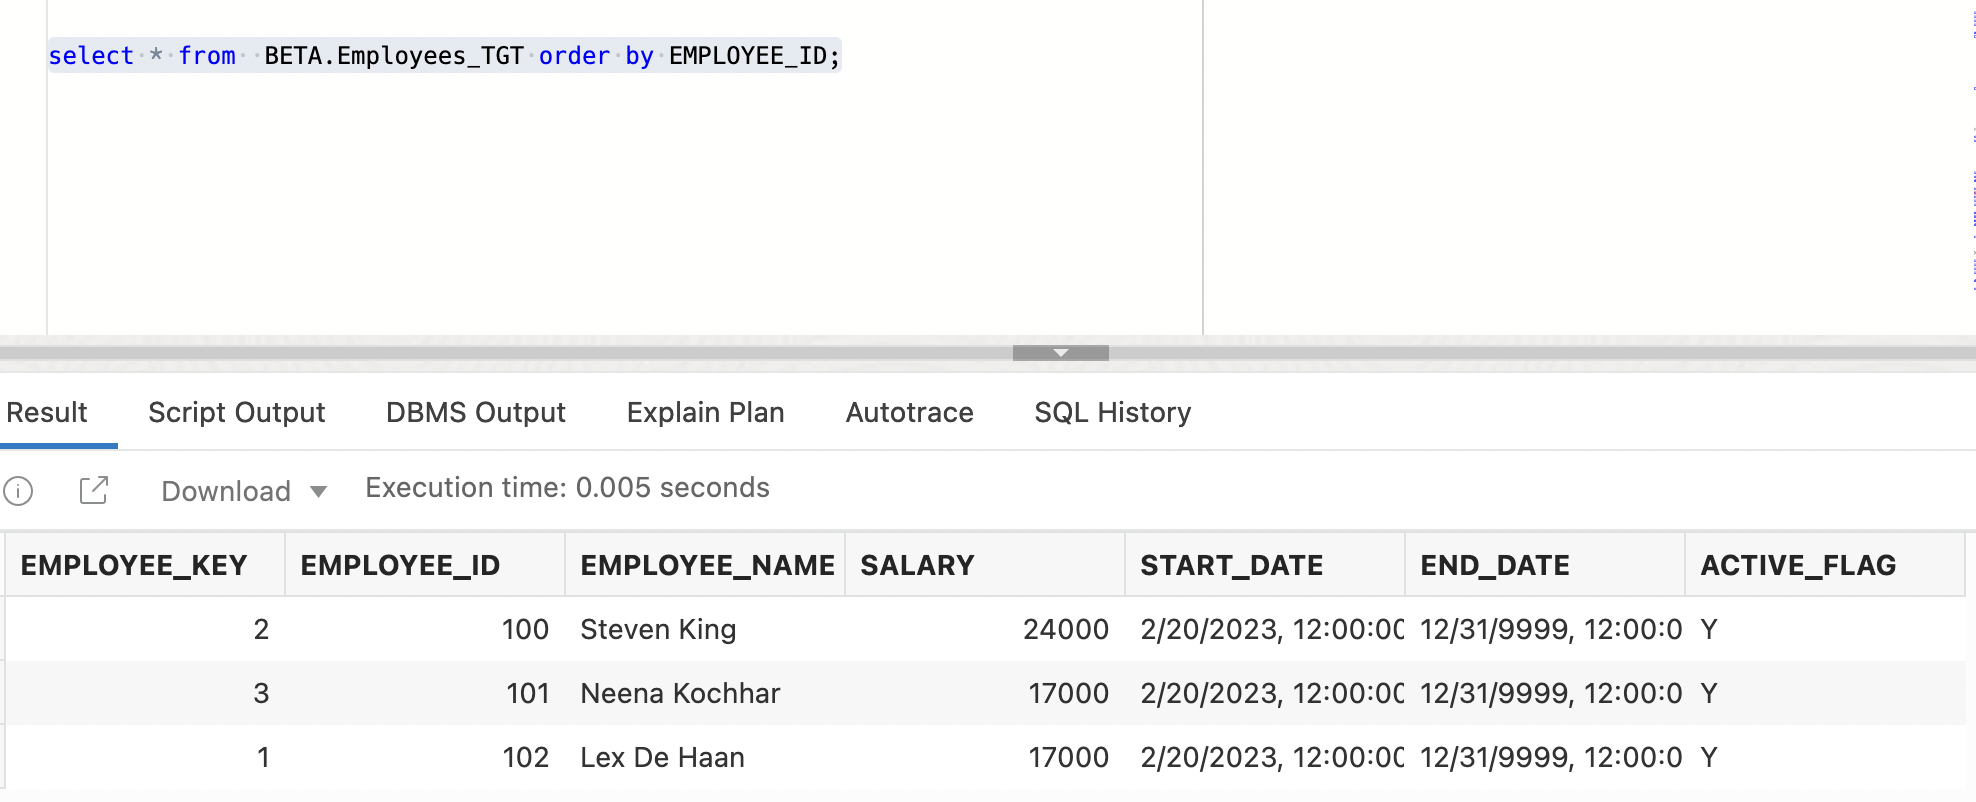
Figure 12: Employees_TGT table after the initial data load
Verifying data in the target table after second run with modified data
Before the 2nd run, we update source table Employee where salary of certain employees were changed and also a new record is included. Updated Source Employees table looks as below
| EMPLOYEE_ID | EMPLOYEE_NAME | SALARY |
|---|---|---|
| 100 |
Steven King |
30000 |
| 101 |
Neena Kochhar |
17000 |
| 102 |
Lex De Haan |
17000 |
| 103 |
Bruce Ernst |
6000 |
After the 2nd run, changed records coming from the source are identified with the target and SCD type-2 logic is applied to those records.
Existing records with change in Salary will be marked inactive by setting active_flag as ‘N’ and end date to current date. A new version of existing record will be created with updated salary and active_flag as ‘Y’.
New records will be inserted with active_flag as ‘Y’ and end date 31-DEC-9999

Figure 13: Job status after the 2nd run
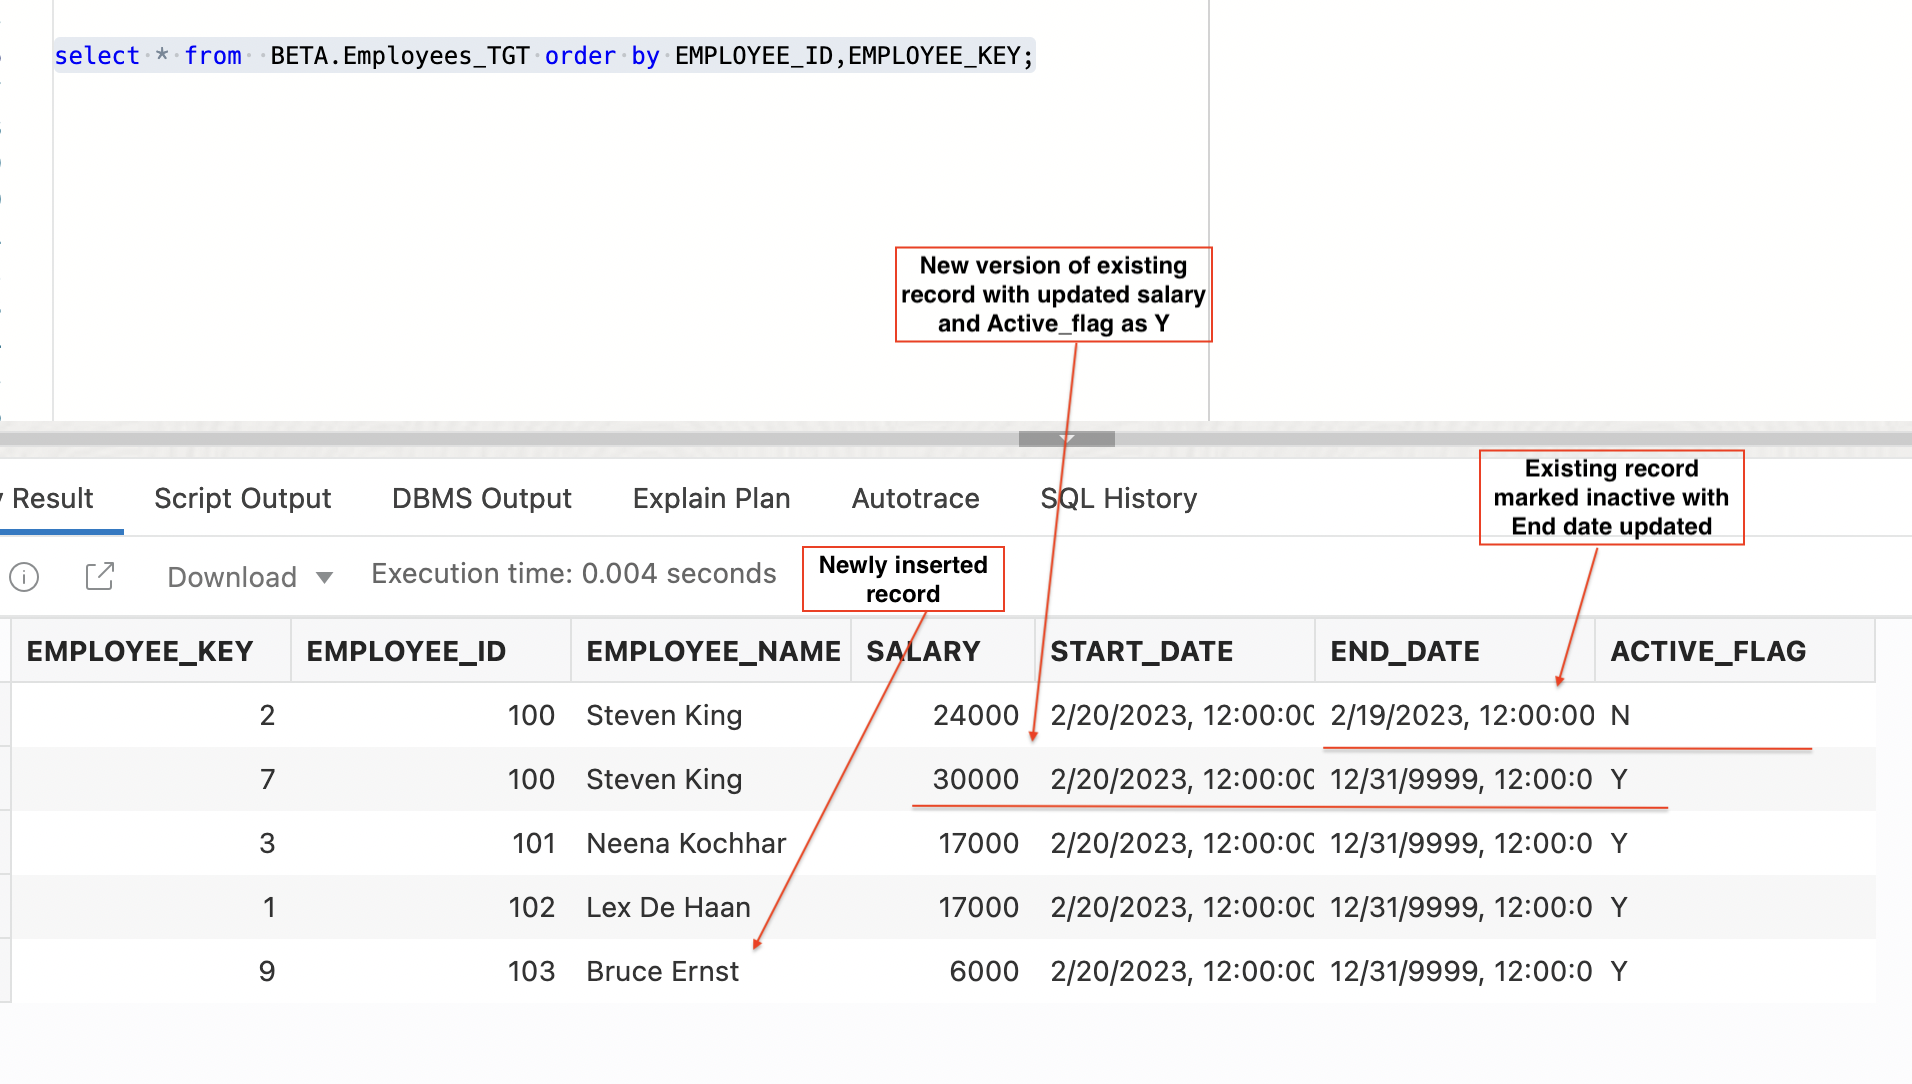
Figure 14: Employees_TGT table after 2nd data load
Verifying data in the target table after third run with modified data
Let’s assume salary of employee 100 changed again, after 3rd run, our target table looks as below
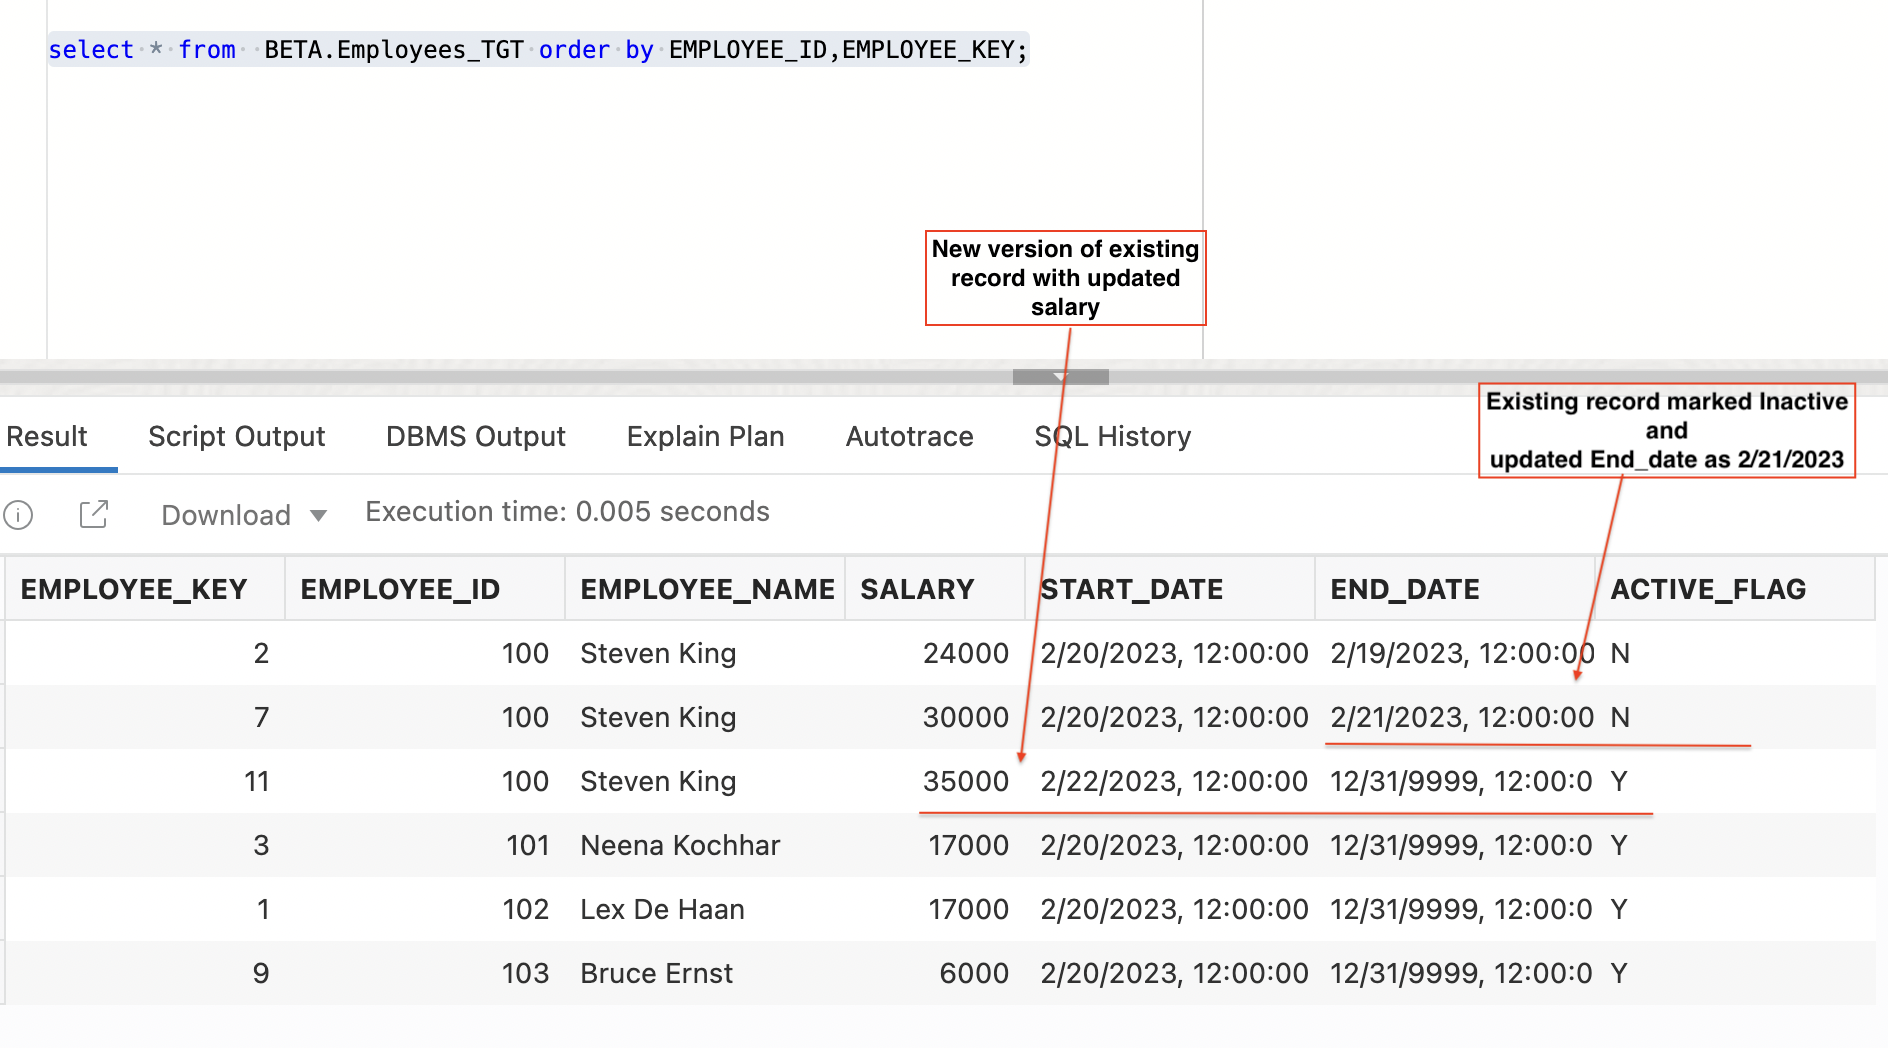
Figure 15: Employees_TGT table after 3rd data load
Here, we have seen a solution to implement Type-2 SCD as simple as possible for the user using OCI Data Integration. This can then be scheduled and executed on a regular basis.
We hope that this blog helps as you learn more about Oracle Cloud Infrastructure Data Integration. For more information, check out the tutorials and documentation. Remember to check out all the blogs on OCI Data Integration!
