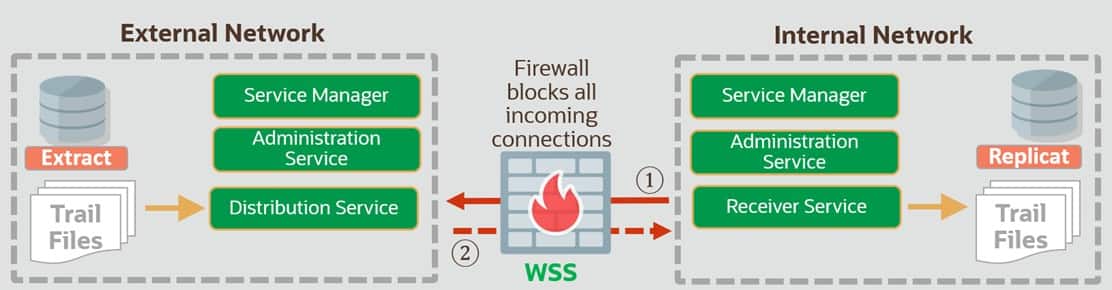
With Oracle GoldenGate, you can set up a Replication Path to route trail files from a less-trusted source system to a trusted target environment. Unlike a standard Distribution Path—which is initiated and controlled from the source—this model allows the trail-file transfer to be initiated and managed from the trusted target side.
In Cloud systems you may want to the Use target-initiated paths when network security policies don’t allow the source-side Distribution Service to open outbound connections to the target-side Receiver Service. In this case, the Receiver Service initiates the connection back to the Distribution Service, allowing the target side to pull trail files from the remote system.
This model also aligns well with firewall/DMZ architectures, where inbound connectivity to the trusted internal network is tightly restricted. In these designs, it’s often preferable for the trusted target to initiate and control connections rather than allowing inbound access from a less-trusted zone.
Common examples include:
- Financial services and healthcare: internal systems are trusted targets, while the internet is a less-trusted client network.
- Manufacturing and automotive: corporate networks are segregated from partner networks to tightly control access.
Here are the key steps that explains how GoldenGate manages the Target Initiated Path:
- An administrator on the trusted (target) system uses the Admin Client / Administration Service to start or enable the required GoldenGate processes and the target-initiated Path (Receiver-to-Source connection).
- The Receiver Service on the trusted (target) system initiates an outbound connection toward the source (less-trusted) system using the Distribution Service endpoint on the source side (1).
- On the less-trusted (source) system, the Service Manager / Distribution Service accepts the inbound session from the target (as allowed by firewall rules) and associates it with the configured Distribution Path.
- The source-side Extract continues to capture changes and write them to the source trail as usual.
- The source Distribution Service reads the required trail data and streams it over the established session to the target Receiver Service (2).
- The key point: the connection was initiated from the trusted side.
- The target Receiver Service writes the incoming stream to a target trail on the trusted system.
- Replicat on the trusted (target) system reads the target trail and applies changes to the target database in the normal way.
Implementation steps
The simplest way to create a Target-Initiated Path is through the WebUI, which uses the same REST APIs behind the scenes. I also show how to configure a Target-Initiated Path directly with cURL
by calling the REST APIs. Finally, you can also create a Target-Initiated Path using AdminClient.
WebUI
As mentioned earlier, the WebUI is the easiest way to create a Target-Initiated Path. Simply go to the Receiver Service in the left navigation pane and add the path. A wizard-style flow will guide you through the required steps.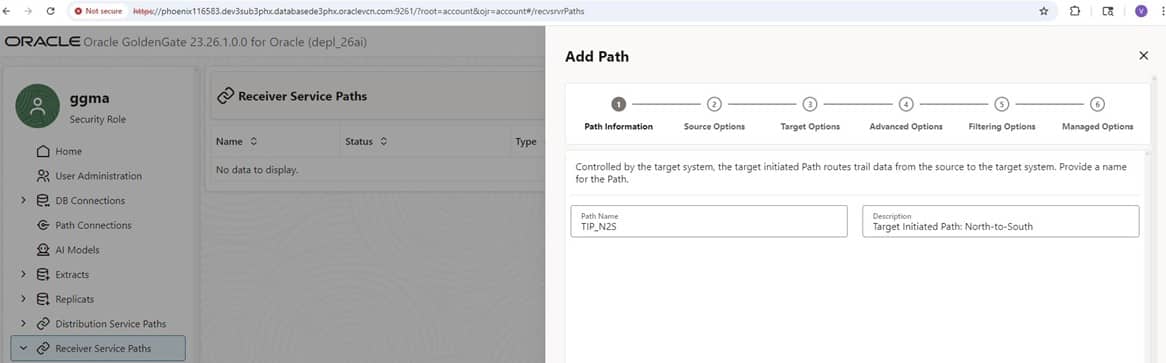
WebUIAfter you name and describe the Target-Initiated Path, you enter the details for the source system—specifically the secure WebSocket protocol (wss), the source hostname, and the Distribution Service port.
This is the key difference between configuring a conventional Distribution Path and a Target-Initiated Path.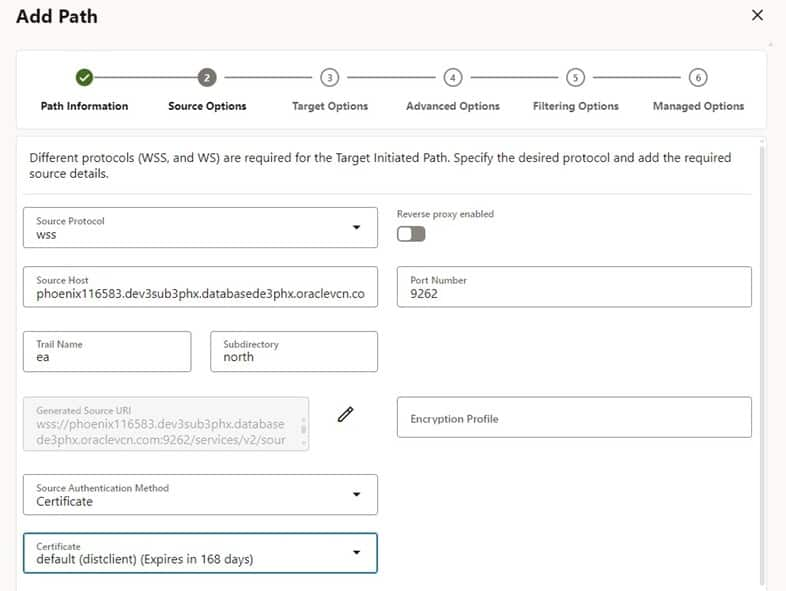
In the next step, you enter the target details. In this example, I route trail files from the source—trail ea in the north directory (as shown above)—to the target—trail ra in the south directory (as shown below).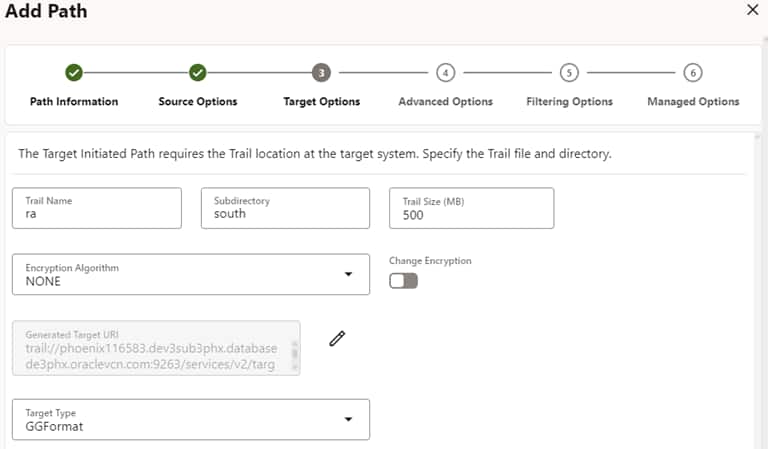
The remaining steps are straightforward and not specific to the Target-Initiated Path, so I’m not showing each one here.
One useful detail, though: the wizard displays the generated Source and Target URIs—the same values used when creating the Target-Initiated Path via the REST APIs.
 |  |
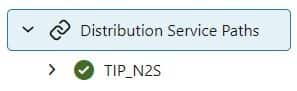 |  |
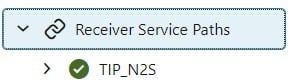
One important detail: you can start/stop, add, and delete a Target-Initiated Path from the Receiver Service (target) side. From the Distribution Service (source) side, you can only stop the Target-Initiated Path.
Also note that if you stop the Target-Initiated Path on either the source or the target system, the path will no longer be visible on the source side. This is expected behavior for this technology.
REST API Calls
While it’s intuitive and straightforward to create a Target-Initiated Path manually in the WebUI, you may prefer to use the REST API directly—especially for scripting and automation.
Note that the Source URI uses the secure WebSocket (wss) protocol and points to the source host and the Distribution Service port. By contrast, the Target URI references the trail and points to the target host and the Receiver Service port.
curl
--location 'https://ggtargethost.oraclevcn.com:9263/services/v2/targets/TIP_N2S'
  --header 'Content-Type: application/json'
  --header 'Authorization: ••••••'
  --data '{
    "description": "Target Initiated Path",
    "name": "RPNS",
    "source": {
      "uri": "wss://ggsourcehost.oraclevcn.com:9262/services/v2/sources?trail=north/ea",
      "authenticationMethod": {
      "certificate": "default"
      }
    },
  "target": {
    "uri": "trail://ggtargethost.oraclevcn.com:9263/services/v2/targets?trail=south/ra"
},
  "status": "running"
}'
AdminClient:
For completeness—and to provide the full picture—the following AdminClient command shows how to set up a Target-Initiated Path in AdminClient.
As with the WebUI and REST API approaches, the key is to specify the source and target settings that differ from a conventional Distribution Path.
ADD RECVPATH TIP_N2S
SOURCE wss://ggsourcehost.oraclevcn.com:9262/services/v2/sources?trail=north/ea AUTHENTICATION CERTIFICATE default
TARGET trail://ggtargethost.oraclevcn.com:9263/services/v2/targets?trail=south/ra!
Summary and What’s Next
This blog highlights a security-focused approach for “trusted target / less-trusted source” scenarios—where you want the target system to stay in control of how changes are received. In GoldenGate Microservices, this is enabled through the Target-Initiated Path.
The solution modernizes and redesigns the capabilities of the Passive Extract from the legacy (Classic) GoldenGate architecture—functionality that is no longer supported starting with GoldenGate 23ai.
I walk through a hands-on setup using the WebUI, and I also include the essential REST API calls that let you automate the same configuration programmatically. If you prefer AdminClient (OBEY) scripts, you can use those as well to set up the Target-Initiated Path.
You may have noticed the “Reverse Proxy” option in the WebUI screenshots. As an additional hardening step, consider placing a reverse proxy in front of GoldenGate Microservices as a single, secure front door. Instead of exposing multiple service ports, clients connect through one familiar endpoint (typically HTTPS/443), simplifying access and enabling stronger centralized control. More on that may come in a future post.