This blog demonstrates how to replicate data from Confluent Kafka to Autonomous Transaction Processing using OCI GoldenGate. OCI GoldenGate reads messages from a Kafka topic or topics and then converts the data into logical change records written to GoldenGate Trail files. GoldenGate Replicat processes can then use the generated Trail files to propagate data to tabular format at the target Autonomous Transaction Processing database.
Architecture
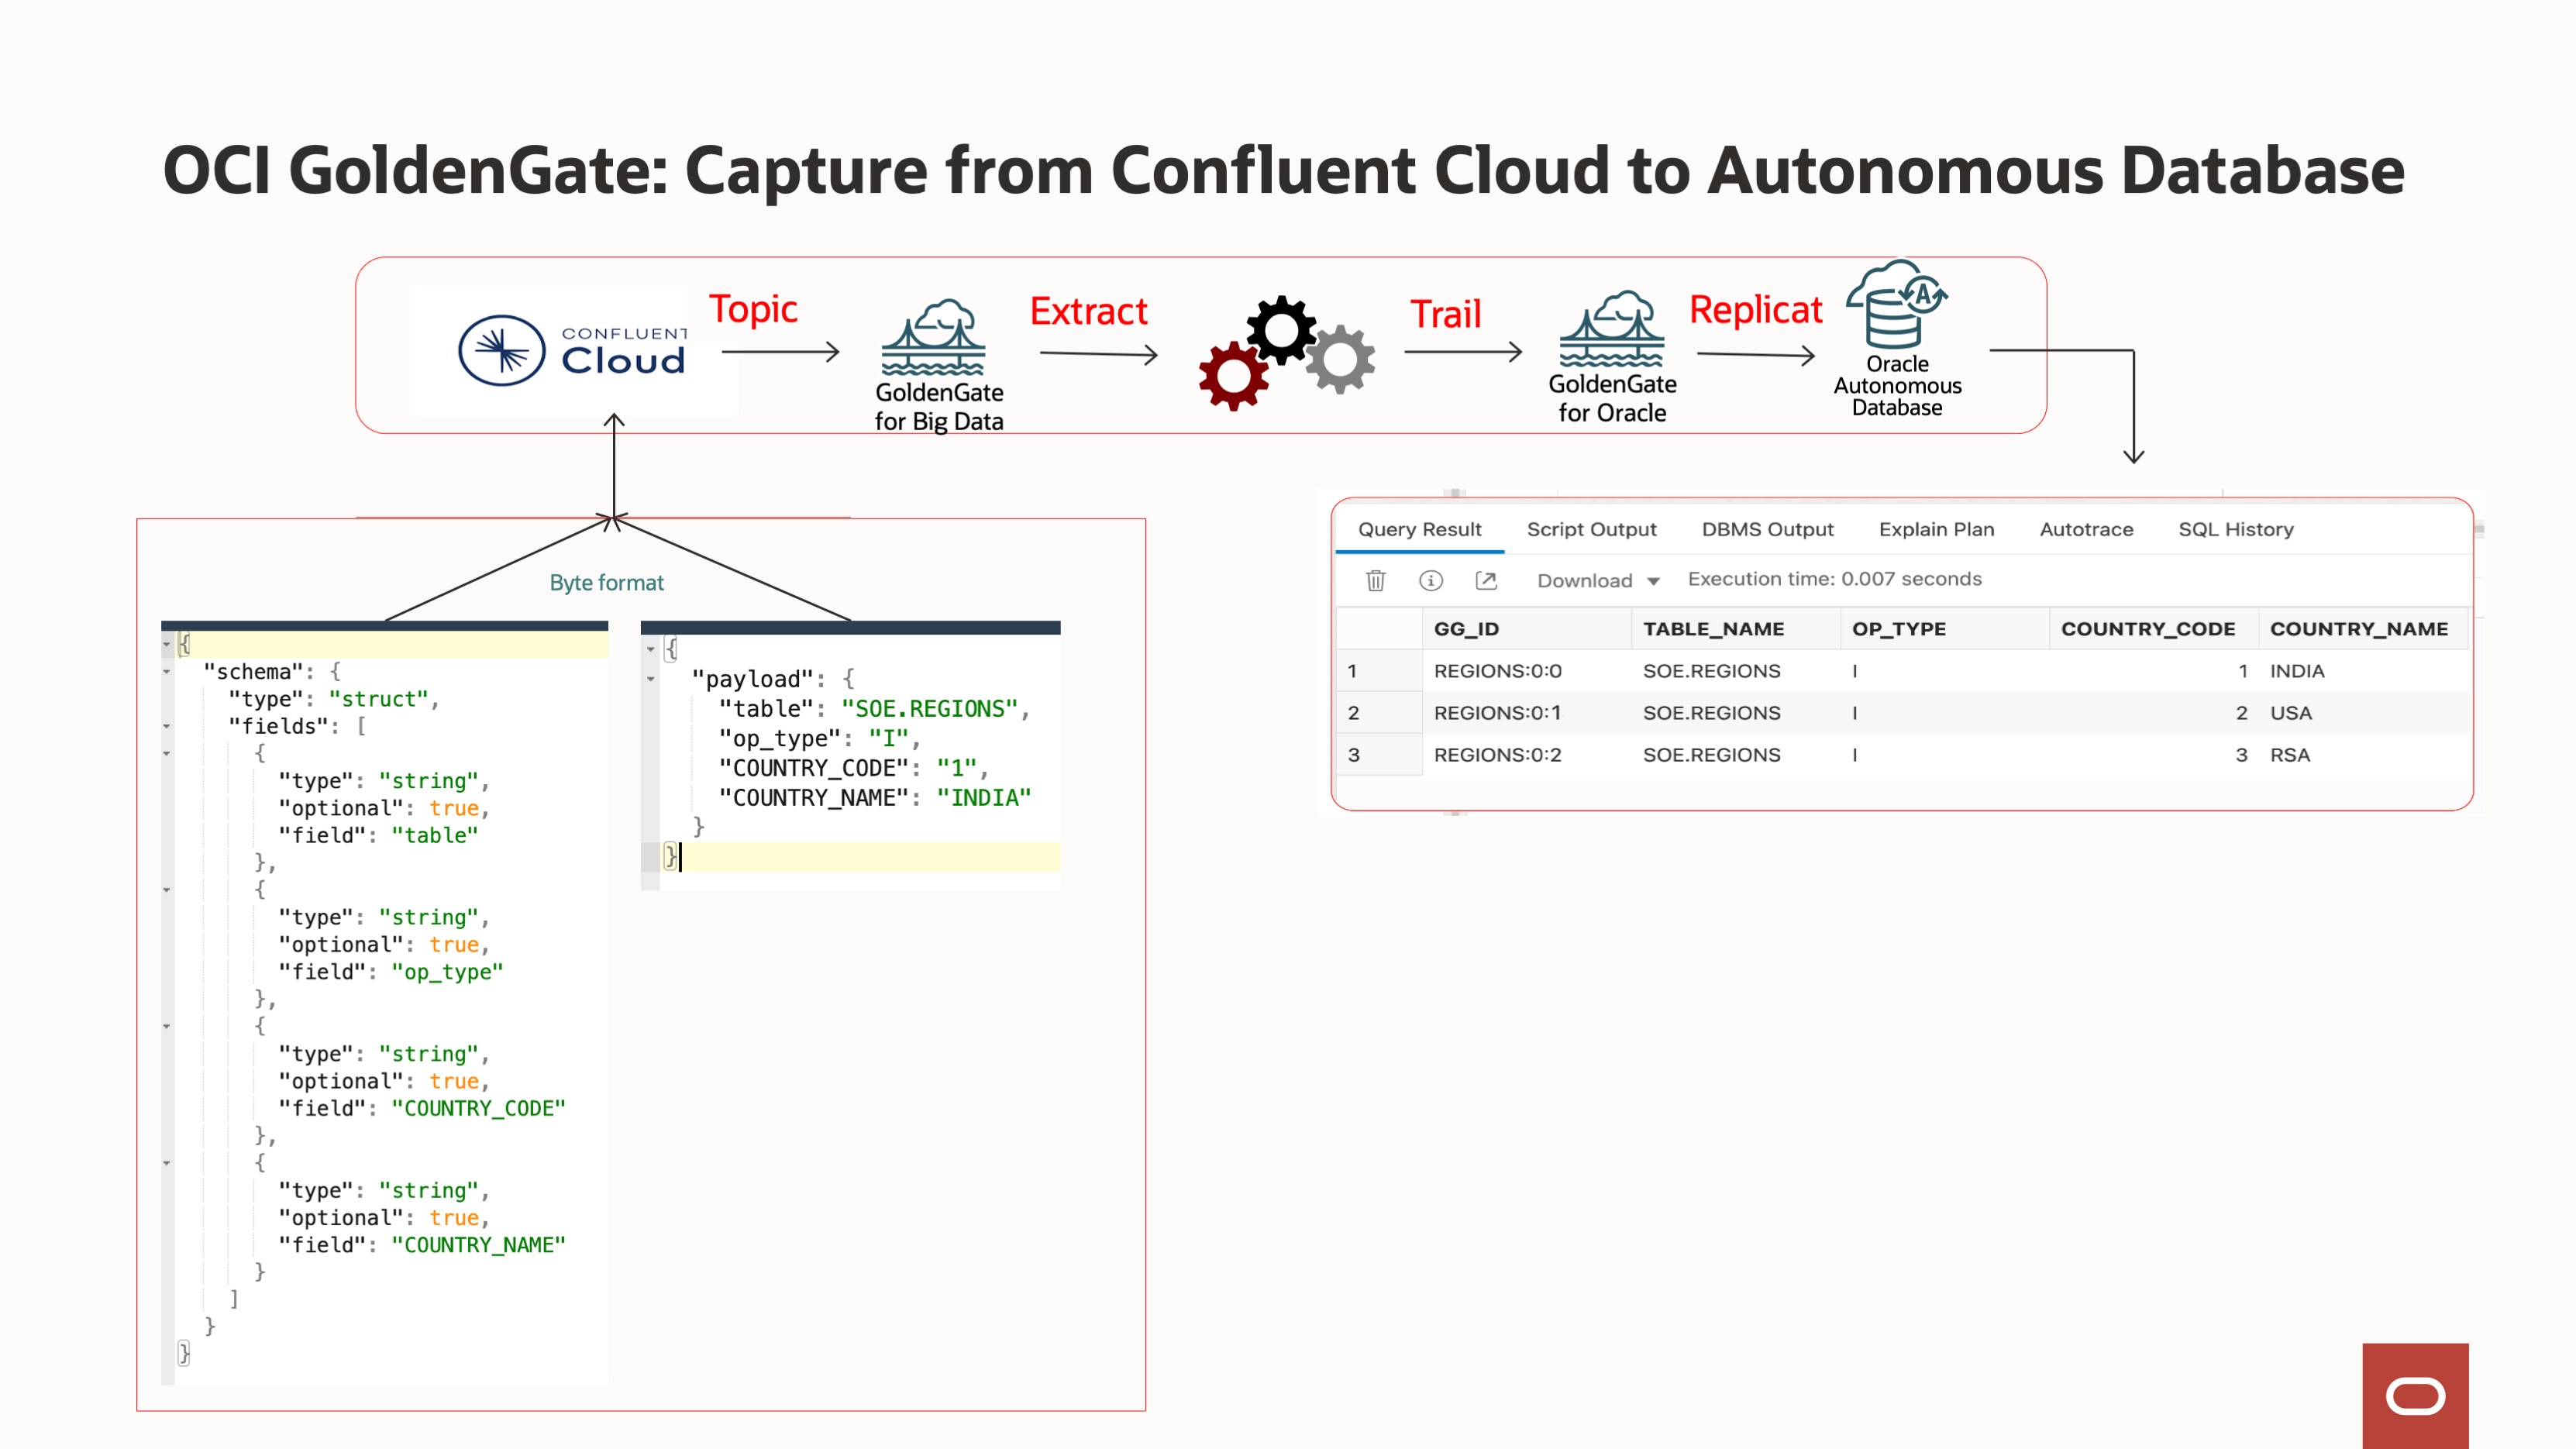
The architecture explains, how the application produces JSON messages to Confluent Cloud topic in byte format. GoldenGate captures the topic/s messages and saves them in a trail file. The Distribution path broadcasts the trail file to target deployment. The Replicat process reads the trail data and advocates the data to target Autonomous Transaction Processing.
Before you begin :
To successfully complete this blog, you must have the following:
- A Confluent Cloud cluster.
- A target Autonomous Transaction Processing instance.
Environment set up:-
Source: Confluent Cloud
If you don’t already have a Confluent Cloud cluster, topic and schema, you can do the following:
- Create a cluster.
- Create an API Key for the Cluster. Note the API Key and Secret for the next steps.
- Create a topic in the cluster. This blog uses a topic name “REGIONS”.
Target: Autonomous Transaction Processing
This blog uses Autonomous Transaction Processing for the target database.
To set up the target Autonomous Database:
- In the Oracle Cloud console, select your Autonomous Transaction Processing (ATP) instance from the Autonomous Databases page to view its details and access Database Actions.
- On the Database details page, click Database actions.
- Unlock the GGADMIN user:
a. On the Database actions page, under Administration, click Database Users.
b. Locate GGADMIN and then click its ellipsis menu (three dots) and select Edit.
c. In the Edit User panel, enter the GGADMIN password, confirm the password, and then deselect Account is Locked.
d. Click Apply Changes.
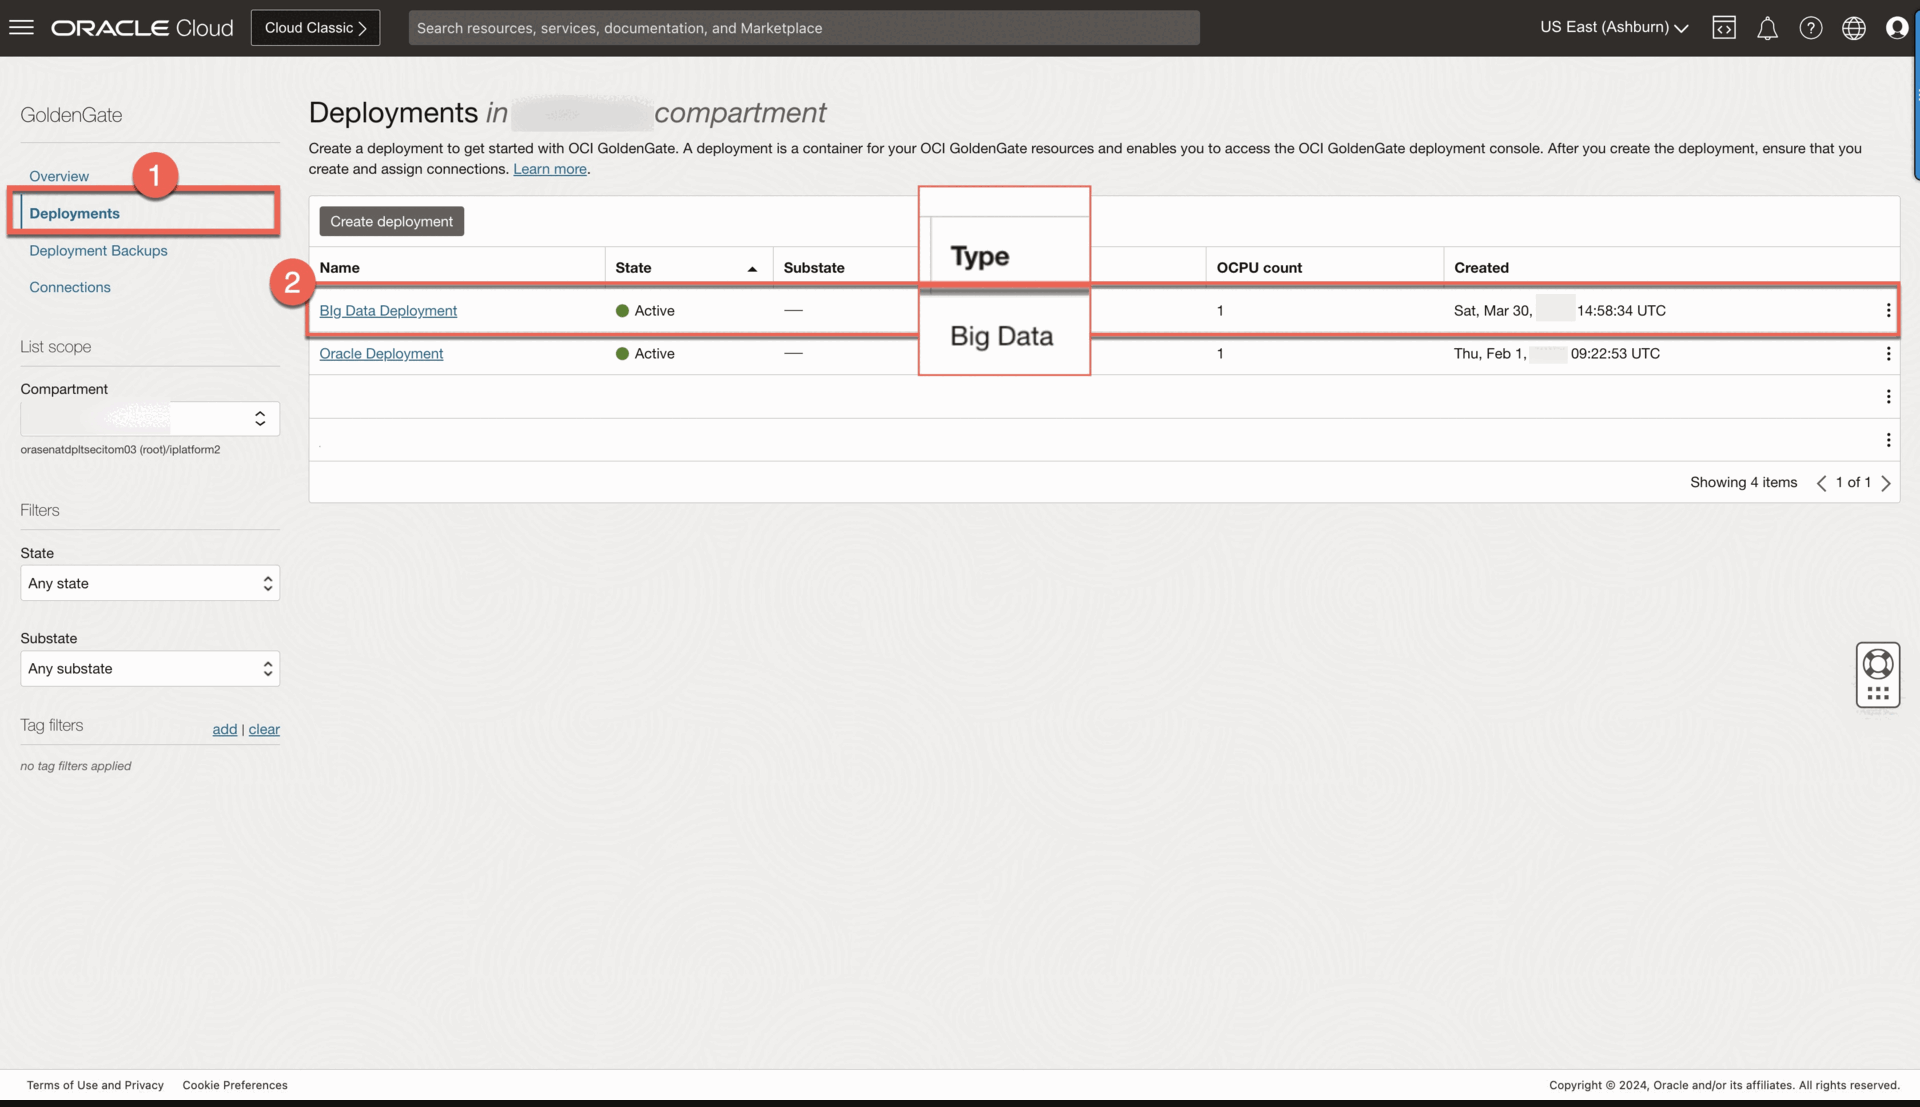
Deployment: Create the OCI GoldenGate deployments.
The blog requires two deployments, one for the source confluent cloud and another for the target database. This blog example requires deployments and connections for both the source and target.
- Create a Big Data deployment for the source Confluent Cloud.
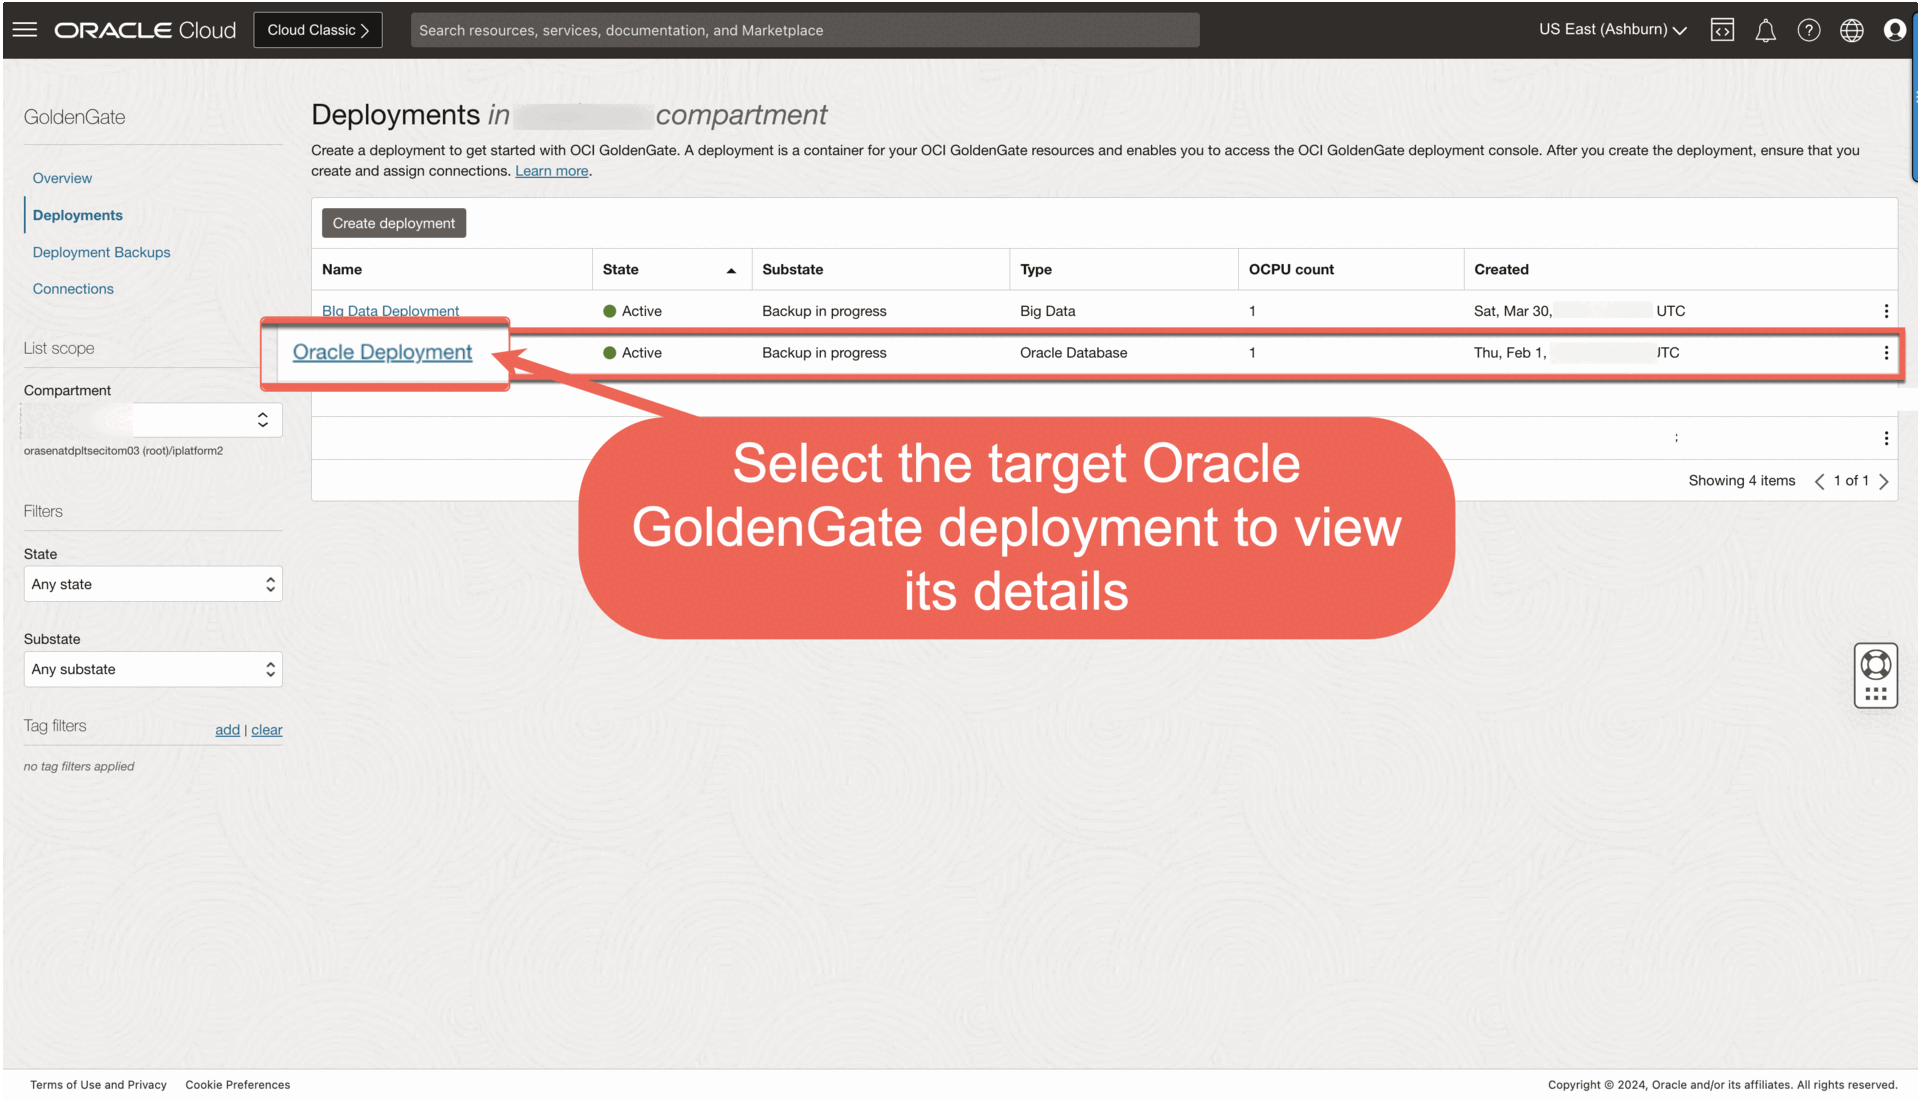
- Create an Oracle deployment for the target Autonomous Transaction Processing instance.
- Create a Confluent Kafka connection.
- Create a connection to the target Autonomous Transaction Processing.
- Assign Confluent Kafka connections to the source Big Data deployment. OCI GoldenGate supports Confluent Cloud private endpoints also
- Assign the Autonomous Transaction Processing connection to the target Oracle deployment.
Follow the below steps to create an Extract to capture the data Confluent Cloud,a Distribution path to push the trail files to target deployment and a Replicat to seamlessly transits the data to the target Autonomous Transaction Processing instance.
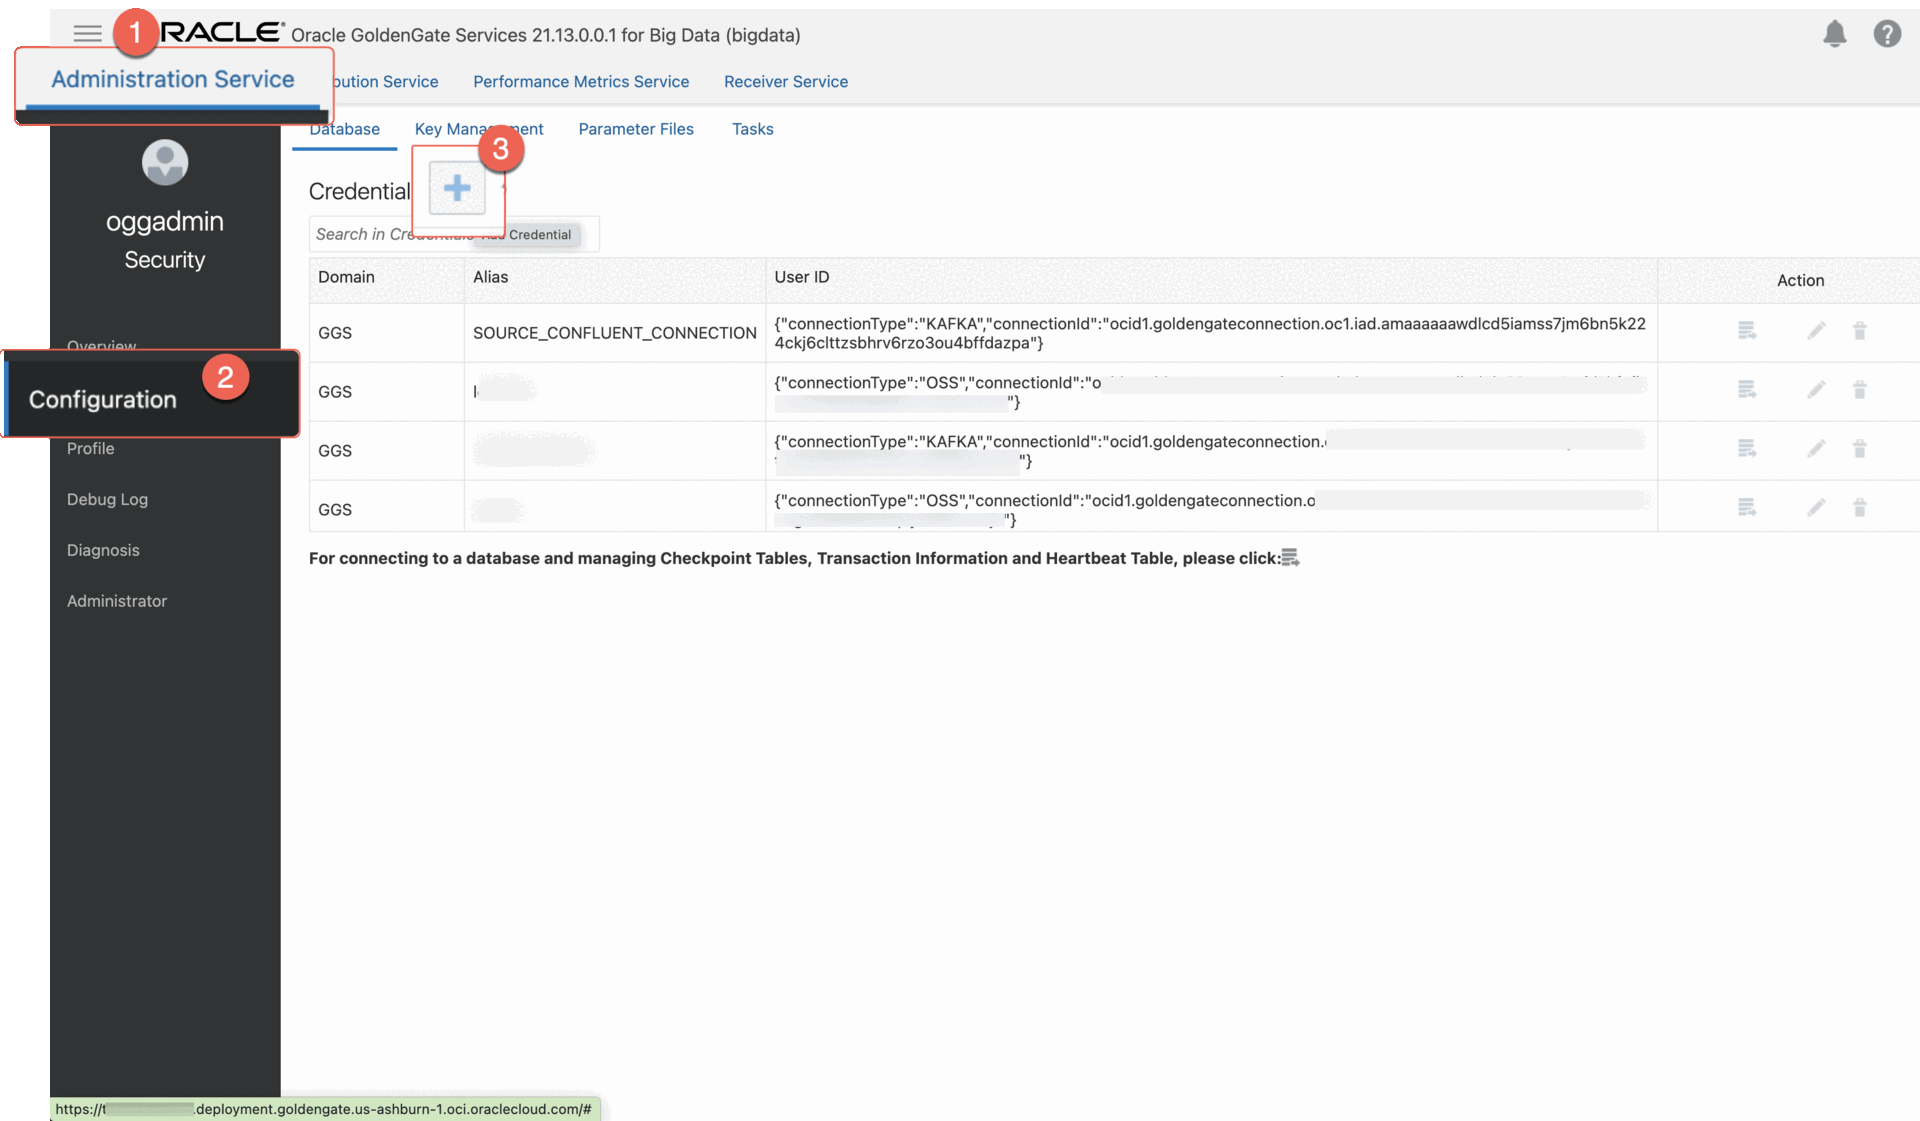
Step 1: Create a credential in the Big Data deployment console for Kafka.
OCI GoldenGate uses credential store entries to identify the source technology. For example, OCI GoldenGate uses the credential’s User ID to determine whether to start a Kafka (kafka:// ) or Mongo (Mongo://) Extract.
- On the Deployments page, select the Big Data deployment to view its details.
- Log in to the Big Data deployment console using the credentials specified when you created the deployment. You’re brought to the Administration Server Overview page.
- Add a credential:
a. Open the navigation menu, and then click Configuration.
b. On the Credentials page, click Add Credential (plus icon).
c. Enter the following details in the fields provided, and then click Submit:
• For Credential Domain, enter OracleGoldenGate.
• For Credential Alias, enter kafka.
• For User ID: enter kafka://
• For Password, enter a password.
• For Verify Password, enter the password again.
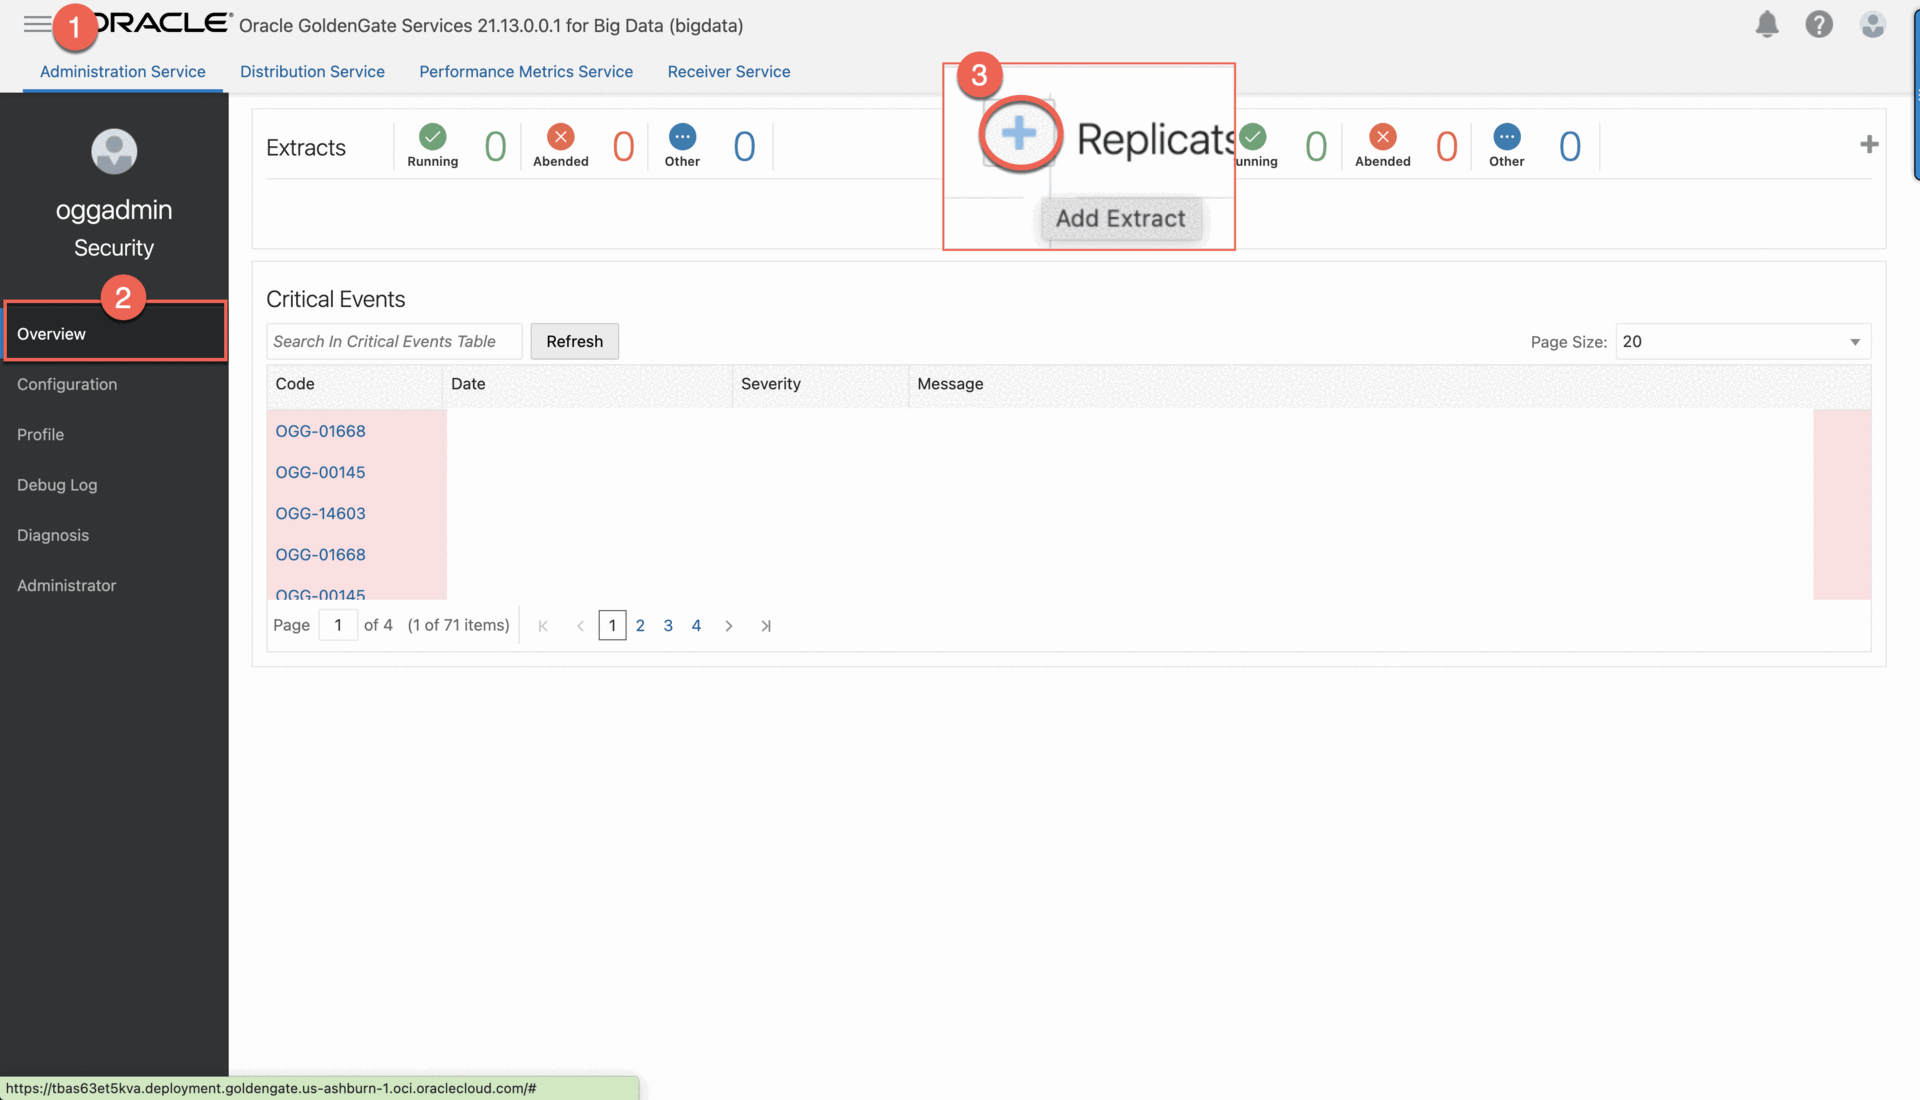
Step 2: Add the Extract for Kafka.
To add an Extract for Kafka in OCI GoldenGate for Big Data deployments version 21.9 or later:
1. In the navigation menu, click Overview to return to the Administration Service Overview page.
2. Click Add Extract (plus icon).
3. On the Add Extract page, select the following, and then click Next:
• Source: Kafka
• Extract type: Change Data Capture Extract.
4. On the Extract Options page, complete the fields as follows, and then click Next:
• For Process Name, enter a name, up to 8 characters.
• For Connection Alias, select the previously assigned connection alias.
• For Begin, select Now.
• For Trail Name, enter a 2-character name.
• Enable Kafka Connect , choose JSON as converter, and then click Next:
5. On the Parameter file page, update the following:
a. Update SOURCEDB USERIDALIAS to SOURCEDB USERIDALIAS kafka DOMAIN OracleGoldenGate
b. Leave the table mapping as is (TABLE source.*;), to listen to all topics in the given bootstrap server. To capture from a designated topic, change the mapping to TABLE source. ; where is the name of the topic to capture from.
6. Click Create and Run. You return to the Administration Service Overview page where you can observe the Extract status. You can then select the Extract to view its details, statistics, and reports.
Step 3: Add and run the Distribution Path
3.1. Create a user for the Distribution Path in the target Oracle GoldenGate deployment.
a. On the Deployments page, select the target Oracle GoldenGate deployment to view its details.
b. On the deployment details page, click Launch Console.
c. Sign in to the target Oracle deployment console using the Administrator username and password.
d. In the Oracle deployment console, open the navigation menu, and then click Administrator.
e. On the Users page, click Add New User (plus icon).
f. Complete the fields as follows, and then click Submit.
i. For Username, enter a name, such as ggsnet.
ii. From the Role dropdown, select Operator.
iii. Enter a password twice for verification.
The new user appears in the Users list.
3.2. In the source Big Data GoldenGate deployment console, add a credential for the user created in Step 3.1.
a. In the source Big Data GoldenGate deployment console, click Administration Service, open the navigation menu, and then select Configuration.
b. On the Credentials page, click Add Credential, and then complete the fields as follows:
i. For Credential Domain, enter GGSNetwork.
ii. For Credential Alias, enter dpuser.
iii. For User ID, enter the name of the user created in Step 3.1 (ggsnet).
iv. Enter the user’s password twice for verification.
c. Click Submit.
The credential appears in the Credentials list.
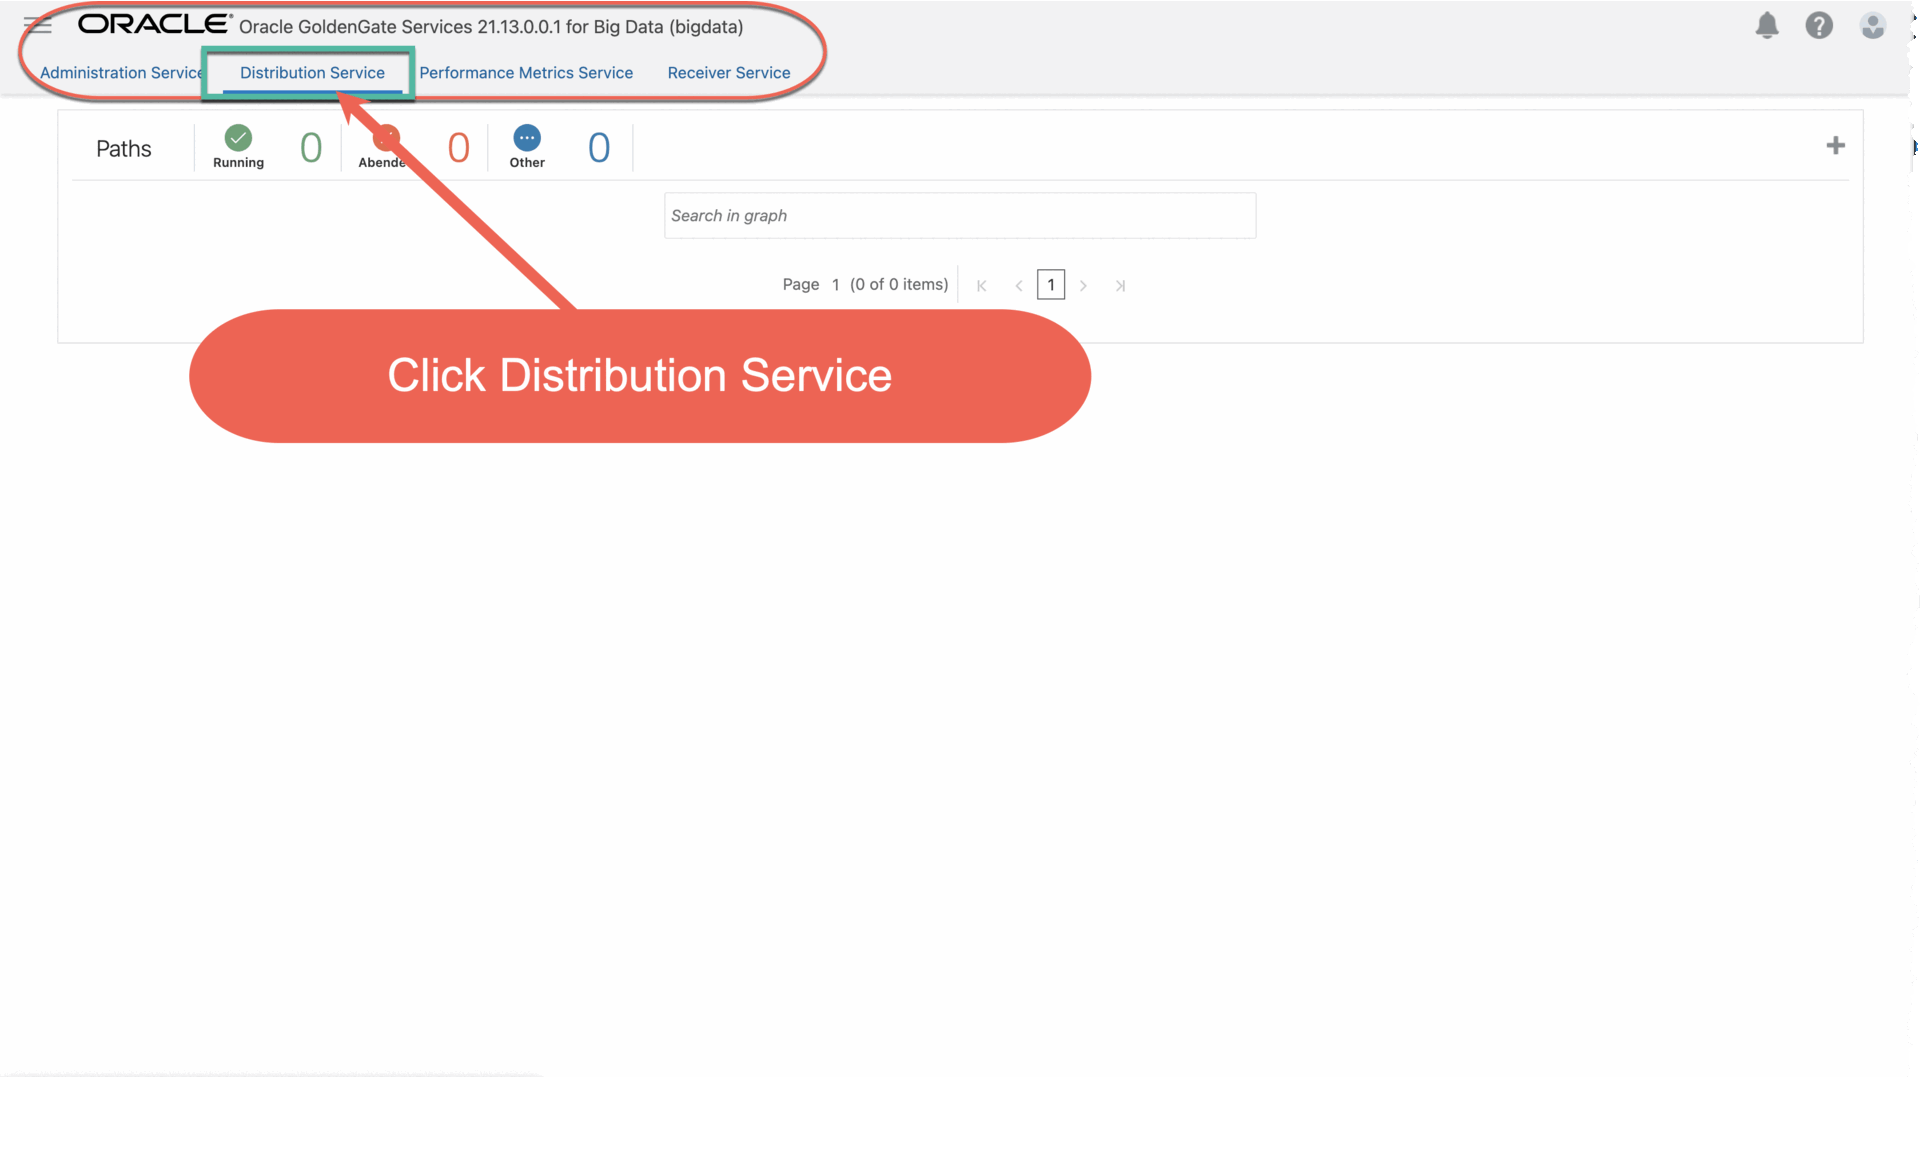
3.3. Click Distribution Service, and then click Add Path (plus icon).
3.4. Complete the Add Path form fields as follows, and then click Create and Run:
a. For Path Name, enter a name conf2ATP.
b. For Source Extract, select the Extract created in Step 2.
c. For Source Trail Name, select the Extract Trail from Step 2.
d. For Target Authentication Method, select UserID Alias.
e. For Target protocol, select wss.
f. For Target Host, enter the host domain of the target deployment. Note: You can copy and paste the URL of the target Oracle deployment console and remove the https:// and any trailing slashes.
g. For Port Number, enter 443.
h. For Trail Name, enter a two-character name, such as “ ec”.
i. For Domain, enter the name of the Credential Domain created in Step 3.2 ( GGSNetwork).
j. For Alias, enter the Credential Alias created in Step 3.2 ( dpuser).
You return to the Distribution Service Overview page where you can view the status of the created path.
3.5. In the target Oracle deployment console, review the Receiver Path.
a. In the target Oracle deployment console, click Receiver Service.
b. Review the path details. This path was created as a result of the Distribution Path created in the previous step.
Step 4: Add and run the Replicat
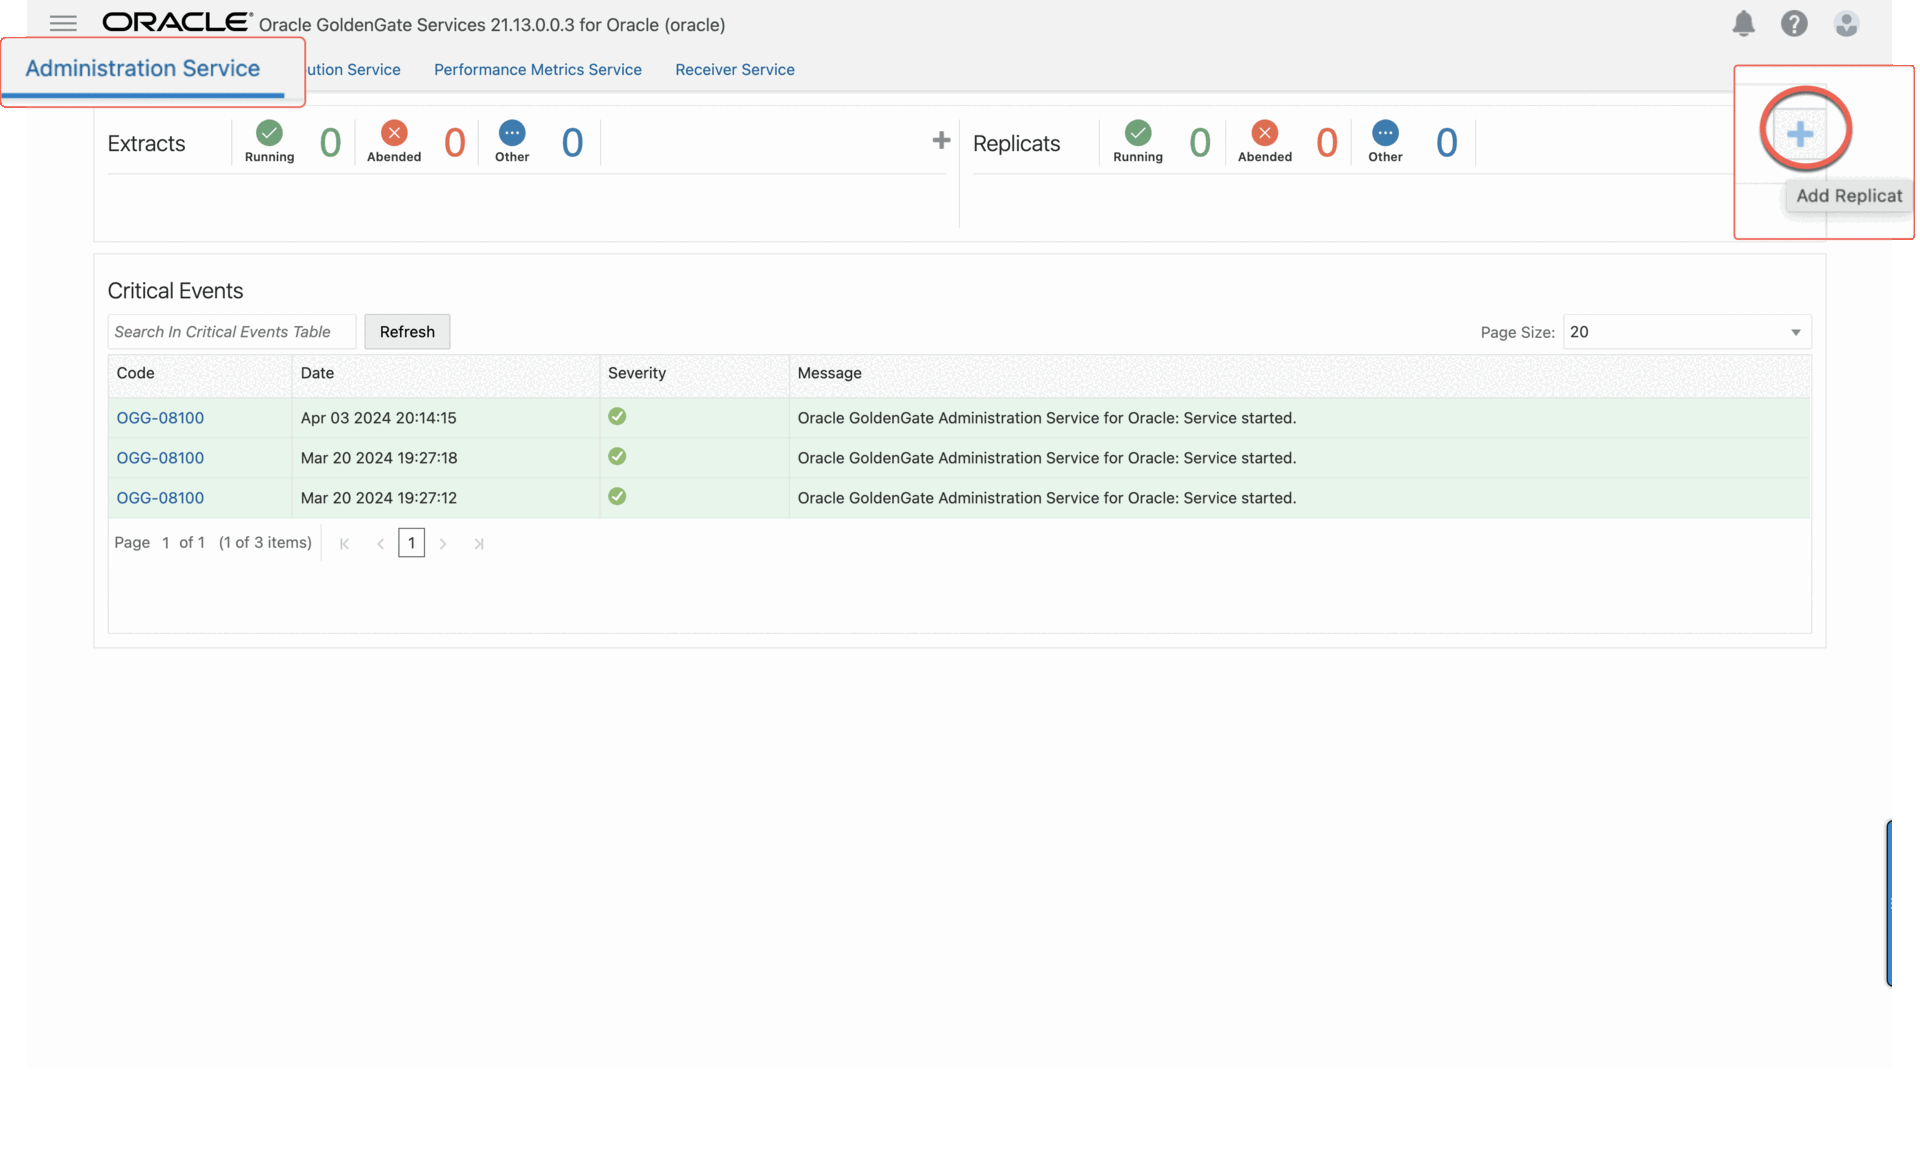
1. In the target Oracle GoldenGate deployment console, click Administrator Service, and then click Add Replicat (plus icon).
2. On the Add Replicat page, under Replicat type, select Parallel Replicat Non integrated, and then click Next.
3. On the Replicat Options page, complete the following form fields, and then click Next:
- For Process Name, enter the name R_ATP.
- For Credential Domain, Select OracleGoldenGate as Domain.
- For Credential Alias, select the TARGET_ATP_CONNECTION
- For Trail Name, enter the name of the Trail “ ec” from Step 2.
- For Checkpoint Table, Choose the checkpoint table from the top-down list and Click Next.
4. On the Replicat Parameters page, update the parameters as below. MAP source.*, TARGET ADMIN.*;
5. Click Create and Run. You return to the Overview page, where you can review the Replicat details.
Step 5: Verify the replication Produce some messages to the source Confluent Kafka Cloud to verify replication to target Autonomous Transaction Processing instance in tabular format.
In example, we are using Node.js application to produce messages to Confluent Kafka Cloud and the topic name as “REGIONS”.
I. Node.js sample application code.
a. Node.js Installation
b. Install the required libraries: npm install kafkajs
c. Create file name as “sample-node.js” and update the Confluent cloud borker details,access key, secret and a topic name.
const { Kafka } = require('kafkajs');
// Update the brokers,username and password details
const kafka = new Kafka({
   clientId: 'my-app',
   brokers: ['<ACCOUNT-ID>.<REGION>.<CLOUD_PROVIDER>.confluent.cloud:9092'],
   ssl: true, // Enable SSL
   sasl: {
      mechanism: 'plain',
      username: '<API-KEY>',
      password: '<API-KEY-SECRET>',
   },
});
const producer = kafka.producer();
const produceMessages = async (jsonArray) => {
await producer.connect();
for (const jsonData of jsonArray) {
// Format message with schema and key values
const message = {
schema: {
type: ‘struct’,
fields: [
{“type”:”string”,”optional”:true,”field”:”table_name”},
{“type”:”string”,”optional”:true,”field”:”op_type”},
{“type”:”string”,”optional”:true,”field”:”COUNTRY_CODE”},
{“type”:”string”,”optional”:true,”field”:”COUNTRY_NAME”}
]
},
payload: jsonData
};
// Convert message to byte format
const byteMessage = Buffer.from(JSON.stringify(message));
// Append the topic name to publish the messages.
await producer.send({
topic: ‘<TOPIC-NAME>’,
messages: [{ value: byteMessage }],
});
console.log(`Message sent with data: ${JSON.stringify(jsonData)}`);
}
await producer.disconnect();
};
// Sample array of JSON objects
const jsonArray = [
{“table_name”: “SOE.REGIONS”,”op_type”: “I”,”COUNTRY_CODE”: “1”,”COUNTRY_NAME”: “INDIA”},
{“table_name”: “SOE.REGIONS”,”op_type”: “I”,”COUNTRY_CODE”: “2”,”COUNTRY_NAME”: “USA”},
{“table_name”: “SOE.REGIONS”,”op_type”: “I”,”COUNTRY_CODE”: “3”,”COUNTRY_NAME”: “RSA”}
];
if (jsonArray.length === 3) {
produceMessages(jsonArray).catch(console.error);
} else {
console.error(‘The input array does not contain 3 JSON objects.’);
}
II. Execute the Node.js application and view the content at confluent cloud.


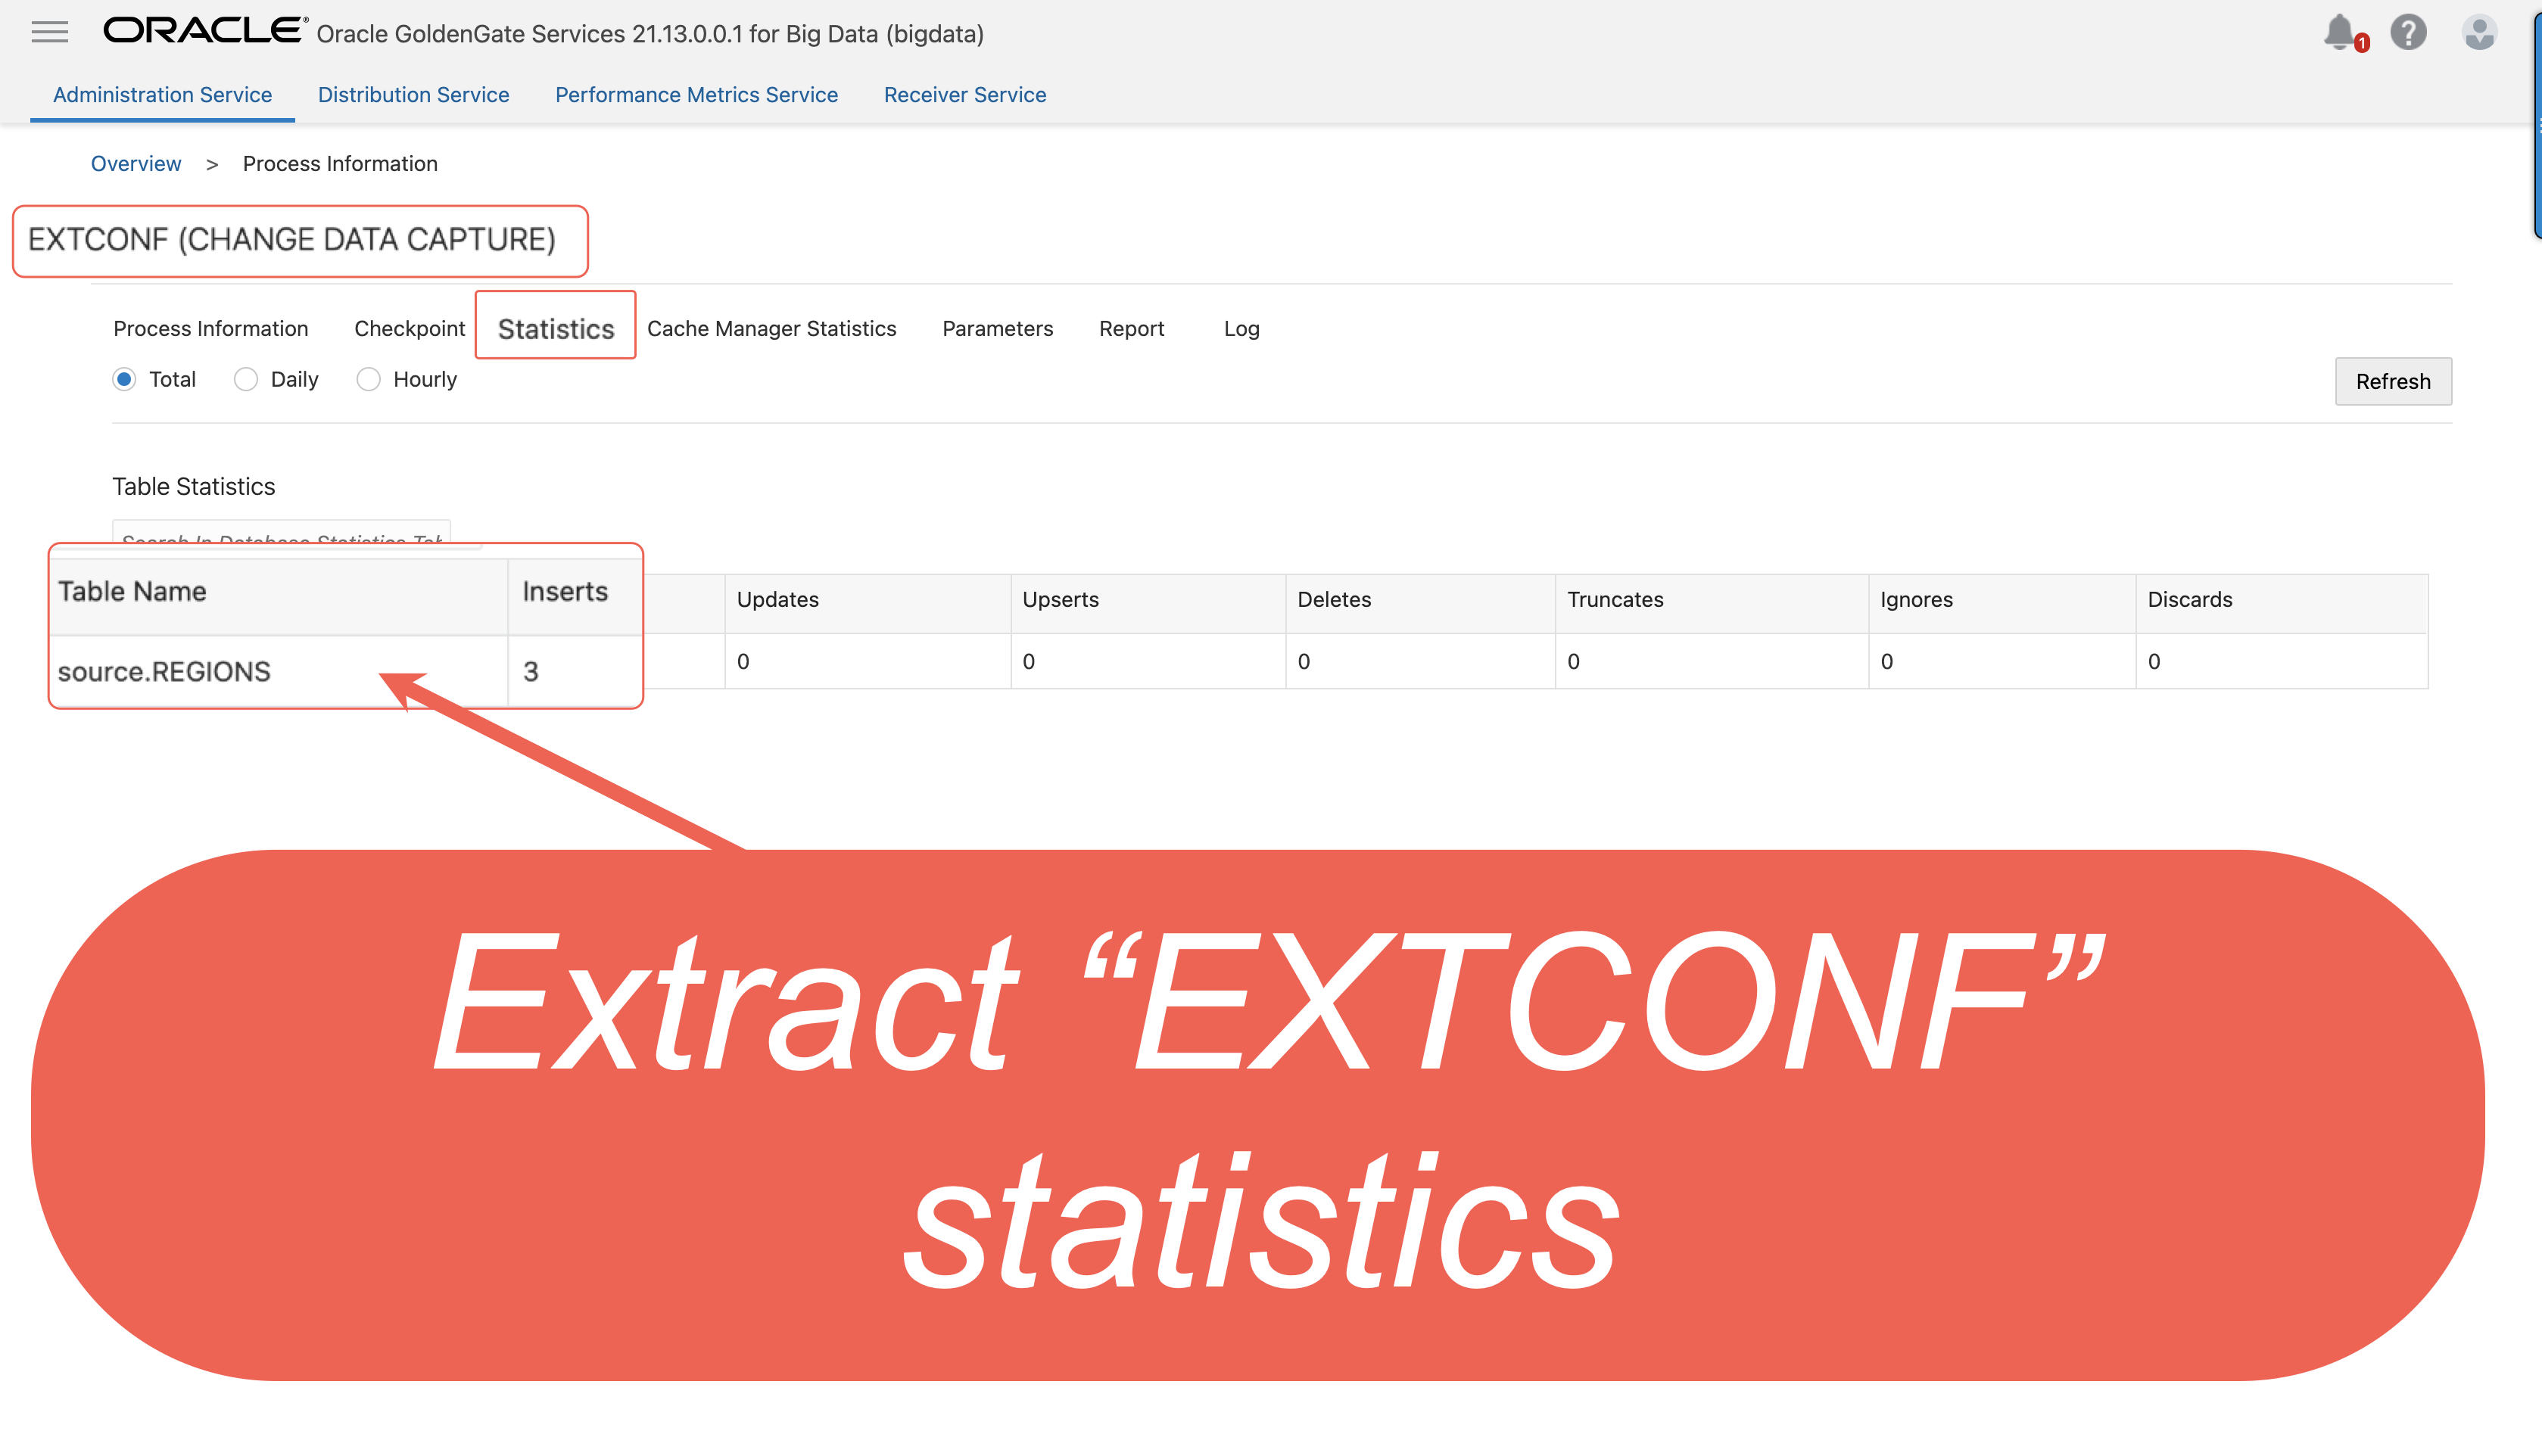
III. Node.js application publishes 3 messages to topic “ REGIONS”, the E xtract capture 3 messages and save them to trail file “ ec”. In the source Big Data deployment console, select the Extract name, and then click Statistics. Verify that source.REGIONS has 3 inserts
IV. The Distribution path ‘ conf2ATP’ broadcasts the three insert trail data to target OCI Oracle deployment.

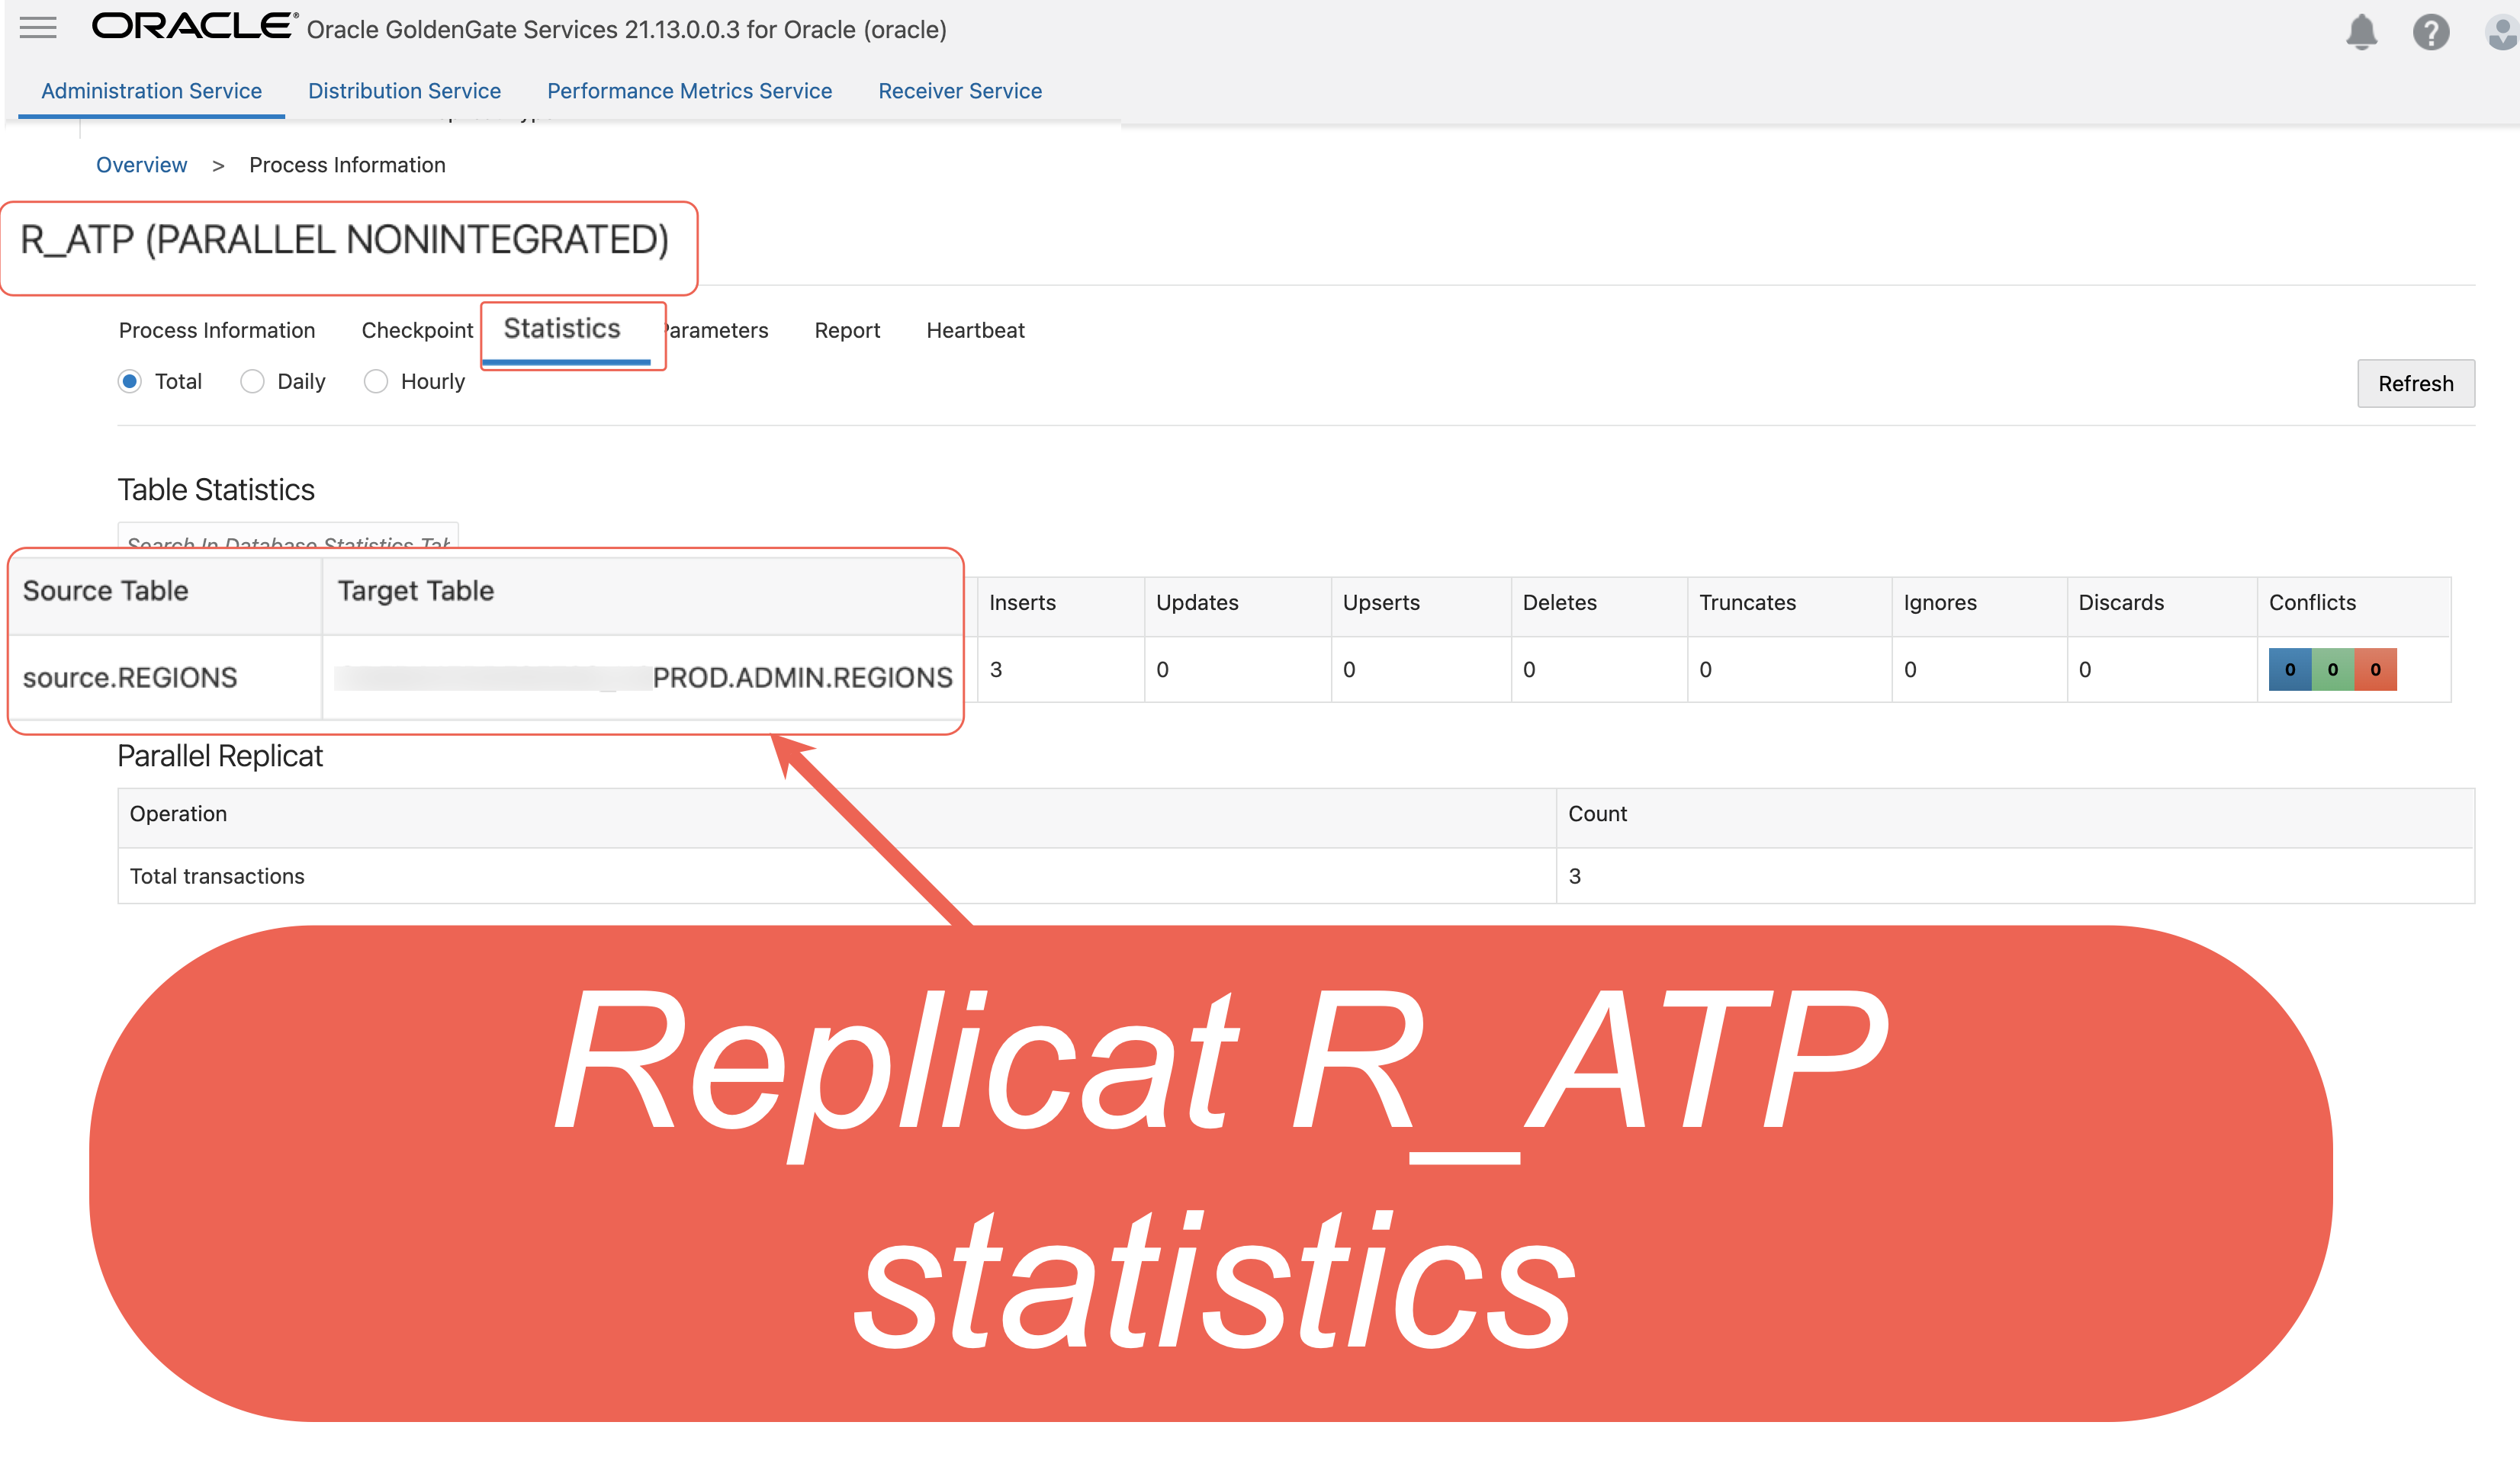
V. The Replicat process ‘ R_ATP’ read the trail data and replicates the data to target Autonomous Transaction Processing instance.
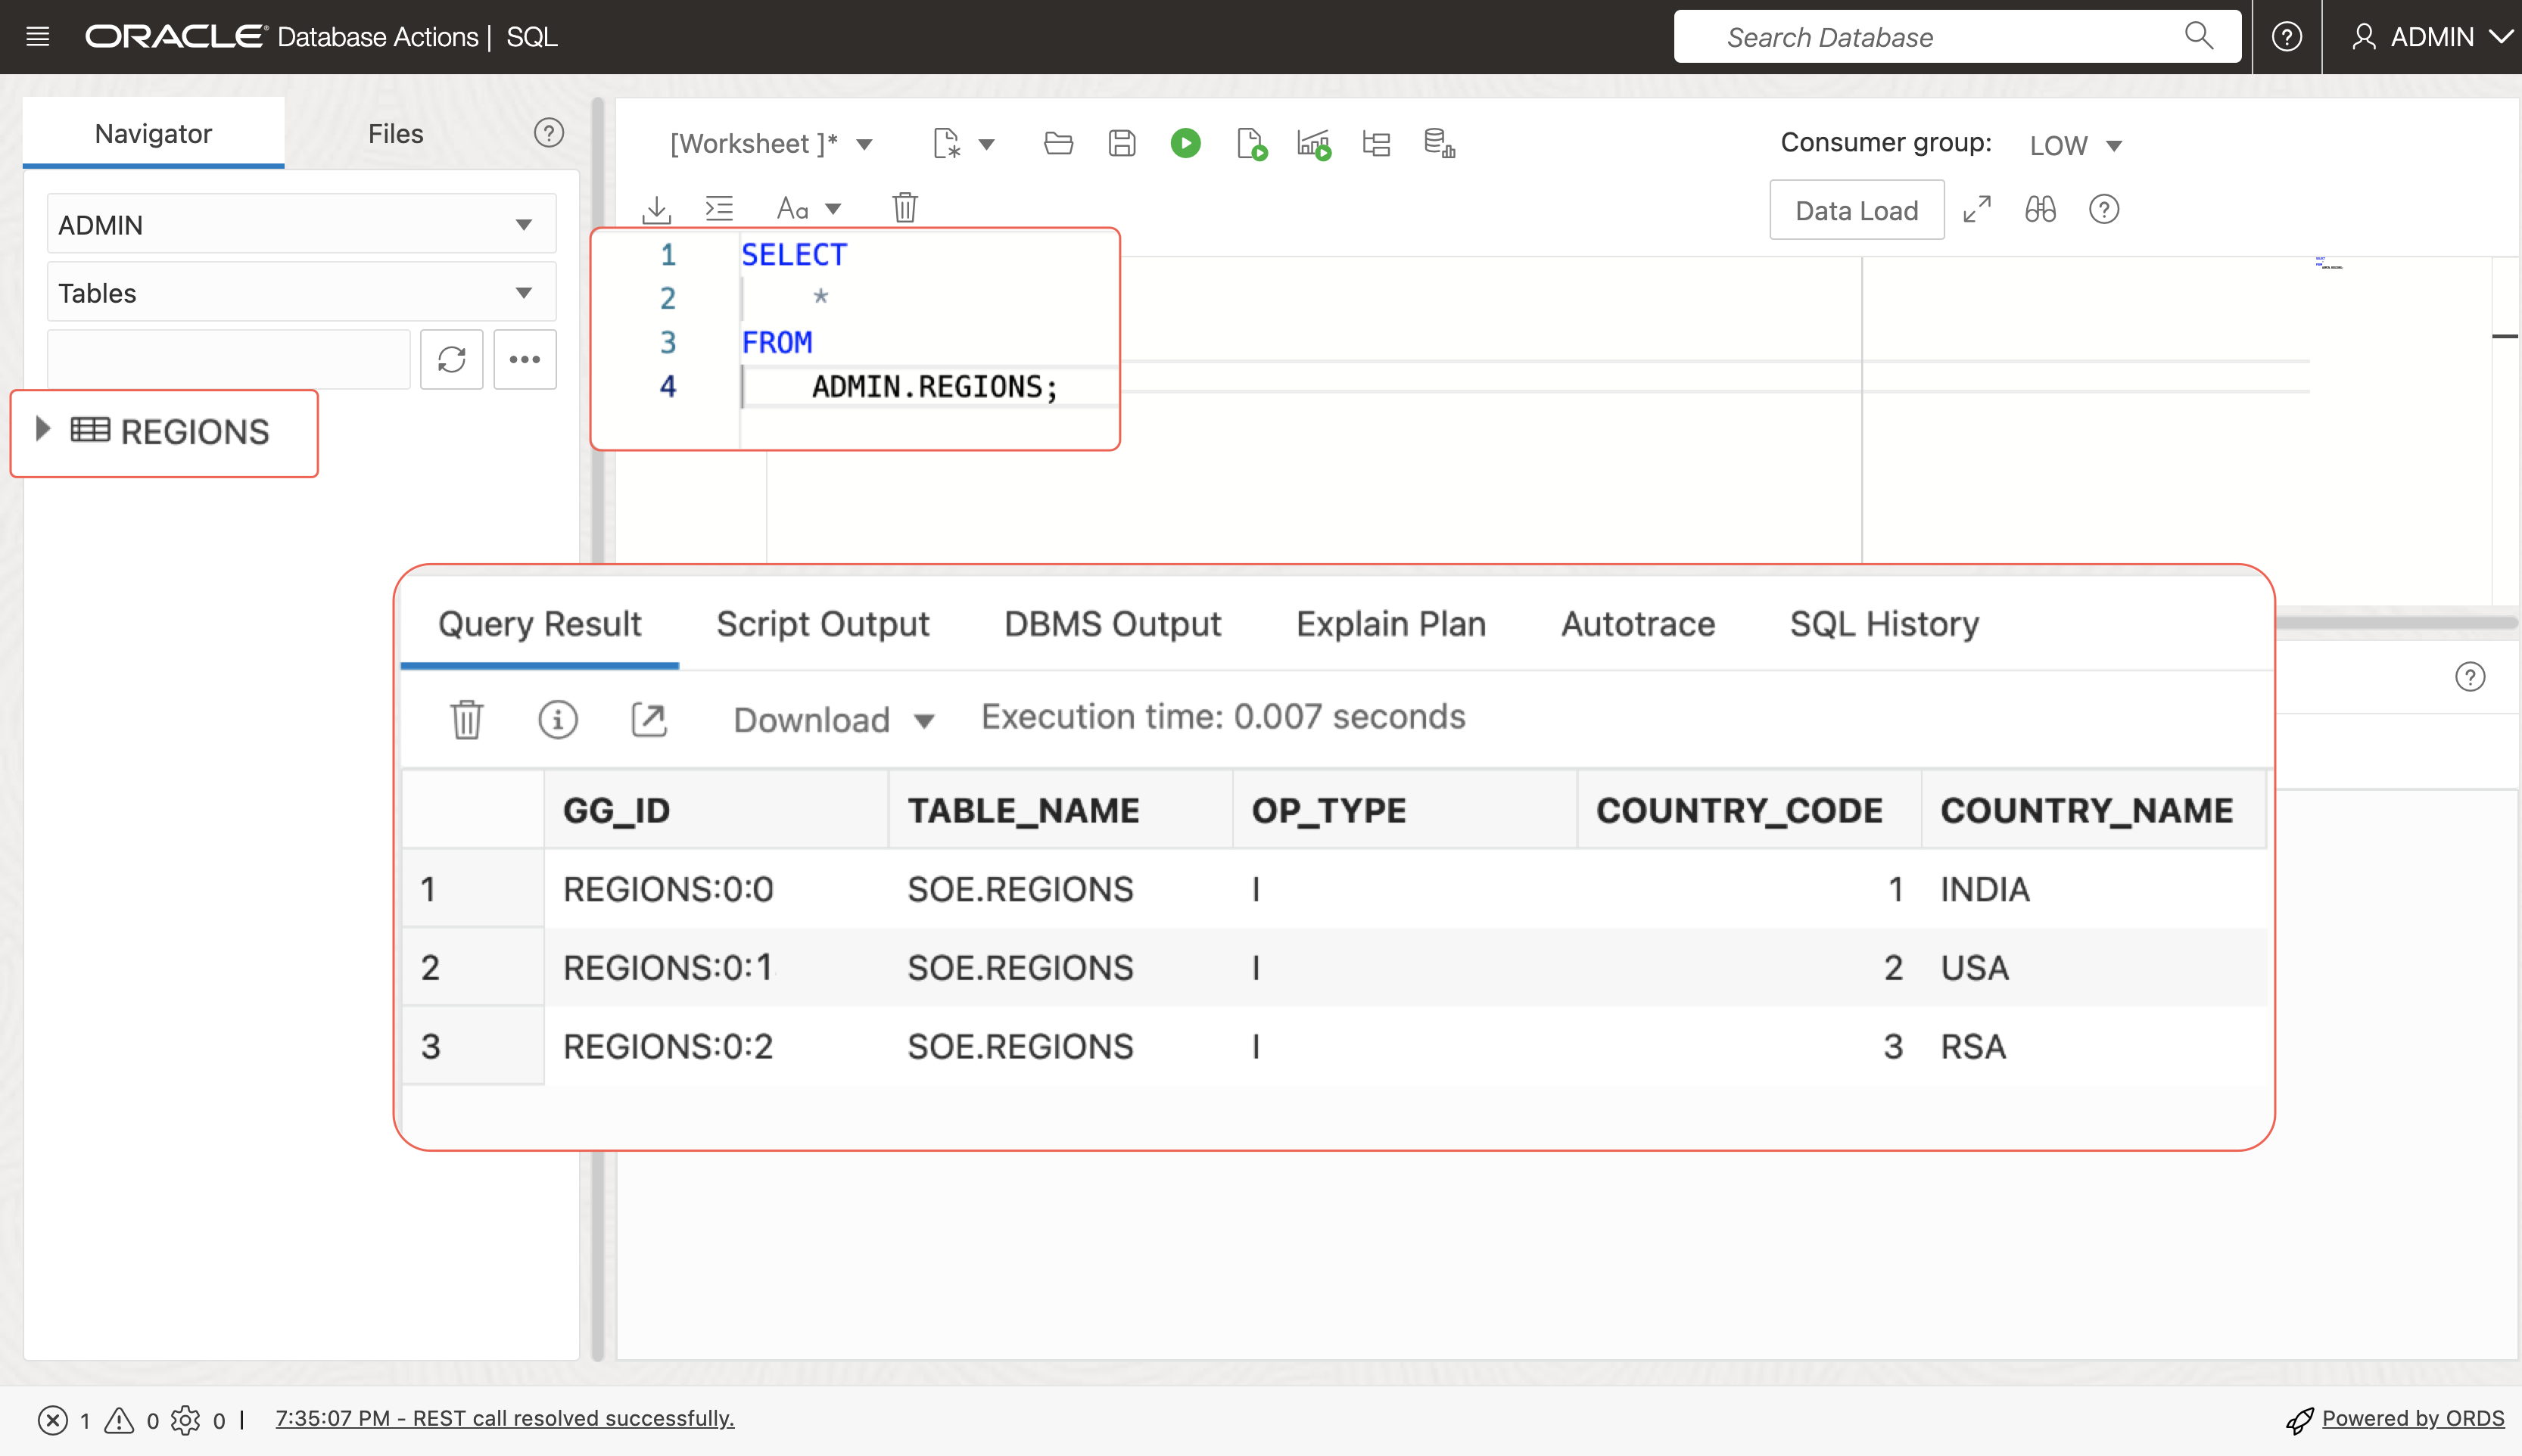
Step 6: (Optional) Verify the replication in the target Autonomous Transaction Processing instance
1. In the Oracle Cloud console, open the navigation menu, select Oracle Database, and then select Autonomous Transaction Processing.
2. In the list of Autonomous Transaction Processing instances, select your source instance to view its details.
3. On the database details page, click Database actions. Note: You should be automatically logged in. If not, log in with the database credentials.
4. On the Database Actions home page, select SQL.
5. Enter the following into the worksheet and click Run.
6. In the target Oracle deployment console, select the Replicat name, and then click Statistics. Verify that ADMIN.REGIONS has 3 inserts.