*Originally published on 5/8/2024
Are you still using Oracle 11g? Looking to migrate off of 11g?
The end of extended support for 11g databases is right around the corner. Without support, your business operations are at risk. It’s a good idea to upgrade as soon as possible. This blog is a simple migration guide that makes use of a free OCI database migration service – OCI Database Migration.
OCI Database Migration supports both offline and online migrations
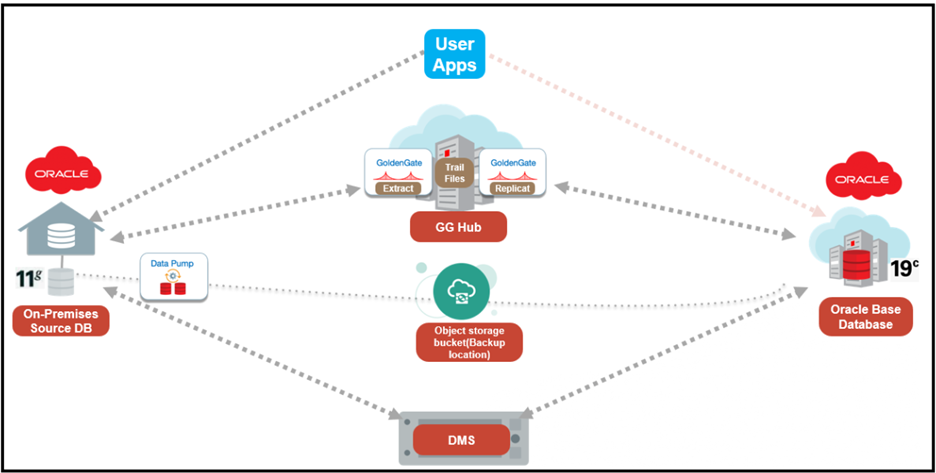
This article will walk you through all the steps to get started using OCI Database Migration Service (DMS) to migrate your data from 11g database version to OCI base database service (Oracle 19c) in online mode. This allows applications to stay online during the migration and then be switched over from source to target database.
You will provision a Virtual Cloud Network (VCN), an Oracle Database 19c instance, and a Goldengate Marketplace instance to perform an online database migration using DMS.
Solution Overview
Infrastructure Setup
About Oracle Database Offerings (Oracle Base Database service)
Oracle Base Database Service allows organizations to create and manage full-featured Oracle Database instances in Oracle Cloud Infrastructure (OCI). IT teams provision databases on virtual machines with block storage volumes providing cost-efficient cloud database services with a choice of Oracle Database editions, including Standard and Enterprise.
Database configuration settings that influence the migration method
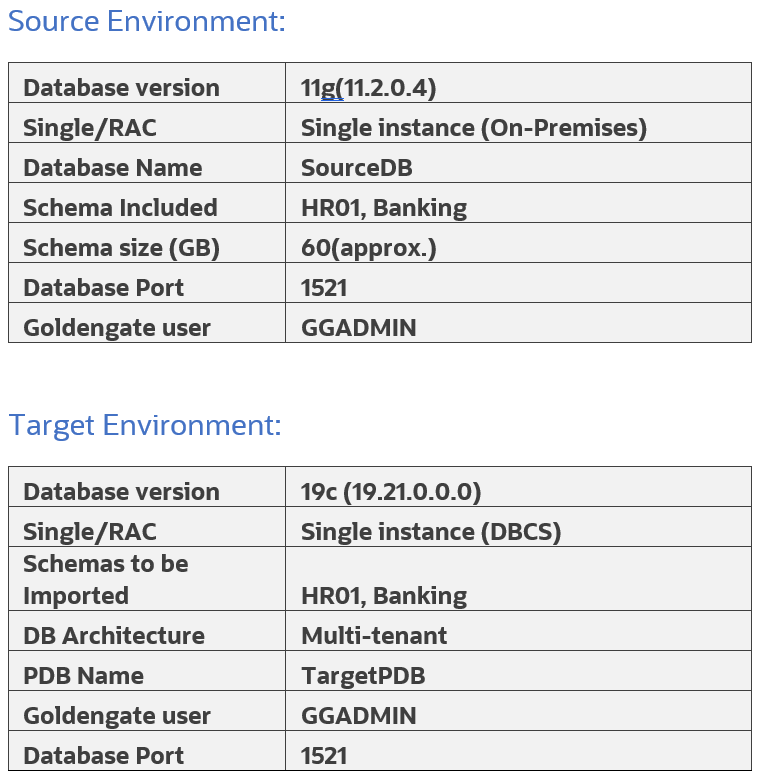
There are several technology factors to consider when choosing a migration method including your on-premise database version, the target database service database version, your on-premise host operating system and version, and database character sets. Gather the information below:
- Database version of your source on-premises database
- Database version of your target DBCS (whether it is a multitenant container database (CDB) or Non-CDB)
- Endian format (byte ordering) of your on-premises database’s host platform
- Database character set of both your source and target databases.
- Right sizing before cloud migration
Connectivity
You will need to connect your on-premise database to your Oracle Cloud Infrastructure tenancy in order to complete your data migration. Your connectivity options are listed below in order of preference.
- FastConnect provides a secure connection between your existing network and your virtual cloud network (VCN) over a private physical network instead of the internet.
- Site-to-Site VPN provides a secure connection between a dynamic routing gateway (DRG) and customer-premise equipment (CPE), consisting of multiple IPSec tunnels.
- Internet Gateway provides a path for network traffic between your VCN and the internet.
At this point, we assume you have completed the following prerequisites:
- Permissions need to be set to have access to the OCI Tenancy in a region.
- Access to OCI DMS and can login to the console.
- A suitable VCN is created with an updated security list (Destination Port Range: 1521,22,443)
- Creating an OCI Vault
- Creating an Object Storage Bucket
- SSH key pair for logging into your Target database and GoldenGate environments (The key needs to be in RSA key in PEM format, other formats like OpenSSL are currently not supported.)
- User should have control access to use OCI DMS. An administrator can review Pre-built policy templates, to authorize the user based on the level of access. If they are granted the highest, then they will have all the related resources for their migration.
You can take a look at the following tutorial for reference: OCI Database Migration Service End-To-End Online Migration Tutorial
Required patches for source 11g Database:
- Must apply Latest PSU patches.
- Apply Patch 20448066: DBMS_XSTREAM_GG APIS SHOULD BE ALLOWED FOR SCA PROCESSES
- Apply Patch 17030189: LOGMINER GG DICTIONARY SUPPORT: MISSING ATTRIBUTES
Known Issue:
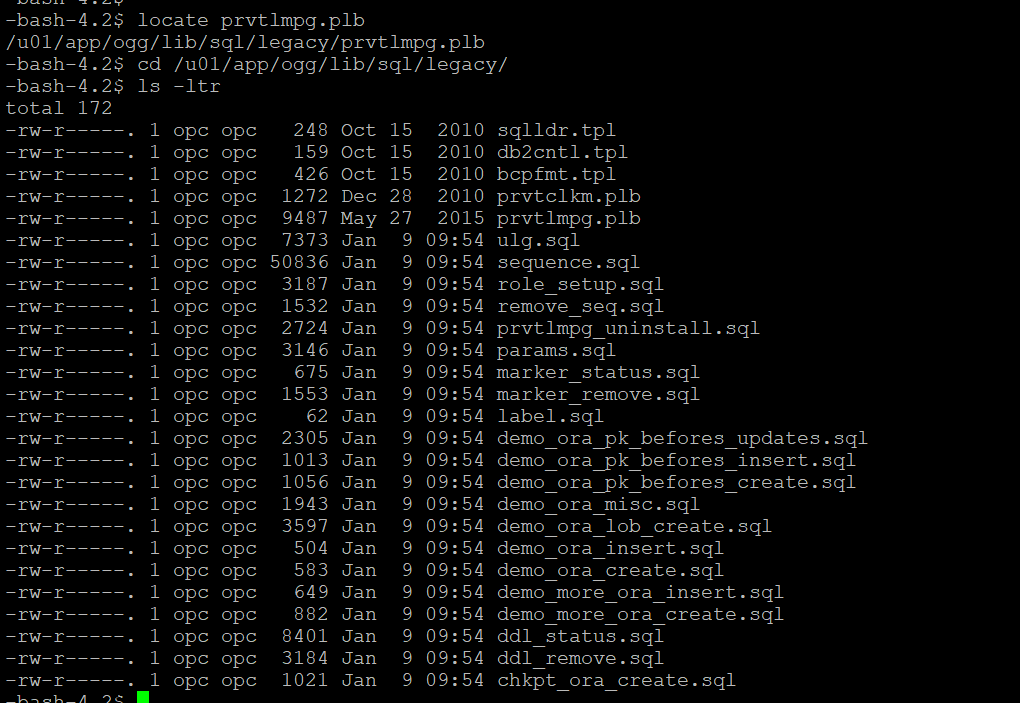
OGG-02912: Patch 17030189 is required on your Oracle mining database for trail format RELEASE 12.2 or later. (Doc ID 2304095.1)
In case that after applying the patch 17030189, the error OGG-02912 is still visible then run script “prvtlmpg.plb” in the database. As mentioned in the Doc ID 2304095.1 it can be found if you have any existing Goldengate home directory but since we are using a marketplace instance you can find it in the following path:
NLS_CHARACTERSET
Both source and target databases should have the same NLS character
You can check by running below query:
SQL> SELECT value FROM NLS_DATABASE_PARAMETERS WHERE parameter='NLS_CHARACTERSET';
Database preparation utility
Prepare your databases using either of the following methods:
- Prepare your database by running scripts generated by the database preparation utility (Recommended option).
- Manually configure your databases by following the documentation and running the SQL commands
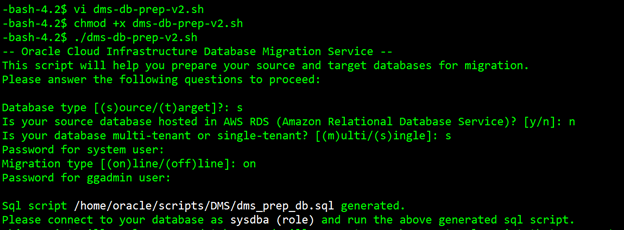
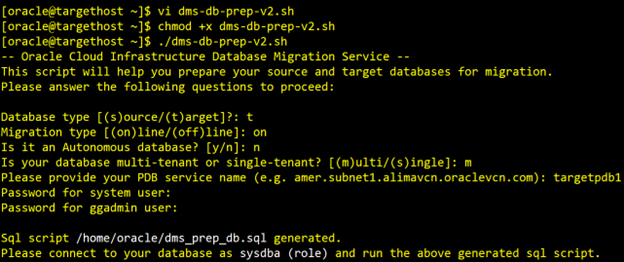
For this guide, we use the Database preparation utility. It accepts the inputs that are specific to your migration and generates a SQL script that you can run for your source and target databases. After analyzing your databases for any missing required configurations or privileges it generates a final script that performs the required operations on your databases to prepare them for the migration. The below image displays how to run this script:
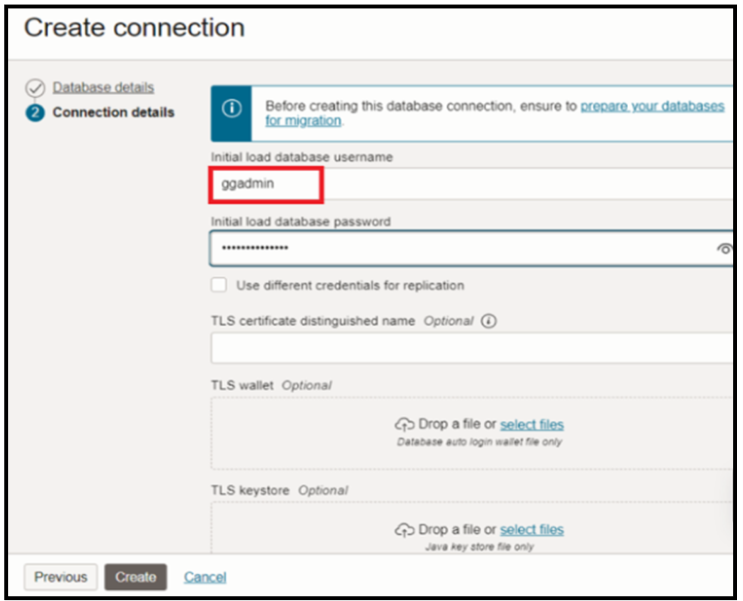
Note: When setting up your migration through the OCI Console:
- Use system user as the Initial Load Database Username when creating a database connection for source database through the Database Migration
- Use ggadmin user as the GoldenGate Database User for source database when creating the migration definition through the Database Migration
dms_prep_db.sql is the script generated by preparation utility. Please review this script, modify as appropriate and run it in your database.
Your source database will be ready for migration after the execution of these operations.
SQL> @dms_prep_db.sql
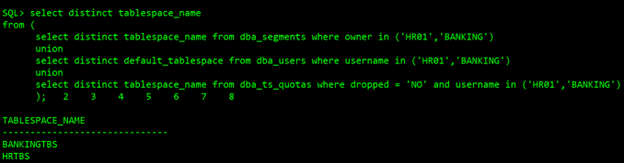
Tablespace list that must exist in the target
Below is the script to list all the tablespaces that must exist in the target database. Add all schemas to the in-list:
select distinct tablespace_name
from (
      select distinct tablespace_name from dba_segments where owner in ('HR01','BANKING')
      union
      select distinct default_tablespace from dba_users where username in ('HR01','BANKING')
      union
      select distinct tablespace_name from dba_ts_quotas where dropped = 'NO' and username in ('HR01','BANKING')
      );
Oracle Database Vault must be disabled before the migration
You can re-enable Oracle Database Vault after you complete the migration tasks.
SQL> SELECT * FROM V$OPTION WHERE PARAMETER = 'Oracle Database Vault’; (Value-> should show False)
Reference
- Disabling and Enabling Oracle Database Vault
- How To Uninstall or Reinstall Database Vault in 11g (Doc ID 803948.1)
Create Data Pump directory
Create a directory that can be used by Data Pump for exported files:
sudo su – oracle
mkdir -p /u01/app/oracle/dumpdir
SQL> Create or Replace directory dumpdir AS '/u01/app/oracle/dumpdir';
SQL> grant read,write on directory dumpdir to system;
Managing Connections
After source database preparation is finished, next, we must Create Connections:
For secure connections, you can use any encryption method like SSL or SSH. Both these technologies help to encrypt and authenticate the data. SSL uses port 443 to create encrypted connections.
In order to safely access HTTP URIs and Object Stores, a wallet is required with appropriate certificates for the object stores. All Object Storage access is done through https and requires the database to have the certifications of all trusted locations. You need to create a security wallet containing the certificates.
To achieve HTTPS connectivity, you must use SSL (Recommended) and perform the following steps in the source 11g database host. ( Refer How to setup ACL Doc ID 2357072.1)
- Create SSL Wallet with Certificates
- Set up Network ACL
Note:
- The wallet has to be created with auto-login capabilities.
- On RAC installations, the wallet must either be accessible for all nodes centrally or you have to create the wallet on all nodes for local wallet storage.
You can either download a pre-created wallet or manually create a wallet. Please refer SSL and Network ACL.
For this guide, we have used manual creation of Wallet:
Download the necessary certificates.
- Extract the files: $tar xvf dbc_certs.tar
- Create the wallet directory by running the following command:
- mkdir -p /u01/app/oracle/dumpdir/wallet
- mkdir -p /u01/app/oracle/dumpdir/cert
- Extracted the files: $tar xvf dbc_certs.tar in dir “/u01/app/oracle/dumpdir/cert”
Create an auto-login wallet by running the following command:
orapki wallet create -wallet /u01/app/oracle/dumpdir/wallet -pwd WalletPasswd123 -auto_login
Import SSL certificates to a new auto-login wallet created under this new directory:
-bash-4.2$ for i in s /u01/app/oracle/dumpdir/cert/*.cer
> do
> orapki wallet add -wallet . -trusted_cert -cert $i -pwd WalletPasswd123
> done
For 11g source databases, user can setup ACL by following steps:
SQL> exec dbms_network_acl_admin.create_acl(acl => 'www.xml',description => 'WWW ACL', principal => 'SYSTEM',is_grant => true,privilege => 'connect');
SQL> exec dbms_network_acl_admin.assign_acl(acl => 'www.xml',host => '*',lower_port => 443, upper_port =>443);
SQL> exec dbms_network_acl_admin.add_privilege(acl => 'www.xml',principal => 'SYSTEM',is_grant => true,privilege => 'connect');
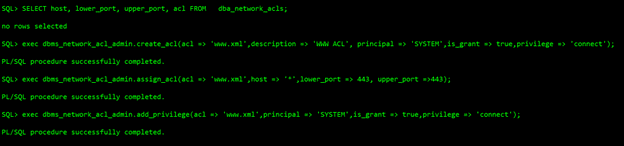
Once the connect privilege is granted, connect as the relevant user such as, SYSTEM, and verify if the privilege is granted using the following query:

The next step is to navigate to the OCI DMS page. Below you can see the OCI Database Migration overview page.
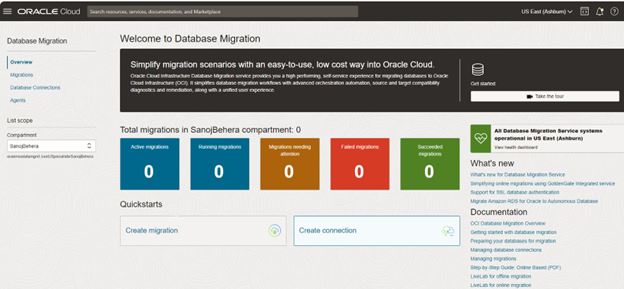
Navigate to Migration & Disaster Recovery –> Database Migrations –> Database Connections
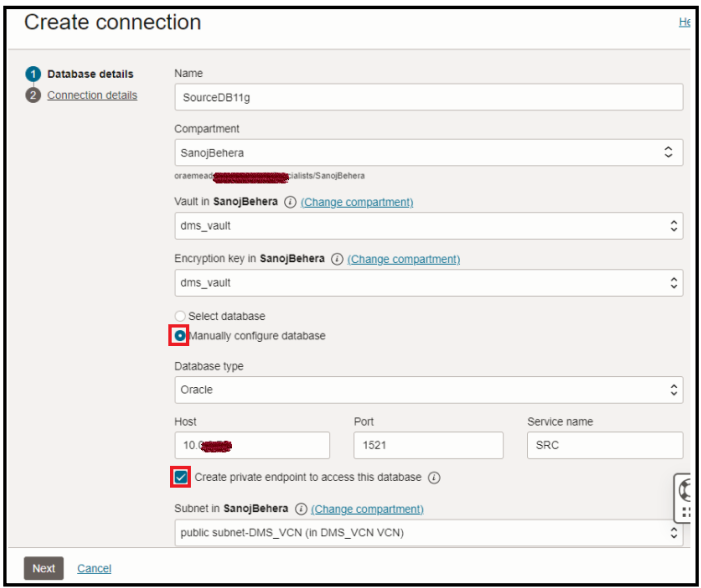
Creating a private endpoint to access this database indicates whether the database is publicly accessible or if you want to create a private endpoint.
Check this box if you plan to connect your database over a private IP address. Do not check it if the database has a public IP address.
Advanced option “Show optional SSH settings”, provide the SSH information for your database hosts if you wish to provide SSH access to the service to perform the migrations. But in our case we have used SSL To connect to source database , hence will not use SSH option here.
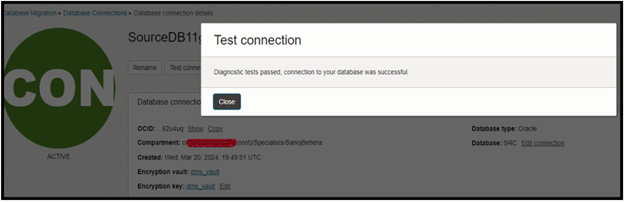
Click on Create. After Successfully created, Test your connections.
Target DB Preparation
Similarly, as for source, we need to run the DB preparation utility for target Database as follows:
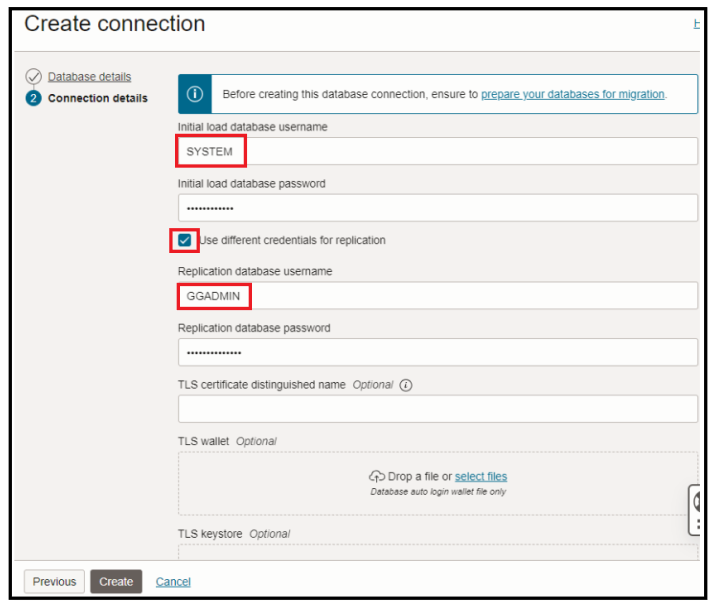
Note: When setting up your migration through the OCI Console:
- Use the Pluggable Database (PDB) connect string when creating a database connection for the target database through the Database Migration Service
- Use system user as the Initial Load Database Username when creating a database connection for the target database through the Database Migration Service
- Use ggadmin user as the Replication Database Username for the target database when creating the migration through the Database Migration Service
dms_prep_db.sql script will be generated. Please review this script, modify it as appropriate, and run it in your database. Your target database will be ready for migration after the execution of these operations.
Directory Creation & permission to access it to GGADMIN user (Make Sure it’s created in PDB)
Create a new directory in the user volume, this directory will be used to temporary storage of database export files:
sudo su - oracle
mkdir -p /u01/app/oracle/dumpdir
SQL> CREATE DIRECTORY dumpdir AS '/u01/app/oracle/dumpdir';
SQL> Grant read,write on directory dumpdir to ggadmin;
Create Target Database Connections
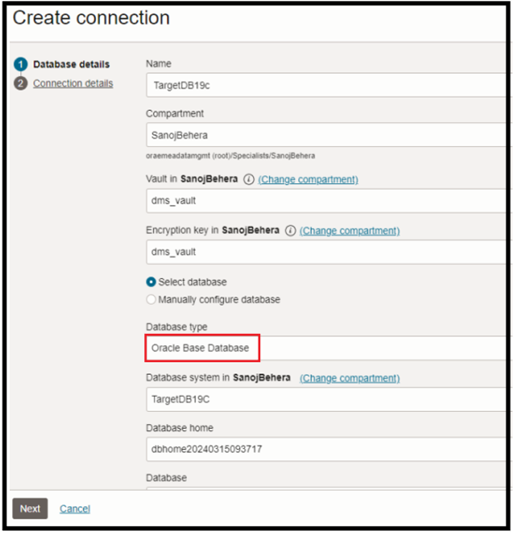

Make sure you have updated the right PDB service pointing to Targetpdb database .
The PDB service status can be verified from listener status.
Note:Use GGADMIN user for both Initial load and Replication.
Optionally if you prefer you can enter SSH credentials under “Show optional SSH settings”:
- SSH Database Server Hostname: < DB Node Private IP Address>
- SSH Private Key: Select private key file
- SSH Username: opc
- SSH Sudo Location: /usr/bin/sudo
Here we have used SSH for Target.
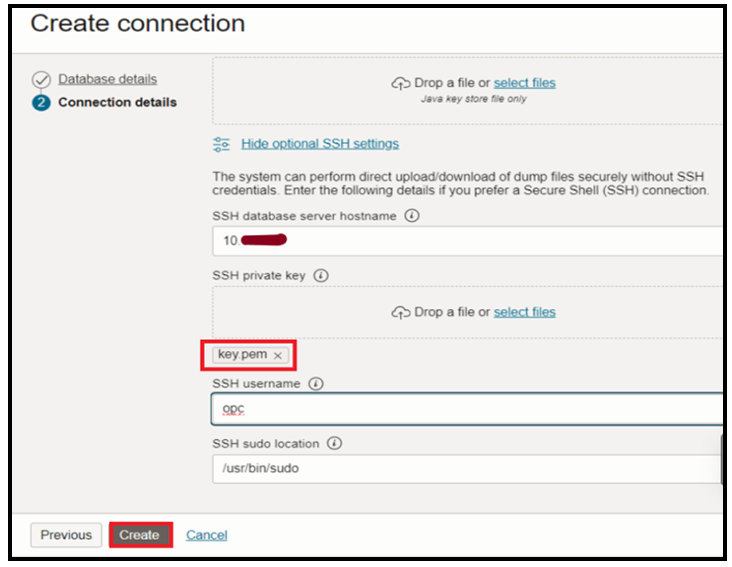
Click on Create.
Once the Connections have been created, you can Test the connections.

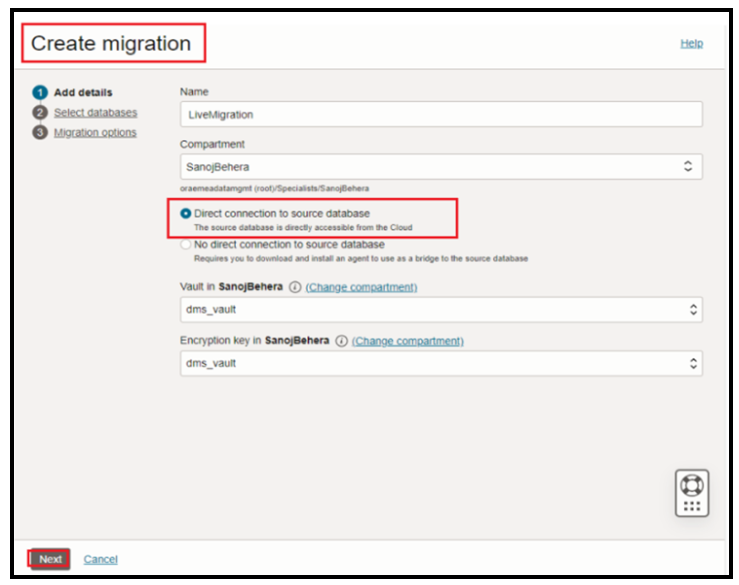
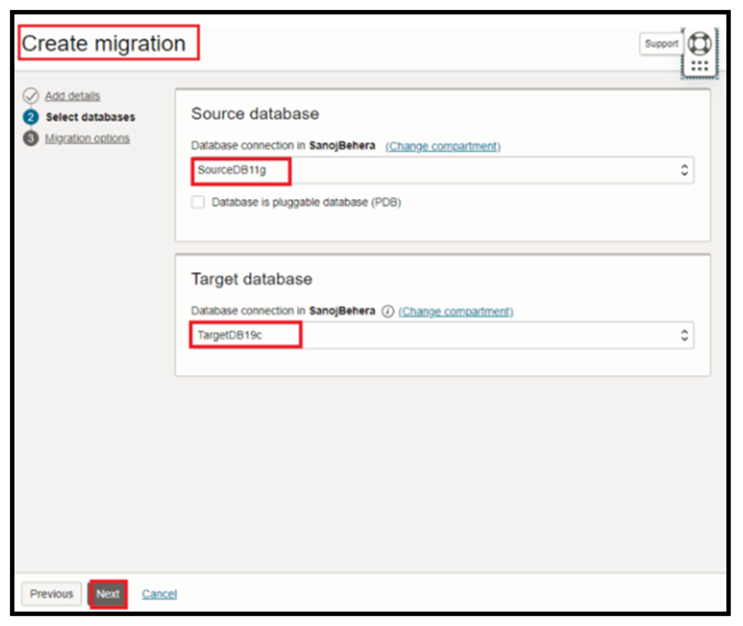
Create Migration
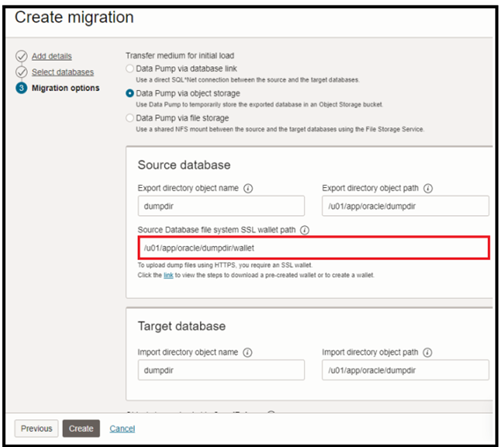
Now navigate to the database migration page, select create migration:
Since our source database is single instance 11g database, we will not select the pluggable database option here.
Now select data pump via object storage & fill up the data pump directory, you also need to specify the source database SSL wallet path as below:
Select the use online replication check box since we want to perform logical online migration:
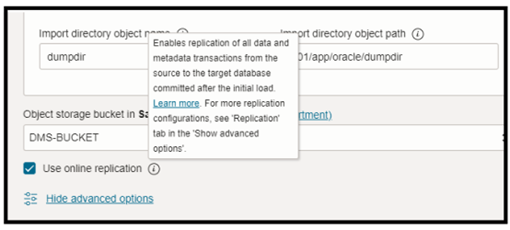
For Online Replication user has the flexibility to use Goldengate in two methods:
- The managed option(recommended) is simpler and faster (DMS integration with Goldengate)
- Manually deployed and managed a GoldenGate marketplace instance in their tenancy.
For reference, please follow Managing Migrations (oracle.com)
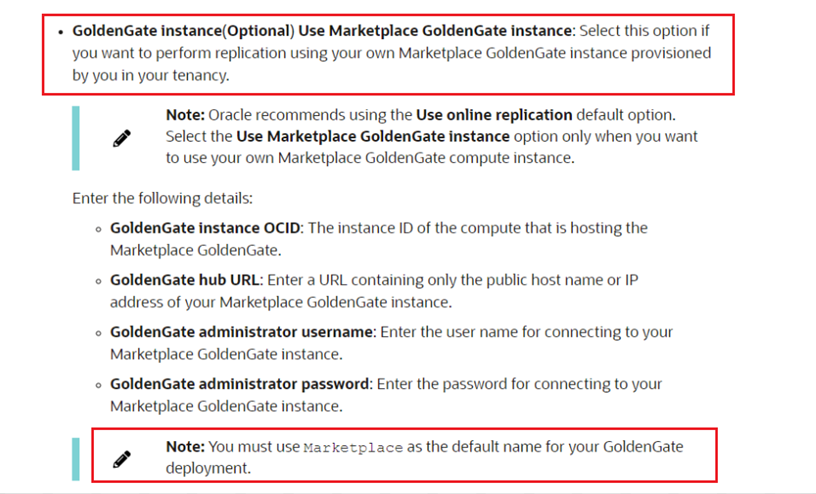
In our use case, we have provisioned a GoldenGate instance from OCI Marketplace to have full control of the instance processes ( extract & replicat), full logs ,shapes, etc).
Navigate to Marketplace / All applications and then select the Oracle GoldenGate – Database Migrations image and provision the instance.
Specify the details as follows:
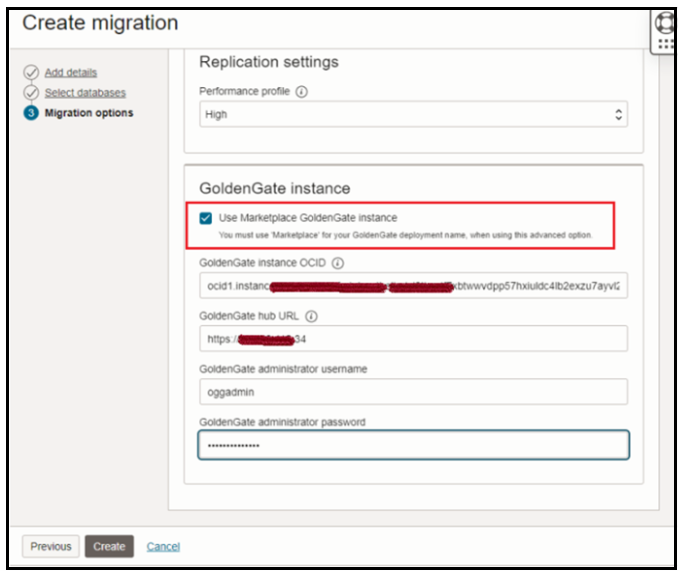
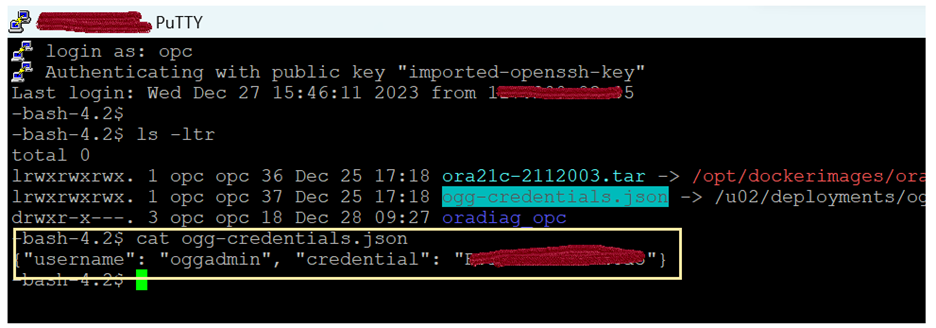
The GoldenGate Credentials can be retrieved from GoldenGateinstance, login to GoldenGate instance and run cat ogg-credentials.json:
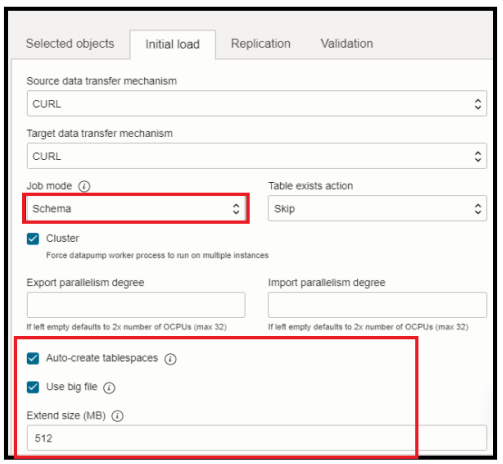
Migration Job Mode:
OCI DMS will migrate data depending on the Job Mode that you decide. There are two types:
- Full: performs a full database export.
- Schema (default): lets you specify a set of schemas to export.
In our case we have used schema based Migration. if you want to migrate all schemas you don’t need to specify the objects explicitly but rather use include or exclude. Refer Selecting Objects for Migration.
Also, you can see we have used Auto-create tablespaces option.
Database Migration automatically discovers the source database tablespaces associated with user schemas that are being migrated, and automatically creates them in the target database before the Data Pump import phase. Database Migration generates the DDL required to pre-create the tablespaces, creates the tablespaces on the target, and runs the generated DDL. For list of other parameters, you can refer Configuring Optional Initial Load Advanced Options.
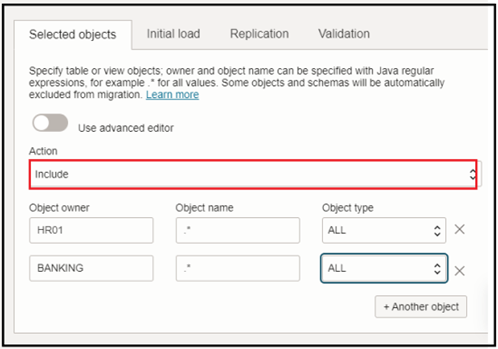
We have selected HR01 and Banking schema and included all the objects of these schemas for the migration.
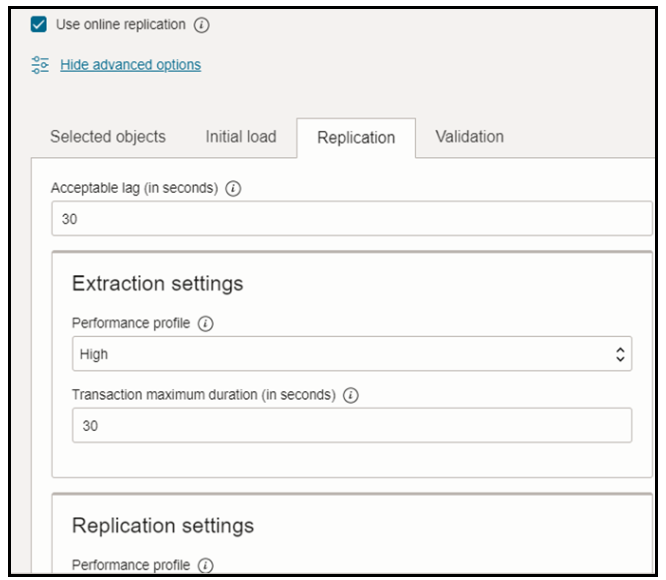
CPAT settings:
When you are creating a migration, you can configure CPAT settings in the Migration resource Advanced Settings, Validation tab:
- Run CPAT during validation: Enables CPAT to run during a migration validation job, in the Validate Pre-migration Advisor phase.
- Continue CPAT validation on error: By default, a validation job stops running when CPAT finds an issue. When checked, if CPAT finds an error, the CPAT validation will continue to its conclusion.
- This setting is useful if you want to proceed with a migration if error conditions have already been reviewed and the problematic objects have been excluded, because since CPAT does not review the exclusions list, it will still report any blocking issues on objects even if they are excluded.
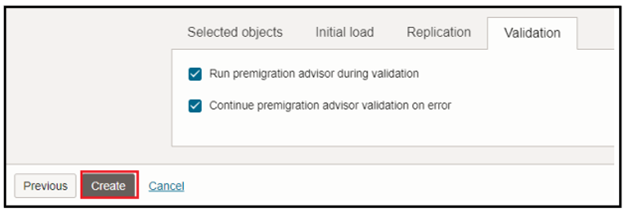
Click on Create.
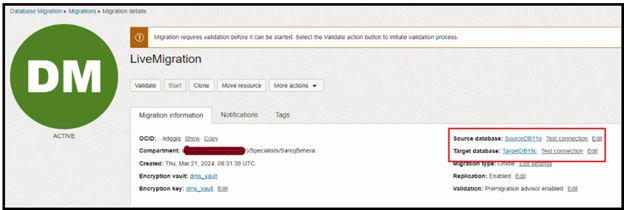
Once the Migration is created, make sure you test the source and target database connections.
Next, you are ready to start the validation
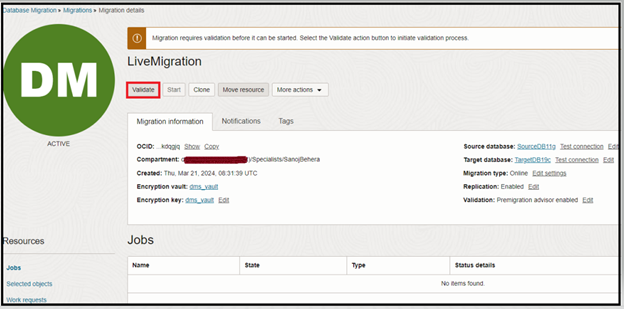
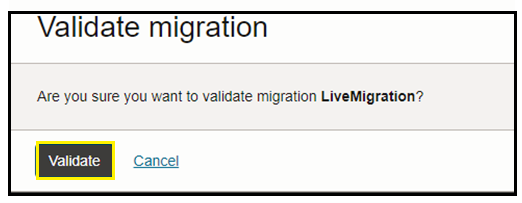
Click on Validate.
Optional Notes:
While running the validation job, you can see the premigration advisory phase, where a report is generated. You can download this report, then review & fix if any actions are needed.
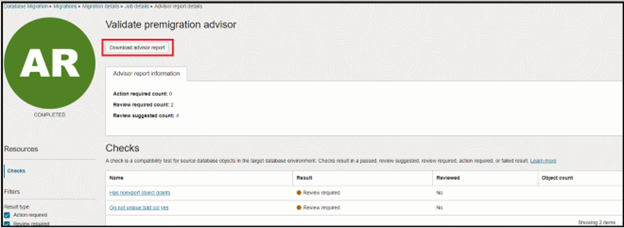
Once a check is validated, you can mark it as Reviewed.

The Validation job is now completed. You can download the Validation Job log to see more details.
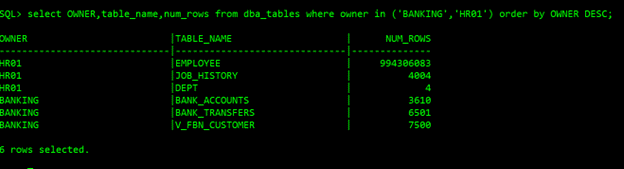
Before the Migration Job starts, verify the source Database objects count.
Source schema data:

The following query can be run to verify that the objects that need to be migrated are supported by GoldenGate:

Understanding the output of DBA_GOLDENGATE_SUPPORT_MODE is crucial in determining whether an object is supported by GoldenGate.
- If the output is FULL, the object is fully supported.
- If the output is ID KEY PLSQL, it’s possible that some columns are replicated only, or that Procedural Supplemental Logging needs to be configured on the source database.
- If the output is INTERNAL/NONE, It could be because the table is an internal table, or simply because it’s not supported.
For more details, refer to Details of Support for Oracle Data Types and Objects.
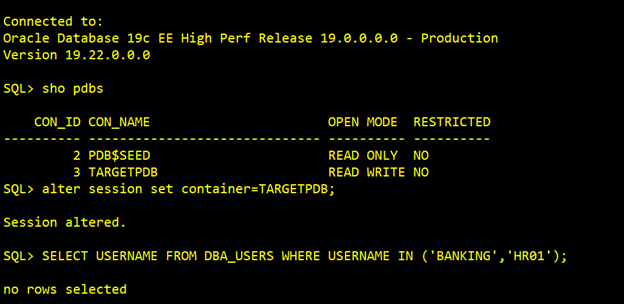
On the Target, we don’t have any schemas like HR01 & Banking Presently:
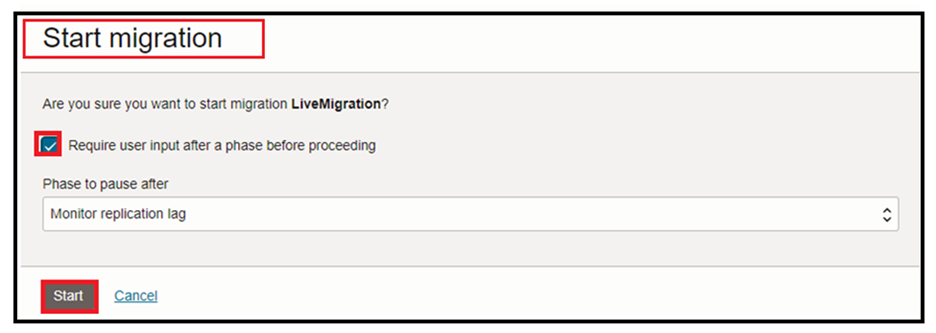
Start the Migration
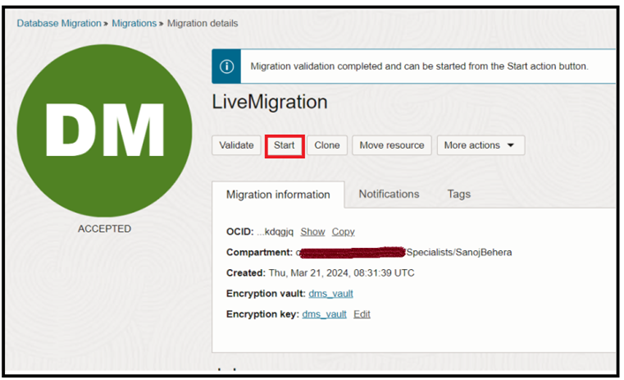
Press Start to begin the migration. The Start migration dialog is shown. Select the default phase: Monitor replication lag. This will cause the replication to run continuously until the Migration is resumed:
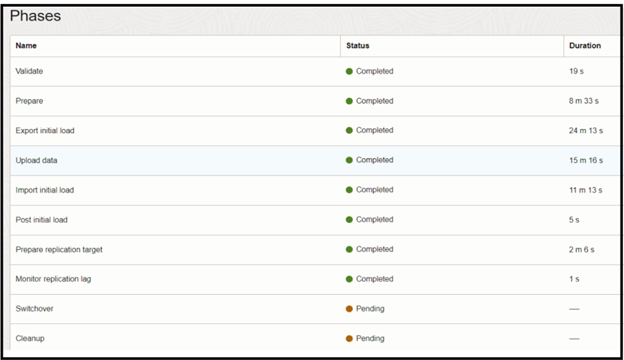
Navigate to Jobs in the left-hand Resources list:
- Click on the most recent Migration Job
- Click on Phases in the left-hand Resources list.
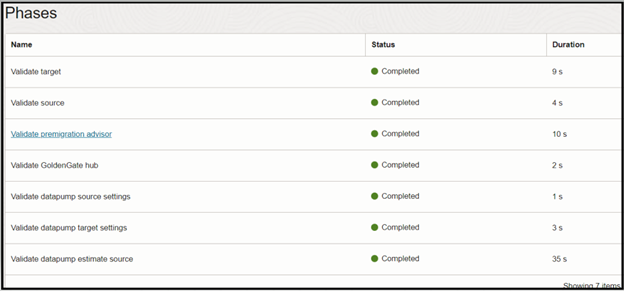
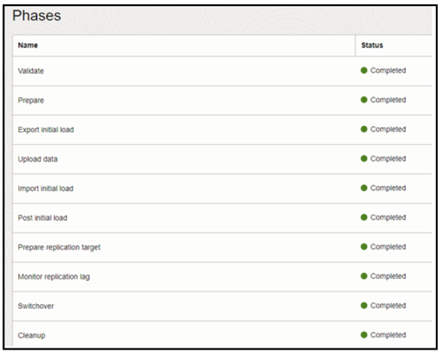
- Job phases are updated as the migration progresses.
- Wait till Monitor replication lag phase completes.
You can see Job phases have been completed up to Monitor Replication lag.
Note: During DMS migration job workflow replication phase, all data and metadata operations in transactions committed after the initial load are replicated until you resume the migration job after the Monitor Replication Lag phase.
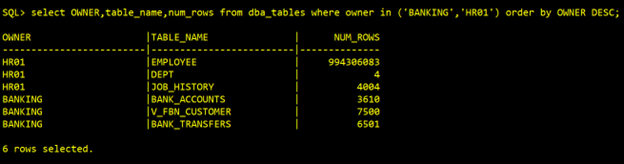
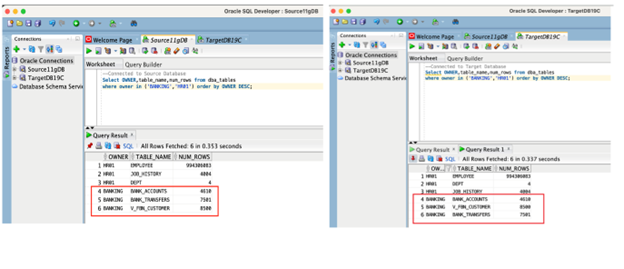
At this point, we verified that both Source and Target are in sync.
Source data now:
Target data now:
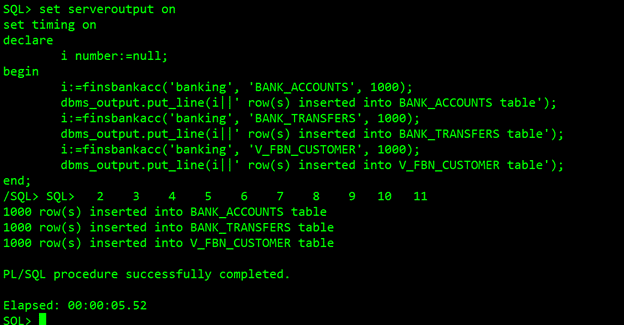
To verify our CDC replication, we will perform some transactions (data inserts) on source banking schema, we will load some new data with the help of a function as below:
Monitoring GoldenGate activities
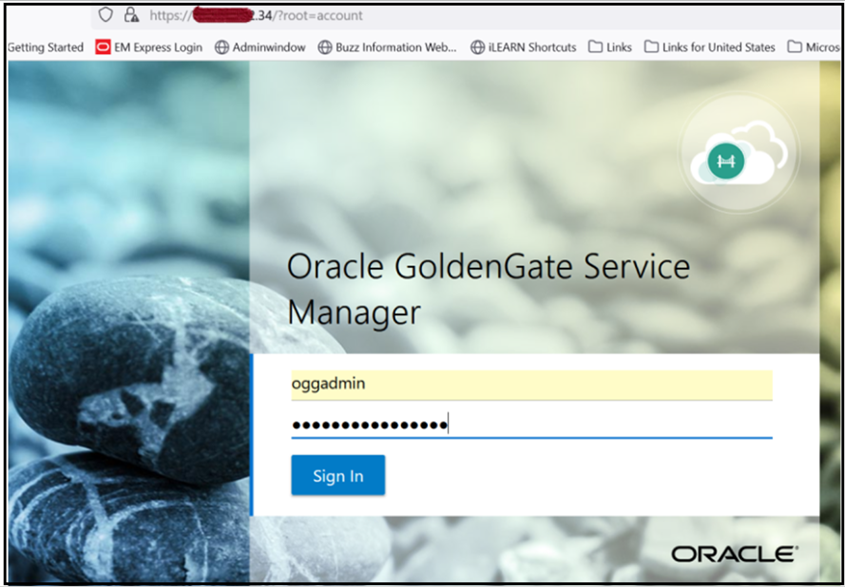
GoldenGate Console Login https://<hostip> — Enter your GoldenGate compute instance public/private IP.
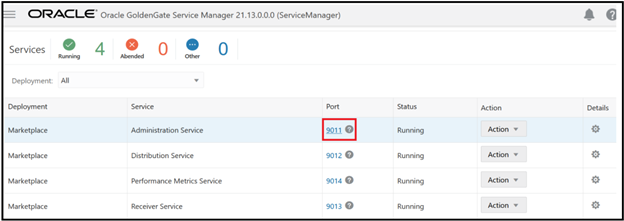
Once logged in, you can see all the services running, click on Administration service port, it will redirect you to Administration service:
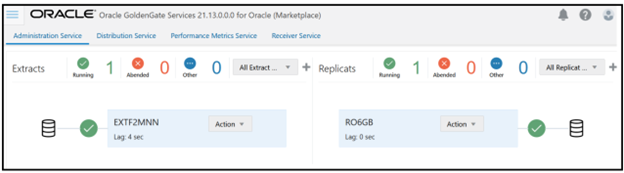
You can see the extract and replicat processes are running :
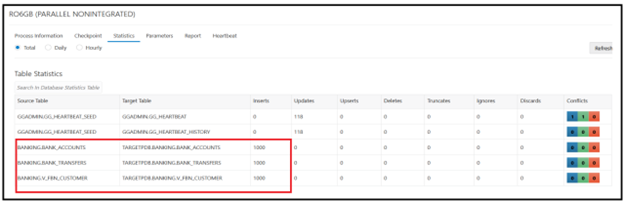
If you navigate to extract statistics, you can find new transactions captured:
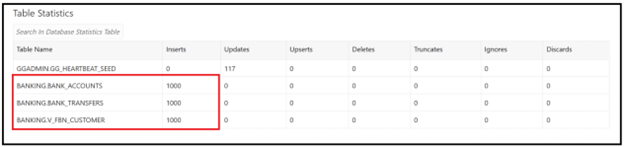
We can also see on the replicat statistics that transactions have been replicated successfully:
Compare and validate
Now both the source and target database are in sync.
This is the point where a migration user would stop the source application so that no more transactions are applied to the source DB. After the source application has been stopped, make sure there are no open transactions in the database.
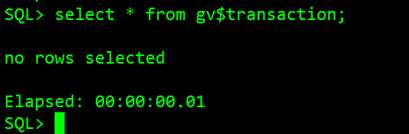
The below query shows any open transactions in your Source Oracle system:
select * from gv$transaction;
However, if your system is complex and you have no control over out-of-scope tables, you may never see gv$transaction empty. You can run the following query to check if any of the in-scope tables are involved in open transactions and close the transactions:
SELECT t.start_scnw,t.start_scnb,t.start_time,s.username, o.object_name,o.owner FROM gv$transaction t, gv$session s, gv$locked_object l,dba_objects o
WHERE
l.object_id IN (<INSCOPE TABLES OBJECT ID FROM DBA_OBJECTS>) AND t.ses_addr = s.saddr AND t.xidusn = l.xidusn AND t.xidslot = l.xidslot AND t.xidsqn = l.xidsqn AND l.object_id = o.object_id;
In our case, we don’t have any open transactions.
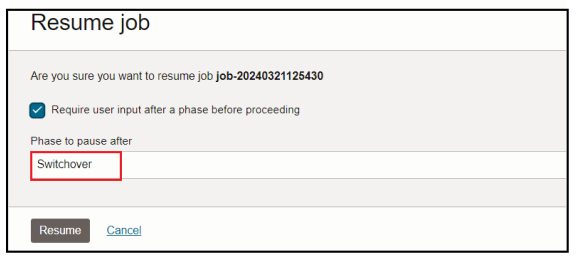
You can now press Resume on the job to complete replication. In the Resume Job dialog, choose the Switchover phase and press Resume. The Switchover phase will gracefully stop replication and signal the target application to initiate transactions to the target DB:
Switchover is in progress. You can also monitor the progress in work requests:

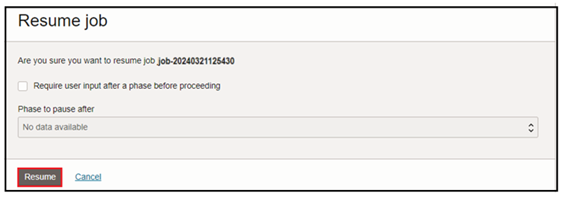
After the Switchover phase is completed, then the job will wait for the final step. Resume again for the last Cleanup phase to complete:
The migration runs and shows as Succeeded when finished:

Your Migration is now complete!
Summary
The post showed how to migrate an on-premises 11g Oracle database to an OCI Base Database 19cusing OCI DMS with near-zero downtime.
You can migrate your mission-critical on-premises databases seamlessly to OCI Base Database in the Oracle Cloud. For more information about migration using DMS, see: https://www.oracle.com/in/cloud/database-migration/