Introduction
A key part of many integrations involves call REST API’s to either get or post data, or, as in this example, invoke jobs as part of the integration orchestraction. However, with OCI Data Integration, only Resource Principal Authentication or No Authentication are supported at this time. This can be overcome with API Gateway. The advantage of API Gateway is it handles the authentication and provides a valid TLS certificate for you, and can be invoked from an OCI -DI REST Task as part of an integration orchestration pipeline where the REST endpoint requires Basic Authorization, or has self-signed TLS certificate.
This scenario unifies the integration of Fusion GL Extracts using OCI Data Integration, and provides a serverless integration from Fusion to Essbase in support of GL period close processes. You could use REST task to invoke MAXL scripts installed on a compute instance, however, this introduces a server that must be maintained and updated into the integration. Another option is to invoke jobs in the target Essbase to pull the data from a staging area in ADB. Since Essbase REST API requires Basic Authenticaion, we’ll use API Gateway to make the REST call
Deploy an API Gateway
Start by creating an API Gateway
In OCI, Developer Services, select Gateways
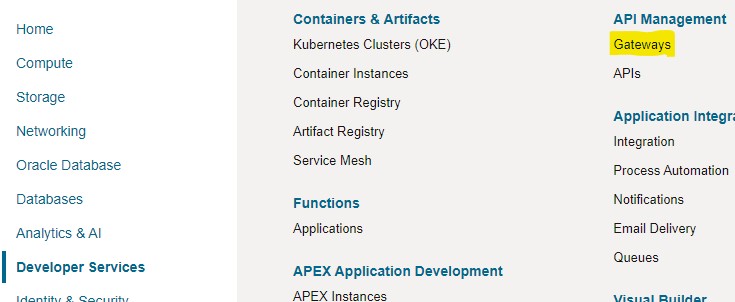
Create an API Gateway in the tenancy and region where your OCI Data Integration instance resides
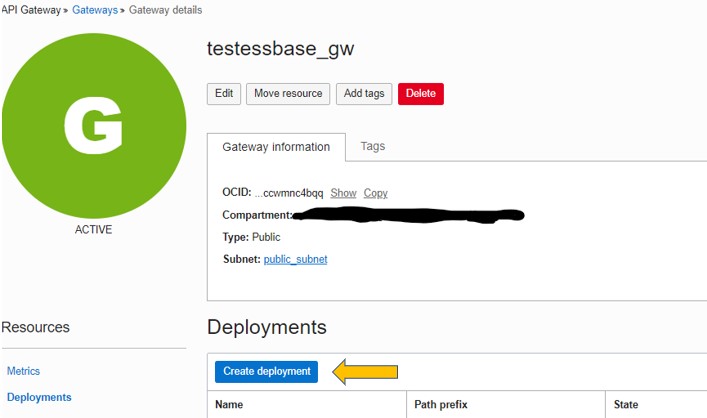
Then Create a Deployment for each Authentication required
.
Basic Information
If this is a new deployment, select ‘From Scratch’. Assign a name and a Path prefix (this will be used in the URL later)
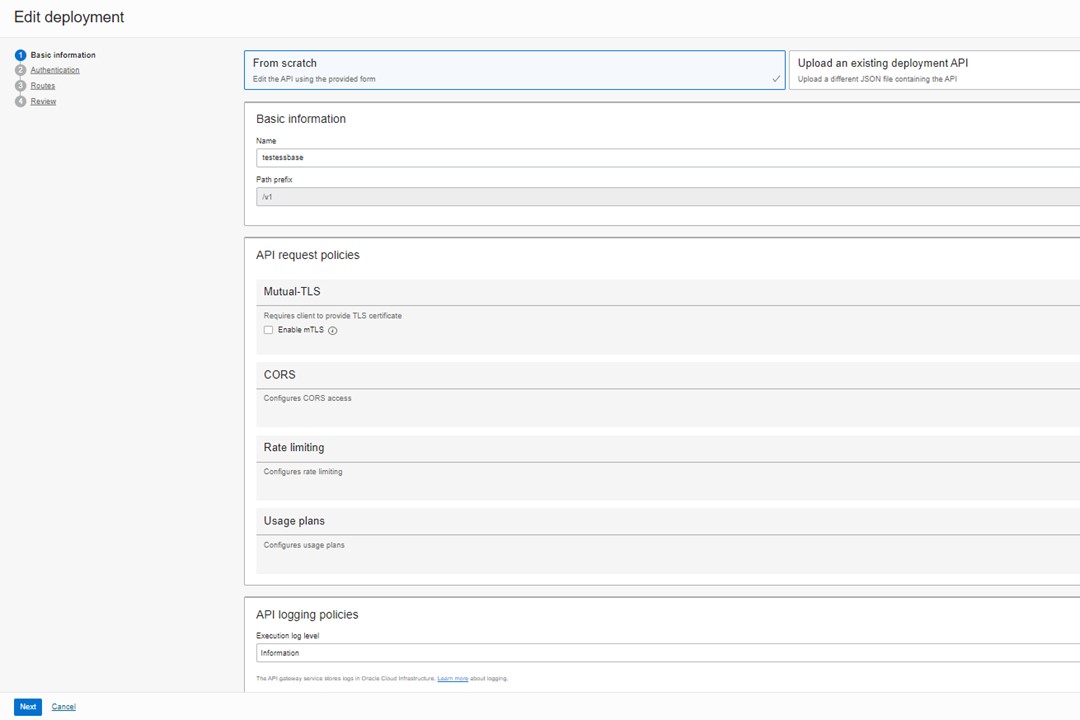
Click ‘Next’
Authentication
- Select ‘No Authentication’
- Click ‘Next’
Routes
Now add the Route to your REST target:
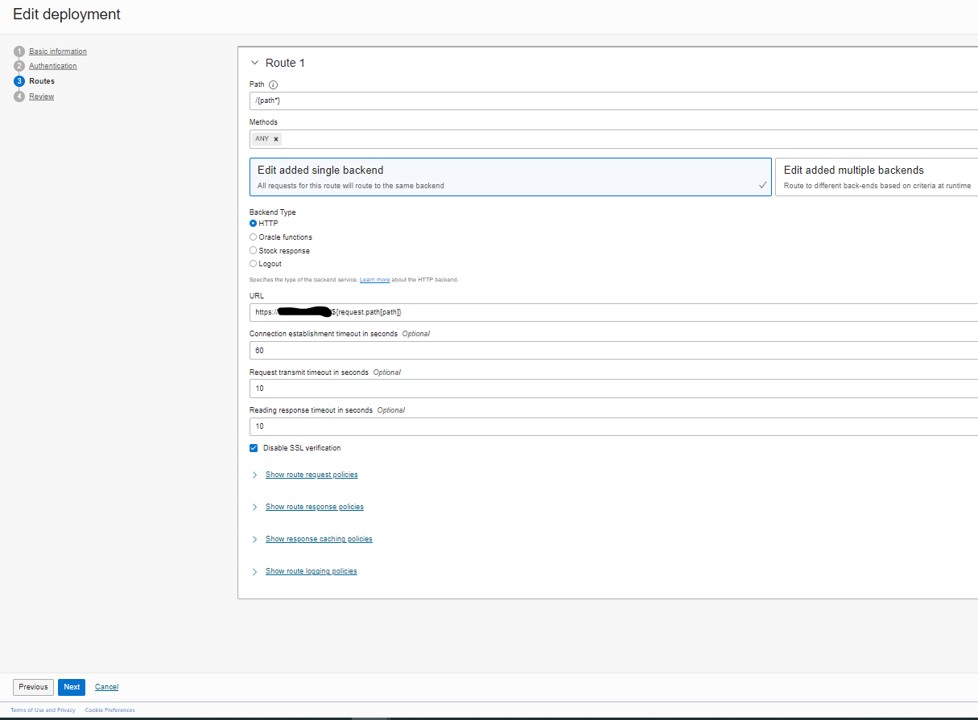
- Path: /{path*}
- Methods: ANY
- Select ‘Edit added single backend’
- Backend Type: HTTP
- URL: Ip or URL address of your REST target + /${request.path[path]}. (ex: https://127.0.0.1/${request.path[path]}
- Disable SSL verification
- Expand route request policies
- Next to Header transformation, click ‘Add’

Select the following:
- Action: Set
- Behavior: Append
- Header Name: Authorization
- Values: Basic <Base 64 encrypted username:password>
- Click ‘Next’
- Review your settings and save
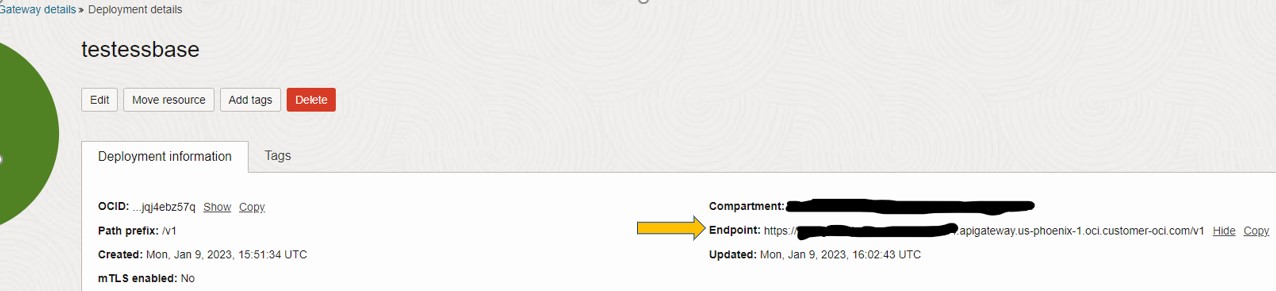
Copy and save your deployment endpoint. You will use this in place of the REST API target in the REST task
Create REST Task in OCI Data Integration
Navigate to your OCI Data Integration workspace & project
- Create a REST task
- Edit REST API Details
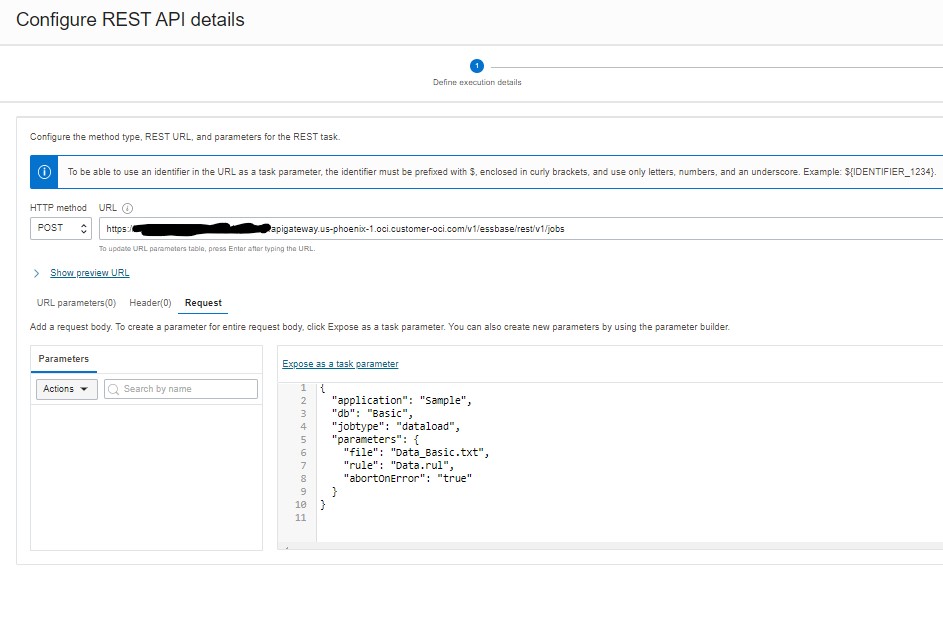
Enter the following
- HTTP method: POST
- URL: API Gateway deployment endpoint/REST path (ex: https://<identifyer>.apigateway.us-phoenix-1.oci.customer-oci.com/v1/essbase/rest/v1/jobs)
- Click on ‘Request’ and enter the request for the REST API as defined in documentation:
- Click ‘Configure’
Test the REST Task
- Let’s test this before continuing:
- Validate and save your task
- Publish the REST task to your application
- Run the task
If the task run fails, examine the log and proceed accordingly
On success, we can continue the REST configuration in OCI DI
Configure Polling
For a long-running REST API operation, in addition to a success condition, you must specify a polling URL and condition, and polling interval and timeout values to identify the completion of the REST invocation.
The polling configuration is used to periodically poll the status of the REST call that is invoked at the execution step.
Navigate back to the REST task
- Edit REST API details
- Review the REST URL and click Next
- Check ‘Configure a polling and termination condition for a no-wait REST call’
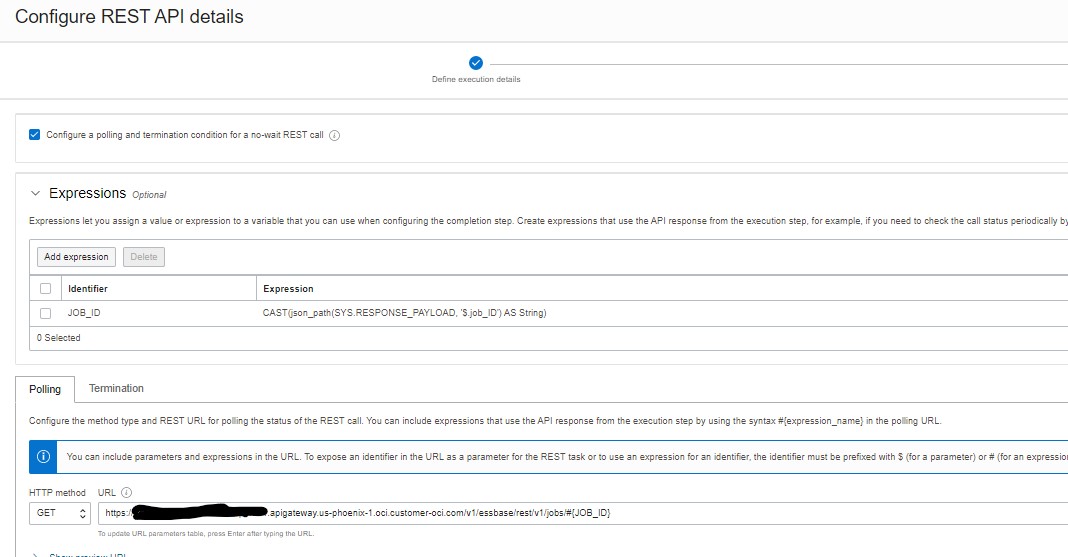
For the POST to Essbase jobs, we first need the identifier for the job that our REST call created in Essbase
- Expand Expressions and click ‘Add expression’
- Enter a name for the expression in Identifier
- Data Type: Varchar with length enough to accommodate the job id’s in the system
Expression
Note: job_ID is a variable returned by the REST API in the Payload
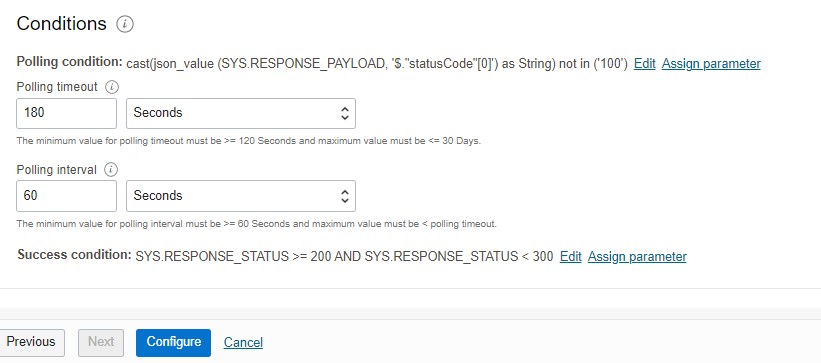
Define the polling condition
- Create a condition that will continue polling until a success or failed status is returned. A Status of 100 indicates the job is still running:
| StatusCode | StatusMessage |
|---|---|
| 100 | IN_PROGRESS |
| 200 | COMPLETED |
| 300 | COMPLETED_WITH_WARNINGS |
| 400 | FAILED |
Edit the Polling Condition
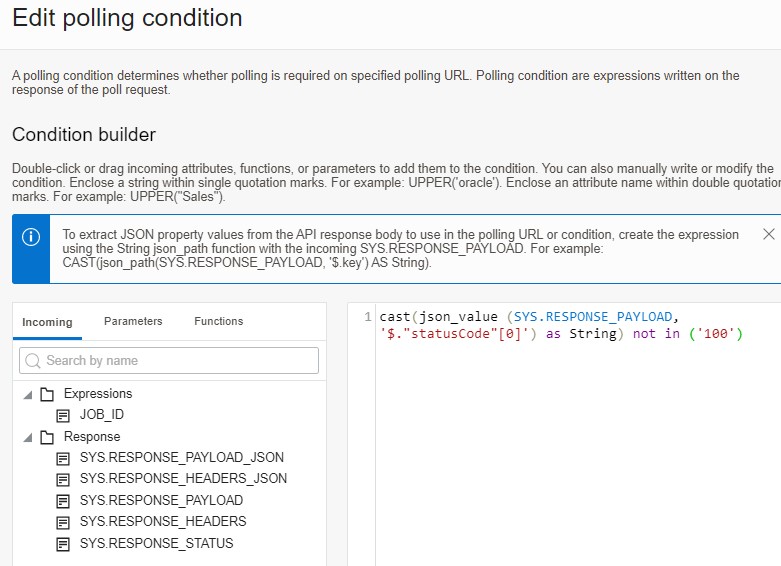
Create Polling condition
-
Set desired timeout and polling interval
Define Success Condition
- Click ‘Configure’, Validate, save and test the REST task
Now that you can successfully invoke the REST task and wait for it to complete, you can now process the response
For simplicity, and preserve a historical response record, write the entire response to a table. You could also parse and process the response as part of a data flow: https://docs.oracle.com/en/database/oracle/oracle-database/21/adjsn/json-path-expressions.html#GUID-AEBAD813-99AB-418A-93AB-F96BC1658618
Create Response and Error tables
These tables will store the REST API response and error messages.
- In SQL Developer, create a table to store the response Create a stored procedure to write parameters to database
( “HEADER” VARCHAR2(4000 BYTE) COLLATE “USING_NLS_COMP”,
“BODY” VARCHAR2(4000 BYTE) COLLATE “USING_NLS_COMP”,
“RUNKEY” VARCHAR2(240 BYTE) COLLATE “USING_NLS_COMP”,
“STATUS” VARCHAR2(24 BYTE) COLLATE “USING_NLS_COMP”
)
TABLESPACE “DATA” ;
( “PROCESS” VARCHAR2(120 BYTE) COLLATE “USING_NLS_COMP”,
“STARTTIME” TIMESTAMP (6),
“STOPTIME” TIMESTAMP (6),
“MESSAGE” VARCHAR2(4000 BYTE) COLLATE “USING_NLS_COMP”,
“STATUS” VARCHAR2(1000 BYTE) COLLATE “USING_NLS_COMP”
)
TABLESPACE “DATA” ;
-
Create stored procedures to write the response and error messages
(
PARAM1 IN VARCHAR2,
PARAM2 IN VARCHAR2,
PSTATUS IN VARCHAR2,
PRUNKEY IN VARCHAR2
) AS
BEGIN
INSERT INTO RESPONSETABLE (HEADER,BODY,STATUS,RUNKEY) VALUES (PARAM1, PARAM2,PSTATUS,PRUNKEY);
END WRITE_PAYLOAD;
-
Similarly, create and stored procedure to process errors
(
PSTATUS IN VARCHAR2
, PERROR IN VARCHAR2
, PSTARTIME IN TIMESTAMP
, PSTOPTIME IN TIMESTAMP
) AS
BEGIN
INSERT INTO ERRORS (STARTTIME,STOPTIME,MESSAGE,STATUS) VALUES (PSTARTIME,PSTOPTIME,PERROR,PSTATUS);
END WRITE_ERROR;
- Compile the stored procedures
Create SQL Tasks
Now create SQL tasks in OCI DI to invoke these stored procedures.
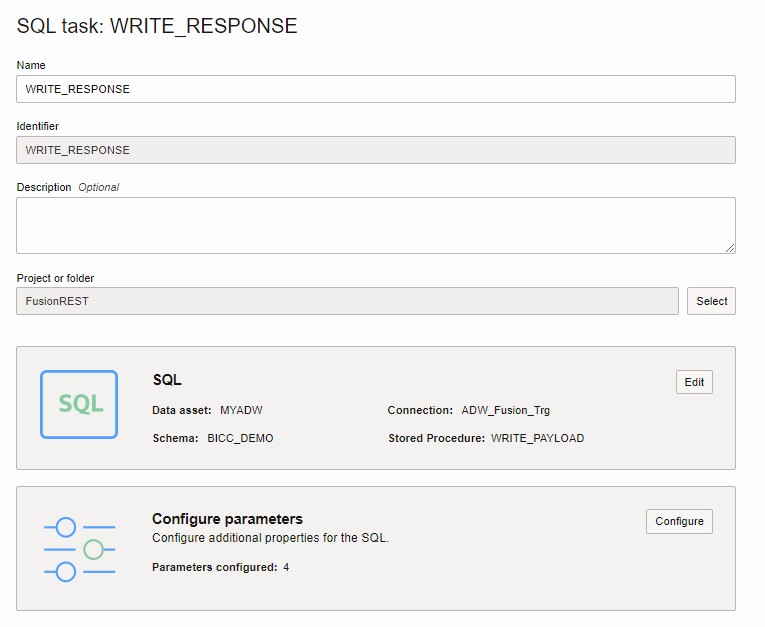
- Configure the Parameters

- Create a SQL task to write error messages to the error table
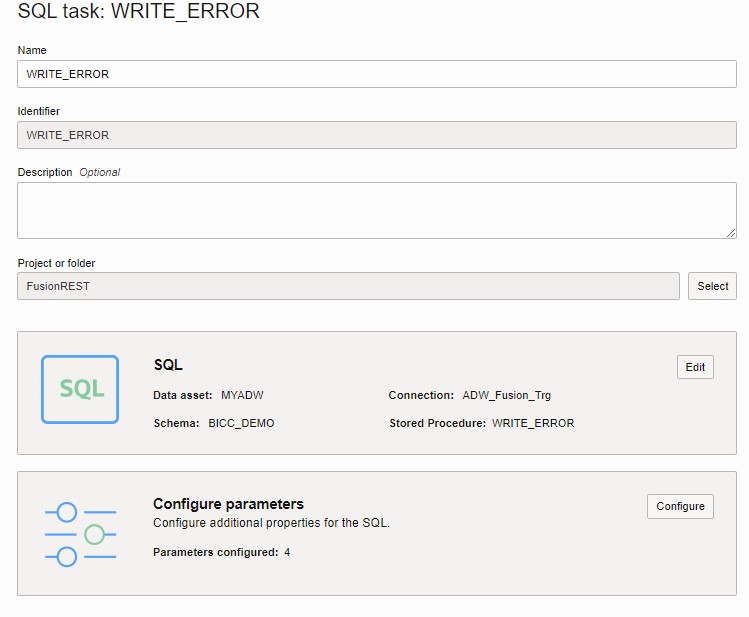
- And configure the parameters

- Publish both SQL tasks to the application
Create Pipeline
Now put it all together in a pipeline
- Create pipeline and add the REST task, and SQL tasks as follows
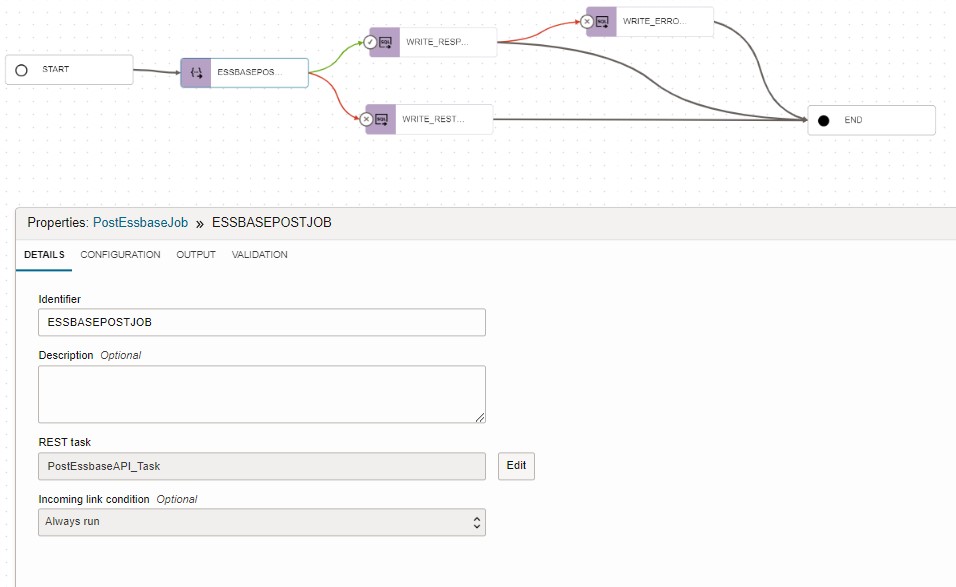
- REST task: <Your REST API Gateway> Task
- Incoming link condition: Always Run
Configure SQL Tasks
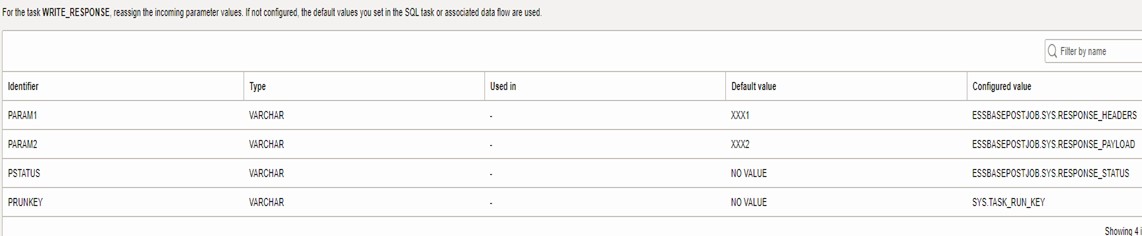
- Add SQL task to the pipeline and invoke the SQL Task WRITE_RESPONSE
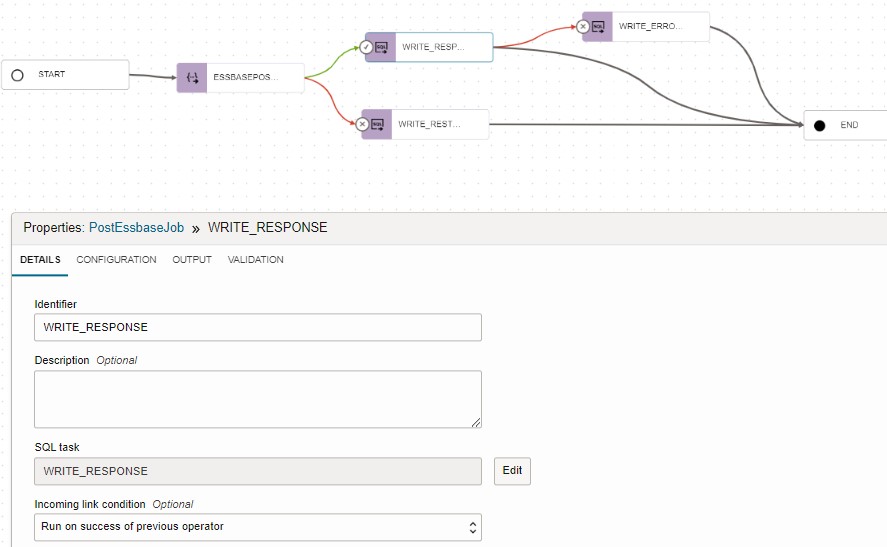
- SQL Task: WRITE_RESPONSE
- Incoming link condition: ‘Run on success of previous operator’
- Configure the Parameters

- Add SQL task WRITE_REST_ERROR. This will record errors returned by the REST Task.
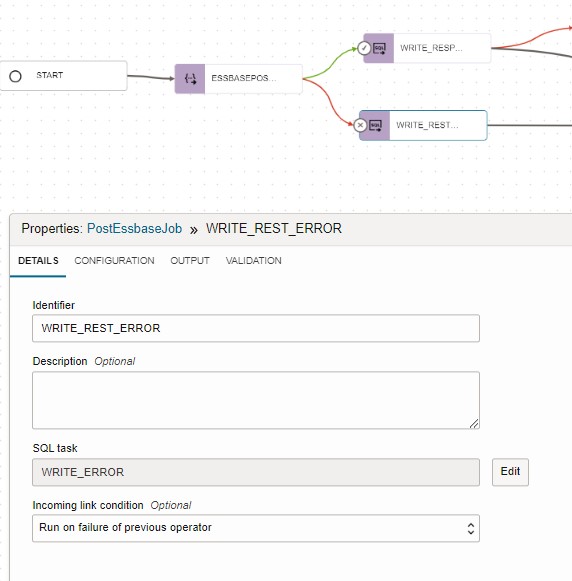
- SQL Task: WRITE_ERRORS
- Incoming link condition: ‘Run on failure of previous operator’
- Configure Parameters to WRITE_ERROR
- Add another SQL Task to WRITE_ERROR to record errors returned by WRITE_RESPONSE
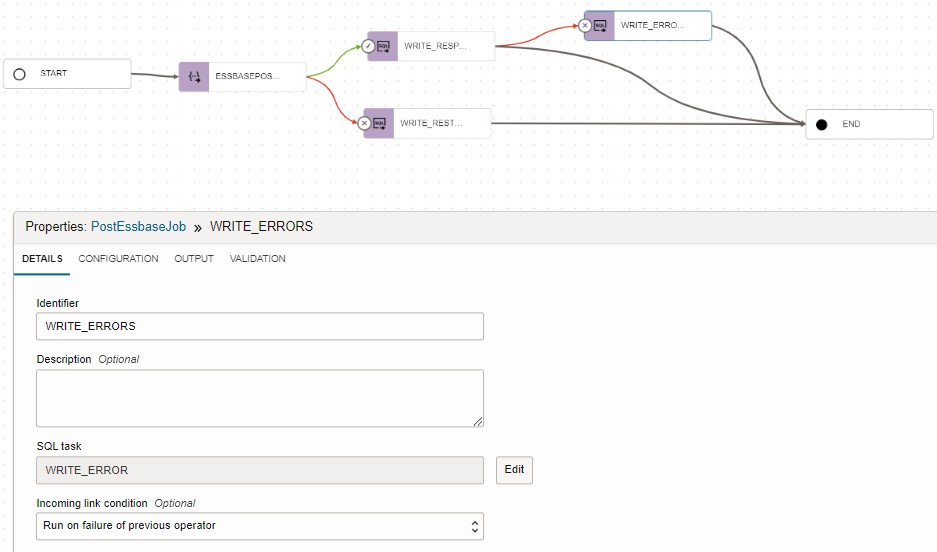
- SQL Task: WRITE_ERROR
- Incoming link condition: “Run on failure of previous operator”
- Configure parameters to write errors returned by WRITE_RESPONSE task
-
Validate and publish the pipeline to the application and test.