*Originally published on 3/13/2023
Introduction:
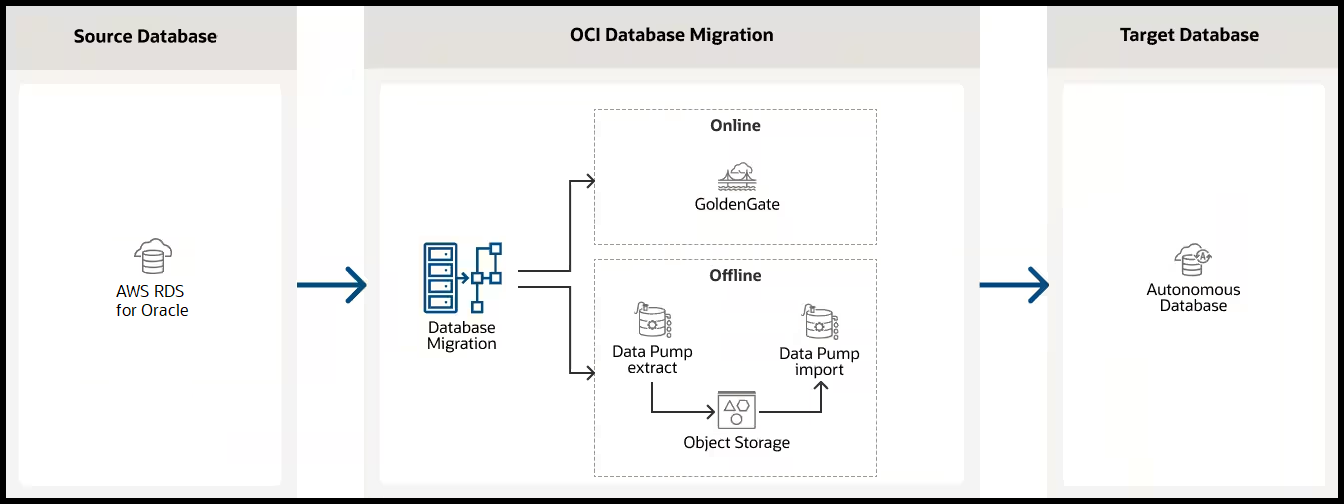
This post explains how to migrate from AWS RDS for Oracle instance to Oracle Autonomous Database using OCI Database Migration service which provides validated, cross-version, fault-tolerant, and incremental Oracle Database migrations. It simplifies database migration workflows with advanced orchestration automation, source and target compatibility diagnostics and remediation, and a unified user experience. Migration scenarios can be short or long-lived and be performed with or without database downtime, eliminating operational disruption.
For more information about the service visit its home page.
Scenario Assumptions
AWS RDS instance:
- There is an existing AWS RDS for Oracle instance with Oracle Enterprise Edition, version 19 was selected for this exercise. The following link contains more information on how to create one.
- Database archiving mode set to ARCHIVELOG, this happens automatically when automated backups are enabled by setting the backup retention period to a value greater than 0.
- Set the instance is Publicly accessible.
- The architecture is Non-CDB. Learn more about RDS for Oracle architecture at the following link.
- Amazon S3 integration is enabled, the database can transfer files between RDS for Oracle DB instance and an Amazon S3 bucket. To learn more check the following link.
Oracle Cloud Infrastructure:
- Use the following instructions to create the resources that OCI Database Migration operations depend on.
- Existing OCI Autonomous Database on Shared Infrastructure to be used as target, version 19c was selected for this exercise.
- Oracle GoldenGate Microservices is installed, this is required for our online migration. Learn more at the following link.
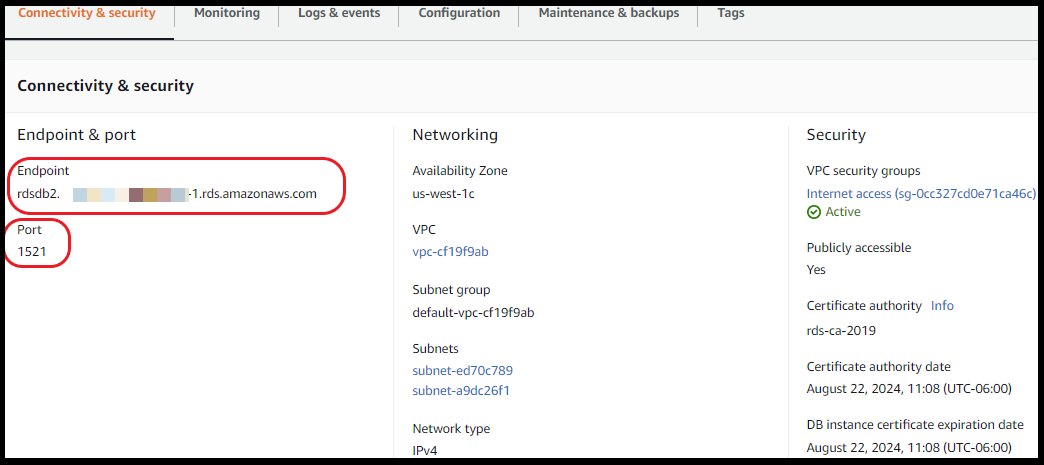
Step 1: Identify the AWS RDS instance connection details:
First find the endpoint (DNS name) and port number for the RDS DB instance.
Navigation: Amazon RDS homepage>Databases>Your DB> Connectivity & security tab:
* OCI Database Migration needs an IP address, the following command nslookup + RDS Private Endpoint should show a simmilar response as the following, take note of the IP address:

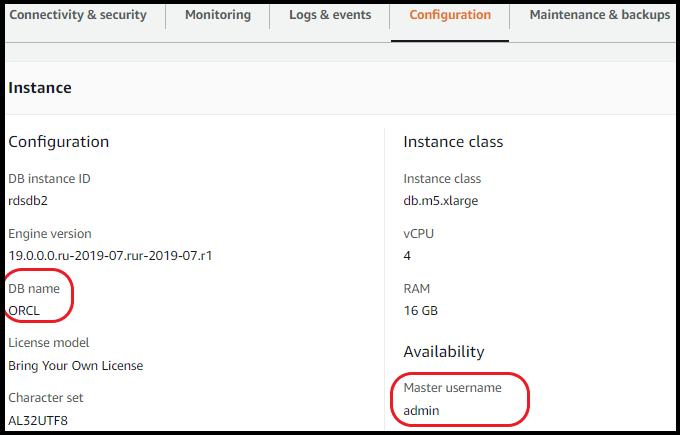
In the Configuration tab, locate the following information:
- DB name (not the DB instance ID)
- Master username
Navigate to the AWS Console Home>S3>buckets:
Identify the bucket Name and Region.
Step 2: Prepare the AWS RDS Oracle database:
Edit: You can now use the database preparation utility a script to help you prepare your souce and target databases.Refer to the following MOS note.
Set the following parameters thru the Parameter groups functionality:
- STREAMS_POOL_SIZE=2147483648
- This parameter can be incompatible if you select a very small DB instance class, i.e. I am using a 4 vCPUs /16GiB RAM.
- ENABLE_GOLDENGATE_REPLICATION=TRUE
- GLOBAL_NAMES=FALSE
Execute the following PL/SQL procedures (I used SQL Developer):
Set the retention period for archived redo logs:
EXEC RDSADMIN.RDSADMIN_UTIL.SET_CONFIGURATION('ARCHIVELOG RETENTION HOURS',72);
Turn on supplemental logging on the source database:
EXEC RDSADMIN.RDSADMIN_UTIL.ALTER_SUPPLEMENTAL_LOGGING('ADD');
Set force logging:
EXEC RDSADMIN.RDSADMIN_UTIL.FORCE_LOGGING(P_ENABLE => TRUE);
Create and set the user ggadmin to be an Oracle GoldenGate administrator:
CREATE USER GGADMIN IDENTIFIED BY GGADMIN_PWD DEFAULT TABLESPACE USERS TEMPORARY TABLESPACE TEMP;
ALTER USER GGADMIN QUOTA 100M ON USERS;
GRANT UNLIMITED TABLESPACE TO GGADMIN;
GRANT CONNECT, RESOURCE TO GGADMIN;
GRANT SELECT ANY DICTIONARY TO GGADMIN;
GRANT CREATE VIEW TO GGADMIN;
GRANT EXECUTE ON DBMS_LOCK TO GGADMIN;
GRANT SELECT ON following objects:
SYS.CCOL$,SYS.CDEF$,SYS.COL$,SYS.CON$,SYS.DEFERRED_STG$,SYS.ICOL$,SYS.IND$,SYS.LOB$,SYS.LOBFRAG$,SYS.OBJ$,SYS.SEG$,SYS.TAB$,
SYS.TABCOMPART$,SYS.TABPART$,SYS.TABSUBPART$ TO GGADMIN

BEGIN
RDSADMIN.RDSADMIN_DBMS_GOLDENGATE_AUTH.GRANT_ADMIN_PRIVILEGE
                                                            (GRANTEE=>'GGADMIN',
                                                             PRIVILEGE_TYPE=> 'CAPTURE',
                                                             GRANT_SELECT_PRIVILEGES=>TRUE,
                                                             DO_GRANTS=>TRUE);
END ;
Step 3: Prepare the target Autonomous Database:
The next steps will connect to the target Database instance and enable the standard ggadmin user.
The connection will be thru the Oracle GoldenGate instance using sqlplus.
Ensure the Autonomous Database regional wallet has been placed in /u02/deployments/Marketplace/etc/adb. If not, download the zip file from OCI Console and unzip it there.
Modify sqlnet.ora so it correctly has the wallet location (needed if connecting with sqlplus):
cat sqlnet.ora
WALLET_LOCATION = (SOURCE = (METHOD = file) (METHOD_DATA = (DIRECTORY="/u02/deployments/Marketplace/etc/adb"))) SSL_SERVER_DN_MATCH=yes
Set the following Export variables:
EXPORT ORACLE_HOME="/U01/APP/OGG/LIB/INSTANTCLIENT"
EXPORT LD_LIBRARY_PATH="$ORACLE_HOME"
EXPORT PATH="$ORACLE_HOME:$PATH"
EXPORT TNS_ADMIN="/U02/DEPLOYMENTS/MARKETPLACE/ETC/ADB"
$ORACLE_HOME/SQLPLUS ADMIN/ <DB PASSWORD>@ ADW_name
*An example of the ADW_name would be targetatp_high.
In SQL Plus enter the following command to unlock the GGADMIN user:
SQL> ALTER USER GGADMIN IDENTIFIED BY <NEW PASSWORD> ACCOUNT UNLOCK;
USER ALTERED.
SQL> QUIT
Getting Started with OCI Database Migration:
Step 4: Create Registered Database for the source RDS database in OCI Database Migration:
Registered database resources enable networking and connectivity for the source and target databases.
Navigation: Go to Migration & Disaster Recovery > Database Migration > Registered Databases: Press Register Database.
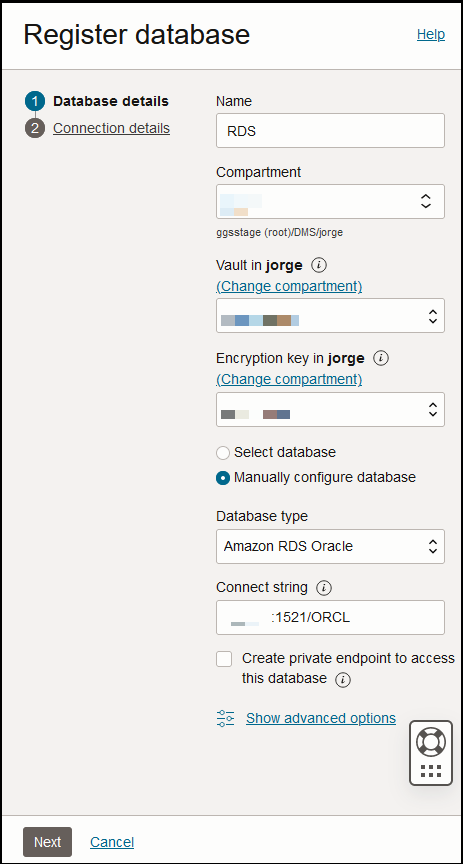
In the page Database Details, fill in the following entries, otherwise leave defaults:
- Name: Provide a name for the registered database.
- Vault: Select the previously created Vault.
- Encryption Key: Select the pre created Key.
- Select the radio button “Manually configure database”.
- Database Type: Amazon RDS Oracle
- Connect String: Provide the RDS public IP, port and the database name, i.e:
- 44.X.152.184:1521/ORCL
- Leave Create private endpoint to access this database unselected.
- Press Next
- Database administrator username: admin
- Database administrator password: Enter the user password
- Click Register
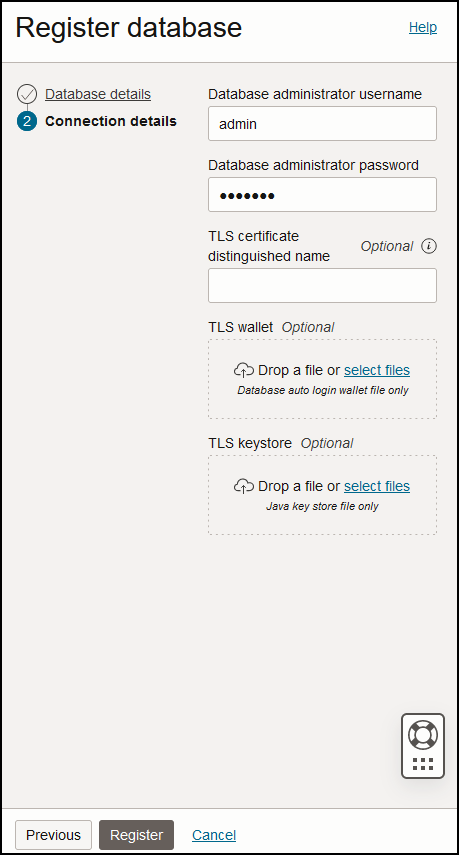
*These details were previously identified on the AWS RDS instance
Step 5: Create Registered Database for the Autonomous Database, (the target DB):
Press Register Database.
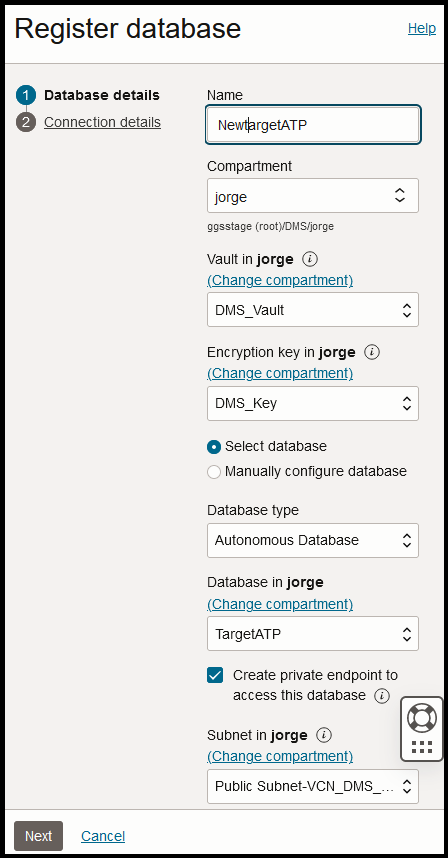
In the page Database Details, fill in the following entries, otherwise leave defaults:
- Name: Provide a name for the registered database.
- Leave selected the “Select database” radio button.
- Database Type: Autonomous Database
- Select the previously created database
- Leave checked the Create private endpoint to access this database option.
- Press Next
- Database administrator username: admin
- Database administrator password: Enter the user password
- Click Register
Step 6: Create a Migration:
When a migration is created with OCI Database Migration, it is specified how the migration should run, source and target databases are selected, and then the data transport settings are configured . Optionally, advanced GoldenGate and Data Pump settings can be configured.
Navigation: Go to Migration & Disaster Recovery > Database Migration >Migrations: Press Create Migration.
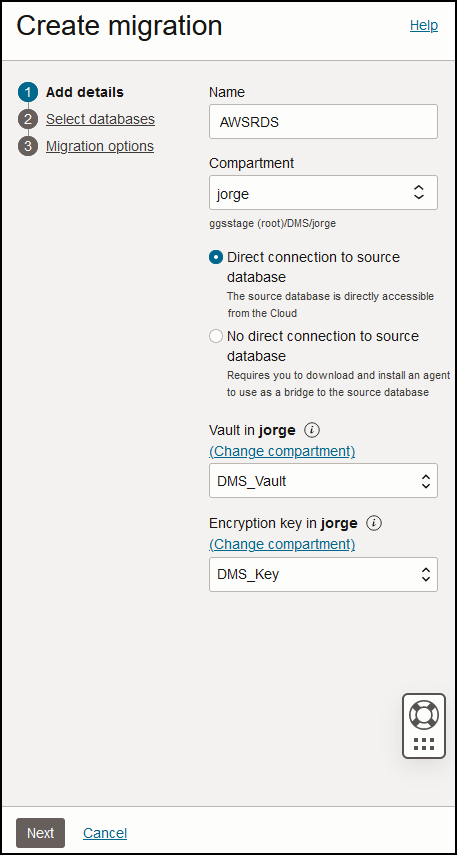
On the page Add Details, fill in the following entries, otherwise leave defaults:
- Name: AWSRDS
- Vault: Select previously created
- Encryption Key: Select previously created
- Press Next
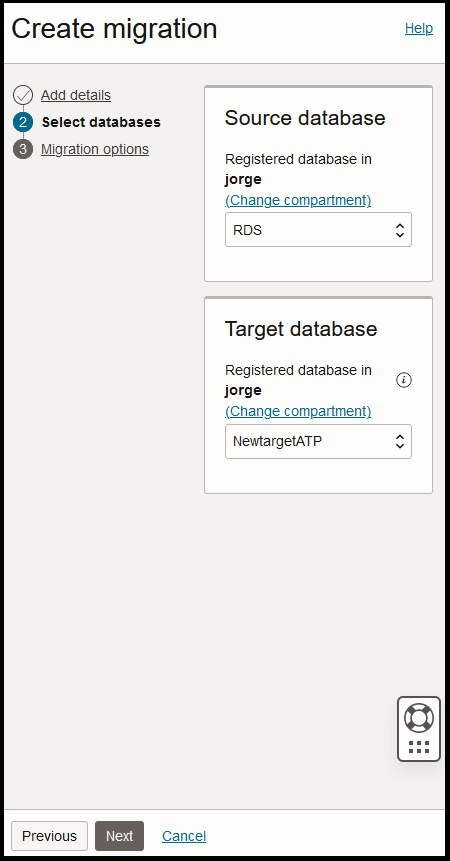
On the page Select Databases, fill in the following entries, otherwise leave defaults:
- Source Database: RDS
- Target Database: NewtargetATP
- Press Next
*This depends on the name provided to the registered databases.
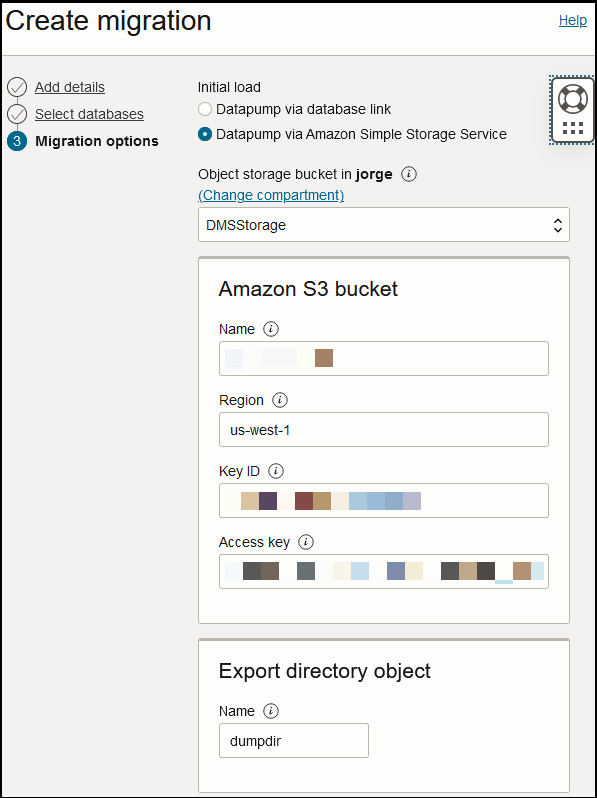
Initial load: Select Datapump via Amazon Simple Storage Service
For Object storage bucket: select the bucket created previously in OCI.
Amazon S3 Bucket details:
- Enter the S3 bucket name previously identified.
- Provide the region, i.e us-west-1
- Enter the associated Access Key
- Enter the associated secret access key.
Provide Database directory object to be created in source database for temporary storage of database export files, i.e. dumpdir.
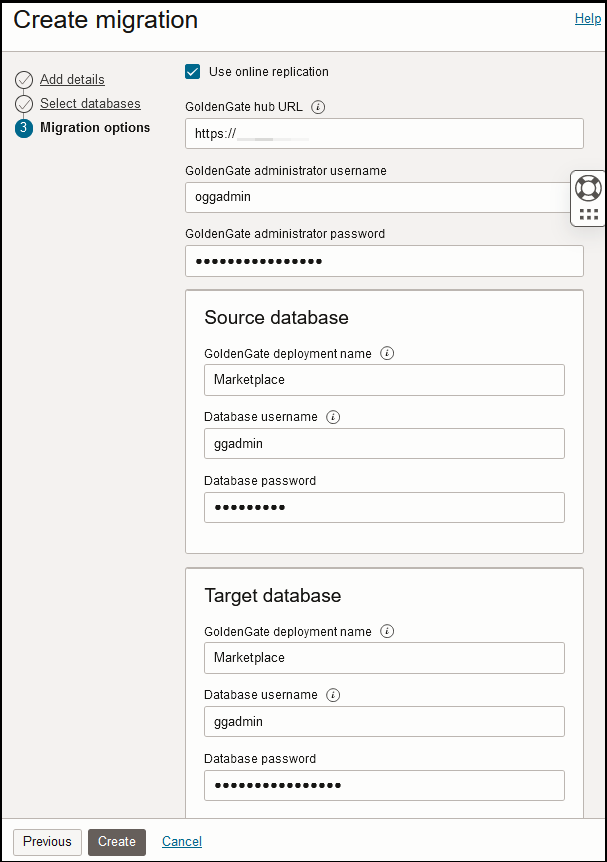
Provide GoldenGate hub details, this should have been created this previously:
- Check Use online replication
- Enter GoldenGate hub URL
- GoldenGate administrator username: oggadmin
- GoldenGate administrator password
Source Database Details:
- GoldenGate deployment name: Default name is “Marketplace”, provide the correct name in case you changed it.
- Database username: ggadmin
- Database password: Enter the user password
*This is the user created on the source and granted goldengate admin rights
Target database details:
- GoldenGate deployment name: Default name is “Marketplace”, provide the correct name in case you changed it.
- Database username: ggadmin
- Database password: Enter the user password
*This is the goldengate user unlocked from the Autonomous Database. - Press Create
*In OCI Database Migration, objects can be specified to be included or excluded from a migration job while creating a migration resource. Learn more at the following link.
Step 7: Validating a Migration:
Before a Migration job can be executed for a migration resource in OCI Database Migration, the migration resource must be validated.
Navigation: Go to Migration & Disaster Recovery > Database Migration >Migrations> Select your migration> Migration details
Click Validate
This job will validate the source, target, Goldengate hub and Datapump settings, if all is fine it should complete successfully.
*If there are any issue the user interface will display the error and provide a potential solution. Once the error is fixed click Validate again for a new job to be created.

After a migration resource is validated then migration jobs can be executed.
Step 8: Start the Migration job:
Navigation: Go to Migration & Disaster Recovery > Database Migration >Migrations> Select your migration> Migration details
Click Start
When a migration job starts, it can be configured to pause at a specified phase, and then it can be resumed when ready.
A confirmation dialog opens, and there the job can be configured to pause at any point by selecting a phase in Require User Input After, the pre-selected value is Monitor replication lag. This phase monitors Oracle GoldenGate Extract and Replicat operations until Replicat has caught up on the target database; end-to-end (E2E) replication lag should be less than 30 seconds.

When the selected phase to pause after completes, the job will enter in a Waiting state until it is resumed (or terminated). If it was selected to pause after the phase Monitor Replication Lag, the transaction replication continues during the Waiting state. It will stop upon resume.
Click on the Resume button again and schedule another pause after phase Switchover. This phase does the following:
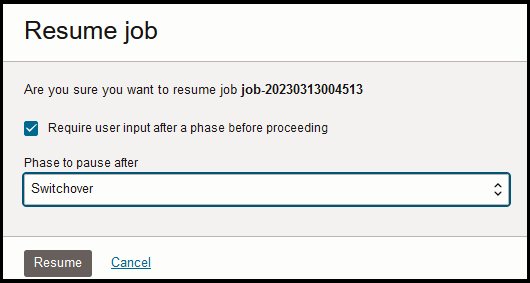
- Ensures replication E2E lag is still less than 30 seconds
- Ensures that Extract has captured outstanding transactions on the source database
- Stops Extract
- Ensures Replicat has applied all remaining trail file data
- Stops Replicat
After phase Switchover has completed, the workload on the target database (end of downtime) can start.
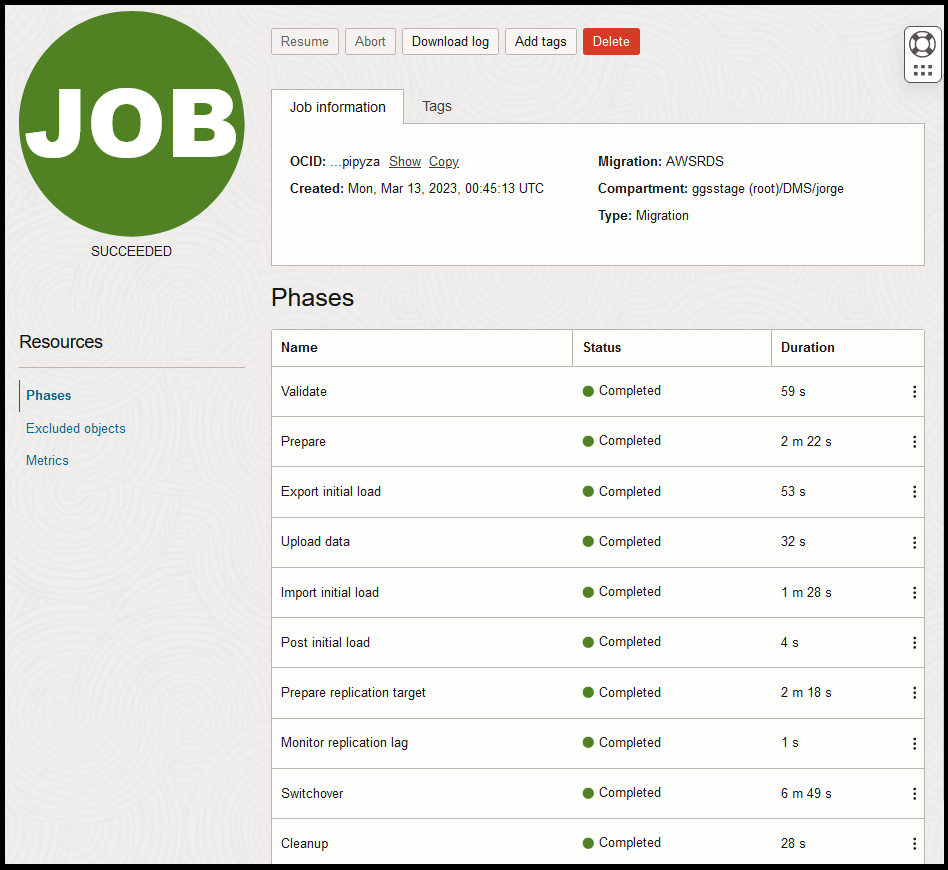
The last phase is Cleanup, click on the Resume button and click again Resume on the phase selection window. This phase performs cleanup operations such as deleting GoldenGate Extract and GoldenGate Replicat processes and connection details on source and target database respectively, removing Autonomous Database access to wallet, and so on. Learn more of the different phases at the following link.
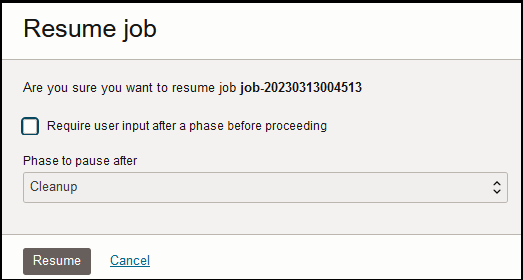
Once the Cleanup phase completes, the migration is considered as Successful.
Conclusion:
OCI Database Migration (DMS) migrates Oracle databases from on-premises or cloud deployments to OCI. The easy-to-use graphical user experience validates and manages migration workflows. DMS transparently uses Oracle Zero Downtime Migration (ZDM) as an engine, Cloud Premigration Advisor Tool (CPAT), Oracle Data Pump, and Oracle GoldenGate services for secure, fault-tolerant, and incremental migrations.