Introduction
Oracle GoldenGate is the industry-leading real-time data integration and replication platform trusted by thousands of enterprises worldwide for zero-downtime migrations, continuous availability, and heterogeneous data replication. With the shift to cloud-native architectures, Oracle now distributes GoldenGate as a hardened container image via the Oracle Container Registry (OCR), making it a natural fit for Kubernetes-based deployments on Amazon Elastic Kubernetes Service (EKS).
This guide walks you through every step of deploying Oracle GoldenGate 26ai container image from the Oracle Container Registry onto an Amazon EKS cluster purpose-built for critical workloads. Whether you are migrating a legacy on-premises Database instance to the cloud or building a net-new cloud replication pipeline, this guide enables organizations to run production-grade real-time data pipelines in Kubernetes environments.
Prerequisites
Ensure the following tools are installed and configured on your workstation before proceeding:
| Tool / Access | Minimum Version / Requirement |
| AWS CLI | v2.15+ — configured with AdministratorAccess or scoped EKS/IAM/EC2 permissions |
| kubectl | 1.35+ — matching target EKS cluster version |
| eksctl | 0.170+ — for cluster provisioning |
| Docker or Podman CLI | Any — used to validate pulled images locally |
| Oracle Container Registry Account | Active SSO account at container-registry.oracle.com |
| AWS Account | Permissions: EKS, EC2, IAM, EBS, Secrets Manager, CloudWatch |
| Oracle GoldenGate License | Valid GoldenGate license or OCI subscription entitlement |
Access Requirements
- AWS account, IAM permissions for EKS and ECR, Access to Oracle Container Registry and GoldenGate container images.
Authenticate with Oracle Container Registry
GoldenGate container images are hosted on the Oracle Container Registry (OCR). Access requires an Oracle SSO account and acceptance of the GoldenGate license agreement.
Accept the License Agreement on OCR
- Navigate to https://container-registry.oracle.com in your browser.
- Sign in with your Oracle SSO credentials.
- Search for GoldenGate in the search bar.
- Select the GoldenGate image under the Repository.
Click ‘Sign in’ on the license agreement page and accept the Oracle Standard Terms
Verify Image Availability
Confirm the GoldenGate image is accessible before proceeding to deployment:
Step 1 – Pull GoldenGate 26ai Container Image
Confirm the GoldenGate image is accessible before proceeding to deployment:
# Pull and Inspect the image locally to confirm access (optional but recommended)
# Login to Oracle Container Registry:
docker login container-registry.oracle.com

# For GoldenGate 26ai (latest)
docker pull container-registry.oracle.com/goldengate/goldengate-oracle:latest

# Inspect the image entrypoint
docker inspect container-registry.oracle.com/ goldengate/goldengate-oracle:latest \
--format '{{.Config.Entrypoint}}'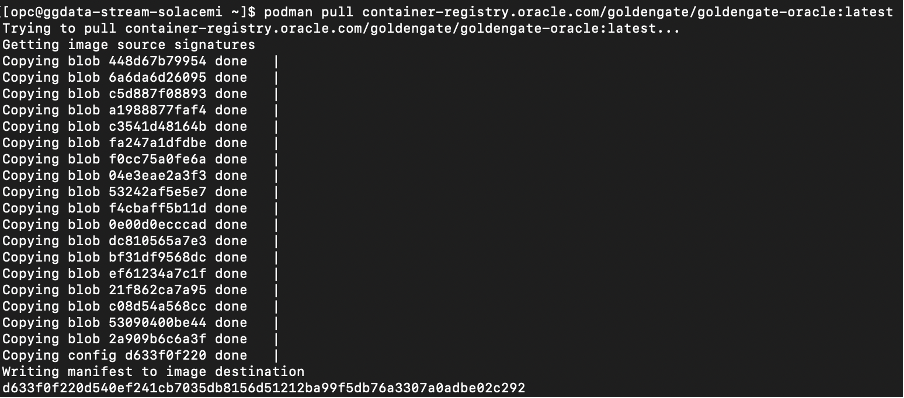
Verify the image:
docker images
Step 2 – Push the Image to Amazon ECR
After building the Oracle GoldenGate container image locally, the next step is to store it in Amazon Elastic Container Registry (ECR) so that it can be deployed to container services like EKS, ECS, or EC2.
Amazon Elastic Container Registry is a fully managed Docker container registry that makes it easy to store, manage, and deploy container images.
In this step we will:
- Create an ECR repository
- Authenticate Docker to AWS
- Tag the GoldenGate image
- Push the image to ECR
2.1 Create an Amazon ECR Repository
First, create a repository in ECR where the GoldenGate container image will be stored.
Run the following command using the AWS CLI:
aws ecr create-repository \
--repository-name goldengate-oracle \
--region us-east-1
2.2 Authenticate Docker to Amazon ECR
Before pushing the container image, you must authenticate your local Docker client with Amazon ECR.
Run the following command:
aws ecr get-login-password \
--region us-east-1 \
| docker login \
--username AWS \
--password-stdin <ACCOUNT_ID>.dkr.ecr.us-east-1.amazonaws.com
Explanation
- aws ecr get-login-password retrieves an authentication token.
- The token is piped (
|) into the Docker login command. <ACCOUNT_ID>should be replaced with your AWS account ID.
2.3 Tag the GoldenGate Docker Image
Next, tag the existing GoldenGate container image with the ECR repository URI.
docker tag container-registry.oracle.com/goldengate/goldengate-oracle:latest <ACCOUNT_ID>.dkr.ecr.<region>.amazonaws.com/goldengate-oracle:latest2.4 Push the Image to Amazon ECR
Now push the container image to your ECR repository.
docker push <ACCOUNT_ID>.dkr.ecr.<region>.amazonaws.com/goldengate-oracle:latest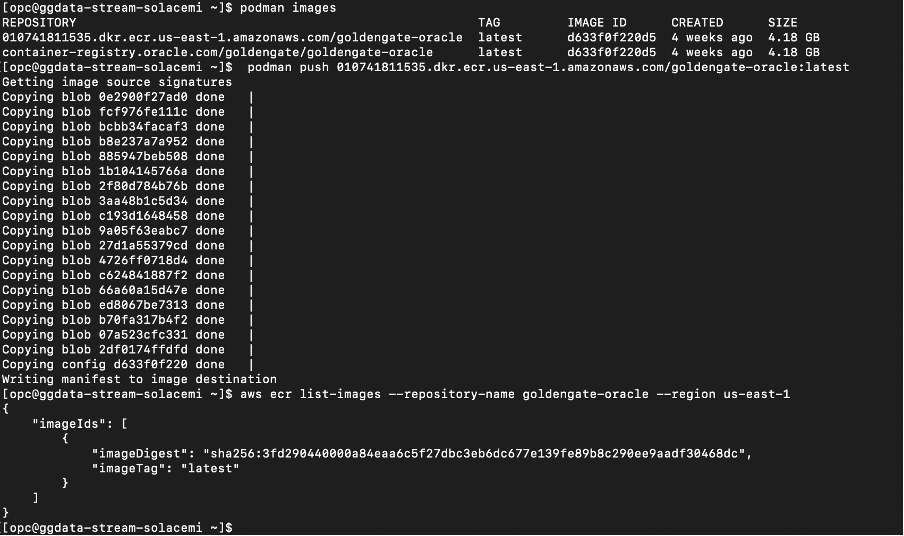
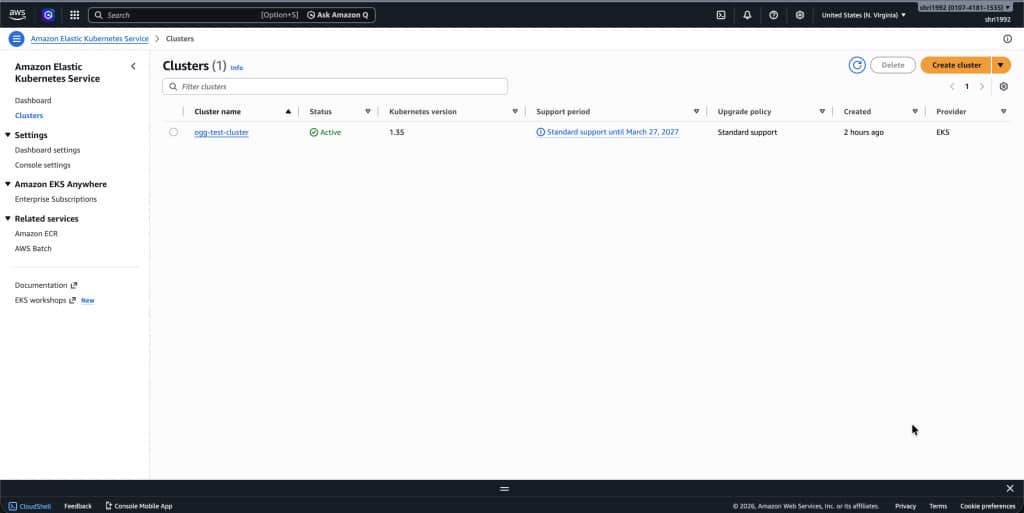
Step 3 – Create an Amazon EKS Cluster
Before deploying Oracle GoldenGate on Kubernetes, you need an operational Amazon EKS cluster where the GoldenGate container will run. Amazon EKS provides a managed Kubernetes control plane, allowing you to focus on deploying and managing workloads while AWS handles the underlying Kubernetes infrastructure, availability, and scaling of the control plane.
We assume that you either already have an EKS cluster available or will create a new one as part of your setup. There are two common ways to provision and configure an EKS cluster:
- Using the AWS Management Console (UI):
The AWS console provides a guided workflow to create an EKS cluster, configure networking, select Kubernetes versions, and add node groups. This approach is useful for users who prefer a graphical interface and step-by-step configuration. - Using the Command Line with
eksctlandkubectl:
Many cloud-native teams prefer infrastructure automation through CLI tools. The open-source tool eksctl simplifies the creation and management of EKS clusters from the command line. After the cluster is created, the standard Kubernetes CLI kubectl is used to configure access, manage namespaces, and deploy workloads to the cluster.
Verify cluster creation:
After creating your Amazon EKS cluster and worker nodes, the first step is to verify that the cluster and its nodes are successfully provisioned.
Run the following command to list the nodes available in your Kubernetes cluster:
kubectl get nodesIf the cluster was created successfully and the worker nodes have joined the cluster, you should see output similar to the following:
NAME                     STATUS   VERSION
ip-172-31-10-11          Ready    v1.35
ip-172-31-10-12          Ready    v1.35
Expected Output
- The STATUS column should display
Ready - One or more nodes should be listed depending on the node group configuration
- The VERSION column should show the Kubernetes version configured for your cluster
If nodes appear with the Ready status, it confirms that the Kubernetes control plane is communicating correctly with the worker nodes.
Step 4 – Connect kubectl to Your EKS Cluster
Before interacting with your EKS cluster, your local Kubernetes CLI must be configured to communicate with the cluster.
You can configure access using the AWS CLI command below:
aws eks update-kubeconfig \
--region us-east-1 \
--name ogg-test-cluster
This command performs the following actions:
- Retrieves cluster endpoint and authentication information
- Updates your local kubeconfig file
- Configures
kubectlto interact with the EKS cluster
Verify Access
Once the kubeconfig is updated, confirm that your local environment can access the cluster:
~ $ kubectl get nodes
NAME                  STATUS   ROLES    AGE     VERSION
i-08231ad46fb7b220f   Ready    <none>   4m56s   v1.35.0-eks-ac2d5a0
i-0a64d10b3d1a19b6e   Ready    <none>   4m57s   v1.35.0-eks-ac2d5a0
If the command successfully returns the node list, your local environment is properly connected to the EKS cluster.
Step 5 – Create a Namespace
Namespaces help logically isolate resources within a Kubernetes cluster. For this deployment, we will create a dedicated namespace for the GoldenGate workload.
Run the following command:
 ~ $ kubectl create namespace goldengate
namespace/goldengate created
You can verify the namespace creation using:
kubectl get namespaces
Expected output will include:
~ $ kubectl get namespaces
NAME              STATUS   AGE
default           Active   9m21s
goldengate        Active   14skube-node-lease   Active   9m21s
kube-public       Active   9m21s
kube-system       Active   9m21s
Using a dedicated namespace helps simplify resource management and improves isolation between applications.
Step 6 – Create Kubernetes Secret for GoldenGate Admin
Oracle GoldenGate requires administrator credentials to access the administration service. Instead of storing credentials in plain text, Kubernetes Secrets can be used to securely store sensitive information.
Create a secret for the GoldenGate administrator credentials using the following command:
~ $ kubectl create secret generic ogg-admin-secret \
--from-literal=OGG_ADMIN=oggadmin \
--from-literal=OGG_ADMIN_PWD=GoldenGate##26ai \
-n goldengate
Verify the secret creation:
kubectl get secrets -n goldengate
NAME              TYPE     DATA   AGE
gg-admin-secret   Opaque   2      10s
This secret will later be referenced by the GoldenGate deployment configuration.
Step 7 – Create GoldenGate Deployment YAML
Next, create a Kubernetes deployment configuration that defines how the GoldenGate container will run inside the cluster.
Create a file named:
~ $ vi goldengate-deployment.yaml
apiVersion: apps/v1
kind: Deployment
metadata:
  name: goldengate
  namespace: goldengate
spec:
  replicas: 1
  selector:
    matchLabels:
      app: goldengate
  template:
    metadata:
      labels:
        app: goldengate
    spec:
      containers:
      - name: goldengate
        image: 010741811535.dkr.ecr.us-east-1.amazonaws.com/goldengate-oracle
        ports:
        - containerPort: 9011
        - containerPort: 9012
        env:
        - name: OGG_ADMIN
          valueFrom:
            secretKeyRef:
              name: ogg-admin-secret
              key: OGG_ADMIN
        - name: OGG_ADMIN_PWD
          valueFrom:
            secretKeyRef:
              name: ogg-admin-secret
              key: OGG_ADMIN_PWD
        resources:
          requests:
            memory: "2Gi"
            cpu: "1"
          limits:
            memory: "4Gi"
            cpu: "2"
          tolerations:
            - operator: Exists
This deployment configuration defines:
- The GoldenGate container image
- Port exposure for the GoldenGate service
Secure credential injection using Kubernetes Secrets
Important status indicators:
Running– container started successfullyREADY 1/1– container inside the pod is healthyRESTARTS 0– no unexpected container restarts
If the pod remains in Pending or CrashLoopBackOff, check logs using:
kubectl logs <pod-name> -n goldengateStep 8 – Verify Node Creation
Finally, confirm that the GoldenGate workload is running on one of the cluster nodes.
Run:
~ $ kubectl get pods -n goldengate -w
NAME                          READY   STATUS              RESTARTS   AGE
goldengate-55fbccb8db-gfx9d   0/1     ContainerCreating   0          6m7s
$ kubectl get pods -n goldengate -w
NAME                          READY   STATUS    RESTARTS   AGE
goldengate-55fbccb8db-gfx9d   1/1     Running   0          6m56s
Verify Node Creation
~ $ kubectl get nodes
NAME                  STATUS   ROLES    AGE   VERSION
i-08231ad46fb7b220f   Ready    <none>   16m   v1.35.0-eks-ac2d5a0
i-0a64d10b3d1a19b6e   Ready    <none>   16m   v1.35.0-eks-ac2d5a0
This command displays additional details including:
- The node where the pod is scheduled
- Internal IP addresses
- Container runtime information
Verifying this ensures that the GoldenGate pod has been successfully scheduled and is running on a worker node within your EKS cluster.
When pod starts: Check Pod Logs
~ $ kubectl logs -f deployment/goldengate -n goldengate
This shows GoldenGate initialization.
OGG_SECURE_DEPLOYMENT=false
APP_HOME=/u01/oggf
APP_DATA_HOME=/u02/oggf
/u02/oggf/deploymentId
OGGF_DEPLOYMENT_ID=88c1a8a7-7280-441a-a927-2b0931422429
/u02/oggf/certificate /
Generating a RSA private key
.....................++++
..............................................................................................................................................................................................++++
writing new private key to '/u01/oggf/certificate/ca-key.pem'
-----
Generating RSA private key, 4096 bit long modulus (2 primes)
..........................................++++
............................................................................................................................................................................................................................++++
e is 65537 (0x010001)
Signature ok
subject=CN = goldengate-55fbccb8db-gfx9d
Getting CA Private Key
/etc/nginx/cert/ogg.pem.full: OK
/etc/nginx/cert/ogg.pem: OK
/
OGG_SERVERCERT=/u02/oggf/certificate/server.pem
OGG_SERVERCERT_KEYFILE=/u01/oggf/certificate/server-key.pem
2026-03-09T07:05:54.358Z | INFO    | -------------------------------------------------------
2026-03-09T07:05:54.359Z | INFO    | Copyright (c) 2014, 2024, Oracle and/or its affiliates.
2026-03-09T07:05:54.360Z | INFO    | All rights reserved.
2026-03-09T07:05:54.360Z | INFO    |
2026-03-09T07:05:54.360Z | INFO    | Create deployment started on 03-09-2026 07:05:54
2026-03-09T07:05:54.361Z | INFO    | JRE: 17
2026-03-09T07:05:54.362Z | INFO    | -------------------------------------------------------
Password:
2026-03-09T07:05:54.368Z | INFO    | Using hostname: 127.0.0.1
Step 9 – Expose GoldenGate Web UI
After successfully deploying the GoldenGate pod, the next step is to expose the GoldenGate Web UI so that it can be accessed externally. In Kubernetes, this is done by creating a Service that exposes the GoldenGate container port.
For this example, we will create a NodePort service, which exposes the application on a port accessible from the worker node’s public IP address.
Create Service File
Create a service definition file for GoldenGate.
nano goldengate-service.yaml
apiVersion: v1
kind: Service
metadata:
  name: goldengate-service
  namespace: goldengate
spec:
  type: NodePort
  selector:
    app: goldengate
  ports:
  - port: 80
    targetPort: 9011
    protocol: TCP
This configuration:
- Creates a Kubernetes service named goldengate-service
- Exposes the GoldenGate container port 9011
- Routes traffic to pods labeled app: goldengate
Apply the Service Configuration
Once the service configuration file is created, apply it to the cluster using the following command:
$ kubectl apply -f goldengate-service.yaml
service/goldengate-service created
Get Service Port
Next, verify that the service has been created and retrieve the exposed port.
Run:
kubectl get svc -n goldengate
NAME                 TYPE       CLUSTER-IP       EXTERNAL-IP   PORT(S)        AGE
goldengate-service   NodePort   10.100.146.170   <none>        80:32248/TCP   11s
Key values to note:
- PORT – internal service port
- NODEPORT – external port used to access the application.
- In this example, the GoldenGate Web UI will be accessible via port 32248.
Get Node Public IP
To access the service externally, you also need the public IP address of one of the worker nodes in the EKS cluster.
Run the following command:
~ $ kubectl get nodes -o wide

NAME                  STATUS   ROLES    AGE    VERSION               INTERNAL-IP     EXTERNAL-IP      OS-IMAGE                                                             KERNEL-VERSION   CONTAINER-RUNTIME

i-08231ad46fb7b220f   Ready    <none>   22m    v1.35.0-eks-ac2d5a0   172.31.67.62    18.232.127.108   Bottlerocket (EKS Auto, Standard) 2026.3.3 (aws-k8s-1.35-standard)   6.12.68          containerd://2.1.6+bottlerocket

i-0e687406544b43d7f   Ready    <none>   3m1s   v1.35.0-eks-ac2d5a0   172.31.23.255   54.152.176.122   Bottlerocket (EKS Auto, Standard) 2026.3.3 (aws-k8s-1.35-standard)   6.12.68          containerd://2.1.6+bottlerocket
Note the EXTERNAL-IP value of any available worker node.
Open GoldenGate Web UI
Once you have the node public IP and NodePort, you can access the GoldenGate Web UI from your browser.
Open your browser and navigate to:
http://NODE-IP:NODEPORTExample:
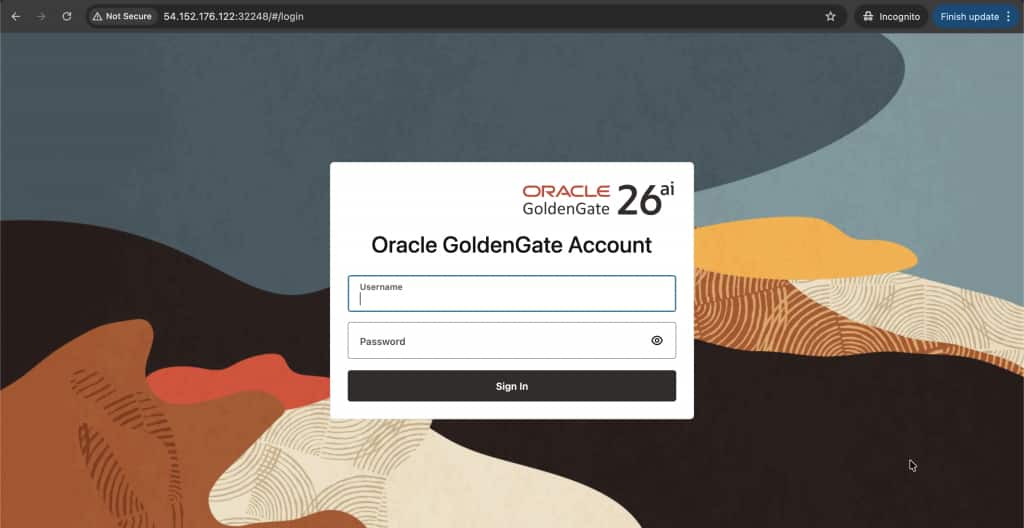
http://54.152.176.122:32248
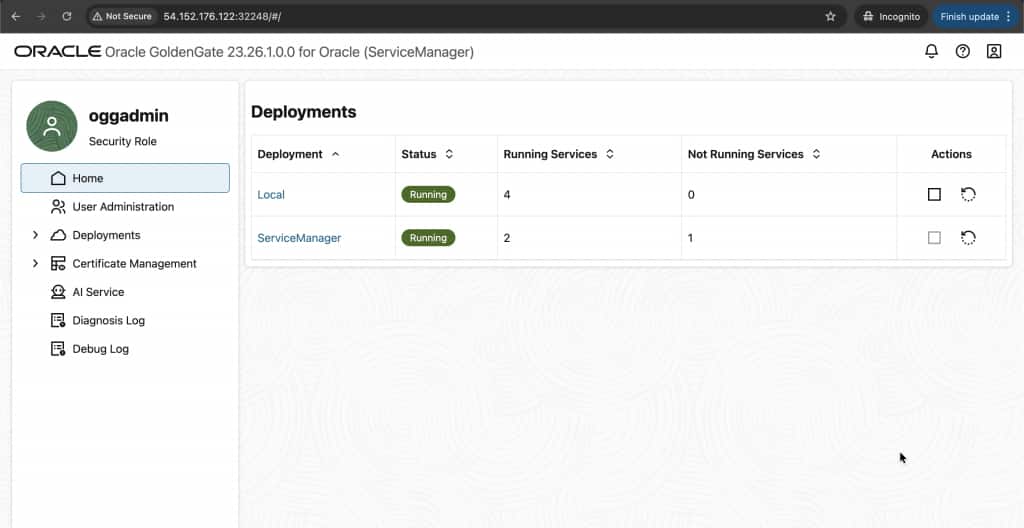
You should see the Oracle GoldenGate Administration Service login page, where you can sign in using the administrator credentials configured earlier.
Verify Running Resources
Finally, it is good practice to verify that all Kubernetes resources for GoldenGate are running correctly.
Run the following command:
~ $ kubectl get all -n goldengateThis command confirms that:
- The GoldenGate pod is running
- The deployment and replica set are healthy
- The service exposing the GoldenGate Web UI is active
At this point, Oracle GoldenGate is successfully deployed and accessible on your Amazon EKS cluster.
Troubleshooting Guide
While deploying Oracle GoldenGate on Amazon EKS, you may occasionally encounter issues related to pod scheduling, node resources, networking, or service exposure. This section outlines common troubleshooting steps to help identify and resolve these issues quickly.
1. Pod Stuck in Pending
If the GoldenGate pod remains in the Pending state, it usually means Kubernetes is unable to schedule the pod onto a worker node.
Run the following command to inspect the pod:
kubectl describe pod goldengate-55fbccb8db-gfx9d -n goldengateScroll to the Events section at the bottom of the output. Kubernetes provides detailed scheduling messages here that explain why the pod has not started.
You may see messages similar to:
0/2 nodes available: insufficient memory
OR image pull error
OR insufficient cpu
When reviewing the events, look for indicators such as:
- Node taints preventing scheduling
- Insufficient resources such as CPU or memory
- Scheduling constraints such as node selectors or affinity rules
- Image pull errors if the container registry cannot be accessed
These messages provide the most accurate explanation for why Kubernetes is unable to start the container.
2. Verify Node Health
If pods are not starting, the next step is to verify that the worker nodes in the cluster are healthy.
Run the following commands:
kubectl get nodeskubectl get nodes -o wideConfirm that:
- The STATUS column shows Ready
- Worker nodes are listed
- The nodes have internal and external IP addresses assigned
If nodes appear as NotReady, Kubernetes will not schedule workloads on them.
3. Test Inside the Cluster (Most Important Test)
If the pod is running but the GoldenGate Web UI is not accessible, it is important to verify whether the GoldenGate services themselves are running inside the container.
You can test connectivity inside the pod using the following command:
kubectl exec -it goldengate-55fbccb8db-gfx9d -n goldengate -- curl http://localhost:9011If GoldenGate microservices are running correctly, you should receive a response such as:
- JSON output
- HTML content
- A service response from the GoldenGate Administration Service
If you receive a valid response, this confirms that:
- The GoldenGate container is running properly
- The GoldenGate microservices inside the container are operational
This means the issue is most likely related to service exposure or networking, rather than the application itself.
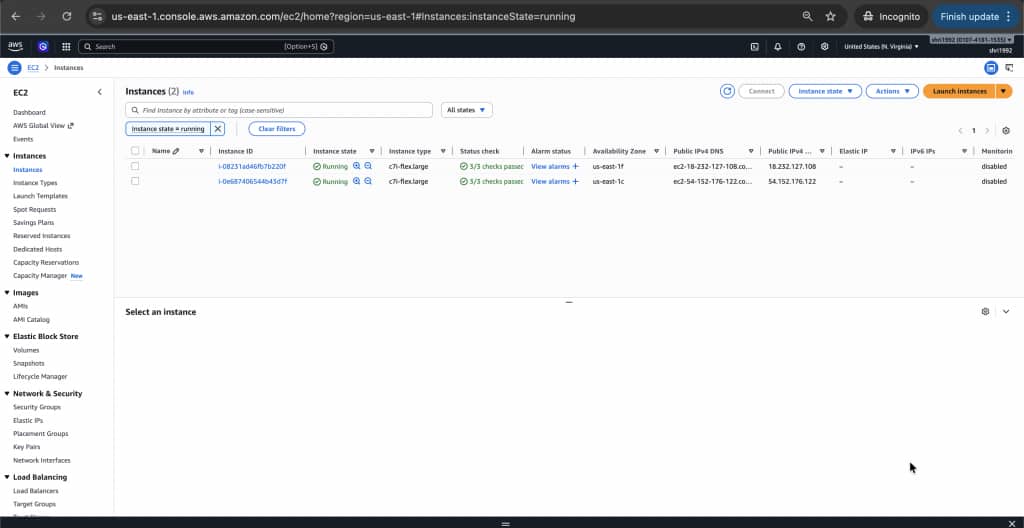
4. Check Node Security Group (Most Common AWS Issue)
One of the most common reasons for not being able to access a NodePort service on Amazon EKS is that the AWS security group attached to the worker nodes blocks the external port.
Your nodes may have public IPs such as:
18.232.127.108
54.152.176.122
However, AWS security groups might still block incoming traffic on the NodePort.
To resolve this:
- Open the AWS Management Console
- Navigate to EC2
- Select Instances
- Locate your EKS worker node
- Identify the Security Group attached to the instance
Add a new Inbound Rule with the following configuration:
| Setting | Value |
| Type | Custom TCP |
| Port | 32248 (your NodePort) |
| Source | 0.0.0.0/0 |
This rule allows external traffic to reach the NodePort exposed by the Kubernetes service.
Once the rule is added, you should be able to access the GoldenGate Web UI using:
http://NODE-IP:NODEPORT
Example:
http://18.232.127.108:32248
If the configuration is correct, the GoldenGate Administration Service login page should load successfully.
