Introduction
PostgreSQL is a relational, open-source database—and replicating data between PostgreSQL instances without downtime or data drift poses a real challenge. Oracle GoldenGate addresses this by offering high-speed, low-latency replication across both homogeneous (PostgreSQL to PostgreSQL) and heterogeneous (PostgreSQL to other databases like Oracle, SQL Server, MySQL, etc.) environments.
For a general overview of GoldenGate replication between on-prem PostgreSQL and Oracle Cloud Infrastructure (OCI) PostgreSQL, refer to this blog.
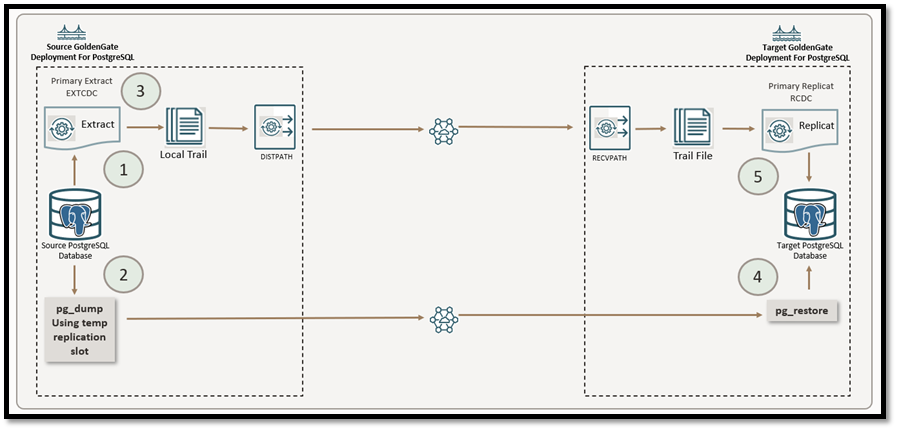
This guide builds on that foundation by walking through a precise instantiation strategy using Oracle GoldenGate and PostgreSQL’s native pg_dump utility. This method enables the creation of a transactionally consistent snapshot while GoldenGate captures and applies ongoing changes—ideal for zero-downtime migrations or continuous replication.
Common Use Cases for GoldenGate with PostgreSQL:
- Bi-directional replication to improve availability and support seamless failover.
- Active-active replication to scale writes across multiple nodes.
- Read-only replicas to offload reporting and analytics from production systems.
Prerequisites for PostgreSQL to PostgreSQL Replication using Oracle GoldenGate
Before kicking off the instantiation process, both the source and target (PostgreSQL) environments need to be prepared. Skipping these steps often leads to setup failures, inconsistent data, or unsupported configuration errors.
Here’s what must be in place:
- GoldenGate Installation :
Install the latest patch release of Oracle GoldenGate 23ai (Microservices Architecture) for PostgreSQL.
See the Oracle GoldenGate documentation for details regarding software installation and patching.
For the latest OGG versions and patch bundles, refer to this blog: How to Obtain the Latest Oracle GoldenGate Microservices Architecture Bundle Patches.
- Create Deployment PostgreSQL GoldenGate :
Next create deployment for PostgreSQL. If you are installing as a hub, then can use a single Service Manager and Deployment. See the Oracle GoldenGate documentation for more details.
- Database Configuration :
Prepare PostgreSQL DB as Source and Target for Oracle GoldenGate. See the following Oracle Documentation Oracle GoldenGate documentation
Once the prerequisites are in place, the system is ready for the snapshot + replication setup — which begins with instantiating the initial data from PostgreSQL Source to Target Database.
Pre-Instantiation Steps for PostgreSQL-to-PostgreSQL Replication
When configuring Oracle GoldenGate for PostgreSQL-to-PostgreSQL replication, understanding your table metadata isn’t just good hygiene—it’s key to ensuring efficient replication performance, especially when using Parallel Replicat.
While tools like pg_dump make it easy to take a consistent snapshot of your PostgreSQL source, certain schema design elements can affect GoldenGate’s performance and replication behaviour. For example, tables without primary or unique keys may lead to less efficient row identification, and tables with complex foreign key relationships can affect how transactions are applied, particularly in parallel replication scenarios.
In this demonstration, we use the Swingbench Order Entry schema, a realistic, transaction-heavy workload consisting of 11 interrelated tables—perfect for simulating a typical e-commerce environment. Understanding how these tables are linked and constrained helps anticipate how GoldenGate will replicate changes.
If you want to inspect key constraints in your PostgreSQL schema, you can use the following queries to compare them in both Source and Target PostgreSQL:
SELECT
    t.relname AS TableName,
    i.relname AS IndexName,
    ix.indisunique AS UC,
    ix.indisprimary AS PK
FROM
    pg_class t
JOIN
    pg_index ix ON t.oid = ix.indrelid
JOIN
    pg_class i ON i.oid = ix.indexrelid
JOIN
    pg_namespace n ON n.oid = t.relnamespace
WHERE
    n.nspname = 'public'
ORDER BY
    t.relname;
Query 1 : View Primary and Unique Keys

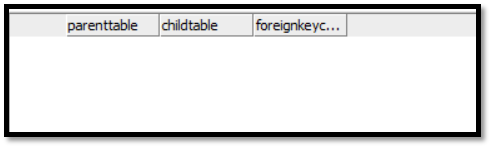
With Query 2 you can check the foreign key dependencies. In this case there are no foreign key dependencies in our sample schema.
SELECT
    tc.table_name AS ParentTable,
    ccu.table_name AS ChildTable,
    tc.constraint_name AS ForeignKeyConstraint
FROM
    information_schema.table_constraints AS tc
JOIN
    information_schema.constraint_column_usage AS ccu
    ON tc.constraint_name = ccu.constraint_name
    AND tc.constraint_schema = ccu.constraint_schema
WHERE
    tc.constraint_type = 'FOREIGN KEY'
    AND tc.constraint_schema = 'public'
ORDER BY
    ParentTable;
Query 2 : To retrieve Foreign Key Constraints
Source Side Instantiation Steps of GoldenGate for PostgreSQL
In this section, we will complete all the required steps on the source side of the replication setup.
Add Trandata
Once the source PostgreSQL connection is established, you must enable table-level supplemental logging. PostgreSQL provides this capability through the REPLICA IDENTITY setting, which controls what information is written to the Write-Ahead Log (WAL) during UPDATE and DELETE operations. GoldenGate relies on this logged data to identify and propagate changes downstream.
There are four levels of table-level logging in PostgreSQL, which correspond to the REPLICA IDENTITY setting:
- NOTHING: No old row data is logged. Replication of updates or deletes is not possible.
- USING INDEX: Logs only the columns from a specified unique index.
- DEFAULT: Logs primary key columns (or a unique index if present).
- FULL: Logs the entire old row image, regardless of keys.
For typical uni-directional GoldenGate replication, the default setting of ADD TRANDATA is usually sufficient. It automatically includes primary key, unique key, and foreign key columns, providing the necessary information for reliable replication and optimal performance with Parallel Replicat.
However, in more complex scenarios—such as replicating tables without keys, implementing conflict detection, or supporting bi-directional replication—it is a best practise to configure the table with REPLICA IDENTITY FULL. This ensures that all column values are logged, enabling GoldenGate to accurately capture the full before-and-after state of each row.
Use FULL logging selectively and only where needed, as it can increase WAL volume and impact performance.
Create Primary CDC Extract.
Before we begin the data export, we first set up the Change Data Capture Extract process. This Extract will eventually capture all ongoing changes (INSERTs, UPDATEs, DELETEs) from the source PostgreSQL database after the initial data has been copied to the target. However, we do not start the Extract just yet.
Because we want to ensure a precise and consistent starting point — one that aligns exactly with the snapshot we’ll export in the next step using pg_dump. Starting the Extract before the export could result in missed or duplicated changes, leading to data drift on the target.
EXTRACT extcdc
USERIDALIAS PG_Ashburn_SOE, DOMAIN OracleGoldenGate
EXTTRAIL st
-- Every 60 minutes, report the count of records
-- processed since Extract start to the process
-- report file.
-- Rate reports the number of operations per second
-- The report file also contains DELTA throughput which is
-- the number of records since the last report divided by
-- the time since the last report
REPORTCOUNT EVERY 60 MINUTES, RATE
-- Select from all tables in the public schema.
TABLE public.*;
Parameter File 1 : CDC Extract Parameter File
Create the snapshot using the pg_dump (or pg_dumpall for clustered databases)
Now that we’ve defined our Extract process (but haven’t started it), it’s time to establish a replication slot — a key component that enables us to create a repeatable, transactionally consistent snapshot of the source PostgreSQL database. For more information find the PostgreSQL documentation CREATE_REPLICATION_SLOT
This replication slot acts as a logical bookmark. It holds back WAL (Write-Ahead Log) files on the source until we confirm that the Extract process has processed them. For our purposes, we’ll create a temporary logical replication slot, which will be used both:
- To define the exact WAL LSN from which to start replication,
- And to ensure that the pg_dump export aligns with this starting point — preventing data loss or duplication.
Here’s how you can create the replication slot:
Log into the source PostgreSQL instance as a user with replication privileges. You must also specify the replication=database option in your connection string. Once connected, create a temporary logical replication slot.
Take note of:
- consistent_point: This is the WAL LSN from which the Extract should start.
- snapshot_name: This is the snapshot identifier that will be used in the upcoming pg_dump command to ensure data consistency.
Important: Do not close or terminate this session yet. You’ll use it to perform the pg_dump in the next step, referencing the exported snapshot.
]$ psql "dbname=soe replication=database user=ggadmin"
psql (16.9)
Type "help" for help.

soe=# CREATE_REPLICATION_SLOT tslot TEMPORARY LOGICAL test_decoding EXPORT_SNAPSHOT;

 slot_name | consistent_point |    snapshot_name    | output_plugin
-----------+------------------+---------------------+---------------
 tslot     | 9/E50B97F0       | 0000000C-0000020E-1 | test_decoding
(1 row)
Now that we’ve created the temporary replication slot with a valid snapshot, it’s time to export the source PostgreSQL database using pg_dump, precisely aligned with that snapshot.
Before running the dump, create a .pgpass file to store credentials and avoid interactive password prompts during automated or background executions:
~]$ more ~/.pgpass
localhost:5432:soe:ggadmin:xxxxxxx
localhost:5432:soe_target:ggadmin:xxxxxxx

-- Security Tip: Set permissions on .pgpass to ensure it's not world-readable:
~]$ chmod 600 ~/.pgpass
Now, in a separate terminal session (while keeping the replication slot session open), run pg_dump using the –snapshot option with the value of the snapshot_name obtained in the previous step.
~]$ nohup /usr/pgsql-16/bin/pg_dump -h localhost -p 5432 -U ggadmin --snapshot=0000000C-0000020E-1 -F c -b -v -f soe.db soe --schema public &
[1] 386219
~]$ nohup: ignoring input and appending output to 'nohup.out'
Explanation of Options:
- –snapshot: Ensures the dump uses the exact snapshot exported from the replication slot.
- -F c: Custom format for efficient restore via pg_restore.
- -b: Include large objects (blobs).
- -v: Verbose output.
- -f soe.db: Output file name.
- soe: Name of the source database.
- –schema public: Dump only the public schema (optional based on scope).
Next you can transfer the .db file to the target system and use pg_restore to import it into target PostgreSQL DB.
Start Primary CDC Extract.
Once the pg_dump utility is completed , you can now start the Extract with the consistent_point(LSN 9/E50B97F0) tracked in previous step.
Create Distribution Path
Create and start a Distribution Path from the source Oracle GoldenGate server to the target Oracle GoldenGate server, as specified in the Oracle GoldenGate documentation, for the CDC trail data.
Target Side Instantiation Steps of GoldenGate for PostgreSQL
Restore the Dump File Using pg_restore
After successfully exporting a consistent snapshot of your source PostgreSQL database, the next step is to restore the dump file into the target PostgreSQL instance.
Just like during the pg_dump process, it’s crucial to ensure the session remains active for the duration of the restore — especially for large databases. If the terminal session is lost or interrupted midway, the restore operation may fail, leaving the target in an inconsistent state.
To prevent this, we recommend running the restore with nohup, allowing the operation to continue in the background.
~]$ nohup /usr/pgsql-16/bin/pg_restore -h localhost -p 5432 -U ggadmin -d soe_target -v soe.db &
[1] 389727
~]$ nohup: ignoring input and appending output to 'nohup.out'
Explanation of Options:
- -h localhost : Target host (use the hostname or IP of the PostgreSQL server)
- -p 5432 : Port number on which PostgreSQL is running
- -U ggadmin : Database user performing the restore (must have sufficient privileges)
- -d soe_target : Name of the target database (should already exist)
- -v : Verbose mode — useful for monitoring progress
- soe.db : The dump file you created earlier using pg_dump
Once the restore is completed, the soe_target database will reflect the same state as the source at the time of the snapshot — and is now ready to start receiving changes via your replication Extract process.
Create CDC Replicat
Now that the target database has been fully restored using a transactionally consistent snapshot, it’s time to start the CDC Replicat process to begin applying the change data (CDC) from the source PostgreSQL instance.
If you are unfamiliar with how to create Replicats, please refer to the Oracle GoldenGate documentation.
Note: Make sure to create a checkpoint table if it does not exist in the target PostgreSQL DB.
REPLICAT RCDC
USERIDALIAS PG_Ashburn_SOE_TARGET DOMAIN OracleGoldenGate
-- Every 10 minutes, report the count of records
-- processed since Extract start to the process
-- report file.
-- Rate reports the number of operations per second
-- The report file also contains DELTA throughput which is
-- the number of records since the last report divided by
-- the time since the last report
REPORTCOUNT EVERY 10 MINUTES, RATE
-- Organize similar SQL statements into arrays and apply
-- them at an accelerated rate.
BATCHSQL
-- Large transactions should be broken into pieces of
-- specified size and applied concurrently.
SPLIT_TRANS_RECS 10000
MAP public.*, TARGET public.*;
Parameter File 2 : CDC Replicat Parameter File
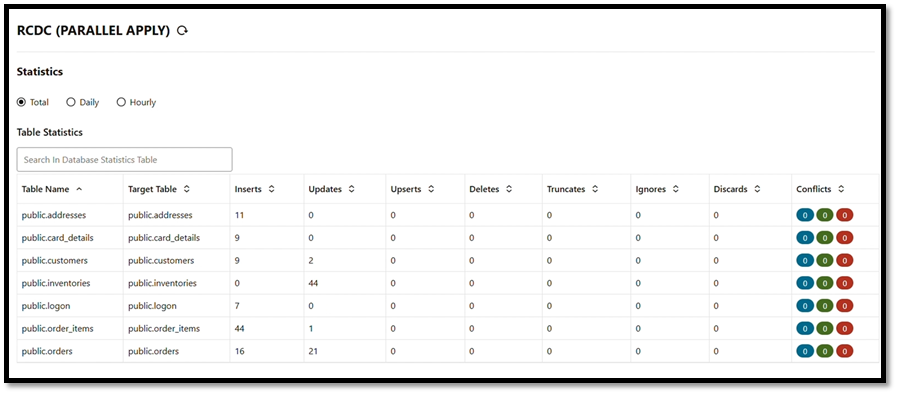
To verify that the source and target data are synchronized, you can use the Oracle GoldenGate Veridata product or use your own scripts to select and compare source and target data.
Conclusion
In this guide, we demonstrated how to set up a precise PostgreSQL-to-PostgreSQL replication using Oracle GoldenGate. By aligning pg_dump with a replication slot snapshot and starting the Extract from the exact LSN, you can ensure zero data loss and maintain perfect consistency across environments.