Starting with version 23.9, Oracle GoldenGate now supports Azure Entra ID in addition to the existing Identity Provider (IdP), such as Oracle Access Manager (OAM), Oracle Identity Cloud Service (IDCS), and OCI Identity Access Management (IAM). By using IdPs, you delegate the GoldenGate user management and authentication to the OpenID-complaint External Identity Providers. To utilize this, you will need to create the authorization profile in GoldenGate and create/register the application in the corresponding External Identity Providers.
This blog will focus on how to use Entra ID as GoldenGate IdP.
Highlights Summary
Azure Entra ID Application Setup
1. Create the appropriate user and security groups in EntraID. You will need four security Groups that will be mapped to the respective GoldenGate user roles of Security/Admin/Operator/User. The group name could be any name you choose.
2. Create an application in Entra ID with the following configuration:
-
Single-tenant only Enterprise application meant to integrate with Entra ID
-
Above groups assigned
-
Client secret generated
-
Client ID generated
-
Groups custom claim enabled
A. Only Groups assigned to the application
B. “cloud_displayname” additional property set.
-
App role with the value “urn:ogg:service:toService”
-
API permission granted for “urn:ogg:serviceToService”
-
Admin consent granted for “urn:ogg:serviceToService”
-
API permission granted for “Microsoft Graph Application.ReadWrite.All”
-
Admin consent granted for “Microsoft Graph Application.ReadWrite.All”
-
“requestedAccessTokenVersion” set to 2
GoldenGate Authorization Profile for Entra ID Creation
Once the above tasks are done, try to create an Authorization Profile in Service Manager for Entra ID and use the values collected from the Entra ID Application to fill in the required fields.
- Choose Microsoft Entra ID as the Type
- Give a Profile name you choose
- Add appropriate Description, free text
- Obtain the Entra ID Application’s Tenant ID from Step 2, use that to create the Tenant Discovery URI as https://login.microsoftonline.com/{tenantID}/v2.0/.well-known/openid-configuration
- Obtain the Entra ID Application’s Client ID and fill in the Client ID field
- Obtain the Entra ID Application’s Client Secret that was associated with that Client ID and fill in the Client Secret Field
- Add the Entra ID security groups created in Step 1 to the appropriate role box

Click Submit.
After the Authorization Profile is successfully created, you can test it to make sure it is configured correctly and GoldenGate can successfully communicate with Azure Entra ID. After that, you can enabled the profile and start using the Azure Entra ID to manage your GoldenGate logins.
The Complete Detail Tasks from Scratch
The following are the detailed tasks that list out each detailed step, assuming you are starting from a new GoldenGate implementation, i.e., no Entra ID user/group has been created, and no GoldenGate authentication profile has been created. While this is a straightforward process, there are many steps and I’ve outlined them here. It is important to ensure each task is done completely prior to moving to the next one.
High Level Tasks
- Create the GoldenGate Group(s) for your Entra ID users
- Create an application in Entra ID
- Assign user/groups to the application
- Assign Application Owner (optional)
- Register Application by creating client secrets
- Create Token Configuration for the Application
- Create GoldenGate Service App roles
- Add API Permission to the GoldenGate Service App Roles and grant admin consent
- Add Microsoft Graph Application.ReadWrite.All API permissions to the Application and grant admin consent
- Manually update the token request properties in the Manifest
- Create the redirect URL for Application Authentication (Preview)
- Configure Entra ID authorization profile in GoldenGate
Each task explained in details.
1. Create the GoldenGate Group(s) for your Entra ID users
When creating the Authorization Profile, GoldenGate will map the Entra ID security groups into four roles for GoldenGate authorization: Security/Administrator/Operator/User, The Entra ID user who belongs to the group will have the corresponding mapped GoldenGate role. The name of the Entra ID security group could be anything you want to name it.
Illustration of the Entra ID security groups
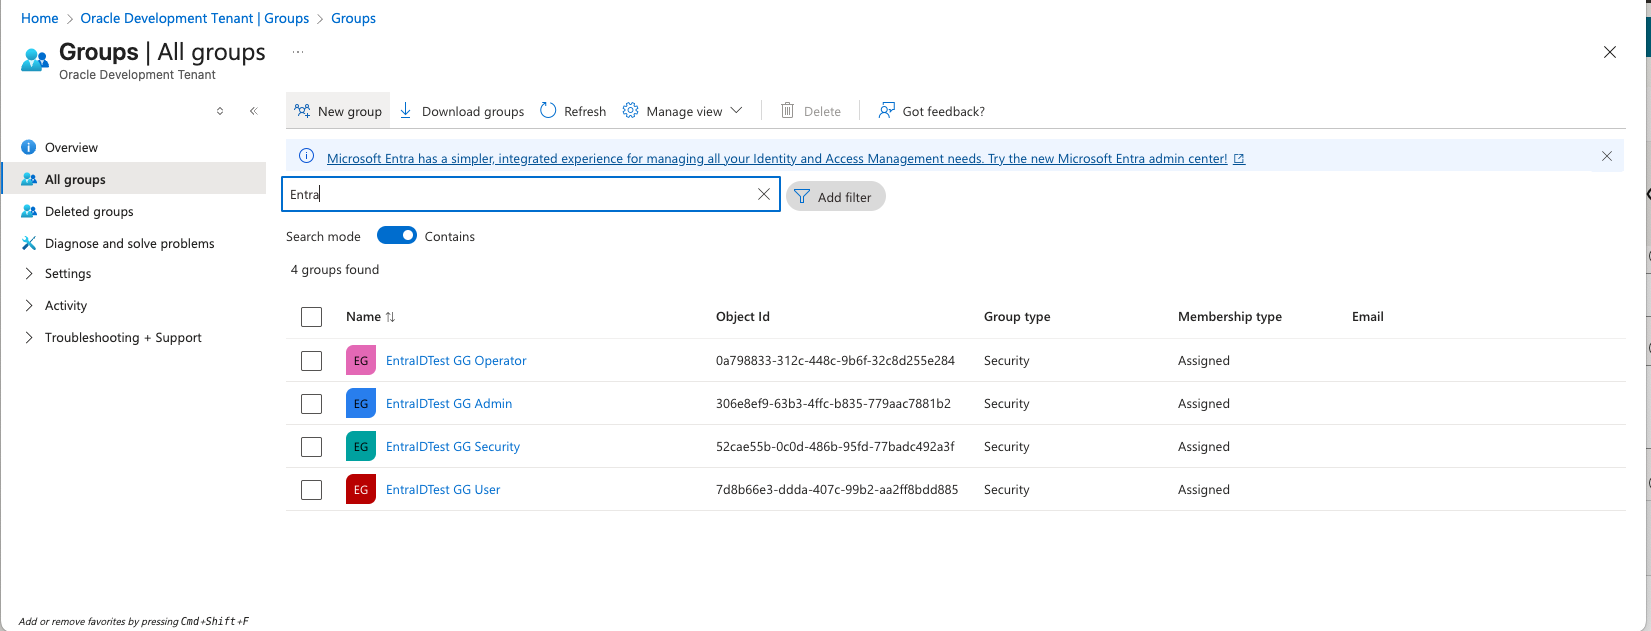
Write down the group names, which will be used in the last step when creating the GoldenGate Authorization Profile.
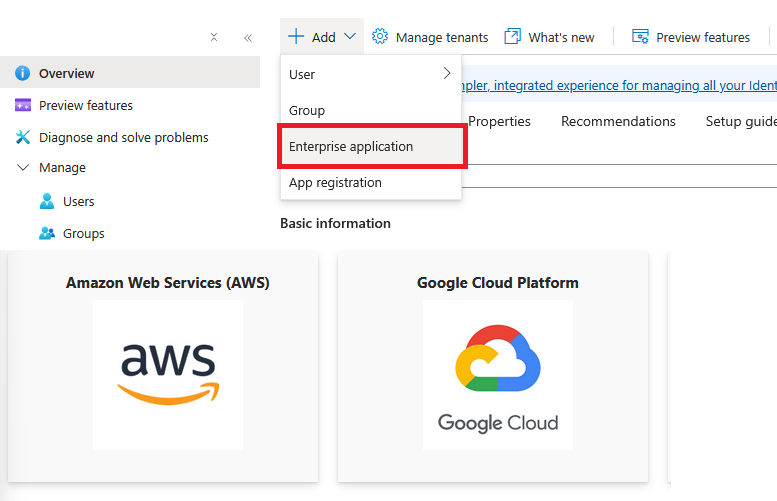
2. Create an application in Entra ID
Under the Azure Entra ID Portal, select Add→Enterprise application
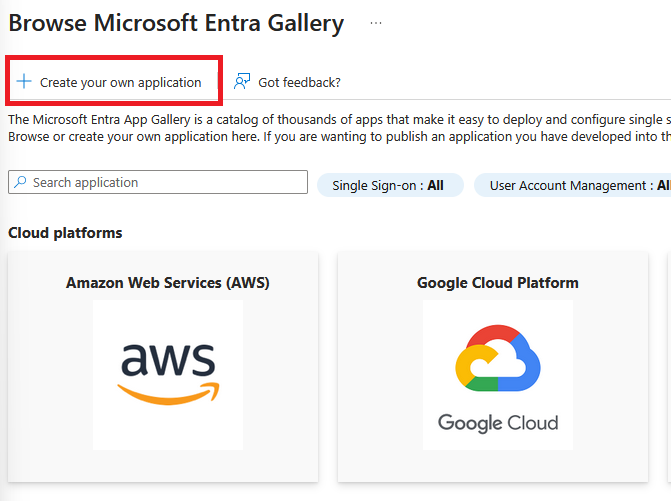
Select “Create your own application”
Name your application and select “Register an application to integrate with Microsoft Entra ID (App you’re developing)”
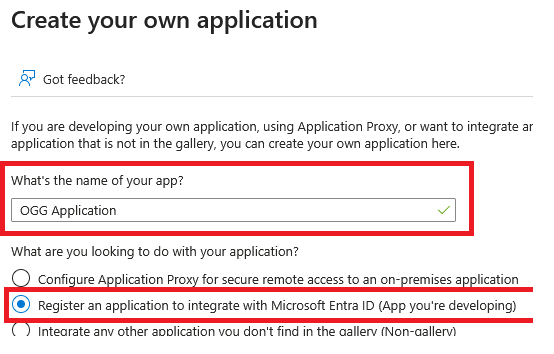
Select Create, then select “Accounts in this organizational directory only (… – Single tenant)”

3. Assign user/groups to the application
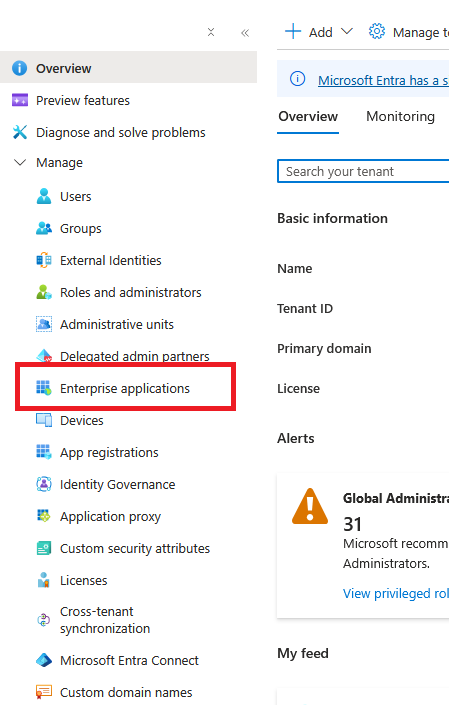
Go back to Entra ID Overview page, under Manage, select Enterprise applications
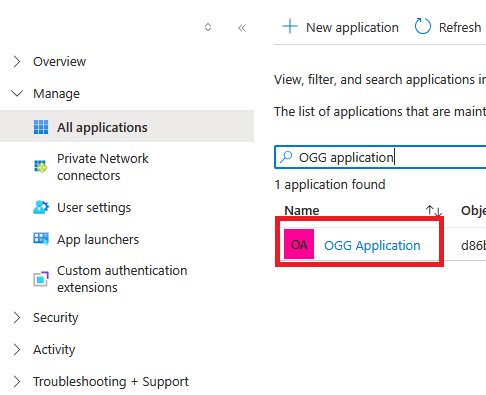
Search for the application name you used in Step 2
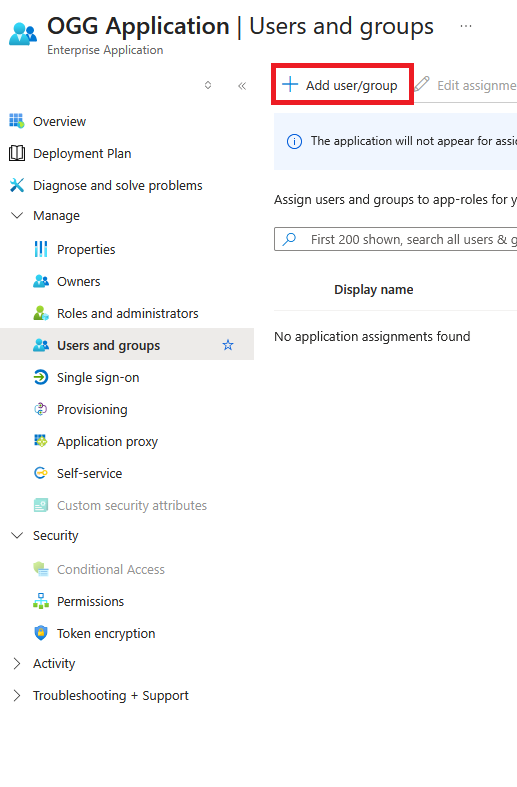
Under Mange select Users and groups, Click “Add user/group”
- Click on “None Selected”.
- Search for and select the groups to assign to this application and ensure that the selected groups appear in the right-hand pane
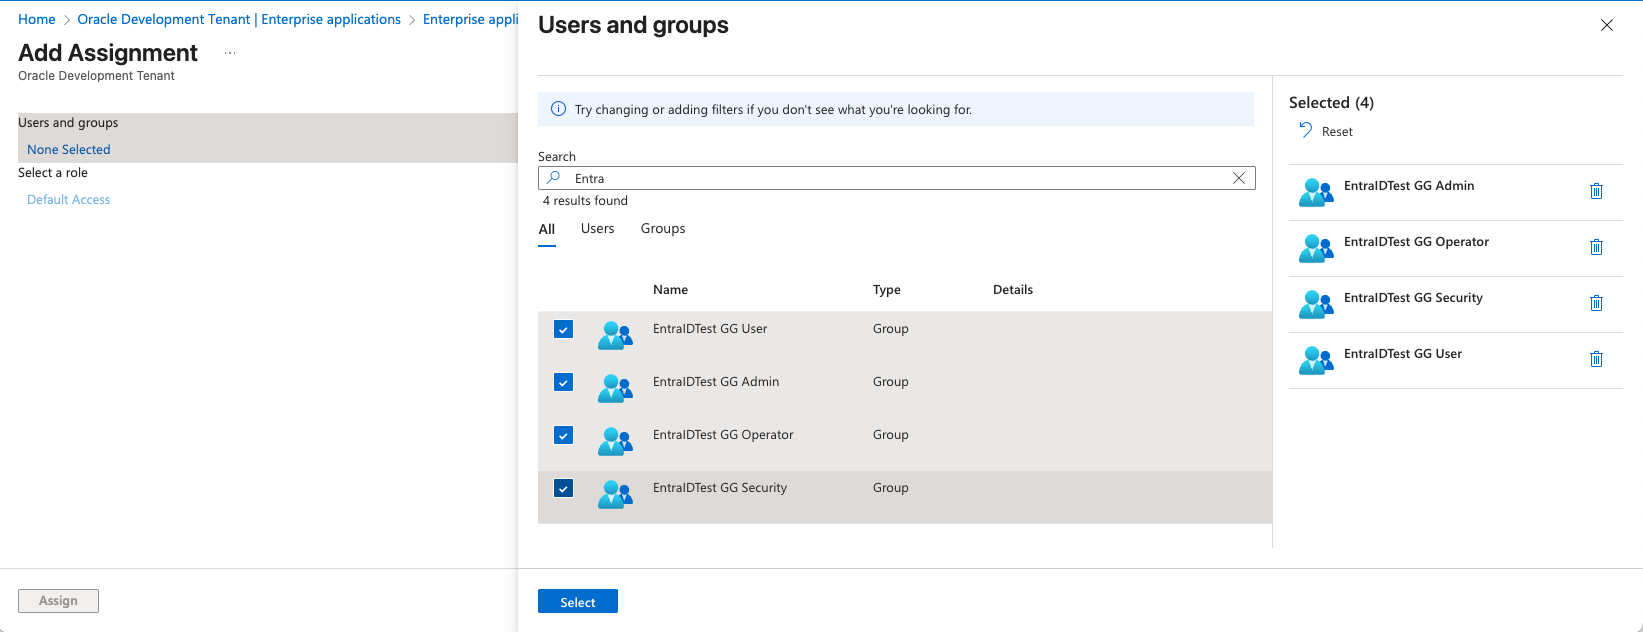
Select all groups, then click “Select”, and click “Assign”
Please make sure you assign all the Entra ID security groups created in Step 1 to this application.
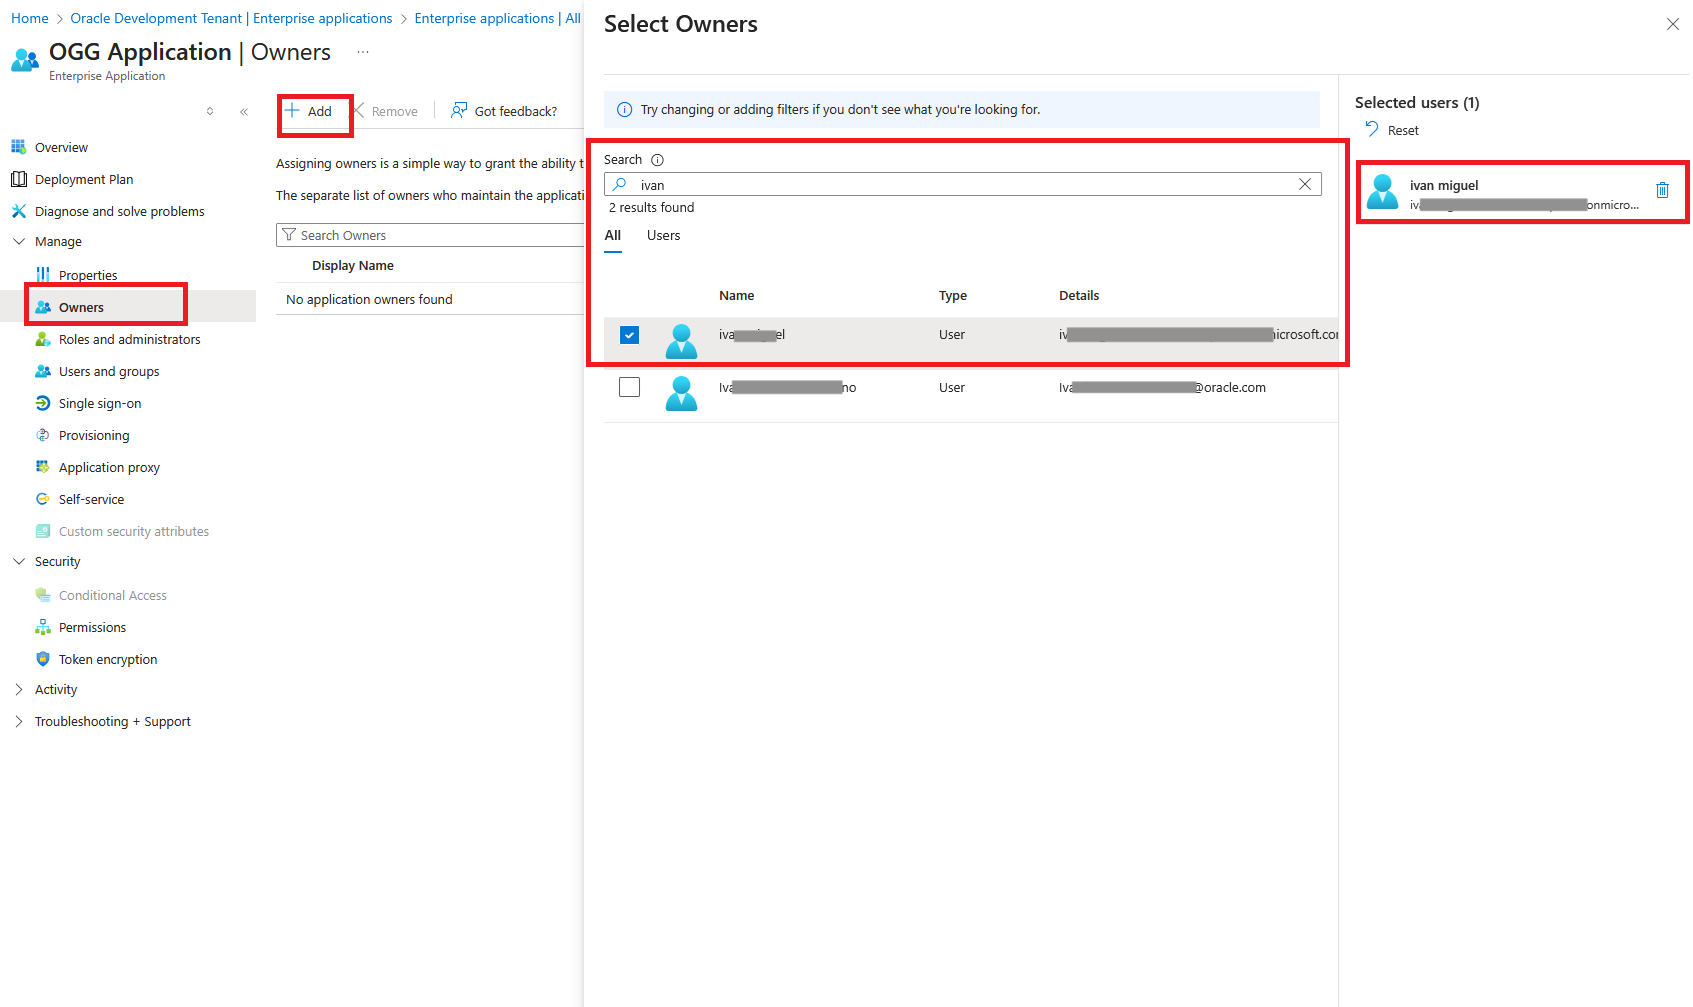
4. Assign Application Owner (optional)
Optionally, you can assign application owners.
- Under “Manage” select “Owners”
- Click Add
- Search for and select owners
- Make sure that selected owners appear on the right hand pane
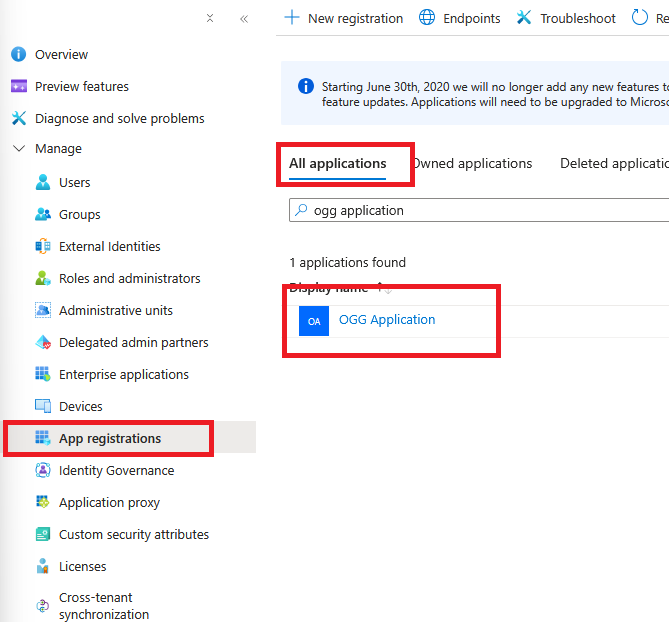
5. Register Application by creating client secrets
- Go back to Entra ID overview
- Select “App registrations”
- Select “All applications”
- Search for and select the application name created in Step 2.
Once clicked the application, it will show the details. Take note of “Application (client) ID” and “Directory (tenant) ID”. In this case they are d6767f3c-xxxxxxxxxxxxxxx and 5b743bc7-cxxxxxxxxxxxxxxx respectively

- Under “Manage” select “Certificates & secrets”
- Select “Client secrets”
- Click “New client secret”
- Add a description and select an expiration period
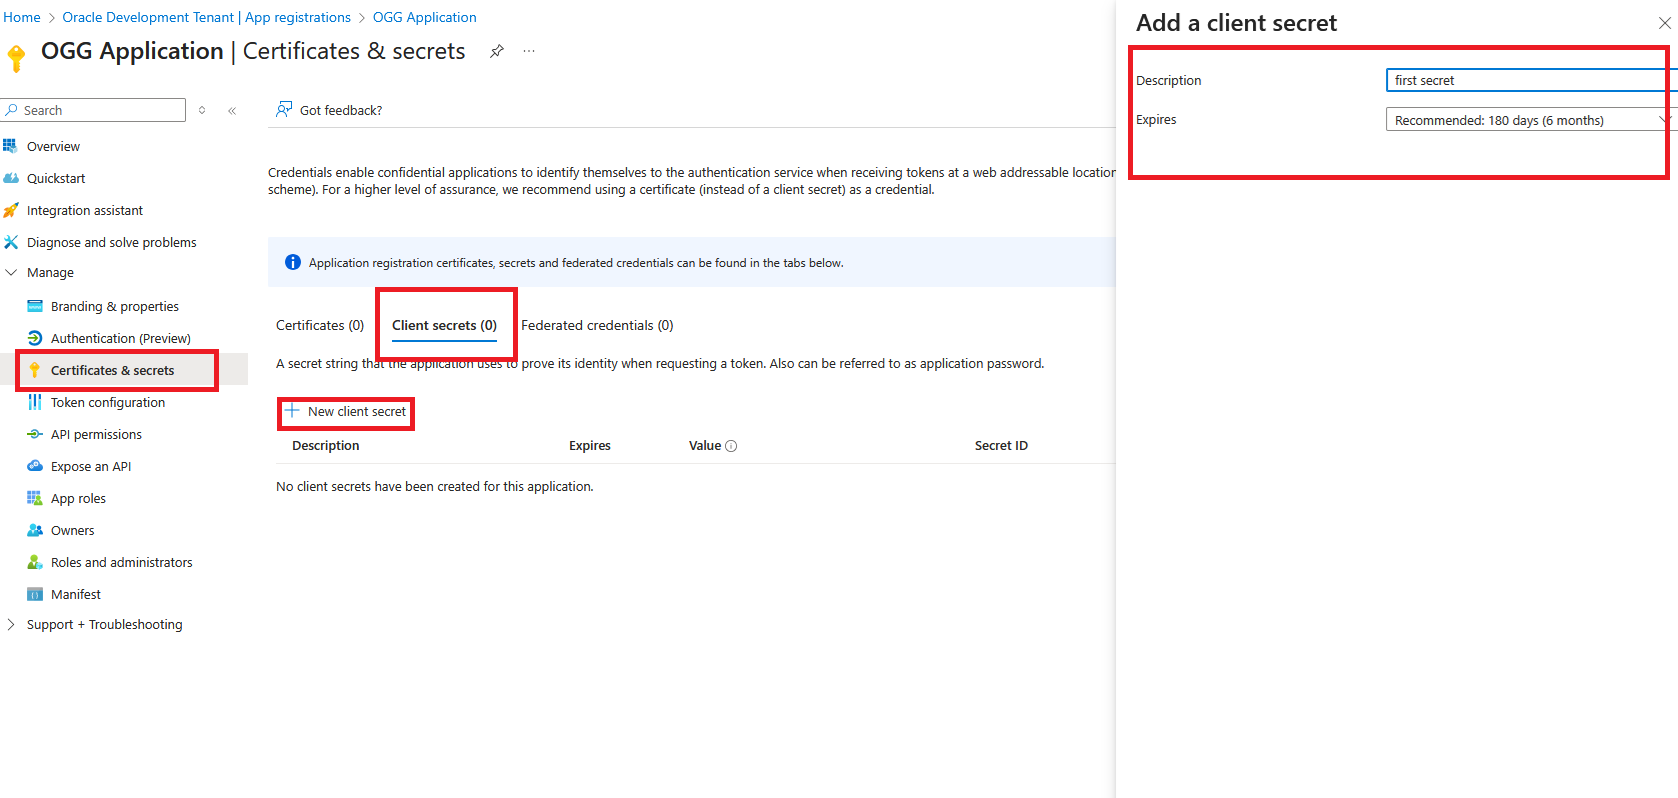
- Click “Add”
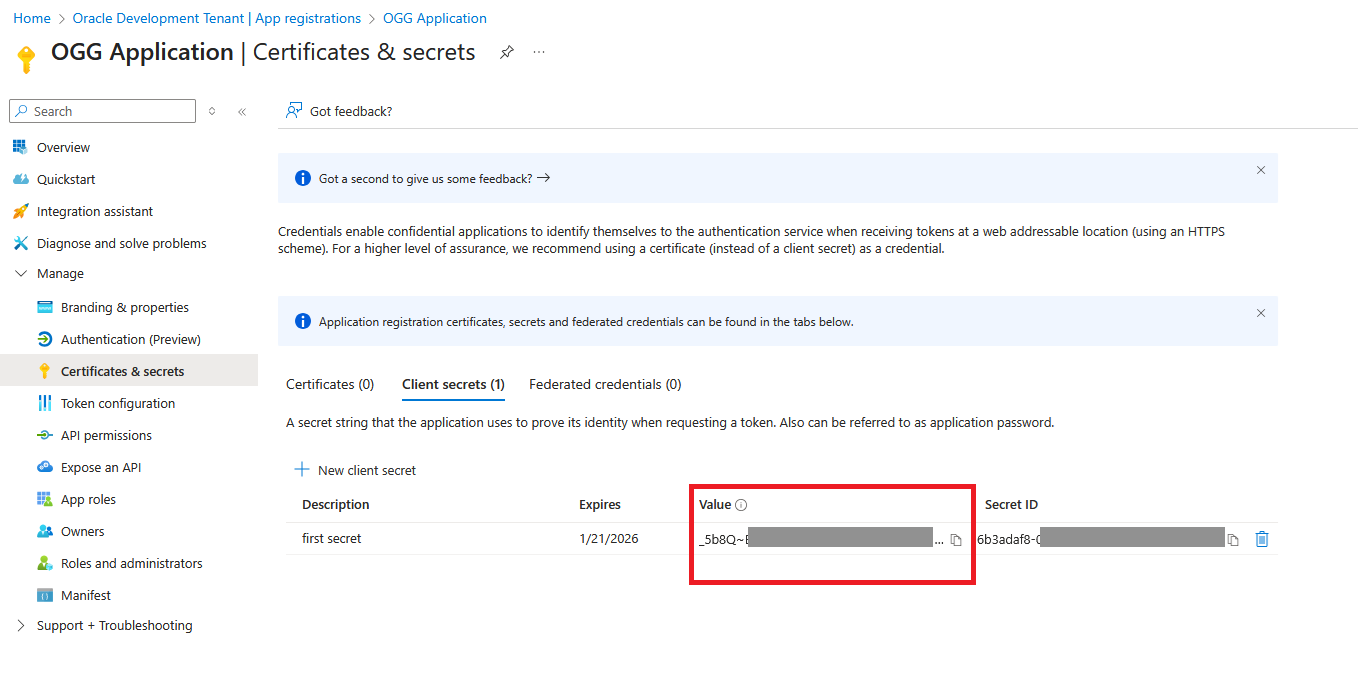
- Take not of the “Value” in this case it’s _5b8Q~xxxxxxxxxxxx
After all the steps are done correctly, please note the following information, which will be used later in Step 12
- Client ID
In the example above, it is d6767f3c-xxxxxxxxxxxxxxx
- Tenant ID
In the example above, it is 5b743bc7-cxxxxxxxxxxxxxxx, this value will be used to construct Tenant Discovery URI, https://login.microsoftonline.com/{tenantID}/v2.0/.well-known/openid-configuration
- Client Secret
In the example above, it is _5b8Q~xxxxxxxxxxxx
6. Create the Token Configuration for the Application
- Under “Manage” in the navigation pane, choose “Token configuration”
- Click “Add groups claim”
- Select “Groups assigned to the application (…)” and click “Add”

7. Create GoldenGate Service App roles
- Under “Manage” in the navigation pane, choose “App Roles”
- Click “Create app role”
- Fill display name
- Under “Allowed member types” select “Applications”
- Set “Value” to urn:ogg:serviceToService
- Fill description
- Select “Do you want to enable this app role?” and click Apply.

8. Add API Permission to the GoldenGate Service App Roles and grant admin consent
- Under “Manage” select “API permissions”
- Click “Add a permission”
- Click “APIs my organization uses”
- Search for the application created in Step 2
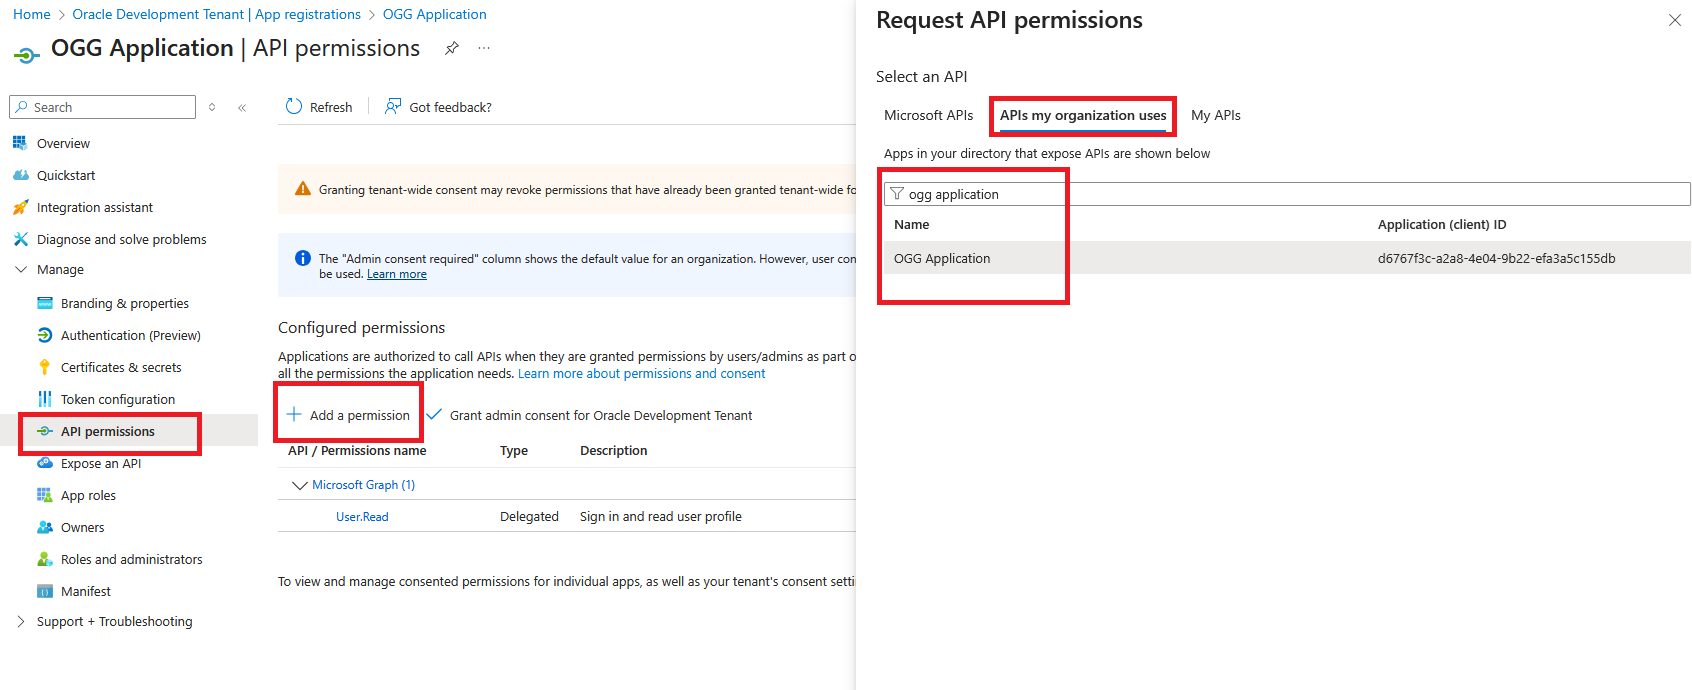
- Click application
- Select “urn:ogg:serviceToService
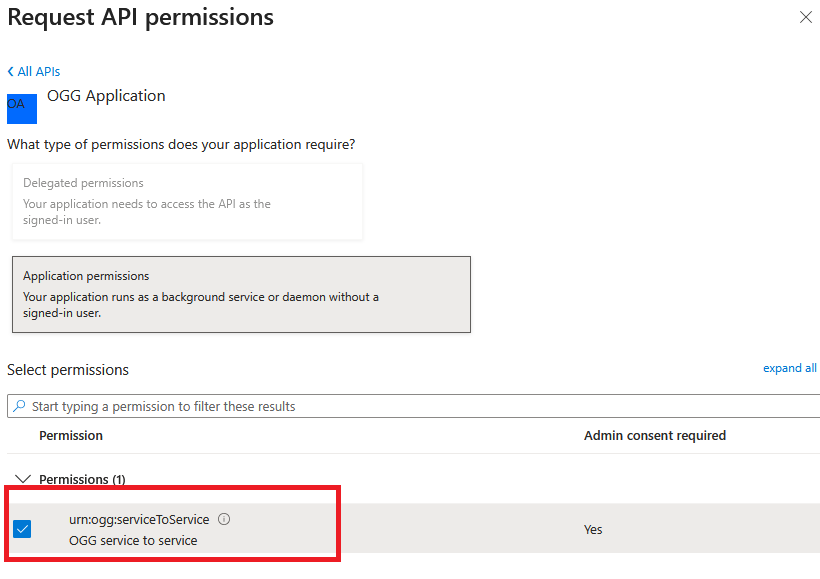
- Click “Add permissions”
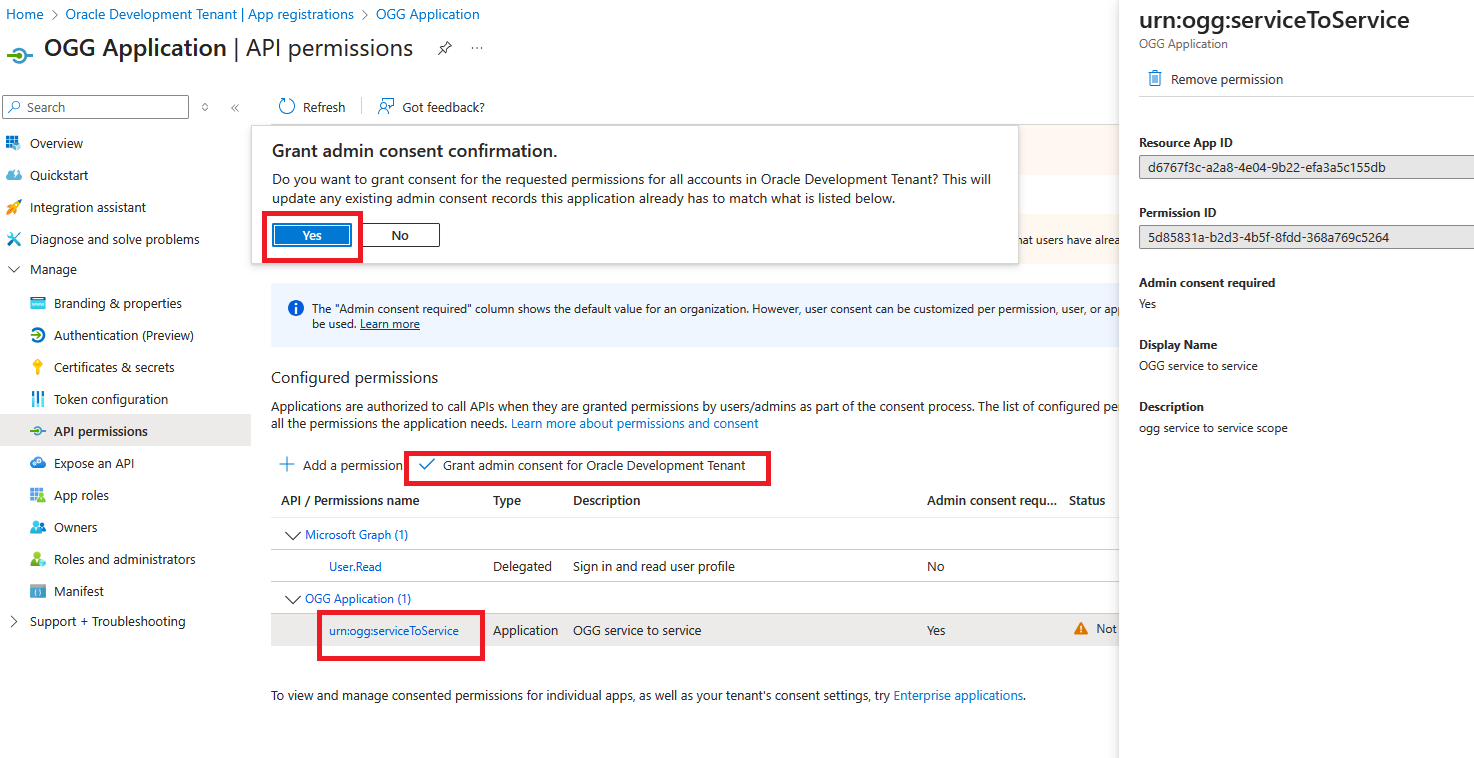
- The permission should appear under “Configured permissions”
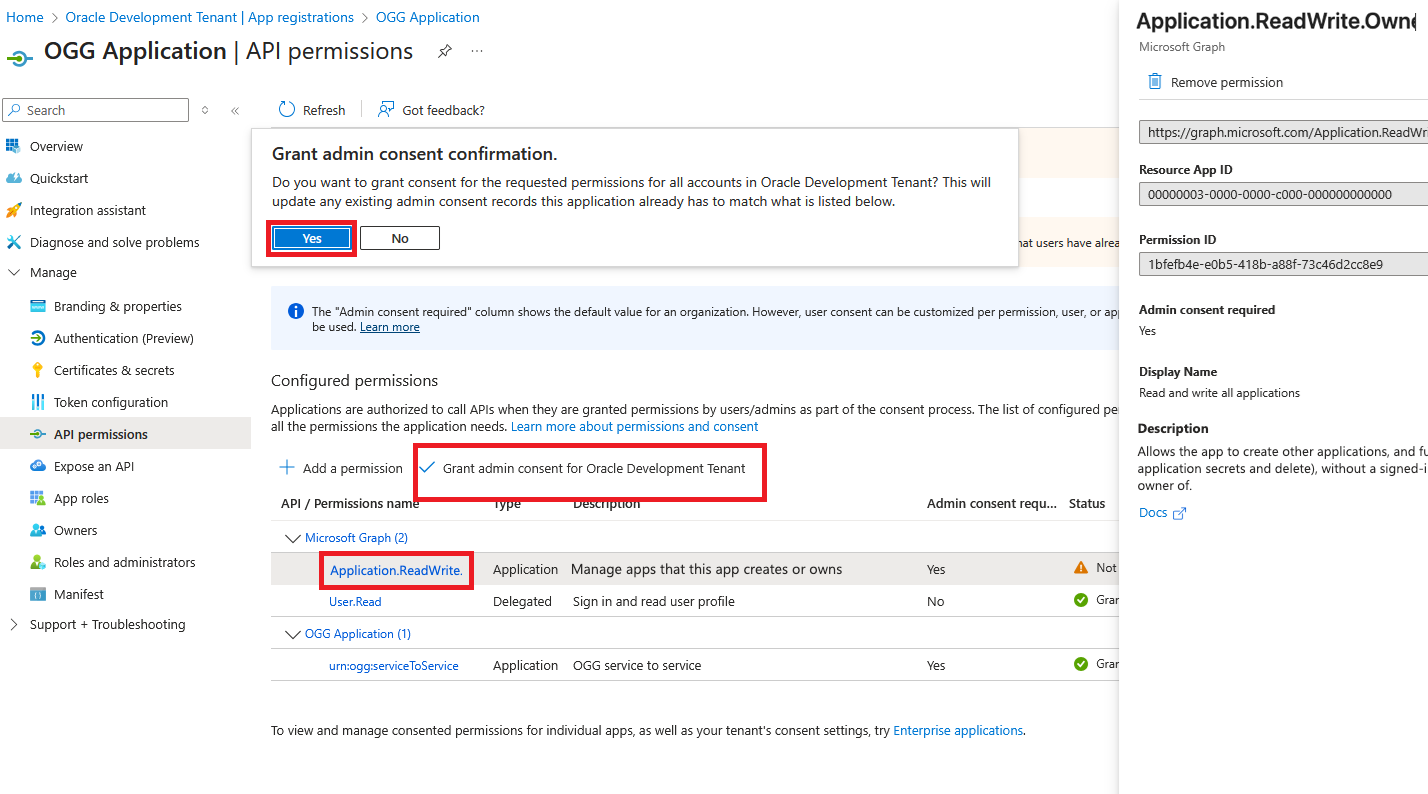
- Click on “urn:ogg:serviceToService”
- Click “Grant admin consent for ….”
- In the pop-up select “Yes”
9. Add Microsoft Graph Application.ReadWrite.OwnedBy API permissions to the Application and grant admin consent
- Click “Add a permission”
- Select Microsoft Graph
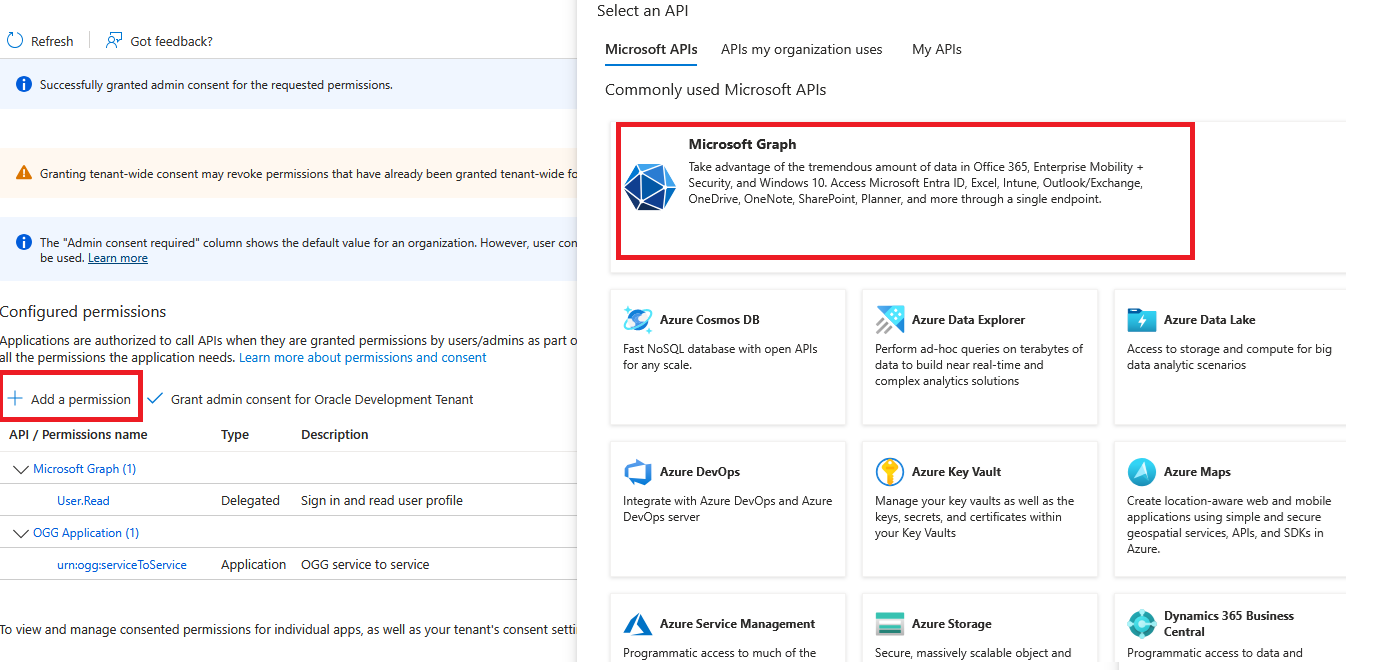
- Select “Application permissions”
- Search for and select “Application.ReadWrite.OwnedBy”
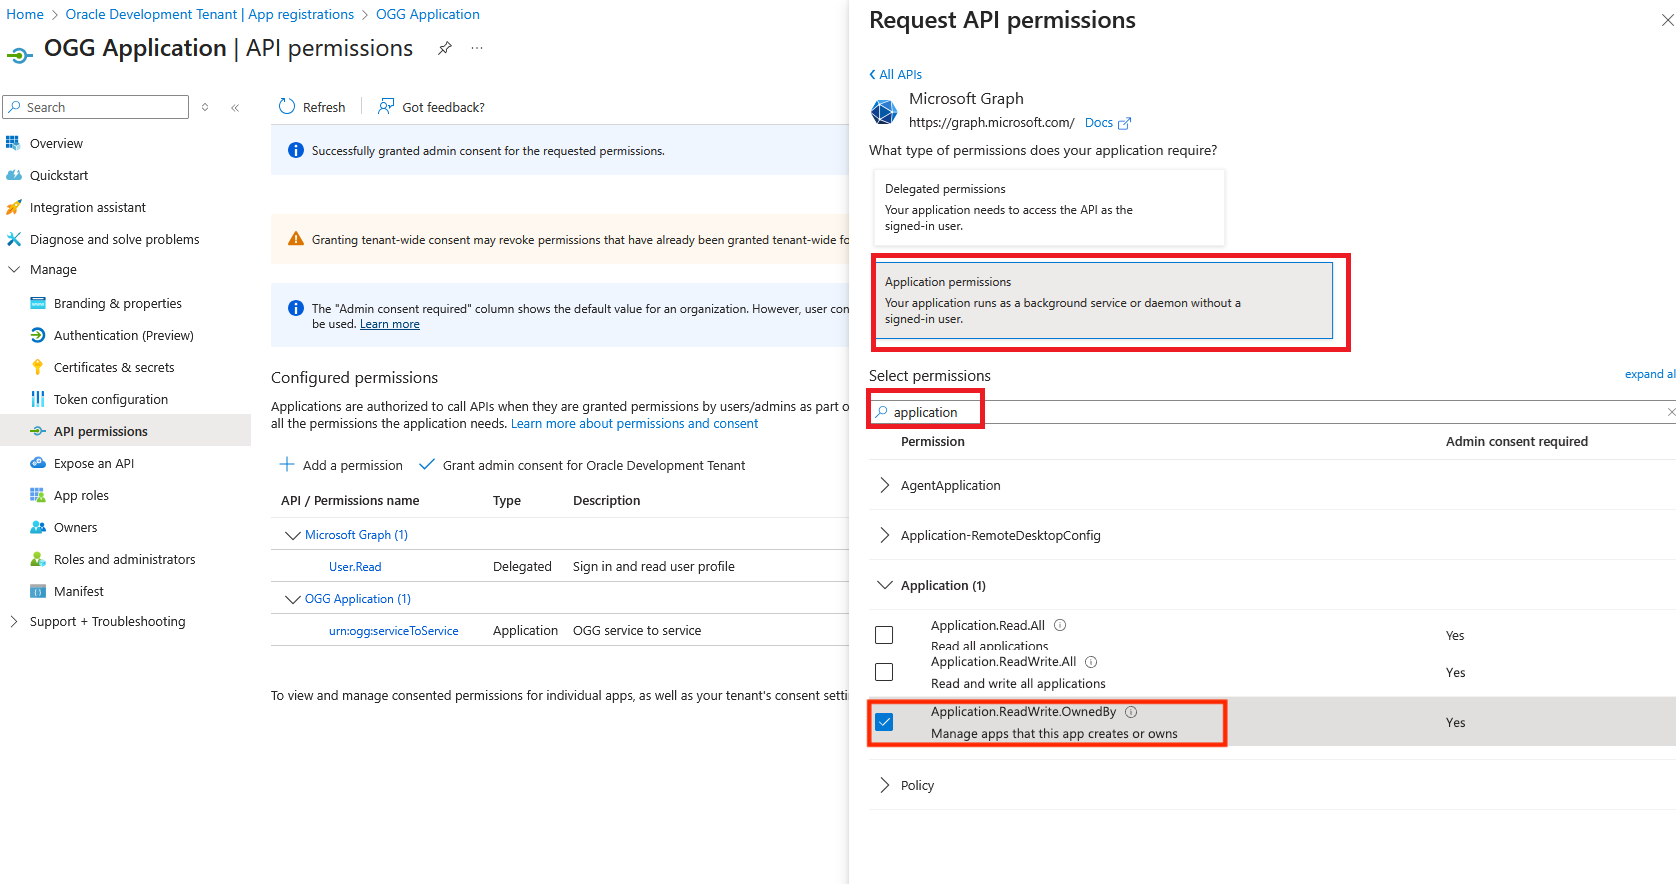
- Click “Add permissions”
- Perform the same steps done to grant consent for “urn:ogg:serviceToService” but for “Application.ReadWrite.OwnedBy”
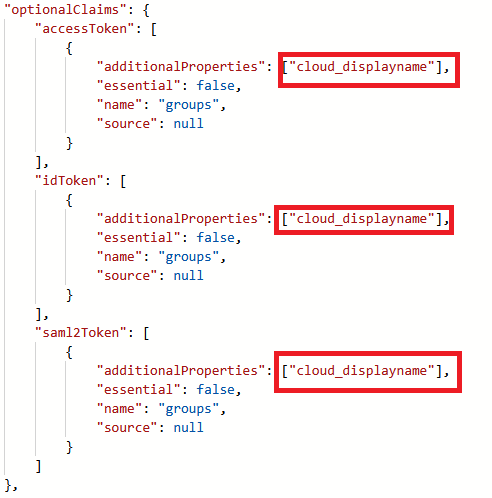
10. Manually update the token request properties in the Manifest
These options are not available under other menus, so they must be set manually as shown in the screenshots below:
- Under “Manage” click “Manifest”
- Under the JSON /optionalClaims/accessToken/additionalProperties add value “cloud_displayname”
- Under the JSON /optionalClaims/idToken/additionalProperties add value “cloud_displayname”
- Under the JSON /optionalClaims/saml2Token/additionalProperties add value “cloud_displayname”
-
- Under the JSON /api/requestedAccessTokenVersion set value to 2
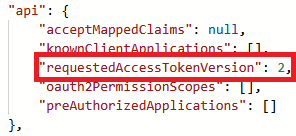
-
- Save the Manifest
11. Create the redirect URL for Application Authentication (Optional)
- Under “Microsoft Entra ID” -> “Entrprise applicaitons”, choose the application you created in Step 2.
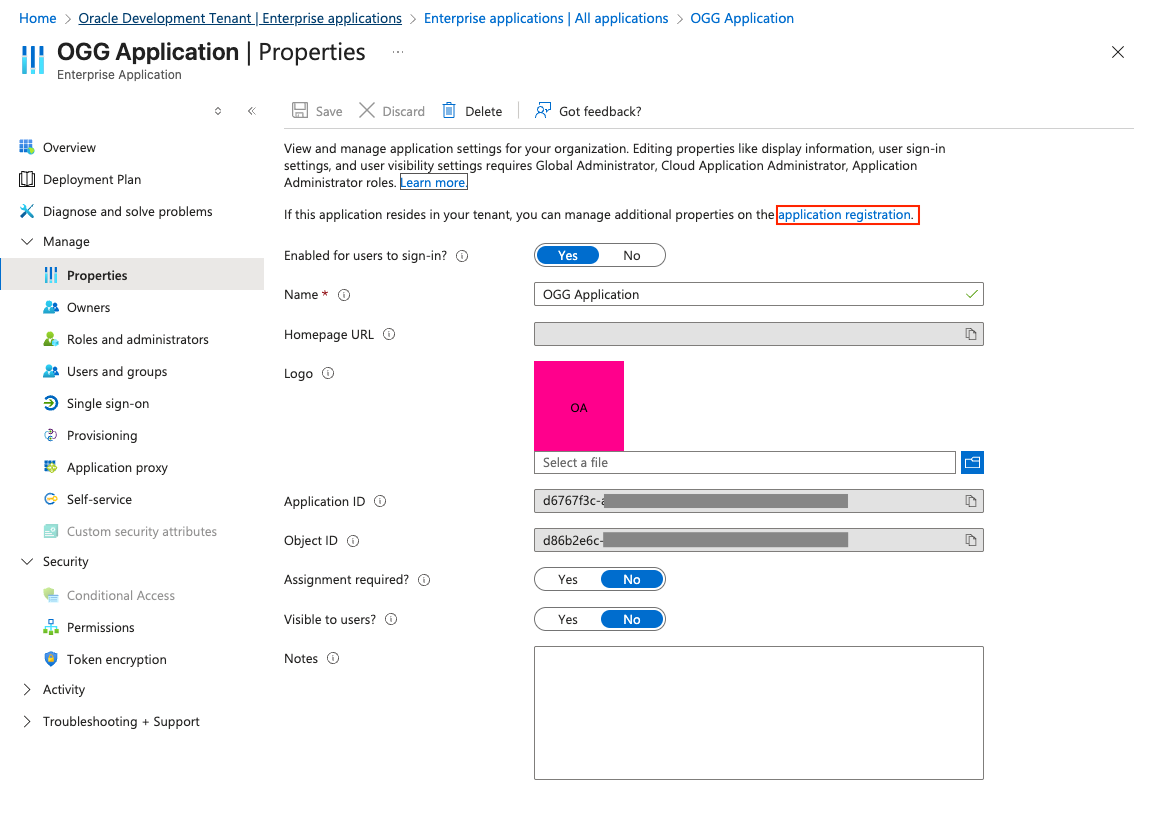
- Under Manage, click “Properties”
- Click “application registration”
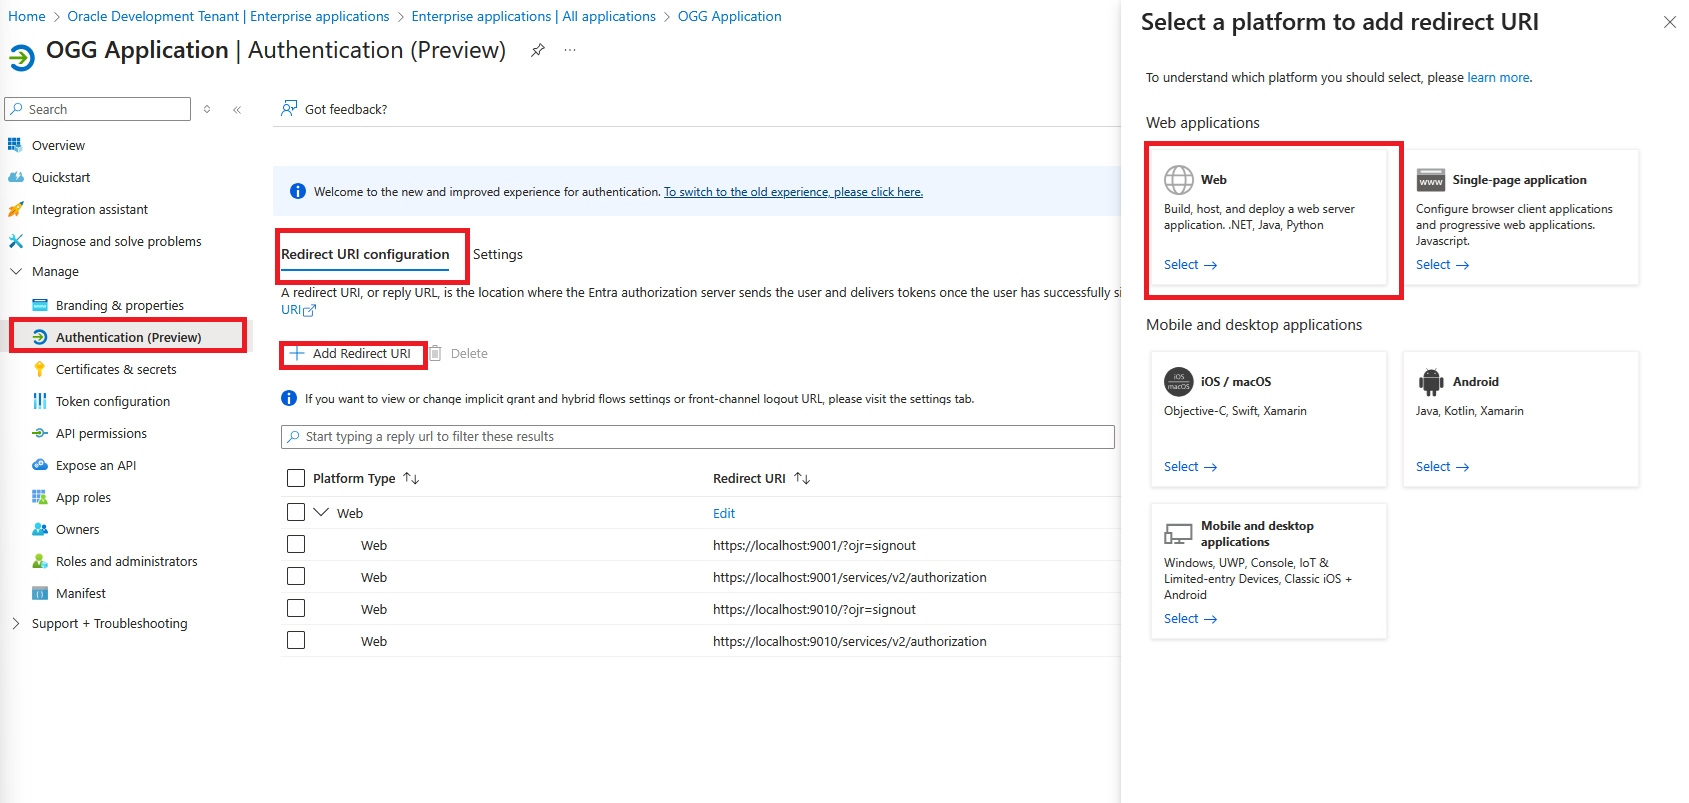
- Under “Manage” click “Authentication (Preview)”
- Click “Redirect URI configuration”
- Click “Add redirect URI”
- Click “Web”
- For the Service Manager deployment you should add the path /services/v2/authorization for the Service Manager.
- For each MS deployment you should add the path /services/v2/authorization for the Admin Service.
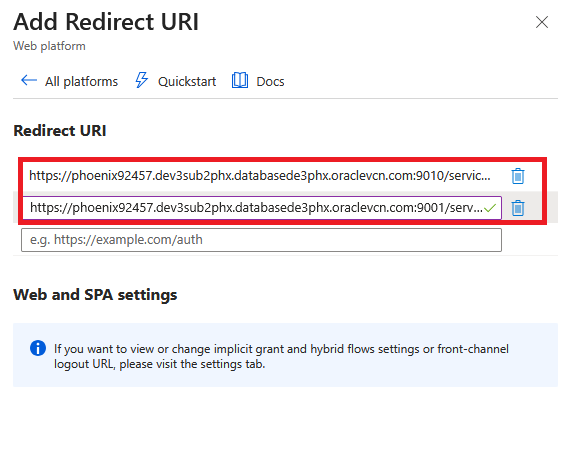
- Click “Configure”
12. Configure Entra ID authorization profile in GoldenGate
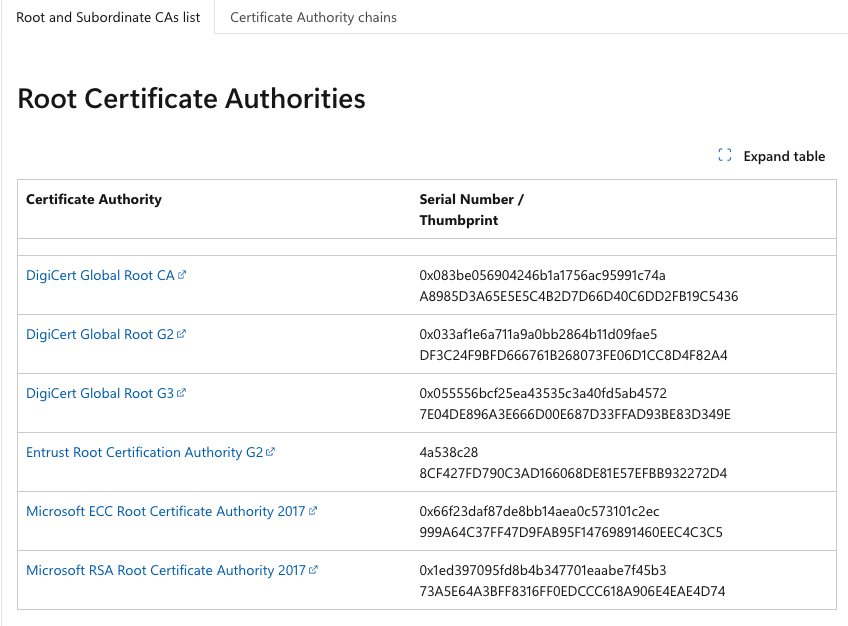
Add Root CA Certificate as Trusted Certificates to the GoldenGate Deployment.
- Download the Azure Root CA Certificates from https://learn.microsoft.com/en-us/azure/security/fundamentals/azure-ca-details?tabs=root-and-subordinate-cas-list#root-certificate-authorities. We only need the Root Certificate Authorities
- Convert the certificates downloaded from crt to pem format by using the openssl command in any Linux O/S or macOS
openssl x509 -in <crt_file> -out <pem_file_name> -outform pem
For example
openssl x509 -in DigicertRootGlobalCA.crt -out DigicertRootGlobalCA.pem -outform pem
Assuming you are using on-premise GoldenGate or OCI Marketplace GoldenGate images, please upload those Root CA certificates as trusted certificates thru the Service Manager WebUI
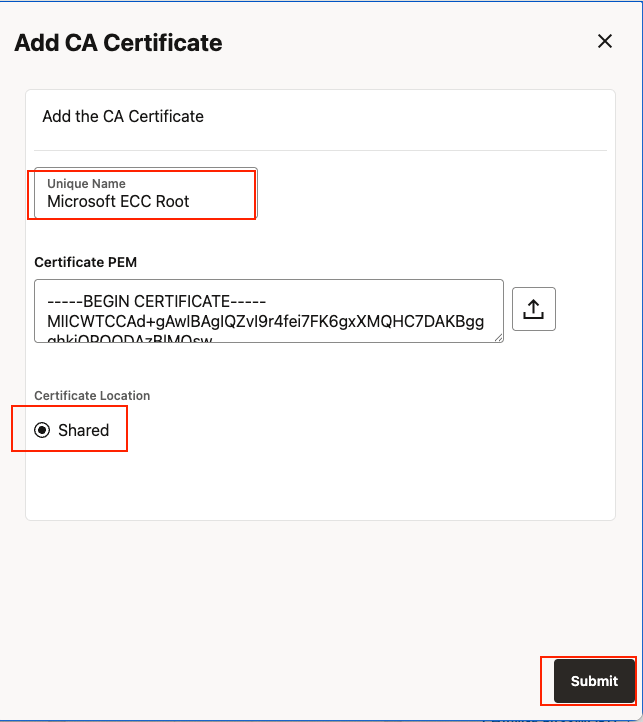
- Find the Service Manager under “Certificate Management Menu, click CA Certificates +
- Click the file upload button to upload the converted pem file
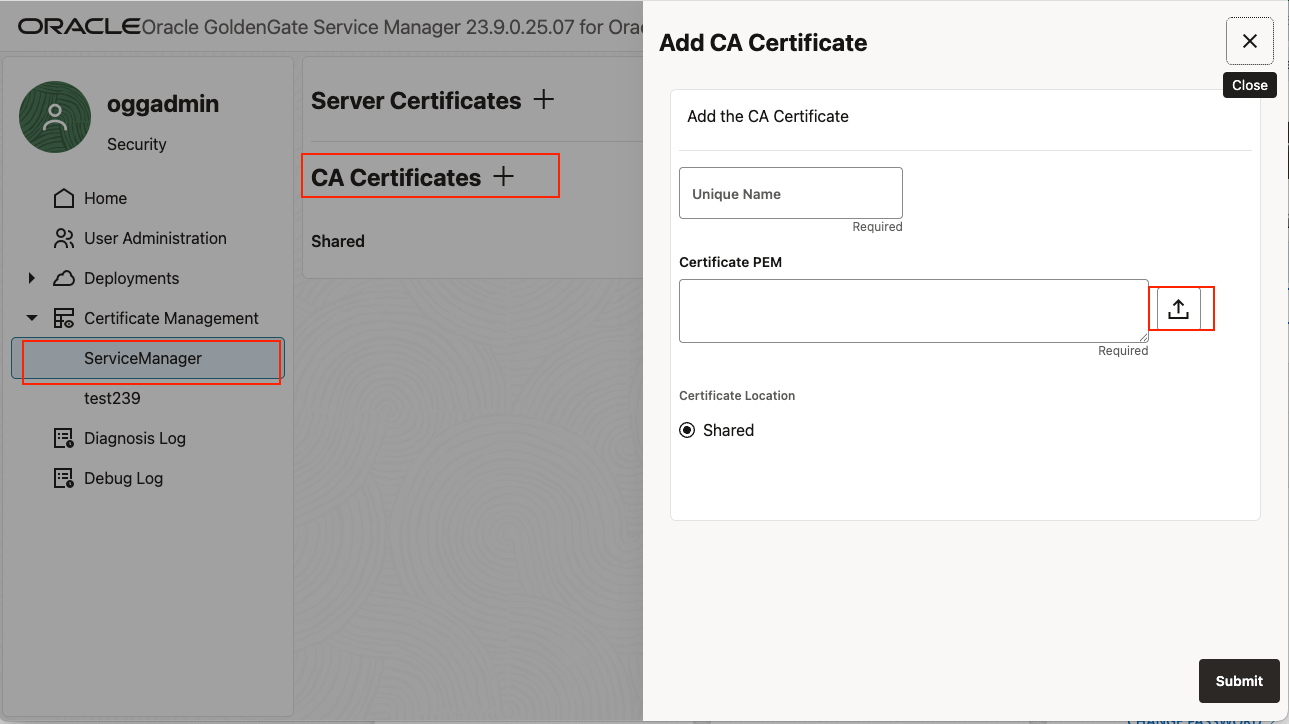
- Give it a unique name, make sure the certed is “shared”, and click submit
With the values collected from Step 1 and Step 6, create the authorization profile for your deployment.
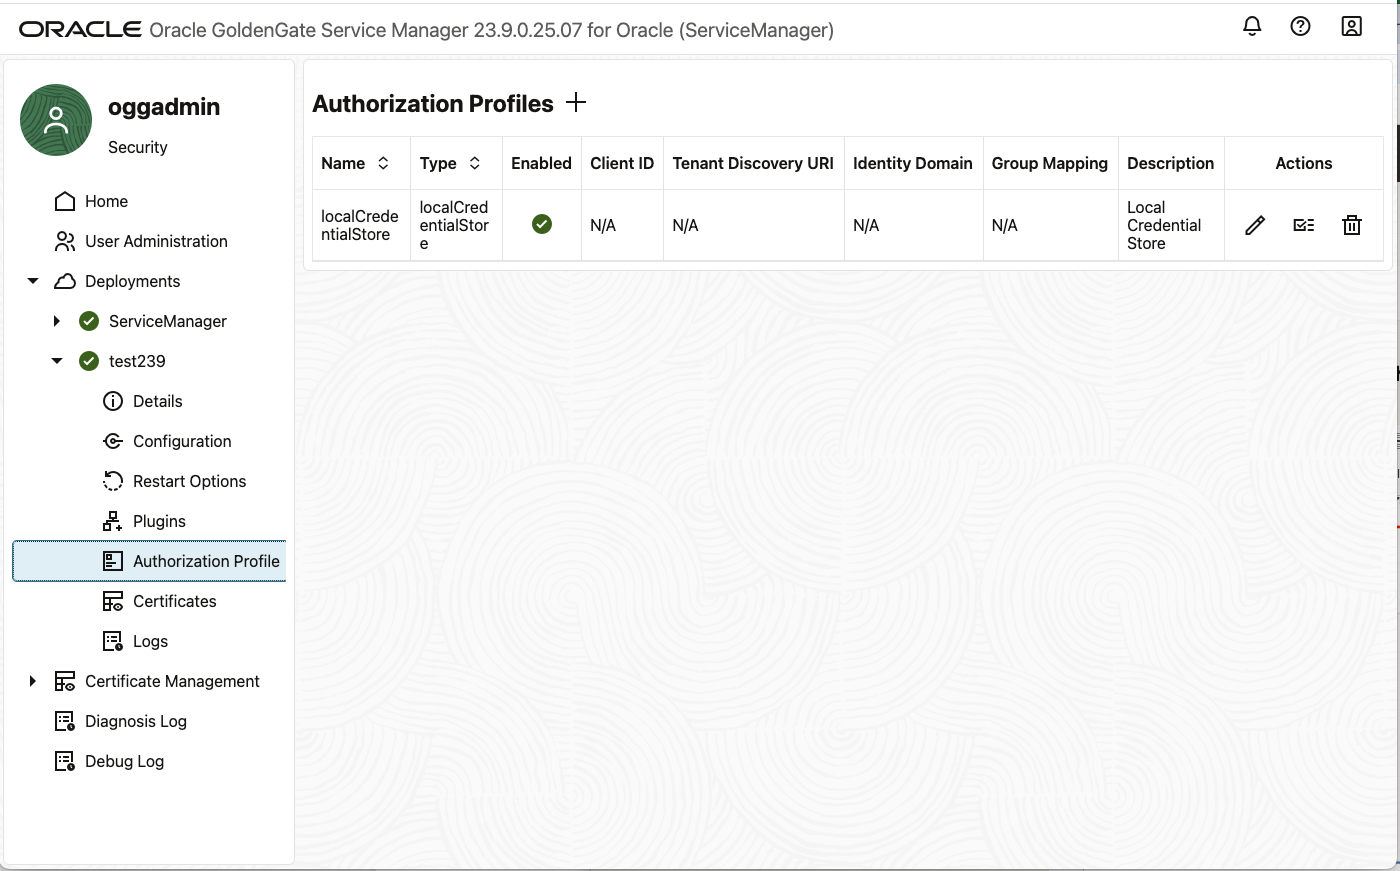
- In the Service Manager WebUI, under your deployment, choose Authorization Profile
- Click + sign for Authorization Profiles
- Fill in the values we collected in Step 1 and Step 5 to fill out the Authorization Profile
- The Tenant Discovery URI follows the template of https://login.microsoftonline.com/{tenantID}/v2.0/.well-known/openid-configuration, in our example it is
- https://login.microsoftonline.com/5b743bc7-cxxxxxxxxxxxxxxx/v2.0/.well-known/openid-configuration
- The Tenant Discovery URI follows the template of https://login.microsoftonline.com/{tenantID}/v2.0/.well-known/openid-configuration, in our example it is
- Click Submit
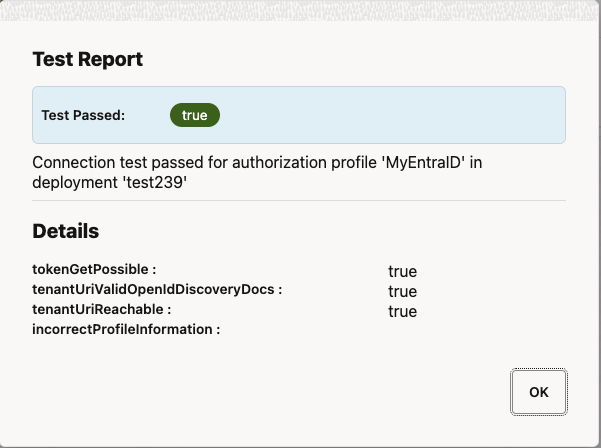
Once the Authorization Profile is created, you can run the test to make sure it is setup correctly before enabling it.
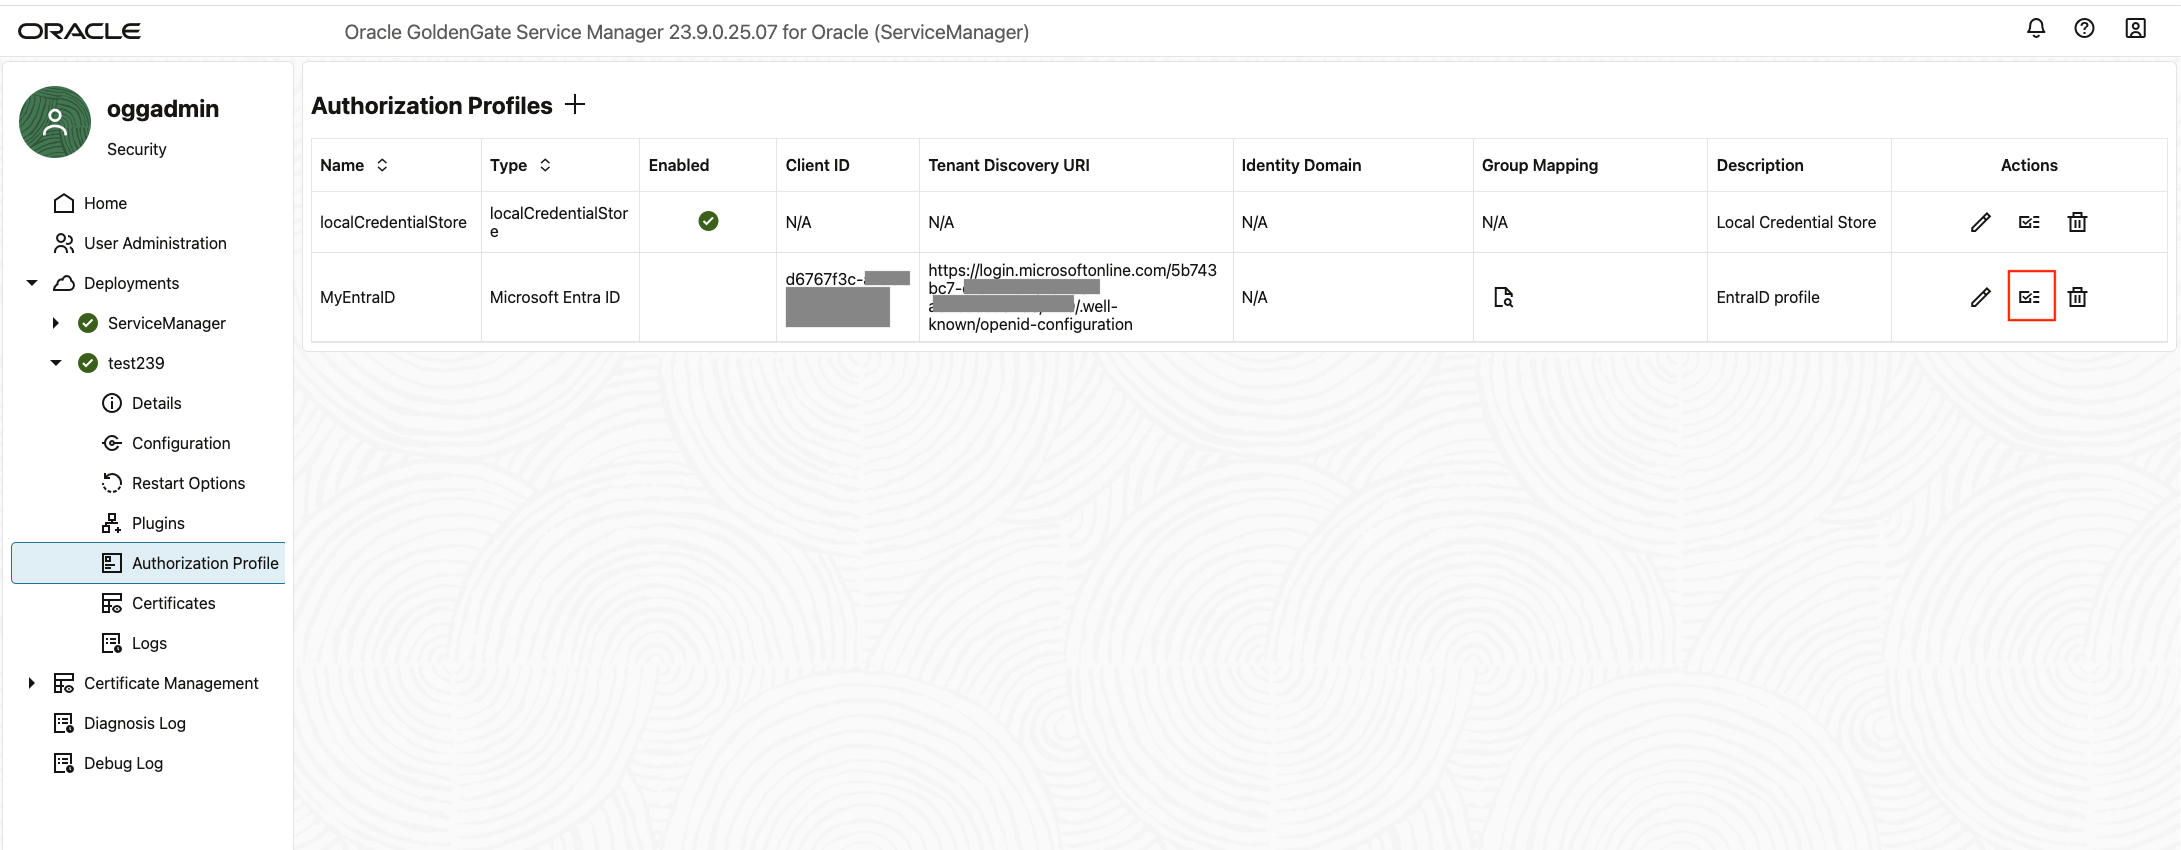
If everything is configured correctly, you will get the success dialog box shown below.
Now you can enable this Authorization Profile
- Click the pen icon to edit the Authorization Profile
- Flip the “Enable Profile” Switch
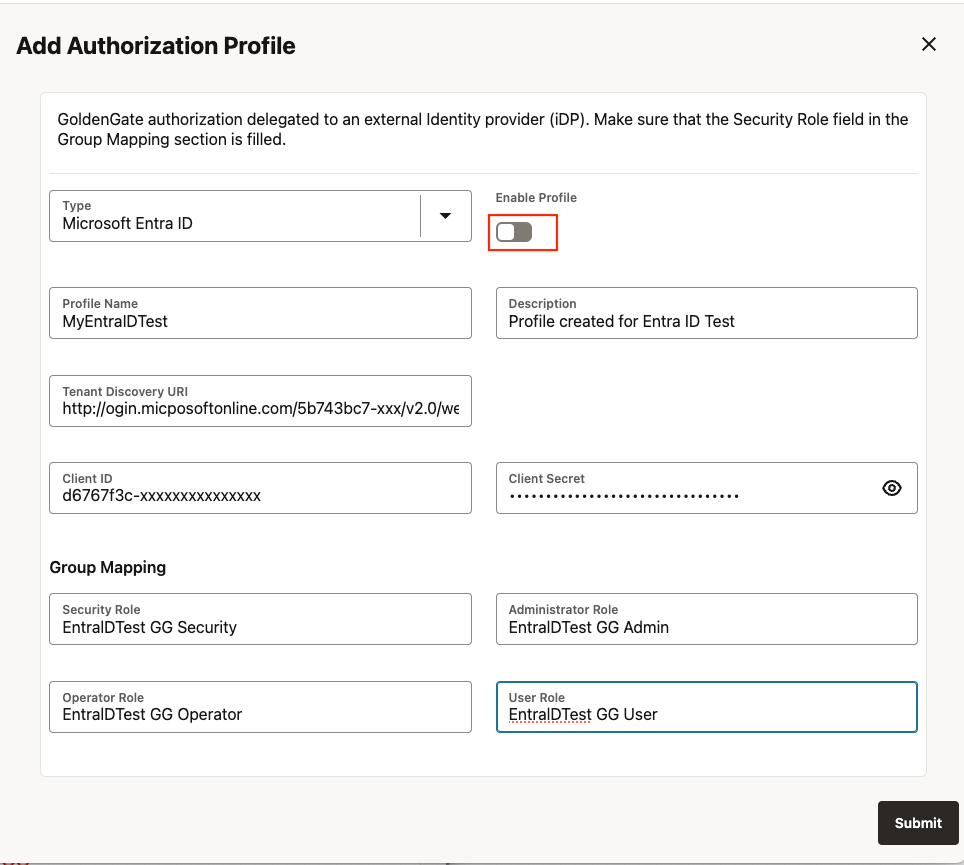
Click Submit
When an Authorization Profile is enabled in Service Manager, it is automatically reloaded.
When an Authorization Profile is enabled in MS deployment, the services must be restarted before it takes effect.
Congratulations, you have now successfully configured the Entra ID Authorization Profile for your GoldenGate Deployment. Then you can test it out to make sure you can use your Entra ID to login to your GoldenGate.
Troubleshooting Tips
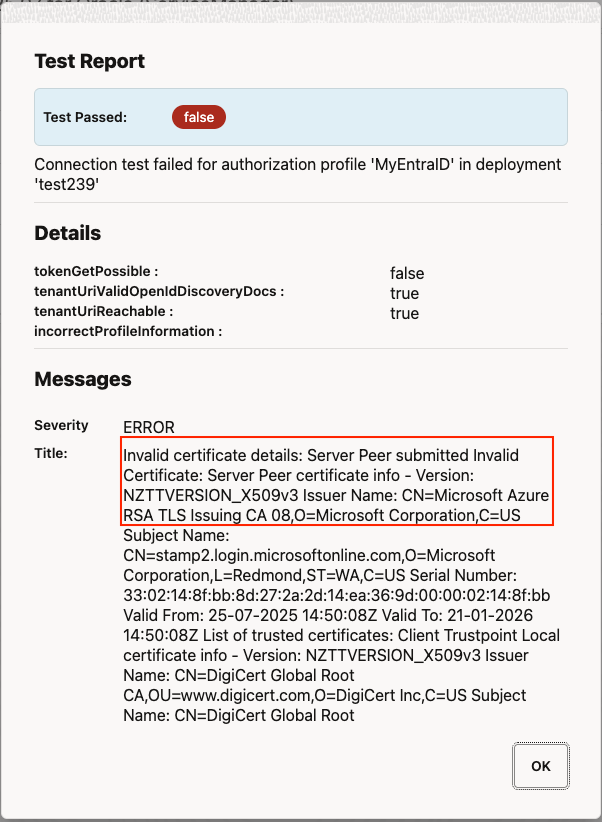
Certificates Related Issue
If the Authorization Profile testing failed with SSL certificate issues like below, double-check you have uploaded all the root CA certificates from the Microsoft Website into the GoldenGate Deployment as shared trusted CA certificates.
GoldenGate Authentication Mode Related Issues
If the Authorization Profile testing comes back with error message complaining the bearer token authentication mode isn’t enabled, you can use a tool called oggServiceConfig to fix it without reinstalling your GoldenGate.
Once you have the tool downloaded, make sure you edit the file to give the correct Python location on the first line, then run it with syntax below, assuming your Service Manager is configured on localhost, listening to port 9011, your deployment name is Local
oggServiceConfig http://localhost:9011 Local adminsrvr \\
–user <oggadmin username> –password <oggadmin password> \\
–path /authorizationDetails/common/allow \\
–value ‘[“Digest”, “Digest-SHA-256”, “Basic”, “Bearer”]’
oggServiceConfig http://localhost:9011 Local pmsrvr \\
–user <oggadmin username> –password <oggadmin password> \\
–path /authorizationDetails/common/allow \\
–value ‘[“Digest”, “Digest-SHA-256”, “Basic”, “Bearer”]’
oggServiceConfig http://localhost:9011 Local distsrvr \\
–user <oggadmin username> –password <oggadmin password> \\
–path /authorizationDetails/common/allow \\
–value ‘[“Digest”, “Digest-SHA-256”, “Basic”, “Bearer”]’
oggServiceConfig http://localhost:9011 Local recvsrvr \\
–user <oggadmin username> –password <oggadmin password> \\
–path /authorizationDetails/common/allow \\
–value ‘[“Digest”, “Digest-SHA-256”, “Basic”, “Bearer”]’
For easier troubleshooting, always keep the Service Manager using the local authorization profile first until you can successfully switch the user deployment to use the Entra ID Authorization Profile.
For the Adminclient and RestAPI authentication using Bearer Token, you can find the following articles on how to obtain the Entra ID tokens as the resource owner or client credentials grant type.
https://learn.microsoft.com/en-us/entra/identity-platform/v2-oauth2-device-code
https://learn.microsoft.com/en-us/entra/identity-platform/v2-oauth2-client-creds-grant-flow
Known limitations
- Currently Entra ID free tier is not supported.
- Only single-tenant applications are supported.
- Administrative privileges are necessary to make some changes to Entra ID applications.
- Screenshots are provided only for refernce, but take into account that they might differ from the current layout.
- This page does not talk about how to manage users and groups inside Entra ID.
- The well-known endpoint is V2
- Only one Entra ID security Group can be mapped to each GoldenGate user role