Introduction
Many customers are looking at or already using multiple clouds, so it is imperative to look for common ground when provinding solutions to build and automate infrastructure. Oracle provides Resource Manager and OCI Marketplace as two of several means to add automation to infrastructure buildouts. But recently, a customer asked about using Terraform Cloud, as it was already in use within their Devops team to build out many projects currently running on other clouds. The question to me was: “Can we simply use the tool we have today to ALSO build out OCI?” — The answer turned out to be “YES, and there are many benefits.”
During the investigation of Terraform Cloud, I wound up trying and using it to drive some OCI projects, and found it helpful in keeping the project up to date, when it comes to changes to the requirements. For example, wouldn’t it be nice to keep the terraform variables (usually given as an example file) in a more stable location, and update them as necessary, then run a plan/apply? And what if you needed to create multiple copies of the terraform code, for example, multiple Oracle Kubernetes Engine (OKE) clusters that are alike aside from name and region? What if you want to use existing terrafrom projects, managed in GitHub, and with minor changes you need to make? Terraform Cloud has the answers and provides a nice way to manage this. Even with more complex builds, such as the Oracle Cloud CIS Landing Zone, Terraform Cloud can be used to build and maintain these environments and react to changes in configuration.
Basic Terraform Workflow
To get started, consider the following workflow:
Clone existing GitHub project -> Customize variables -> Command line plan and apply -> time passes…. -> Updates to config
What are some of the challenges here? To start, the terraform plans and apply runs are likely are likely stored locally, and can become cumbersome over time. A configuration you built months ago is very likely to have deviated over time, and may be difficult to get back into sync. You cannot simply wipe it out and start over, as real workload is running. Moreover, you are likely going to need to change something in the repository, which implies creating a fork, checking in your changes, and then keeping up with upstream. Now you have to deal with where to keep your secret variables, what security risks are associated with the information in your terraform variables file, and what happens if you had some variable in common across many terraform configurations, and it changed.
Enter Terraform Cloud
What Terraform Cloud adds is the ability to manage the variables, the state file, and the run/apply history. This does 2 things: #1 it separates the code from the configuration. #2 it keeps the history of plans, applies, and logs in the cloud, and not on a local machine. By also using version control branches and forking, we can also control which version of the code we want to use and automate the running of Terraform Plans upon changes to an underlying repository.
Consider the case where you would like to use a GitHub project that is actively being maintained, but you would like to curate additional changes that come in. In this case you would not want your infrastructure to be updated each time the original repository is updated. Instead, why not link Terraform Cloud to your branch, and then only commit changes that you are ready to accept from the main branch. Once committed to your branch, Terraform Cloud will automatically run a plan for you and you can see if the changes would affect you. Simply fix any errors with additional commits until the plan is acceptable to you, and then apply the changes. The UI will keep track of everything for you, including the history of all changes and logs of each.
It Gets Even Better…
With that in mind, let’s talk about variables. Every Terraform configuration you will find has you set multiple variables in order for the configuration to do something. Some of these variables are going to the be the same for anything you run, such as the cloud provider credentials. Others will be unique for each terraform package you are working with. And some of these will required complex variables, such as JSON, multi-line text, and secret (sensitive) values. Terraform Cloud handles all of these. In fact, a recent feaure they added was the ability to define a “variable set”, which can encompass the variables and values that would apply to multiple configurations, with the ability to make overrides as necessary. An example of this might be OCI region, which would be set to your home region in the variable set, but could be overridden in a configuration to support a deployment elsewhere, with the same credentials.
It Gets Even, Even Better…
Before getting to fancy and going into details, I will quickly mention the Terraform Registry – This allows authors to create re-usable modules, complete with documentation, and usable from within Terraform Cloud. This further reduces the size of your code, as you are simply referencing a known configuration, storing your variables within Terraform Cloud, and running the code. More on that in a future blog entry.
By The Way…
With all of this, you might worry about being able to do things as needed from the command line. Fear not – Terraform Cloud supports setting up TF Cloud as a remote provider, so that if you run a plan from your local machine, it will really be executing from the cloud. We’ll actually set that up here as a starting point.
Terraform Cloud 101
First things first – you need an account on Terraform Cloud. It’s free for our purposes. Create the account, verify email, and then create an organization – I used the same name as my login.
Next you need to collect the things you need for OCI tenancy access. If you already have set up OCI Command Line access on your machine, you have everything you need in your <home>/.oci directory. The only thing extra we’ll be doing is working directly with the OCI private key. More on that as we go along.
Finally, we need a terraform config to run – we can do one of several things here:
- Start from scratch with an empty config
- Clone a basic (or advanced) GitHub repository
- Build a registry module-based config
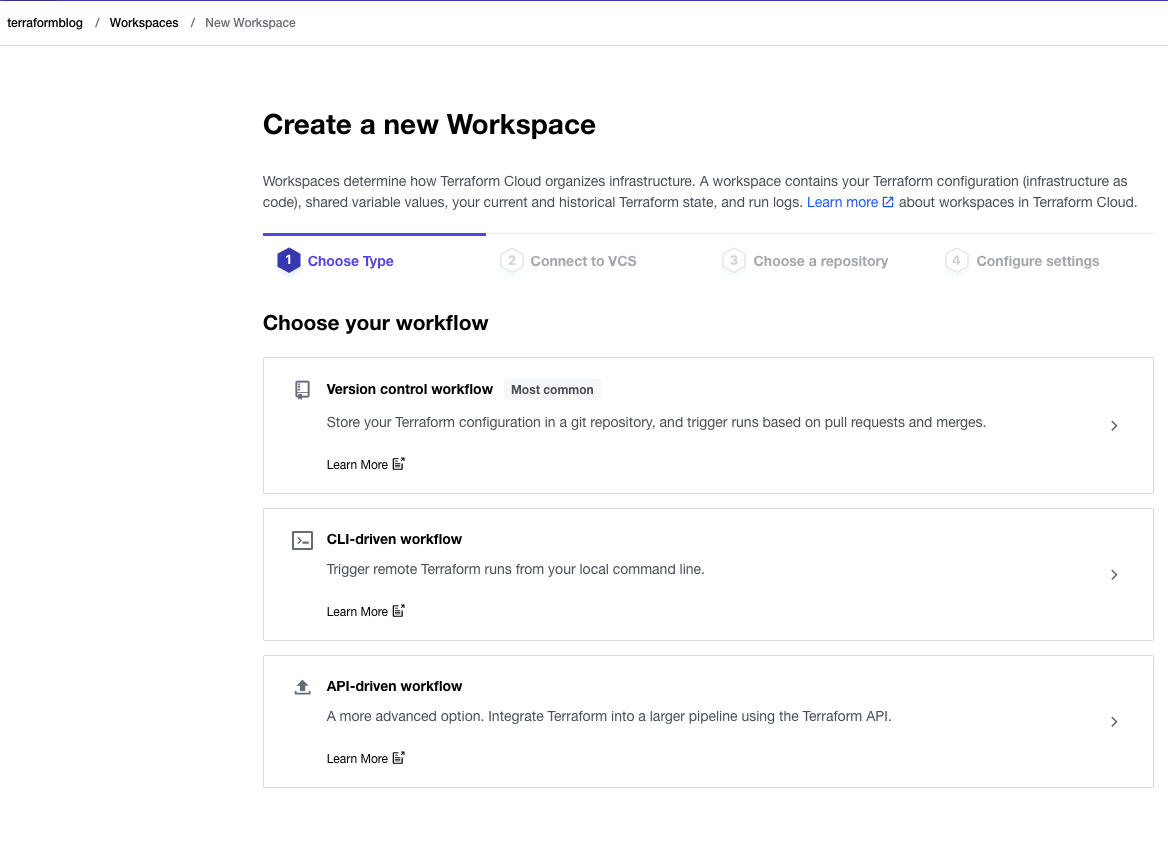
For this basic example, lets do the first one. We’ll use what Terraform Cloud calls the CLI-driven approach, which allows use to our local command line to verify all is good. In another blog entry, we’ll take this and check in the code to GitHub, and use the Version Control workflow features.
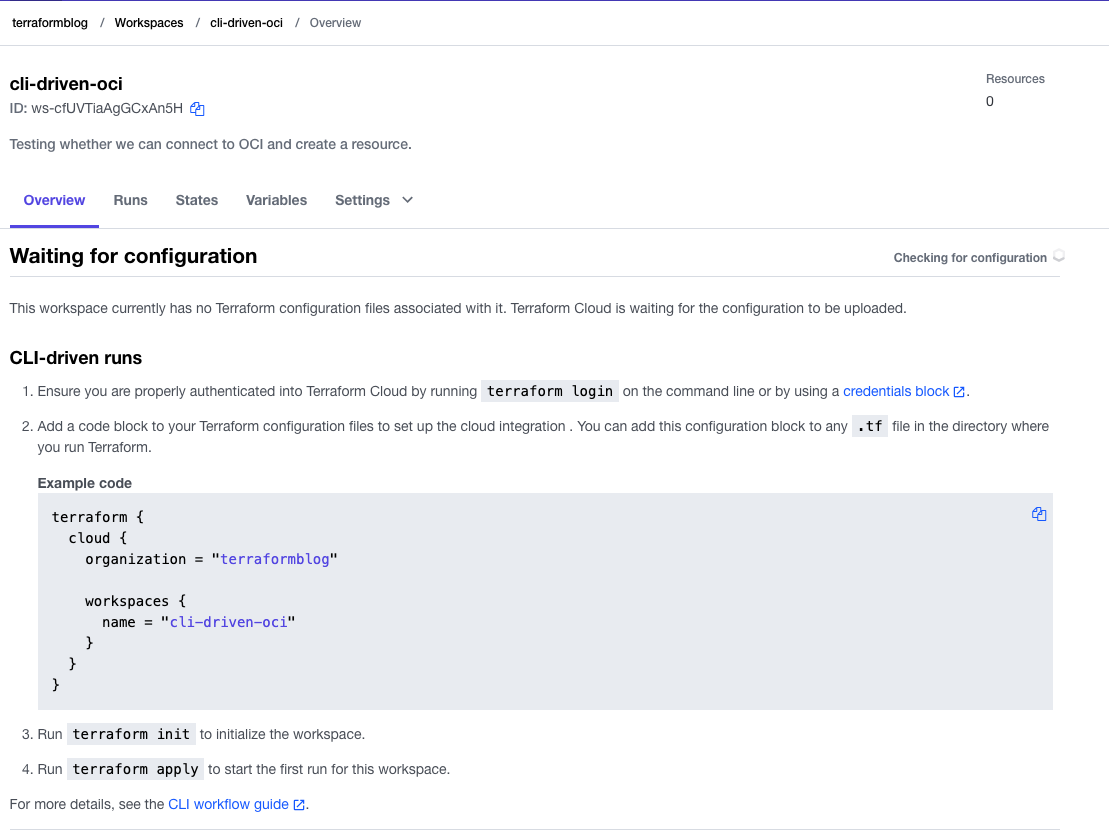
Here is what that looks like – at the end of this you should see the screen that is “waiting for configuration”, which simply means that it is looking for you to set up the command line and tell it to accept your configuration. Upon seeing this, move to the next section and configure your command line.
Command Line Configuration
To set up the command line, we need to use the terraform command, which can be installed via tfenv. This handy utility is available via brew on a Mac. Install it and then grab the latest terraform client using these commands (in this case I chose the latest version:
tfenv list-remote
 tfenv install 1.2.2
 tfenv use 1.2.2
NOTE: If you don’t have a Mac, simply follow OCI Getting Started with Terraform.
Once this is done, as the UI screen says, run terraform login. Following this token generation process, you are now able to interact with your Terraform Cloud account from the command line.
Create Terraform Config
Anything with a .tf extension is going to be evaluated by Terraform. As shown in the UI, create a file (I used terraform-cloud.tf) and paste in the code shown. With that complete, run terraform init and terraform apply. You should see it execute an apply, with no code, but in order to see that we are connected to Terraform Cloud. The UI page should change to this:

From here, you can see that if there were resources created, outputs generated, and logs, they’d be here. In the next section, we’ll hook this up to OCI.
OCI Configuration
In order to interact with OCI, we need to establish a provider block, link variables, and choose something to do. In the simplest example I can think of, we will create an Object Bucket. This will likely not require any pre-requisites, limit increases, or other objects. We simply need to grab the OCID of a compartment in which to place he bucket. Add the following into a files called provider.tf and oss.tf – these will represent what is needed to do this. Do not populate variables yet – these will come from Terraform Cloud.
provider.tf:
provider "oci" {
   region = var.region
   tenancy_ocid = var.tenancy_ocid
   user_ocid = var.user_ocid
   fingerprint = var.fingerprint
   private_key = var.private_key
 }
oss.tf:
resource "oci_objectstorage_bucket" "test_bucket" {
  #Required
  compartment_id = var.compartment_id
  name = var.bucket_name
  namespace = var.bucket_namespace
}
variables.tf:
# Default OCI provider
 variable "tenancy_ocid" {}
 variable "user_ocid" {}
 variable "fingerprint" {}
 variable "private_key" {}
 variable "region" {}
# For Object Storage Bucket
 variable "compartment_id" {}
 variable "bucket_name" {}
 variable "bucket_namespace" {}
Running another terraform plan command will fail for an obvious reason – we haven’t put in any of the variables yet. Let’s do that.
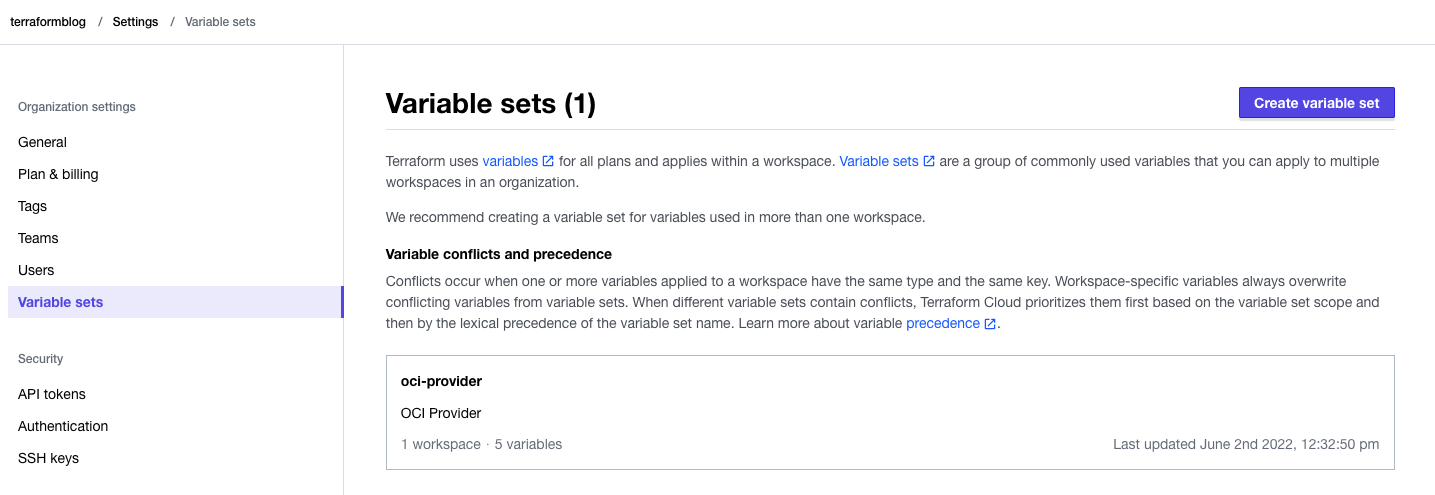
Terraform Variables and Variable Sets
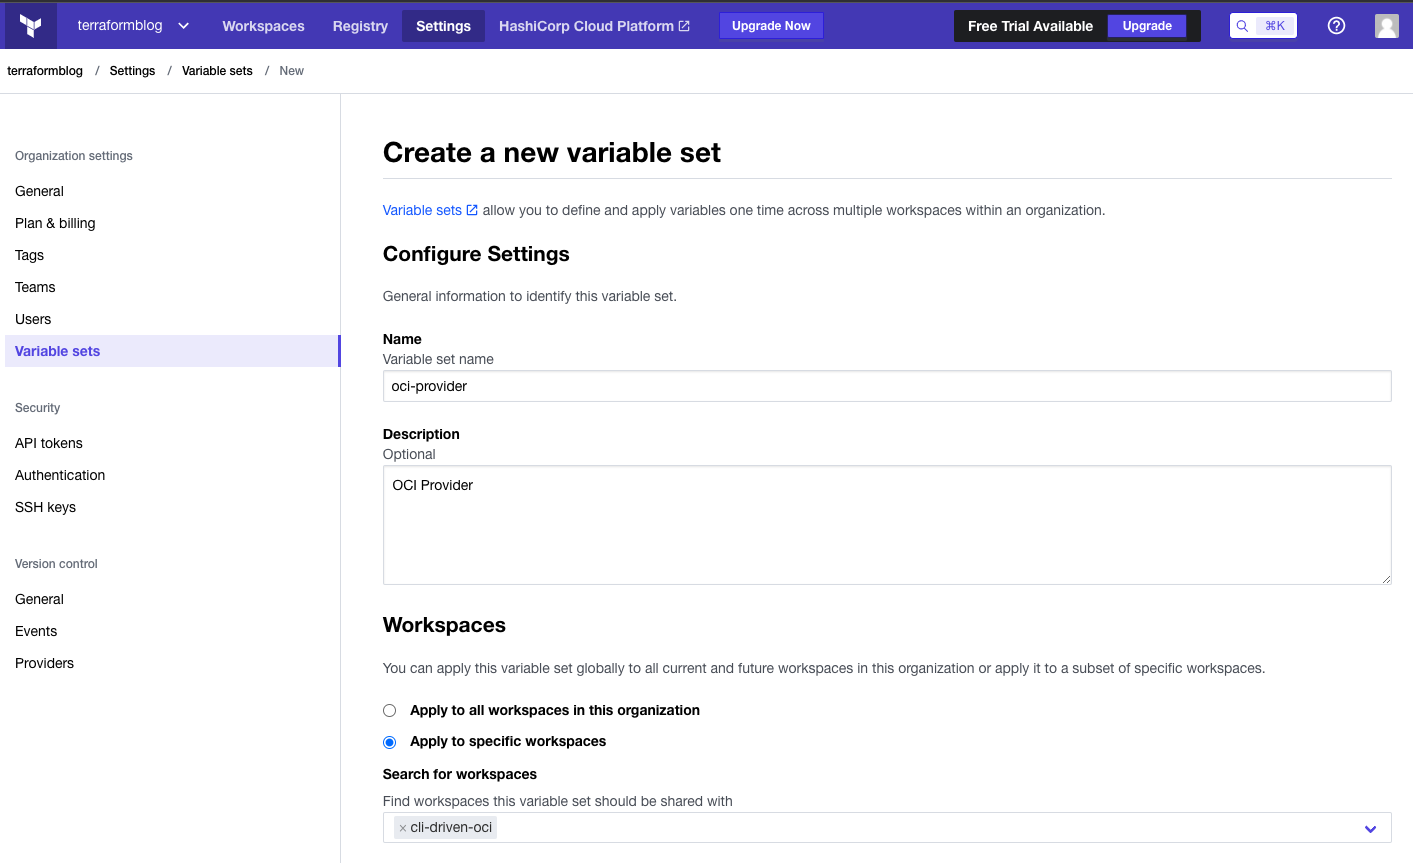
As mentioned earlier, a key feature of Terraform Cloud is variable management. With what we require above, it is easy to see that the provider variables can/should be re-used across many configurations (projects, workspaces, different use cases). But the Object Storage variables are unique to this Terraform workspace. To make this easy, define a Variable Set to include the first ones. These values come from the OCI CLI configuration, which you either will have locally, or can create from OCI Console itself (User Settings -> API Keys -> Add API Key (download private key)
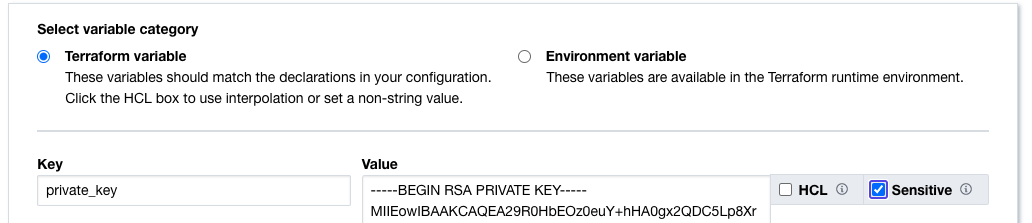
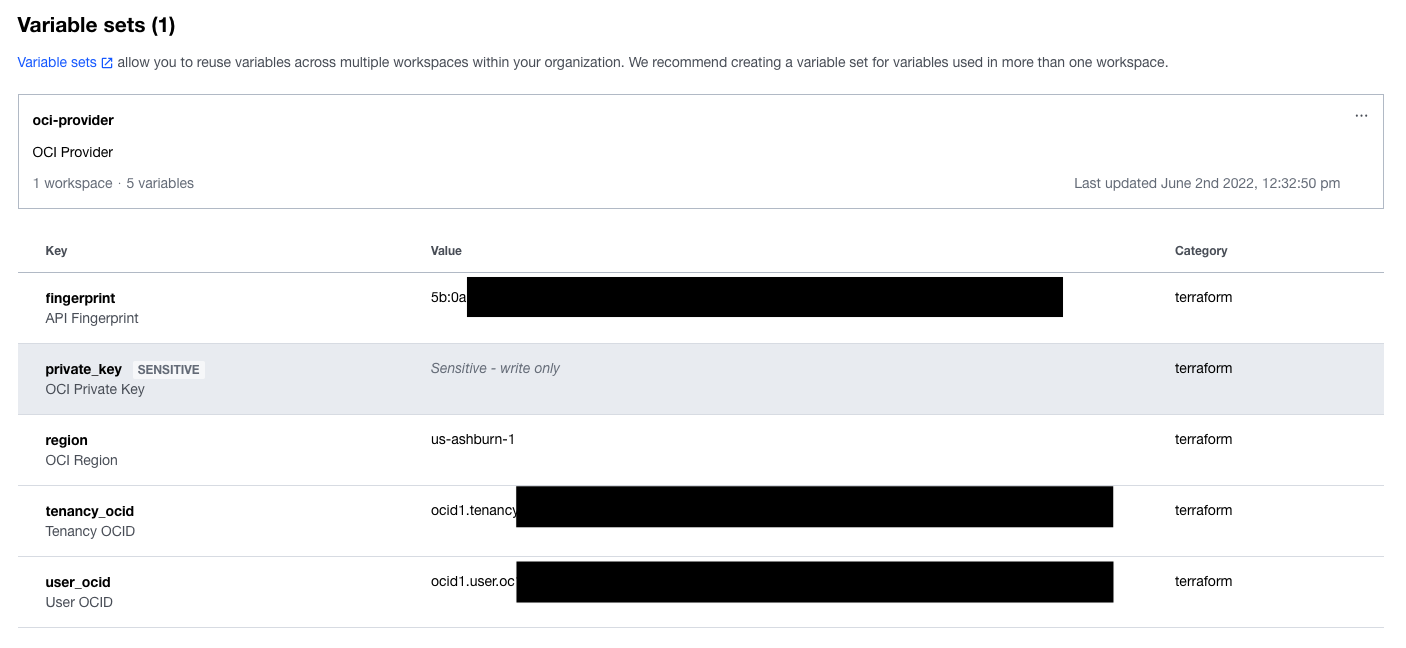
Looking at the screen shots here, add the 5 variables for the OCI provider, paying close attention to the private_key. For this one, click off the sensitive check box, which will prevent it from being exposed on a screen or log. It will be encrypted and write-only. Note also that we also selected an existing workspace to apply this variable set to – if we have other projects for OCI, we can add these later.
Add variables for the provider, with only private key being marked as sensitive:
When completed, the Variable Set has all 5 required provider variables:
Now, within the workspace, add the Object storage specific variables:
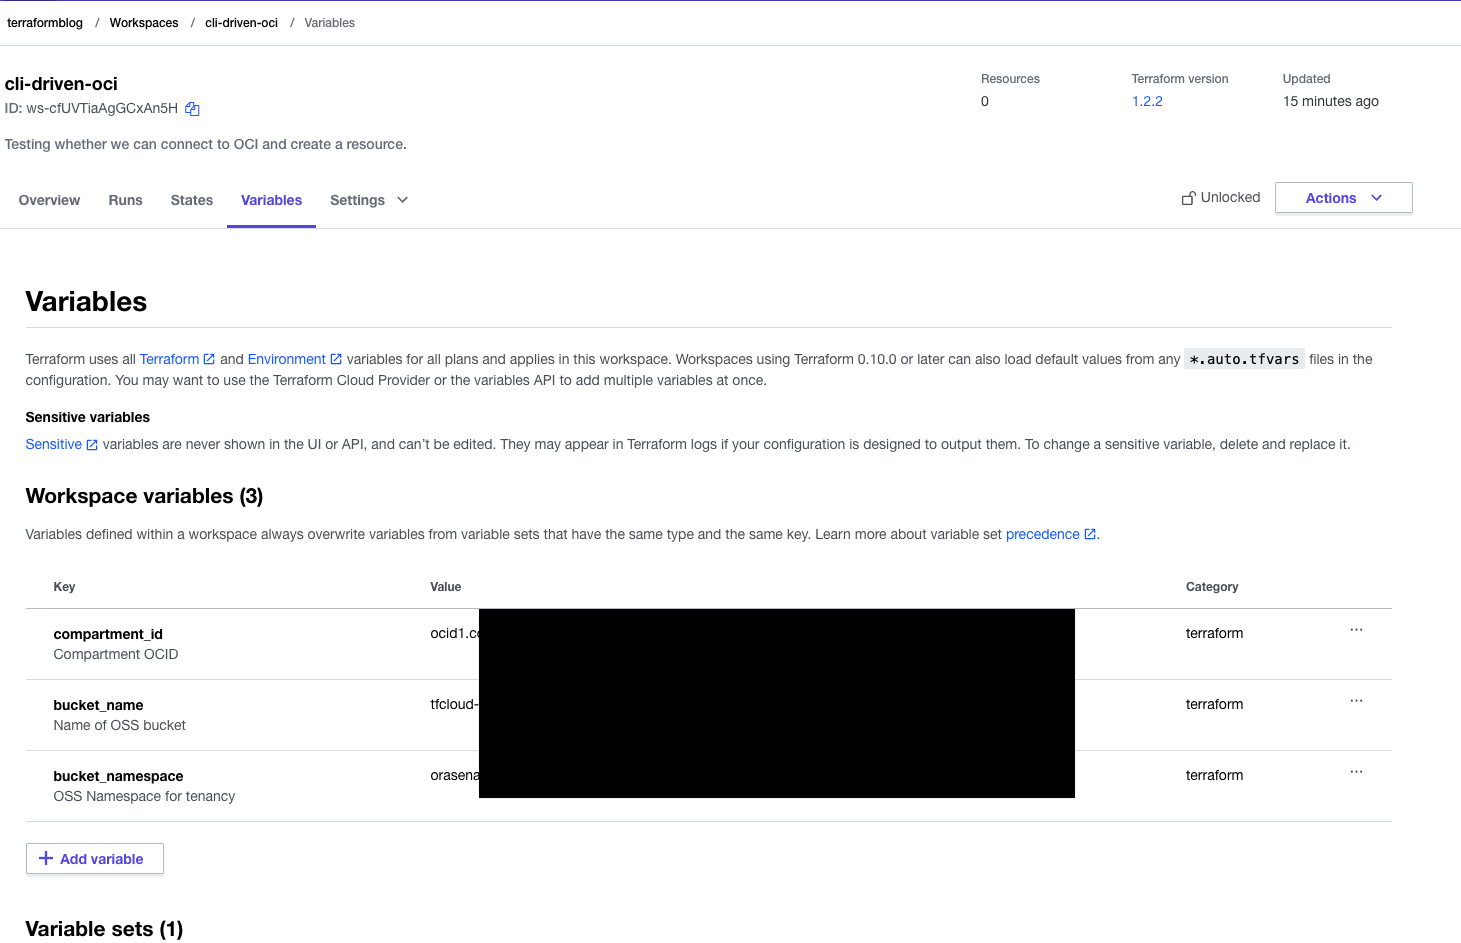
Below the workspace variables, you will see what is coming from the common Variable Set:
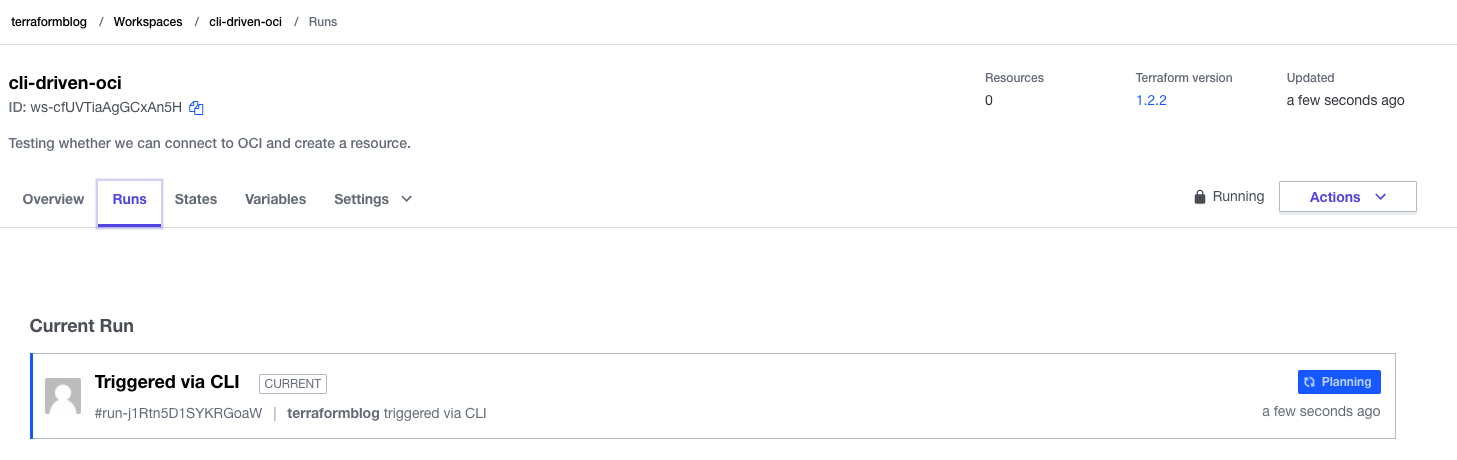
Running the Code Again
Now run the code again from the command line, using terraform plan. The result should be a plan that is ready to create the resource on OCI.
argregor@argregor-mac terraform-blog % terraform plan
 Running plan in Terraform Cloud. Output will stream here. Pressing Ctrl-C
 will stop streaming the logs, but will not stop the plan running remotely.
Preparing the remote plan...
To view this run in a browser, visit:
 https://app.terraform.io/app/terraformblog/cli-driven-oci/runs/run-qU88awBw5hgfxZnw
Waiting for the plan to start...
Terraform v1.2.2
 on linux_amd64
 Initializing plugins and modules...
Terraform used the selected providers to generate the following execution
 plan. Resource actions are indicated with the following symbols:
   + create
Terraform will perform the following actions:
  # oci_objectstorage_bucket.test_bucket will be created
   + resource "oci_objectstorage_bucket" "test_bucket" {
       + access_type                  = "NoPublicAccess"
       + approximate_count            = (known after apply)
       + approximate_size             = (known after apply)
       + auto_tiering                 = (known after apply)
       + bucket_id                    = (known after apply)
       + compartment_id               = "ocid1.compartment.oc1..xxxxxxxxxx"
       + created_by                   = (known after apply)
       + defined_tags                 = (known after apply)
       + etag                         = (known after apply)
       + freeform_tags                = (known after apply)
       + id                           = (known after apply)
       + is_read_only                 = (known after apply)
       + kms_key_id                   = (known after apply)
       + name                         = "tfcloud-bucket"
       + namespace                    = "ora-xxxxxxx"
       + object_events_enabled        = (known after apply)
       + object_lifecycle_policy_etag = (known after apply)
       + replication_enabled          = (known after apply)
       + storage_tier                 = (known after apply)
       + time_created                 = (known after apply)
       + versioning                   = (known after apply)
     }
Plan: 1 to add, 0 to change, 0 to destroy.
Run again with terraform apply, and watch the UI and command line at the same time. On the UI, you may see it progressing through Planning and then Planned. The command line will ask you to approve the plan, and then the status will change to Apply Queued and then Applied. The command line will report success, and now we can check the resource.


Time to check the OCI Console:

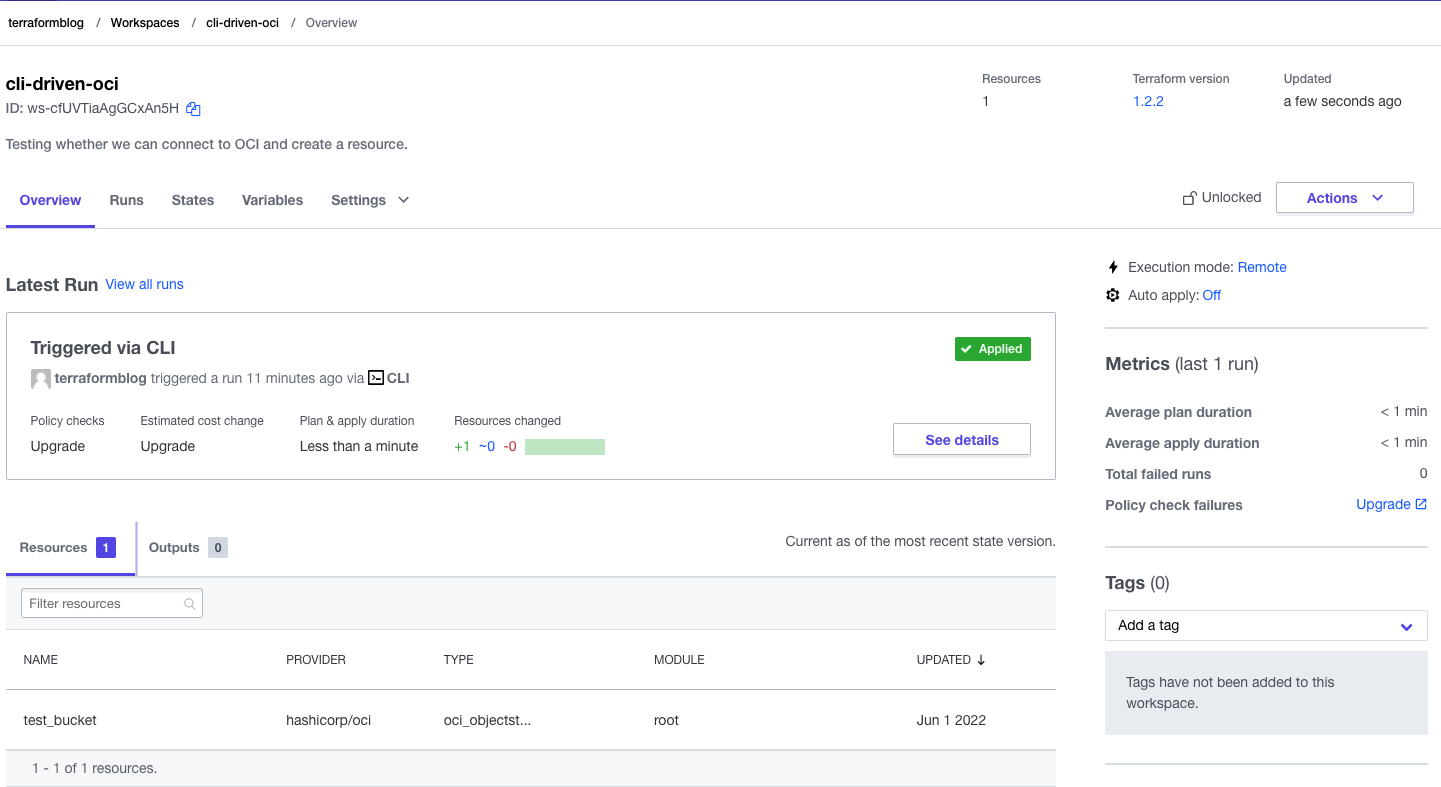
Terraform Cloud Outputs
Looking at the Terraform Cloud, we can see the resources created, outputs (if any), and logs. Have a look at the workspace. In the screen shot here, we can see the OCI resource created. There are no outputs (yet) because we didn’t define those yet. Keep reading…
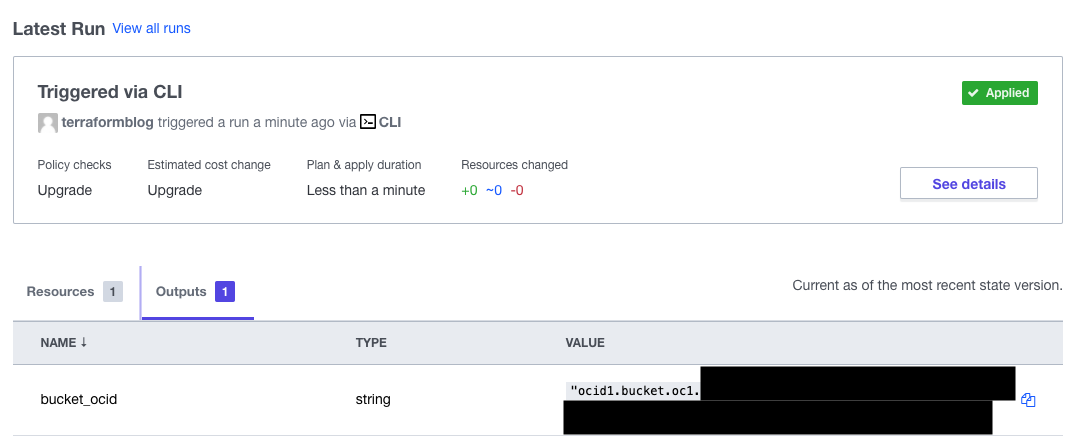
Adding Output
In order to see an output, we can add the following to a file called outputs.tf:
output "bucket_ocid" {
   value = oci_objectstorage_bucket.test_bucket.bucket_id
 }
Re-run terraform plan and terraform apply – for the apply, try with terraform apply -auto-approve – this will prevent the extra prompt. Once applied, the output will appear:
Now Add “The Rest”
At this point we can see that we’ve established an iterative process. We can continue to build out our terraform, following the documentation for the OCI provider, pasting in examples, and re-running the plan to ensure that it is going to work.
At the end of this process, it makes sense to check this work into GitHub. The great part is that with the separation of variables into Terraform Cloud, none of this needs to interfere with the code that is checked in. We’ll cover GitHub-based integration in another blog.
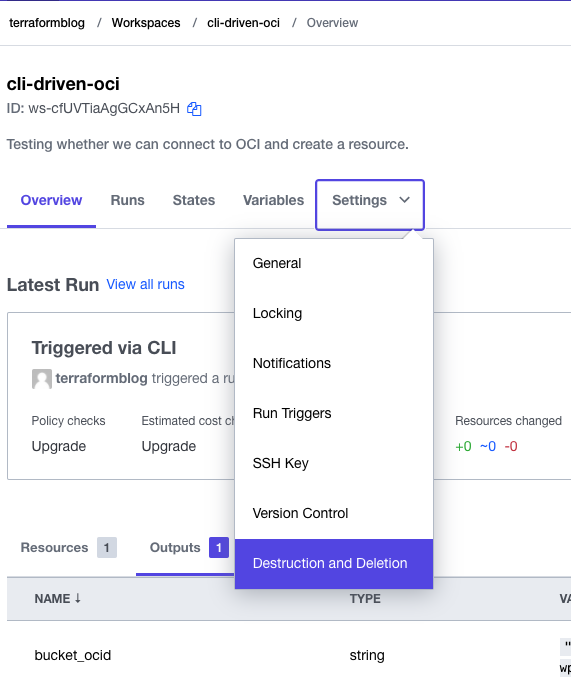
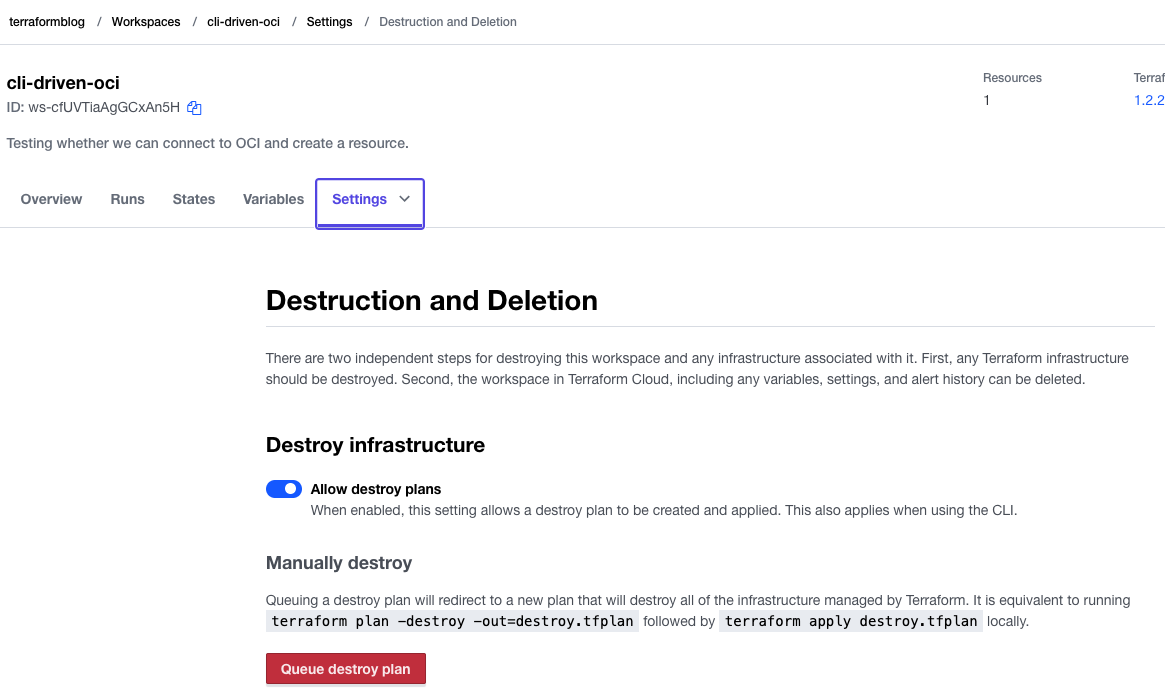
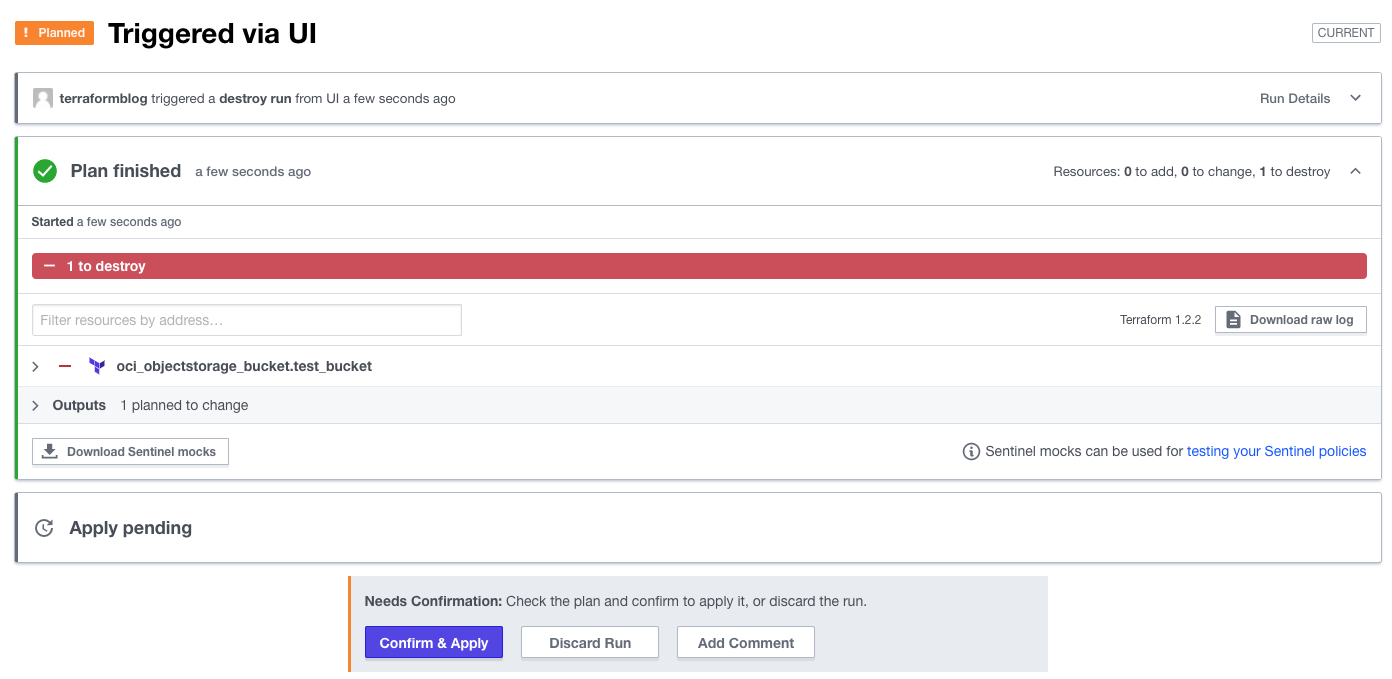
Tear It All Down
Terraform Cloud makes this easy as well. To do this, go into the project settings and queue a delete plan, then apply it. All gone:
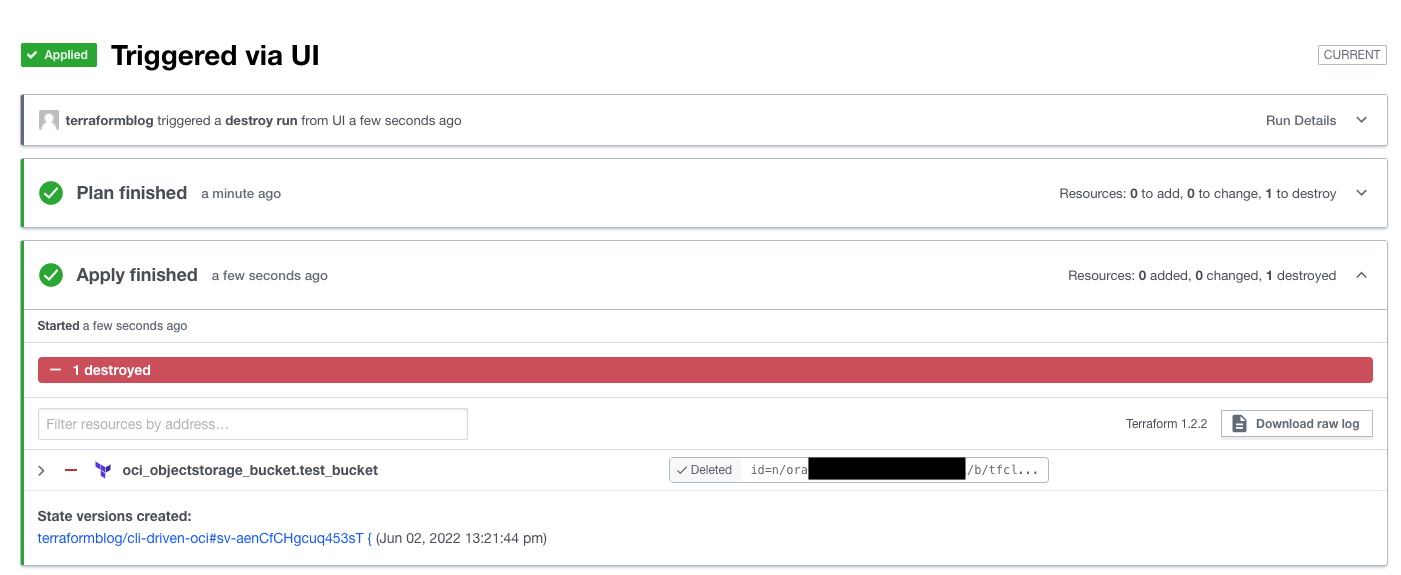
Confirm the deletion:
And the success screen:
Conclusions
This is just one way to use Terraform Cloud. In another blog entry, I will go through the GitHub workflow, where we can fork existing projects, make changes, and have Terraform Cloud pick up the commits, automatically generate plans (and even apply if you tell it). Combining this with variable sets, we can quickly see that an entire infrastructure can be created, kept up to date, and deleted all from the same console.