With many new services and new technologies being made available, it’s not often clear how to best use a combination of these tools to serve a specific purpose. One request that I often encounter with customers is how they can quickly and easily deploy PostgreSQL databases in Oracle Cloud Infrastructure (OCI). Whether for testing, rapid prototyping, or a standalone production instance, you can use Oracle Container Engine for Kubernetes (OKE), Oracle Cloud Shell, and the preinstalled Helm package manager to deploy and connect to a cluster-ready PostgreSQL database in no time.
Companies want predictable, repeatable, and easily executable ways to deploy a PostgresQL database. With Oracle Cloud Shell, we have a preconfigured shell environment and don’t need to do any local machine setup. Even the connection details are displayed for us right in our terminal. OKE is also a managed service that requires minimal environment setup when you’re looking to deploy, scale, manage a Kubernetes deployment. Finally, Helm is an open source package manager tool preinstalled on our Kubernetes cluster that allows us to quickly and easily deploy many types of applications and databases, including PostgreSQL.
By combining these tools in the cloud, we now have a templated deployment process that reduces human error, leads to faster iteration, and ultimately affords us more time on innovation as opposed to configuration.
In this blog post, we cover the following steps of the process:
-
Create a cluster with default settings, new network resources, and a node pool.
-
Set up the kubeconfig file for the cluster.
-
Verify that you can access the cluster using kubectl.
-
Define an administrator service account and clusterrole inding.
-
Install Helm and add Helm charts to your cluster.
-
Deploy a PostgreSQL instance using Helm.
-
Connect to your PostgreSQL instance.
Installation
First, log in to your OCI account and deploy your Kubernetes cluster if you haven’t already. In this tutorial, you use default settings to define a new cluster. When you create the cluster, new network resources for the cluster are created automatically, along with a node pool and three private worker nodes. You then set up the Kubernetes configuration file for the cluster (‘kubeconfig’). The kubeconfig file enables you to access the cluster using kubectl.
In this tutorial, you want to set up the configuration to give access to the cluster from the Cloud Shell environment instead of your local environment. See the Setting Up Cluster Access topic in the Container Engine for Kubernetes documentation.
Next, we set up the cloud shell access for your cluster. On your cluster’s console screen, go to Access Cluster and select Cloud Shell Access.
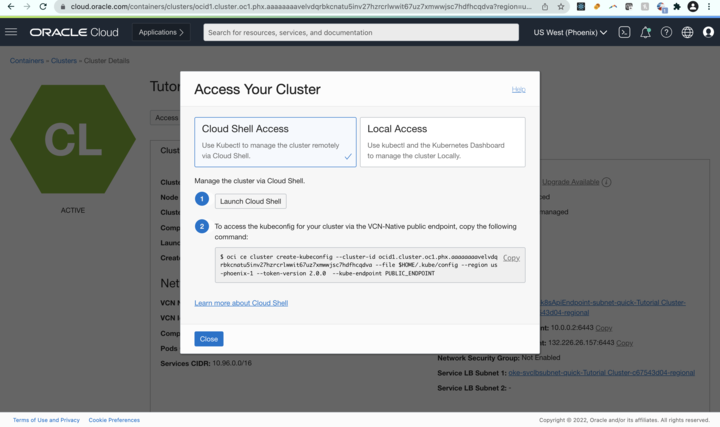
Then, to set up the kubeconfig file and save it in a location accessible to kubectl, run the OCI CLI command given. The following example has different inputs from yours.
oci ce cluster create-kubeconfig --cluster-id ocid1.cluster.oc1.phx.aaaaaaaaae... --file $HOME/.kube/config --region us-phoenix-1 --token-version 2.0.0 --kube-endpoint PUBLIC_ENDPOINT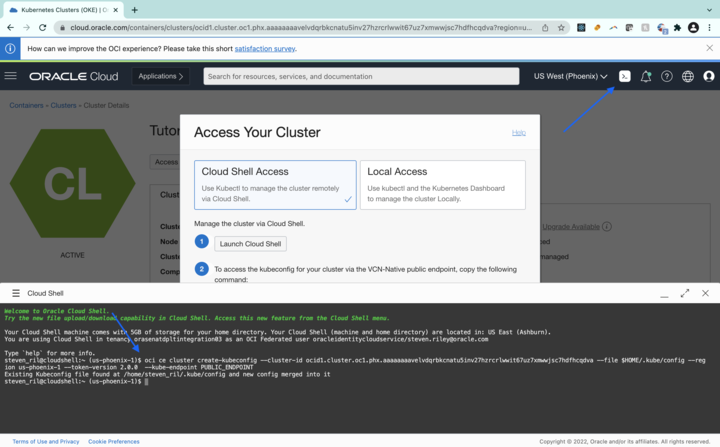
Verify that kubectl can connect to the cluster by entering the following command in the Cloud Shell window:
$ kubectl get nodesThe output shows information about the nodes in the cluster. You can see the details of the nodes running in the cluster in the following example:
| Name | Status | Role | Age | Version |
| 10.0.10.2 | Ready | Node | 1d | v1.18.10 |
| 10.0.11.2 | Ready | Node | 1d | v1.18.10 |
| 10.0.12.2 | Ready | Node | 1d | v1.18.10 |
You can now use kubectl to perform operations on the cluster.
Next, we create a file called oke-admin-service-account.yaml with the following content:
apiVersion: v1

kind: ServiceAccount

metadata:

name: oke-admin

namespace: kube-system

---

apiVersion: rbac.authorization.k8s.io/v1

kind: ClusterRoleBinding

metadata:

name: oke-admin

roleRef:

apiGroup: rbac.authorization.k8s.io

kind: ClusterRole

name: cluster-admin

subjects:

- kind: ServiceAccount

name: oke-admin

namespace: kube-system
In Cloud Shell, use the following command to create a yaml file. This command opens a text editor.
$ cat > oke-admin-service-account.yamlNext, copy the text to your clipboard, copying the whole blurb to maintain spacing and paste it into the open text editor in your Cloud Shell. Exit the editor. The file defines an administrator service account and a clusterrolebinding, both called oke-admin.
We can now create and apply the service account and the clusterrolebinding in the cluster by entering the following command:
$ kubectl apply -f oke-admin-service-account.yamlThe output from the command confirms the creation of the service account and the clusterrolebinding.
serviceaccount "oke-admin" created
clusterrolebinding.rbac.authorization.k8s.io "oke-admin" created
You can now use the oke-admin service account to view and control the cluster and connect to the Kubernetes dashboard.
Obtain an authentication token for the oke-admin service account by entering the following command:
$ kubectl -n kube-system describe secret $(kubectl -n kube-system get secret | grep oke-admin |

awk '{print $1}')
The output from this command includes an authentication token (a long alphanumeric string) as the value of the token: element, as shown. Keep this information somewhere safe.
Name: oke-admin-token-gwbp2

Namespace: kube-system

Labels:


Annotations: kubernetes.io/service-account.name: oke-admin

kubernetes.io/service-account.uid: 3a7fcd8e-e123-11e9-81ca-0a580aed8570

Type: kubernetes.io/service-account-token

Data

====

ca.crt: 1289 bytes

namespace: 11 bytes

token: eyJh______px1Q
Our OKE cluster is now fully set up and configured.
Now we can access our cluster and add Helm charts. First, confirm that Helm is installed by running the following command. If you configured an OKE cluster without Helm preinstalled, you can install Helm manually.
$ helm versionYou might want to familiarize yourself with Helm charts and their architecture by reading this blog on Helm Charts in Kubernetes and OCI.
Finally, run the following command, which adds the family of Bitnami Helm charts to our cluster.
helm repo add bitnami https://charts.bitnami.com/bitnamiWith the Bitnami Helm charts installed, we can now provision your PostgreSQL Helm instance, which is named “my-release” in our example, with the following command:
$ helm install my-release bitnami/postgresqlIf successful, you see a similar output to the following example with details specific to your now deployed PostgreSQL instance:
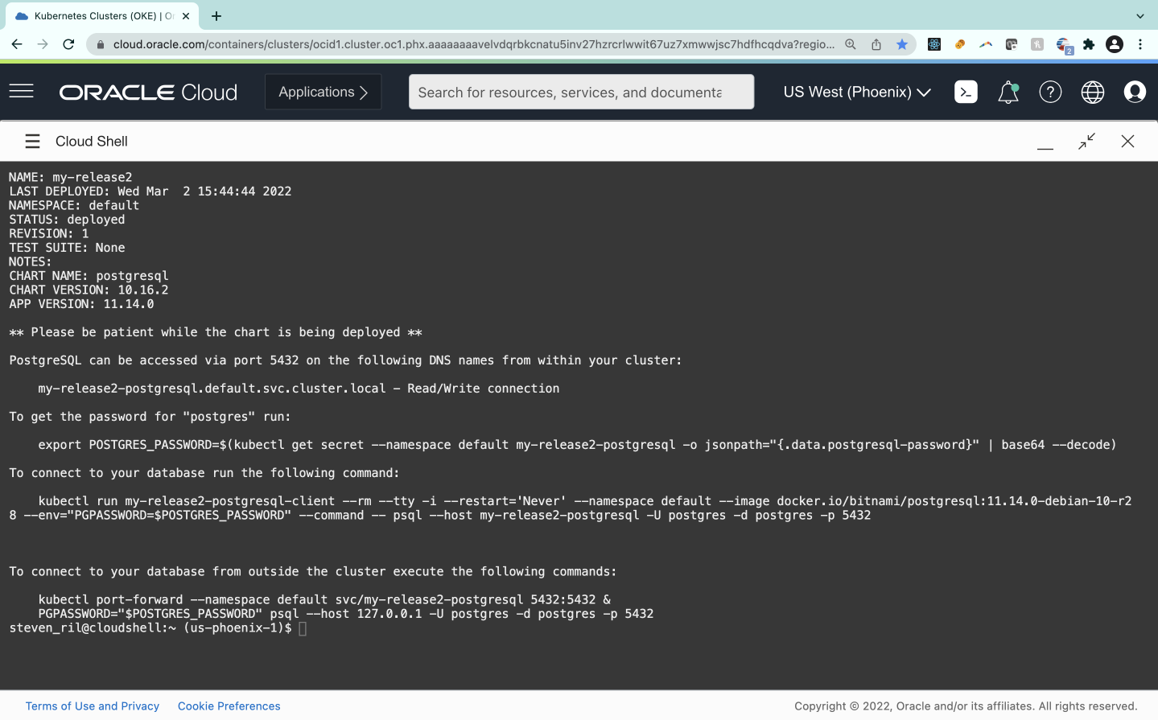
Save the output so that you have access to your password and PostgreSQL connection.
Now use your saved output to apply your password and connect to your PostgreSQL instance. To get the password for “postgres,” run your output similar to the following command:
$ export POSTGRES_PASSWORD=$(kubectl get secret --namespace default my-release2-postgresql -o jsonpath="{.data.postgresql-password}" | base64 --decode)To connect to your database, run your second output with something like the following command:
$ kubectl run my-release2-postgresql-client --rm --tty -i --restart='Never' --namespace default --image docker.io/bitnami/postgresql:11.14.0-debian-10-r28 --env="PGPASSWORD=$POSTGRES_PASSWORD" --command -- psql --host my-release2-postgresql -U postgres -d postgres -p 5432You can confirm that you’re connected when you see your cursor change to “postgres=#.”

And that’s it! You’ve successfully deployed and connected to a PostgreSQL instance running in a Kubernetes cluster in OCI.
Conclusion
Whether for testing, rapid prototyping, or a standalone production instance, you now know how to use OKE, Oracle Cloud Shell, and the preinstalled Helm package manager to deploy and connect to a cluster-ready PostgreSQL database, as well as many other applications, packages, and databases. I encourage you to explore the many types of Helm charts available in the open source ecosystem. Spend less time configuring and more time on managing and innovating in Oracle Cloud Infrastructure.
In part 2 of this blog series, we deploy a multinode high availability PostgreSQL architecture using Oracle Cloud Shell, OKE, and Helm. If you want to try this lab for free, I recommend the Oracle Cloud Free Tier with US$300 credits for a 30-day free trial. Free Tier also includes several Always Free services that are available for an unlimited time, even after your free credits expire.
