Forgetting your Administrator password on Windows Server is frustrating, but don’t despair. If you server is a member of a domain, you can easily use domain management tools to reset the password. If it’s configured for local management, however, this post will help you recover your compute instance in a few easy steps!
This tutorial requires access to the Oracle Cloud Infrastructure Console, a few Linux command-line skills, and shutting down your instance for a couple of minutes. By the end of it, you’ll be able to log in to your recovered instance without the password and then set a new password.
Important: This tutorial is specifically for Windows 2012 and Windows 2016 server. Do not use it with Windows 2008R2 as it will render instance unusable.
This technique involves a short interval during which blank password login is enabled. Consider implementing additional security for this compute instance before proceeding. For example, you could restrict the IP range allowed to access the instance via remote desktop (TCP port 3389).
This tutorial takes about 10 minutes using virtual machine (VM) instances. If you are using bare metal instances, it might take longer.
If you see the following:
$ command
or
> command
these commands are meant to be executed on the remote instance we create during the process.
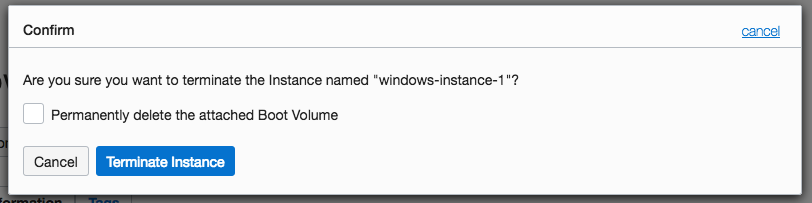
Step 1: Terminate the Windows instance, preserving the boot volumeIn the Oracle Cloud Infrastructure Console, terminate the Windows instance, but clear the Permanently delete the attached Boot Volume check box. Preserving the boot volume enables you to modify it and reuse it to create a new instance, preserving all the data while destroying an actual virtual machine.
Important: Note all the details you would like to preserve for your instance (compartment, attached block storage volumes, subnet or static IP address configured).
Step 2: Launch an Ubuntu instance and attach block storage
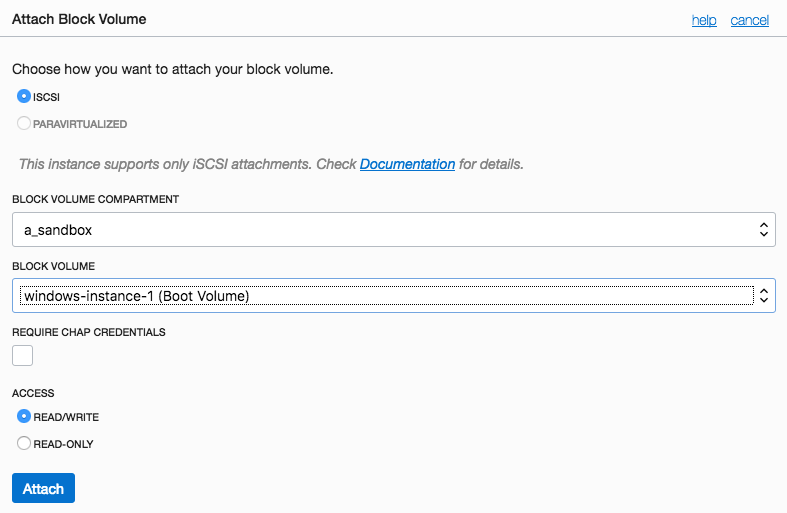
In the same compartment as the terminated instance, launch a new Ubuntu instance. You’ll just be using this to run a few Linux commands on that Windows Server boot volume, so the specific configuration of the VM doesn’t matter; you can just use VM.Standard2.1.
When the Ubuntu instance switches to the RUNNING state, attach the Windows instance boot volume as a block storage volume.
Step 3: Run the ISCSI login commands
Log in to the recovery instance using ubuntu@<ip_address> (and SSH key assigned during the launch).
The Console provides ISCSI commands on the details page of the volume’s attached instance. Click the actions icon on your volume’s row, click iSCSI Information, copy and execute the commands on ubuntu host.
$ sudo iscsiadm -m node -o new -T iqn.2015-02.oracle.boot:uefi -p 169.254.2.2:3260
$ sudo iscsiadm -m node -o update -T iqn.2015-02.oracle.boot:uefi -n node.startup -v automatic
$ sudo iscsiadm -m node -T iqn.2015-02.oracle.boot:uefi -p 169.254.2.2:3260 -l
Step 4: Validate the partition layout
The partition layout should be similar to the following example. You should see four partitions with the same labels in the type column.
Run the following command:
$ sudo sfdisk -l /dev/sdb
Disk /dev/sdb: 256 GiB, 274877906944 bytes, 536870912 sectors
Units: sectors of 1 * 512 = 512 bytes
Sector size (logical/physical): 512 bytes / 4096 bytes
I/O size (minimum/optimal): 4096 bytes / 1048576 bytes
Disklabel type: gpt
Disk identifier: 3D757AFA-F8FA-4592-A8FE-5D6A19E2FA6C

Device       Start       End   Sectors   Size Type
/dev/sdb1     2048    616447    614400   300M Windows recovery environment
/dev/sdb2   616448    821247    204800   100M EFI System
/dev/sdb3   821248   1083391    262144   128M Microsoft reserved
/dev/sdb4  1083392 536868863 535785472 255.5G Microsoft basic data
Step 5: Check the NTFS volume for common problems
$ sudo ntfsfix /dev/sdb4
Mounting volume... OK
Processing of $MFT and $MFTMirr completed successfully.
Checking the alternate boot sector... OK
NTFS volume version is 3.1.
NTFS partition /dev/sdb4 was processed successfully.
$ mkdir -p /media/windows
$ mount /dev/sdb4 /media/windows
Step 6: Install chntpw
$ sudo apt update
$ sudo apt install chntpw
Step 7: Use chntpw to reset the Administrator password
$ chntpw /media/windows/Windows/System32/config/SAM -u opc
ubuntu@linux-instance-1:~$ chntpw /media/windows/Windows/System32/config/SAM -u opc
chntpw version 1.00 140201, (c) Petter N Hagen
Hive </media/windows/Windows/System32/config/SAM> name (from header): <\SystemRoot\System32\Config\SAM>
ROOT KEY at offset: 0x001020 * Subkey indexing type is: 686c <lh>
File size 65536 [10000] bytes, containing 7 pages (+ 1 headerpage)
Used for data: 329/31960 blocks/bytes, unused: 28/8776 blocks/bytes.

================= USER EDIT ====================

RID     : 1000 [03e8]
Username: opc
fullname:
comment :
homedir :

00000220 = Administrators (which has 2 members)

Account bits: 0x0010 =
[ ] Disabled        | [ ] Homedir req.    | [ ] Passwd not req. |
[ ] Temp. duplicate | [X] Normal account  | [ ] NMS account     |
[ ] Domain trust ac | [ ] Wks trust act.  | [ ] Srv trust act   |
[ ] Pwd don't expir | [ ] Auto lockout    | [ ] (unknown 0x08)  |
[ ] (unknown 0x10)  | [ ] (unknown 0x20)  | [ ] (unknown 0x40)  |

Failed login count: 2, while max tries is: 8
Total  login count: 2

- - - - User Edit Menu:
 1 - Clear (blank) user password
(2 - Unlock and enable user account) [seems unlocked already]
 3 - Promote user (make user an administrator)
 4 - Add user to a group
 5 - Remove user from a group
 q - Quit editing user, back to user select

Select: [q] >
> 1
Password cleared!
================= USER EDIT ====================

RID     : 1000 [03e8]
Username: opc
fullname:
comment :
homedir :

00000220 = Administrators (which has 2 members)

Account bits: 0x0010 =
[ ] Disabled        | [ ] Homedir req.    | [ ] Passwd not req. |
[ ] Temp. duplicate | [X] Normal account  | [ ] NMS account     |
[ ] Domain trust ac | [ ] Wks trust act.  | [ ] Srv trust act   |
[ ] Pwd don't expir | [ ] Auto lockout    | [ ] (unknown 0x08)  |
[ ] (unknown 0x10)  | [ ] (unknown 0x20)  | [ ] (unknown 0x40)  |

Failed login count: 2, while max tries is: 8
Total  login count: 2
** No NT MD4 hash found. This user probably has a BLANK password!
** No LANMAN hash found either. Try login with no password!

- - - - User Edit Menu:
 1 - Clear (blank) user password
(2 - Unlock and enable user account) [seems unlocked already]
 3 - Promote user (make user an administrator)
 4 - Add user to a group
 5 - Remove user from a group
 q - Quit editing user, back to user select
Select: [q] >
> 2
Unlocked!

...

Select: [q] >
> q
Hives that have changed:
 #  Name
 0  </media/windows/Windows/System32/config/SAM>
Write hive files? (y/n) [n] :
> y
0 </media/windows/Windows/System32/config/SAM> - OK
Step 8: Edit the registry settings to allow blank-password login
$ chntpw -e /media/windows/Windows/System32/config/SYSTEM
> ls Select
Node has 0 subkeys and 4 values
  size     type              value name             [value if type DWORD]
     4  4 REG_DWORD          <Current>                  1 [0x1]
     4  4 REG_DWORD          <Default>                  1 [0x1]
     4  4 REG_DWORD          <Failed>                   0 [0x0]
     4  4 REG_DWORD          <LastKnownGood>            2 [0x2]
Record the value of the Current field.
> cd ControlSet001\Control\Lsa\
Use ControlSet001 or ControlSet002, depending on the value of Current from the Select key.
> ed LimitBlankPasswordUse
EDIT: <LimitBlankPasswordUse> of type REG_DWORD (4) with length 4 [0x4]
DWORD: Old value 1 [0x1], enter new value (prepend 0x if hex, empty to keep old value)
> 0x0
> q
Hives that have changed:
# Name
0
Write hive files? (y/n) [n] :
> y
$ sudo umount /media/windows
$ sudo iscsiadm -m node -T iqn.2015-02.oracle.boot:uefi -p 169.254.2.2:3260 -u
$ sudo iscsiadm -m node -o delete -T iqn.2015-02.oracle.boot:uefi -p 169.254.2.2:3260
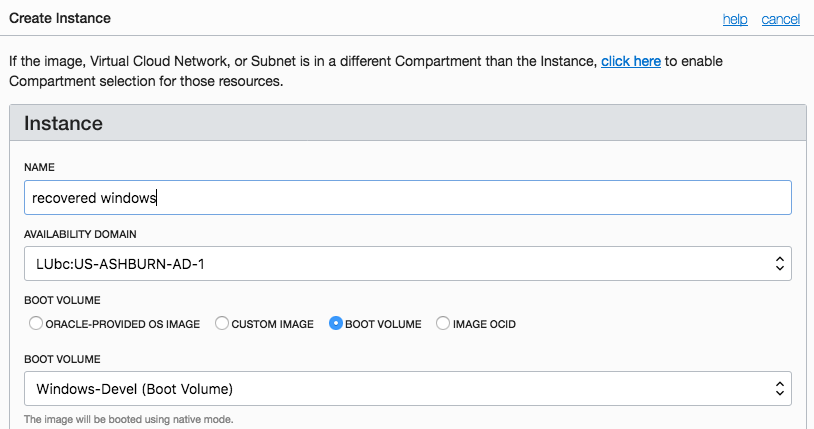
Step 9: Launch the recovered instance
Terminate the temporary Ubuntu instance and re-launch original boot disk using Create Instance menu. Use all the original parameters that you took a note of in the step 1.
After instance is in the RUNNING state, log in with the blank password and set the password for the opc user.
Important: Your instance now allows login with a blank password. After you recovered the system, be sure to set the HKEY_LOCAL_MACHINE\System\Currentcontrolset\Control\Lsa\Limitblankpassworduse key to 1.
After disabling blank password login you can revert your security policy to the original version.
Thanks for reading. I hope it helps. Your feedback is most welcome. Feel free to reach out and tell us how we can help you!
Marcin Zablocki
Solutions Architect
Twitter: https://twitter.com/mz_oracle
LinkedIn: https://www.linkedin.com/in/marcinzablocki/