
Kubernetes environments can contribute significantly to an organization’s cloud spend. Development, test, integration, and staging clusters are often provisioned with production-like capacity but experience highly variable utilization. Outside business hours, many application pods and the worker nodes supporting them remain running despite little or no workload, resulting in unnecessary compute costs.
KEDA combined with Cluster Autoscaler provides an effective way to address this idle capacity.
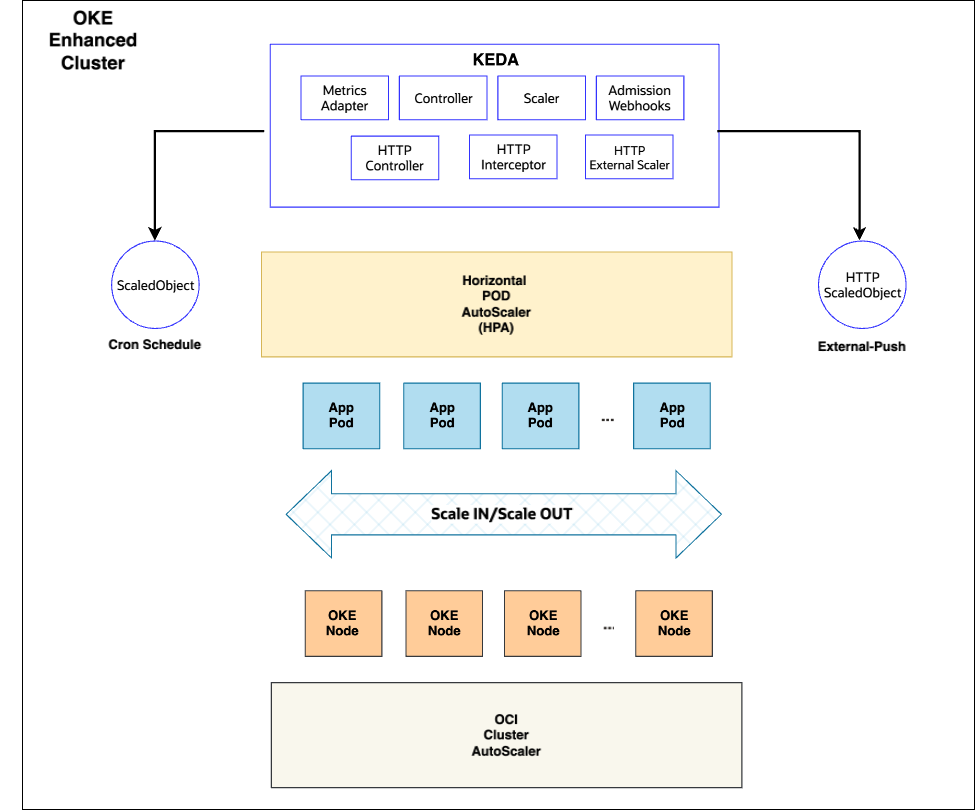
Figure 1: Application Autoscaling with KEDA on OKE
KEDA can scale application workloads based on schedules or demand, including scaling eligible non-production workloads down to zero replicas during nights, weekends, or other inactive periods. When workloads become active again, KEDA can restore capacity based on schedules or supported http-based triggers.
At the infrastructure layer, Cluster Autoscaling complements KEDA by adjusting worker-node capacity as pod demand changes. As KEDA reduces application replicas, fewer worker nodes are required; the node autoscaler can subsequently remove unnecessary nodes. When application demand increases, the process works in the opposite direction. This approach is particularly valuable across large fleets of non-production clusters, where small amounts of persistent idle capacity can translate into substantial aggregate cost.
The combined model is:
| During outside business hours KEDA reduces application pods to zero →nodes become empty → Cluster Autoscaler removes node capacity → lower compute consumption and cost. When traffic arrives during outside hours → KEDA HTTP Add-on intercepts and wakes up the App → Keda scales up the pods → Cluster Autoscaler scales up node capacity. |
Step 1: OKE Cluster Design
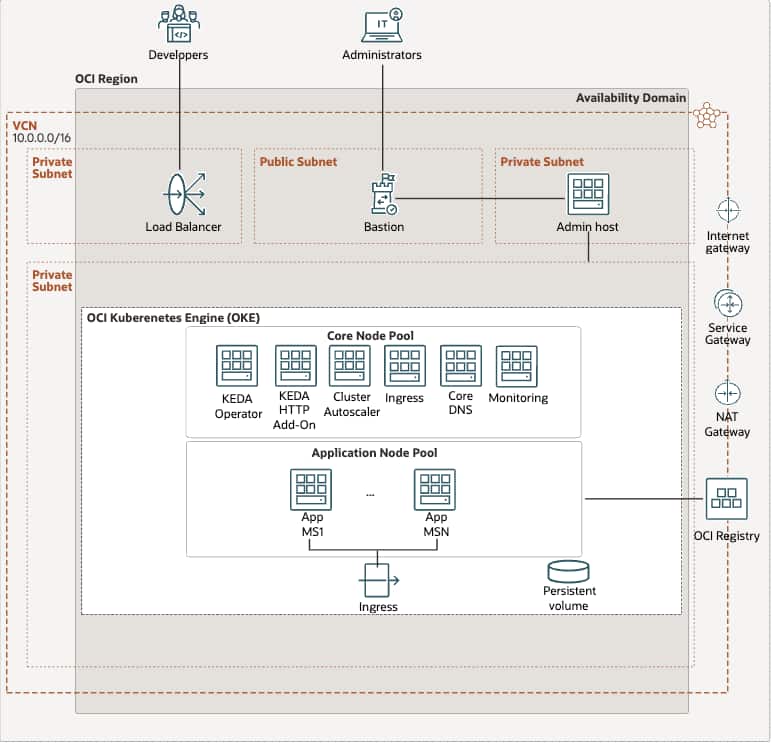
Figure 2: OKE Architecture with multi node pools
OKE explicitly supports and recommends separate managed node pools per workload type.
A “core” pool hosting components that must never scale to zero: KEDA’s operator, the HTTP Add-on interceptor, Ingress Controller, CoreDNS, Monitoring agents, and the Cluster Autoscaler itself. Please note this should be a managed pool and not a virtual pool due KEDA HTTP add-on dependencies currently not supported with Virtual Node Pool.
oci ce node-pool create \
  --cluster-id <CLUSTER_OCID> \
  --compartment-id <COMPARTMENT_OCID> \
  --name core-pool \
  --kubernetes-version <K8S_VERSION> \
  --node-shape <VM_SHAPE> \
  --node-shape-config '{"ocpus":2,"memoryInGBs":16}' \
  --size 2 \
  --node-image-id <IMAGE_OCID> \
  --placement-configs '[{"availabilityDomain":"<AD1>","subnetId":"<SUBNET_OCID>"}]'\
  --freeform-tags '{"role":"core"}' \
  --ssh-public-key <SSH_PUBLIC_KEY> \
  --pod-subnet-ids '["<POD_SUBNET_ID>"]' \
  --initial-node-labels '[{"key":"pool-role","value":"core"}]'
No taint is applied to the core pool. It’s fine for core system pods to run here without special tolerations, since nothing else should be scheduling onto the application pool that isn’t explicitly tolerating it.
An “application” pool – this is the one you want to reduce to zero. Nothing from the core stack should be scheduled here (use taints/tolerations and nodeSelectors to enforce it).
$ cat > cloudinit.sh << 'EOF'
#!/bin/bash
curl --fail -H "Authorization: Bearer Oracle" -L0 http://169.254.169.254/opc/v2/instance/metadata/oke_init_script | base64 --decode >/var/run/oke-init.sh
bash -x /var/run/oke-init.sh --kubelet-extra-args '--node-labels=pool-role=application --register-with-taints=pool-role=application:NoSchedule'
EOF

$ USER_DATA=$(base64 -w0 cloudinit.sh)

$ oci ce node-pool create \
  --cluster-id <CLUSTER_OCID> \
  --compartment-id <COMPARTMENT_OCID> \
  --name app-pool \
  --kubernetes-version <K8S_VERSION> \
  --node-shape <VM_SHAPE> \
  --node-shape-config '{"ocpus":4,"memoryInGBs":32}' \
  --size 0 \
  --node-image-id <IMAGE_OCID> \
  --placement-configs '[{"availabilityDomain":"<AD1>","subnetId":"<SUBNET_OCID>"}]'\
  --freeform-tags '{"role":"application"}' \
  --ssh-public-key <SSH_PUBLIC_KEY> \
  --pod-subnet-ids '["<POD_SUBNET_ID>"]' \
  --node-metadata '{"user_data":"'"$USER_DATA"'"}' \
  --initial-node-labels '[{"key":"pool-role","value":"application"}]'
The taint (pool-role=application:NoSchedule) is what prevents KEDA, ingress, DNS, monitoring, or the Cluster Autoscaler pods from ever landing here. They don’t carry the matching toleration, so the scheduler never place them on this pool even if the core pool is briefly full. Only application Deployments that explicitly tolerate the taint schedule onto app-pool.
Step 2: Cluster Autoscaling
The CA pods must not run on any node pool it manages. So, it needs to be pinned onto core-pool specifically, via nodeSelector and a matching toleration (if core-pool is tainted).
For Cluster Autoscaler as a Standalone Program: edit the pod spec directly in cluster-autoscaler.yaml.
apiVersion: apps/v1
kind: Deployment
metadata:
  name: cluster-autoscaler
  namespace: kube-system
  labels:
    app: cluster-autoscaler
spec:
  replicas: 3
  selector:
    matchLabels:
      app: cluster-autoscaler
  template:
    metadata:
      labels:
        app: cluster-autoscaler
      annotations:
        prometheus.io/scrape: 'true'
        prometheus.io/port: '8085'
    spec:
      serviceAccountName: cluster-autoscaler
      nodeSelector: pool-role: core
      containers:
        - image: iad.ocir.io/oracle/oci-cluster-autoscaler:{{ image tag }}
          name: cluster-autoscaler
          resources:
            limits:
              cpu: 100m
              memory: 300Mi
            requests:
              cpu: 100m
              memory: 300Mi
          command:
            - ./cluster-autoscaler
            - --v=4
            - --stderrthreshold=info
            - --cloud-provider=oci
            - --max-node-provision-time=25m
            - --nodes=0:20:<APP_NODE_POOL_OCID>
            # format is min:max:node-pool-ocid — min=0 enables true
            # scale-to-zero for this pool specifically
            - --scale-down-delay-after-add=10m
            - --scale-down-unneeded-time=10m
            - --unremovable-node-recheck-timeout=5m
            - --balance-similar-node-groups
            - --balancing-ignore-label=displayName
            - --balancing-ignore-label=hostname
            - --balancing-ignore-label=internal_addr
            - --balancing-ignore-label=oci.oraclecloud.com/fault-domain
          imagePullPolicy: "Always"
For Cluster Autoscaler as a Cluster Add-on: pass nodeSelectors and tolerations as config arguments in the cluster-autoscaler-add-on.json.
{
  "configurations": [
    {
      "key": "nodes",
      "value": <APP_NODE_POOL_OCID>
    },
    {
      "key": "authType",
      "value": "workload"
    },
    {
      "key": "numOfReplicas",
      "value": "3"
    },
    {
      "key": "maxNodeProvisionTime",
      "value": "15m"
    },
    {
      "key": "scaleDownDelayAfterAdd",
      "value": "15m"
    },
    {
       "key": "nodeSelectors",
       "value": "{\"pool-role\":\"core\"}"
    },
    {
      "key": "scaleDownUnneededTime",
      "value": "10m"
    },
    {
      "key": "annotations",
      "value": "{\"prometheus.io/scrape\":\"true\",\"prometheus.io/port\":\"8086\"}"
    }
Step 3: Installing Keda and HTTP Add-on
Pin both Keda core and Keda HTTP add-on onto the core-pool.
$ helm install keda kedacore/keda --namespace keda --create-namespace --set nodeSelector. pool-role=core --set metricsServer.nodeSelector.pool-role=core --set webhooks.nodeSelector.pool-role=core

$ helm install http-add-on kedacore/keda-add-ons-http --namespace keda --set operator.nodeSelector.pool-role=core --set interceptor.nodeSelector.pool-role=core --set scaler.nodeSelector.pool-role=core
Step 4: Application Deployment
Application deployment must run on app pool, keeping other pools free of unintended scheduling. To guarantee placement only on app-pool, pair the toleration with a nodeSelector (or nodeAffinity) matching a label present on that pool (e.g., pool-role=application, added via –initial-node-labels in the Step 1).
apiVersion: apps/v1
kind: Deployment
metadata:
  name: nginx-deployment
spec:
  selector:
    matchLabels:
      app: nginx
  replicas: 5
  template:
    metadata:
      labels:
        app: nginx
    spec:
      nodeSelector:
        pool-role: application
      tolerations:
        - key: "pool-role"
          operator: "Equal"
          value: "application"
          effect: "NoSchedule"
      containers:
        - name: nginx
          image: iad.ocir.io/mytenancy/library/nginx:latest
          ports:
            - containerPort: 80
          resources:
            requests:
              cpu: 50m
              memory: 64Mi
            limits:
              cpu: 200m
              memory: 128Mi
---
apiVersion: v1
kind: Service
metadata:
  name: nginx-service
spec:
  type: ClusterIP
  selector:
    app: nginx
  ports:
    - port: 80
      targetPort: 80
Step 5: Define KEDA InterceptorRoute and ScaledObject (Cron + HTTP Autoscaling)
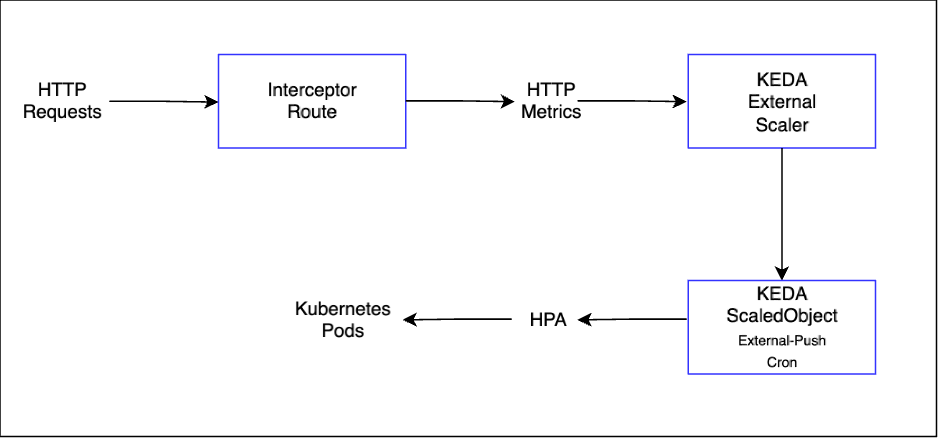
Figure 3: KEDA HTTP architecture
KEDA extends the Kubernetes Horizontal Pod Autoscaler (HPA) with support for event- and schedule-driven scaling, including scale-to-zero, and is made up of a few core pieces:
- KEDA Operator – watches ScaledObject/ScaledJob custom resources, activates or deactivates a workload (including scaling it to zero), and creates/manages the underlying HPA object on the workload’s behalf.
- Metrics Server – implements the Kubernetes external metrics API so the HPA can read the current value of whatever a trigger is measuring (cron window, queue depth, request concurrency, etc.).
- Scalers – pluggable adapters that know how to read a specific event source (cron schedules, message queues, Prometheus, and 60+ others) and feed that value to the Metrics Server.
- ScaledObject / ScaledJob – the CRD that ties a Deployment (or Job) to one or more triggers, along with minReplicaCount, maxReplicaCount, and cooldown behavior.
Since HTTP traffic isn’t a metric KEDA can observe on its own, the KEDA HTTP Add-on introduces three additional components used in this design:
- Interceptor – a proxy that sits in front of the application service. While the app is scaled to zero, the interceptor holds incoming requests and signals the operator to scale the workload up. Once pods are ready, it forwards the traffic through.
- External Scaler – reports live concurrent/queued request counts back to KEDA as a trigger metric, which is what lets the ScaledObject react to real HTTP demand rather than just a schedule.
- HTTP Add-on Operator – reconciles the InterceptorRoute CRD, keeping the interceptor’s routing table in sync with the application services it fronts.
All these components – operator, metrics server, interceptor, and external scaler, are what get pinned to the core pool in Step 1 as none of them can be allowed to scale to zero themselves.
KEDA autoscaling is well suited for the pattern where we want to scale down the deployment completely to zero outside business hours, maintain specific replicas during business hours, enables demand driven autoscaling if HTTP traffic arrives outside business hours.
KEDA HTTP Add-on separates routing from the scaling. The InterceptorRoute handles the HTTP routing/metrics configuration, while the ScaledObject contains the workload reference and scaling triggers (Cron + HTTP).
The InterceptorRoute needs to be created first, and then the ScaledObject. It tells the interceptor how to route requests to your service and what scaling metrics to report.
For autoscaling to work, traffic must flow through the interceptor instead of directly to your application.
apiVersion: http.keda.sh/v1beta1
kind: InterceptorRoute
metadata:
  name: nginx-deployment
  namespace: default
spec:
  target: # The Kubernetes Service and port to route traffic to
    service: nginx-service
    port: 80
  rules:
    - hosts: # Hostnames to match against the HTTP Host header. This must match what callers send
        - nginx.example.com
  scalingMetric: # Target concurrent requests per replica. If there are 20 concurrent in-flight requests total, KEDA scales to ~4 replicas
    concurrency:
      targetValue: 5
For traffic entering the cluster from outside, configure your ingress or gateway to point at the interceptor proxy service instead of your application.
apiVersion: networking.k8s.io/v1
kind: Ingress
metadata:
  name: native-ic-ingress
  namespace: keda
spec:
  ingressClassName: native-ic-ingress-class
  rules:
    - http:
        paths:
          - pathType: Prefix
            path: /
            backend:
              service:
                name: keda-add-ons-http-interceptor-proxy
                port:
                  number: 8080
If other services in your cluster call your application directly, redirect them to the interceptor proxy service. Create an ExternalName service in your application’s namespace so callers can reach the interceptor.
apiVersion: v1
kind: Service
metadata:
  name: <your-service>-proxy
  namespace: <your-namespace>
spec:
  type: ExternalName
  externalName: keda-add-ons-http-interceptor-proxy.keda.svc.cluster.local
  ports:
    - port: 8080
Define a single ScaledObject with multiple triggers:
apiVersion: keda.sh/v1alpha1
kind: ScaledObject
metadata:
  name: nginx-deployment-scaledobject

spec:
  scaleTargetRef:
    name: nginx-deployment

  # Allow the workload to scale completely to zero.
  minReplicaCount: 0

  # Never scale beyond 10 replicas.
  maxReplicaCount: 10

  # Wait before scaling from active replicas to zero.
  cooldownPeriod: 300

  triggers:
    # Maintain 5 replicas during business hours.
    - type: cron
      metadata:
        timezone: Asia/Calcutta
        start: "0 10 * * 1-5"
        end: "0 23 * * 1-5"
        desiredReplicas: "5"

    # Dynamically scale based on HTTP traffic.
    - type: external-push
      metadata:
        scalerAddress: keda-add-ons-http-external-scaler.keda:9090
        interceptorRoute: nginx-deployment
The above scaled object results in the following behavior:
| Scenario | Cron | HTTP | Expected Behavior |
| Monday 09:00, no traffic | Inactive | Inactive | Remain at 0 |
| Monday 14:00, no traffic | 5 | Inactive | Maintain 5 |
| Monday 16:00, low traffic | 5 | Low | Maintain at least 5 |
| Monday 17:00, heavy traffic | 5 | Requires 8 | Scale to 8 |
| Monday 23:00, no traffic | Inactive | Inactive | Scale to 0 |
| Tuesday 02:00, HTTP traffic | Inactive | Active | Activate and scale for traffic |
| Saturday, no traffic | Inactive | Inactive | Remain at 0 |
| Saturday, HTTP traffic | Inactive | Active | Activate and scale for traffic |
A ScaledObject does not apply automatically to every Deployment in a namespace. ‘scaleTargetRef’ identifies one scalable workload.
The best practice for generating many ScaledObjects, while maintaining 10, 50, or 200 near-identical YAML files, is to generate the ScaledObjects automatically with Helm, Kustomize, GitOps, or an operator/policy mechanism.
Conclusion
KEDA and the OKE Cluster Autoscaler work together to deliver predictable, responsive, and cost-efficient scaling. KEDA determines how many pods are needed, proactively via cron for expected traffic, reactively via HTTP triggers for actual demand, and down to zero during idle periods.
The Cluster Autoscaler manages the nodes. It adds nodes when more pods need to run and removes nodes when they are no longer needed.
Together, they help keep the application ready for traffic while reducing compute costs during off-hours.
For more information, see the following resources: