The purpose of this migration strategy is to enable the migration of a SQL Server database or logical group of SQL Server databases with a small window of downtime. This strategy uses Microsoft SQL Server with Always On availability groups to move critical SQL Server resources that are currently in Oracle Cloud Infrastructure-Classic (OCI-Classic) environments to Oracle Cloud Infrastructure. This same strategy is applicable to other clouds or even from your on-premises data center.
The architecture looks similar to the following diagram. The basis of the strategy is to use SQL Server Always On availability groups to move the databases that are mission-critical or too large to fit into the current downtime allotted for the migration. You build an Always On availability group between two or more SQL Server databases that reside in an OCI-Classic region and an Oracle Cloud Infrastructure region. Because SQL Server Always On availability groups handle one or more databases in a single availability group, ensure that you build your availability groups in a logical way that facilitates the best migration of the database with the least amount of downtime for the database.

Diagram 1: Architecture for Migrating SQL Server Databases from OCI-Classic to Oracle Cloud Infrastructure
This strategy use five phases of migration: Discover, Analyze, Plan, Migrate, and Post-Migrate.
Discover
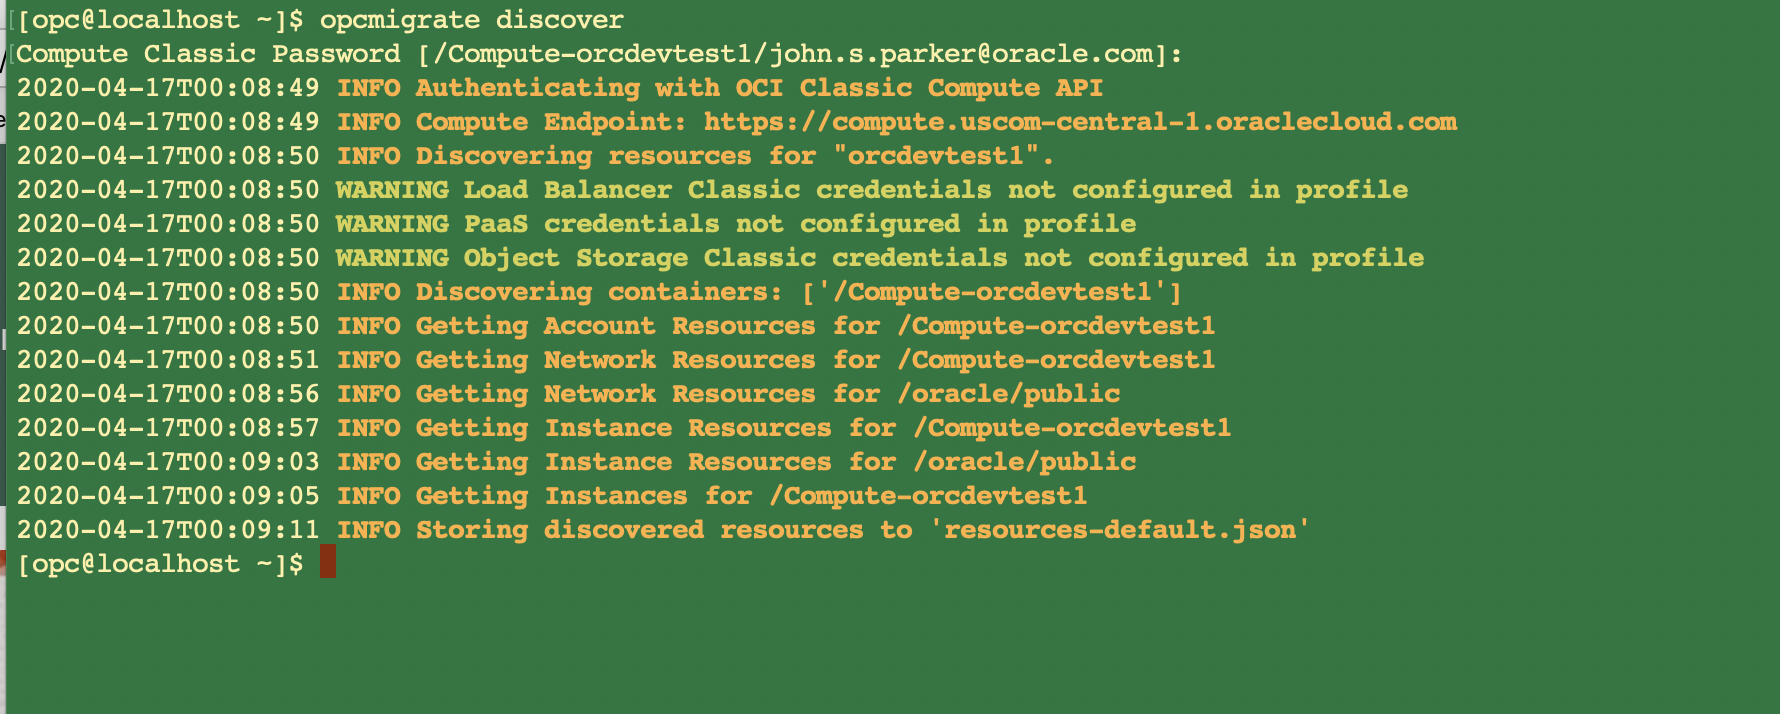
In the Discover phase, you determine what the current environment contains and how it’s built. You can use the OPCMIGRATE tool to interrogate the OCI-Classic environment. The output report shows the number of instances and block volumes, and provides an overview of the current network topology. This information is the basis for building the new SQL Server environment in the new Oracle Cloud Infrastructure tenancy.
For more information about OPCMIGRATE, see Run Oracle Cloud Infrastructure Classic Discovery and Translation Tool to Generate Reports.
-
Run opcmigrate discover. For more information, see Generate a Summary and JSON Output. Following is an example.
-
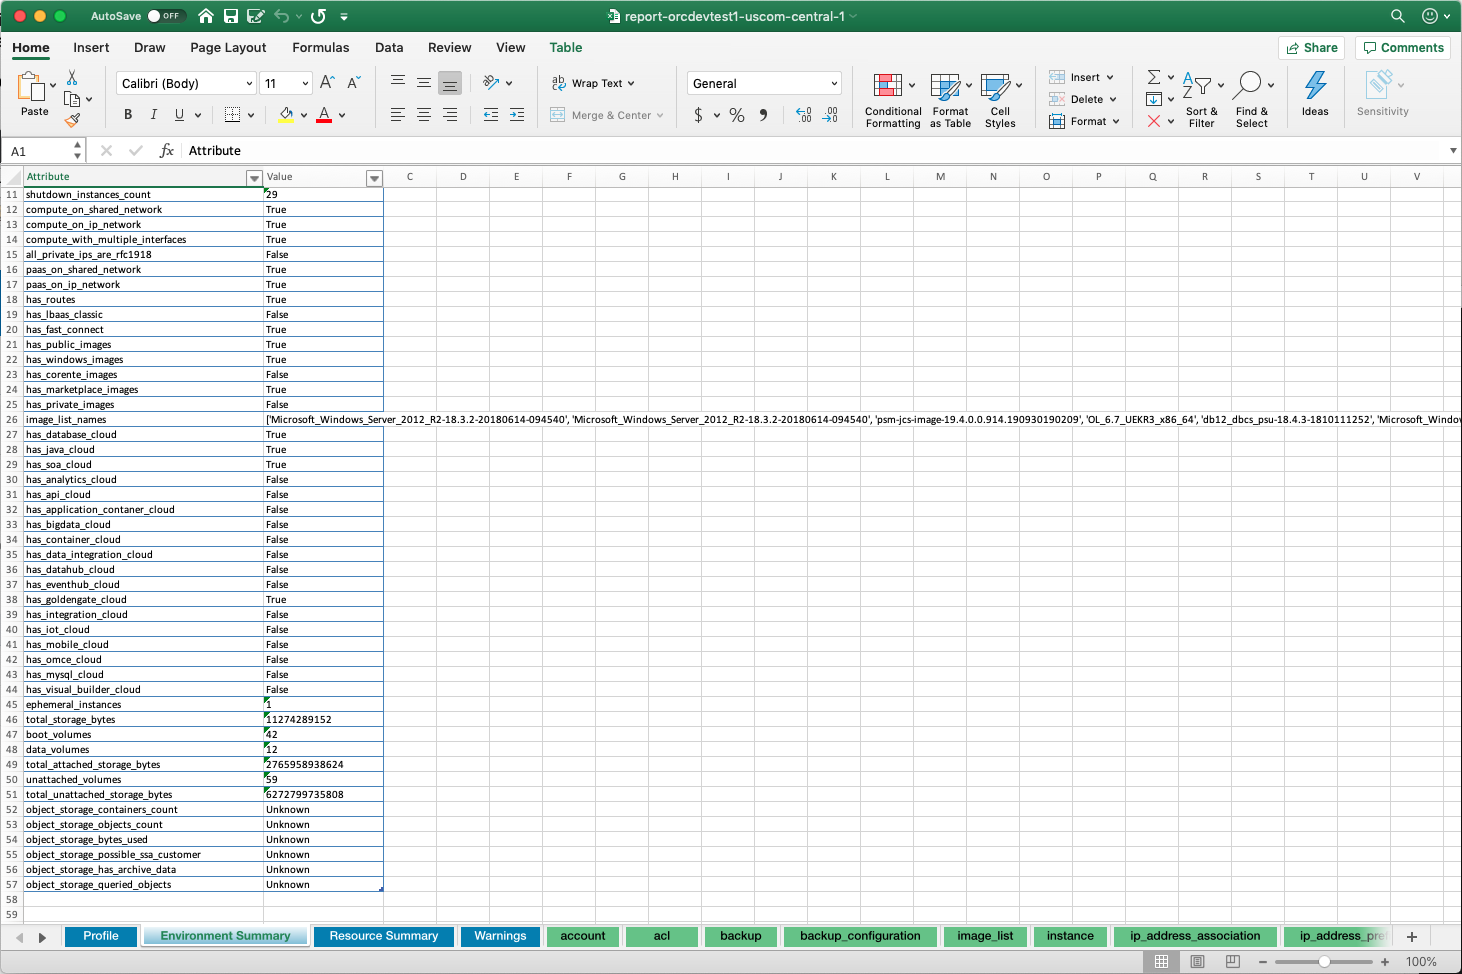
Run opcmigrate report. For more information, see Generate a Spreadsheet. Following is an example.
After discovering all of the components that need to be migrate the next phase will be to analyze the current environment.
Analyze
In the Analyze phase, you ensure that all the portions of the environment are identified. By analyzing the data from the Discover phase, you can identify bottlenecks. These bottlenecks could be in the network, compute, or storage layers of the architecture. When you analyze the current environment, note any improvements that you can make while migrating, and think about acceptance criteria for the migration.
-
Using the output from the OPCMIGRATE tool, plan the new architecture:
-
OPCMIGRATE network
-
OPCMIGRATE instances-export
-
-
Determine any current bottlenecks in the architecture:
-
Network
-
Compute
-
Storage
-
-
Determine outline for acceptance criteria for the new system.
The next phase of the process is to plan the migration.
Plan
Most of the work occurs in the Plan phase. In this phase, you build the migration checklist, create any Terraform code that’s needed to create the environment in Oracle Cloud Infrastructure, and create the Oracle Cloud Infrastructure environment.
-
Create the migration checklist. Be sure to include DNS changes and other potential network and application items.
-
Create the Terraform scripts needed to create the Oracle Cloud Infrastructure environment. You can use the output from OPCMIGRATE to help.
Run opcmigrate generate to generate the Terraform configuration file. Following is an example of the Terraform variables.tf script.
/* Copyright (c) 2019, Oracle and/or its affiliates. All rights reserved. * varibles.tf * This example demonstrates round robin load balancing behavior by creating two instances, a configured * vcn and a load balancer. The public IP of the load balancer is outputted after a successful run, curl * this address to see the hostname change as different instances handle the request. * * NOTE: The https listener is included for completeness but should not be expected to work, * it uses dummy certs. * * * Variables for the Terraform * Need to include Instance, Compartment, and User OCID's * Compartment - SQLMigrate ocid1.compartment.oc1.. */ variable "compartment_id" { default = "**Insert Compartment OCID** " } variable "tenancy_ocid" { default = "**Insert Tenancy OCID** " } variable "user_ocid" { default = "**Insert User OCID** " } /* * Secrets information */ variable "fingerprint" { default = "**Insert Fingerprint** " } variable "private_key_path" { default = "**Insert Path to Private Key** .pem" } /* * Instance Hostnames */ variable "hostname_1" { default = "Bastion1" } variable "hostname_2" { default = "SQLB" } variable "hostname_3" { default = "SQLC" } variable "hostname_4" { default = "SQLAD01" } /* * Network component name */ variable "vcn_name" { default = "SQLVCN" } variable "vnic1_name" { default = "vnic1" } variable "vnic2_name" { default = "vnic2" } variable "subnet1_name" { default = "DMZ" } variable "subnet2_name" { default = "SQLAPPNet001" } /* * Add the Region you want to create the environment: * phoenix = us-phoenix-1 * Ashburn = us-ashburn-1 * London = uk-london-1 * Frankfurt = eu-frankfurt-1 * Toronto = ca-toronto-1 */ variable "region" { default = "us-ashburn-1" } /* * Virtual Machine Shapes * VM.Standard2.1 * VM.Standard2.16 * VM.Standard2.2 * VM.Standard2.24 * VM.Standard2.4 * VM.Standard2.8 */ variable "instance_shape" { default = "VM.Standard2.4" } variable "sql_shape" { default = "VM.Standard2.8" } /* Current Availability Domains */ variable "availability_domain1" { default = "AaRH:US-ASHBURN-AD-1" } variable "availability_domain2" { default = "AaRH:US-ASHBURN-AD-2" } variable "availability_domain3" { default = "AaRH:US-ASHBURN-AD-3" } /* Current Region Availability Domains */ variable "instance_fault_domain_1" { default = "FAULT-DOMAIN-1" } variable "instance_fault_domain_2" { default = "FAULT-DOMAIN-2" } variable "instance_fault_domain_3" { default = "FAULT-DOMAIN-3" } /* Image information * See https://docs.us-phoenix-1.oraclecloud.com/images/ * Oracle-provided image "Windows-Server-2016-Standard-Edition-VM-Gen2-2019.03.14-0" */ /* /* Image information See https://docs.us-phoenix-1.oraclecloud.com/images/ Oracle-provided image "Windows-Server-2016-Standard-Edition-VM-Gen2-2019.03.14-0" */ data "oci_core_images" "windows-server-2016-standard-VM" { compartment_id = var.compartment_id operating_system = "Windows" operating_system_version = "Server 2016 Standard" sort_by = "TIMECREATED" sort_order = "DESC" state = "AVAILABLE" filter { name = "display_name" values = ["^Windows-Server-2016-Standard-Edition-VM-Gen2-([\\.0-9-]+)$"] regex = true } } /* * Block Volume Storage variables * SQL servers * SQLB * SQLC */ variable "TempDBSize" { default = "50" // size in GBs, min: 50, max 16384 } variable "LogSize" { default = "50" // size in GBs, min: 50, max 16384 } variable "DBDataSize" { default = "100" // size in GBs, min: 50, max 16384 } -
Create the network and compute resources in the Oracle Cloud Infrastructure environment.
-
Build the new VCN, appropriate subnets, and security lists. Following is an example of the Terraform network.tf script.
/* Copyright (c) 2019, Oracle and/or its affiliates. All rights reserved. * network.tf * This example demonstrates round robin load balancing behavior by creating two instances, a configured * vcn and a load balancer. The public IP of the load balancer is outputted after a successful run, curl * this address to see the hostname change as different instances handle the request. * * NOTE: The https listener is included for completeness but should not be expected to work, * it uses dummy certs. */ provider "oci" { version = ">= 3.0" tenancy_ocid = var.tenancy_ocid user_ocid = var.user_ocid fingerprint = var.fingerprint private_key_path = var.private_key_path region = var.region } /* Network */ resource "oci_core_virtual_network" "vcn1" { cidr_block = "10.10.10.0/24" compartment_id = var.compartment_id display_name = var.vcn_name dns_label = var.vcn_name } resource "oci_core_subnet" "subnet1" { #availability_domain = var.availability_domain1 cidr_block = "10.10.10.32/27" display_name = var.subnet1_name dns_label = var.subnet1_name security_list_ids = [oci_core_security_list.securitylist1.id] compartment_id = var.compartment_id vcn_id = oci_core_virtual_network.vcn1.id route_table_id = oci_core_route_table.routetable1.id dhcp_options_id = oci_core_virtual_network.vcn1.default_dhcp_options_id provisioner "local-exec" { command = "sleep 5" } } resource "oci_core_subnet" "subnet2" { #availability_domain = var.availability_domain2 cidr_block = "10.10.10.64/27" display_name = var.subnet2_name dns_label = var.subnet2_name security_list_ids = [oci_core_security_list.securitylist2.id] compartment_id = var.compartment_id vcn_id = oci_core_virtual_network.vcn1.id route_table_id = oci_core_route_table.routetable1.id dhcp_options_id = oci_core_virtual_network.vcn1.default_dhcp_options_id provisioner "local-exec" { command = "sleep 5" } } resource "oci_core_internet_gateway" "internetgateway1" { compartment_id = var.compartment_id display_name = "internetgateway1" vcn_id = oci_core_virtual_network.vcn1.id } resource "oci_core_route_table" "routetable1" { compartment_id = var.compartment_id vcn_id = oci_core_virtual_network.vcn1.id display_name = "routetable1" route_rules { destination = "0.0.0.0/0" destination_type = "CIDR_BLOCK" network_entity_id = oci_core_internet_gateway.internetgateway1.id } } resource "oci_core_security_list" "securitylist1" { display_name = "public" compartment_id = oci_core_virtual_network.vcn1.compartment_id vcn_id = oci_core_virtual_network.vcn1.id egress_security_rules { protocol = "all" destination = "0.0.0.0/0" } ingress_security_rules { protocol = "6" source = "0.0.0.0/0" tcp_options { min = 80 max = 80 } } ingress_security_rules { protocol = "6" source = "0.0.0.0/0" tcp_options { min = 3389 max = 3389 } } } resource "oci_core_security_list" "securitylist2" { display_name = "private" compartment_id = oci_core_virtual_network.vcn1.compartment_id vcn_id = oci_core_virtual_network.vcn1.id egress_security_rules { protocol = "all" destination = "0.0.0.0/0" } ingress_security_rules { protocol = "6" source = "0.0.0.0/0" tcp_options { min = 3389 max = 3389 } } } -
Build the compute resources. Following is an example of the Terraform compute.tf script.
/* Copyright (c) 2019, Oracle and/or its affiliates. All rights reserved.
 * compute.tf
 * This example demonstrates round robin load balancing behavior by creating two instances, a configured
 * vcn and a load balancer. The public IP of the load balancer is outputted after a successful run, curl
 * this address to see the hostname change as different instances handle the request.
 *
 * NOTE: The https listener is included for completeness but should not be expected to work,
 * it uses dummy certs.
 */
/*
* provider "oci" {
*  version          = ">= 3.0"
*  tenancy_ocid     = var.tenancy_ocid
*  user_ocid        = var.user_ocid
*  fingerprint      = var.fingerprint
*  private_key_path = var.private_key_path
*  region           = var.region
* }
*/
/*
* Instance Creation
*/
resource "oci_core_instance" "Bastion" {
   availability_domain = var.availability_domain1
   fault_domain        = var.instance_fault_domain_1
   compartment_id      = var.compartment_id
   display_name        = var.hostname_1
   shape               = var.instance_shape
   subnet_id           = oci_core_subnet.subnet1.id
   hostname_label      = var.hostname_1

metadata = {
 user_data = base64encode(file("/Users/jsparker/Code/SQLMigration/ActiveDirectory/opcuser.ps1"))
}

source_details {
 source_id  = data.oci_core_images.windows-server-2016-standard-VM.images[0].id
 source_type = "image"
}

lifecycle {
  ignore_changes = [
   source_details[0].source_id,
  ]
 }
}

resource "oci_core_instance" "SQLB"
 availability_domain = var.availability_domain2
 fault_domain        = var.instance_fault_domain_2>
 compartment_id      = var.compartment_id
 display_name        = var.hostname_2
 shape               = var.sql_shape
 subnet_id           = oci_core_subnet.subnet2.id
 hostname_label      = var.hostname_2

metadata = {
 user_data = base64encode(file("/Users/jsparker/Code/SQLMigration/ActiveDirectory/opcuser.ps1"))
}

source_details {
 source_id  = data.oci_core_images.windows-server-2016-standard-VM.images[0].id
 source_type = "image"
}

lifecycle {
 ignore_changes = [
  source_details[0].source_id,
  ]
 }
}

resource "oci_core_instance" "instance3" {
 availability_domain = var.availability_domain3
 fault_domain        = var.instance_fault_domain_3
 compartment_id      = var.compartment_id
 display_name        = var.hostname_3
 shape               = var.sql_shape
 subnet_id           = oci_core_subnet.subnet2.id
 hostname_label      = var.hostname_3

metadata = {
 user_data = base64encode(file("/Users/jsparker/Code/SQLMigration/ActiveDirectory/opcuser.ps1"))
}

source_details {
 source_id = data.oci_core_images.windows-server-2016-standard-VM.images[0].id
 source_type = "image"
}

lifecycle {
 ignore_changes = [
  source_details[0].source_id,
  ]
 }
}
resource "oci_core_instance" "SQLAD01" {
 availability_domain = var.availability_domain3
 fault_domain        = var.instance_fault_domain_3
 compartment_id      = var.compartment_id
 display_name        = var.hostname_4
 shape               = var.instance_shape
 subnet_id           = oci_core_subnet.subnet2.id
 hostname_label      = var.hostname_4

metadata = {
 user_data = base64encode(file("/Users/jsparker/Code/SQLMigration/ActiveDirectory/ActiveDirectoryInit.ps1"))
}

source_details {
 source_type = "image"
 source_id   = var.instance_image_ocid[var.region]
 }
}

<file location=""><file location=""><file location=""><file location="">
</file></file></file></file>
-
-
Create the new Active Directory Domain Servers. This solution doesn’t require you to have redundant Active Directory domain controllers, but we recommend that you do.
Following is an example of the PowerShell ActiveDirectoryInit.ps1 script.
#ps1_sysnative ######## # Title: ActiveDirectoryInit.ps1 # Version & Date: v1 31 Oct 2018 # v1.2 3 Apr 2020 # Creator: john.s.parker@oracle.com # Version 1.2 note: # This version is designed for a quick build of a single AD Controller. If you need more than 1 AD # controller then you should # see the original whitepaper that describes building an Active Directory Domain in OCI.DESCRIPTION # # # Warning: This script is a representation of how to use PowerShell to create an Active Directory Domain controller # and build the first DC in a new Active Directory Forest. This script creates and uses the domain administrator account # there are potential for mistakes and destructive actions. USE AT YOUR OWN RISK!! # This is the first script in the Active Directory Series that will establish the first # Active Directory Domain Controller. This script will unlock the local administrator account # this account will become the Domain Administrator. # # This script will install the required Windows features that are required for Active # Directory. This script will install the prerequisites for Active Directory, then create a # one-time executed script on the login after the reboot. This script will reboot the host # a total of 2 times to add the windows features, create the forest, and promote the domain controller. # # Variables for this script # $password - this is the password necessary to unlock the administrator account # - and is used in both runs of the AD build. # $FullDomainName - the full name for the AD Domain example: CESA.corp # $ShortDomainName - the short name for the AD Domain example: CESA # $encrypted - you must encrypt the password so that you can use it as you set up your domain controller # $addsmodule02 - this is the text block that will be used to create the RunOnceScript that will finish the installation # - of the domain controller. # $RunOnceKey - this is the key that will create the command to complete the installation of the domain controller. Try { # # Start the logging in the C:\DoimainJoin directory # Start-Transcript -Path "C:\DomainJoin\stage1.txt" # Global Variables $password="P@ssw0rd123!!" # Set the Administrator Password and activate the Domain Admin Account # net user Administrator $password /logonpasswordchg:no /active:yes /Expires:Never # Install the Windows features necessary for Active Directory # Features # - .NET Core # - Active Directory Domain Services # - Remote Active Directory Services # - DNS Services # Install-WindowsFeature NET-Framework-Core Install-WindowsFeature AD-Domain-Services Install-WindowsFeature RSAT-ADDS Install-WindowsFeature RSAT-DNS-Server # Create text block for the new script that will be ran once on reboot # $addsmodule02 = @" #ps1_sysnative Try { Start-Transcript -Path C:\DomainJoin\stage2.txt `$password = "P@ssw0rd123!!" `$FullDomainName = "<>.corp" `$ShortDomainName = "<>" `$encrypted = ConvertTo-SecureString `$password -AsPlainText -Force Import-Module ADDSDeployment Install-ADDSForest `` -CreateDnsDelegation:`$false `` -DatabasePath "C:\Windows\NTDS" `` -DomainMode "WinThreshold" `` -DomainName `$FullDomainName `` -DomainNetbiosName `$ShortDomainName `` -ForestMode "WinThreshold" `` -InstallDns:`$true `` -LogPath "C:\Windows\NTDS" `` -NoRebootOnCompletion:`$false `` -SysvolPath "C:\Windows\SYSVOL" `` -SafeModeAdministratorPassword `$encrypted `` -Force:`$true } Catch { Write-Host $_ } Finally { Stop-Transcript } "@ Add-Content -Path "C:\DomainJoin\ADDCmodule2.ps1" -Value $addsmodule02 # Adding the run once job # $RunOnceKey = "HKLM:\Software\Microsoft\Windows\CurrentVersion\RunOnce" set-itemproperty $RunOnceKey "NextRun" ('C:\Windows\System32\WindowsPowerShell\v1.0\Powershell.exe -executionPolicy Unrestricted -File ' + "C:\DomainJoin\ADDCmodule2.ps1") # End the logging # } Catch { Write-Host $_ } Finally { Stop-Transcript } # Last step is to reboot the local host # Restart-Computer -ComputerName "localhost" -Force -
Create the SQL Server environment in the Oracle Cloud Infrastructure region.
-
Join all the SQL Server hosts to the Active Directory domain.
-
Following is an example of the PowerShell AddComputer.ps1 script.
#ps1_sysnative ######## # Title: AddComputer.ps1 # Version & Date: v1 31 Oct 2018 # Creator: lawrence.gabriel@oracle.com & john.s.parker@oracle.com # Warning: This script is a representation of how to use PowerShell to create an Active Directory Domain controller # and build the first DC in a new Active Directory Forest. This script creates and uses the domain administrator account # there are potential for mistakes and destructive actions. USE AT YOUR OWN RISK!! # This is the third script in the Active Directory Series that will join a computer to your new Active Directory Domain. This script # will create the computer account to the Active Directory Domain. You will need to use an account that has the Add Computer domain # role. # Source: # From https://docs.microsoft.com/en-us/powershell/module/microsoft.powershell.management/add-computer?view=powershell-5.1#examples # Variables for this script # $NewComputerName - this is the name of the new computer that you want to add to your domain # ## Run as Administrator on a domain computer. $NewComputerName = "SQLB" New-ADComputer -Name $NewComputerName -AccountPassword (ConvertTo-SecureString -String 'TempJoinPA$$' -AsPlainText -Force) -
Following is an example of the PowerShell Newcomputer.ps1 script.
#ps1_sysnative
########
# Title: newcomputer.ps1
# Version & Date: v1 31 Oct 2018
#               : v1.2 3 Apr 2020
# 1.2 note: This has been modified for migrating a SQL Server to OCI
#
# Creator: lawrence.gabriel@oracle.com & john.s.parker@oracle.com
# Warning: This script is a representation of how to use PowerShell to create an Active Directory Domain controller
#          and build the first DC in a new Active Directory Forest. This script creates and uses the domain administrator account
#          there are potential for mistakes and destructive actions. USE AT YOUR OWN RISK!!
# This is the forth script in the Active Directory Series that will join a computer to your new Active Directory Domain. This script
# will join the newly created host to an Active Directory Domain.
#
# Variables for this script
# $DnsServer - this is the private IP address of the Primary Domain Controller
# $DnsServer2 - this is the private IP address of the Secondary Domain Controller
# $DomaintoJoin - this is the full name of the domain you want to join.
# $JoinCred - this will be the encrypted credential
#
Try {
Start-Transcript -Path "C:\DomainJoin\Stage4.txt" -Force
$DnsServer = 'IP of Domian Controller'
$DnsServer2 = 'IP of Domain Controller'
$DomainToJoin = 'CMGSOL.corp'
#######
# Sets the DNS to the DC.
#######
Set-DnsClientServerAddress -InterfaceAlias Ethernet -ServerAddresses ($DnsServer, $DnsServer2)
#######
# Build the one time use password
#######
$JoinCred = New-Object pscredential -ArgumentList ([pscustomobject]@{
    UserName = $null
    Password = (ConvertTo-SecureString -String 'TempJoinPA$$' -AsPlainText -Force)[0]
})
Add-Computer -Domain $DomainToJoin -Options UnsecuredJoin,PasswordPass -Credential $JoinCred
} Catch {
Write-Host $_
} Finally {
Stop-Transcript
}
#######
#
# This wait is to ensure that the Add-Computer command finishes before the restart.
#
#######
start-sleep -s 300
Restart-Computer -ComputerName "localhost" -Force
-
-
Ensure that metrics and monitoring are in place for the new instances.
-
Create the VPN connection between the current OCI-Classic environment and the new Oracle Cloud Infrastructure VCN.
-
Using the SQL Server setup instructions, establish SQL endpoints between the OCI-Classic SQL Server (primary) and new Oracle Cloud Infrastructure SQL Server (target). Do this step for all databases within the availability group.
This example was built using the Microsoft SQL Server 2016 binaries that were moved into Oracle Cloud Infrastructure Object Storage. Then, a Pre-Authorized Request (PAR) was created to mount on the newly created SQL Server host. The installation of the binaries followed the Microsoft documentation for creating a SQL Server and then adding building the Always On availability groups.
-
Add the databases to the availability group. For instructions, see Add a Database to an Always On availability group.
-
Add the replica. For instructions, see Add a replica to your Always On Availability group using the Availability Group Wizard in SQL Server Management.
-
Complete the migration checklist. Following is a sample checklist. Your checklist can be more detailed depending on the environment that is being migrated.
-
Applications are identified.
-
Target network is created.
-
All hosts are created.
-
Target SQL Servers SQLB or SQLC, if building multiple replicas.
-
New Active Directory domain controllers, if needed.
-
-
All hosts are joined to the Active Directory Domain.
-
Primary SQL Servers SQLA
-
Replica SQL Servers SQLB
-
-
SQL Server availability group is built, and databases are syncing between SQLA and SQLB.
-
All application and database clients are identified, and plan is built for ensuring reconnecting after failover.
-
Failover commands are identified.
-
Failover acceptance criteria is determined.
-
New clients can connect to SQLB.
-
Applications work according to prescribed methods.
-
-
Target SQL Server is operating.
-
After planning and creating the Oracle Cloud Infrastructure environment, the next phase is to actually migrate the SQL Server environment.
Migrate
The Migrate phase is straightforward. Move the client activity from SQLA to SQLB following the migration checklist that you developed.
-
Monitor the synchronization process and ensure that the target database is synchronized with the primary database. For more information, see Perform a planned manual failover of an Always On availability group (SQL Server).
-
Use one of the following methods to perform the manual failover:
-
SQL Server Management Studio:
-
In the Object Explorer, expand Always On High Availability, and then expand Availability Groups.
-
Right-click the availability groups to fail over and select Failover.
-
Follow the prompts in the wizard.
-
-
Transact SQL: Alter Availability Group DBGRP1 Failover;
-
-
Fail over the database at the scheduled time.
-
Use SQL command to switch the target and primary database groups.
-
Ensure that all client access is turned off for SQLA.
-
Update the SQL Server cluster IP address to match the new SQL Server location SQLB.
-
Fail over the clients to the new SQL Server or use the cluster name for your clients to ensure that clients are pointing to the correct SQL Server.
-
Monitor traffic to ensure that all transactions are working correctly.
-
-
Verify the failover.
Congratulations on migrating to Oracle Cloud Infrastructure. The final phase is to decommission the OCI- Classic environment.
Post Migration
In the Post-Migrate phase, you go through the OCI-Classic environment and shut down the services and monitoring that are no longer needed. You might wait some time before you completely destroy the old environment to ensure that unknown clients or applications that weren’t found in the Discover through Migrate phases aren’t affected.
-
Optionally, you can add another SQL Server to the availability group to allow the expansion of the availability group to ensure high availability. See Diagram A for SQLC in the Availability Domain 2.
-
Disable the availability group between SQLA and SQLB.
-
Decommission the OCI-Classic SQL Server SQLA.
Successful migration is a process of ensuring that all the applications, compute, storage, and network resources are discovered, analyzed, planned, and migrated to Oracle Cloud Infrastructure.