Oracle and VMware have a fully certified and supported software-defined data center (SDDC) solution called Oracle Cloud VMware Solution, available in all global cloud regions. This solution is a dedicated, cloud-native, VMware-based environment that enables enterprises to easily move their production VMware workloads to Oracle Cloud Infrastructure (OCI). Unique to VMware Solution, customers have complete control of their VMware environment, enabling them to run production enterprise applications in the cloud.
Since the inception of VMware Solution, our customers have implemented complicated and creative architectures like in their on-premises environments. In previous blogs, we discussed architectures, such as deploying a DMZ within NSX-T and achieving multi-tenancy within OCVS using VRF Gateways in NSX-T 3.x. In this blog, we cover the steps to assign a public IP to a guest virtual machine (VM) within the demilitarized zone (DMZ) NSX-T segment.
Use case
You can deploy a public-facing application using a few different methods within VMware Solution. You can either use an OCI load balancer and add VMware Solution guest VMs as backend servers, which provides a secure and scalable method to access an application from the public internet. In the following video tutorial, we showed how to convert the existing uplink-1 VLAN into a public-facing VLAN.
We converted the uplink-1 VLAN to a public-facing because a route table can have a route through either a NAT gateway or an internet gateway to reach the internet. But this architecture wouldn’t solve most of those use cases because customers have a mix of private and public workloads. The recommended architecture to achieve this use case is by creating a multitenancy within NSX-T.
By following our previous blog to deploy a DMZ in NSX-T, we created the uplink-2 VLAN into a public-facing VLAN, while uplink-1 VLAN continues to cater to the internal workloads. By configuring uplink-2 VLAN for DMZ, we now have a separate route table to add an internet gateway rule. You can also achieve multitenancy by deploying virtual routing and forwarding (VRF) gateways starting NSX-T 3.0, which doesn’t require extra NSX infrastructure.
Prerequisites
Before we begin the configuration, we recommend creating a dedicated VLAN for public-facing traffic by either deploying separate NSX infrastructure or by deploying VRF gateways. In our lab, we implemented the architecture as discussed in the blog to create a DMZ on NSX-T.
Architecture
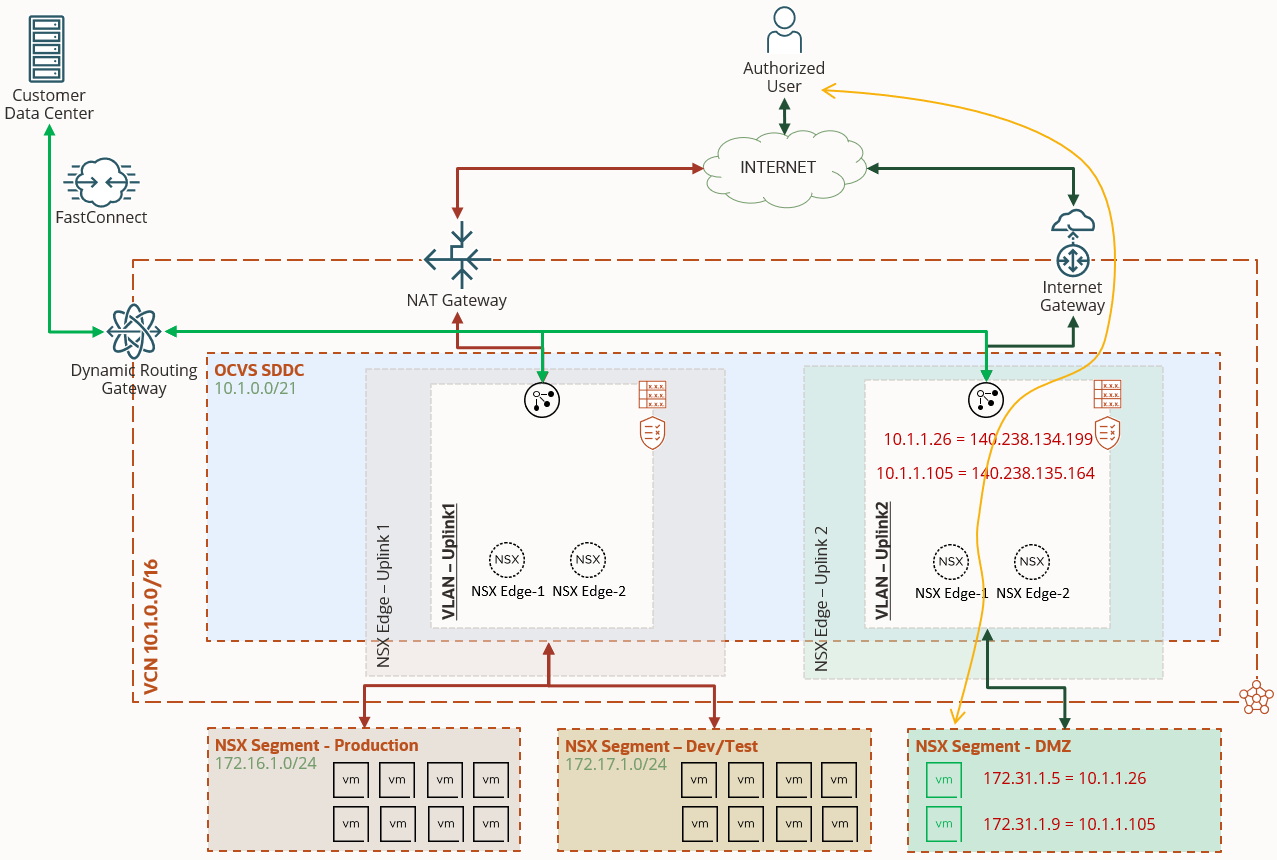
As shown in the following image, you can continue to route your internal traffic to on-premises environments through the dynamic routing gateways (DRG), while an authorized user from the public internet can establish a secure connection using SSH or RDP, directly into a guest VM in the DMZ overlay segment.
Use the following detailed steps to attach a public IP to a guest VM.
Reserve or BYOIP public IPs
To attach a public IP, either reserve Public IPs in the OCI Console or import Bring Your Own IP (BYOIP) CIDR blocks. In this blog, we cover the steps of reserving IP addresses from the OCI Console.
-
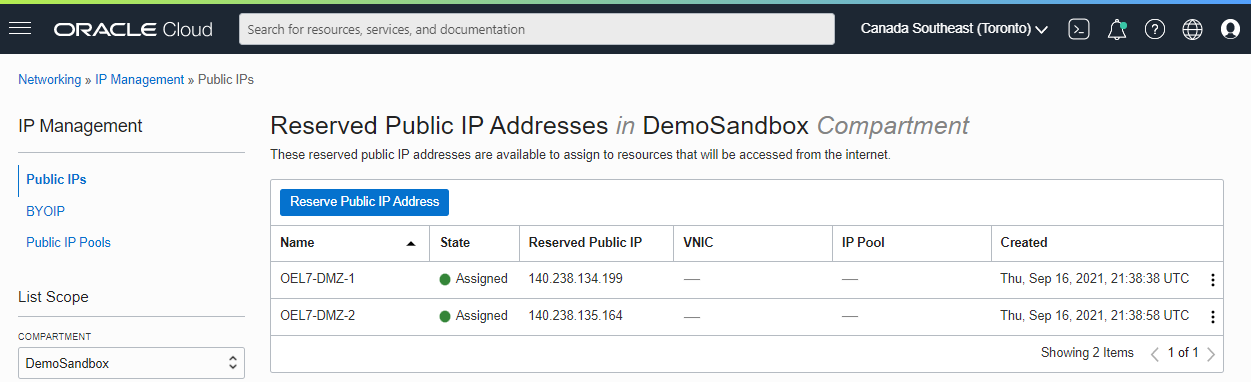
In the OCI Console, navigate to Networking and under IP Management, select Reserved IPs.
-
Click the Reserve Public IP Address button and reserve IPs as required. Because we’re attaching two public IPs to two different Guest VMs, we reserve two IP addresses.
Map public IP to private IP
Next, let’s create a public IP to private IP mapping within uplink 2 VLAN.
-
Navigate to NSX Edge Uplink 2 VLAN.
-
Select Add External Access and select the Public Access tile.
-
Provide a name to identify the IP mapping.
-
Leave the private IP Address field blank.
-
Under the Reserved Public IP Address, select the existing IP address reserved in the earlier section.

Add an internet gateway rule
For guest VMs to be accessible from the internet, we need an internet gateway route rule.
-
Validate that an internet gateway is created within the VCN.
-
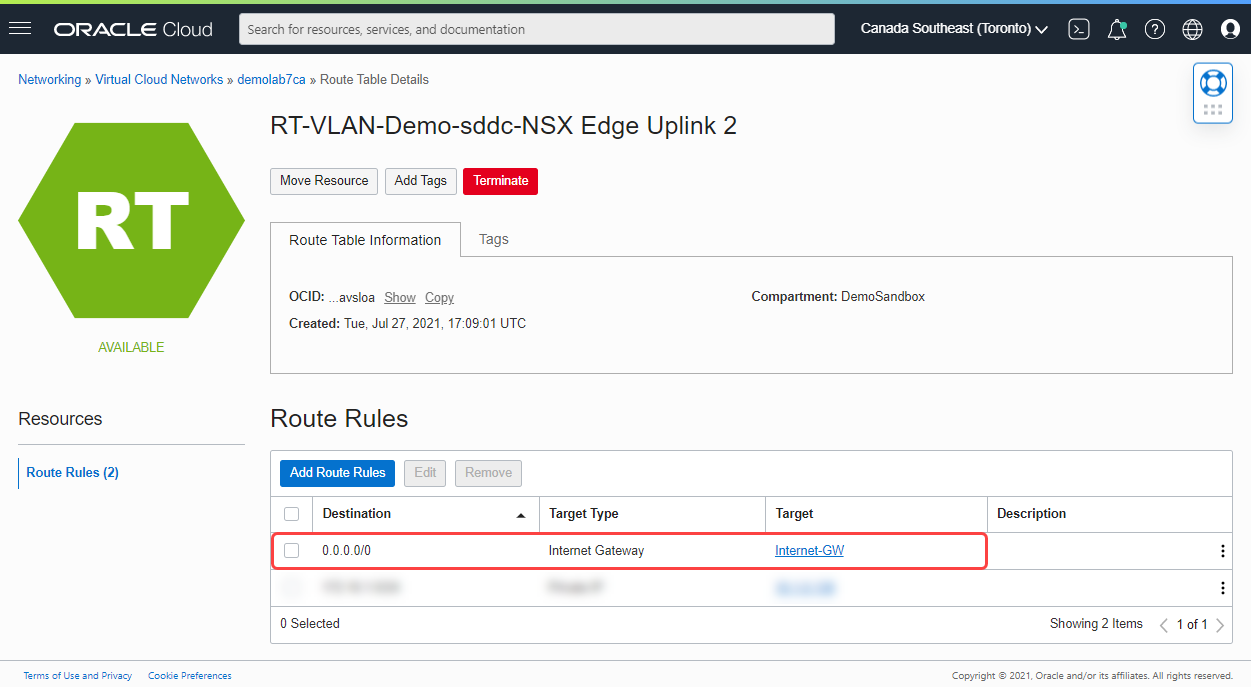
Navigate to the route table of the NSX Edge Uplink 2 VLAN within the VCN.
-
Add a route rule to route internet traffic through the internet gateway that we created within the VCN.
NSX-T NAT rules
Let’s utilize the NAT rules capability within NSX Manager to map the private IP address to the private IP address of the guest VM within the NSX overlay segment. Access the NSX Manager to perform the following steps:
-
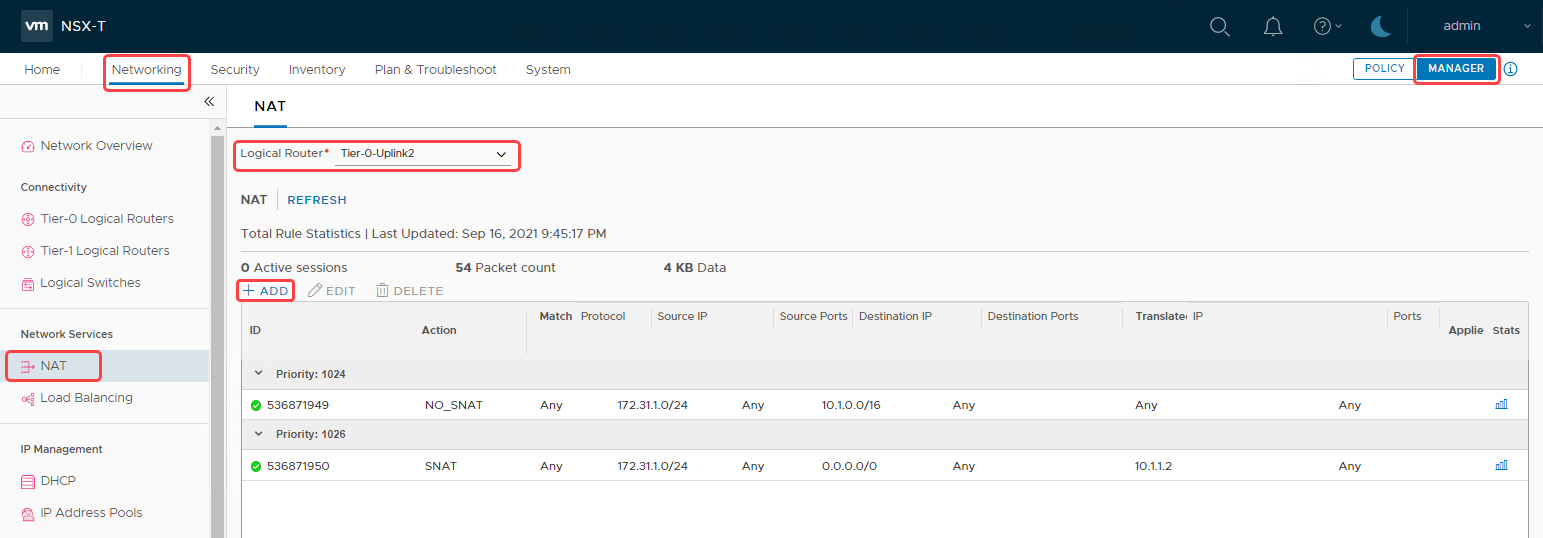
Select the Networking tab and select the Manager tile.
-
Under the Network Services section, select NAT.
-
In the Logical Router section, select the Tier-0-Uplink2 from the menu. If you don’t see a Tier-0 for Uplink-2, refer to the prerequisites section to implement the recommended DMZ architecture.
-
Select ADD to add rules to map the IP addresses. We’re adding two different rules: A DNAT rule and a SNAT rule.
-
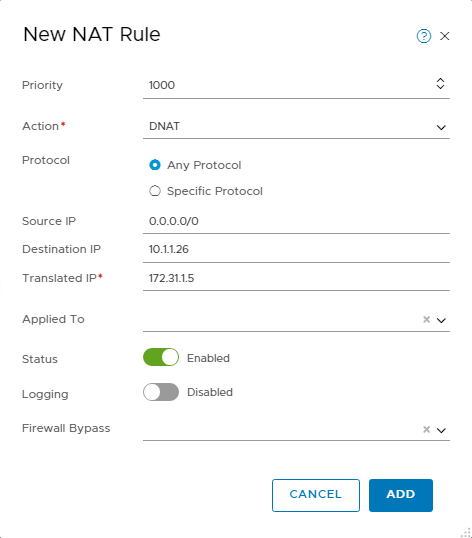
Add a DNAT rule and use the following parameters:
-
Priority: 1000
-
Action: DNAT
-
Source IP: 0.0.0.0/0
-
Destination IP: 10.1.1.26 (The private IP created earlier in the uplink 2 VLAN)
-
Translated IP: 172.31.1.5. (The IP address of the guest VM within the NSX Overlay segment)
-
Select ADD to create the rule.
-
-
Add a SNAT rule using the following parameters:
-
Priority: 1025
-
Action: SNAT
-
Source IP: 172.31.1.5. (The IP address of the guest VM within the NSX overlay segment)
-
Destination IP: 0.0.0.0/0
-
Translated IP: 10.1.1.26. (The Private IP created earlier in the Uplink 2 VLAN)

-
Select ADD to create the rule.
-
I repeat these steps to perform the mapping for the second guest VM. In the following screenshot, we can see the two sets of rules.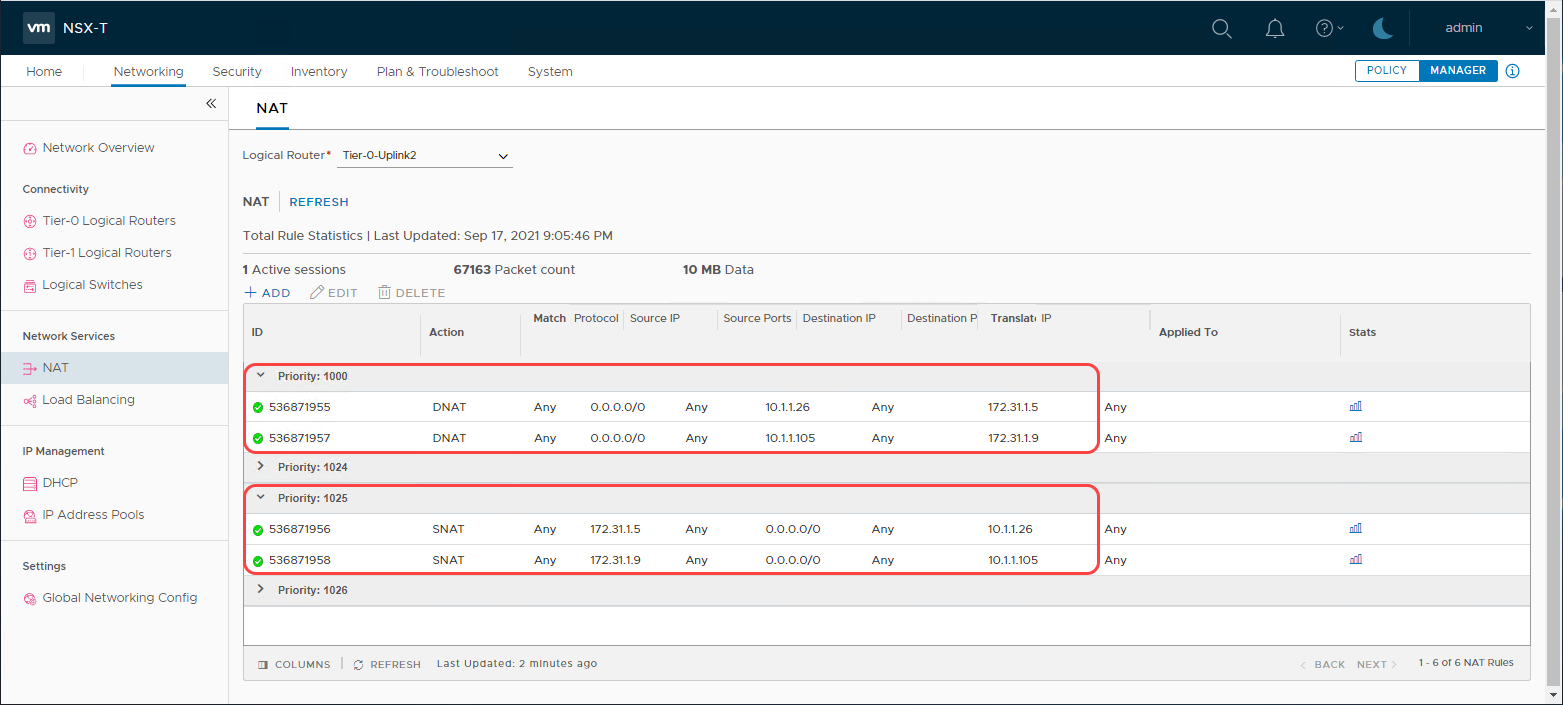
Now, we’re ready to test the connectivity from the public internet to access the guest VM using the public IP address.
Validation
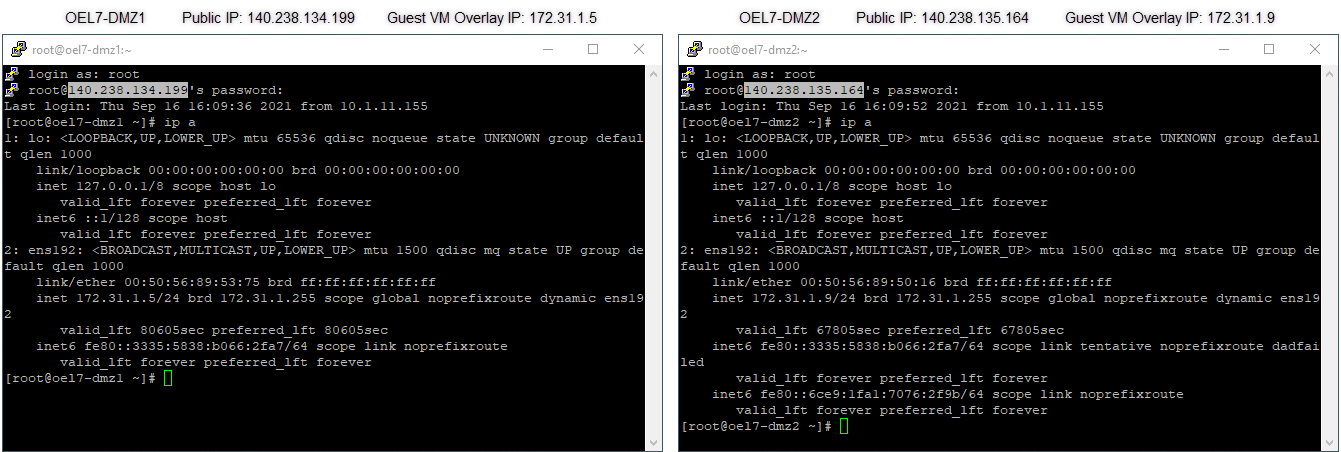
Because both the guest VMs deployed in the NSX overlay are Oracle Linux, I SSH into the public IP addresses from my laptop using Putty. In the following screenshot, we can see that I successfully established an SSH into each of the guest VMs using their respective public IP addresses.
Conclusion
Oracle Cloud VMware Solution provides customers with full control of their VMware environments and our customers have taken full advantage of this control by implementing several creative architectures. VMware Solution was architected to get the best of both worlds, to take advantage of the public cloud while maintaining their existing VMware processes. VMware Solution is a first-class service on OCI, which enables users to seamlessly connect to OCI resources for various purposes.
You can see the flexibility of the solution in this blog where we easily attached a public IP from Oracle Cloud Infrastructure to a guest VM hosted on the NSX overlay. VMware users require full control of the underlying resources to customize the configuration to meet their infrastructure needs, and we stand by our promise to provide exactly that. Contact us to help you with your cloud journey.
Get started with Oracle Cloud VMware Solution and learn more about our solution.