Redis (REmote DIctionary Server) is a popular open-source, in-memory data store that supports a wide array of data structures in addition to simple key-value pairs. It is a key-value database where values can contain more complex data types, such as strings, hashes, lists, sets, sorted sets, bitmaps, and hyperloglogs, with atomic operations defined on those data types. Redis combines in-memory caching with built-in replication, persistence, sharding, and the master-slave architecture of a traditional database. Given the rich features offered by Redis out of the box, a wide variety of deployment options are available.
First let’s go over a few important Redis constructs.
- Single-Instance Architecture: Redis runs as a single threaded application, called Redis server. Redis server is responsible for storing data in memory. It handles all kinds of management and forms the major part of the architecture. A Redis client can be the Redis console client or any application that uses the Redis API.
- Persistence: Redis stores everything in primary memory. Because primary memory is volatile, you lose all your stored data when you restart your Redis server. Therefore, you need a way for the data to persist. Redis can persist data by using a Redis Database File (RDB) or an Append Only File (AOF).
- RDB is a snapshot-style persistence format, which copies all the data in memory and stores the copies in secondary storage. This happens at specified intervals, so you could lose data that is set after RDB’s last snapshot.
- AOF is a change-log-style persistence format, which logs all the write operations received by the server. Therefore, every operation is persisted. The problem with using AOF is that it writes to disk for every operation and it’s an expensive task. Also the size of the AOF file is larger than the RDB file.
- Backup and Recovery: Redis doesn’t provide any mechanism for data store backup and recovery. Therefore, if there’s a hard disk crash or any other kind of disaster, all data is lost. You can use RDB snapshots or AOF logs and store them in Oracle Cloud Infrastructure Object Storage, which provides durable storage. I’ll discuss this more when we start architecting a Redis cluster on Oracle Cloud Infrastructure.
- Partial High Availability: Redis supports replication, both for high availability and to separate read workloads from write workloads. Redis asynchronously replicates its data to one or more nodes, called read replicas. This is similar to a master-slave architecture, with the Redis primary node being the master, which handles both reads and writes, and the read-replicas (slaves) handling only reads. All the slaves contain exactly the same data as the master. If the master node fails (crash of master with loss of data on disk), Redis gives you the ability to convert a slave into a master. Many monitoring solutions can perform this action; the most commonly used is Redis Sentinel, which can handle service discover and automatic failover of Redis instances.
- Maximum High Availability: Clustering, although complicated, provides the highest level of availability for Redis instances. Redis achieves clustering by partitioning and replication of data. Partitioning involves sharding your data into multiple Redis instances so that every instance contains only a subset of the keys. Sharding helps by taking some of the load of a particular instance as the data volume grows, and also reduces the impact when a node fails. Redis supports primitive types of partitioning like range partitioning and hash partitioning. It doesn’t natively support consistent hashing because its data structures (such as multidimensional sets, lists, and hashes) can’t be horizontally sharded. But if you are using Redis just to store simple key-value pairs, you can leverage consistent hashing.
This blog post starts with a simple walkthrough of installing and securing a Redis instance on Oracle Cloud Infrastructure. Subsequently, we then scale the Redis instances across multiple availability domains to demonstrate Redis replication and clustering, which provides high availability to Redis instances.
This post uses the following setup. For more information about Oracle Cloud Infrastructure instance shapes for Redis, see this white paper.
- Oracle Cloud Infrastructure instance shapes:
- VM.Standard2.4 (application servers)
- VM.Standard2.2 (memcache)
- BM.Standard2.1 (database)
- Oracle Cloud Infrastructure services:
- Networking (VCN, internet gateway, route tables, security lists)
- Load Balancing
- Operating system: Oracle Linux running on a KVM hypervisor (Oracle Cloud Infrastructure provided image “Oracle-Linux-7.4-2017.12.18-0”)
- Third-party service: Redis
Scenario 1: Installing and Securing a Single Redis Instance on Oracle Cloud Infrastructure
This scenario demonstrates how to install and secure a standalone Redis instance running on Oracle Linux 7. Redis was designed for use by trusted clients in a trusted environment, and it has no robust security features of its own. Redis does, however, have a few security features that include a basic unencrypted password, and command renaming and disabling. This scenario provides instructions on how to configure these security features, and also covers a few other settings that can boost the security of a standalone Redis installation on Oracle Linux 7 to fully secure the access of your Redis instance.
The following diagram shows the high-level deployment architecture:

Create a VCN and Subnets
- Create a VCN with two subnets to house a bastion server and Redis server. Ensure that the VCN CIDR is big enough to accommodate more subnets if you plan to expand your deployment in the future by introducing Redis clustering and adding application servers or database servers. For more information about how to create a VCN and associated best practices, see VCN Overview and Deployment Guide.
Build the bastion server in a public subnet and the Redis server in a private subnet. By doing this, you’re restricting the public access of the Redis instance and allowing access only via the bastion server. Following are the two subnets:- BastionSubnet: (10.0.0.0/24), a public subnet that can be used as a jump box to access the instances in the private subnets
- CacheSubnet (Private): (10.0.1.0/24), a private subnet with no access to the internet, where cache instances reside
- Attach the following security lists to each subnet to restrict the access further. By default, the security list rules are stateful in nature, and these are stateful.
- Security list for Bastion subnet: Allow ingress access on TCP port 22 from the public internet, to allow SSH access to the bastion host. Allow egress of all protocols.
- Security list for Redis subnet: Redis server by default listens on TCP port 6379. Allow ingress access on TCP port 6379 for accessing the Redis instance from the bastion server only. Also allow ingress access on TCP port 22 for SSH access from the BastionSubnet private IP address range. Allow egress access to all protocols.
Note: Because the Redis instances are in a private subnet, they will not have internet access. So, running commands for updating yum repositories and downloading Redis binaries will fail. To work around this issue, create NAT instances in the same public subnet as the bastion host or a different public subnet and route the internet-bound traffic through the NAT instances. For the sake of brevity, this post doesn’t show you how to do that, but you can read another blog post more information about how to set up NAT instances and automate their deployment by using Terraform.
Install Redis
- Before you can install Redis, you must first add an Extra Packages for Enterprise Linux (EPEL) repository to the server’s package lists. EPEL is a package repository that contains a number of open-source add-on software packages, most of which are maintained by the Fedora Project.
sudo yum install epel-release - After the EPEL installation has finished, install Redis:
sudo yum install redis -y - After the installation completes, start the Redis service:
sudo systemctl start redis.service - If you want Redis to start on boot, you can enable it with the enable command:
sudo systemctl enable redis - Check the status of Redis by running the following command:
sudo systemctl status redis.serviceYou should see output similar to the following:

- After you confirm that Redis is running, test the setup with this command:
redis-cli pingIf PONG is the response, it means that Redis is running on your server, and you can begin configuring it to enhance its security.

Secure the Redis Instance
An effective way to safeguard Redis is to secure the server on which it’s running. You can do this by ensuring that Redis is bound only to either localhost or to a private IP address, and that the server has a firewall up and running. In this case, because we plan on setting up a Redis cluster to interact with other Redis instances and application servers in the subsequent scenarios, we’ll bind the Redis server to accept connections on the private IP address of the instance.
- Locate the private IP address of your instance:

- Update it in the /etc/redis.conf file:

- Update the firewall rules on the instance to allow inbound access to the Redis server. By default, Redis listens on TCP port 6379. You should only allow access to your Redis server from your hosts by using their private IP addresses in order to limit the number of hosts your service is exposed to.
sudo firewall-cmd --permanent --new-zone=redissudo firewall-cmd --permanent --zone=redis --add-port=6379/tcpsudo firewall-cmd --permanent --zone=redis --add-source=<client_server_private_IP>sudo firewall-cmd --reloadThe preceding steps ensure security at the instance level to limit access to the Redis instance. You can further secure it by adding password and authentication, which requires clients to authenticate before being allowed access to the Redis store. Like the bind setting, the password is configured directly in the Redis configuration file, /etc/redis.conf.
- In the /etc/redis.conf file, scroll to the SECURITY section and look for a commented directive that reads as follows:

- Uncomment it and change foobared to a very strong password of your choosing. Rather than make up a password yourself, you can use a tool like apg or pwgen to generate one.
If you don’t want to install an application just to generate a password, though, you can use the following command.
Note that entering this command as written generates the same password every time. To create a password different from the one that this command would generate, change the word in quotation marks to any other word or phrase.
echo "OCI" | sha256sumAlthough the generated password is not pronounceable, it is a very strong and very long one, which is exactly the type of password required for Redis.
After copying and pasting the output of that command as the new value for requirepass, that section should now look as follows:
/etc/redis.confrequirepass password_copied_from_output - After setting the password, save and close the file then restart Redis:
sudo systemctl restart redis.service


Note: Redis also gives an option to rename or completely disable certain commands that are considered dangerous. When run by unauthorized users, such commands can be used to reconfigure, destroy, or otherwise wipe your data. See Redis Security for more information about this feature.
Scenario 2: Scaling Redis by Using Replication (Master-Slave model)
Scenario 1 laid a solid foundation for launching a single Redis instance on Oracle Cloud Infrastructure. This scenario describes how you can scale Redis, which is especially useful for easing the pressure on a single instance as the traffic volume increases while providing high availability. This scenario demonstrates a master-slave replication by creating three Redis instances spread across two availability domains. One of the nodes will be the primary, or master, and the other two will be read replicas, or slaves. By designing the architecture this way, you are splitting your database read traffic to the read replicas while the master node handles all the write traffic. Spreading the nodes across two availability domains also provides high availability if an entire availability domain fails. If the availability domain that contains the master node fails, you can quickly elect one of the slave instances to be the new master, either manually or automatically using Redis Sentinel (which is covered in the next scenario).
Note: If you plan to use Redis Sentinel to monitor using instances, open the TCP port 26379 both on the instance firewall and also in the subnet’s security lists. Redis Sentinel requires at least a three-node instance of Redis running. For more information, see the official documentation on Redis Sentinel.
The following diagram shows the high-level deployment architecture:

Create a VCN and Subnets
- Create a VCN with three subnets to house a bastion server and Redis instances. Ensure that the VCN CIDR is big enough to accommodate more subnets if you plan to expand your deployment in the future by introducing Redis clustering and adding application servers or database servers. For more information about how to create a VCN and associated best practices, see the VCN Overview and Deployment Guide. As in Scenario 1, build the bastion server in a public subnet and the Redis instances in private subnets.
- BastionSubnet: (10.0.0.0/24), a public subnet in AD1 that can be used as a jump box to access the instances in the private subnets
- CacheSubnet-1 (Private): (10.0.1.0/24), a private subnet in AD1 with no access to the internet, where the Redis master and one read replica reside.
- CacheSubnet-2 (Private): (10.0.2.0/24), a private subnet in AD2 where the second read replica resides.
- Attach the following stateful security lists to each subnet to restrict the access further:
- Security list for Bastion subnet: Allow ingress access on TCP port 22 from the public internet, to allow SSH access to the bastion host. Allow egress of all protocols.
- Security list for Redis subnets: Allow ingress access on TCP port 6379 for accessing the Redis instance from the other Redis subnets only. This facilitates the communication between the Redis instances. Also allow ingress access on TCP port 22 for SSH access from the BastionSubnet private IP address range. Allow egress access to all protocols.
Install Redis
Install Redis on the three instances as described in Scenario 1.
Then you can configure replication on the Redis instances.
Configure Replication on the Master Node
Configuring a Redis primary node (master) is not very different from configuring a standalone Redis instance as described in Scenario 1. There are a few things worth noting:
- Secure the master by using a strong password, as discussed earlier.
- Specify your cache eviction policies or just use the defaults.
- Specify a sensible value for the TCP keepalive timeout value. This ensures that the master node is connected with its clients on a periodic basis.
- Bind the server to the private IP address of the instance.
- Redis provides backup of the data by persisting it to disk. You can specify the backup type that you need and the file used to back up this data. For more information about backups, see this white paper.
You can edit all of the preceding settings in the /etc/redis.config file. Be sure to restart the Redis server after making changes to the config file.
You can test the newly created master by running the following command. The output should indicate that no slave nodes are connected to it.


Configure Replication on the Slave Nodes
You need to make a few changes on the slave instances to allow communication with the master.
- Bind the server to the private IP address of the instance.
- Secure your slave instance by using a strong password.
- Uncomment the following line in /etc/redis.config file and indicate the IP address where the master server can be reached, followed by the port set on that machine. By default, the port is 6379.
slaveof <your_redis_master_ip> 6379 - Uncomment the masterauth line and provide the password/passphrase that you set up earlier on the master server:
masterauth <your_redis_master_password> - Restart the service like you did in your master server, to reinitialize Redis and load the modified config file.
- Verify this configuration with the Redis info command, which reports information about replication:


If you happen to look at the same information on the Redis master server, you would see something like this:

As you can see, the master and slave servers correctly identify one another in their defined relationship. You can follow the same approach in setting up the second slave in the second availability domain. The process should look exactly the same.
After the complete replication is set up, you can try manually to promote a slave to master to test failover. We recommend using Redis Sentinel for doing this automatically, but the deployment of Redis Sentinel is beyond the scope of this post.


Scenario 3: Scaling Redis by Using Clustering
This scenario discusses clustering in Redis, which involves sharding of data in addition to some other constructs provided by Redis. According to Redis official documentation, Redis Cluster provides a way to run a Redis installation where data is automatically sharded across multiple Redis nodes. Redis Cluster also provides some degree of availability during partitions, which is in practical terms the ability to continue the operations when some nodes fail or are not able to communicate. So in practical terms, what you get with Redis Cluster?
- The ability to automatically split your dataset among multiple nodes.
- The ability to continue operations when a subset of the nodes are experiencing failures or are unable to communicate with the rest of the cluster.
Notes:
- Every Redis Cluster node requires two TCP connections open: the normal Redis TCP port used to serve clients, for example 6379, plus the port obtained by adding 10000 to the data port, for example 16379. This second high port is used for the Cluster bus, which is a node-to-node communication channel that uses a binary protocol. This means you should also open an additional TCP port 16379 in your security list on all the Redis instance subnets.
- Only Redis 3.0 and later support clustering.
- The Redis documentation strongly encourages a minimum cluster of six Redis nodes with three masters.
The following diagram shows the high-level deployment architecture:

Use the following table to track the Redis instances you plan to have and their roles:
| Availability Domain |
Role |
Private IP Address |
| AD1 |
Master1 |
10.0.1.66 |
| AD1 |
Master3 |
10.0.1.68 |
| AD2 |
Master2 |
10.0.2.66 |
| AD, AD2 |
Slave1,2,3 |
10.0.1.69,10.0.1.67, 10.0.2.69 |
Create a VCN and Subnets
- Create a VCN with three subnets to house a bastion server and the Redis instances. As in the preceding scenarios, build the bastion server in a public subnet and the Redis instances in private subnets.
- BastionSubnet: (10.0.0.0/24), a public subnet in AD1 that can be used as a jump box to access the instances in the private subnets
- CacheSubnet-1 (Private): (10.0.1.0/24), a private subnet in AD1 with no access to the internet, where one Redis master and one read replica reside
- CacheSubnet-2 (Private): (10.0.2.0/24), a private subnet in AD2 where the second Redis master and read replica reside
- Attach the following stateful security lists to each subnet to restrict the access further:
- Security list for Bastion subnet: Allow ingress access on TCP port 22 from the public internet, to allow SSH access to the bastion host. Allow egress of all protocols.
- Security list for Redis subnets: Allow ingress access on TCP ports 6379 and 16379 for communication between Redis instance and the other Redis subnets only. Also allow ingress access on TCP port 22 for SSH access from the BastionSubnet private IP address range. Allow egress access to all protocols.
Install and Secure Redis
Install and secure Redis instances as described in Scenario 1.
Enable Cluster Communication
Enable the cluster mode on all the Redis instances and add some other information for enabling cluster communication, and then restart the Redis server. To do this, edit the following lines in /etc/redis.conf:
cluster-enabled yes
 cluster-config-file nodes.conf
 cluster-node-timeout 5000
 appendonly yes
Create and Test the Cluster
Now that you have a number of instances running, you can create the cluster by writing some meaningful configuration to the nodes. This is very easy to do with the Redis Cluster command-line utility called redis-trib, a Ruby program that executes special commands on instances in order to create new clusters, check or reshard an existing cluster, and so on. The redis-trib utility is in the src directory of the Redis source code distribution. You need to install Redis gem to be able to run redis-trib.
- Install Ruby on your machine prior to running the following command:
gem install redis - To create your cluster, enter the following command:
./redis-trib.rb create --replicas 1 10.0.1.66:6379 10.0.1.69:6379 \
 10.0.2.66:6379 10.0.2.69:6379
The –replicas 1 option means that you want a slave for every master created. The other arguments are the list of addresses of the instances you want to use to create the new cluster. The cluster will be configured and joined, which means that instances will be bootstrapped into talking with each other.
If everything went well, you’ll see a message like the following one:

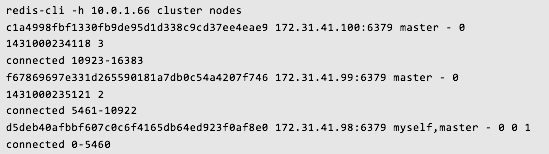
- Test your cluster by running the following command on any cluster node:
redis-cli -h 10.0.1.66 cluster nodesThe output should looks as follows:


This is the simplest way to deploy a Redis cluster on Oracle Cloud Infrastructure. The clustering in Redis is fairly complex. For more information about Redis clustering, see Redis Clustering.
In this blog post, I discussed how to deploy and further scale Redis instances on Oracle Cloud Infrastructure. There can be many enhancements to this deployments, like Dockerizing the Redis instances and orchestrating them using Kubernetes. I’ll cover those enhancements in my next blog post.
Abhiram Annangi | Twitter LinkedIn