In Oracle Cloud Infrastructure, a local peering gateway (LPG) is used to connect two or more virtual cloud networks (VCNs). An LPG enables a service provider model in which the provider VCN can peer with the consumer VCN and allow private access to shared resources. However, you can connect only 10 LPGs per VCN. Let’s consider an example of an IT management company that uses Oracle Cloud Infrastructure. They provision one VCN to be the hub VCN, which will be controlled by the central IT team. For each client, they provision a spoke VCN. If the hub VCN needs to connect to more than 10 client VCNs and manage them, then using a bridge instance can solve the limit problem.
This post discusses a solution to connect multiple VCNs by using secondary VNICs on a bridge instance. The same concept can be expanded to connect more than two VCNs in the same region and the same tenancy.
Use Case
This post uses the example of connecting two VCNs (VCN-1 and VCN-2) with nonoverlapping subnets, 10.0.0.0/16 and 10.1.0.0/16. If two VCNs have overlapping subnets, the traffic is confined to the same VCN because overlapping endpoints within the same VCN is preferred for routing.
How Does VCN-1 Connect to VCN-2?
The answer is secondary VNICs on the bridge instance. Every instance has a primary VNIC that is connected to the VCN’s subnet in which the instance is launched. You can attach secondary VNICs to this instance and connect each of these VNICs to a different VCN’s subnet. This is a unique capability offered by Oracle Cloud Infrastructure as a building block for a service provider model.
When the public instance, called the bridge instance, is launched in the VCN-1’s management subnet, a VNIC is attached to the bridge instance from the management subnet of VCN-1. This is the default (primary) VNIC.
To connect the bridge instance to VCN-2, you create an attached VNIC, also referred to as the secondary VNIC. Ensure that the new attached VNIC for the bridge instance is coming from the management subnet of VCN-2, as shown in the following diagram.

The bridge instance is now connected to VCN-1’s management subnet (MgmtSubnet1) via its default VNIC and to VCN-2’s management subnet (MgmtSubnet2) via the secondary VNIC.
After this configuration is completed, you need to set up the basic route table and security lists to finally enable IP forwarding on the bridge instance. This step ensures that traffic can be forwarded from VCN-1 to VCN-2 and from VCN-2 to VCN-1 through the bridge instance.
Network
Each VCN has a management subnet and a private subnet.
| VCN-1 | VCN-2 | |
| Network Subnet | 10.0.0.0/16 | 10.1.0.0/16 |
| Management Subnet | 10.0.0.0/24 | 10.1.0.0/24 |
| Private Subnet | 10.0.1.0/24 | 10.1.1.0/24 |
Instances
Both VCN-1 and VCN-2 have a private instance each in their respective private subnets. VCN-1 additionally has a public instance, called the bridge instance, which helps to bridge the two VCNs. Note that the bridge instance can be created in either of the VCNs.
| VCN-1 | VCN-2 | |
| Management Subnet | Bridge Instance | |
| Private Subnet | PrivateInstance1 | PrivateInstance2 |
How Do I Implement This?
To deploy this setup, you have two options.
Deploy Using Terraform
We have created a Terraform template that does all the work for you. Terraform deploys the preceding setup, executing the required Linux commands automatically. At the end of Terraform execution, you will see login information to your instances.
As a user, all you need to do is deploy Terraform, log in to the instance, and start ping traffic from one VCN to the other.
Manually Deploy Using the Oracle Cloud Infrastructure Console and Linux Commands
This section provides the steps for deploying the setup by using the Oracle Cloud Infrastructure Console and Linux commands.
Console Steps
- Create two VCNs with the Create Virtual Cloud Network Only option and nonoverlapping CIDR blocks (for the subnets). For instructions, see To create a cloud network in the Networking documentation.

- Each subnet in each VCN needs an associated route table and security list. For this purpose, create four route tables and four security lists. For instructions, see To create a route table and To create a new security list.
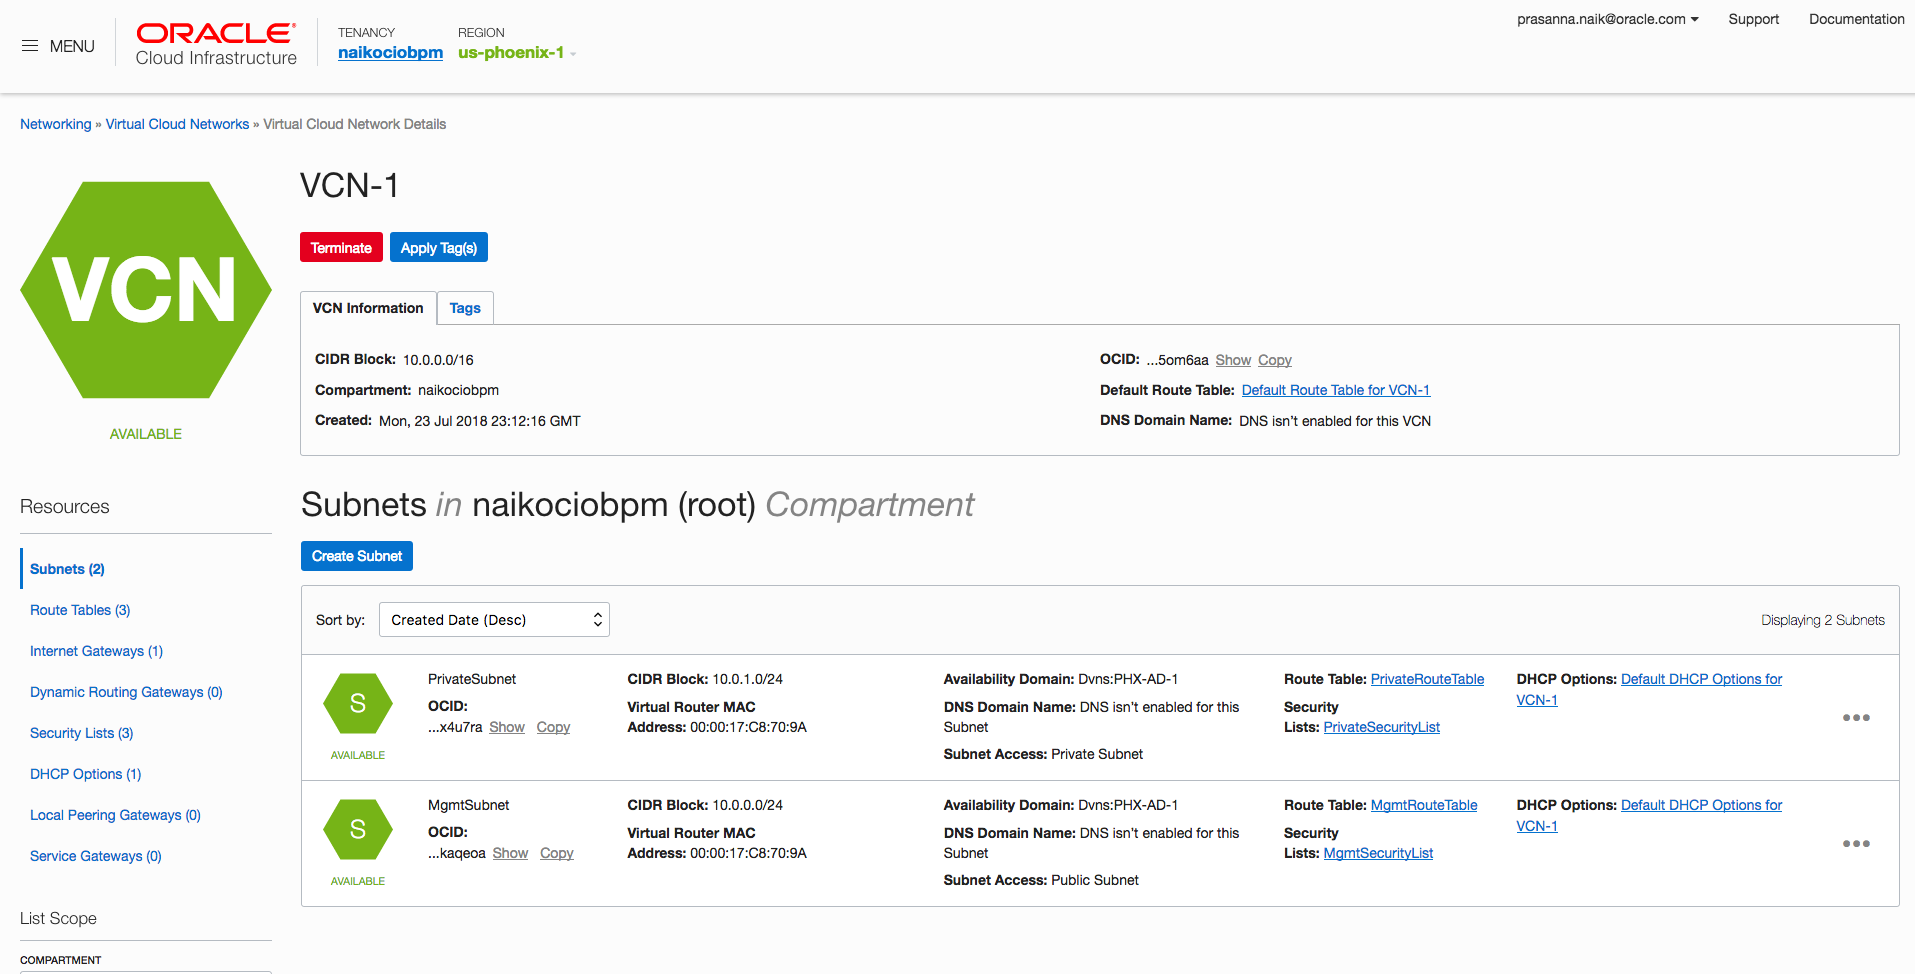
- For each VCN, create one public subnet and private subnet, specifying a security list and route table for each. Your VCN subnet page should look as follows. For instructions, see To create a subnet.
- Create PrivateInstance1 and relate it to the private subnet (PrivateSubnet1) in VCN-1. Similarly, create PrivateInstance2 and relate it to the private subnet (PrivateSubnet2) in VCN-2.
- Create one more instance, called BridgeInstance, and attach it to VCN-1 and MgmtSubnet1.

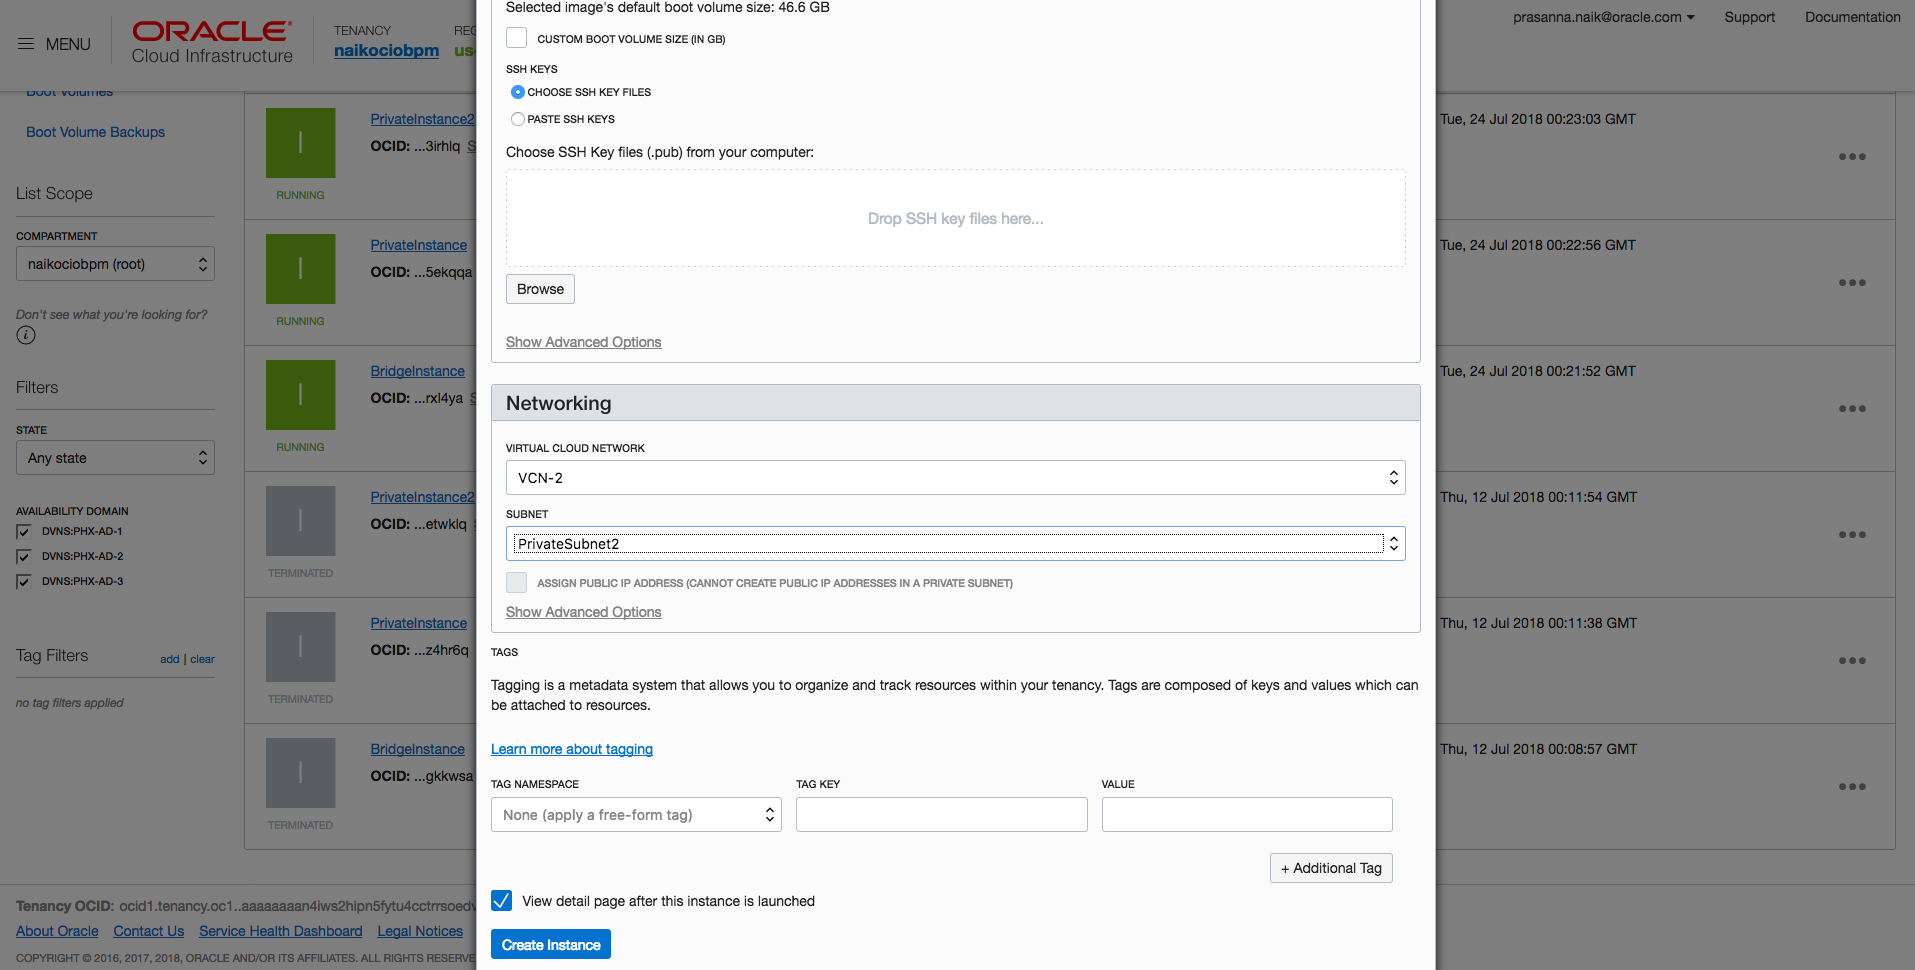
- Open BridgeInstance, click Attached VNICs, and then click Create VNIC.
- Attach this secondary VNIC to VCN-2 and MgmtSubnet2.

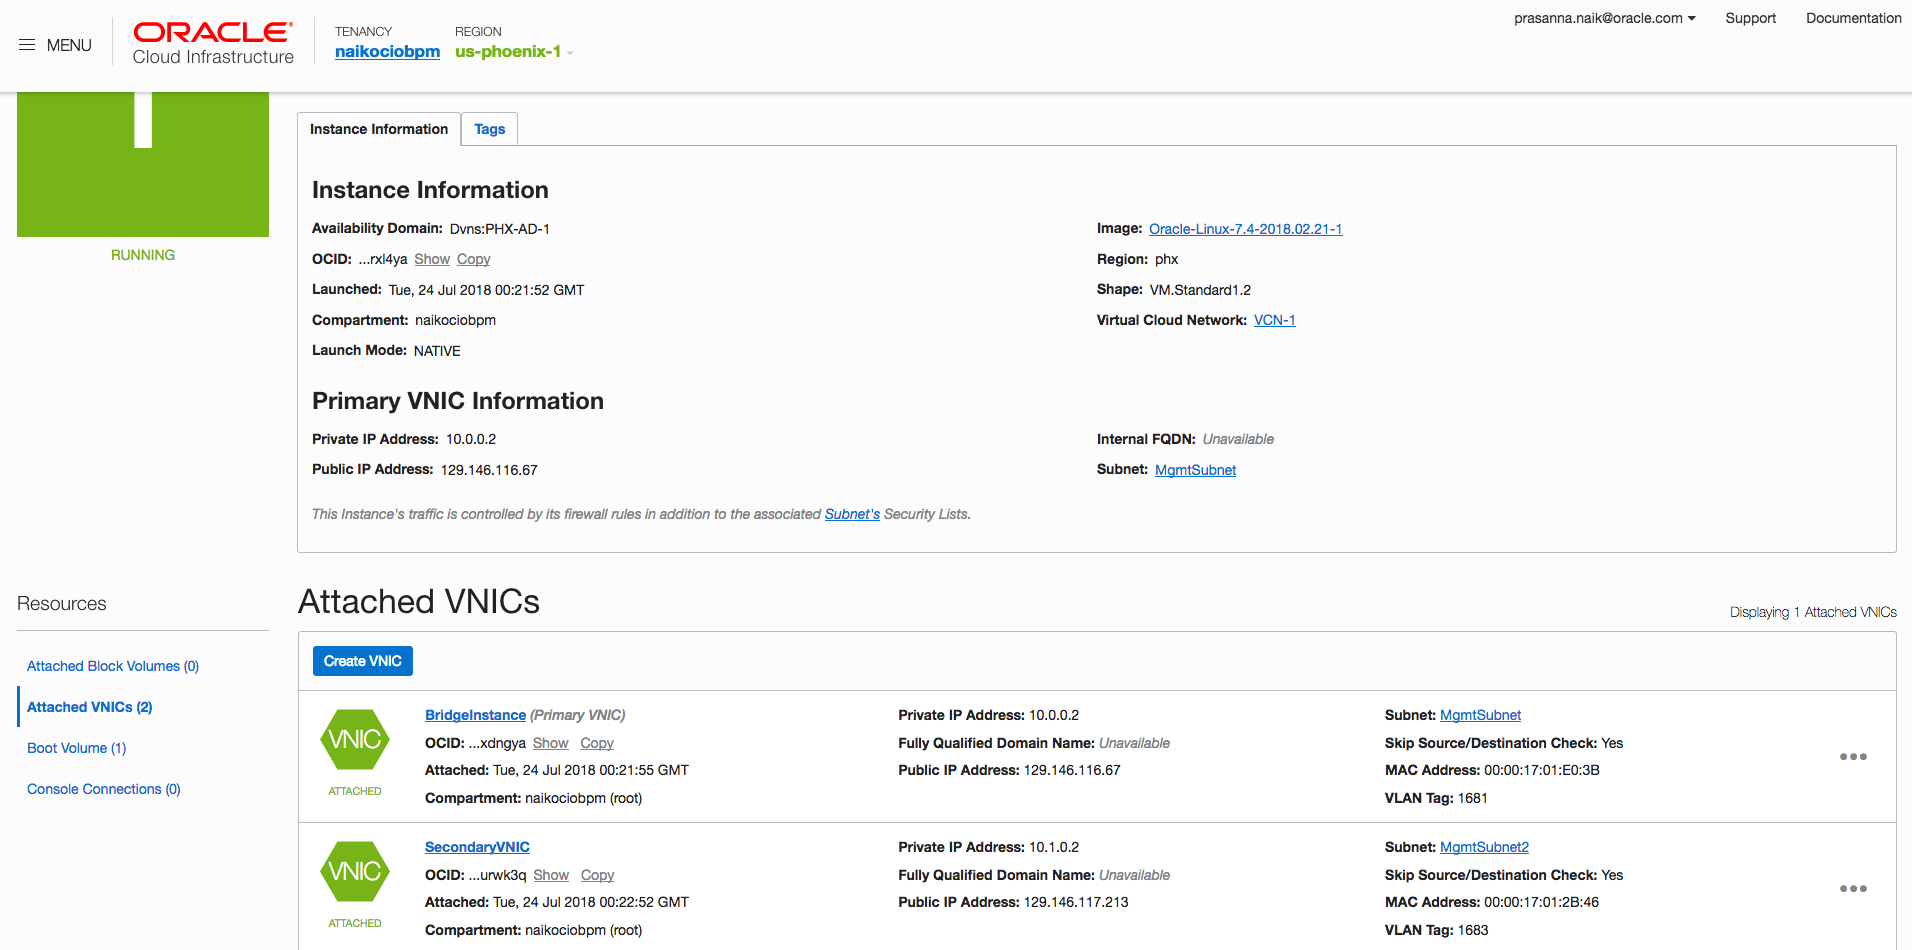
- Note the IP address of the primary VNIC and secondary VNIC in BridgeInstance.
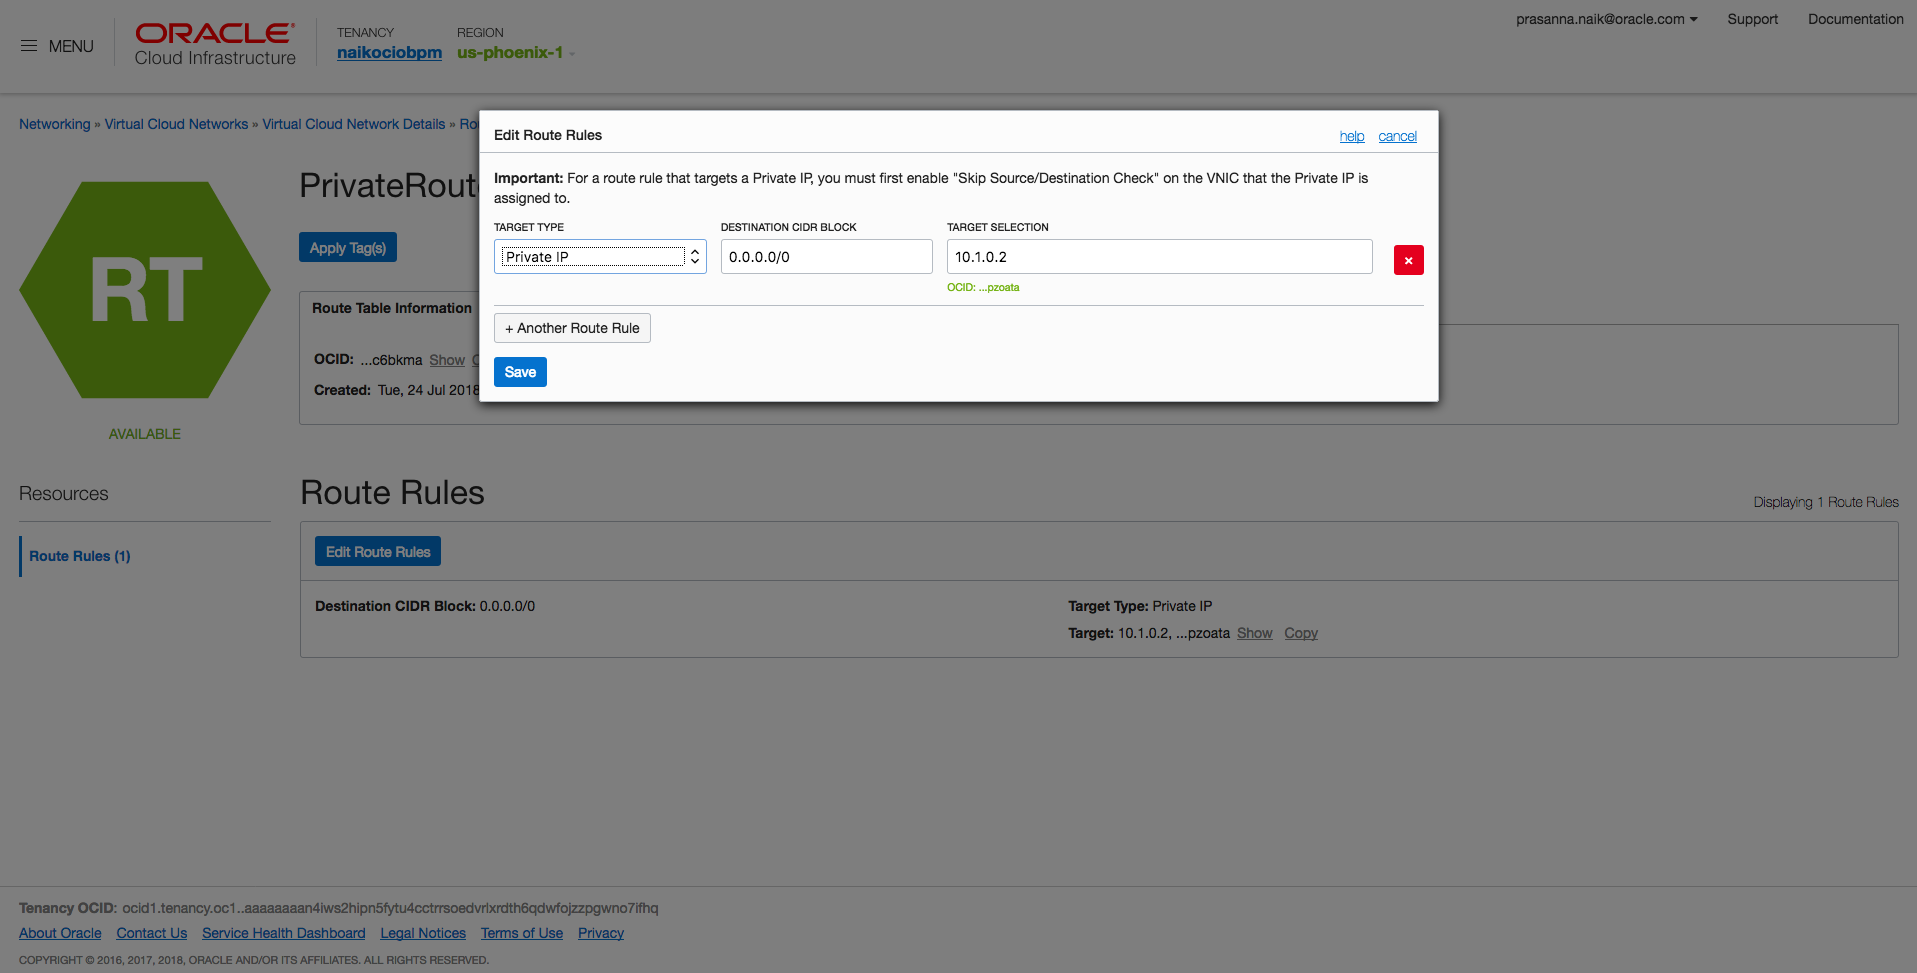
- Open VCN-1, open PrivateRouteTable-1, and add a route rule to BridgeInstance’s primary VNIC IP address.
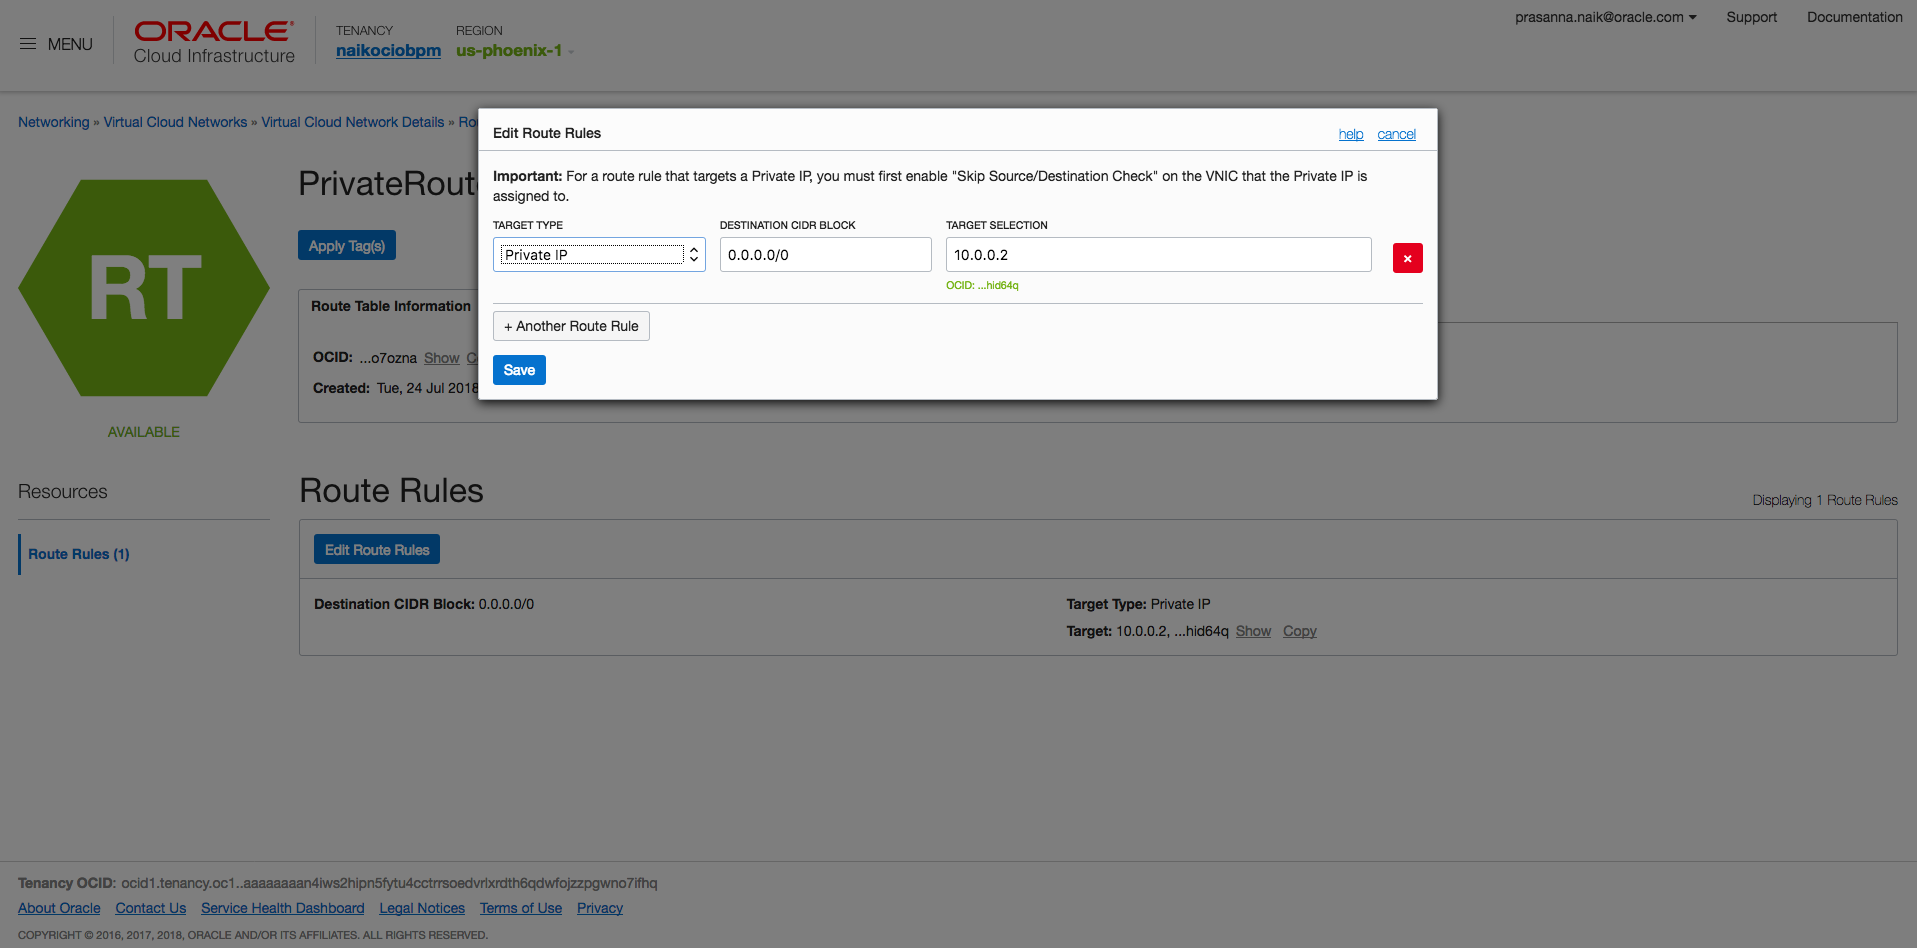
- Open VCN-2, open PrivateRouteTable-2, and add a route rule to BridgeInstance’s secondary VNIC IP address.
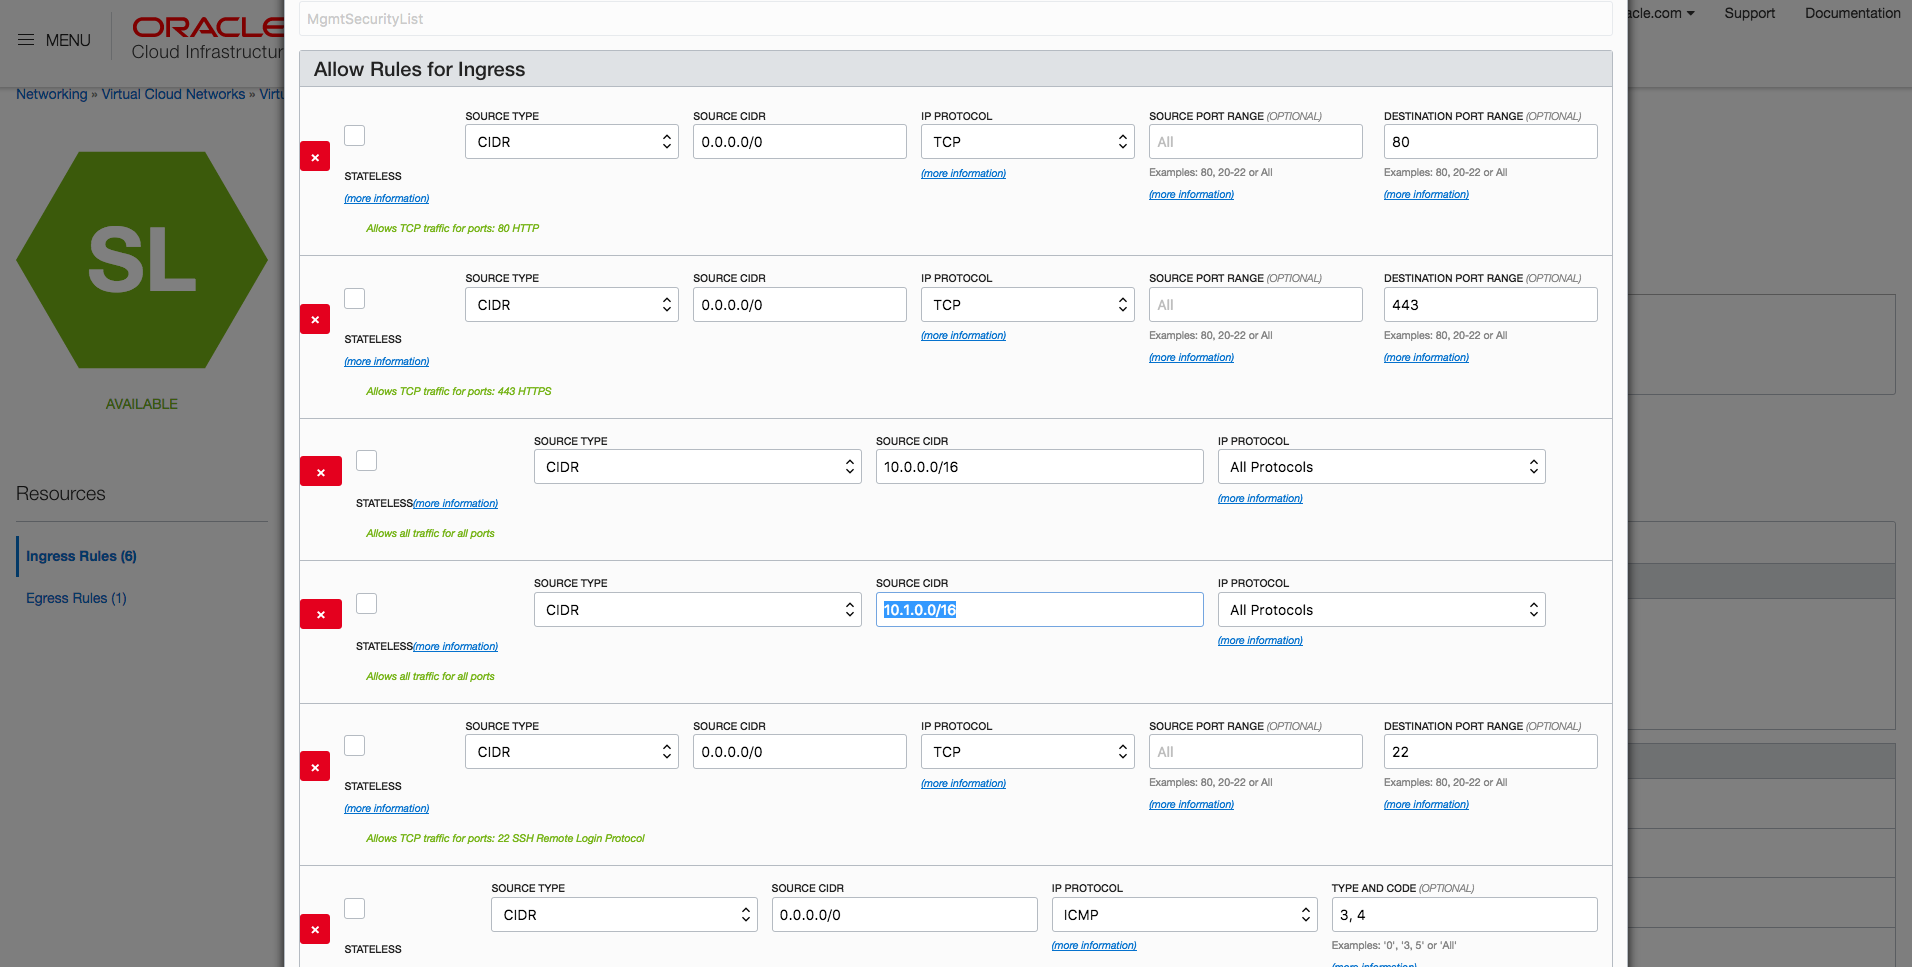
- Open VCN-1, open MgmtSecurityList, and specify ingress rules as shown in the following example. The additional rule that is required for cross communication with VCN-2 (10.1.0.0/16) is highlighted. Replicate similar rules in VCN-2.
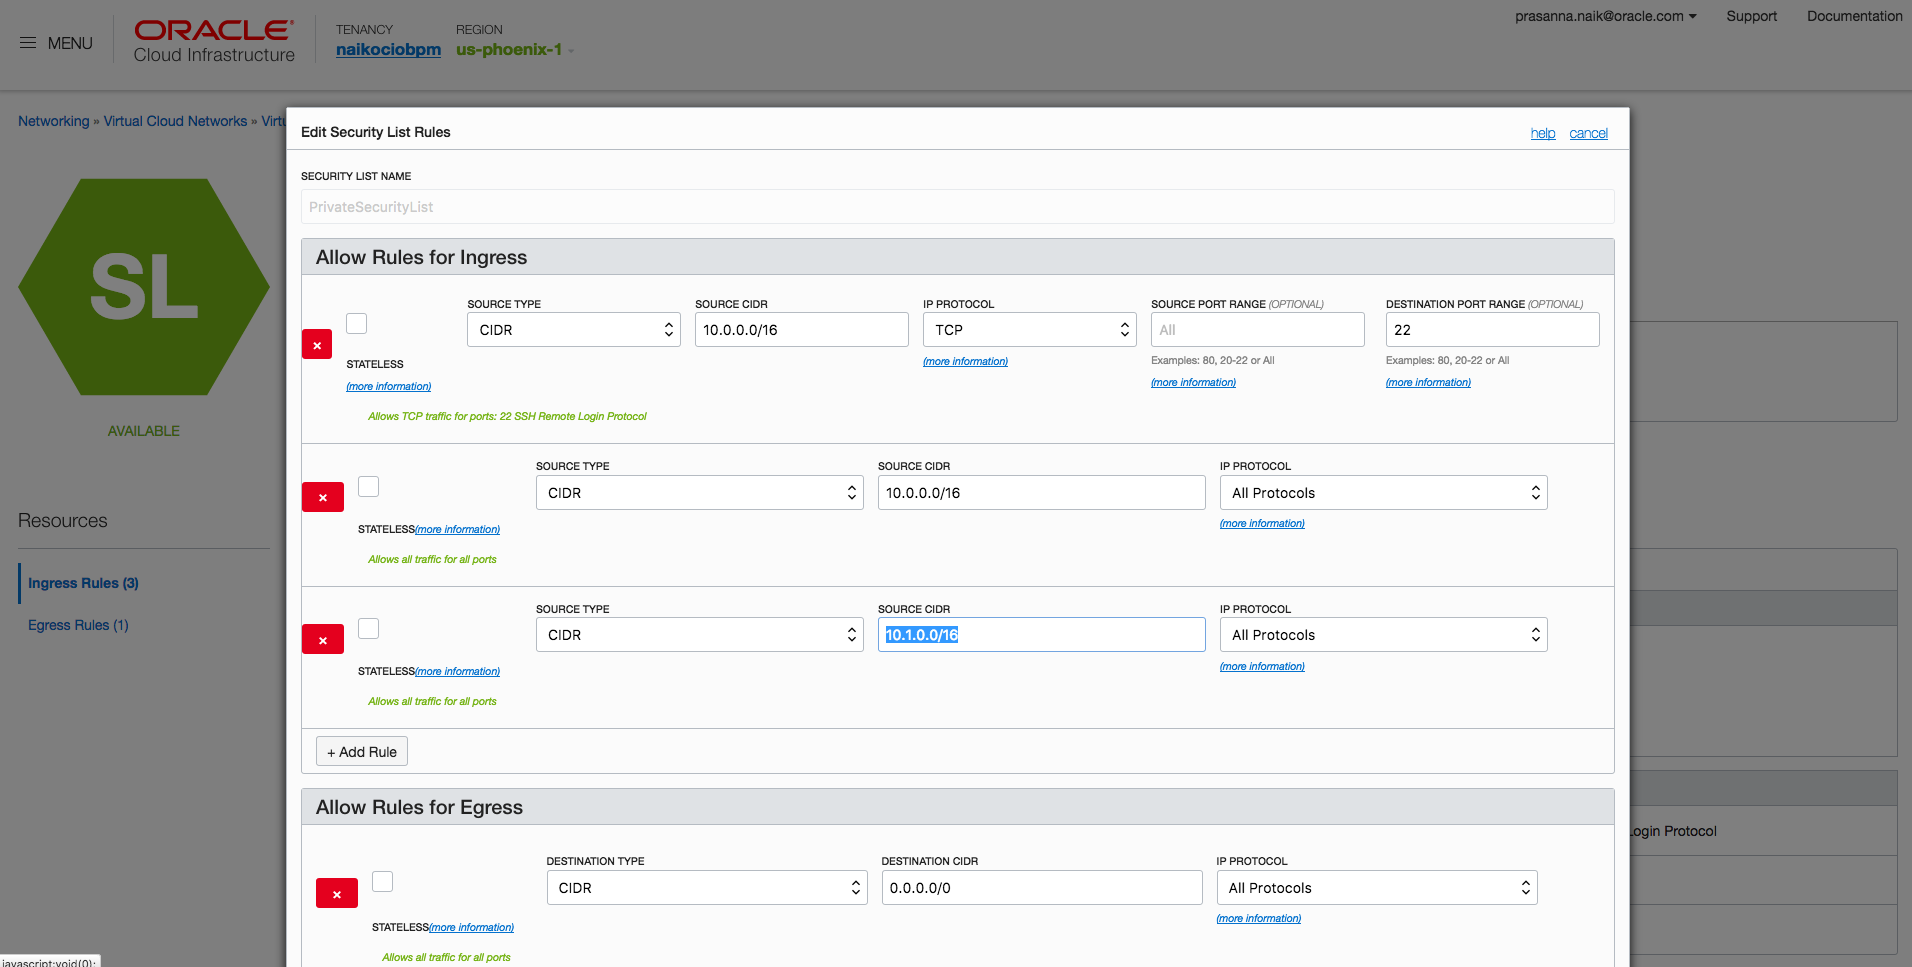
- In VCN-1, open PrivateSecurityList, and specify ingress and egress rules as shown in the following example. Replicate similar rules in VCN-2.
- After you complete all of the Console-related configuration, log in to the Oracle Linux instance to perform the following steps.
Configuring the Bridge Instance
- Log in to the bridge instance and bring up the secondary VNIC.
Note: You must perform the steps to bring up the secondary VNIC before proceeding. - Verify that the secondary VNIC (ens4) appears with the correct IP address.
-
On the bridge instance, run the following command to enable IP forwarding:
sysctl -w net.ipv4.ip_forward =1 -
Run the following firewall commands to enable port forwarding:
firewall-cmd --direct --add-rule ipv4 filter FORWARD0-i ens3 -j ACCEPTfirewall-cmd --direct --add-rule ipv4 filter FORWARD0-i ens4 -j ACCEPT/bin/systemctl restart firewalld -
Note the virtualRouterIp for VCN-2’s MgmtSubnet2 by checking the instance metadata using the following command:
[opc@bridgeinstance~]$ curl http://169.254.169.254/opc/v1/vnics/[ {"vnicId":"ocid1.vnic.oc1.phx.abyhqljssar7g5nfkw5wfa52df6ysz5zh7qgjnz4u5mute7bsjagjixdngya","privateIp":"10.0.0.2","vlanTag":1681,"macAddr":"00:00:17:01:E0:3B","virtualRouterIp":"10.0.0.1","subnetCidrBlock":"10.0.0.0/24"}, {"vnicId":"ocid1.vnic.oc1.phx.abyhqljsj6uqkigzjkfyauhalgeqgrytxfmhqipgrmddxgan4343tuurwk3q","privateIp":"10.1.0.2","vlanTag":1683,"macAddr":"00:00:17:01:2B:46","virtualRouterIp":"10.1.0.1", <<<<<<<<"subnetCidrBlock":"10.1.0.0/24"} ][opc@bridgeinstance~]$ -
Add an IP route rule for traffic to be routed to the virtual router IP of VCN-2 MgmtSubnet2:
ip route add <VCN-2-Network> dev <secondary-vnic> via <MgmtSubnet2.Virtual_router_ip>Ex: ip route add10.1.0.0/16dev ens4 via10.1.0.1
Verification
- Log in to PrivateInstance1 via BridgeInstance.
- Ping from PrivateInstance1 to PrivateInstance2. You have enabled cross-VCN communication using secondary VNICs on a bridge instance.
Extension
Now you can extend this solution to have a hub and spoke model by connecting up to 52 VCNs with each other. The bridge instance can have a maximum of 52 VNICs and hence a maximum of 52 VCNs can be connected using the bridge instance.
Next
In Part 2 of this series, we will explore how you can provide high availability (HA) to the bridge instance, so that if the active bridge instance goes down, the backup bridge instance can take over.
Thank you for reading this post. Your feedback and recommendations for future posts is most welcome.I hope you will enjoy using Oracle Cloud Infrastructure. Keep watching the Oracle Cloud Infrastructure space for updates as we add more exciting capabilities.
Prasanna Naik
Senior Product Manager
Oracle Cloud Infrastructure Networking