RackWare helps enterprises migrate to the cloud and protect their workloads through backup and disaster recovery, providing a single console to protect physical, virtual and cloud environments. Many enterprise customers are looking for migration and disaster recovery solutions to optimize the applications effectively on Oracle Cloud Infrastructure (OCI) and Oracle Cloud VMware Solution.
This blog summarizes the support for RackWare Autoprovision functionality with Oracle Cloud VMware Solution, which enables customers to migrate and protect their workloads to VMware Solution easily and without manual effort.
The RackWare autoprovision functionality allows you to choose NSX-T logical network segments in a VMware Solution environment for automated provisioning of the workloads. This feature supports the following use cases:
-
Migrate workloads from any supported source to Oracle Cloud VMware Solution and consume NSX-T logical segments for networking to autoprovision virtual machines (VMs).
-
Enable disaster recovery for the workloads from on-premises or cloud environments to VMware Solution and utilize the NSX-T network function within your software-defined data center (SDDC) to autoprovision the recovered VMs.
This blog post doesn’t describe details about OCI as a target for migration and disaster recovery workloads. We don’t recommend using vDS portgroup for autoprovision unless needed. The vDS in the Oracle Cloud VMware Solution environment is solely used for management purposes.
Prerequisites
-
Oracle Cloud VMware Solution SDDC in your customer tenancy
-
Identity and Access Management (IAM) service access to manage the deployment of the RackWare remote monitoring and management (RMM) server from Oracle Cloud Marketplace.
-
Connectivity between source and OCI tenancy. We recommend OCI FastConnect. You can only use IPSec VPN for proofs of concept.
For RackWare RMM prerequisites with OCI, refer to the official RackWare documentation, RackWare RMM with Oracle Marketplace.
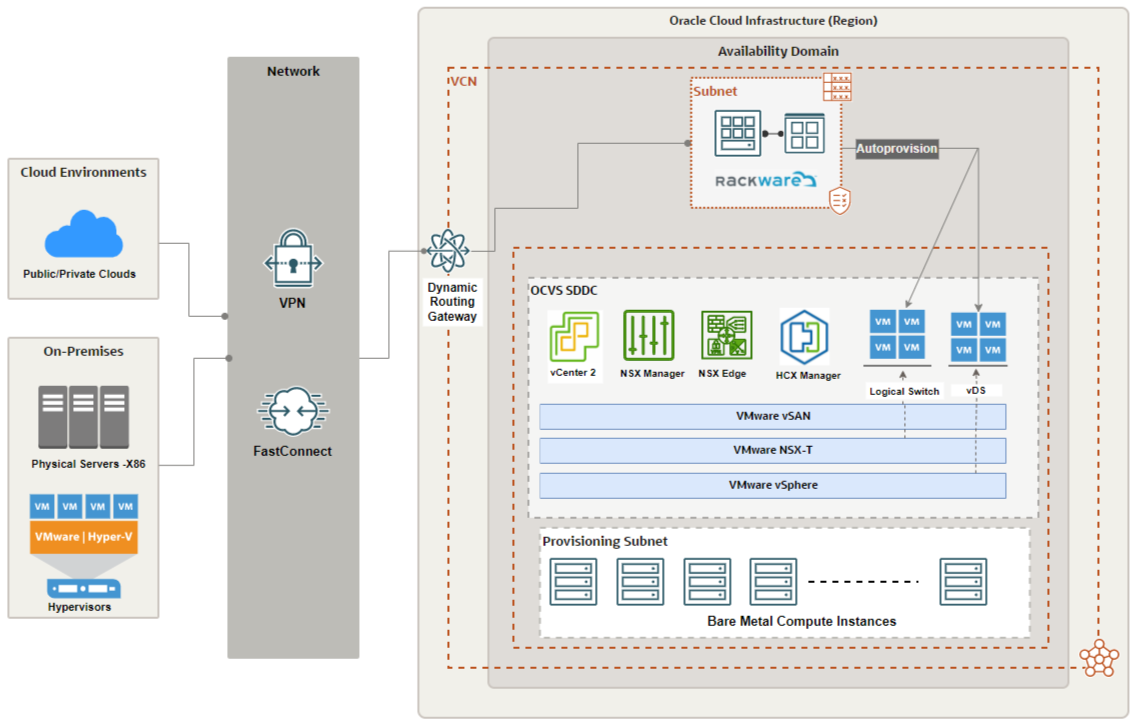
Architecture diagram
The architecture diagram represents the Oracle Cloud VMware Solution as a target for all the supported cloud, physical, and virtual environments. The architecture consists of the following components:
-
Oracle Cloud VMware Solution SDDC: The Oracle Cloud VMware Solution acts as a target for the placement of the migrated and recovered VMs.
-
RMM server: RackWare’s management module is the core component of RackWare to migrate and protect workloads to the VMware Solution environment.
-
FastConnect: Dedicated private network connectivity between source and OCI tenancy.
-
VPN: OCI IPSec VPN for connectivity over the internet where FastConnect implementation isn’t possible.
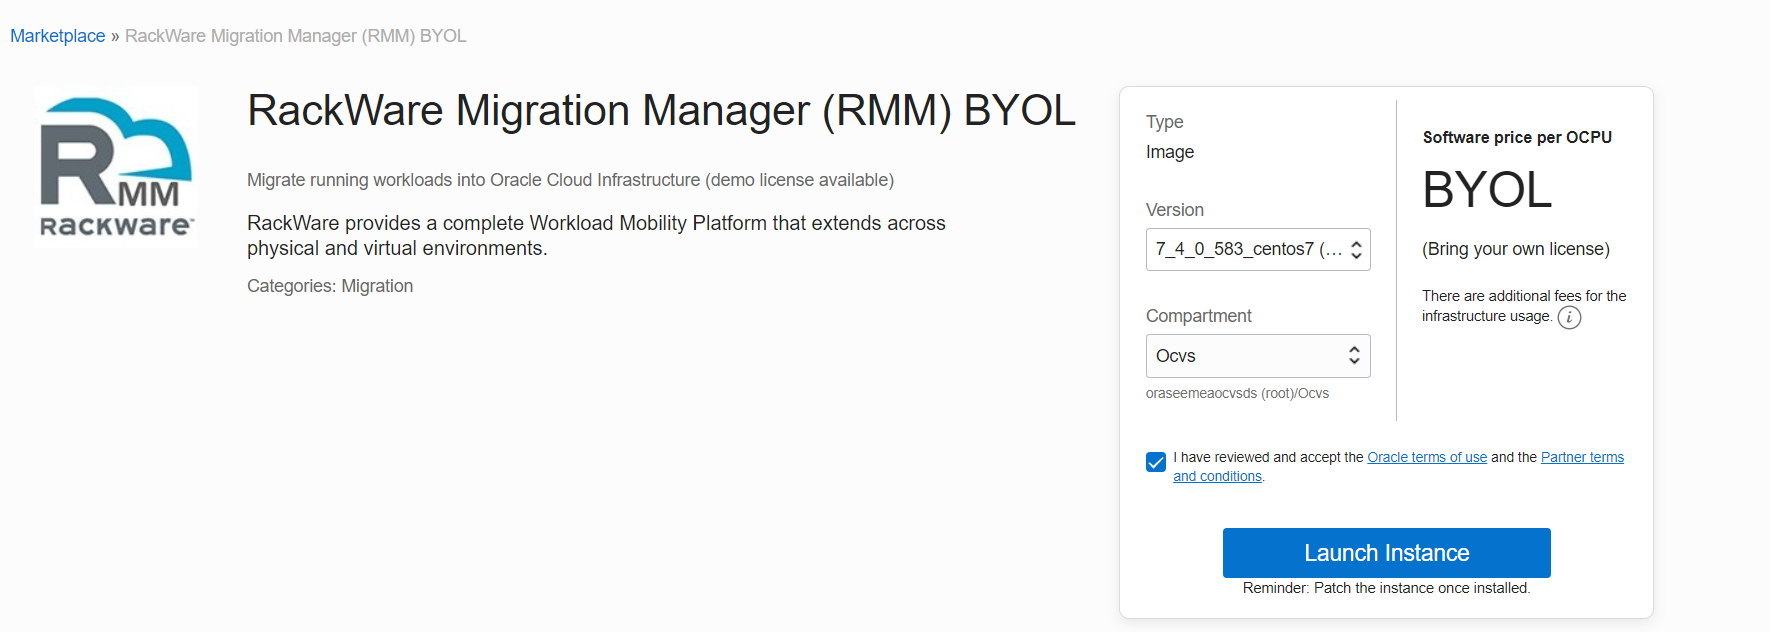
Deploy RackWare RMM
The RackWare RMM is available as an Oracle Cloud Marketplace image with Bring Your Own License (BYOL) and Paid options. Follow the installation and configuration instructions to complete the RackWare RMM setup in OCI.
Register the target Oracle Cloud VMware Solution environment
The VMware vCenter server is used for centralized management of the Oracle Cloud VMware Solution. Follow the steps to register the vCenter server as a target for migrated and protected workloads.
-
Log in to the RMM server with the admin credential created during the initial configuration.
-
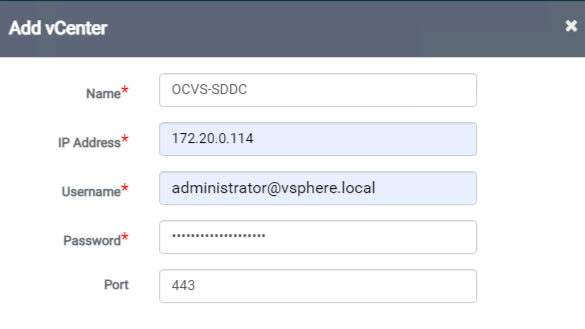
Navigate to Configuration, and in vCenter, and click Add.
-
Provide the vCenter details, such as IP address and credentials, and click Add.
-
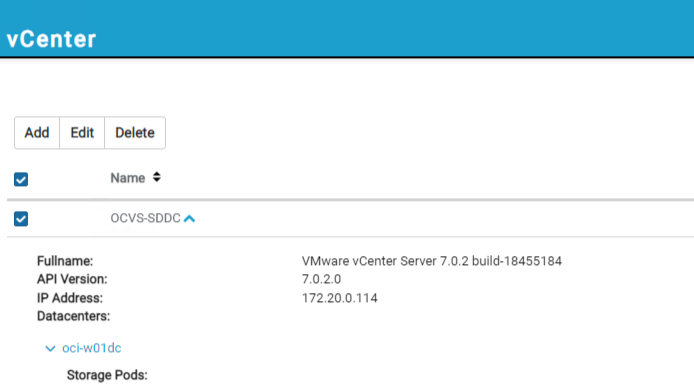
Successful registration provides vCenter server details and its associated resources. Refer to the following screenshot.
Migrate and protect servers to Oracle Cloud VMware Solution using auto provisioning
In this section, you create a wave for the migrations or disaster recovery operation to autoprovision servers in the VMware Solution environment. The wave represents a single host or bunch of hosts scoped for migration to the target environment.
-
Log in to the RMM server using admin credentials.
-
Navigate to Replication and, under Waves, click the plus (+) sign, and select + Create Wave.

-
Provide the name of the wave and leave the default option selected for wave without host and passthrough.
-
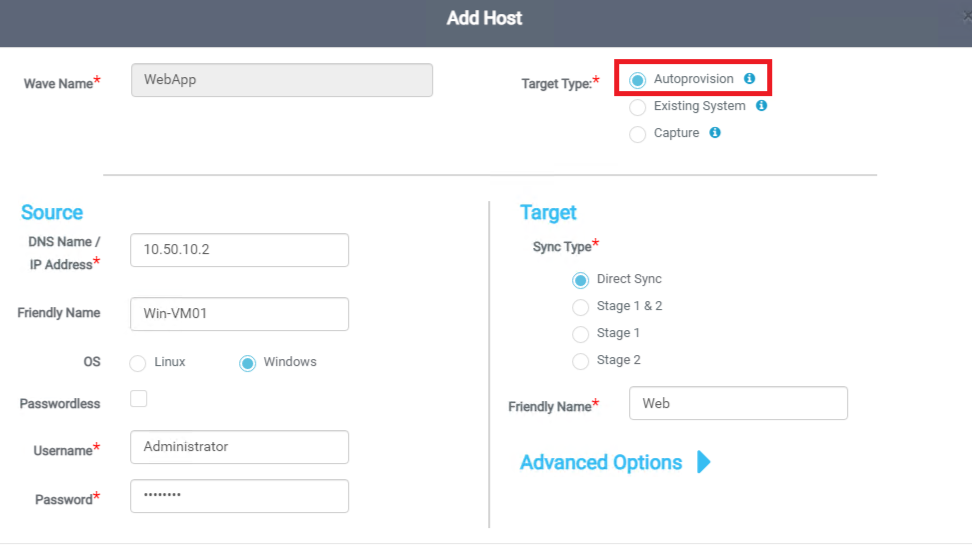
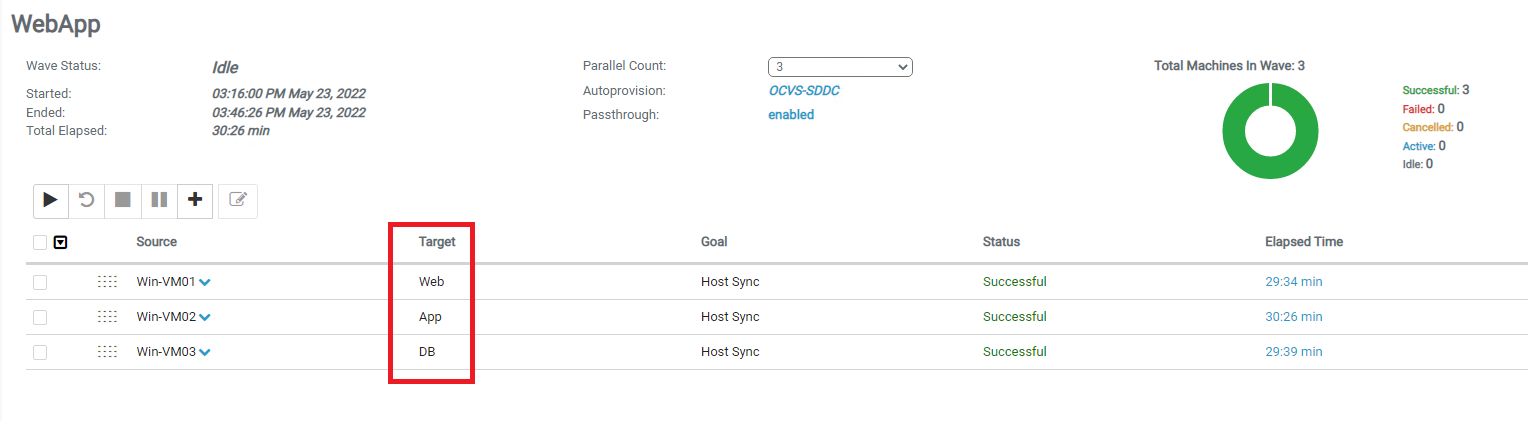
Click the newly created wave and click the plus + sign to add hosts to this wave. Refer to the following screenshot for the sample Add Host process. Add other relevant and dependent servers scoped for the migration. Refer to the following screenshot, where the sample WebApp application has web, app, and database servers.
-
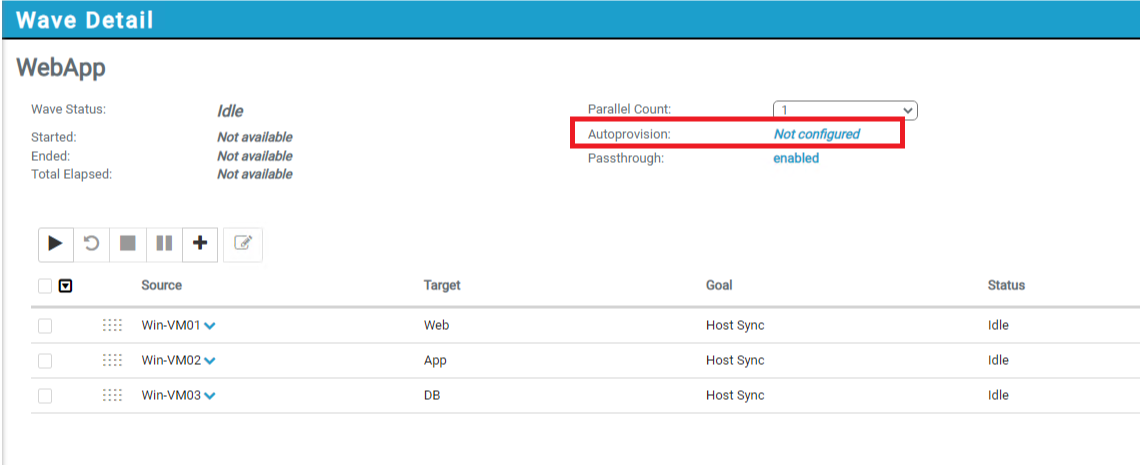
When all the servers are added to the wave, configure the autoprovision setting.
-
Click Not Configured next to autoprovision. Select the previously added Oracle Cloud VMware Solution SDDC environment and provide relevant details from the target vCenter server for the cluster, ESXi host, and datastore to complete the wizard. Click Apply Changes.
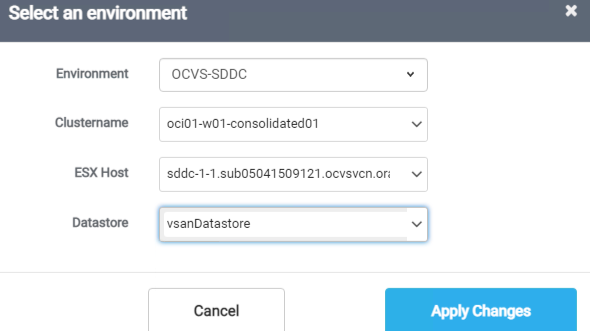
As a result, autoprovisioning changes to the Oracle Cloud VMware Solution SDDC.
-
Next, select the network for the VMs from the Oracle Cloud VMware Solution SDDC environment. This network must be precreated from the NSX-T environment as a logical network segment in the vCenter server.
-
To select the destination network for the servers, open the wave and click Edit under the Action column for each wave item to update the network settings. Go to the vCenter Options tab and under network interface cards (NICs), click +.
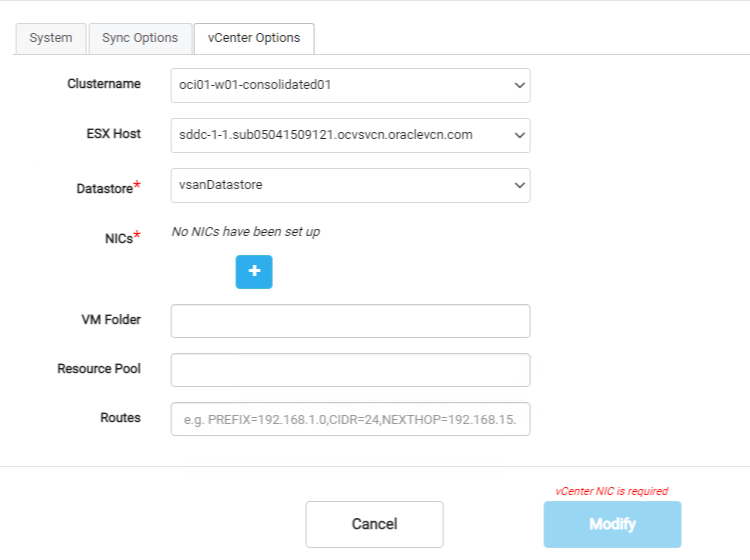
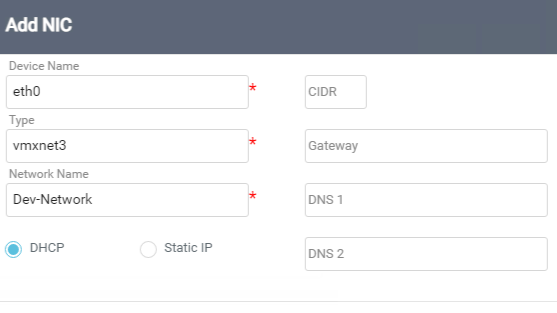
-
Add the NIC details as shown in the following screenshot. In this example, “Dev-Network” is an NSX-T logical network segment precreated and available in the vCenter server. Ensure that the RMM server has communication on the required ports with this network.
-
Repeat the process for all the hosts as part of the wave.
-
Run the wave by clicking the Play button. Monitor the status and with a successful operation, the VMs are automatically provisioned in the target Oracle Cloud VMware Solution environment.
-
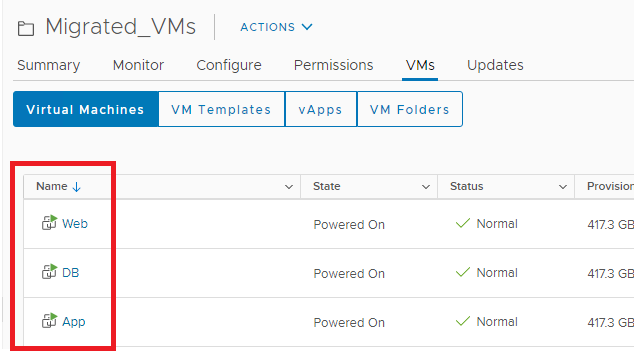
Refer to the following screenshot from vCenter Server. The VMs are powered on and running in Oracle Cloud VMware Solution SDDC vCenter Server.
Conclusion
This blog post summarizes the RackWare RMM autoprovision functionality with Oracle Cloud VMware Solution to seamlessly migrate and protect mission-critical workloads in an automated deployment model. For more information, see the following resources:
