Istio, an open source service mesh, is a networking layer that provides a transparent and language-independent way to flexibly and easily automate application network functions. With Istio, organizations can run distributed, microservices-based apps anywhere and modernize their enterprise apps swiftly and securely. Although port-forwarding access is the simplest way to access the Istio addons, it requires a config file and isn’t always an ideal scenario. The following method has no Kubeconfig requirement, and anyone with network access can work with them.
Istio comes with an ingress gateway, a load balancer operating at the edge of the mesh that receives incoming HTTP/TCP connections. It configures exposed ports, protocols, egress gateway, and more. Traffic routing for ingress traffic is configured using Istio routing rules in the same way as internal service requests.
Istio provides various addons for monitoring, tracing, and visualizing the services in the cluster, including the following examples:
-
Prometheus: Retrieve service mesh custom metrics
-
Grafana: Visualize metrics and everything going on through dashboards and charts
-
Kiali: Visualize, manage, and customize service mesh traffic
-
Jaegar: Monitor and inspect all requests using tracing
In this tutorial, we show you how to access the addons through the ingress gateway.
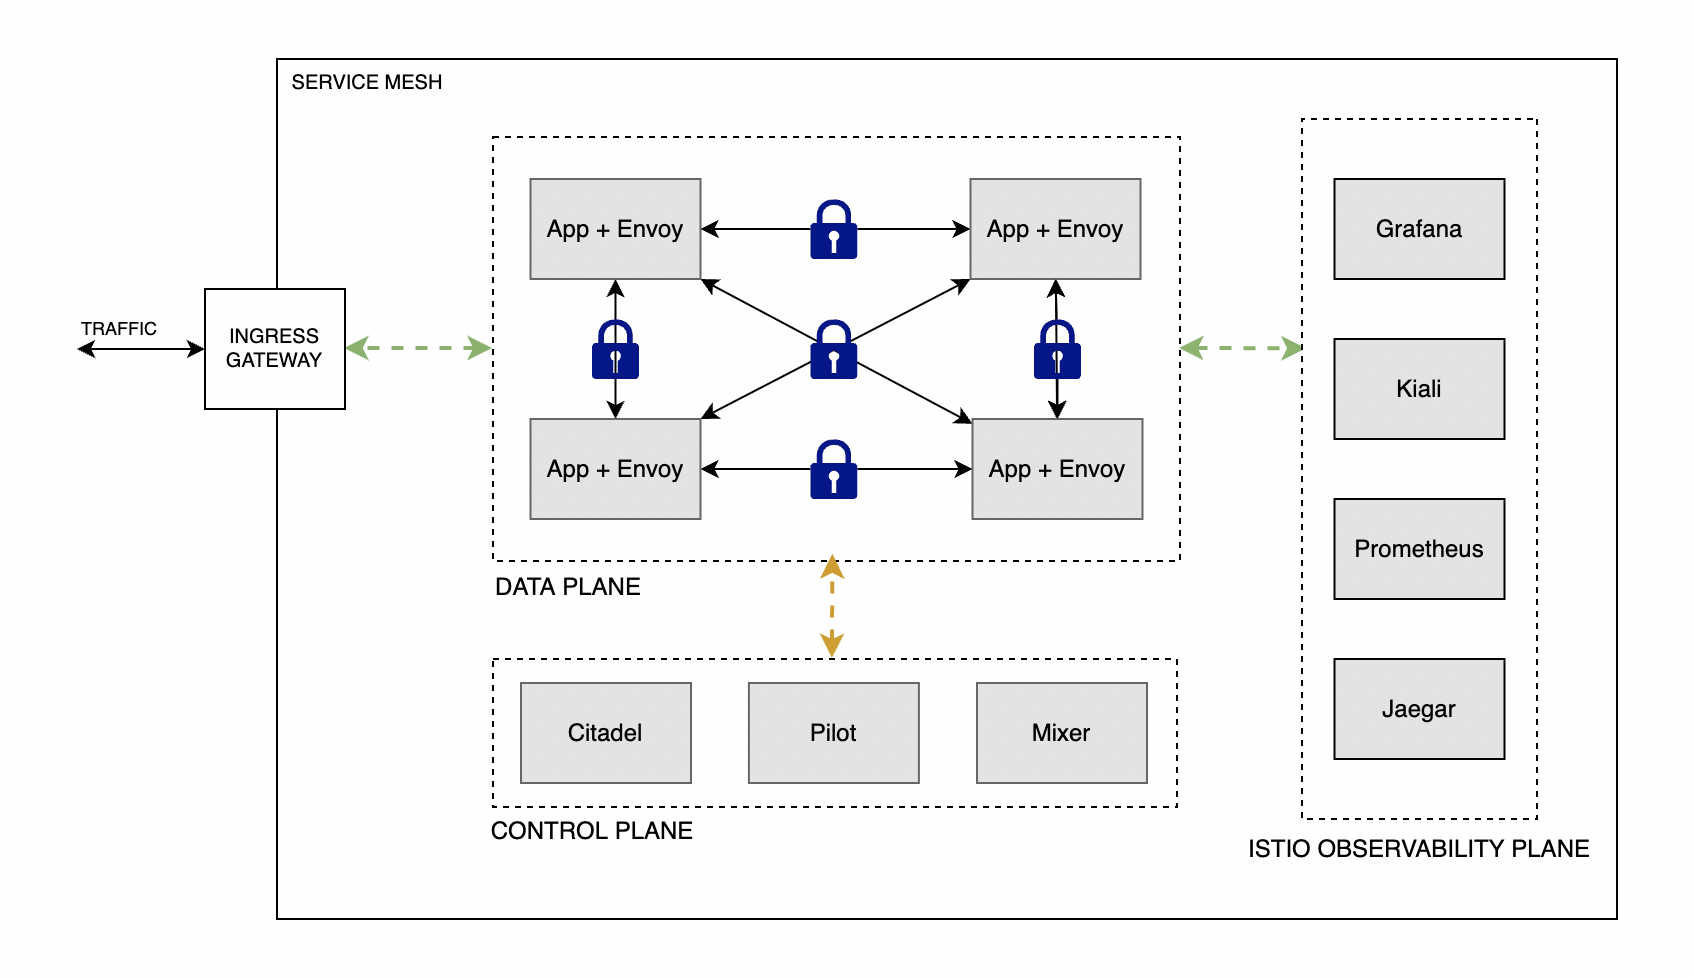
Architecture
Istio architecture is comprised of a control plane, a data plane, and a observability plane. Refer the following architecture diagram.
Prerequisites
The following prerequisites are required for the setup:
-
An Oracle Container Engine for Kubernetes (OKE) cluster with Istio installed. For reference, see Creating a Kubernetes Cluster and Installing Istio Service Mesh on OKE.
-
kubectl (Already installed if you use the Oracle Cloud Console)
-
A network configuration that allows kubectl commands to be sent to OKE. Using the Oracle Cloud Console typically doesn’t need any extra setup.
Verifying the OKE cluster
Use the kubectl command kubectl get nodes -A to verify the cluster setup:

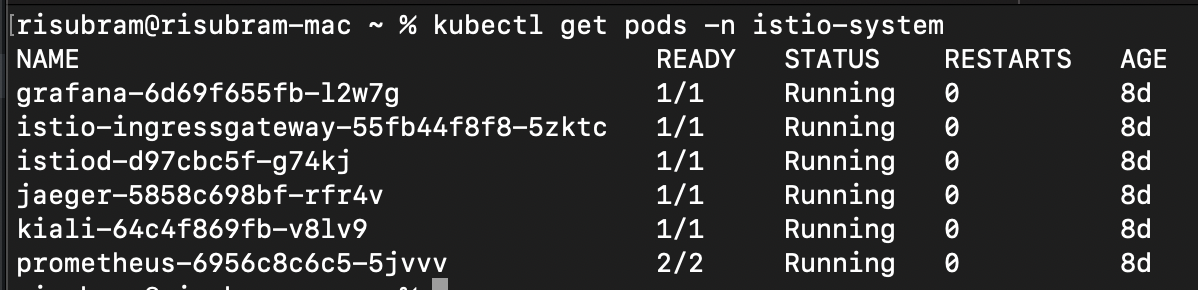
Verify that the Istio setup has completed successfully using the command kubectl get pods -n istio-system:

Verify the Istio service for the outbound access using the command kubectl get svc -n istio-system. While setting up Istio, OKE automatically creates a load balancer for the istio-ingress gateway.

Deploying telemetry addons
Now, we install the Istio telemetry addons into our OKE cluster. If the addons were installed already, you can skip this step.
Clone the Istio repo with the following command:
git clone https://github.com/istio/istio.gitNavigate to the addons directory:
cd samples/addonsDeploy the required addons using the kubectl command. In this tutorial, we’re deploying the Kiali addon for visualizing and customizing our traffic.
kubectl apply -f kiali.yamlCheck the deployment status for the Kiali dashboard:
kubectl rollout status deployment/kiali -n istio-systemYou can follow the same process for setting up Grafana, Prometheus, and Jaegar.
kubectl apply -f <prometheus>/<grafana>/<jaegar>.yamlNow, verify that the Kiali dashboard has been deployed successfully using the command, kubectl get pods -n istio-system. If successful, the status is Running.

If you have deployed other addons (Grafana, Prometheus, or Jaegar), you can find them in the same command output, as shown in the following screenshot:
Setting up access
To access the Addons through the ingress gateway, we require the following configurations:
Each link provides more details on each module.
We’re using the ingress gateway, a load balancer, through which the services are exposed using ports 80 (HTTP) and 443 (HTTPS).
HTTP access
Create a gateway using the following configuration. It exposes the ports for ingress traffic (80, in this case). The simplest method is to paste the configuration into a new YAML file, such as gateway.yaml, and then use the command, kubectl apply -f gateway.yaml.
apiVersion: networking.istio.io/v1alpha3
kind: Gateway
metadata:
  name: kiali-gateway
  namespace: istio-system
spec:
  selector:
    istio: ingressgateway
  servers:
  - port:
      number: 80
      name: http-kiali
      protocol: HTTP
    hosts:
    - '*'
Now, create the virtual service. A set of traffic routing rules to apply when a host is accessed.
apiVersion: networking.istio.io/v1alpha3
kind: VirtualService
metadata:
  name: kiali-vs
  namespace: istio-system
spec:
  gateways:
    - kiali-gateway
  hosts:
    - '*'
  http:
    - match:
      - uri:
          prefix: /kiali
      route:
      - destination:
          host: kiali.istio-system.svc.cluster.local
          port:
            number: 20001
        weight: 100
Finally, we create the destination rule. It defines a set of policies that apply to traffic intended for a service after routing has occurred.
apiVersion: networking.istio.io/v1alpha3
kind: DestinationRule
metadata:
  name: kiali-dr
  namespace: istio-system
spec:
  host: kiali.istio-system.svc.cluster.local
  trafficPolicy:
    tls:
      mode: DISABLE
Verify the gateway, virtual service and destination rule using the following kubectl commands:
kubectl get gateway -n istio-system
kubectl get virtualservice -n istio-system
kubectl get destinationrule -n istio-system
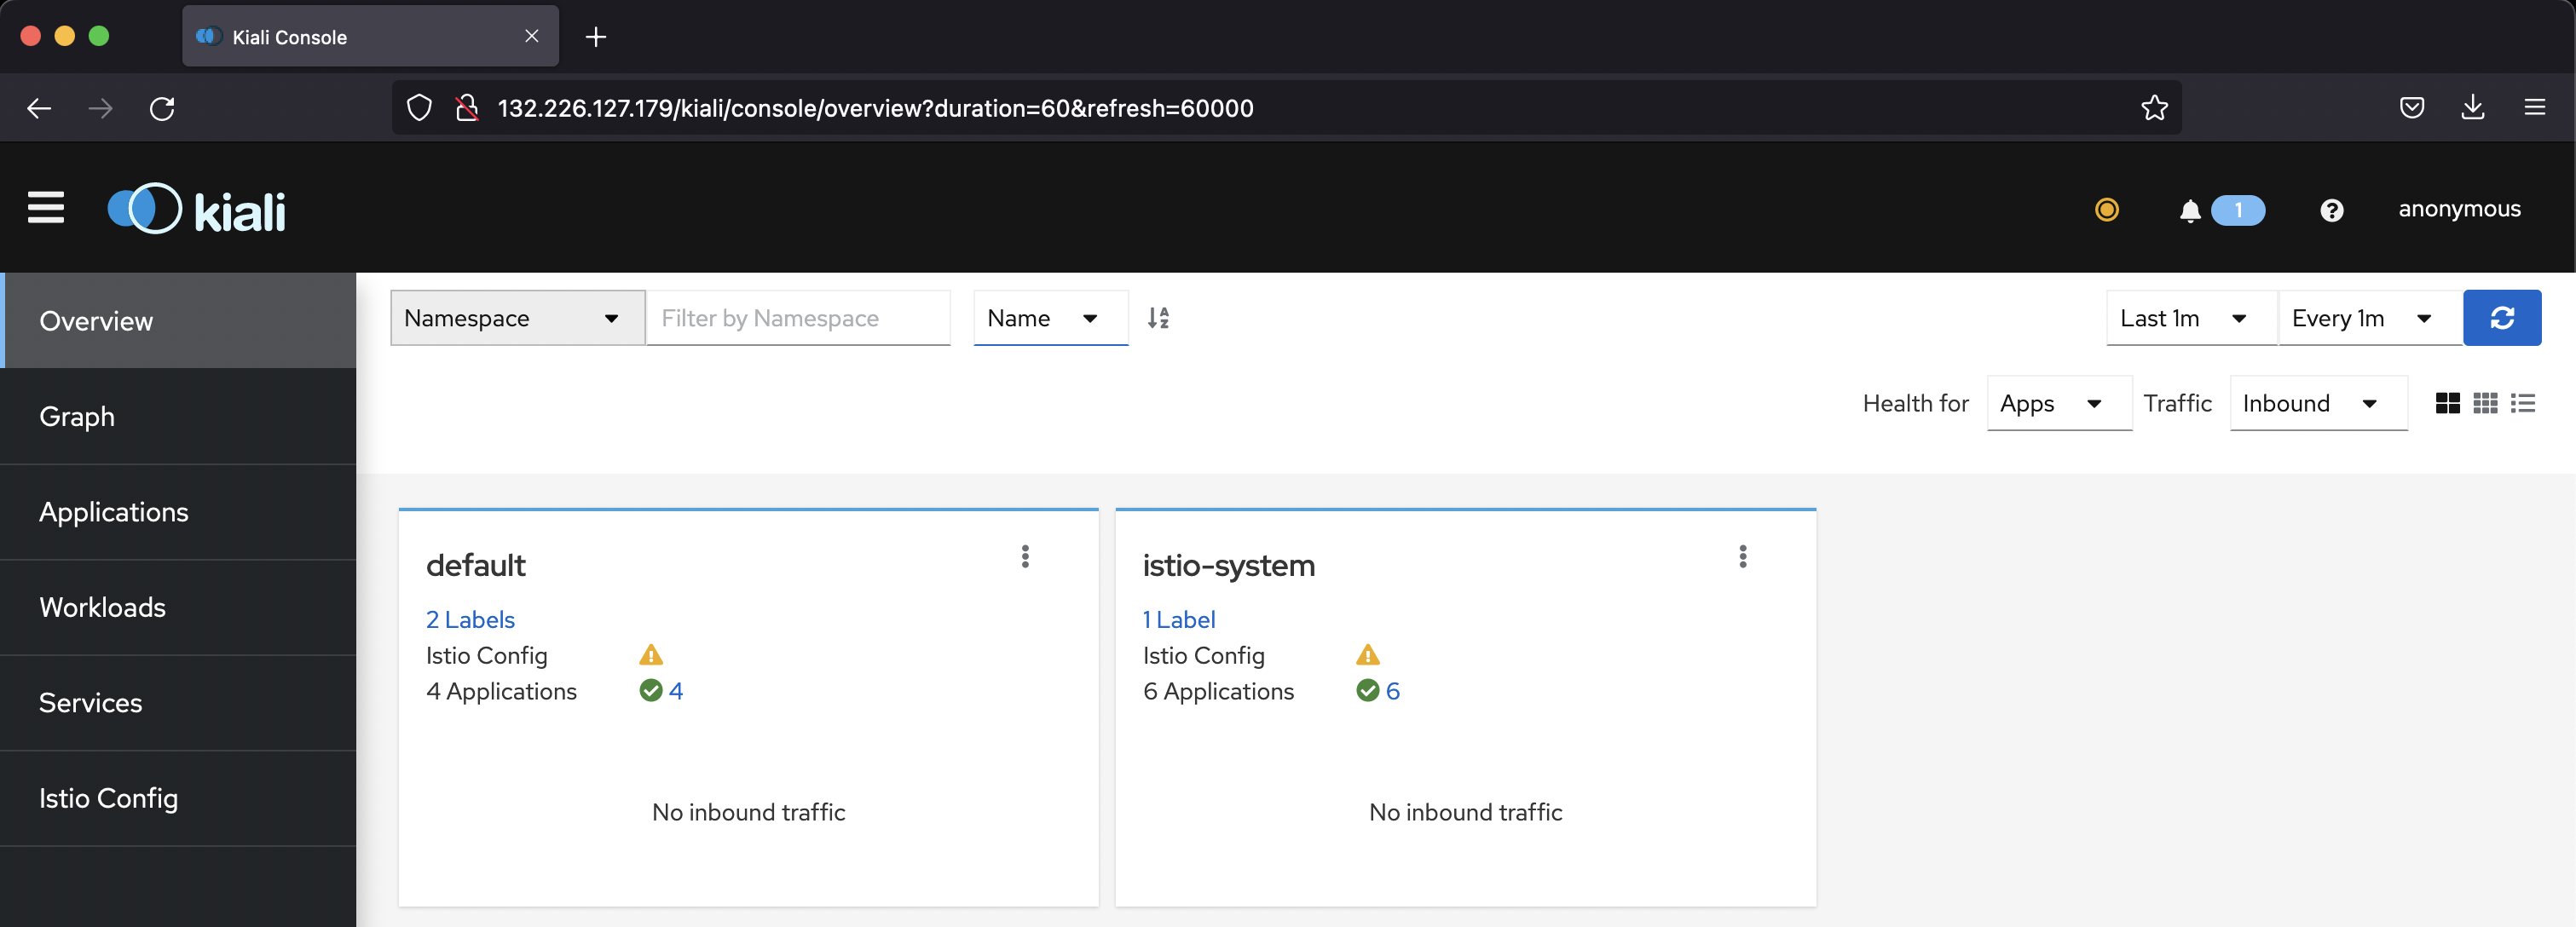
To access the UI for the services, we get the ingress load balancer’s port and IP address, using the command, kubectl get svc istio-ingressgateway -n istio-system. Using the load balancer and node port IP, we can access the Kiali dashboard with the suffix /kiali (provided in our virtual service. In our example the IP address is http://132.226.127.179/kiali.
HTTPS access
The gateway that we set up with HTTP isn’t a secure way of accessing. To set it up with HTTPS (Secured), we need an SSL certificate provided by any certificate authority.
For the demo, we set up the gateway with HTTPS enabled using a self-signed certificate (Strictly not recommended for production).
Create an SSL key pair using the following OpenSSL commands:
openssl req -x509 -sha256 -nodes -days 365 -newkey rsa:2048 -subj "/O=<OrgName>./CN=*.<INGRESS_DOMAIN>" -keyout ./ca.key -out ./ca.crt

openssl req -out ./cert.csr -newkey rsa:2048 -nodes -keyout ./tls.key -subj "/CN=*.<INGRESS_DOMAIN>/O=<OrgName>"

openssl x509 -req -sha256 -days 365 -CA ./ca.crt -CAkey ./ca.key -set_serial 0 -in ./cert.csr -out ./tls.crt
Now, create a kube secret in the istio-system namespace with the TLS certificate and key.
kubectl create -n istio-system secret tls telemetry-gw-cert --key./tls.key --cert=./tls.crtCreate the gateway with the following configuration, as we did earlier:
apiVersion: networking.istio.io/v1alpha3
kind: Gateway
metadata:
  name: kiali-gateway
  namespace: istio-system
spec:
  selector:
    istio: ingressgateway
  servers:
  - port:
      number: 443
      name: https-kiali
      protocol: HTTPS
    tls:
      mode: SIMPLE
      credentialName: telemetry-gw-cert #Kube-Secret-Name
    hosts:
    - "*.<INGRESS_DOMAIN>" #Domain as per the Cert
For the virtual service and destination rule, the config remains same for both HTTP and HTTPS protocols.
After we create all three configurations, we can access the Kiali dashboard with HTTPS enabled.
https://132.226.127.179/kialiBecause we used a self-signed SSL certificate, we might get a warning that says “Error code: SEC_ERROR_UNKNOWN_ISSUER.” To make it secure, use the SSL certificate signed by a certificate authority.
Conclusion
This tutorial showed how to access the Istio addons remotely using an ingress gateway. With this approach, we don’t need to provide the kubectl config for everyone who wants to access the Istio addons for gathering metrics and visualizing traffic.
Oracle Cloud Infrastructure provides enterprise-grade features for developers to build modern cloud applications while supporting the open source developer tools and solutions you’re already used to. Create your Always Free subscription, which comes with US$300 credits trial credits.