Why KVM Nested Virtualization?
Nested virtualization allows you to run a virtual machine (VM) inside another VM while still using hardware acceleration from the physical host. It is an easy provisioning process for enterprise and regular users providing great flexibility along with low cost options based on the workload requirements. This blog describes the steps to install, configure, and use KVM Guests on top of an Oracle Cloud Infrastructure (OCI) KVM Hypervisor Virtual Machine. This process is also known as Nested KVM Virtualization.
Getting Started
Review Oracle Cloud Infrastructure public documentation for current shape options and features you can use in the environment then select a virtual machine shape based on the workload requirements that will be used for the KVM Hypervisor and provision it before proceeding.
Requirements
– A Virtual Machine Instance running Oracle Linux 7.x (other Linux Distros can be used as well as long as it supports KVM)
– Note that when bringing a 3rd party application license to Oracle Cloud Infrastructure you are solely liable for meeting the licensing obligations with any 3rd party OS/application vendor you are using on a KVM Server Instance
– The KVM VM OS(s) ISO(s) file(s) need(s) to be uploaded into the KVM Server instance for the Guest VM install
– Recommend using an additional block-storage volume and attaching it to the Nested KVM Server instance to hold the KVM VM(s) qcow2 disk image(s) file(s). You can also use a VM.DenseIO shape with NVMe disks instead of an attached iSCSI block storage for the KVM VM(s) qcow2 disk image(s) file(s)
Installing KVM and Preparing the KVM Server for IOMMU Passthrough
Once you have provisioned a Virtual Machine that will be used for the KVM hypervisor, in order to be able to run a Nested KVM server, you need to enable that feature along with the capability of using virtual NICs passthrough (IOMMU) option. Below is the process for it.
| ### Edit grub and include the following options after backing it up (i.e.; “sudo cp /etc/default/grub /etc/default/grub.bck”) |
Then, issue the following command to install the latest qemu packages along with virt-manager.
$ sudo yum -y install qemu-kvm qemu-img virt-manager libvirt libvirt-python libvirt-client virt-install virt-viewer |
Now, run the following commands to
| ### Enable tuned $ sudo systemctl enable tuned $ sudo systemctl start tuned $ sudo tuned-adm profile virtual-host
### Recreate grub to validate all the changes $ sudo cp /boot/efi/EFI/redhat/grub.cfg /boot/efi/EFI/redhat/grub.cfg.orig $ sudo grub2-mkconfig -o /boot/efi/EFI/redhat/grub.cfg |
Installing VNC and Xorg packages for GUI Remote Connection
There are two ways to use VNC. First one is using vncviewer client with your instance public IP and the second option is running VNC through a SSH client.
Run the following commands to install VNC and Xorg packages based on your connection selection (Public IP or through SSH Tunnel). These packages will allow you to use the virtual machine GUI to manage the KVM Guests
Direct TCP / Unsecure |
Through SSH |
$ sudo yum update -y$ sudo yum groupinstall “Server with GUI” -y |
$ sudo yum update -y |
$ To connect : use vncviewer client with publicIP:5901 |
$ Use vcnviewer localhost:5901 |
Using the OCI Console, edit the Virtual Cloud Network Security List and enable port 5901 assuming that is the VNC port you are using. Change the VNC port number accordingly based on the environment.
| Source: 0.0.0.0/0 IP Protocol: TCP Source Port Range: All Destination Port Range: 5901 Allows: TCP traffic for ports: 5901 |
Reboot the OCI Nested KVM VM instance to load the KVM kernel modules, VNC and Xorg services. Once the VM comes back online, connect into the KVM VM hypervisor instance using a VNC application like vncviewer

Creating an Oracle Cloud Infrastructure Secondary vNIC
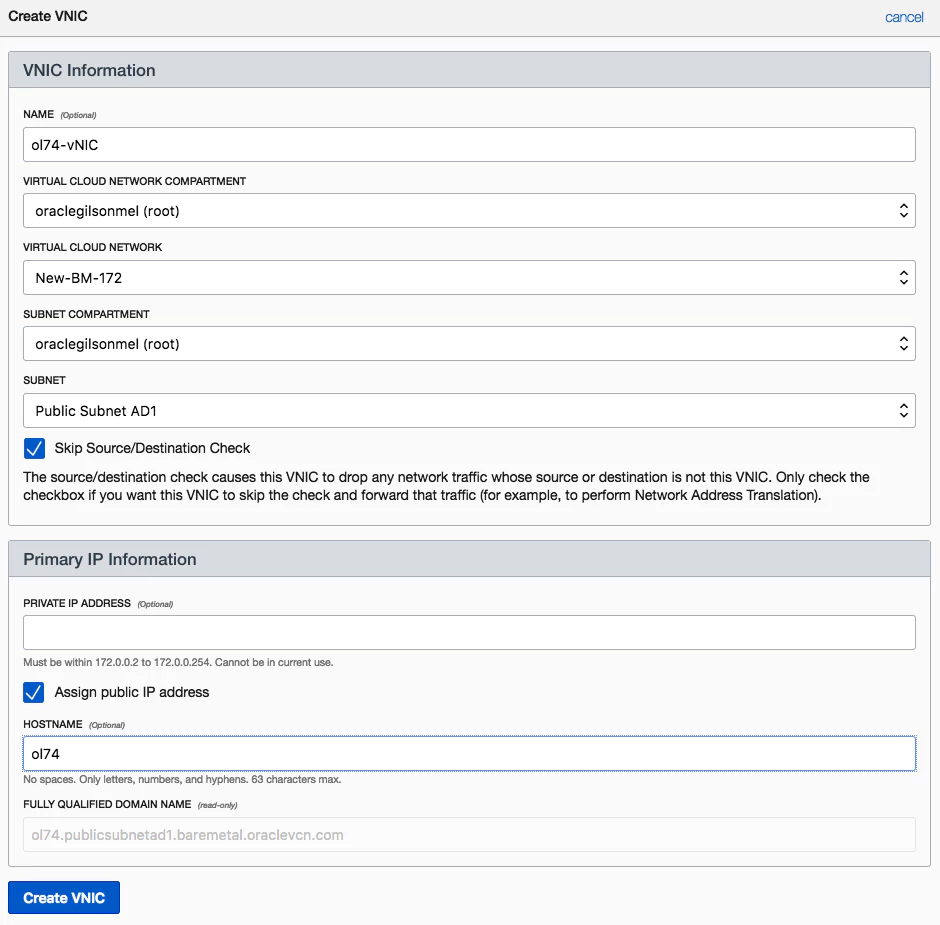
Before configuring the guest instance, the host interface needs additional configurations. Next step is creating a secondary vNIC and attaching it to the KVM Nested VM instance. This secondary vNIC will be used for the Nested VM guest. Using the OCI Dashboard, click on the details of the KVM Nested VM instance, select “Attached vNICs” and click on “Create vNIC” option. Below is an example using a Virtual Cloud Network (VCN) called “New-BM-172” on Availability Domain1 (AD1)
After that vNIC has been created, you should see the following output. Attention to the “MAC Address” and IP address information because you will use them later.

Associating OCI Secondary vNIC with the KVM Guest VM
Before starting the guest installation process, run the following command in the KVM VM Hypervisor
| [opc@kvmx7 ~]$ sudo ip a |
Identify the interface that matches the OCI Secondary vNIC mac address created in the previous step. As shown above only one interface carries an ip address: ens3 besides the loopback one. This is the network interface used for host management access.The newly created interface is: ens5 and you can see the corresponding MAC address is the one listed in the OCI UI. Now configure the interface on the host instance before attaching them to the KVM.
| $ sudo cp /etc/sysconfig/network-scripts/ifcfg-ens3 /etc/sysconfig/network-scripts/ifcfg-ens5 $ sudo uuidgen ens5 ### Edit the config file for ens5 and use the newly generated UUID sudo cat /etc/sysconfig/network-scripts/ifcfg-ens5 ### Reboot the KVM host to allow the KVM Guest instance to use this new NIC interface in case you get an error with virt-manager after restarting the network service with the below command $ systemctl restart network |
After the restart, ens5 NIC interface will be ready to be used.

Creating a KVM guest instance
KVM can be managed through command line or graphical tools and the focus here is on GUI tools. Use VNC to connect into the OCI KVM Hypervisor instance then open gnome-terminal and run the following command
| $ sudo virt-manager |
If this is the first time you’re running virt-manager you will need to create a local QEMU/KVM Connection. Once that’s done click on “Create a new Virtual Machine” button and follow the required options as shown. As mentioned in the Requirements Session, the OS(s) file(s) need to be uploaded into the KVM Nested VM first and there are different ways to do it like using SCP command line (Mac or Linux workstation) or winscp (Windows workstation) for example. Proceed with the KVM Guest install process after the OS ISO file upload process has finished.
1- Select the KVM Guest install option

2- Select the information based on the setup

3- Choose Memory and CPU settings based on the services workload that will be used on this KVM guest VM

4- Set the Storage size and location

5- Make sure you select “Customize Configuration before install” option then click on finish

6- Now, click on the default NIC that was added during the above Guest creation process on virt-manager, change it to “Passthrough”, add the OCI Secondary vNIC mac address identified above along with the correct network interface name as well (i.e.; ens4)

7- Click on “Apply” and “Begin Installation” buttons and follow the OS installation process as usual.
8- You will need to add the network information either during the install or after it so make sure the network configuration is set to use a static IP (use the IP information based on the Secondary vNIC you created above), along with DNS (server and search domain options) and gateway IP.

Additional Security Recommendations
– Disable SSH Password Authentication and enable SSH key authentication (add the ssh public key in /home/opc/.ssh/authorized_keys file)
– Keep the KVM guest firewall enabled and open only required ports
– Patch the KVM guest VMs regularly
– Use VPN when possible
– Keep VNC port blocked and use “ssh -L” (SSH Port Forwarding option) to create a tunnel between the OCI Nested KVM VM Hypervisor and the localhost to be able to use VNC through an encrypted channel
Conclusion
We have walked you through how to set up a nested KVM hypervisor on Oracle Cloud Infrastructure. This is a great way to address applications running on older versions of KVM and/or to lower your on-premises infrastructure cost allowing you to migrate a KVM environment to the Cloud. Remember that Oracle Cloud Infrastructure has full KVM support for running directly on Virtual Machines or Bare Metal shapes and that for other use cases, Ravello is also a good solution for migrating and managing existing KVM environments.