Genome-sequencing software for GPUs running on Oracle Cloud Infrastructure
Oracle Cloud Infrastructure is working with NVIDIA to accelerate researchers’ understanding of the COVID-19 virus. Oracle Cloud Infrastructure has released an updated NVIDIA GPU Cloud Machine Image that enables researchers to use NVIDIA’s Parabricks software suite to perform genome-sequencing of the virus. This is in conjunction with NVIDIA’s announced free 90-day license of Parabricks to any researcher in the fight against COVID-19.
Updated NVIDIA GPU Cloud Machine Image
The NVIDIA GPU Cloud Machine Image on Oracle Cloud Infrastructure contains GPU-optimized software from NVIDIA GPU Cloud (NGC) and gives researchers, data scientists, and developers an environment to help them gain insights, build business value, and develop new solutions. This image takes advantage of the cutting-edge cloud computing infrastructure that Oracle has built. You can run the NVIDIA GPU Cloud Machine Image across the full portfolio of GPU options on Oracle Cloud, ranging from virtual machines with one or more P100 or V100 GPU chips to the cutting-edge, bare metal GPU instance with eight V100 chips attached.
Parabricks
Researchers who want to test possible outcomes and responses related to to this new and largely unknown virus can use Parabricks software, which was designed to perform next-generation sequencing of DNA data. Parabricks can analyze whole human genomes in about 45 minutes, compared to about 30 hours for 30x WGS data. If you’re a researcher working on COVID-19, you just need to fill out a form to request a Parabricks license. We’re excited for our cloud resources to be a small part of our society’s response to this pandemic that is affecting all of us, and hope to see progress in research that benefits our world in the face of this challenge.
Getting Started
Follow these steps to launch a Compute instance with Parabricks software.
Step 1: Create a Virtual Cloud Network
Sign in to the Oracle Cloud Console at cloud.oracle.com. Click here to apply for a free Oracle Cloud account. To learn more about the Console, please click here.
Select a region where GPUs are available, for example, Japan East (Tokyo).
Open the navigation menu in the upper left (nick named the hamburger menu ) , navigate to Networking and then Virtual Cloud Networks.
Click Start VCN Wizard to bring up the Wizard pop-up menu, check Create VCN with Internet Connectivity, then click Start VCN Wizard.
A new panel to Create a VCN with Internet Connectivity will pop up. Enter network details (or simply use the default values) for the VCN, and then click Next to move to the next page.
Review all the content on the menu page to ensure accuracy. To make any changes, click Previous. Otherwise, click Create.
Remember the name of the VCN, which will be used later during Step 2.
Step 2: Launch a GPU Instance by using NVIDIA GPU Cloud Machine Image
From Oracle Cloud Console, open the navigation menu in the upper left , navigate to Marketplace and then All Applications.
In the newly opened Marketplace panel, search “GPU”. From the tiles of the search results, choose and click on the one for NVIDIA GPU cloud Machine Image, as follows:
Please note this image is created based on Ubuntu 18.04.
In the newly opened panel for NVIDIA GPU Cloud Machine Image, double check the Version number and the Compartment name to make sure they meet your expectation. If you accept the Oracle terms of use, you may check the box and then, click on
A new Create compute instance panel will be opened. Enter Name, Compartment name.
In Placement section, select the availability domain in which you want to place the GPU instance to be created. See example selection as follows:
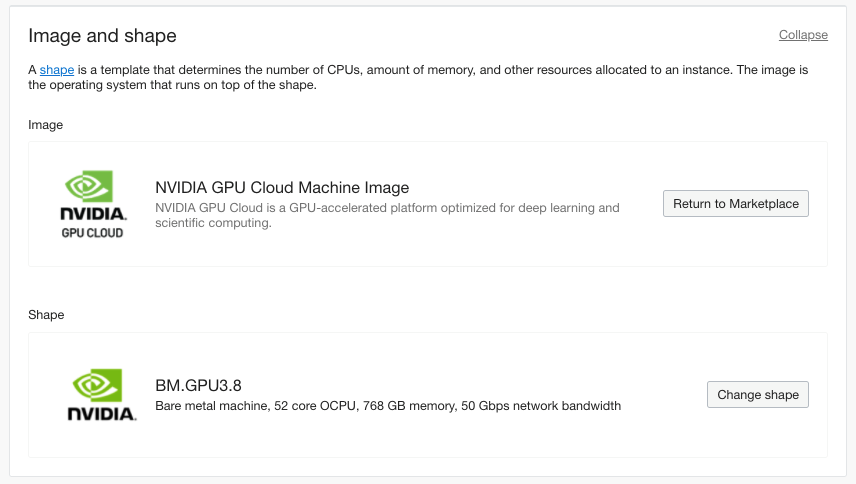
In Image and shape section, make sure the image is NVIDIA GPU Cloud Machine Image. Then, select the bare metal GPU shape that you plan to use. For this example, we selected BM.GPU3.8, as follows:
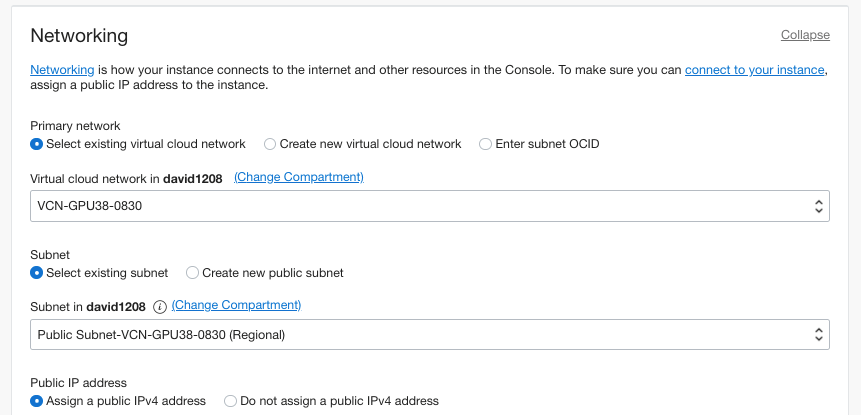
In Networking section, select the VCN network that you have just created in Step 1. Make sure the default subnet and public IP address are selected. See example selections as follows:
Moving on to Add SSH keys section. You can either generate an SSH key pair or upload a public key.
The last section is for Boot volume specification. You may review and take default selections.
Click Create to launch the instance.
Step 3: Sign in to the GPU instance
Once the launch process is completed, you will be able to ssh to the instance. You can find the public IP address from → Compute → Instances panel.
Use the following command to connect to the GPU instance:
ssh -i path/to/private_key ubuntu@public_IP
To check the OS installed on the instance, you may run
Step 4 (Optional): Add Block Volume Storage for Additional Space to Run Large Parabricks Datasets
From Oracle Cloud Console, open the navigation menu in the upper left , navigate to Storage and then Block Volumes to open Block Volumes panel.
Click on Create Block Volume.
Create a volume with the following values:
Name: enter a meaningful name that associates with this Parabricks work
Create in Compartment: Select your compartment.
Availability Domain: Select the same availability domain as your GPU instance.
Volume Size and Performance: you may select the default (1024 GB) or check Custom so that you can enter your desired volume size and performance.
Backup Policy: Select a backup policy, for example, Bronze.
Cross Region Replication: for a non-mission critical test, you may choose OFF
Encryption: Encrypt using Oracle managed keys.
To mount the block volume, return to the navigation menu, select Compute and then Instances.
Select the GPU instance that you have just created.
Under Resources (on the left-hand side of the page), click Attached Block Volumes.
to open Block Volume Details page.
In the Attached Block Volumes section, Click Attach Block Volume
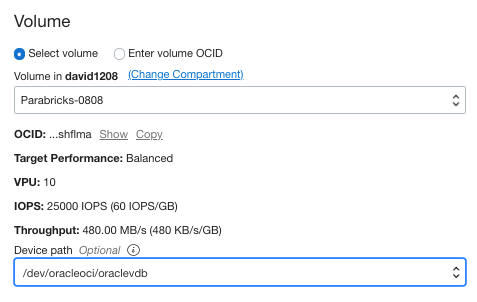
Attach Block Volume menu will open. Select iSCSI for Volume attachment type,
In the Volume section, from the pull down menu select the volume that you just created, select a Device Path (Optional). See example below:
For Access, select Read/Write.
Click Attach.
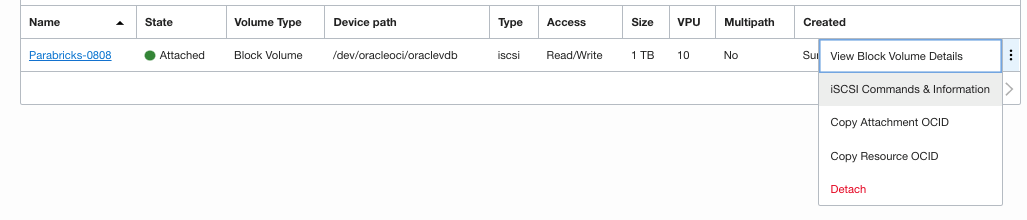
After the volume is attached, click the Actions menu (three dots) next to the volume, and then click iSCSI Commands and Information.
Copy the 3 Commands for connecting,
Move to your ssh session, and run the commands, one by one in your ssh window.
To list the attached devices, run
lsblk.
The block volume should appear as attached.
Create a partition:
sudo fdisk -l
For example:
sudo fdisk -l /dev/oracleoci/oraclevdb
Create an NFS fileshare system on the block volume:
sudo mkfs -t ext4
Create a mount point on the /mnt drive to mount the block volume.
For example:
sudo mkfs -t ext4 /dev/oracleoci/oraclevdb
Make folder path for Parabricks sudo mkdir /mnt/parabricks
Mount the block volume: sudo mount For example: sudo mount /dev/oracleoci/oraclevdb /mnt/parabricks
Run lsblk. The disk should appear as correctly mounted on the mountpoint.
Change the permissions of the volume. For example: sudo chmod 777 /mnt/parabricks
Now the volume is ready to be used.
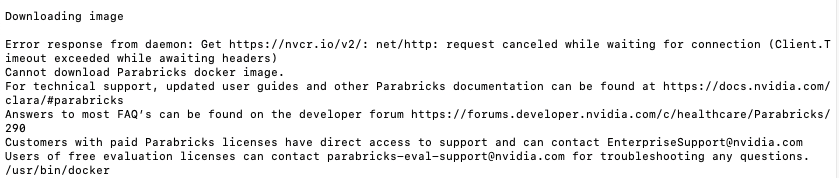
Step 5: Install Nvidia Clara Parabricks
To install Nvidia Clara Parabricks, follow these steps and refer to the NVIDIA instructions.
Request access to the Parabricks installer Python file for a 90-day trial.
Following instructions from Nvidia to download the Parabricks installer file parabricks.tar.gz. Please note the tar ball may have included a temporary Parabricks demo license as a file named license.bin.
Be sure to include option [-ampere] if you install Parabricks to BM.GPU4.8 shape that uses Nvidia Ampere A100 GPUs. Follow the instructions in your screen to answer 4 required questions. Be sure to correctly answer “yes” or “no” to the following question:
Parabricks installation has two options:
     I. exclusively for ampere GPUs,
     II. exclusively for non-ampere GPUs.
Do you want to install exclusively for ampere GPUs? Type yes or no only: no If you keep getting the following error, you may need to run the installer as the superuser:
Verify your Parabricks version:
sudo pbrun version
Sample command to run a Parabricks Germling pipeline job
Congratulations! You have completed the installation of Nvidia Clara Parabricks on an OCI BM.GPU3.8 instance which has 8 Nvidia V100 GPU cards. Please keep in mind the exact identical procedure also works for OCI BM.GPU4.8 shape, as we tested in our lab.
 , navigate to Networking and then Virtual Cloud Networks.