Apache ActiveMQ is a popular open source, multi-protocol, Java-based message broker. It supports industry standard protocols, so you get the benefits of client choices across a broad range of languages and platforms. By using Oracle’s MySQL Database service as a persistence store for ActiveMQ, you can employ AMQ as a highly available cloud native messaging platform for Kubernetes.
This guide uses ActiveMQ 5, but you can use a similar approach for the more modern ActiveMQ Artemis. You can find the complete code samples on GitHub.
Setup
To begin, you need access to an Oracle Cloud Infrastructure (OCI) account. You also need to provision an Oracle Container Engine for Kubernetes (OKE) cluster, a MySQL Database instance, and a bastion server. For the OKE cluster, the quick create wizard supplies some sensible defaults for your cluster and is the quickest way to get up and running. This process creates a virtual cloud network (VCN) with three subnets: A public subnet for the k8s API endpoint, a private subnet for worker nodes, and another public subnet for load balancers.
Either deploy the MySQL instance into the worker node subnet or create a separate private subnet and ensure that the security lists are open for the worker nodes to connect to the database on port 3306. Deploy the MySQL instance with high availability turned on. Then, create another instance to act as bastion in the load balancer subnet.
MySQL
When the database is up and running, connect to it through the bastion following the documentation for the MySQL Shell. Create a database and user for ActiveMQ with the following commands:
> CREATE DATABASE activemq;
> CREATE USER 'activemq'@'%' IDENTIFIED BY 'MyComplexPass#12';
> GRANT ALL ON activemq.* TO 'activemq'@'%';
Docker
Apache doesn’t publish a canonical Docker image for ActiveMQ, so we can build our own. Use the following minimal Dockerfile for a reference:
FROM openjdk:8-jre-alpine
WORKDIR /home/alpine
RUN apk update
ADD https://www.apache.org/dyn/closer.cgi?filename=/activemq/5.16.2/apache-activemq-5.16.2-bin.tar.gz&action=download amq.tar.gz
RUN tar -xvf amq.tar.gz --directory=/opt/
EXPOSE 8161 61616 5672 61613 1833
CMD ["/bin/sh","/opt/apache-activemq-5.16.2/bin/activemq","console"]
Build the docker image and push it to OCI Container Registry or your repository of choice.
Configuration
When you have connected to your Kubernetes cluster, create a namespace for your ActiveMQ deployment with the following command:
$ kubectl create ns active-mqTo use MySQL as a persistence store for AMQ, we need to inject some configuration files into the AMQ image. From this example config file, update the MySQL IP address, username, and password as appropriate.
<bean class="org.apache.commons.dbcp2.BasicDataSource" destroy-method="close" id="mysql-ds">
<property name="driverClassName" value="com.mysql.cj.jdbc.Driver">
<property name="url" value="jdbc:mysql://<IP ADDRESS>/activemq?relaxAutoCommit=true">
<property name="username" value="activemq">
<property name="password" value="MyComplexPass#12">
<property name="poolPreparedStatements" value="true">
</property>
Save this file and use it to create a Kubernetes ConfigMap.
$ kubectl create configmap activemq-config --from-file=activemq.xml -n active-mq
We also create another ConfigMap from this file so that the web UI is accessible from outside the instance with the following command:
$ kubectl create configmap jetty-cm --from-file=jetty.xml -n active-mqDeployment
With those configurations in place and the Docker image built, you can now create your AMQ deployment.
apiVersion: apps/v1
kind: Deployment
metadata:
  annotations:
  labels:
    app: active-mq
  name: active-mq
  namespace: active-mq
spec:
  replicas: 1
  revisionHistoryLimit: 10
  selector:
    matchLabels:
      app: active-mq
  strategy:
    rollingUpdate:
      maxSurge: 25%
      maxUnavailable: 25%
    type: RollingUpdate
  template:
    metadata:
      labels:
        app: active-mq
    spec:
      imagePullSecrets:
        - name: ocir-secret # Remember to create your image pull secret if you are using OCIR
      initContainers:
      - image: busybox
        name: jar-getter
        command: ["/bin/sh", "-c"]
        args:
        - "wget -O /work-dir/mysql-connector-java-8.0.26.tar.gz https://dev.mysql.com/get/Downloads/Connector-J/mysql-connector-java-8.0.26.tar.gz; tar -xf /work-dir/mysql-connector-java-8.0.26.tar.gz --directory=/work-dir"
        volumeMounts:
        - name: workdir
          mountPath: "/work-dir"
      containers:
      - image: <my activemq="" image="">
        imagePullPolicy: Always
        name: activemq
        ports:
        - containerPort: 61616
          name: jmx
          protocol: TCP
        - containerPort: 8161
          name: ui
          protocol: TCP
        - containerPort: 61616
          name: openwire
          protocol: TCP
        - containerPort: 5672
          name: amqp
          protocol: TCP
        - containerPort: 61613
          name: stomp
          protocol: TCP
        - containerPort: 1883
          name: mqtt
          protocol: TCP
        resources:
          requests:
            memory: 500Mi
            cpu: 200m
          limits:
            memory: 1000Mi
            cpu: 400m
        volumeMounts:
        - name: activemq-config
          mountPath: /opt/apache-activemq-5.16.2/conf/activemq.xml
          subPath: activemq.xml
        - name: jetty-cm
          mountPath: /opt/apache-activemq-5.16.2/conf/jetty.xml
          subPath: jetty.xml
        - name: workdir
          mountPath: /opt/apache-activemq-5.16.2/lib/optional/mysql-connector-java-8.0.26.jar
          subPath: mysql-connector-java-8.0.26/mysql-connector-java-8.0.26.jar
      volumes:
      - name: activemq-config
        configMap:
          name: activemq-config
          items:
          - key: activemq.xml
            path: activemq.xml
      - name: jetty-cm
        configMap:
          name: jetty-cm
          items:
          - key: jetty.xml
            path: jetty.xml
      - name: workdir
        emptyDir: {}
      restartPolicy: Always

$ kubectl apply -f activemq-deploy.yaml
Next, check that your deployment was successful and that you have a running ActiveMQ pod.
$ kubectl get pods -n active-mq
NAME                         READY   STATUS    RESTARTS   AGE
active-mq-64bd4bb5d9-8p4p2   1/1     Running   0          42s
Also check that ActiveMQ has created the tables in your MySQL database as expected.
> USE activemq;
Default schema set to `activemq`.
Fetching table and column names from `activemq` for auto-completion... Press ^C to stop.
> show tables;
+--------------------+
| Tables_in_activemq |
+--------------------+
| ACTIVEMQ_ACKS      |
| ACTIVEMQ_LOCK      |
| ACTIVEMQ_MSGS      |
+--------------------+
Service
Now that ActiveMQ has been deployed successfully, you need to create a service to access it. Here we’re exposing both the web UI and all the messaging ports through a public load balancer, but in production, these services are internal to Kubernetes.
apiVersion: v1
kind: Service
metadata:
  name: active-mq
  namespace: active-mq
  labels:
    app: active-mq
spec:
  selector:
    app: active-mq
  ports:
  - name: dashboard
    port: 8161
    targetPort: 8161
    protocol: TCP
  - name: openwire
    port: 61616
    targetPort: 61616
    protocol: TCP
  - name: amqp
    port: 5672
    targetPort: 5672
    protocol: TCP
  - name: stomp
    port: 61613
    targetPort: 61613
    protocol: TCP
  - name: mqtt
    port: 1883
    targetPort: 1883
    protocol: TCP
  type: LoadBalancer

$ kubectl apply -f activemq-svc.yaml
High availability
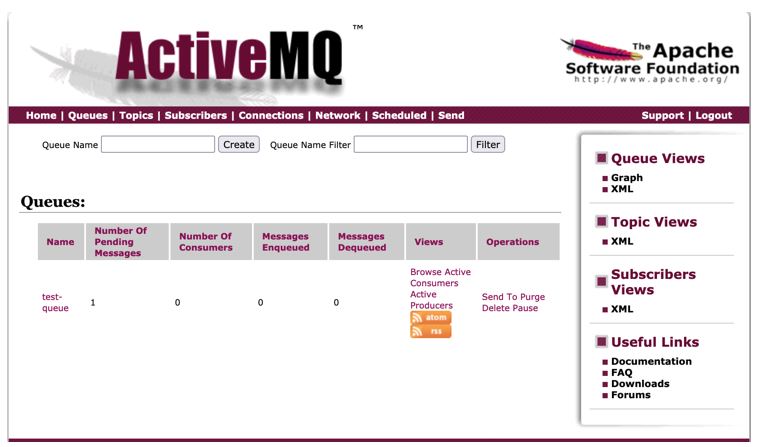
For high availability of the platform… That’s it! If the ActiveMQ pod goes down, it’s automatically rescheduled and the new pod acquires the lock in the database, all in just a few seconds. We can test this out. Log in to the web UI at <loadbalancer ip>:8161/admin/ and log in with the default admin/admin. Create a test queue and use ‘send to’ to publish a test message to the queue. Then simulate failover.
$ kubectl get pods -n active-mq
NAME                         READY   STATUS    RESTARTS   AGE
active-mq-64bd4bb5d9-djcgn   1/1     Running   0          8m
$ kubectl delete pod active-mq-64bd4bb5d9-djcgn -n active-mq
pod "active-mq-64bd4bb5d9-djcgn" deleted
$ kubectl get pods -n active-mq
NAME                         READY   STATUS    RESTARTS   AGE
active-mq-64bd4bb5d9-8p4p2   1/1     Running   0          5s
Refresh your browser open to the AMQ web UI. Your test message is still there!
Conclusion
It’s easy to get started running popular open source technology on Oracle Cloud Infrastructure. Sign up for your free trial today and dig into OKE by deploying a Helidon application.
For more information, see the following resources: