
Oracle APEX 26.1 introduces a new translation approach for applications based on Text Messages. It adds the ability to convert and manage translatable text within an application as text messages, making it easier to maintain user-facing content and support multiple languages. With support for exporting and importing translations in XLIFF and CSV, the overall localization workflow becomes more practical in APEX.
Developers can continue building applications in their primary language, convert translatable text into text messages, define target languages, and exchange translation content using standard formats catering to both manual translation workflows and external localization services. In addition, the APEX_LANG PL/SQL API supports programmatic export and import of text messages, making it easier to automate parts of the localization workflow.
Why this matters
Text Message-based translation streamlines application localization by removing the need for shadow applications and centralizing translatable content in one place.
With Oracle APEX 26.1, teams can:
- Continue building in their primary language
- Convert translatable UI text into reusable text messages
- Manage multiple languages from a single application
- Exchange translation content with external localization providers using standard formats
- Automate export and import through PL/SQL APIs
This makes the translation workflow easier to adopt, easier to maintain, and better suited for modern localization processes.
Translate your application in 5 simple steps:
- Enable Application Translation
- Convert translatable application text into Text Messages
- Define Application Languages
- Export text messages in CSV or XLIFF for translation
- Import the translated text messages back into the application
Enable Application Translation
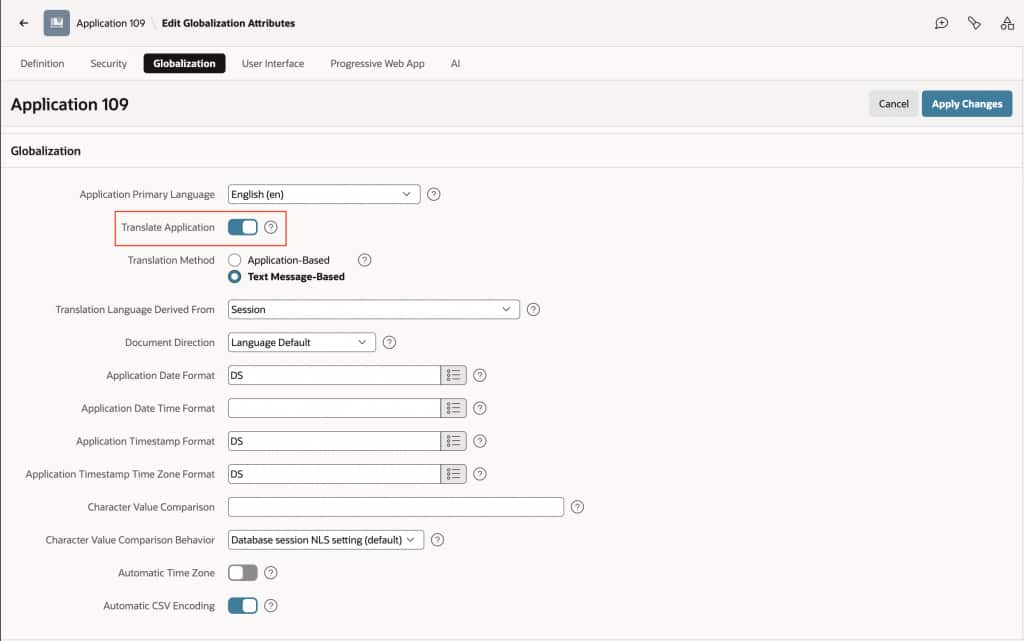
To translate an APEX application, go to Shared Components -> Globalization and enable Translate Application.
Once translation is enabled, the Translation Method property becomes available with the following options:
- Application-Based:
Translatable text defined across application components is translated using separate translated applications, one for each language. This is the traditional translation approach available in earlier APEX releases. Refer to this documentation to learn more about this approach. - Text Message-Based:
Translatable text across application components is stored in Shared Components -> Text Messages, allowing a single application to support multiple languages through text message translations.
Convert translatable application text into Text Messages
This is the key step in the workflow.
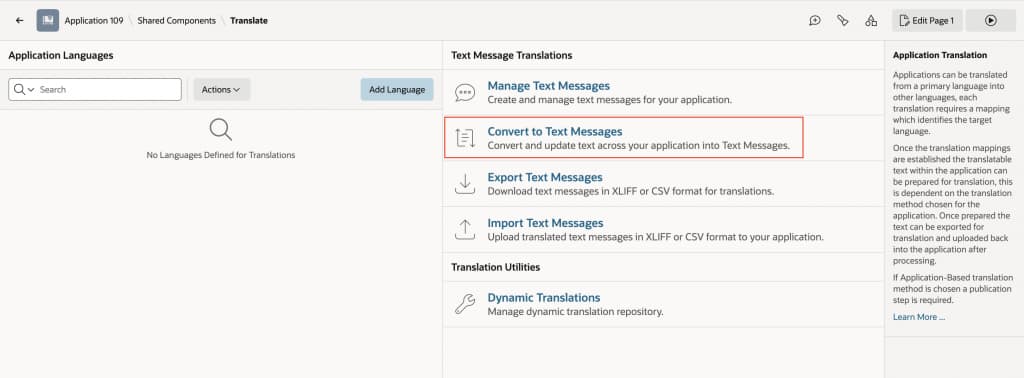
This process converts translatable text throughout the application into Text Messages. For example, if a region title is ‘Customer Orders’, APEX creates a corresponding text message such as ‘CUSTOMER_ORDERS’, which is then used for any instance of ‘Customer Orders’ across the application.
This makes application text easier to manage and simplifies translation through XLIFF or CSV export and import. Developers can continue building in the primary language and run this process whenever needed to keep text messages in sync with application changes.
To do this:
- Select an application
- Navigate to Shared Components -> Application Translations
- Click Convert to Text Messages
Alternatively, you can also access this under Shared Components -> Text Messages -> Convert Application Text from the Tasks menu.
Note: This process does not convert template directives, numeric-only text, component text marked as non-translatable, or subscribed text objects. Subscribed text objects must be translated in the source application from which they are subscribed.
Define Application Languages
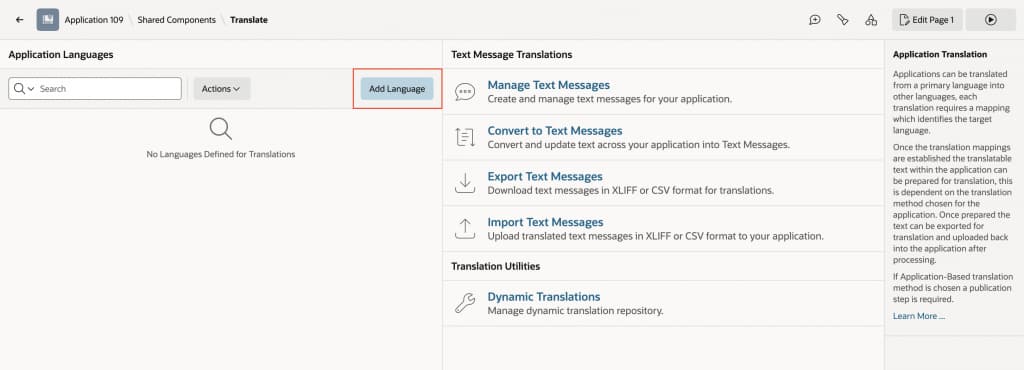
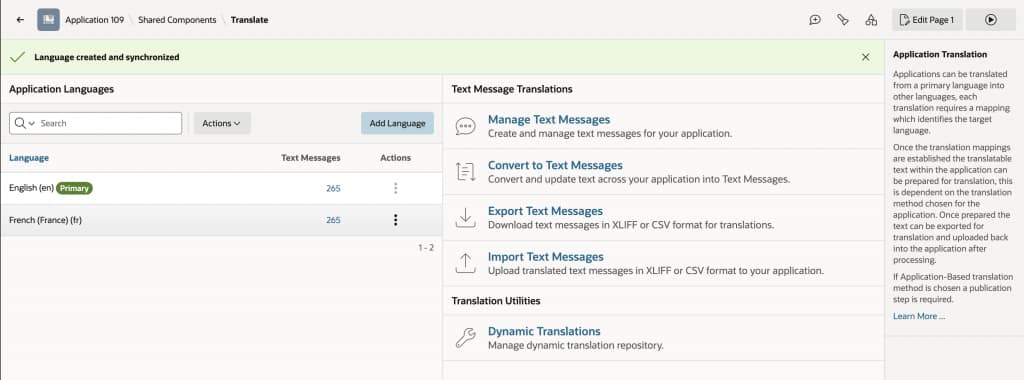
Next, add the target languages you want to support.To do this:
- Select an application
- Click Shared Components
- Under Globalization, click Application Translations
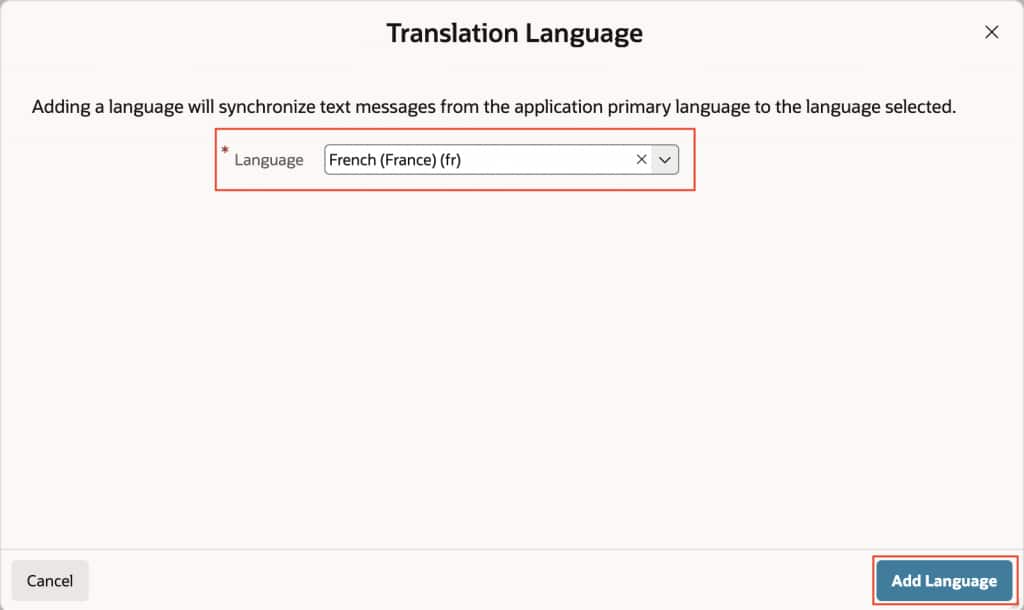
On the Translate page, click Add Language in the Application Languages section, choose the desired language, and then click Add Language.
This synchronizes text messages from the application’s primary language into the selected translation language.
Export text messages in CSV or XLIFF for translation
Once languages are defined, you can export text messages for translation.
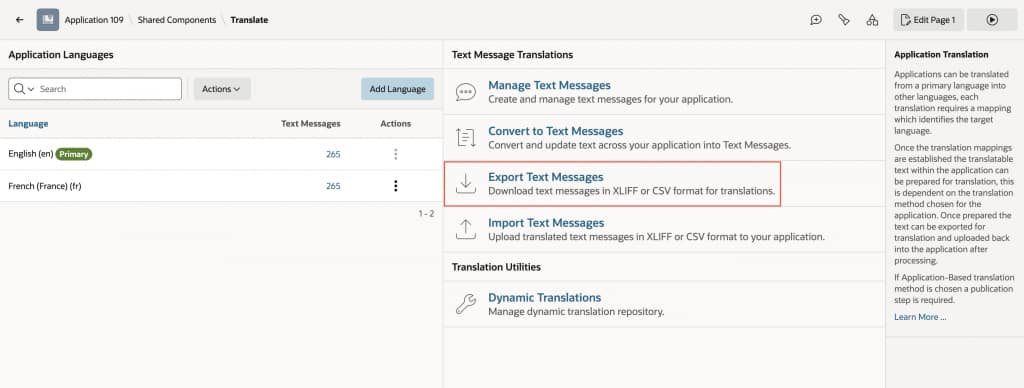
From the Application Translations page:
- Click Export Text Messages
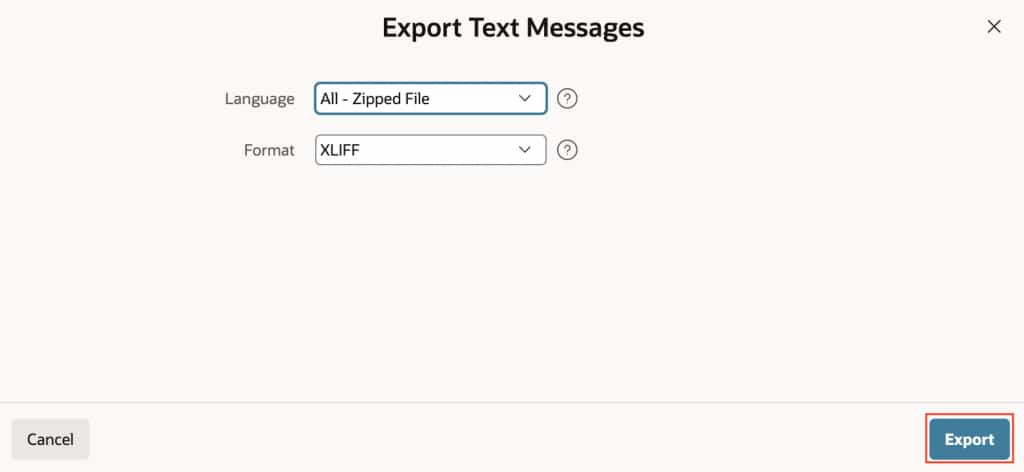
- Choose a language, or select All to export all languages as a ZIP file
- Choose the export format: XLIFF or CSV
- Click Export
You can export text messages for a single language or for all configured languages. This supports both manual translation workflows and integration with external localization services.
Import the translated text messages back into the application
After the translation file has been updated, upload it back into the application to apply the translated values.
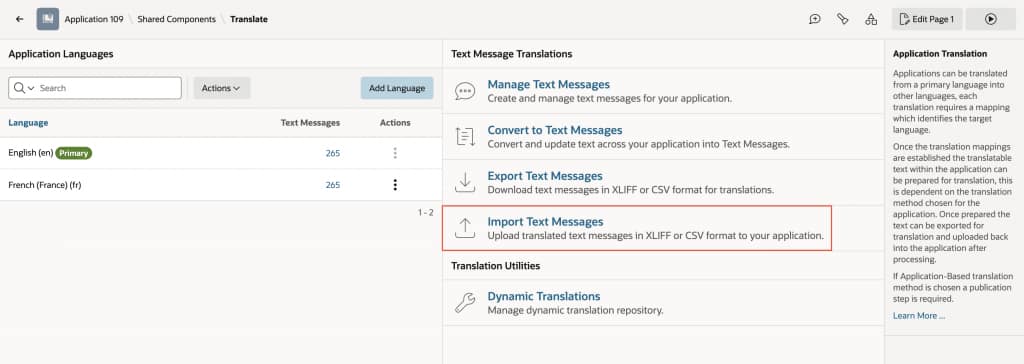
From the Application Translations page:
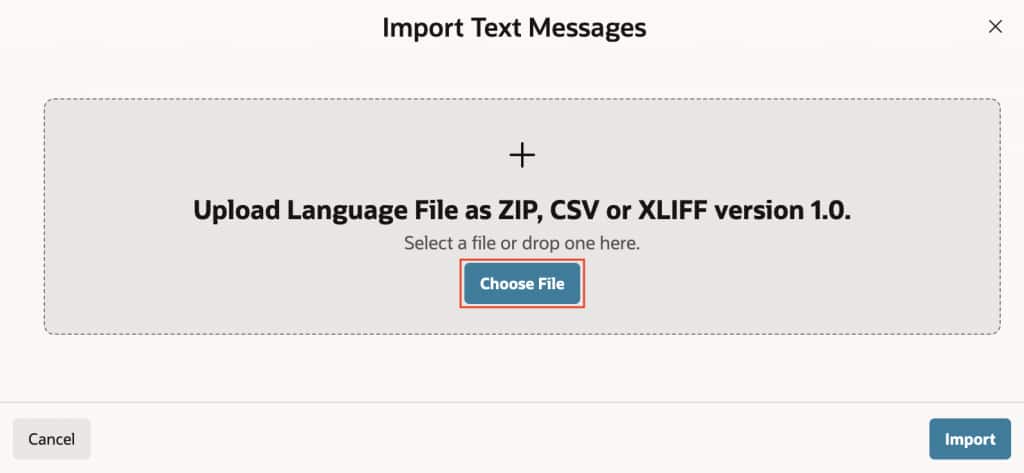
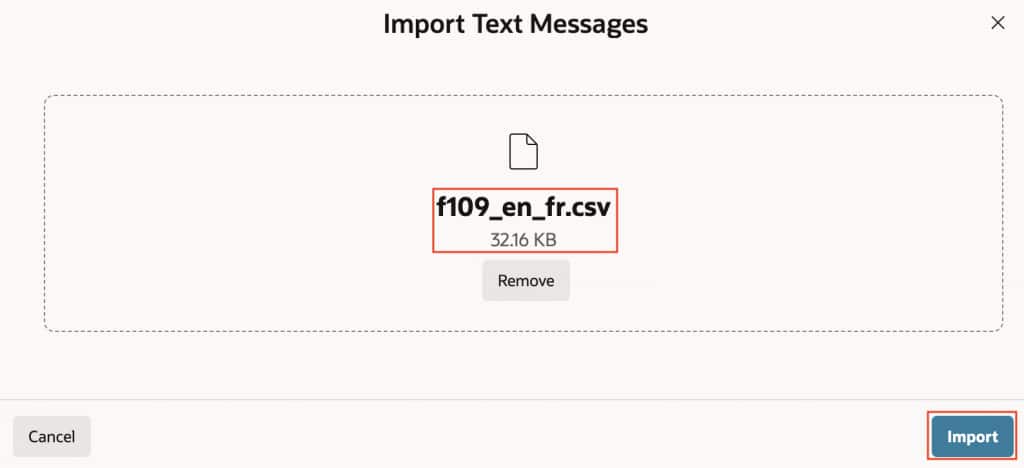
- Click Import Text Messages
- On the Import page, locate the translated XLIFF, CSV, or ZIP file
- Click Import
After import, the application’s text messages are updated with the translated values for the selected languages.
Translating Text as Your App Evolves
As your application grows, adding new translatable text remains straightforward. You can either create a Text Message first and reference it where needed, or simply enter text inline as you build new pages and components. Later, you can run Sync Text Messages to pick up new text and prepare it for translation.
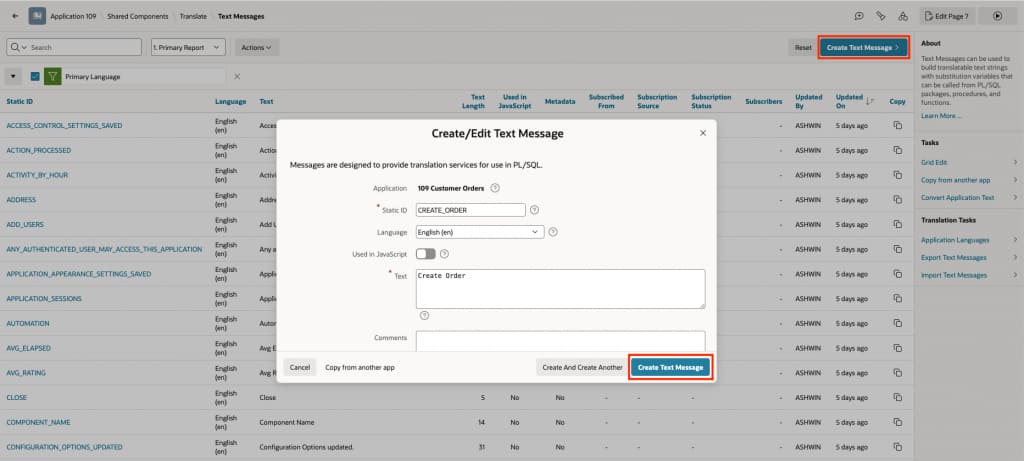
Adding a New Text Message
For example, imagine you need to add an Create Order button to the Customer Orders page.
One approach is to first create a new Text Message named CREATE_ORDER with the primary language value Create Order. You can then use that text message as the label for the new button.
Using the Text Messages Picker
APEX makes this even easier with the Text Messages Picker, shown as a globe icon next to properties that support translatable text. If you do not see the globe icon, you can enable it from the toolbar using Show > Text Messages Picker.
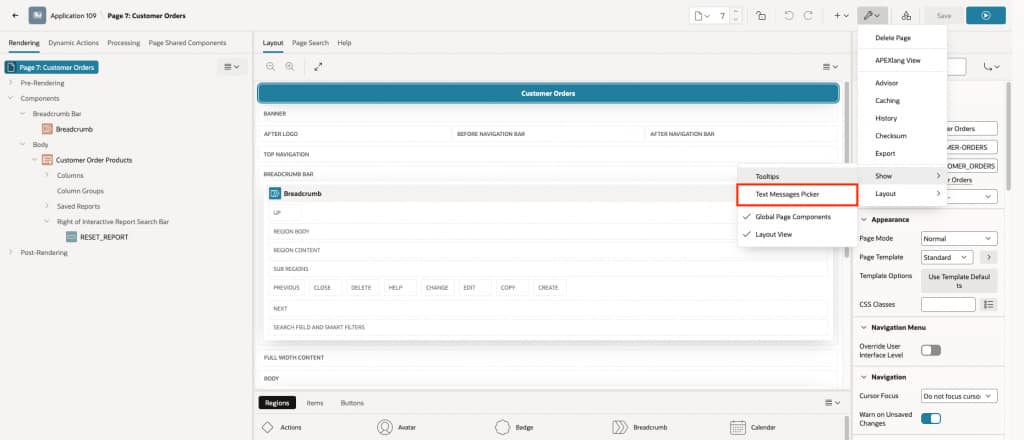
Once enabled, click the globe icon next to the button label property, search for CREATE_ORDER, and select it. APEX automatically inserts the appropriate substitution syntax, and the resolved text is displayed just below the property value so you can immediately confirm the label as Create Order.
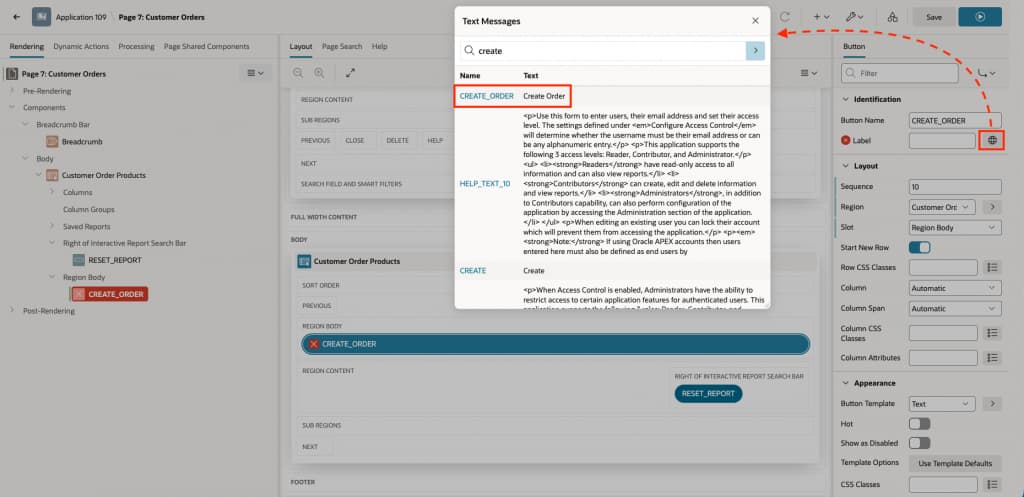
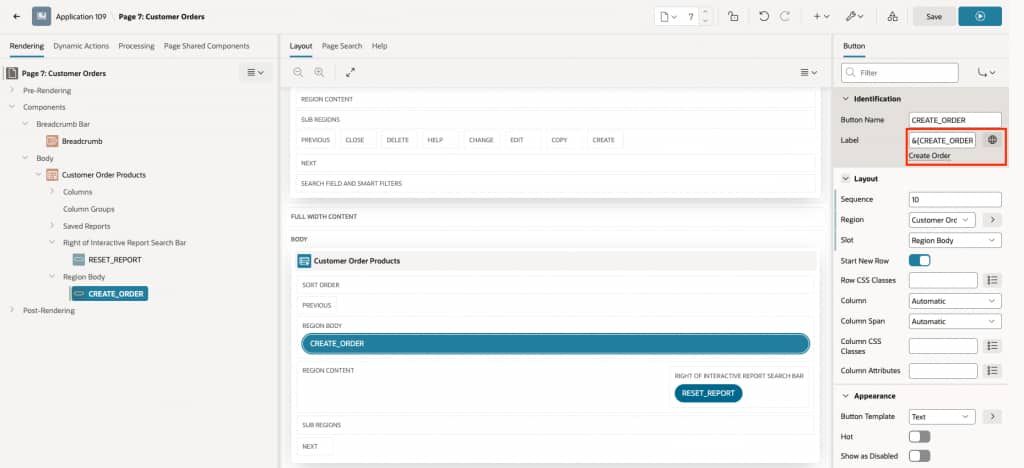
This makes it easy to reuse translatable text consistently across the application while keeping translations centralized and easier to maintain.For more details, refer to the official documentation.
Synchronizing Text Messages
When you are ready to translate the newly added text, open the actions menu (three vertical dots) for the French language, as shown below, and select Sync Text Messages. Then click Synchronize in the dialog that appears. This adds the missing french entry for CREATE_ORDER.
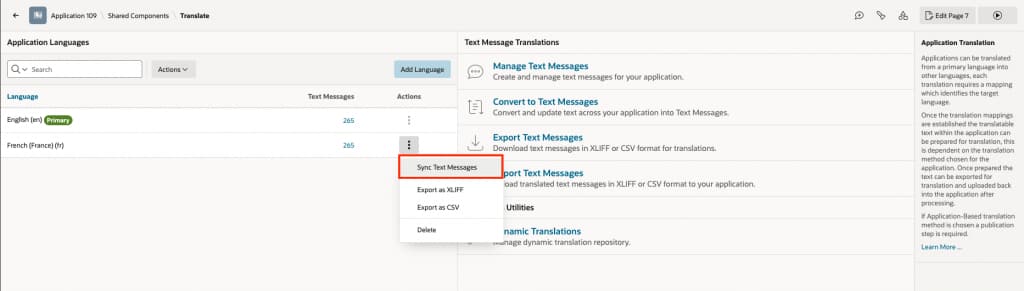
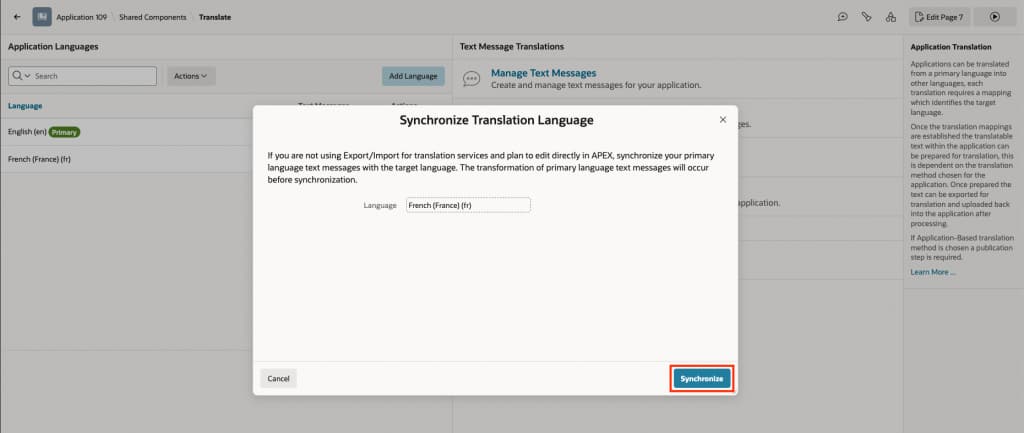
Traditional vs. Text Message-based translation
The new approach offers a simpler workflow for many translation scenarios.
| Application-Based Translation | Text Message-Based Translation |
|---|---|
| Separate translated applications per language | One application supports multiple languages |
| Requires seeding and managing shadow applications | Translations are managed through text messages |
| More maintenance effort, even when only logic changes | Less maintenance effort, logic changes usually require no extra work because there is only one application. |
| Less direct for file-based exchange | Built for CSV/XLIFF export and import |
| Can require more manual operational steps | Easier to automate with APIs |
Integration with APEX_LANG PL/SQL API
Text Messages can also be programmatically exported and imported using the APEX_LANG PL/SQL API in supported formats such as CSV, XLIFF, and ZIP. This is especially useful for teams that want to integrate APEX translation workflows with external localization systems or automate translation deployment as part of a broader delivery process.
The following example demonstrates how to generate a ZIP file containing translation files for each translation mapping in the specified output format:
declare
    l_zip blob;
begin
    apex_util.set_workspace( 'MY_WORKSPACE' );
    l_zip := apex_lang.export_text_messages(
        p_application_id             => 100,
        p_format                     => apex_lang.c_export_format_csv );
end;
The following example imports translated text messages from a table and applies them to an existing application:
begin
    apex_util.set_workspace( 'MY_WORKSPACE' );
    for c1 in ( select application_id,
                       translation_file,
                       translation_format
                from   my_translation_table
                where  translation_app_id = 100 )
     loop
         apex_lang.import_text_messages(
             p_application_id         => c1.application_id,
             p_file                   => c1.translation_file,
             p_format                 => c1.translation_format);
     end loop;
     commit;
end;
For more details, refer to the official documentation.
Note: If running from SQLcl, you need to set the environment for the Oracle APEX workspace associated with the schema. The call to apex_util.set_workspace is not necessary if you’re running within the context of the App Builder or an APEX application.
Conclusion
Text Message-based translation represents a simpler and more modern approach to multilingual application development in Oracle APEX.
With Oracle APEX 26.1, that approach becomes more complete. By supporting conversion of translatable application text into text messages, along with export and import in CSV and XLIFF formats, APEX now provides a much more practical end-to-end workflow for managing translated application text.
For teams building multilingual applications, the benefits are clear: fewer moving parts, easier maintenance, better integration with translation workflows, and stronger support for automation.
FAQs
Do I need shadow applications to use this feature?
No. Text Message-based translation works within a single application, eliminating the need for shadow applications.
Can I still use the existing Application Translation method?
Yes. Oracle APEX continues to support the existing Application-Based translation method. Teams can choose the approach that best fits their requirements.
What export formats are supported?
Oracle APEX 26.1 supports exporting text messages in XLIFF and CSV. You can also export all defined languages together as a ZIP file.
What import formats are supported?
Translated text messages can be imported using XLIFF, CSV, or ZIP files containing multiple languages.
What should I do after changing labels or adding new components?
Run Convert Application Text again so that any new or updated translatable text is captured and kept in sync as text messages.
What happens if a translation is missing for a language?
Oracle APEX falls back to the primary language text message value.