

Consider an Oracle APEX application that reads documents from OCI Object Storage or calls an OCI AI service. Along with the REST endpoint, the application needs an identity that has permission to use that service. If you configure an Oracle Cloud Infrastructure(OCI) user’s API key in an APEX Web Credential, you also need to manage that key as part of the application’s operation.
Oracle APEX 26.2 adds support for DBMS_CLOUD credentials with OCI Native Authentication, including Autonomous AI Database Resource Principal and Database Tools Identity. You can now reference a managed database credential from an Oracle APEX Web Credential and use it in REST Data Sources and APEX_WEB_SERVICE calls.
In this blog, we will walk through the setup using a Database Tools Identity, test it with an OCI REST request, and then look at the Resource Principal option on Autonomous AI Database.
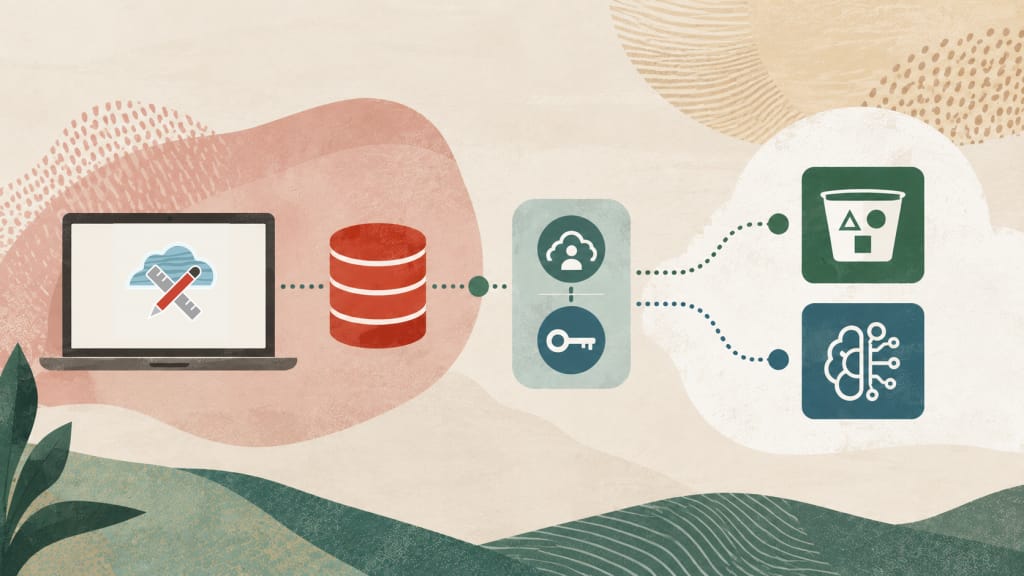
Understanding the credential model
Before we begin, it helps to distinguish the three parts of the configuration:
| Component | Role |
| OCI identity and IAM policies | Establish who is making the request and which OCI resources that identity can access. |
| Database credential | Makes the managed authentication information available to the database. |
| Oracle APEX Web Credential | References the database credential and provides the name and Static ID used by APEX components and APIs. |
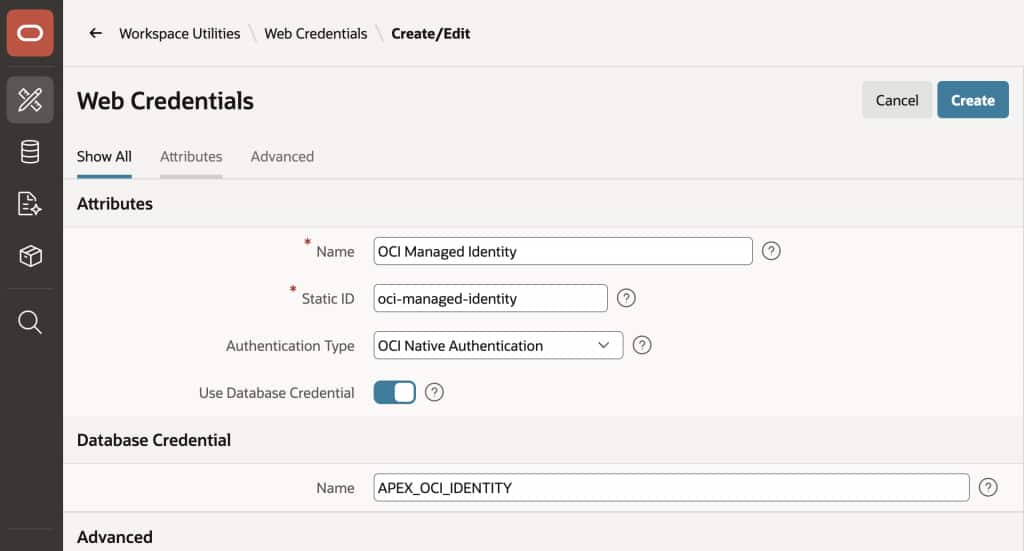
For example, your application might use a Web Credential with the Static ID oci-managed-identity. That Web Credential points to a database credential named APEX_OCI_IDENTITY. The identity associated with that credential must have an OCI IAM policy allowing the operation you want to perform.
Creating the credential does not grant access to OCI resources. The IAM policy still determines what the application can do.

Resource Principal
On Autonomous AI Database, a Resource Principal allows the database to authenticate to OCI services using its resource identity. OCI manages the underlying credentials and their rotation. An IAM dynamic group and policies define the permitted access.
After enabling it, the database exposes the credential as OCI$RESOURCE_PRINCIPAL. See Using Resource Principal with Autonomous AI Database.
DBTools Identity
A Database Tools Identity is associated with an OCI Database Tools connection. When you create the identity, Database Tools creates a managed credential in the database schema configured for that connection. OCI manages the underlying credentials and their rotation. (Database Tools identity creates its own Resource Principal that has the same management and rotation properties as any OCI Resource Principal.)
You choose its name through the Credential Key field. In our example, this will be APEX_OCI_IDENTITY. Database Tools maintains the credential, and APEX references it through a Web Credential. See Workflow to Use Identity.
With either option, you do not need to enter an OCI user’s API private key in the APEX Web Credential.
What changes in APEX 26.2?
Oracle APEX already supports Web Credentials backed by database credentials for selected authentication types. APEX 26.2 extends this configuration to OCI Native Authentication.
When creating an OCI Web Credential, you can now select Use Database Credential and enter the database credential name.
At runtime, APEX resolves the Web Credential and uses the referenced database credential for the request. When a Web Credential uses a database credential, the HTTP request runs in the context of the application’s parsing schema, not the APEX engine schema. Therefore, the parsing schema must have the required network ACL and HTTPS access to the target OCI endpoint. Note that Valid for URLs is not enforced for Web Credentials backed by database credentials.
The change also enables Resource Principal and DBTools Identity authentication for OCI AI service calls using the corresponding OCI Web Credential configuration.
Example: Calling an OCI REST API with DBTools Identity
To test the setup, we will call the OCI API to list compartments. Use the following names, or substitute names appropriate to your environment:
| Item | Example value |
| Application parsing schema | APP_SCHEMA |
| Database credential / Credential Key | APEX_OCI_IDENTITY |
| APEX Web Credential name | OCI Managed Identity |
| APEX Web Credential Static ID | oci-managed-identity |
Prerequisites
Use an APEX 26.2 environment with the required database credential support. You will also need access to OCI Database Tools and permission to configure a connection, Vault secret, identity, and IAM policies.
Check connectivity in both directions needed by this example: Database Tools must be able to connect to the APEX database, and the database must be able to make HTTPS requests to the OCI API endpoint.
The database user configured in the connection needs CREATE CREDENTIAL and access to DBMS_CLOUD. If DBMS_CLOUD is not already configured on your database, complete the applicable installation, HTTPS, and wallet setup first. See Creating an Identity for these prerequisites.
Step 1: Configure IAM prerequisites
Before creating and using a Database Tools connection with Resource Principal, configure the Dynamic Groups and Policies required for the connection and the Database Tools Identity:
– The Database Tools connection resource principal retrieves the database password and, where applicable, wallet or keystore secrets from OCI Vault so Database Tools can connect to the database.
– The Database Tools Identity resource principal authenticates to and accesses the target OCI service. Database Tools creates and secures the resource-principal credentials, which are exposed to the database through the database credential used by DBMS_CLOUD and Oracle APEX.
An IAM administrator has to create the dynamic groups and policies, or obtain the permissions needed to create them. Use the compartment OCID in each dynamic-group matching rule.
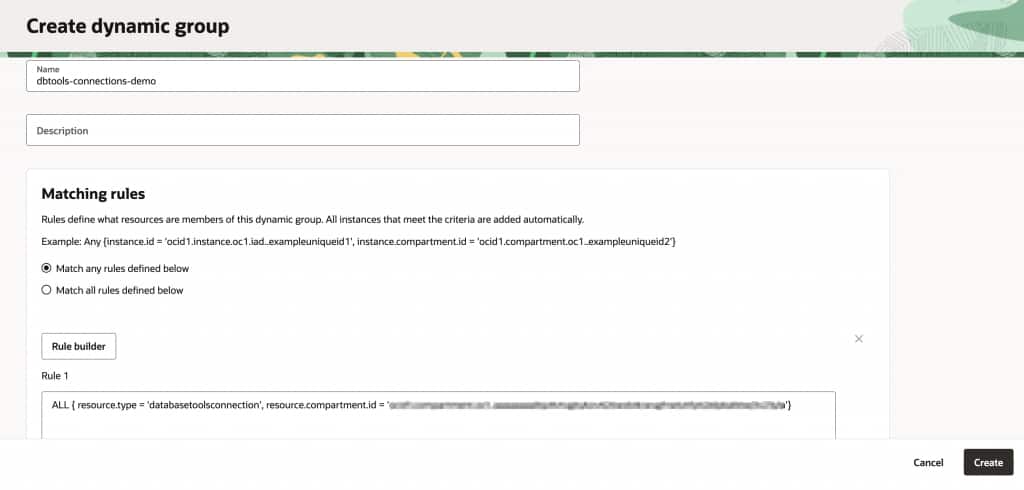
Step 2: Create the Database Tools connection dynamic group
Create a dynamic group for Database Tools connections in the compartment where the connections will be created.
For example:
ALL {
  resource.type = 'databasetoolsconnection',
  resource.compartment.id = '<connection_compartment_ocid>'
}
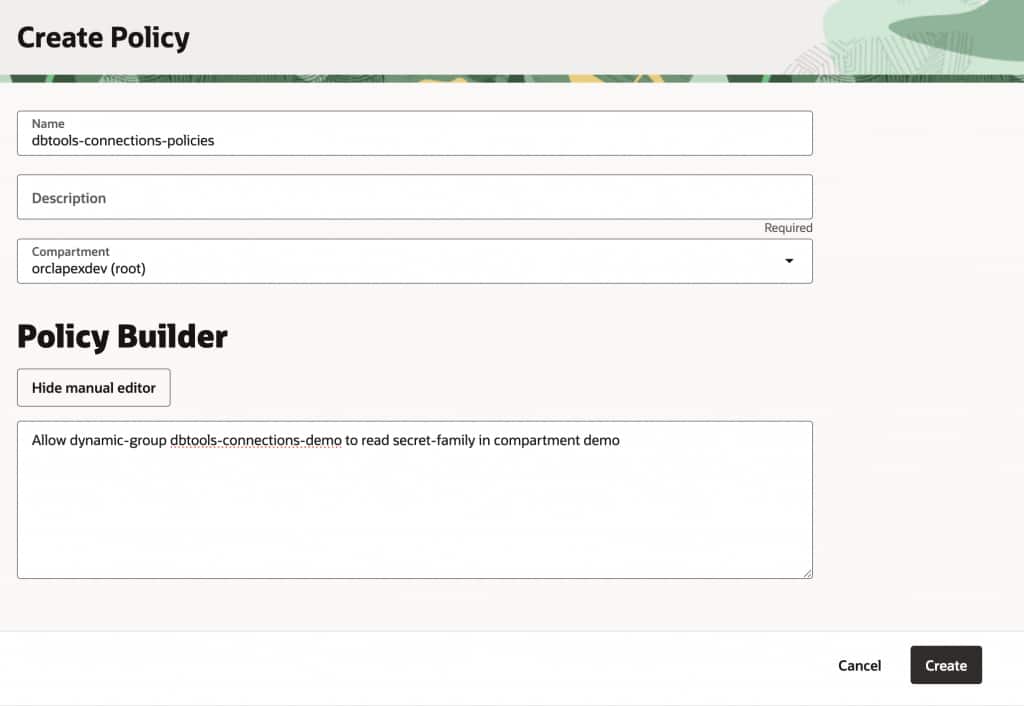
Then grant the dynamic group permission to read the Vault secrets used by those connections. Scope the policy to the compartment that contains the secrets:
Allow dynamic-group apex-dbtools-connections to read secret-family in compartment <vault_secret_compartment_name>This policy is compartment-wide for the matching Database Tools connections; it is not limited to one secret OCID. Confirm that the group has access to every password or wallet secret required by the connections.
Step 3: Create the Database Tools Identity dynamic group and grant access
Create a dynamic group for the Database Tools Identities that will call OCI services. To include all identities in a compartment, use:
ALL {
  resource.type = 'databasetoolsidentity',
  resource.compartment.id = '<identity_compartment_ocid>'
}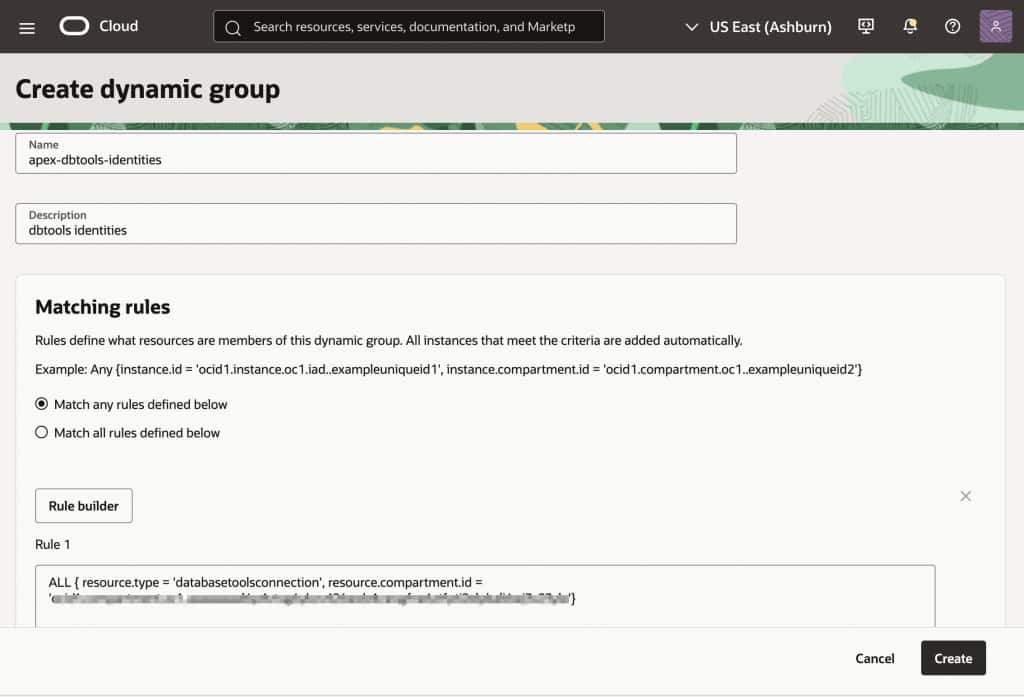
If the identities are in the same compartment as the connections, use the same compartment OCID. To include only one identity, add a resource.id condition with that identity’s OCID instead.
Grant the dynamic group the permissions required by the target service.
For the compartment-list example, use:
Allow dynamic-group apex-dbtools-identities to inspect compartments in tenancy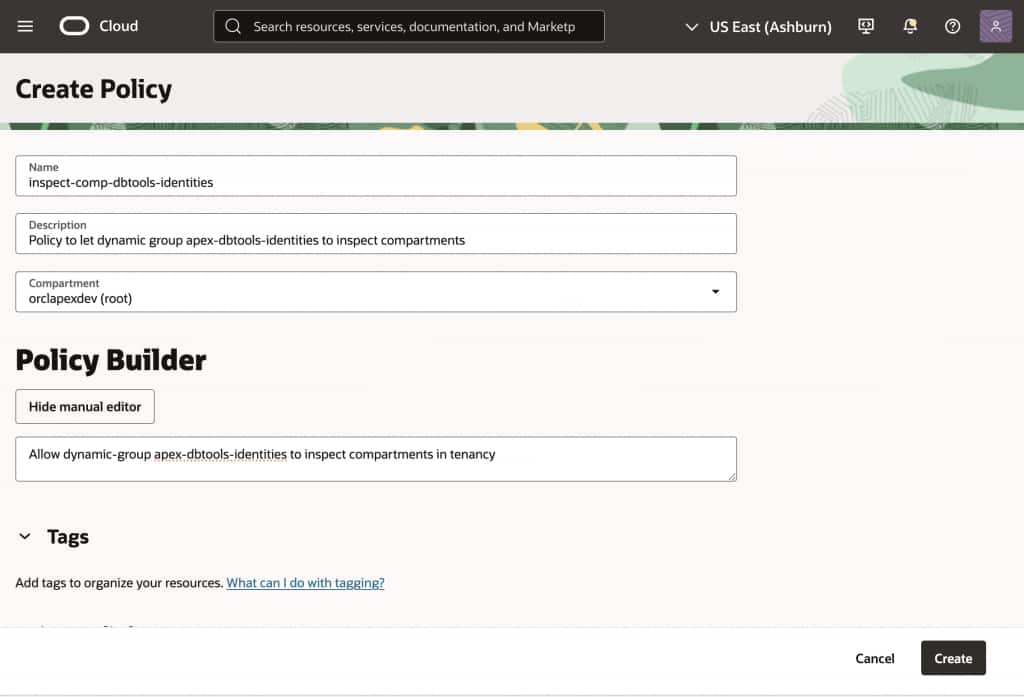
For an Object Storage example, add a policy such as:
Allow dynamic-group apex-dbtools-identities to read object-family in compartment <bucket_compartment_name>Replace the example policy with the least-privilege policy required by the OCI service that the application calls.
Step 4: Create the Database Tools connection
Start by creating a connection from OCI Database Tools to the database where APEX is installed. Database Tools uses this connection to create and maintain the identity’s database credential, so the database must be reachable from the selected OCI network configuration.
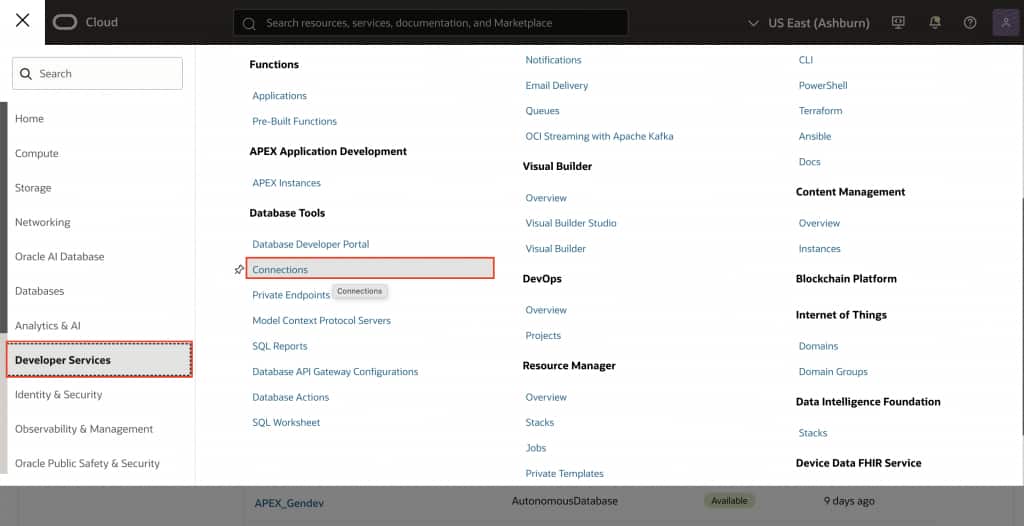
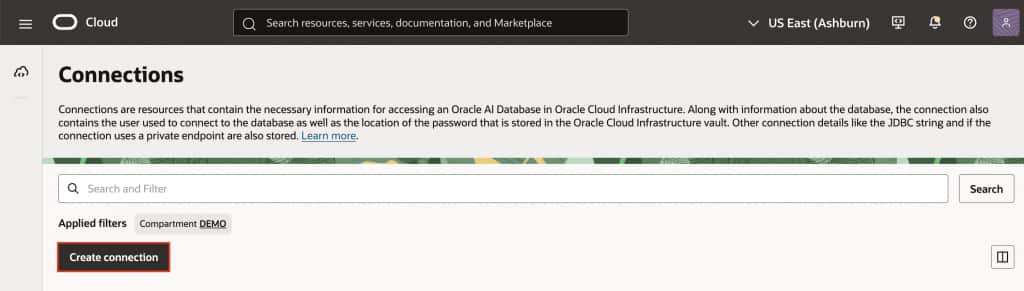
In the OCI Console, navigate to Developer Services → Database Tools → Connections, then click Create Connection.
Enter the database details
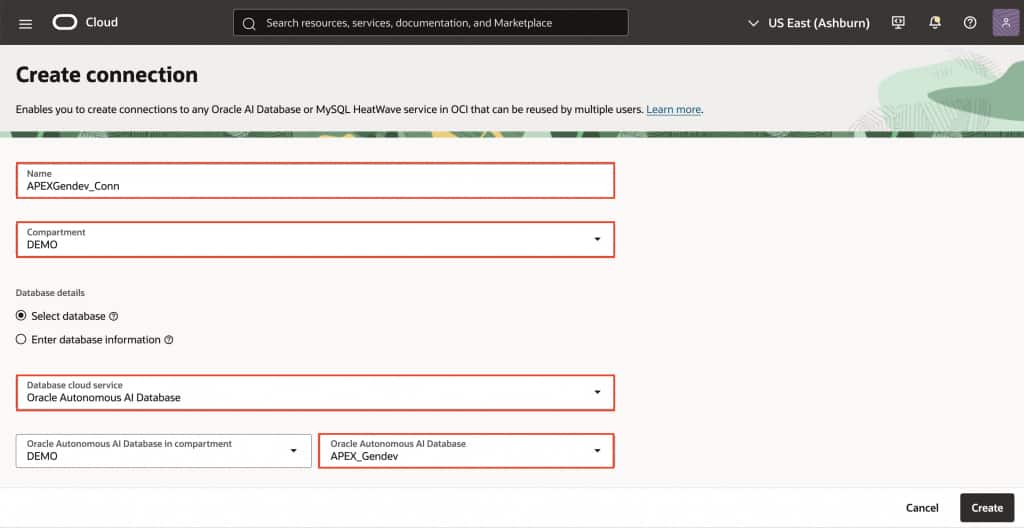
Provide a Name and choose the Compartment for the connection. This walkthrough uses Select database under Database Details to pick up the connection details automatically. You can also use Enter database information which is useful when the target database is outside the OCI tenancy. Choose Oracle Autonomous AI Database as the Database Cloud Service. And then under Oracle Autonomous AI Database, select the Database that you wish to create connection for. For example, in this case, we are using APEX_Gendev.
Provide a Name and choose the Compartment for the connection. Under Database Details, choose Select database to populate the connection details automatically. Set Database Cloud Service to Oracle Autonomous AI Database, then select your database. For this walkthrough, we’ll use APEX_Gendev.
If your database is outside the OCI tenancy, choose Enter database information and provide the connection details manually.
Enter APP_SCHEMA as the database Username and select Create password secret.
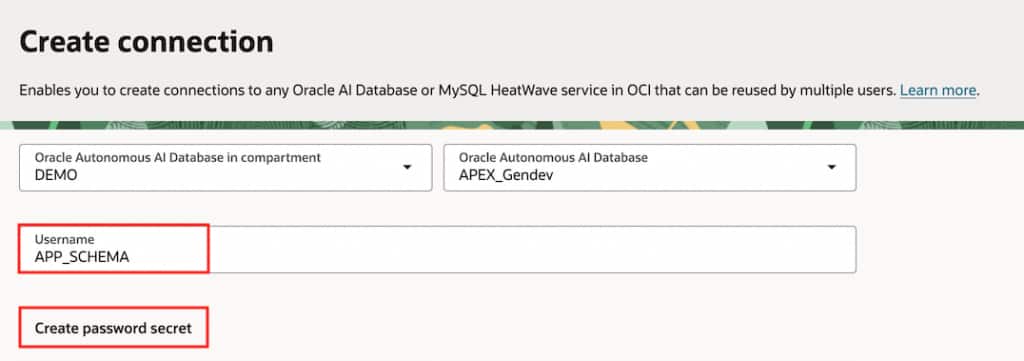
 Select username and click create password secret
The entered Username here will own the credential created in the next step, so confirm that it has the CREATE CREDENTIAL privilege before continuing.
If you have selected Enter database information, then enter the connection string of your Database.
Note: If the database hostname cannot be resolved through the selected network path, use its reachable IP address. You can use nslookup <database-hostname> to identify the address; also confirm that routing and firewall rules allow the connection.
Create the password secret
The connection stores a reference to a Vault secret containing the database user’s password. Click Create password secret to open the secret creation dialog.
Enter a Name for the secret and, optionally, a Description. Check the Vault compartment, Vault, Encryption Key compartment, and Encryption Key selections. Keep the preselected values if they are appropriate for your environment; otherwise select the vault and key intended for this connection.
Enter the password for APP_SCHEMA, confirm it, and click Create. You will return to the connection form with the password secret available for the connection.
This secret lets Database Tools log in to APP_SCHEMA. The managed credential used to call OCI services will be created with the identity in Step 5.
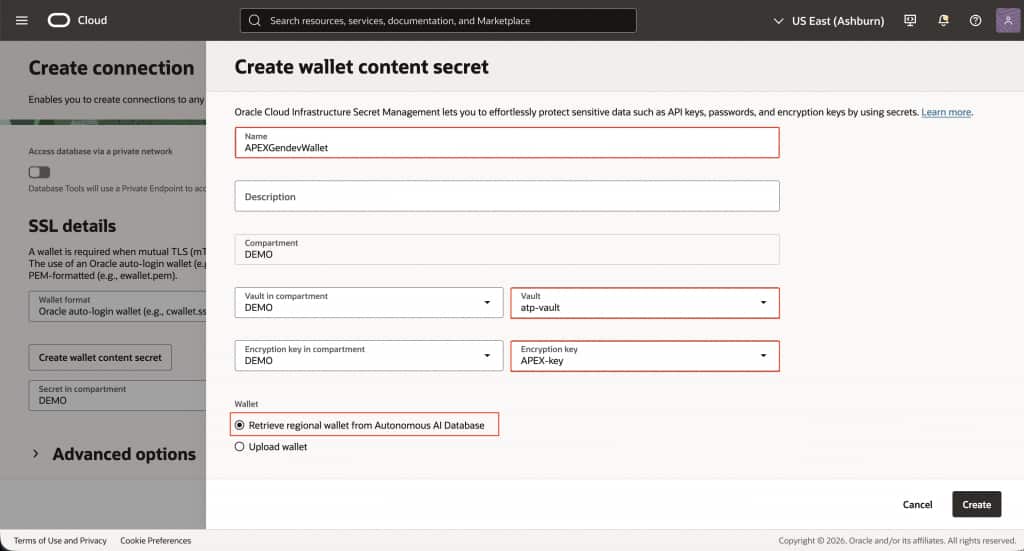
Creating the Vault secret for the database user’s password.
Create password secret dialog showing the vault and encryption key selections, with password values concealed.
Select the private endpoint
Note: If you are using a private connection, choose Select private endpoint. Select the Private Endpoint compartment, then provide the Private endpoint that provides connectivity to the target database.
Choose an endpoint that can actually reach the database address in your TNS connection string. An existing endpoint in the tenancy may serve a different network and may not provide that access.
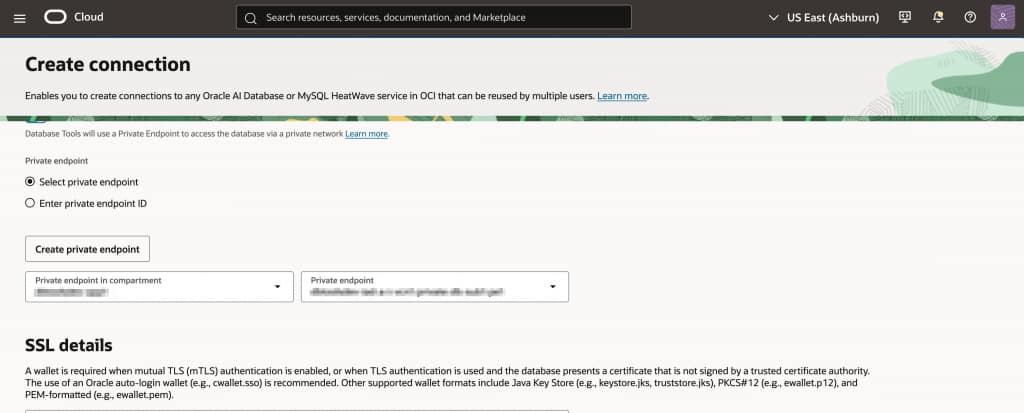
Configure SSL details
A wallet is required when mutual TLS (mTLS) authentication is enabled, or when TLS authentication is used and the database presents a certificate that is not signed by a trusted certificate authority.
If you are not using a Private endpoint, then under SSL details, select Oracle auto-login wallet (cwallet.sso) as the Wallet format.
If you don’t have a SSO wallet content secret, then click Create wallet content secret and create one.
Under SSO wallet content secret, select that APEXGendevWallet on the create connection page.
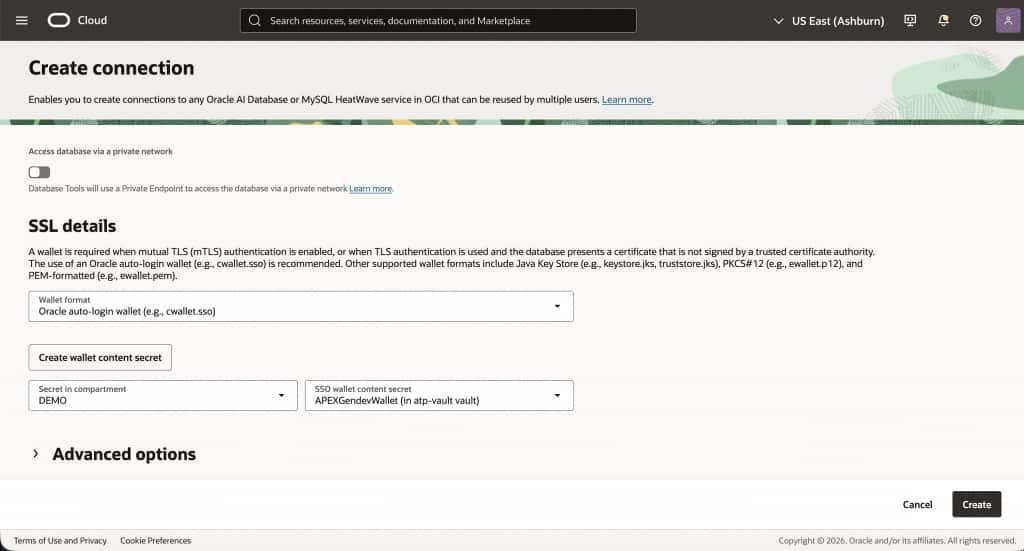
 Configuring the wallet for the database connection.
Ensure that the connection’s IAM policy allows it to read both the database password secret and the wallet content secret.
Enable runtime support
Expand Advanced Options, open Settings, and turn on Enable Runtime Support. Choose Resource Principal as the Runtime Identity.
This setting is required to create a DBTools Identity for the connection. It configures the Database Tools connection’s runtime identity; the Autonomous AI Database Resource Principal setup is covered separately later in this blog.
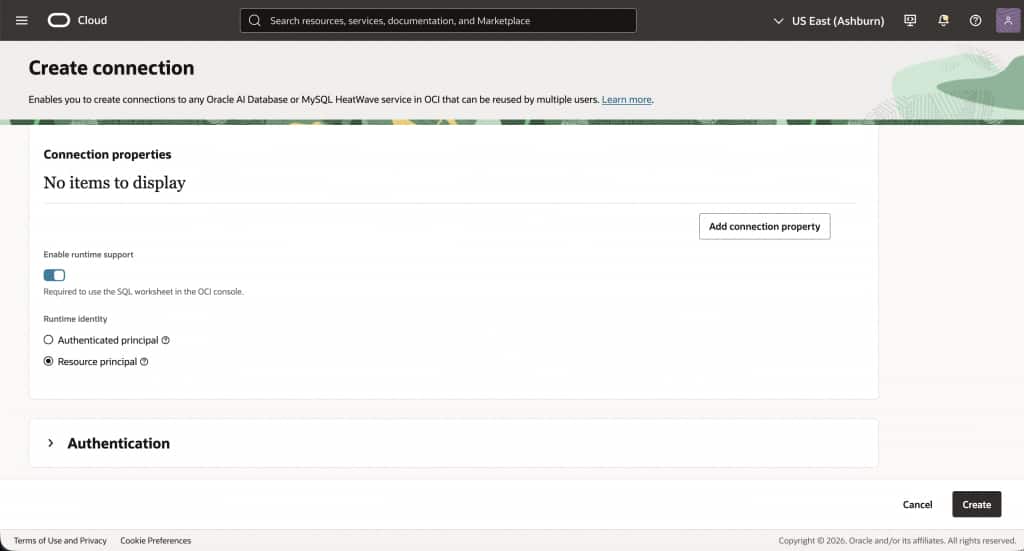
Steps: Advanced Options → Settings, showing Enable Runtime Support and Resource Principal.
Click Create. Once the connection appears on the Connections page, open it and validate connectivity. Resolve any connection errors before creating the identity.
Step 5: Create and verify the identity
Open the connection, select the Identities tab, and click Create Identity.
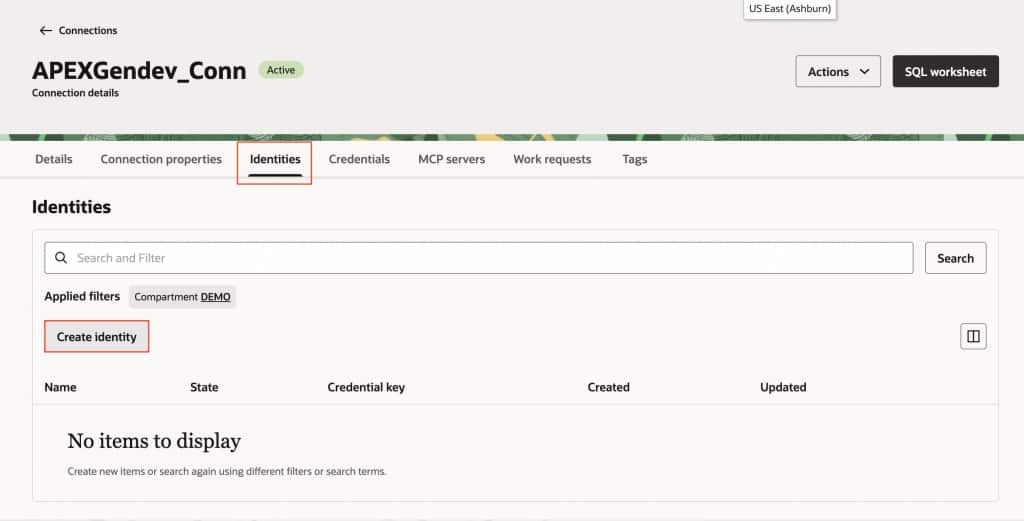
 Create Identity
Enter a descriptive Name and set Credential Key to APEX_OCI_IDENTITY. This key becomes the name of the database credential, so keep it handy for the APEX configuration.
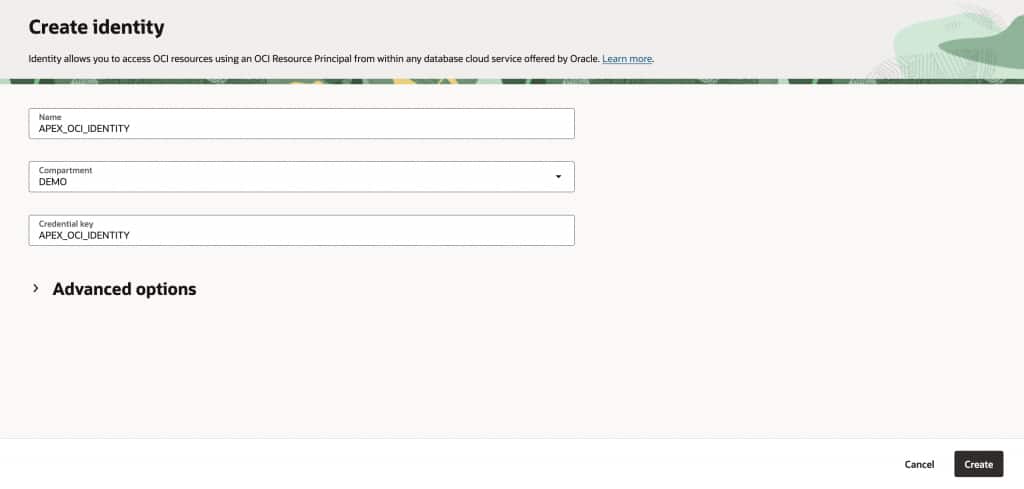
 DBTools Identity and its associated database credential.
Click Create. The identity will initially show Creating and should move to Active when it is ready.
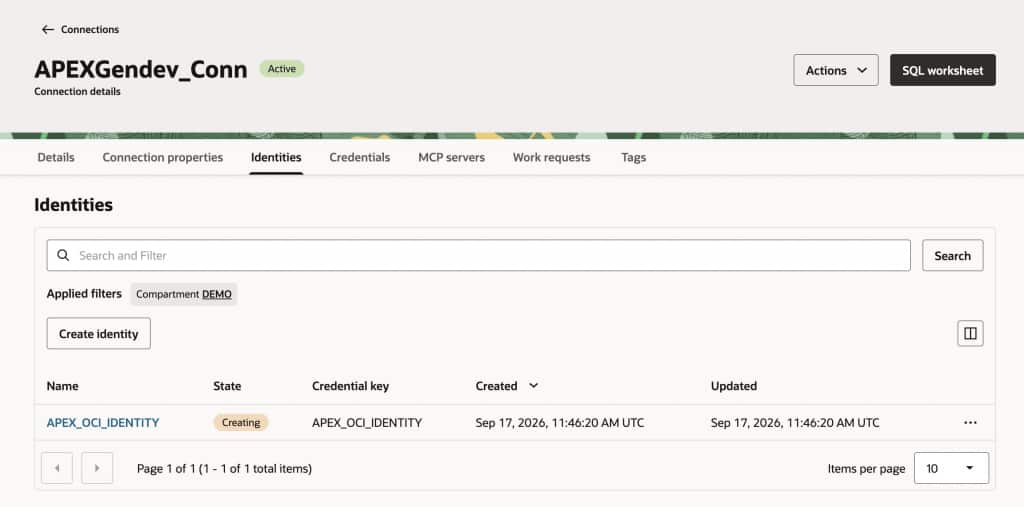
 Identity being created
From your SQL Client, connect as APP_SCHEMA and verify that the credential exists:
select credential_name, username, comments from user_credentials where credential_name = 'APEX_OCI_IDENTITY';
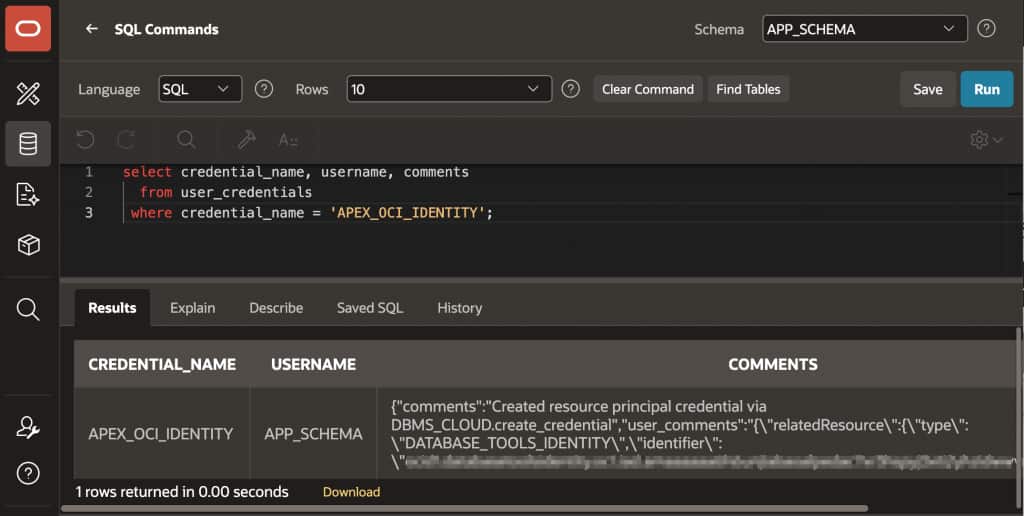
If the identity remains in Creating, check database connectivity, the password secret, and the user’s credential creation privileges.
Step 6: Refresh and validate the Database Tools Identity
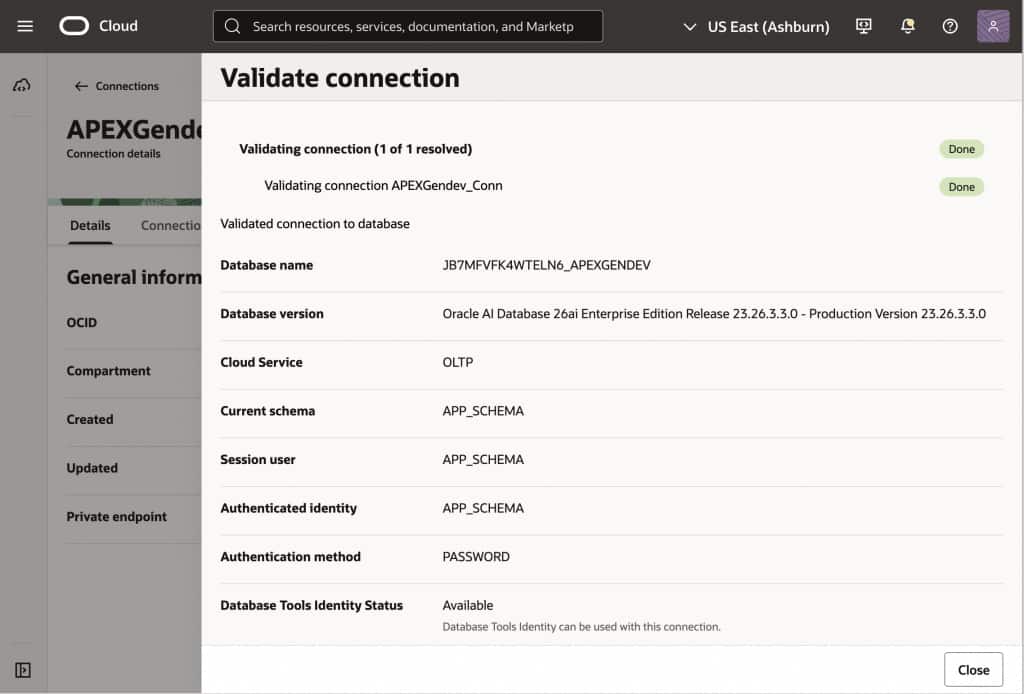
The dynamic groups, IAM policies and DB Tools connection are now in place. Return to the Database Tools connection, open the Identities tab, select the identity, and use Actions → Refresh. After the identity is refreshed, use Validate to confirm that the database credential and Resource Principal path are working.
If validation fails, check the connection’s access to the Vault secret, the identity dynamic group rule, the target-service policy, database connectivity, and the database’s outbound HTTPS configuration. IAM policy changes can take time to propagate; refresh and validate again after the policy becomes effective.
Step 7: Create the APEX Web Credential
APEX provides two ways to use the Database Tools Identity:
- As an Instance credential, available across workspaces on the APEX instance.
- As a Schema credential, available only to workspaces whose parsing schema can access the database credential.
Using an instance credential
To use an instance credential, first enable instance database credentials:
begin
apex_instance_admin.set_parameter('INSTANCE_DBMS_CREDENTIAL_ENABLED', 'Y');
end;
/
The database credential must also be available to the APEX engine schema as a local object. Grant EXECUTE on the credential and create a synonym for the APEX engine schema:
grant execute on APP_SCHEMA.APEX_OCI_IDENTITY to APEX_260200;create synonym APEX_260200.APEX_OCI_IDENTITY
for APP_SCHEMA.APEX_OCI_IDENTITY;Use the APEX engine schema appropriate to your environment.
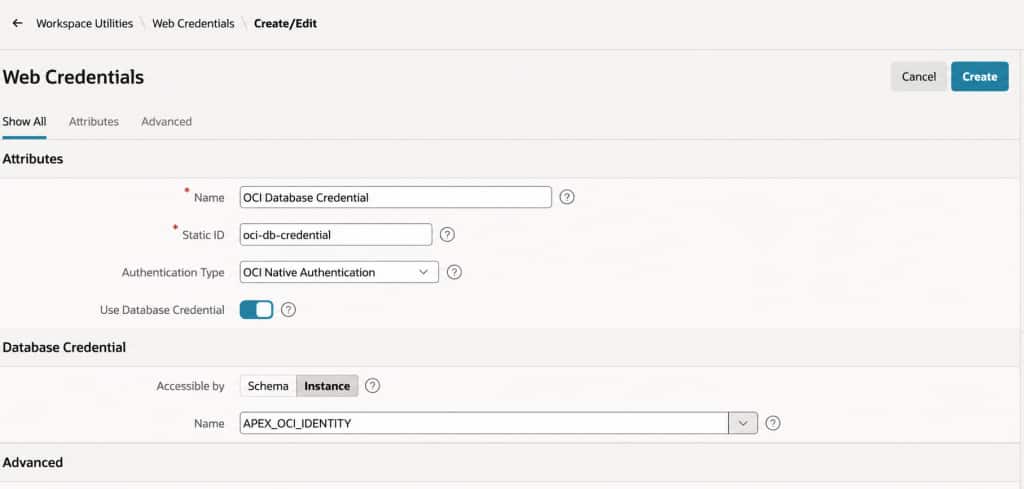
With these preparations in place, navigate to Workspace Utilities → Web Credentials and create a new Web Credential. Provide a name, select OCI Native Authentication as the Authentication Type, and enable the Use Database Credential switch. Then select Instance as the credential scope.
The database credential name should populate automatically. If it does not, enter APEX_OCI_IDENTITY.
| Property | Value |
| Name | OCI Database Credential |
| Static ID | oci-db-credential |
| Authentication Type | OCI Native Authentication |
| Use Database Credential | Enabled |
| Database Credential scope | Instance |
| Database Credential Name | APEX_OCI_IDENTITY |
Click Create. Because this is an instance credential, the same operation can be repeated in other workspaces on the APEX instance.
Note: The steps above apply only to Oracle Database 23ai and 26ai. If you are using Oracle Database 19c, create the required instance credential directly in the APEX schema. Creating a synonym for the credential will not work.
Using APEX Schema Credential
The APEX schema credential option allows a workspace to use only database credentials that its parsing schema can access. The database credential must either be owned by the workspace schema, or the workspace schema must have EXECUTE privilege on the credential and a local or public synonym must exist.
As before, provide a name, select OCI Native Authentication as the Authentication Type, and enable the Use Database Credential switch. Then select Schema as the credential scope and enter APEX_OCI_IDENTITY.
The database credential name cannot be prefixed with a schema. For example, enter APEX_OCI_IDENTITY, not APP_SCHEMA.APEX_OCI_IDENTITY. APEX resolves the credential as a local database object, so the required EXECUTE privilege and synonym must already be in place.
Click Create. A schema credential can be used only in workspaces whose assigned parsing schema can access the database credential.
Step 8: Test the REST request
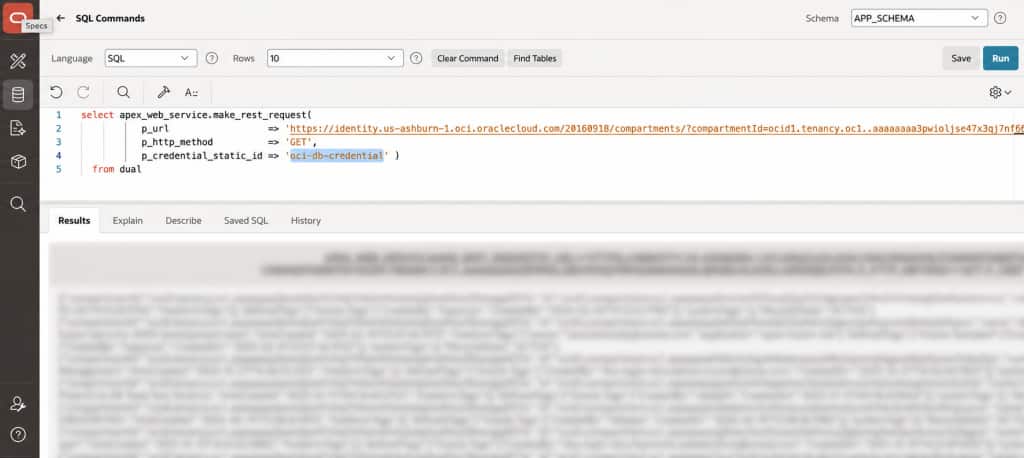
From now on, you can use the Web Credential in REST Data Sources and APEX_WEB_SERVICE calls. For instance, in SQL Workshop → SQL Commands, with APP_SCHEMA selected, run the REST API to list the compartments in a tenancy:
select apex_web_service.make_rest_request(
        p_url =>
           'https://identity.us-ashburn-1.oci.oraclecloud.com/20160918/'
           || 'compartments/?compartmentId=<tenancy_ocid>',
        p_http_method => 'GET',
        p_credential_static_id => 'oci-db-credential'
      ) as response
from dual;
Replace <tenancy_ocid> with your tenancy OCID and use the OCI Identity endpoint appropriate to your environment.
Here, oci-db-credential is the APEX Web Credential Static ID. You do not pass APEX_OCI_IDENTITY to this API. APEX uses the Web Credential to locate the database credential.
If the setup is correct, the call returns a JSON response containing compartment information. You can use the same Web Credential in a REST Data Source by selecting it for authentication, discovering the response structure, and using the resulting data profile in your application.
Using Resource Principal on Autonomous AI Database
If your application runs on Autonomous AI Database, you can use its Resource Principal. Configure an IAM dynamic group that includes the Autonomous AI Database resource, then grant that group the permissions required by the target service.
As ADMIN, enable Resource Principal for the database and the application’s parsing schema:
begin
    dbms_cloud_admin.enable_resource_principal;
    dbms_cloud_admin.enable_resource_principal(
        username => 'APP_SCHEMA'
    );
end;
/
These calls make OCI$RESOURCE_PRINCIPAL available for use. Follow the Autonomous AI Database Resource Principal setup for prerequisites and verification.
Create an APEX Web Credential using OCI Native Authentication, enable Use Database Credential, choose Schema, and enter OCI$RESOURCE_PRINCIPAL as the database credential name. Ensure that it resolves locally for the parsing schema, consistent with the credential access rules above.
A few checks when troubleshooting
| Symptom | What to check |
| Database Tools Identity stays in Creating | Connection reachability, database password secret, and CREATE CREDENTIAL privilege. |
| APEX cannot resolve the credential | Correct credential name, selected scope, EXECUTE privilege, and synonym where required. |
| OCI rejects the request | Identity state, dynamic group membership, IAM policy, and target resource or tenancy. |
| Request cannot reach the service | Database outbound connectivity, applicable network ACLs, and TLS configuration. |
| Access does not reflect a recent IAM change | Refresh Database Tools Identity; account for Resource Principal token caching on Autonomous AI Database. |
Once the database credential and IAM permissions are in place, the APEX configuration is minimal: create an OCI Web Credential, enable Use Database Credential, and enter the credential name. You can then use that Web Credential in your REST Data Sources and PL/SQL calls, while the underlying identity remains managed by Autonomous AI Database or Database Tools.