Oracle APEX is the world’s most popular enterprise AI application platform for building secure, scalable web applications. Oracle Cloud Infrastructure (OCI) Object Storage offers highly scalable, secure storage for unstructured data. Integrating these two technologies enables developers to build robust document management systems, media libraries, and file-sharing applications.
When dealing with large files – videos, datasets, backups, or anything exceeding 100MB – a well-architected approach becomes essential. Standard upload methods can strain server resources and impact user experience. This blog demonstrates a production-ready solution using client-side chunking combined with OCI’s multipart upload API.
The approach is straightforward: JavaScript splits large files into smaller chunks (typically 10-20MB) on the client side before sending them to APEX. This client-side chunking is crucial because it prevents browser timeouts, allows for progress tracking, and works around APEX’s request size limitations. Each chunk is sent as a separate AJAX request, which stores them temporarily in a staging table. Once all chunks are received, they’re assembled and uploaded to OCI Object Storage using the multipart upload REST API – OCI’s recommended approach for files larger than 100MB. This dual-layer chunking strategy – first breaking files into manageable pieces for APEX transmission, then using OCI’s multipart upload for the final storage – creates a robust, enterprise-grade solution that handles network interruptions gracefully and provides real-time upload feedback to users.
Prerequisites for Building this App
- An Oracle Cloud Infrastructure account.
- The OCI user should have the necessary priviledges to create and manage Object Storage buckets in this compartment. You can configure these privileges via an OCI IAM Policy.
- Oracle APEX workspace and application.
Step 1: Configure OCI API Keys
In Oracle Cloud Infrastructure (OCI), API keys are used to securely access resources via the API. Generate the API Keys for your OCI User Account in OCI Console in the following way:
- Log into OCI Console and click your profile icon (top right).
- Select User Settings > API Keys under Resources.
- Click Add API Key > Generate API Key Pair.
- Download the private key and save it securely.
- Click Add.
OCI displays a configuration file snippet containing your User OCID, Fingerprint, Tenancy OCID, and Region. Keep this information – you will need it for APEX Web Credentials setup.
Learn more about generating API signing keys.
Step 2: Create Web Credentials in Oracle APEX
Web Credentials securely store and encrypt authentication credentials for connecting to external REST services or REST-enabled SQL services.
These credentials are stored at the workspace level, making them accessible to all applications. We will use these credentials to interact with OCI Object Storage REST APIs.
Follow the below steps to configure Web credentials in your Oracle APEX workspace:
- Navigate to Workspace Utilities > Web Credentials
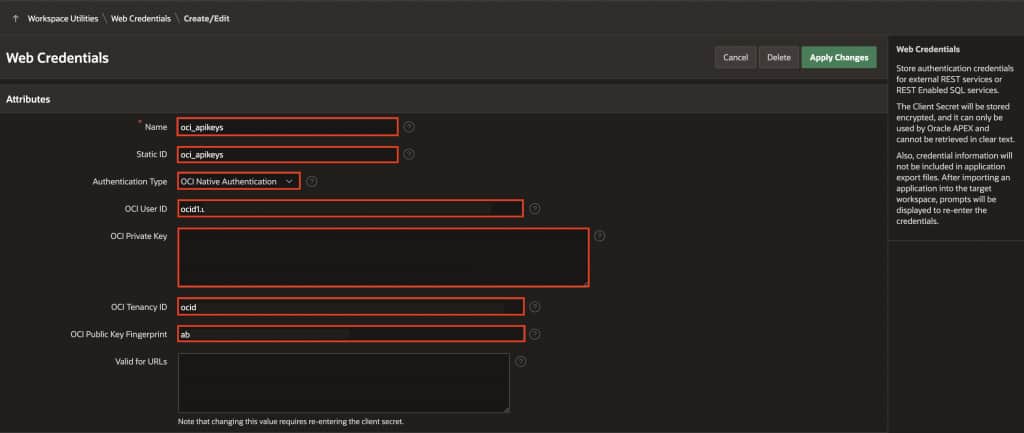
- Click Create and fill in the following fields (all values come from the OCI configuration snippet you saved in Step 1):
- Name: oci_apikeys
- Static Identifier: oci_apikeys (You will be referring to this Static Identifier to refer to this web credential in your applications)
- Authentication Type: OCI Native Authentication
- OCI User ID: Paste your User OCID (format:
ocid1.user.oc1..) - OCI Private Key: Paste the entire contents of your downloaded private key file (including
-----BEGIN PRIVATE KEY-----and-----END PRIVATE KEY-----) - OCI Tenancy ID: Paste your Tenancy OCID (format:
ocid1.tenancy.oc1..) - OCI Public Key Fingerprint: Paste the fingerprint value (format:
xx:xx:xx:xx:xx:xx:xx:xx:xx:xx:xx:xx:xx:xx:xx:xx)
- Click Create.
APEX will now automatically sign API requests to OCI using these credentials.
Important: Use the exact values from your OCI configuration snippet. Do not modify, truncate, or reformat them.
Learn more about creating Web Credentials.
Step 3: Create Application Settings
Application Settings in APEX provide a centralized way to store configuration values at the application level. These settings can be referenced throughout your application code, making it easy to manage environment-specific configurations without modifying code.
Configure application-level settings to store OCI configuration. These settings will be referenced in the package that we’ll create in the next step.
Now create the four settings in APEX:
- Navigate to Shared Components > Application Logic > Application Settings
- Create these five settings:
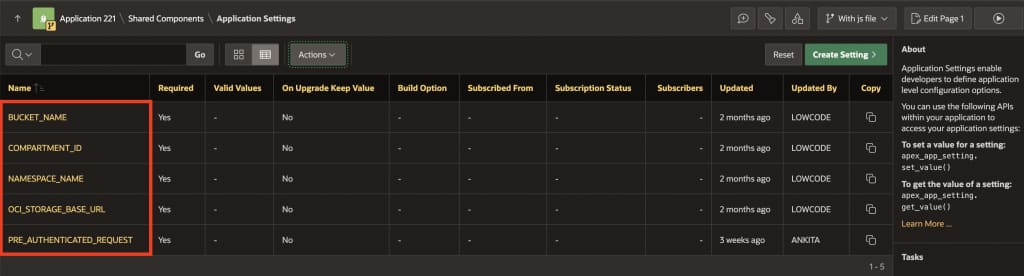
| Name | Value | Purpose | Reference |
| BUCKET_NAME | Your Bucket Name | Identifies which OCI Object Storage bucket to use | Learn about Creating an Object Storage Bucket. |
| NAMESPACE_NAME | Your OCI Object Storage Namespace | Identifies your OCI namespace (found in Object Storage console) | Learn about how to access and use your namespace for running Object Storage tasks. |
| OCI_STORAGE_BASE_URL | https://objectstorage.[your-region].oraclecloud.com | Base URL for OCI Object Storage in your region | Replace [your-region] with your region identifier. |
| PRE_REQUESTED_AUTHENTICATION | PAR URL prefix for accessing files in private bucket | Pre-Authenticated Request token for accessing private bucket files | Creating an Object Storage Pre-Authenticated Request |
Step 4: Upload SQL Script
The implementation requires three database tables and a PL/SQL package.
Database Objects:
| Name | Description | Database Object |
| UPLOAD_CHUNKS | Staging table for temporary chunk storage | Table |
| MY_FILES | Final file metadata storage | Table |
| MULTIPART_ETAGS | OCI multipart upload tracking | Table |
| PKG_OCI_UPLOAD | Package implementing the three-phase OCI multipart upload process (initiate, upload parts, commit). This package uses the Application Settings configured in Step 3. | Package |
To run the SQL script:
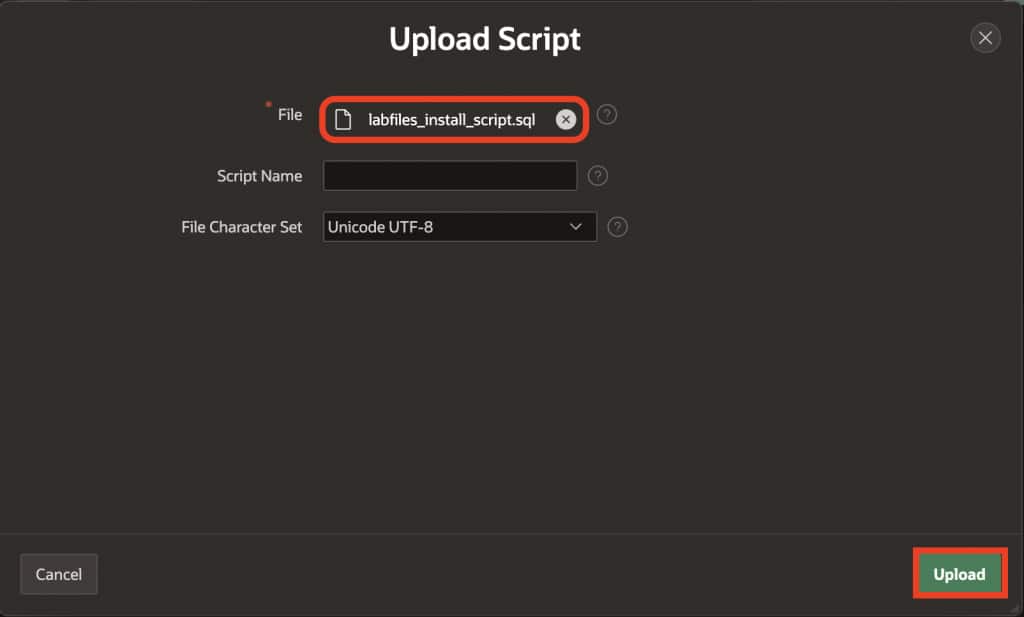
- Download the provided SQL script.
- In your APEX workspace, navigate to SQL Workshop > SQL Scripts
- Click Upload, select the downloaded file, and give it a name like “OCI_Upload_Setup”
- Click Upload.
- Before running the script, click Edit and make these modifications:
- Find this line:
p_web_credential_name => 'YOUR_API_KEY',Replace it with:p_web_credential_name => 'oci_apikeys'(This matches the Static Identifier from Step 2) - Find this line:
p_folder_path => 'Speech/input/'Optionally modify the folder path to organize your files:'uploads/'– for general uploads'files/'– for all files –''(empty string) – for bucket root level - Click Save.
- Find this line:
- Click Run and Run Now to execute the script.
- Verify the objects were created by going to SQL Workshop > Object Browser. Check for the three tables and the PKG_OCI_UPLOAD package.

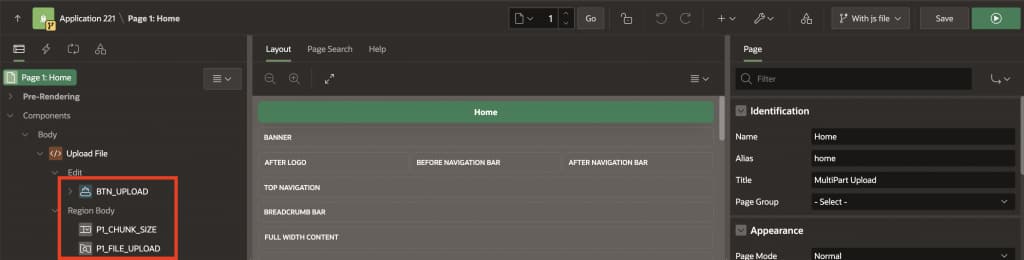
Step 5: Step Build the Upload Page
The upload page provides the user interface for file selection and upload initiation. On this page, users can select a file, choose a chunk size and click the upload button to start the process. The page will also display real-time progress as chunks are uploaded to APEX and then transferred to OCI Object Storage.
- Navigate to App Builder and open your application.
- Navigate to 1- Home Page .
- Right-click on Body and select Create Region.
- Configure the region:
- Name:
Upload File - Type:
Static Content
- Name:
- Right-click on the Upload File region and select Create Page Item.
- Create the first item with these properties:
- Name:
P1_FILE_UPLOAD - Type:
File Upload - Label:
Select File - Display As: Block Dropzone
- Value Required: Yes
- Name:
- Right-click on the Upload File region again and select Create Page Item.
- Create the second item with these properties:
- Name:
P1_CHUNK_SIZE - Type:
Select List - Label:
Chunk Size (MB) - List of Values: Select Type as Static Values and for Display Value enter 10 MB ,20 MB ,50 MB and for Return Value enter 10, 20, 50.
- Name:
- Right-click on the Upload File region and select Create Button
- Configure the button:
- Button Name:
BTN_UPLOAD - Label:
Upload to OCI - Static ID:
BTN_UPLOAD(Important: must match exactly)
- Button Name:
- Click Save.
Step 6: Implement Client-Side JavaScript
This JavaScript reads the selected file, slices it into chunks based on chosen size, converts each chunk to Base64 (required for APEX transmission), sends chunks sequentially via AJAX, displays real-time progress, and triggers OCI Object Storage REST API to upload after all chunks are received.
Open the JavaScript file from this link: oci-upload.js
Right-click the link and select Save Link As (or Save Target As) to download the file to your computer.
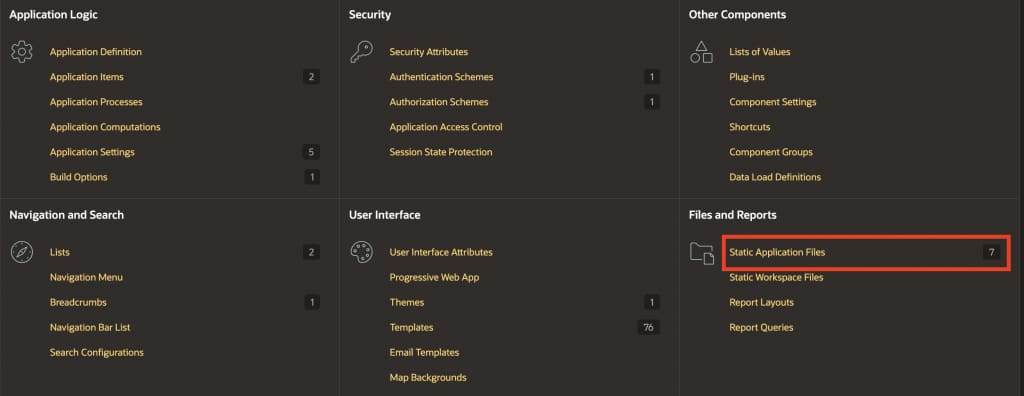
6.1: Upload JavaScript File to APEX Static Application Files
- In your APEX application, go to Shared Components > Static Application Files
- Click Create File.
- Drag and drop the downloaded
oci-upload.js - Click Create.
- Note the reference path (typically
#APP_FILES#oci-upload.js)

6.2: Add the JavaScript File to the Page
After uploading the oci-upload.js file to Static Application Files, you need to reference it in your page so that the JavaScript functions are available when the upload button is clicked.
Follow these steps:
- Open your Home Page (Page 1) in Page Designer.
- In the Property Editor, select the Page node (top-level page).
- Navigate to JavaScript → File URLs.
- Add the following reference: #APP_FILES#oci-upload.js

This ensures that the oci-upload.js file is loaded whenever the page is rendered.
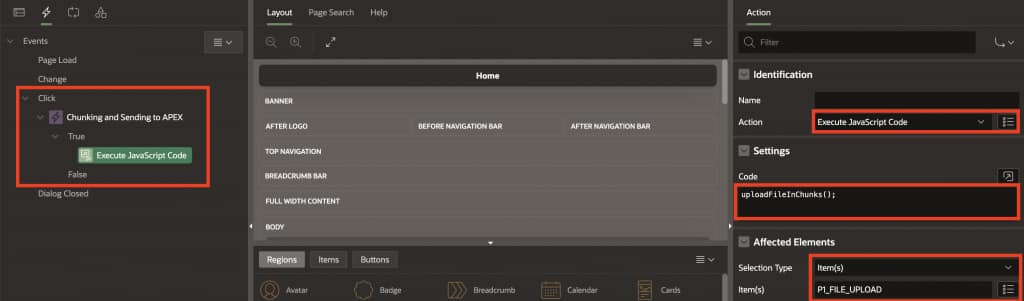
6.3: Create Dynamic Action
Create a Dynamic Action to trigger the upload when the button is clicked:
- In Page Designer, navigate to your upload page
- In the left pane, find BTN_UPLOAD button under the Dynamic Actions tab
- Right-click on BTN_UPLOAD and select Create Dynamic Action
- In the property editor (right pane), configure the Dynamic Action:
- Name: Chunking and Sending to APEX
- Event: Click
- Selection Type: Button
- Slot: Edit
- Hot: Toggle On
- Button: BTN_UPLOAD
- Click on the True action under the Dynamic Action.
- In the property editor, configure the action:
- Action: Execute JavaScript Code
- Code:
uploadFileInChunks(); - Selection Type: Item(s)
- Item(s): P1_FILE_UPLOAD
- Save your changes.
Note: The uploadFileInChunks() function is defined in the oci-upload.js file that you uploaded to Static Application Files in the previous step. This function handles the entire client-side chunking process.
The dynamic action will now call the uploadFileInChunks() function from the JavaScript file whenever the Upload to OCI button is clicked.
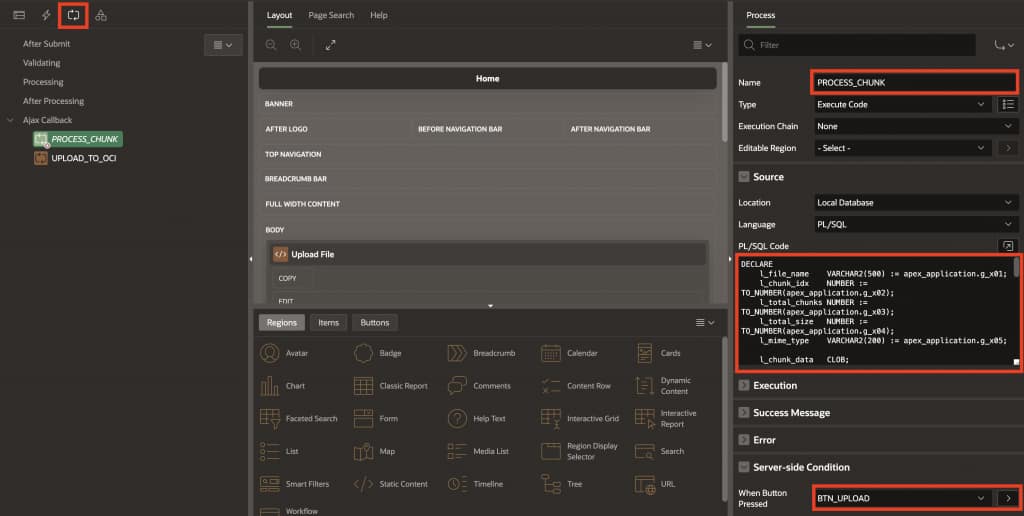
Step 7: Create PROCESS_CHUNK AJAX Process
This server-side process receives each chunk from JavaScript, reassembles the Base64 pieces, converts to BLOB, and stores in the staging table. This process will be called multiple times—once for each chunk—until the complete file is uploaded.
What This Process Receives:
When JavaScript sends chunk data to APEX, it passes these parameters:
- g_x01: File name
- g_x02: Chunk index number (which chunk this is)
- g_x03: Total number of chunks
- g_x04: Total file size in bytes
- g_x05: MIME type/file type
- g_f01: Base64-encoded chunk data (as an array)
Create the AJAX Callback Process
- Navigate to your upload page in Page Designer
- In the left pane (Rendering tab), navigate to “Processing” tab
- Right-click on AJAX Callback and select Create Process.
- Configure the process properties (in the right pane):
- Identification Section:
- Name:
PROCESS_CHUNK - Type: Select Execute Code from the dropdown
Important: The process name must be exactlyPROCESS_CHUNKbecause this name is hardcoded in theoci-upload.jsJavaScript file. When the JavaScript sends each chunk to APEX via AJAX, it specifically calls this process by name usingapex.server.process('PROCESS_CHUNK', ...). If you use a different name here, the JavaScript won’t be able to find the process and the upload will fail.
- Name:
- Identification Section:
5. Under Source > PL/SQL Code: Paste the code below
DECLARE
    l_file_name    VARCHAR2(500) := apex_application.g_x01;
    l_chunk_idx    NUMBER := TO_NUMBER(apex_application.g_x02);
    l_total_chunks NUMBER := TO_NUMBER(apex_application.g_x03);
    l_total_size   NUMBER := TO_NUMBER(apex_application.g_x04);
    l_mime_type    VARCHAR2(200) := apex_application.g_x05;
    l_chunk_data   CLOB;
    l_chunk_blob   BLOB;
BEGIN
    FOR i IN 1 .. apex_application.g_f01.COUNT LOOP
        l_chunk_data := l_chunk_data || apex_application.g_f01(i);
    END LOOP;

    l_chunk_blob := apex_web_service.clobbase642blob(l_chunk_data);

    INSERT INTO upload_chunks (file_name, chunk_index, chunk_data, total_size, mime_type)
    VALUES (l_file_name, l_chunk_idx, l_chunk_blob, l_total_size, l_mime_type);

    COMMIT;

    apex_json.open_object;
    apex_json.write('success', TRUE);
    apex_json.write('chunk', l_chunk_idx + 1);
    apex_json.write('total', l_total_chunks);
    apex_json.close_object;

EXCEPTION
    WHEN OTHERS THEN
        ROLLBACK;
        apex_json.open_object;
        apex_json.write('success', FALSE);
        apex_json.write('error', SQLERRM);
        apex_json.close_object;
END;
What This Process Does:
- Receives chunk data from JavaScript (in Base64 format)
- Reassembles Base64 pieces into a single string
- Converts Base64 to BLOB (binary data)
- Stores in UPLOAD_CHUNKS table with metadata
- Returns JSON response to JavaScript indicating success/failure
Step 8: Understanding OCI Multipart Upload
OCI requires files larger than 100MB to use multipart upload, which involves three distinct phases:
Phase 1 – Initiate: Send a POST request to OCI with the object name and content type. OCI returns an uploadId that identifies this upload session. This ID is required for all subsequent operations in this upload.
Phase 2 – Upload Parts: Split the file into parts and upload each part individually with a PUT request, including the uploadId and uploadPartNum. OCI returns an ETag (a unique identifier) for each part, which must be stored and used later.
Phase 3 – Commit: Send a final POST request with all the ETags collected from Phase 2. OCI assembles all parts into a single file and confirms completion. At this point, the file becomes available in your bucket.
This approach allows for:
- Reliable uploads – Failed parts can be retried without re-uploading the entire file
- Resumable transfers – If a connection drops, you can resume from where you left off
- Parallel uploads – Multiple parts can be uploaded simultaneously for faster performance
The PKG_OCI_UPLOAD package created in Step 4 implements all three phases automatically.
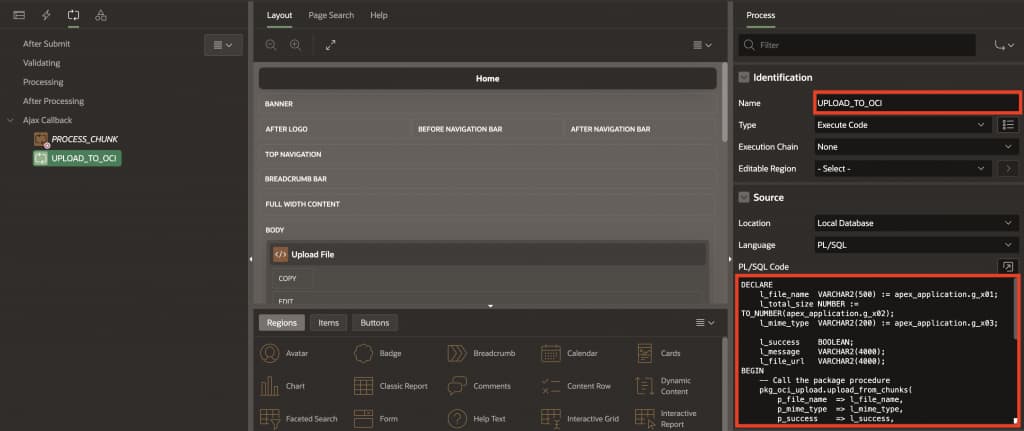
Step 9: Create UPLOAD_TO_OCI AJAX Process
This process calls the OCI upload package after all chunks are received and returns a JSON response indicating success or failure.
Create the AJAX Callback Process
- Navigate to your upload page in Page Designer.
- In the left pane (Rendering tab), navigate to “Processing” tab.
- Right-click on AJAX Callback and select Create Process.
- Configure the process properties (in the right pane):Identification Section:
- Name:
UPLOAD_TO_OCI - Type: Select Execute Code
- Name:
5. Under Source > PL/SQL Code: Paste the code below
DECLARE
    l_file_name  VARCHAR2(500) := apex_application.g_x01;
    l_total_size NUMBER := TO_NUMBER(apex_application.g_x02);
    l_mime_type  VARCHAR2(200) := apex_application.g_x03;

    l_success    BOOLEAN;
    l_message    VARCHAR2(4000);
    l_file_url   VARCHAR2(4000);
BEGIN
    -- Call the package procedure
    pkg_oci_upload.upload_from_chunks(
        p_file_name  => l_file_name,
        p_mime_type  => l_mime_type,
        p_success    => l_success,
        p_message    => l_message,
        p_file_url   => l_file_url
    );

    -- Return simple JSON
    IF l_success THEN
        htp.p('{"success":true,"message":"' || APEX_ESCAPE.JSON(l_message) || '","file_url":"' || APEX_ESCAPE.JSON(l_file_url) || '"}');
    ELSE
        htp.p('{"success":false,"error":"' || APEX_ESCAPE.JSON(l_message) || '"}');
    END IF;

EXCEPTION
    WHEN OTHERS THEN
        htp.p('{"success":false,"error":"' || APEX_ESCAPE.JSON(SQLERRM) || '"}');
END;
Save your changes.
What This Process Does:
- Receives file metadata from JavaScript (filename, size, MIME type)
- Calls
pkg_oci_upload.upload_from_chunkswhich:- Retrieves chunks from UPLOAD_CHUNKS table
- Initiates multipart upload with OCI Object storage
- Uploads each chunk to OCI Object storage
- Commits the multipart upload
- Stores file metadata in MY_FILES table
- Returns JSON response with success status and file URL
Step 10: Create a Report to View Files from OCI Object Storage
Now that files are uploading successfully to OCI, let’s create a visual report that fetches and displays them directly from your bucket. This will give users a convenient way to browse and view all uploaded files in one place.
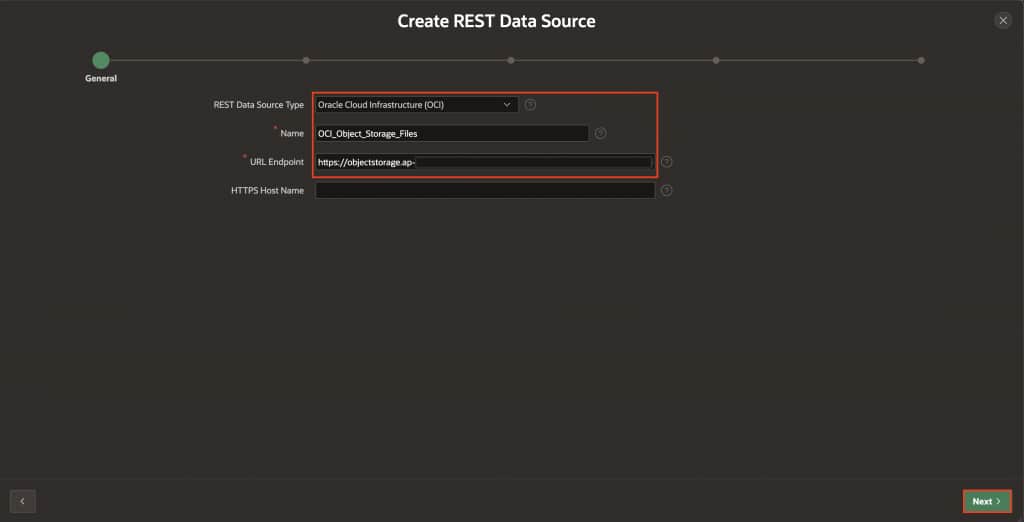
10.1 : Create a REST Data Source
The REST Data Source acts as a bridge between APEX and OCI Object Storage, allowing you to query files without server-side processing.
- Navigate to Shared Components > REST Data Sources.
- Click Create.
- Select From Scratch and click Next.
- Configure the REST Data Source with these values:
- Name:
OCI_Object_Storage_Files - URL Endpoint:
https://objectstorage.[your-region].oraclecloud.com/p/[pre-authenticated-request]/n/[your-namespace]/b/[your-bucket]/o
- Name:
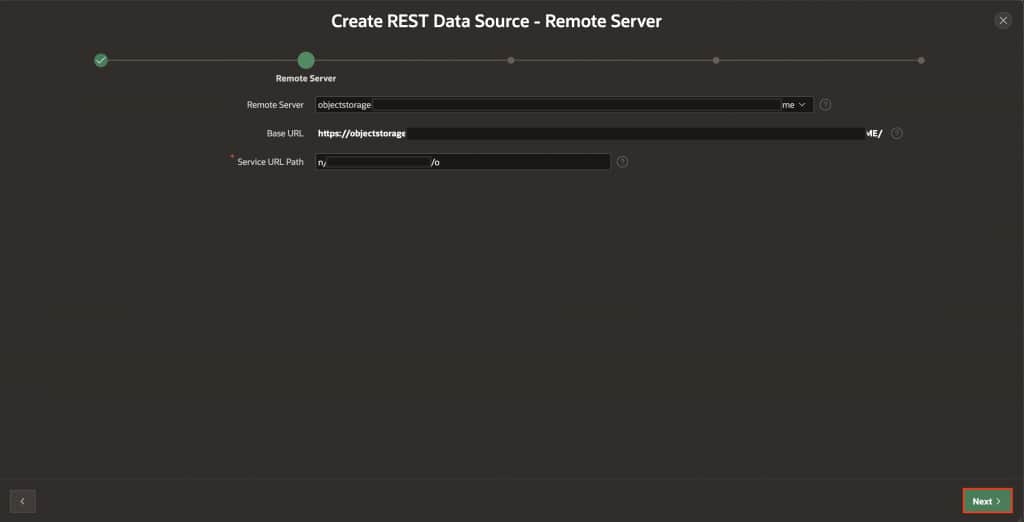
- Click Next.
- On the Remote Server dialog, keep the default settings and click Next.
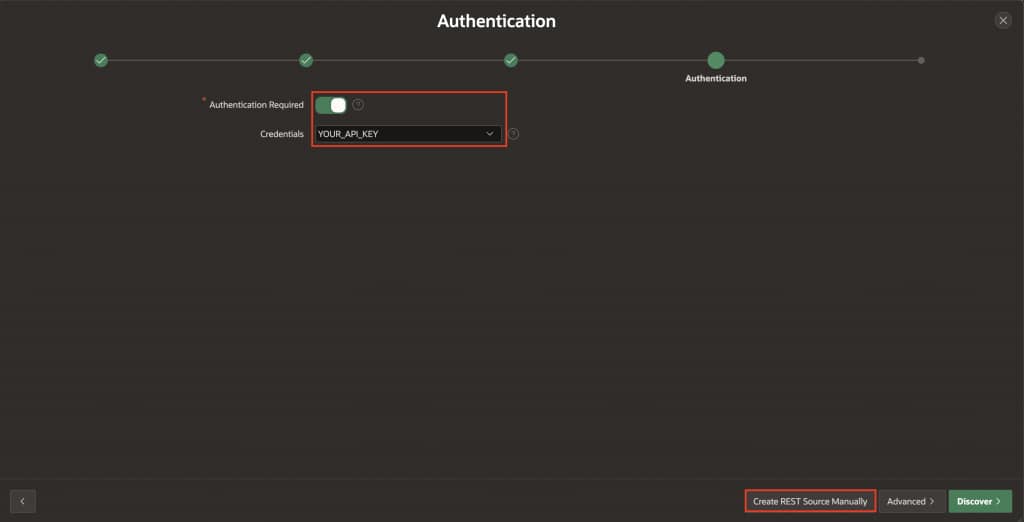
- Enable Authentication Required.
- Credentials: Select
oci_apikeys(the credential created in Step 2). - Click Create REST Data Source Manually.
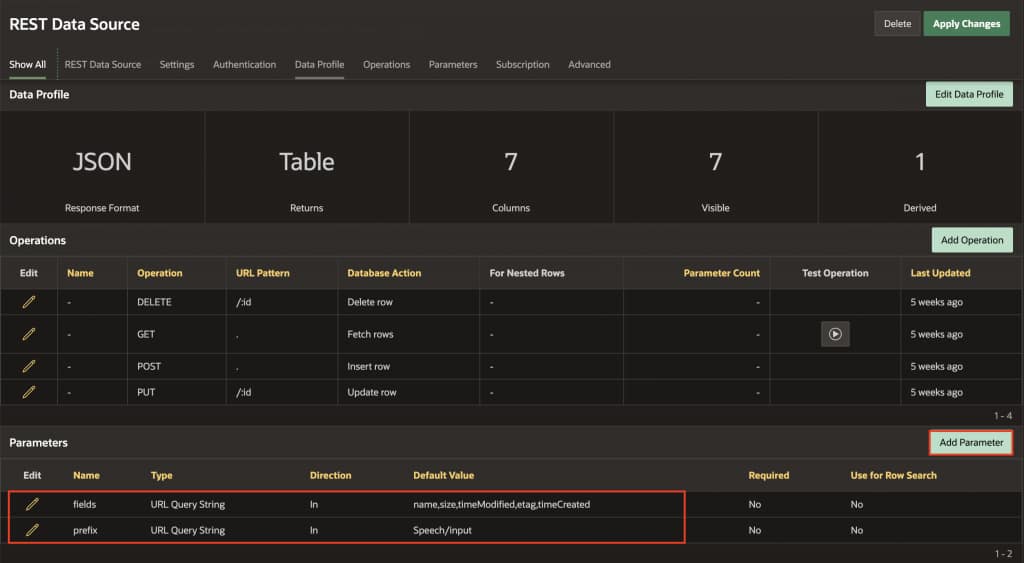
10.2: Add Query Parameters
Parameters filter which files appear in your report and specify which metadata fields to retrieve from OCI. If you organized files in a folder (like Speech/input/), the prefix parameter will ensure only those files are displayed. The fields parameter tells OCI which file attributes to return.
- Click Add Parameter and configure each:
| Name | Type | Default Value | Purpose |
| prefix | URL Query String | Speech/input/ | Filters files to display only those in the specified folder |
| fields | URL Query String | name,size,timeCreated,md5 | Specifies which file metadata to retrieve from OCI |
Note: If files are at bucket root, leave prefix empty.
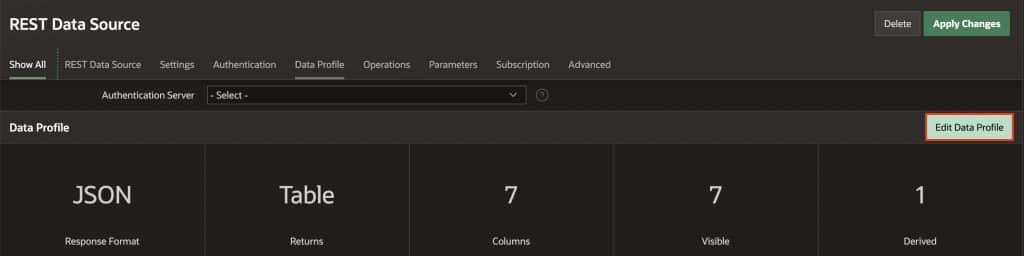
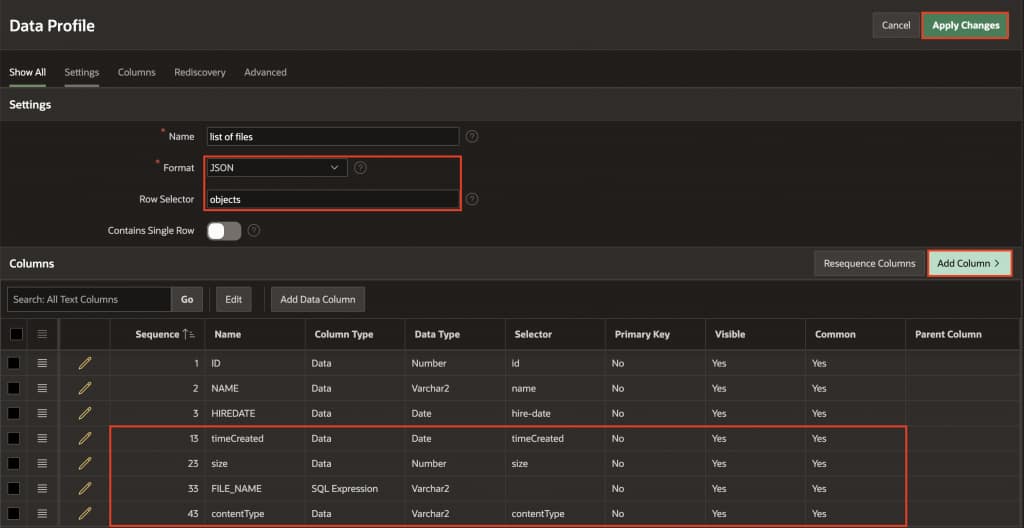
2. Click Edit Data Profile to map response fields from OCI Object Storage:
- Under Settings:
- Set Format to
JSON - Set Row Selector to
objects
- Set Format to
3. Rename the Columns name to ID, NAME and HIREDATE.
4. Click Add Column and configure these columns to extract data from the OCI response:
| Name | Column Type | Data Type | Source |
| FILE_NAME | SQL Expression | Clob | SQL Expression > SELECT REGEXP_SUBSTR(NAME, ‘[^/]+$’, 1, 1) FROM DUAL |
| timeCreated | Data | Timestamp with local time zone | Selector > timecreated |
| size | Data | Number | Selector > size |
| contentType | Data | Varchar2 | Selector > contentType |
5. Click Apply Changes to confirm the Data Profile configuration.
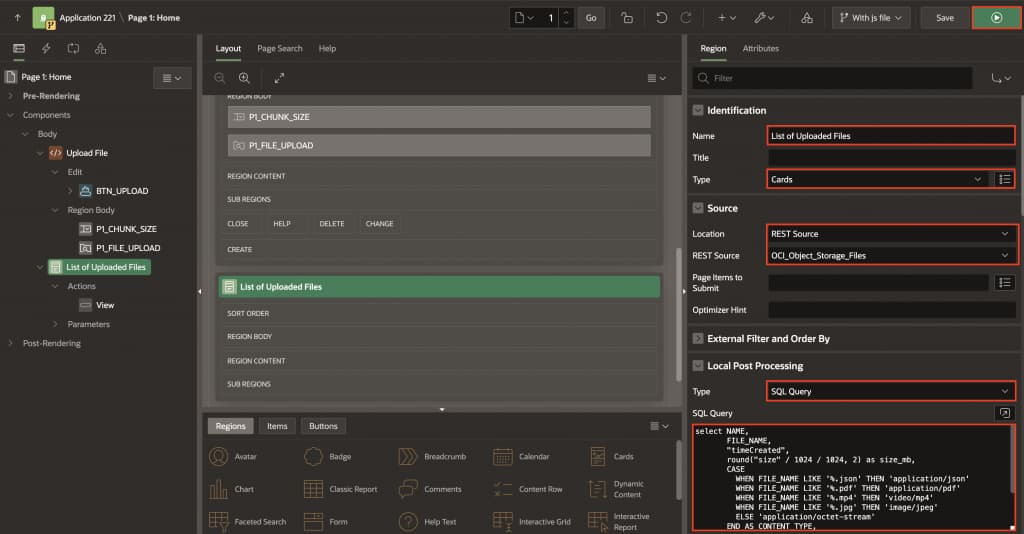
10.3: Create a Card Region
Now let’s create the visual region that will display your files as interactive cards.
- Navigate to your application Home Page.
- Right-click on Body and select Create Region.
- Configure the region with these settings:
- Name:
List of Uploaded Files - Type: Cards
- Source: REST Source
- REST Data Source:
OCI_Object_Storage_Files
- Name:
10.4: Format the Display with Post-Processing
Add a local post-processing query to calculate file sizes in a user-friendly format (MB) and generate download URLs dynamically using your Application Settings.
- In the List of Uploaded Files region properties, scroll to Local Post Processing, select Type: SQL Query
- Copy and paste this SQL code:
SELECT NAME,
       FILE_NAME,
       "timeCreated",
       ROUND("size" / 1024 / 1024, 2) AS size_mb,
       CASE
         WHEN FILE_NAME LIKE '%.json' THEN 'application/json'
         WHEN FILE_NAME LIKE '%.pdf' THEN 'application/pdf'
         WHEN FILE_NAME LIKE '%.mp4' THEN 'video/mp4'
         WHEN FILE_NAME LIKE '%.jpg' THEN 'image/jpeg'
         ELSE 'application/octet-stream'
       END AS CONTENT_TYPE,
       apex_app_setting.get_value('OCI_STORAGE_BASE_URL') || '/p/' ||
       apex_app_setting.get_value('PRE_REQUESTED_AUTHENTICATION') || '/n/' ||
       apex_app_setting.get_value('NAMESPACE_NAME') || '/b/' ||
       apex_app_setting.get_value('BUCKET_NAME') || '/o/' || NAME AS FILE_URL
FROM #APEX$SOURCE_DATA#
This approach uses your Application Settings (configured in Step 3) to build the file URL dynamically, which means the report will work across any region and bucket without requiring code changes.
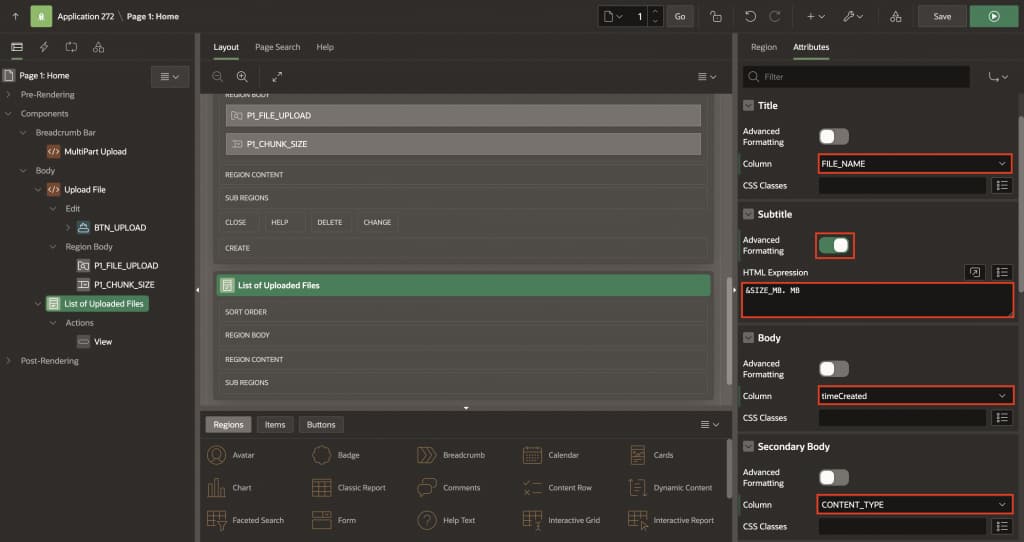
3. Navigate to Attributes tab and configure the following:
- Titile > Column: FILE_NAME
- For Subtitle, toggle On Advanced Formatting and enter &SIZE_MB. MB in HTML Expression
- Body > Column: timeCreated
- Secondary Body > Column: CONTENT_TYPE
4. Click Save and Run.
10.5: Add a View Action
Now let’s add a button that allows users to view files directly in their browser.
- In the List of Uploaded Files region, right-click Actions and select Create Action
- Configure the action in the right pane:
- Type:
Button - Label:
View - Link Target:
- Type:
Redirect to URL - Target:
&FILE_URL. - Link Attributes:
target="_blank"
- Type:
- Appearance:
- Display Type:
Icon - Icon:
fa-eye
- Display Type:
- Type:
- Click Save and Run.

10.6: Test the Report
- Click Run to view your page in the application
- You should see a card-based report displaying all files from your OCI bucket
- Each card will show:
- File Name: The name of the uploaded file
- Creation Date: When the file was uploaded
- File Size: Size in MB
- Click the View icon on any card to open the file in a new browser tab
Note: Files like PDFs, images (JPG, PNG), and videos (MP4) will display directly in your browser. Other file types like JSON datasets may download depending on your browser’s MIME type handling and security settings.
Conclusion
This implementation provides a robust, scalable solution for uploading large files from Oracle APEX to OCI Object Storage using client-side chunking and OCI multipart upload. The approach ensures excellent user experience with real-time progress tracking while handling files of any size reliably and efficiently.