Oracle APEX 23.2 introduces a new feature, Action Tasks, that could be quickly summarized as ‘An Approval Task for Tasks that aren’t Approvals!’.
So what are these, what do they do, and how do I use them in an application?
What is an Action Task?
Approval Tasks and Action Tasks are both types of Human Task – that is, tasks that need to be performed by a user, as opposed to tasks that will be performed by a script or an automation or some other form of automated server. By now, you are probably familiar with Approval Tasks, which were introduced in APEX 22.1, and which have been enhanced in each subsequent release.
The key features of a Human Task are defined in an application’s Shared Components. The Task Definition:
- specifies who can be Potential Owners (i.e., assignees) for the task, and who the Business Admin is.
- can include Actions that can occur at various stages of the task, from task creation, task completion, delegation, etc. These actions can execute code, send email or a notification, or execute a process plugin.
- specifies parameters that can be passed in when the task is started, and from 23.2 onwards, updated later.
- specifies a Subject, which is how a task instance will appear in a user’s Task List
- a Task Detail Page is generated for the user to perform the Task
- a Unified Task List Page can be generated. The Unified Task List will show a user all of their current tasks, across all applications in the APEX Workspace (or just for a single app, if desired).
At runtime, a task is created based on the task definition, and will then appear in the Task List for any of the task’s potential owners. The functionality built-into APEX give a task the following capabilities:
- a task can be claimed by one of its potential owners, or released back to all potential users
- it is auto-assigned / claimed if there is only one potential owner
- can be delegated to another user
- the task owner can request more information for the task originator, who can then reply
- the task owner can provide comments, which are then visible to a delegate or the originator
- a task history is available, showing all the activities on the task
- an approval task can be approved or rejected by the task owner, creating a task outcome of APPROVED or REJECTED.
Human Tasks can be standalone items or can be coordinated to form part of a workflow that is managed by a workflow manager, such as APEX Workflow or Flows for APEX. If your business process is simple, and just requires another user to approve a transaction, you might use a Human Task as a standlone item. However, if your business process requires a more complex sequence of human tasks and automated tasks, possibly with conditional process flow based on certain parameters, you can build these tasks into a workflow.
How is an Action Task different from an Approval Task?
Firstly, an Action Task is used when you want a user to perform some task that is not an approval. For example, a task could be providing some information into an APEX form page.
The Task Detail Page for an Action Task is likely to be customized for each Action Task, and not reused across several tasks (although that is possible!). This is because the information required will typically be different for each Task definition.
An approval ultimately has an outcome – the task was either aproved or rejected. An Action Task doesn’t have an outcome.
An Approval Task forces some separation of duty, so that the originator of a task cannot be the approver of the task. For an Action Task, this is typically not the case, and so an originator can create an action task which they perform themselves later.
Other than that, an Action Task CAN have all of the capabilities of an Approval Task. As part of your application design, you may decide that a particular action task should not be able to request more information from the task originator, or can’t be delegated, or whatever. If that’s the case, you can delete the regions and buttons from the generated task details page to remove these capabilities from your users.
So having introduced Action Tasks, let’s build a small application containing an Action Task so that you can see how they can be defined and customised to meet our business need.
Building our Demo
Our Scenario
In our example, we’re going to build a simple application where an employee is asked to provide information for a self-review as part of a performance management application. The actual application might have several action tasks and one or more approval tasks to build a complete employee appraisal application – but our simple application, we are just going to create a single action task.
Prerequisite
It is assumed that the users logging in into the application at run time, have already been created beforehand. Create the following users using the Manage Users And Groups menu option under Workspace Administration: SOPHIE, MATT, JANE, CLARA and JOHN.
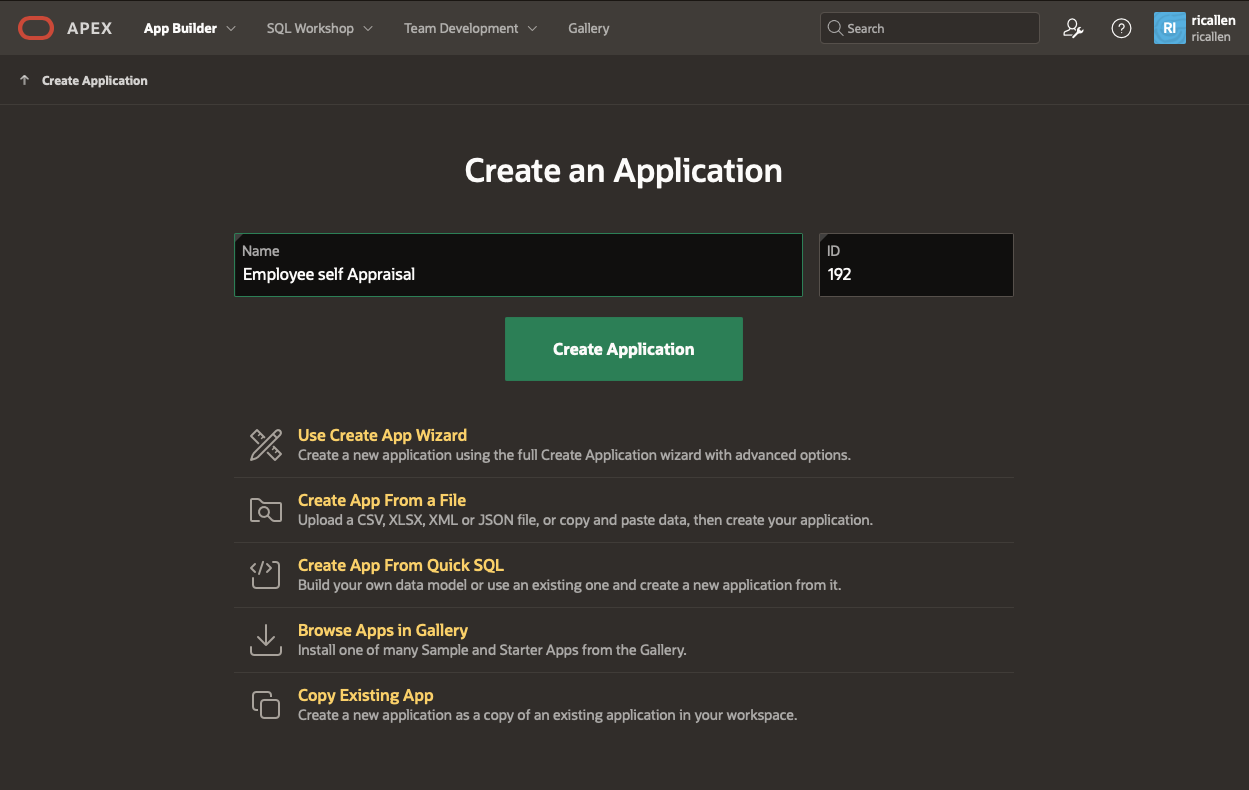
Create the App
- Navigate to Application Builder
- Click Create
- Click New Application
- For Name – enter ‘Employee Self Appraisal’
Sample Table and Sample Data
Install the Dataset
- Navigate to SQL Workshop and click SQL Scripts
- Click Create
- Copy and Paste the commands given below into the Script Editor to create new tables ACT_EMP and ACT_REVIEW, and insert employee records into ACT_EMP.
-- Action Task Demo database setup create table act_emp ( empno number GENERATED BY DEFAULT ON NULL AS IDENTITY MINVALUE 1 MAXVALUE 9999999999999999999999999999 INCREMENT BY 1 START WITH 8000 CACHE 20 NOORDER NOCYCLE NOKEEP NOT NULL ENABLE, ename varchar2(30), mgr number, constraint "ACT_EMP_PK" primary key (empno)); insert into act_emp(empno, ename, mgr) values (10, 'JOHN', 40); insert into act_emp(empno, ename, mgr) values (20, 'CLARA',50); insert into act_emp(empno, ename, mgr) values (30, 'JANE', 50); insert into act_emp(empno, ename, mgr) values (40, 'MATT', 50); insert into act_emp(empno, ename, mgr) values (50, 'SOPHIE', null); commit; create table act_review ( review_id number GENERATED BY DEFAULT ON NULL AS IDENTITY MINVALUE 1 MAXVALUE 9999999999999999999999999999 INCREMENT BY 1 START WITH 100 CACHE 20 NOORDER NOCYCLE NOKEEP NOT NULL ENABLE, empno number, period_from date, period_to date, achievements varchar2(4000), problems varchar2(4000), fwd_objectives varchar2(4000), submitted_on date, status varchar2(15), constraint "act_review_fk_emp" foreign key (empno) references act_emp (empno), constraint "act_review_pk" primary key (review_id), constraint "act_review_status" check (status in ('REQUESTED','SUBMITTED', 'REVIEWED')) ); - Click Run
- Click Run Now.
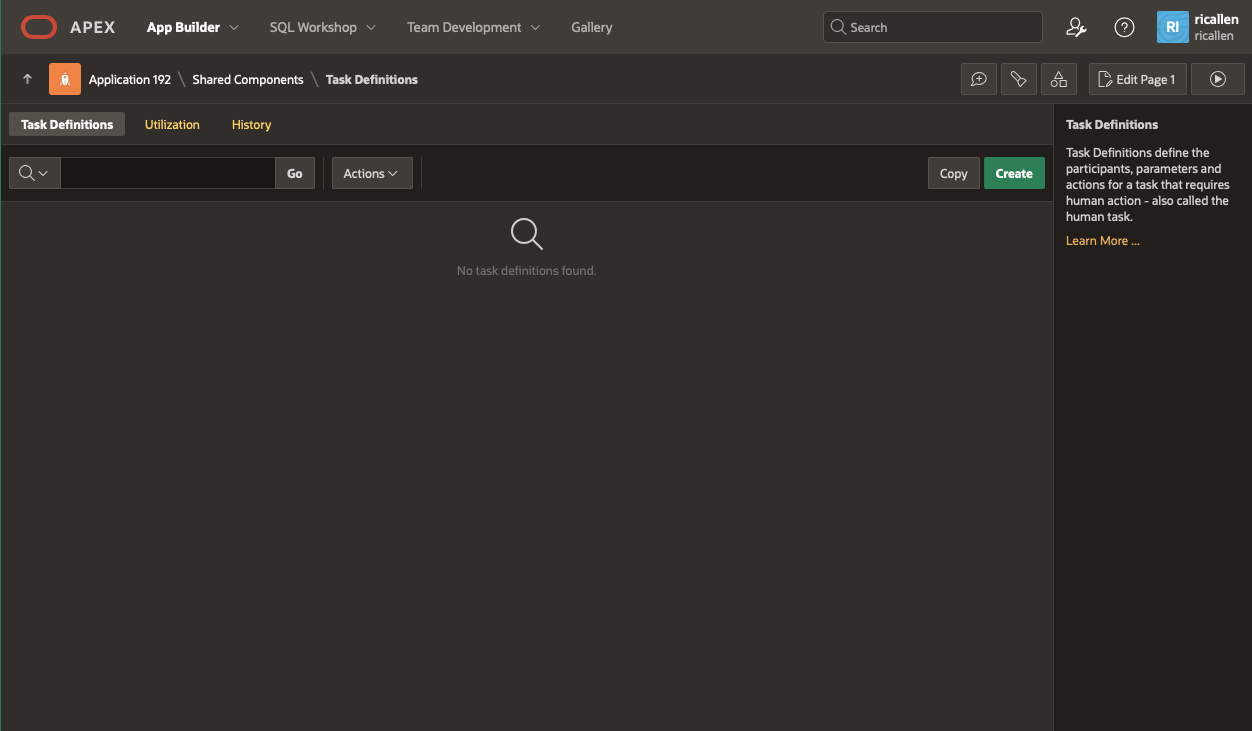
Creating the Task Definition for our Action Task
In the empty Application, we go to the Shared Components → Workflows and Automations → Task Definitions and click Create.
Fill in the Task Definition Wizard fields as shown below, and hit Create. Note the new Task Type select list – choose Action Task.
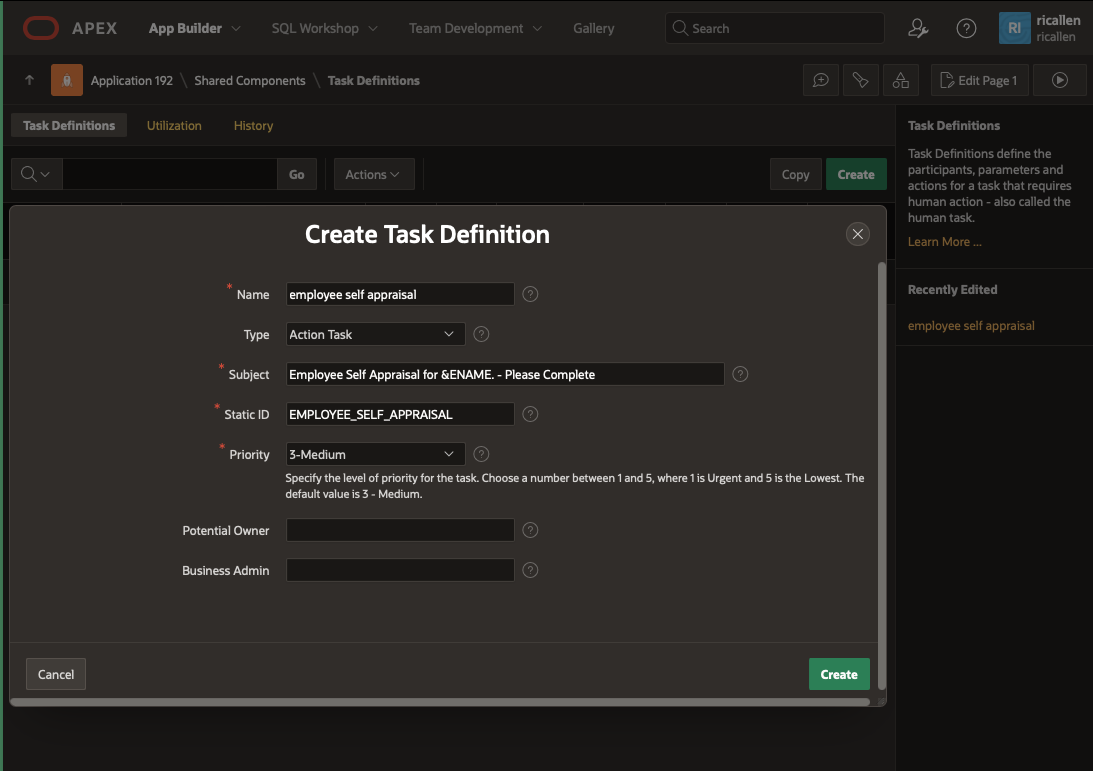
Leave the Potential Owner and Business Administrator fields empty for now. We will fill them up in the next section.
We can now further configure the Employee Self Appraisal Task Definition in the Edit Task Definition screen that opens once the Create button is clicked.
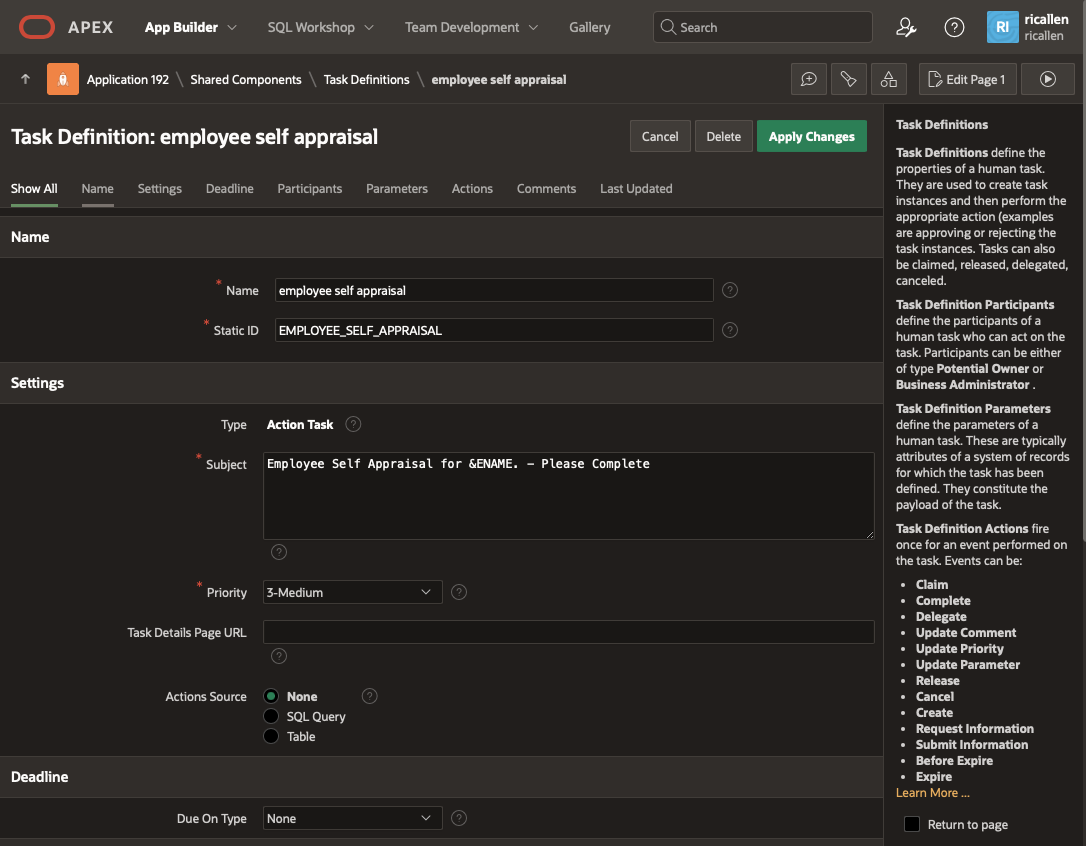
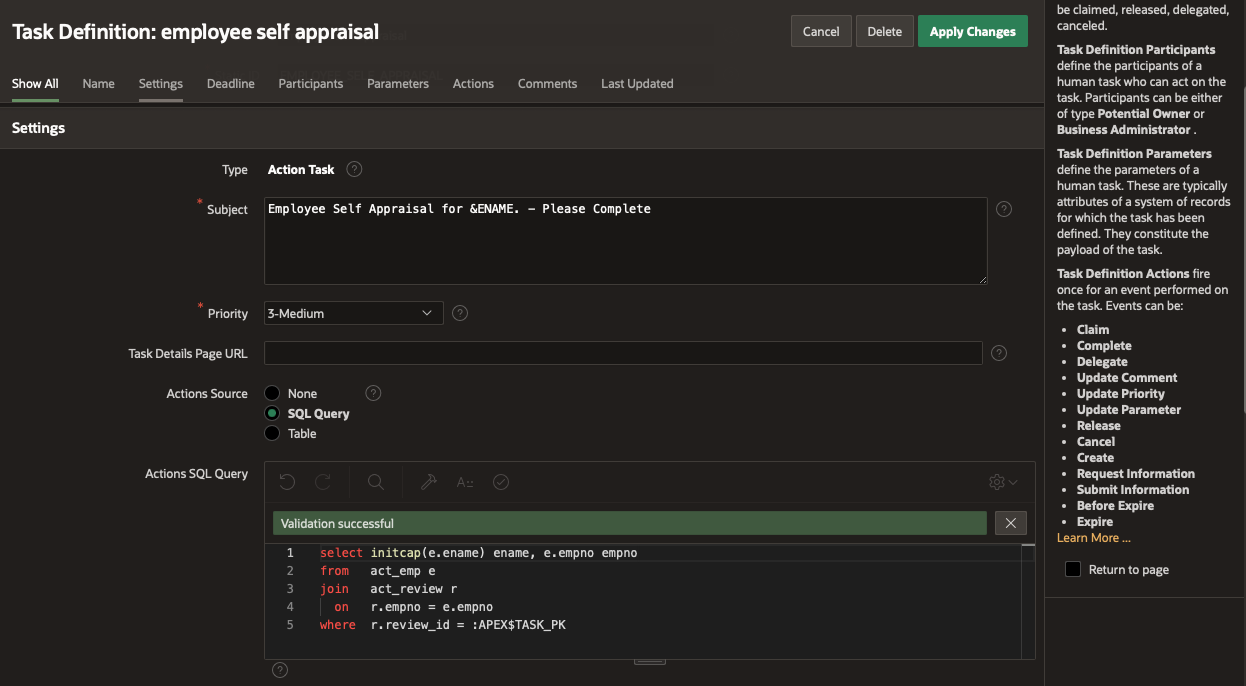
Adding the Actions Source
The Actions Source defines the supporting information used in the Subject text and actions code. When the task instance is created, the APEX$TASK_PK can be added to the task by specifying the Detail Primary Key Item when you configure the Human Task – Create page process. We’ll do that later in the demo. Tying the Task record to an underlying record in the System of Record is a key concept, and allows the Task to know which underlying record it is working on. Our job in the Actions source is define a query that gets all of the fields we need for the task definition in a query given the the APEX$TASK_PK.
In our case, we are going to use the act_review table as the source for our task, and so a review_id will be in the APEX$TASK_PK field. We want the Employee Name (ename) for the subject line, and the empno to use in other statements — so our query will join act_emp and act_review to get all of the columns we need for the task definition.
- Select SQL Query as the Action Source.
- Add the following SQL statement to the Actions SQL Query Editor.
select initcap(e.ename) ename, e.empno empno
   from act_emp e
   join act_review r
   on r.empno = e.empno
   where r.review_id = :APEX$TASK_PK
Generating the Task Details Page
Notice that the Task Details Page Number is empty. Click on the Create Task Details Page button to generate the details page for this task. You will get a popup dialog asking if the next available page number should be used. Click OK.
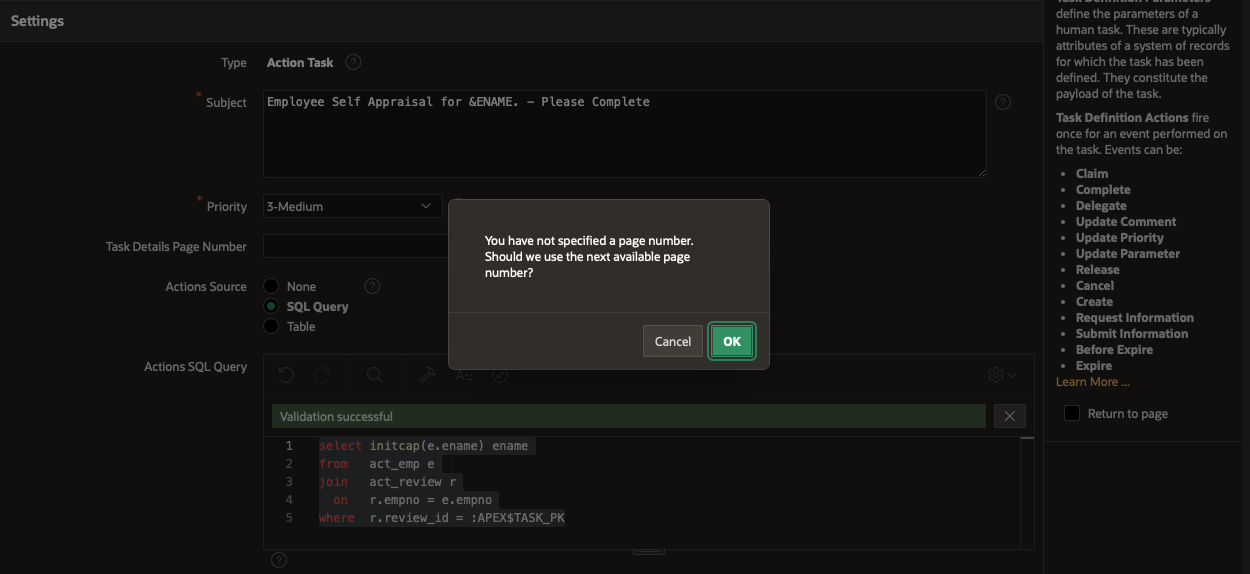
The Task Detail Page URL gets replaced with a page link to the newly generated Task Detail Page.

We will customise this generated Task Detail Page later.
Adding the Task Participants
We want the Employee Self Review Task to be assigned to the relevant employee to complete their self review. So we wil define the Task Owner as a SQL Query which returns the review subject’s name.
- In the Participants section of the Task Definition Page, click Add Row.
- Select Potential Owner as the Participant Type.
- Set Value Type to SQL Query
- Enter the following SQL statement into Value:
select e.ename
from act_emp e
join act_review r
on r.empno = e.empno
where r.review_id = :APEX$TASK_PK
Alternatively, and probably better practice here, would be to use the value ENAME that we got in the Actions Source query in the previous step. Items that were specified in the Actions Query are available to bind into statements in Task Actions and Task Parameters. So an alternative configuration here would be:
- Value Type : Expression
- Value : upper (:ename). Note that you need to force this to upper case.
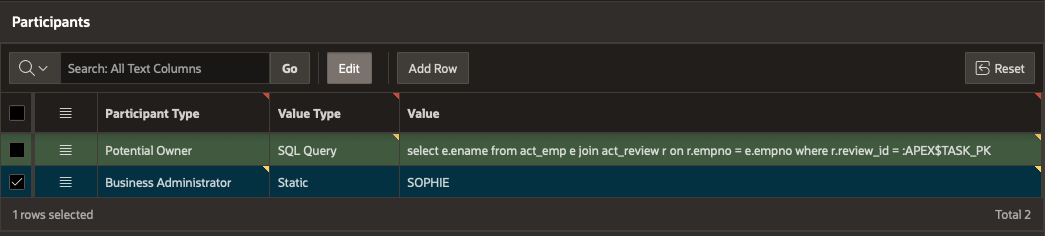
We need to set a Business Owner. To keep the demo simple, we’ll use a static definition of SOPHIE for this.
- Select Business Admin as the Participant Type
- Select Static Value as the Value Type
- Enter SOPHIE as the Value.
Click Apply Changes to save our Task Definition so far.
Adding Task Actions
This allows you to define additional actions that will be performed when an event (defined in the Task Events section above) occurs on a task. Click on Add Action as shown below . This will take you to the Task Definition Actions Edit Page.
We’re going to define the following actions:
1: On Task Creation.
We’re going to assume that the application creating the task also creates a review record in ACT_REVIEW. That’s a design choice – you could also have opted for the review record to be created by the task. (See Ananya’s blog ‘Implementing Multi-Approvals in Oracle APEX 22.1‘ for an example where the task creates the detail record). We are, though, going to use a task action to keep the STATUS field updated in our review table.
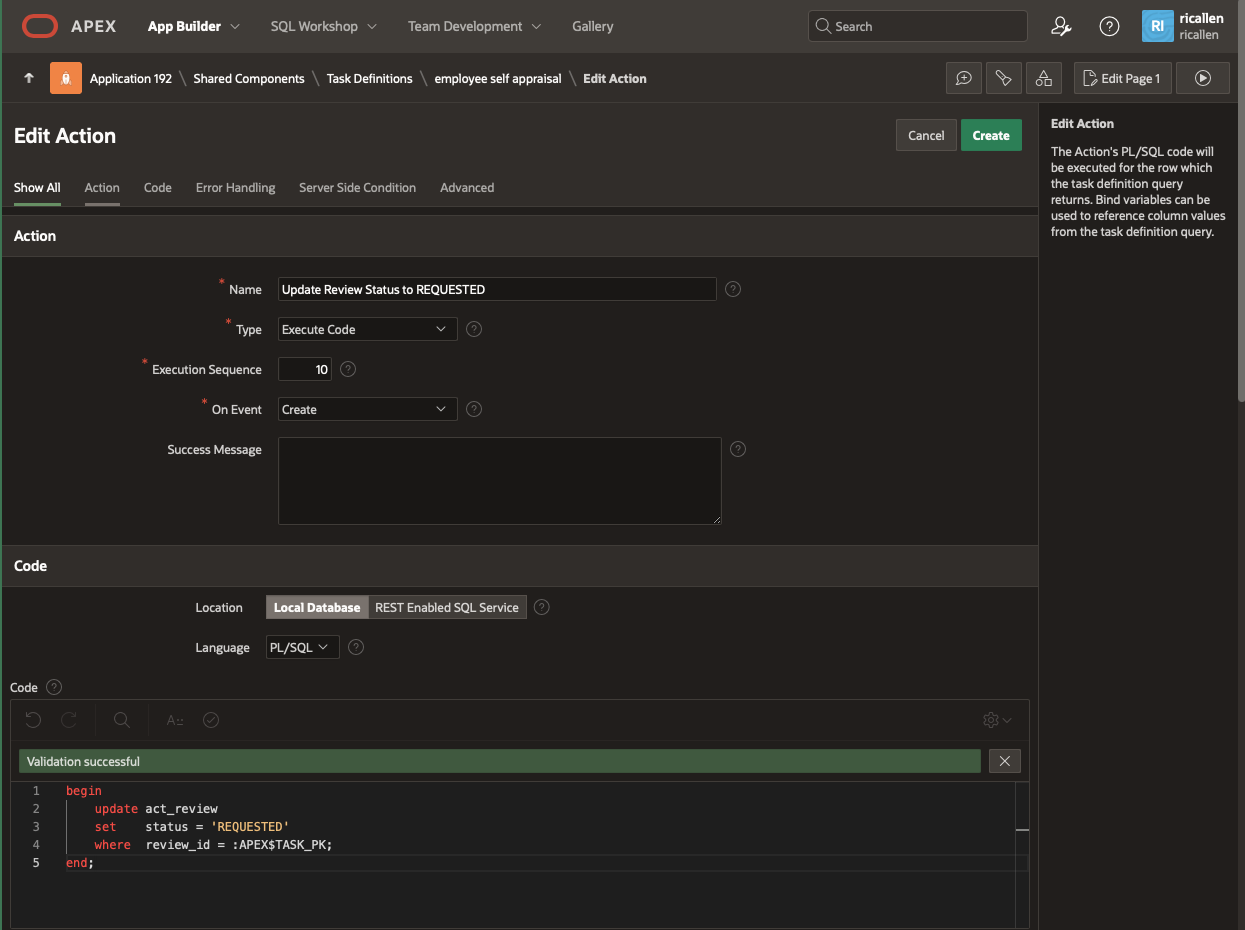
- Give the Action a name: Update Review Status to REQUESTED
- Type: Execute Code
- Execution Sequence: 10
- On Event: Create
- In the code section, set the language to PL/SQL, and enter:
begin update act_review set status = 'REQUESTED' where review_id = :APEX$TASK_PK; end; - Click Apply Changes
We could add another step here to send an email to the employee, telling them about the self appraisal that they need to complete.
2: On Task Completion.
Here we are going to use a task action to update the STATUS field updated in our review table now that the self-review has been completed.
- Give the Action a name: Update Review Status to SUBMITTED
- Type: Execute Code
- Execution Sequence: 10
- On Event: Complete
- In the code section, set the language to PL/SQL, and enter:
begin update act_review set status = 'SUBMITTED' where review_id = :APEX$TASK_PK; end; - Click Apply Changes
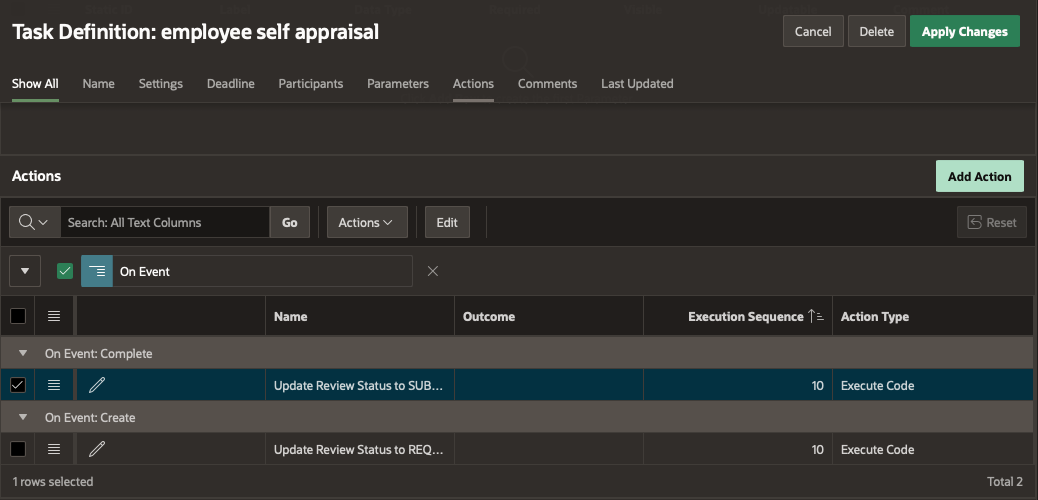
That’s all of our actions defined. Your Actions section on the Task Definition page should look like this, with the Created and Completed Actions defined.
So now we have completed our task definition. Apply Changes, and return to your application.
Building the Manager’s My Team Page
Now we are going to build a simple page for a manager to see the employees in their team. This will be used by the manager to task their employee with completing a self review. We’re going to create this is a Card Report.
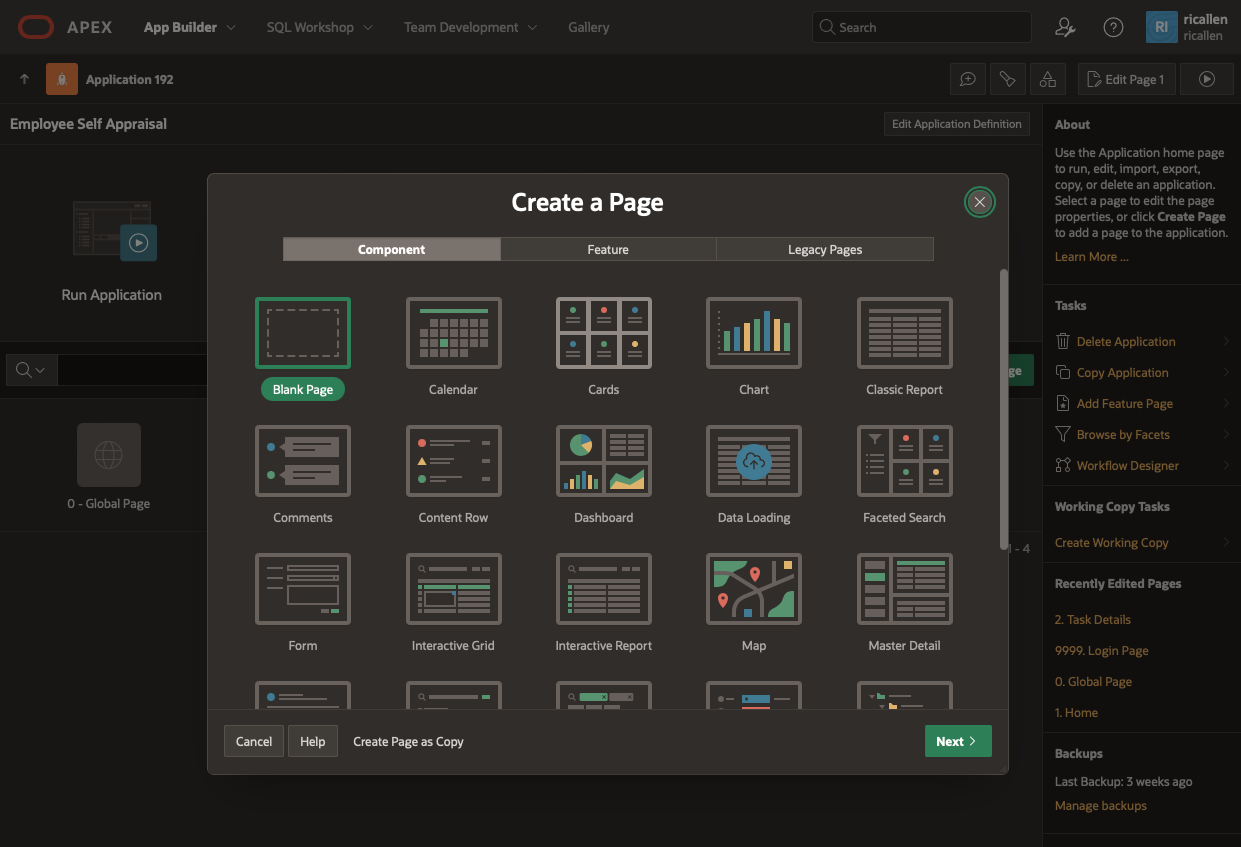
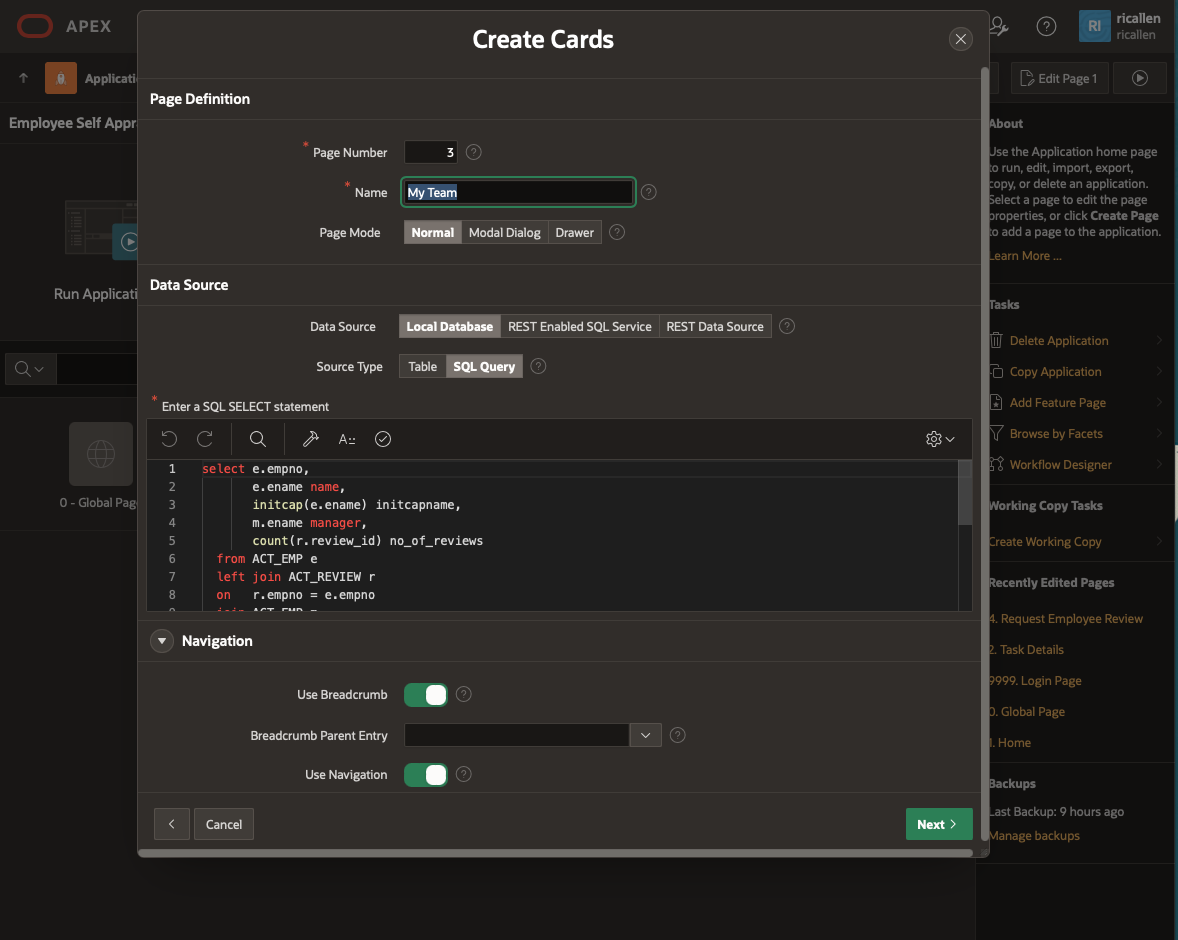
Go back to the Application Builder, and click Create Page to start adding our new page.
- Select Card Page
- On the Create Cards Wizard, Page Name : My Tasks
- Data Source: Local Database – SQL Query
- Use the following SQL Statement for our page
select e.empno, e.ename name, initcap(e.ename) initcapname, m.ename manager, count(r.review_id) no_of_reviews from ACT_EMP e left join ACT_REVIEW r on r.empno = e.empno join ACT_EMP m on m.empno = e.mgr where m.ename = upper(:APP_USER) group by e.empno, e.ename, initcap(e.ename), m.ename - Click Next
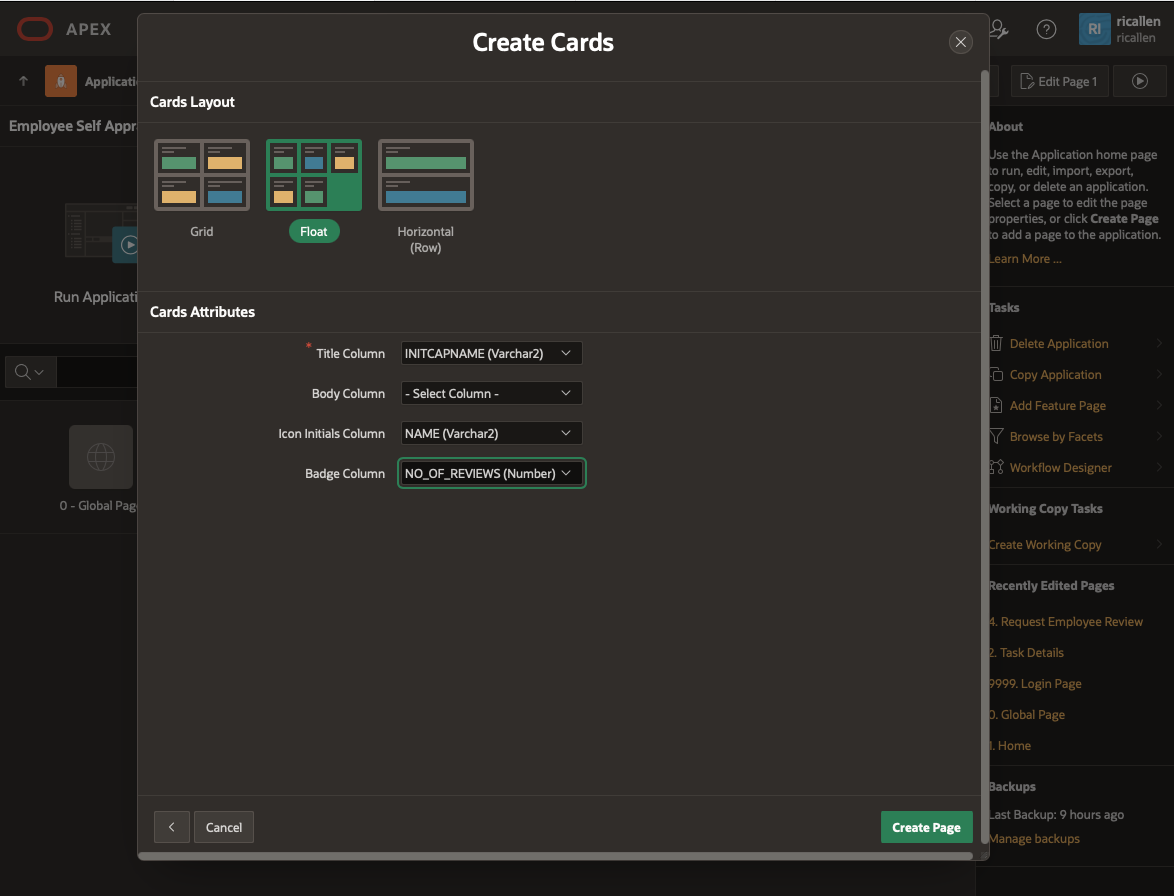
Continue configuring our page.
- Card Layout: Float
- Cards Attributes:
- Title Column: INITCAPNAME
- Icon Initials Column: NAME
- Badge Column: NO_OF_REVIEWS
- Click Create Page.
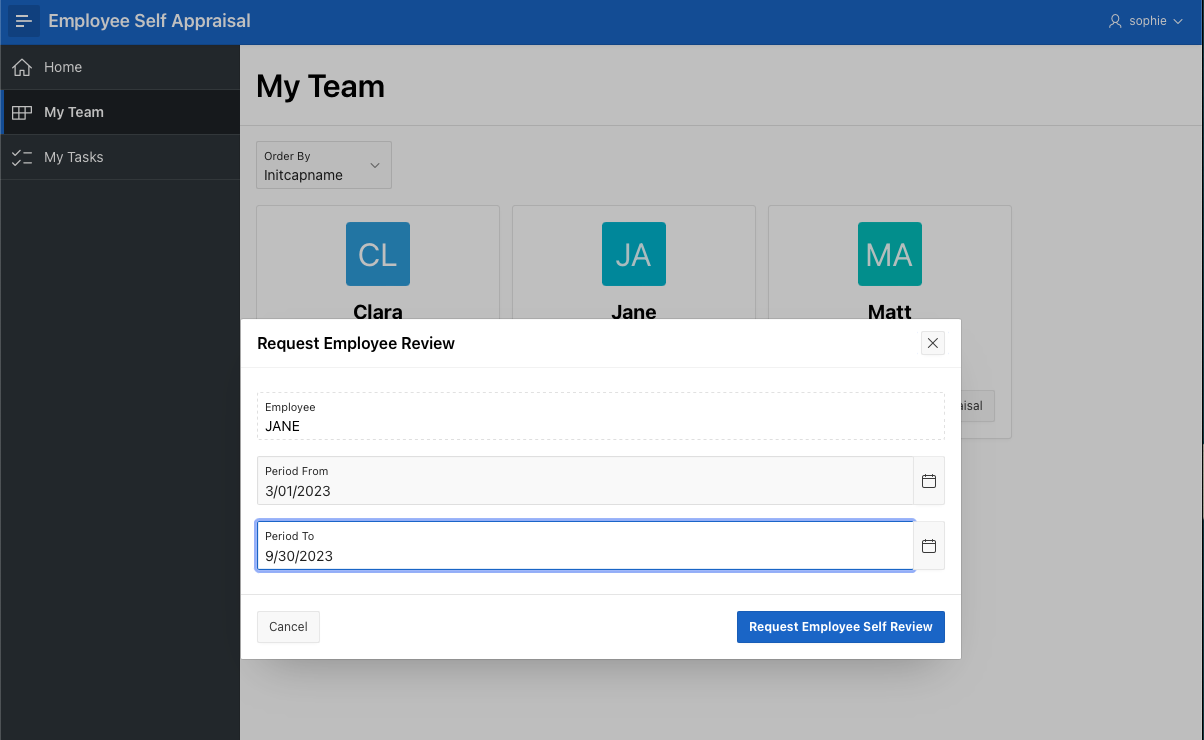
Building Launch Review Request Page
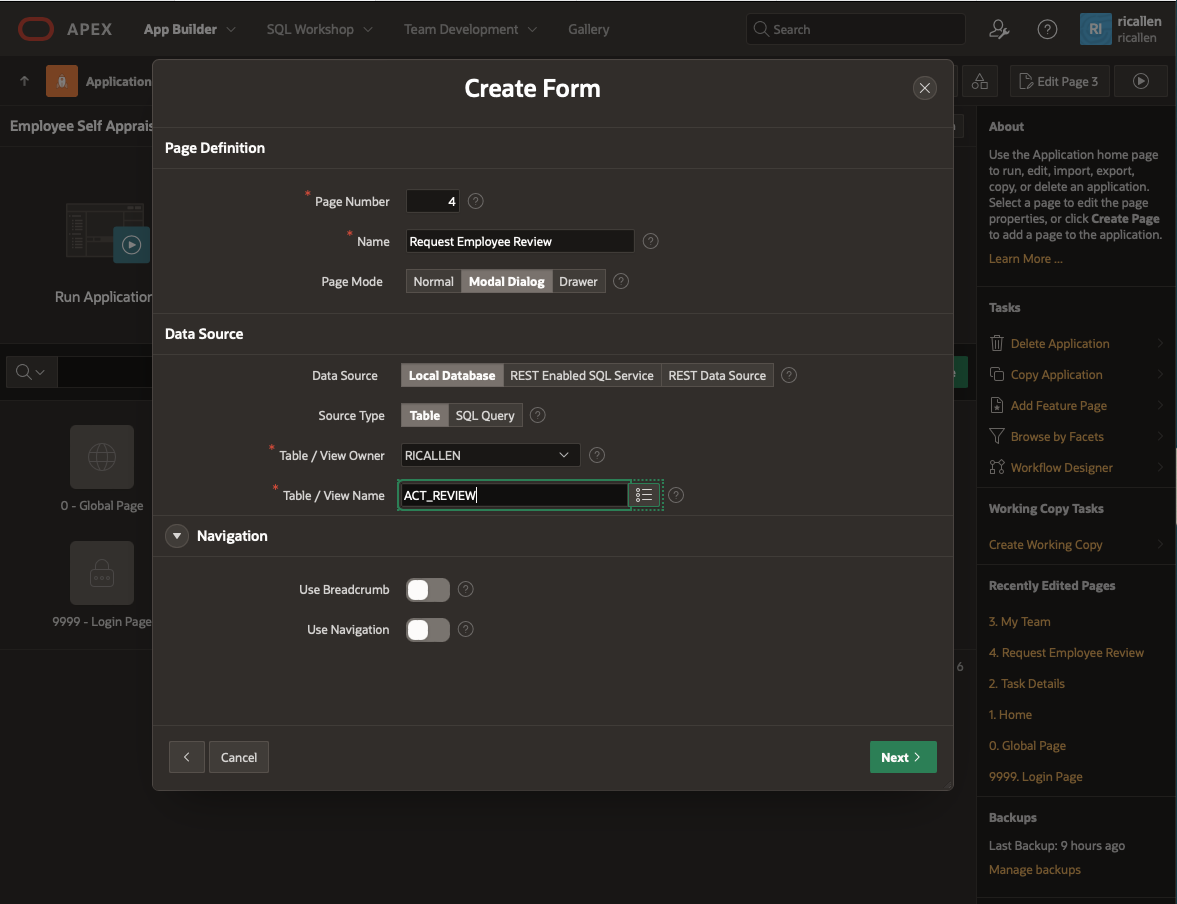
We need another small modal page that we will use to initiate our task, and which will be called by a button on the My Teams page.
Starting back in Application Builder again, click Create Page. Select a Form page, and click Next.
On the Create Form page:
- Page Name: Request Employee Review
- Page Mode: Modal Dialog
- Data Source: Local Database
- Source Type: Table
- Table / View Name: ACT_REVIEW
- Click Next
Open our new page in the Application Builder
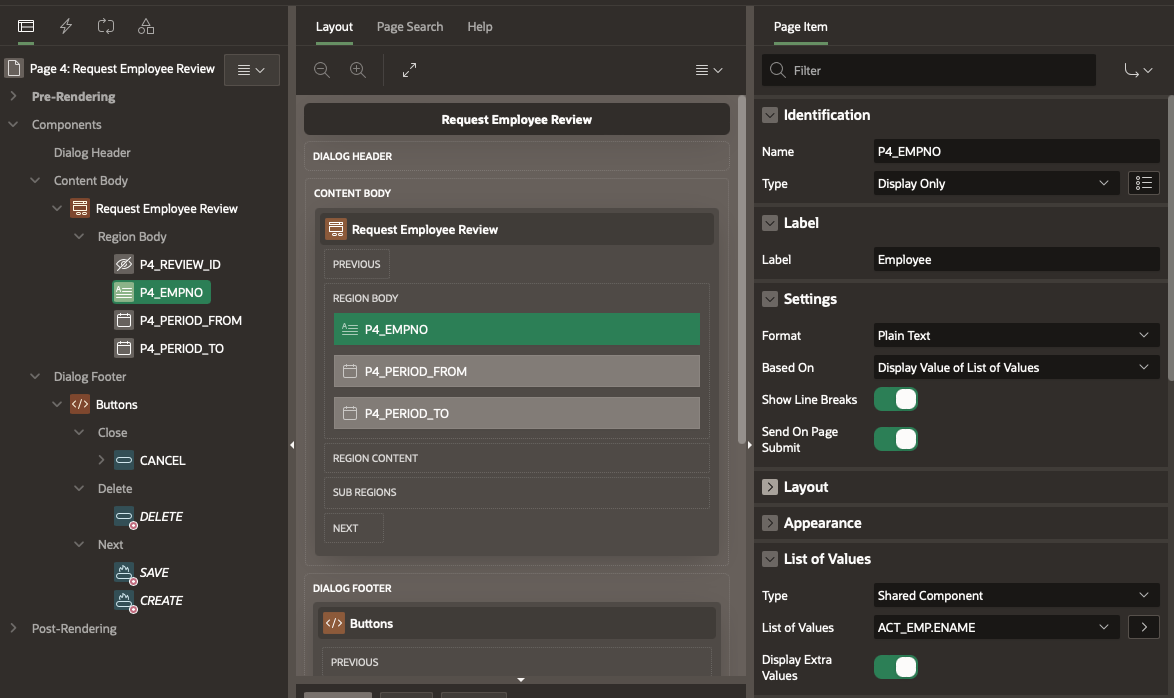
- In the Request Employee Review region, delete all columns except P4_REVIEW_ID, P4_EMPNO, P4_PERIOD_FROM, P4_PERIOD_TO.
- Select P4_REVIEW_ID and make it a Hidden Column.
- Check that P4_REVIEW_ID is set as the Primary Key.
- Select P4_EMPNO. Make this a Display only Item.
- Set it to be based on on the Display List of Values.
- Scroll down to the List of Values region.
- Type: Shared Component
- List of Values: ACT_EMP.ENAME
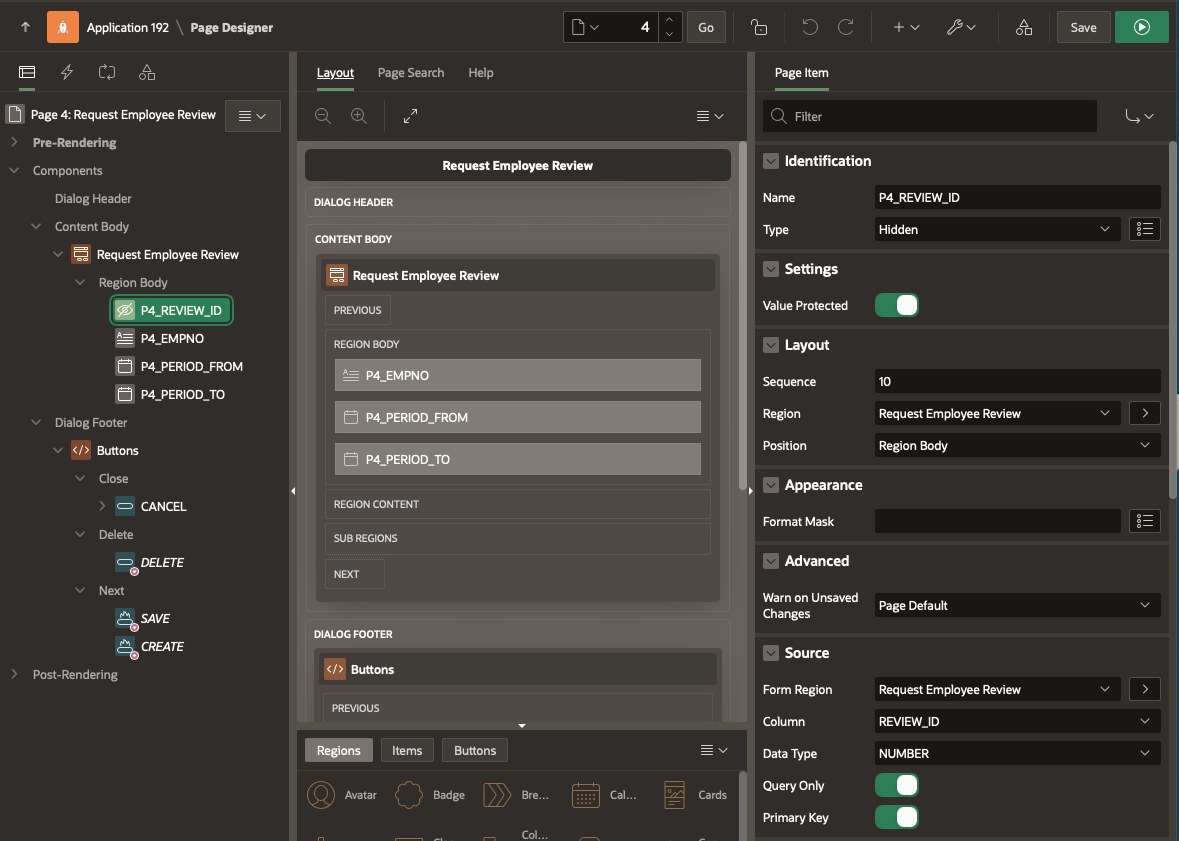
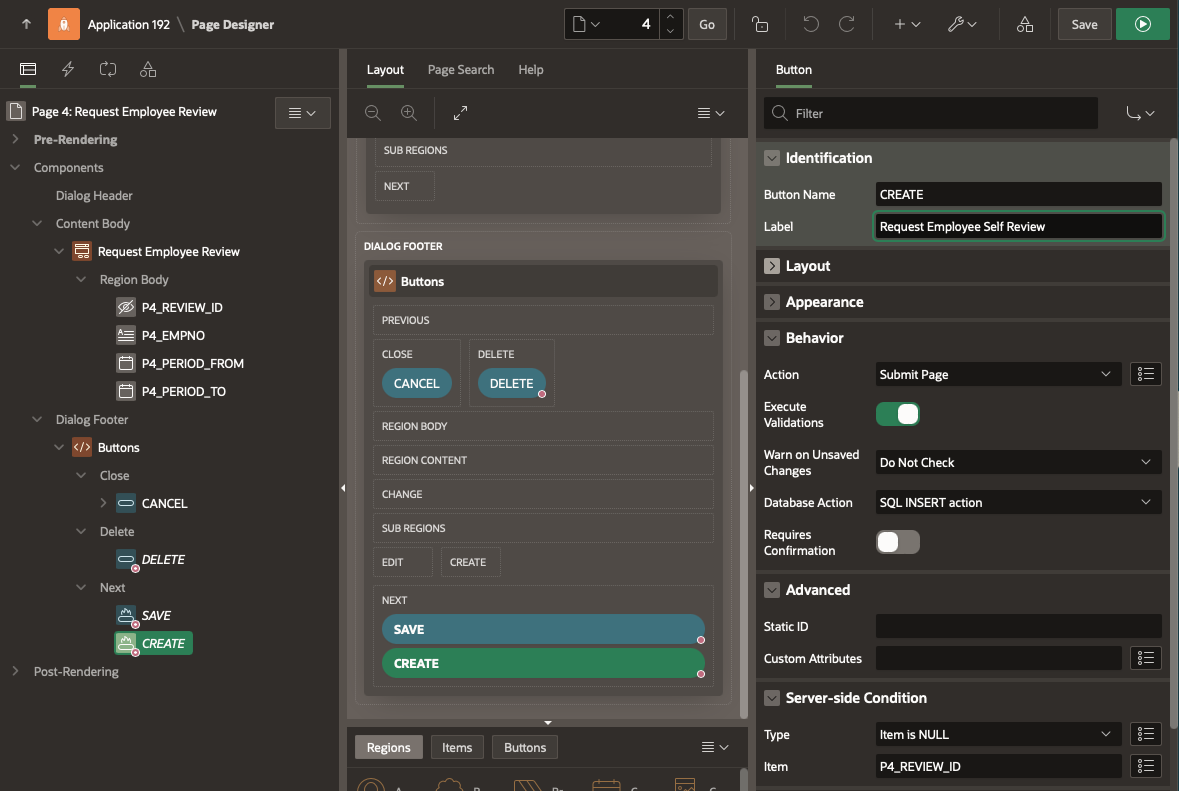
Now we are going to connect our Task Definition to this page. When the Create button is clicked, we want the application to insert a new record into the ACT_REVIEW table, and then create an instance of our Action Task. We’ll start off changing the label on the Create button to Request Employee Review.
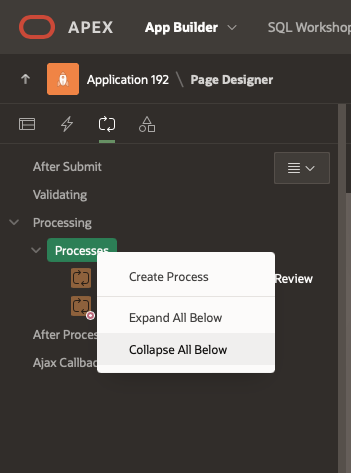
Now click on the Page Processes icon at the top of the left column to show Page Processes.
We want to add a process to start our Human Task (Action Task). This should occur after the normal DML processing has occured for the page – so make sure you place this below the Process Form Request Employee Review Process.
- Shift-Click on Processes. Insert Process.
-
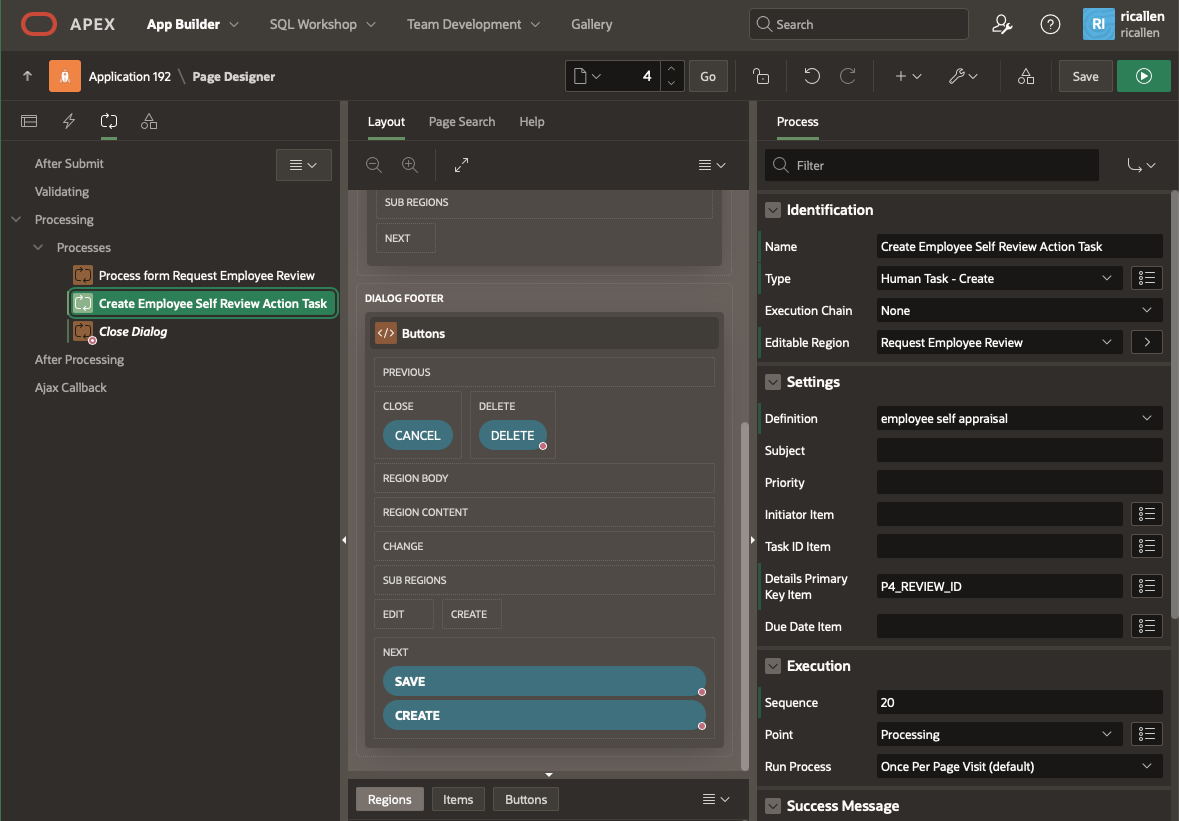
- Drag the New Process so that it occurs after Process Form Request Employee Review Process and before Close Dialog.
- On the Right Hand properties panel, for Type select Human Task – Create.
- Name : Create Employee Self Review Action Task
- Editable Region: Request Employe Review
- In Settings. Definition – Find our Action Task employee self appraisal
- Details Primary Key. As we discussed earlier, we’ll put the REVIEW_ID here as the underlying record for our task.
That should be all we need on this page. we now need to hook that up to the My Team page that we created earlier.
Linking the Request Review page to My Team
Return to the Application Builder, and select Page 3 – My Teams.

Find the My Team Region. Under Actions, right-click to Add Action
- Type : Button
- Label : Request Employee Self Appraisal
- Link: Redirect to Page in this Application
- Target: Click on the Link Builder
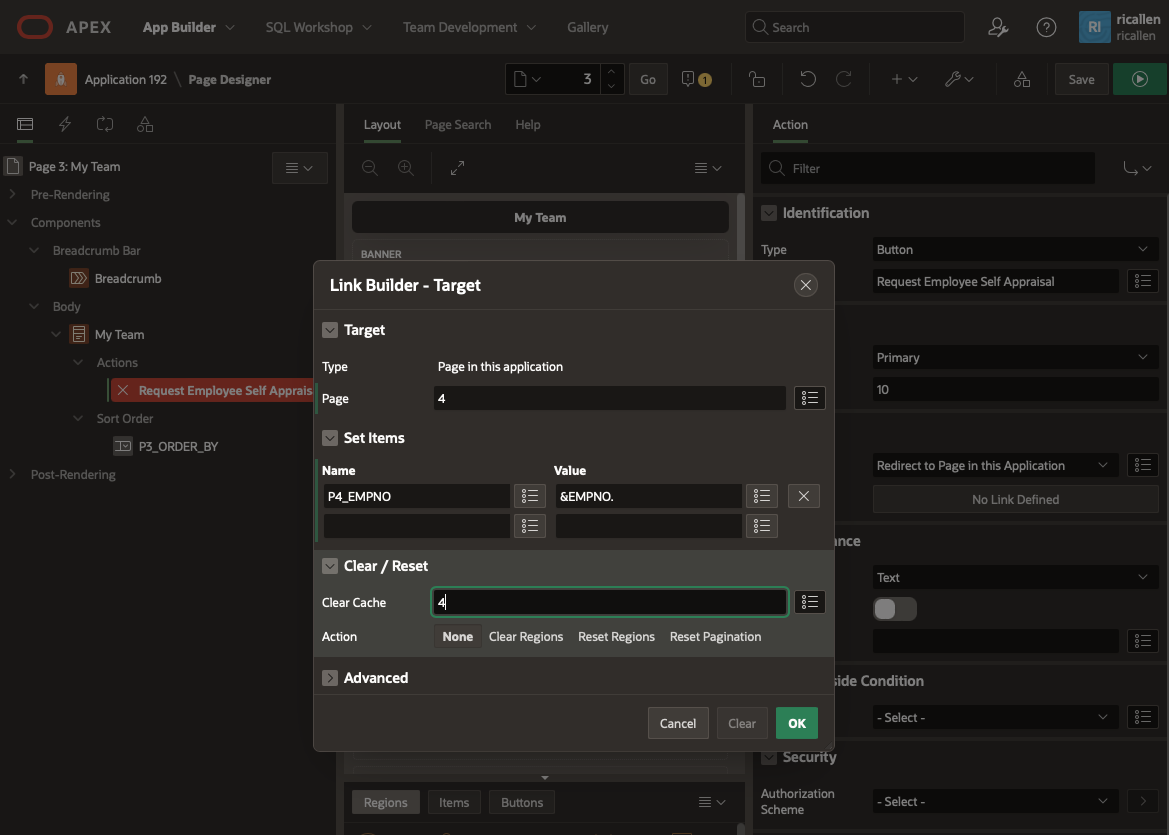
- Type: Page in this Application
- Page: 4
- Set Item: P4_EMPNO with &EMPNO.
Let’s next add a Task List to our app.
Generating the Task List Page
From APEX Approval Components, you might be familiar with the Unified Task List. This is a page that can be generated into your application, and acts as a task list or task inbox, and gathers all tasks for a user across the workspace. Yes, this collects a user’s tasks from all application in the current workspace – that’s why its called Unified. You can add a Unified Task List page to one or more applications that a user has access to, and the user will seee all their current tasks. The link to the task detail page should work across applications.
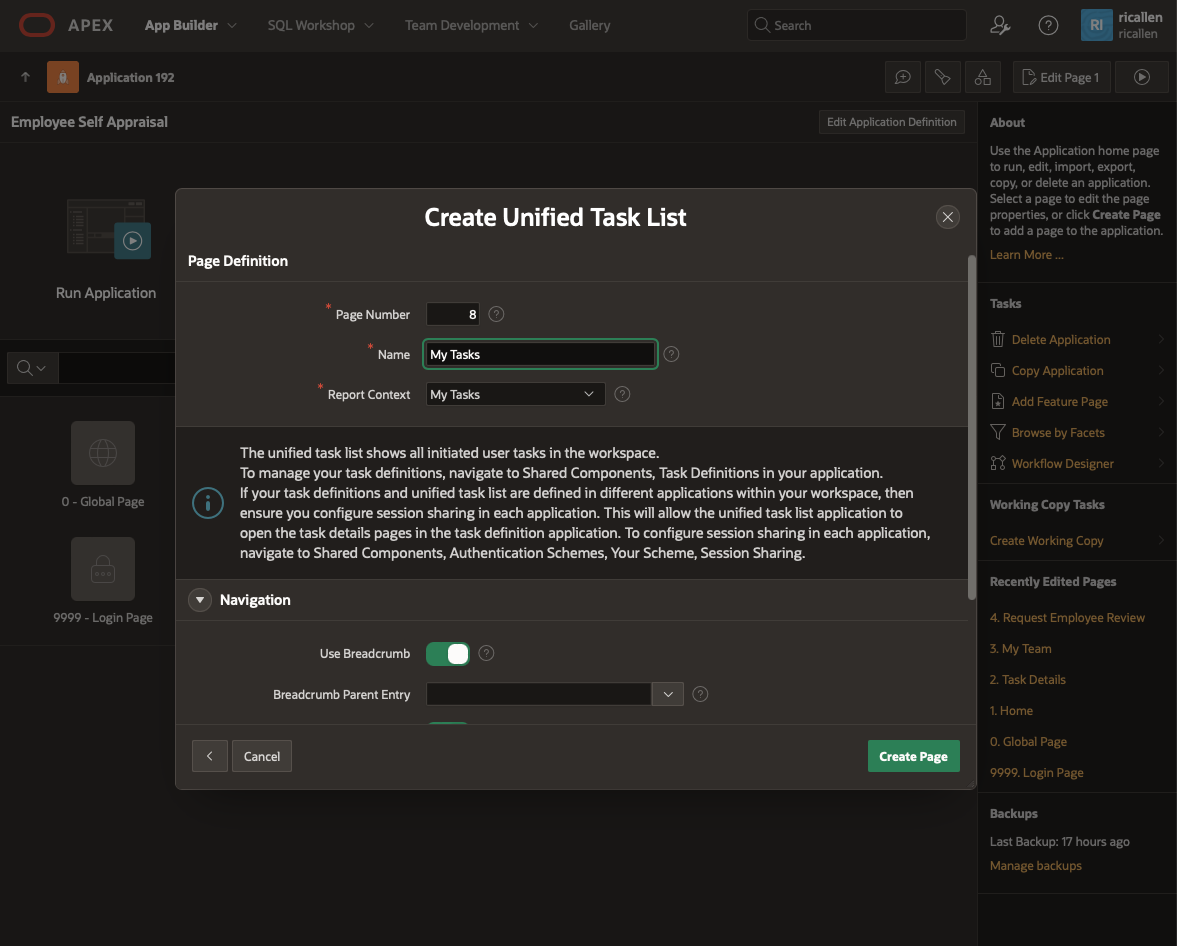
Starting back in the Application Builder, again click on Create Page.
This time, select the Unified Task List icon and click Next.
Now name the page: My Tasks.
There are three types of task list that you can create:
- My Tasks
- Tasks Originated By Me
- Tasks Administered by Me
We’re just going to create the My Tasks task list on this page. Select Report Context: My Tasks. Then click Create Page.
So now all of our application infrastructure is set up, and our Action Task is defined. Let’s try our application, test the basic functionality, and look at the first-cut generated Task Detail Page, which we’ll customise later.
Testing Basic Functionality
From the Application Builder, click Run Application to run our application in Developer Mode.
Login to the application as Sophie, our Manager, using the password you set earlier.
Open the Screen Navigation by clicking on the Hamburger icon in the top left hand corner.
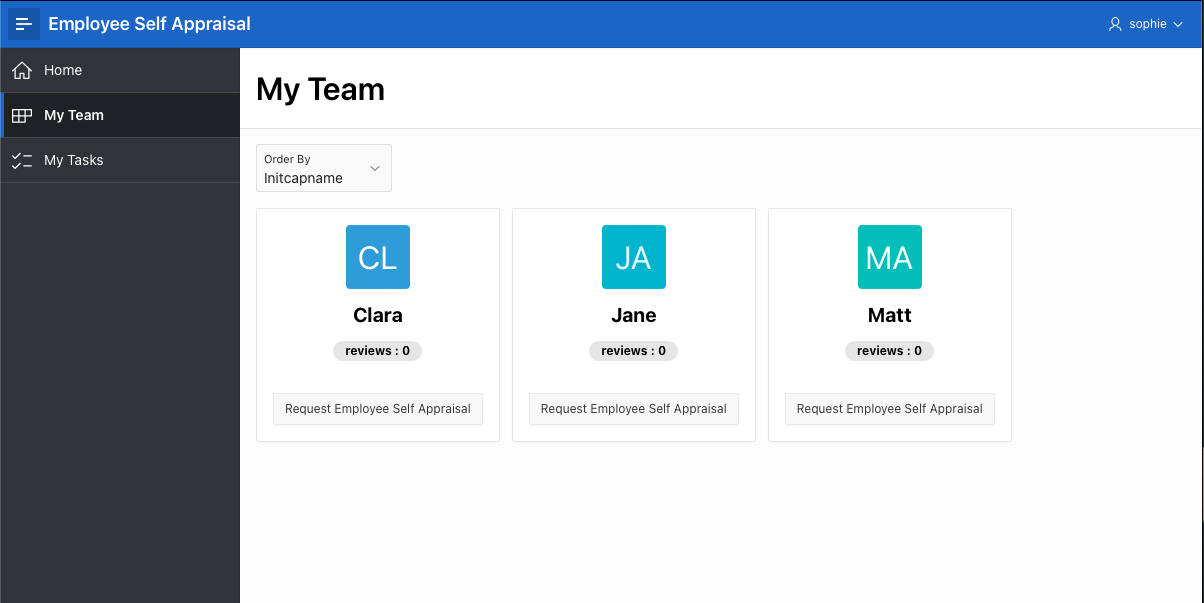
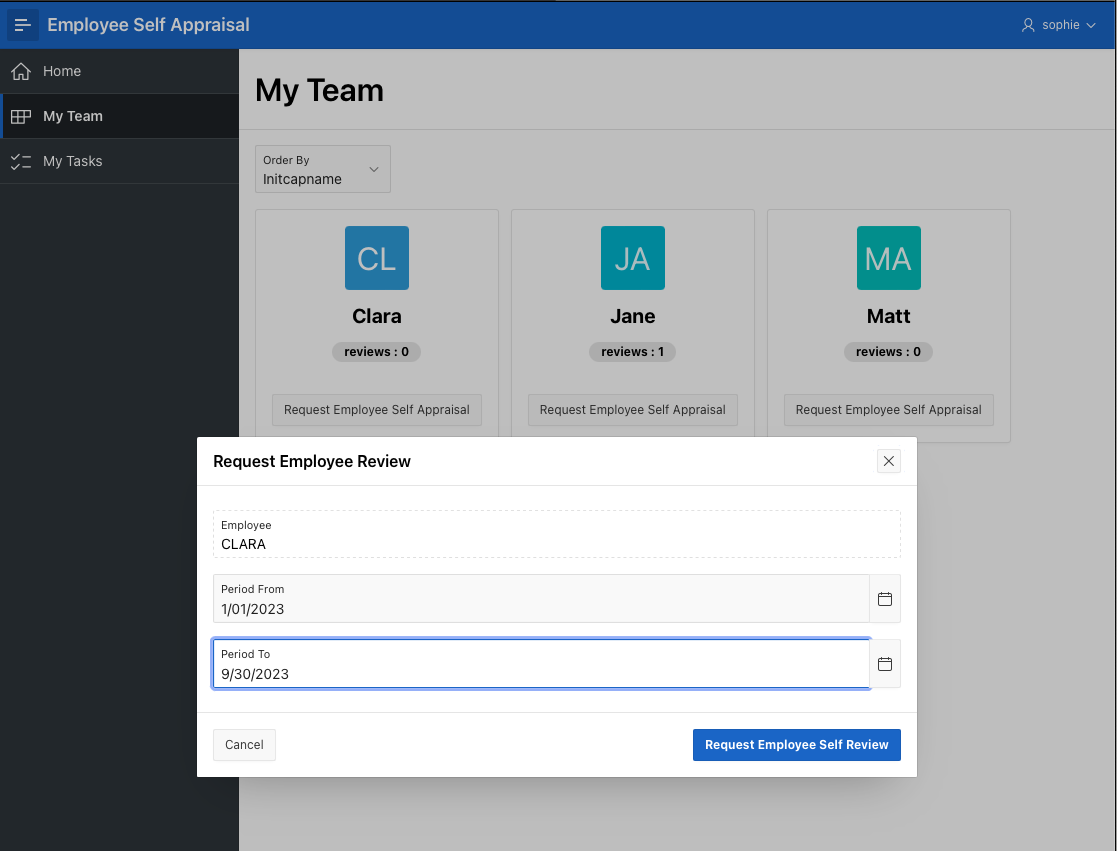
Let’s create a task for JANE to do a self review.
- On Jane’s card, click the Request Employee Self Appraisal button.
- In the modal pop-up window, specify a Start Period and End Period for her review.
-
- Click the Request Employee Appraisal button.
Our task should now be created.
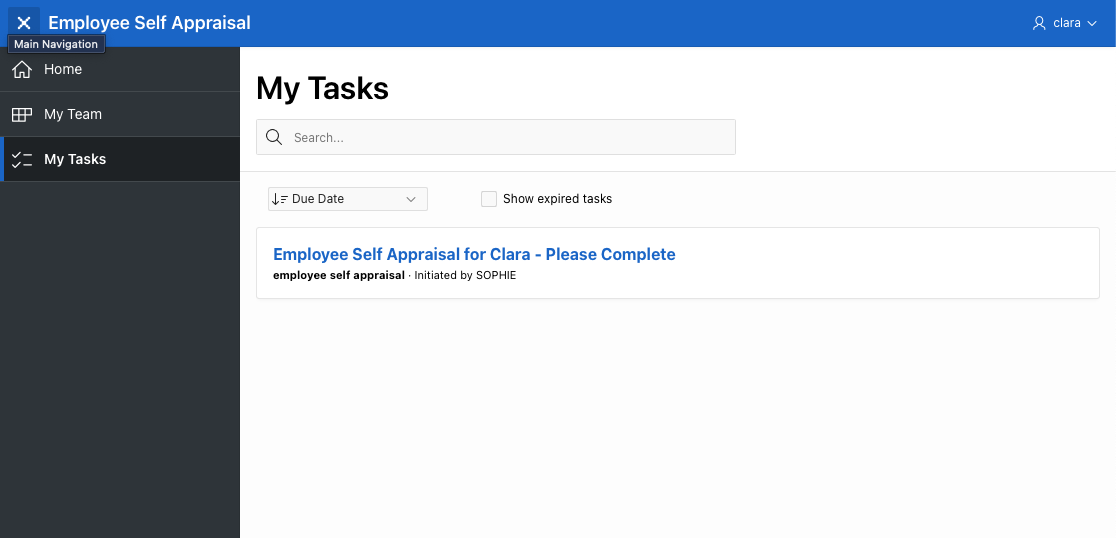
Sign out of the application. Sign back in as JANE. Click on the Hamburger to open the Navigation Menu. This time select My Tasks.
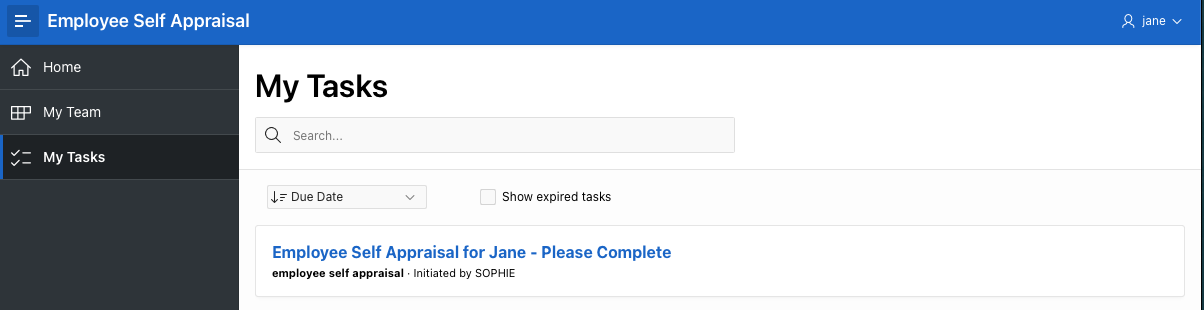
So our task was correctly created. As Jane is the only potential user for this task, it’s been automatically assigned to Jane — so you don’t see any buttons in the Task List for claiming the task. It’s not an approval, so you don’t see buttons to approve or reject the task directly from the Unified Task List.
Now let’s open the task by clicking on its title, and look at the Task Detail Page that was generated for us by APEX.
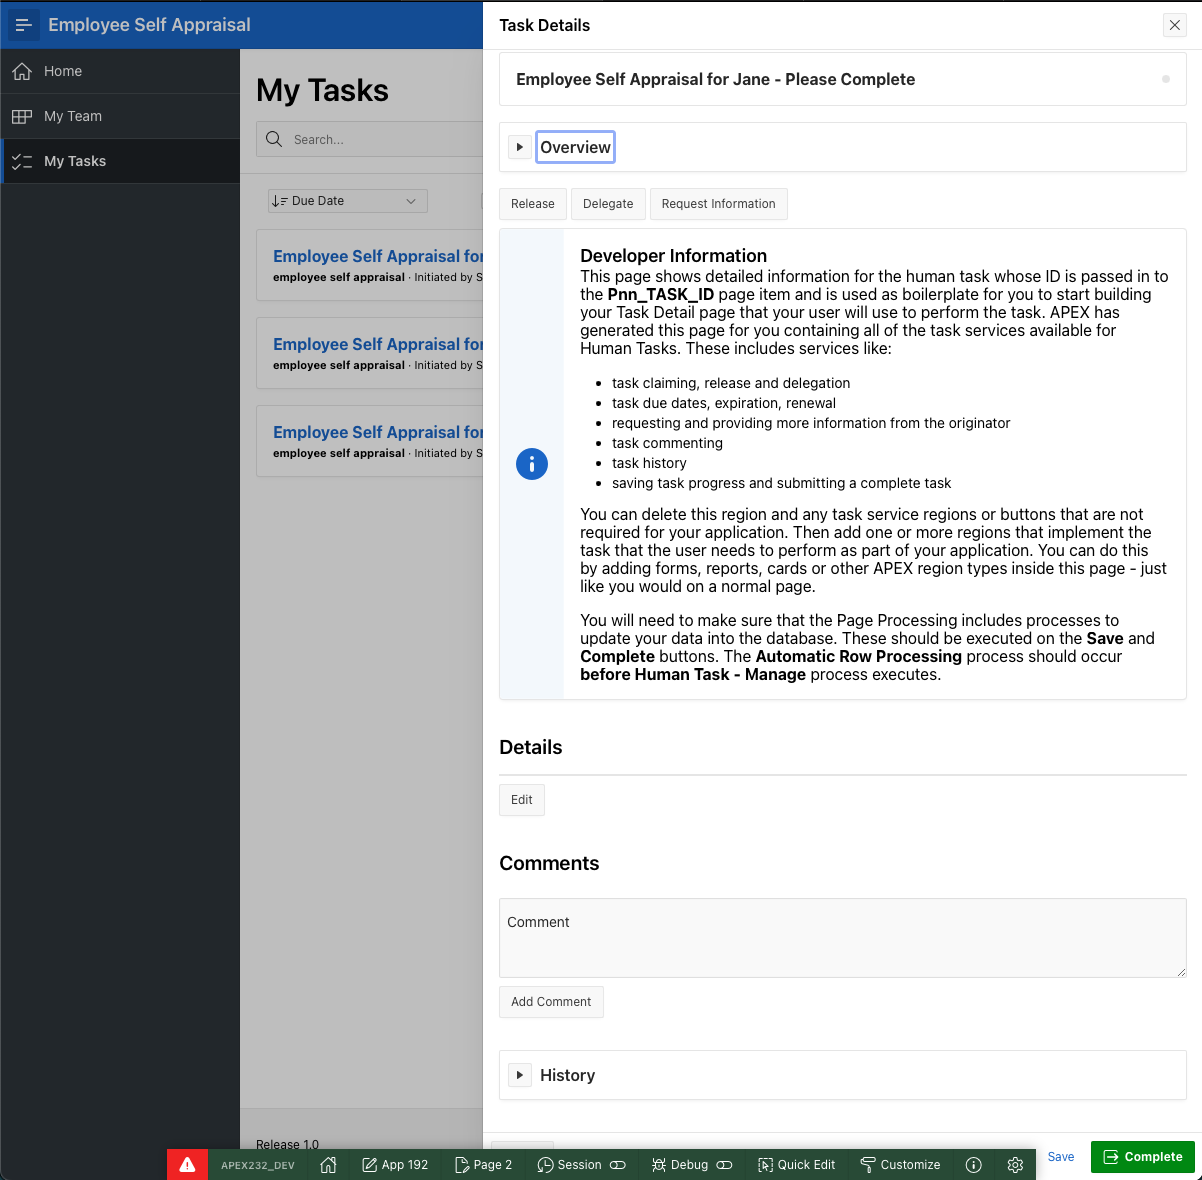
As it is running in Developer Mode, there is a region containing some instructions, which you can read.
The Task Detail Page needs a few changes before we are ready to use it in our application.
- There are several regions here that aren’t relevant for our little application. It’s OK to delete or comment-out the bits that you don’t need, and much easier to delete than add, so APEX gives you a page with everything in and expects you to remove some sections. we’re going to:
- remove the Release and Delegate buttons – employees shouldn’t be able to delegate doing a self-appraisal!
- remove the Developer Information region, after reading it.
- remove the Details region. Not relevant for our task.
- Keep the Request Information, Comments, and History sections in case they are useful.
- Add a region for our Self Appraisal, which is where the employee will do their self-review.
Now we need to customize the Task Detail Page that was generated earlier when we were defining the task. Finally we are really for the key part of this blog post!
Just Cancel out of this page and return to the Unified Task List, then Sign out as Jane.
Customising the Task Detail Page
When we defined our Action Task, a Task Detail Page was generated for us. The layout of the page is very similar to the Task Detail Page generated for an Approval Task but, unlike an Approval Page, we are building this page for a user to enter data and complete a task, rather than to approve or reject a business transaction.
Start again in the Application Builder. Select our Task Detail Page, Page 2
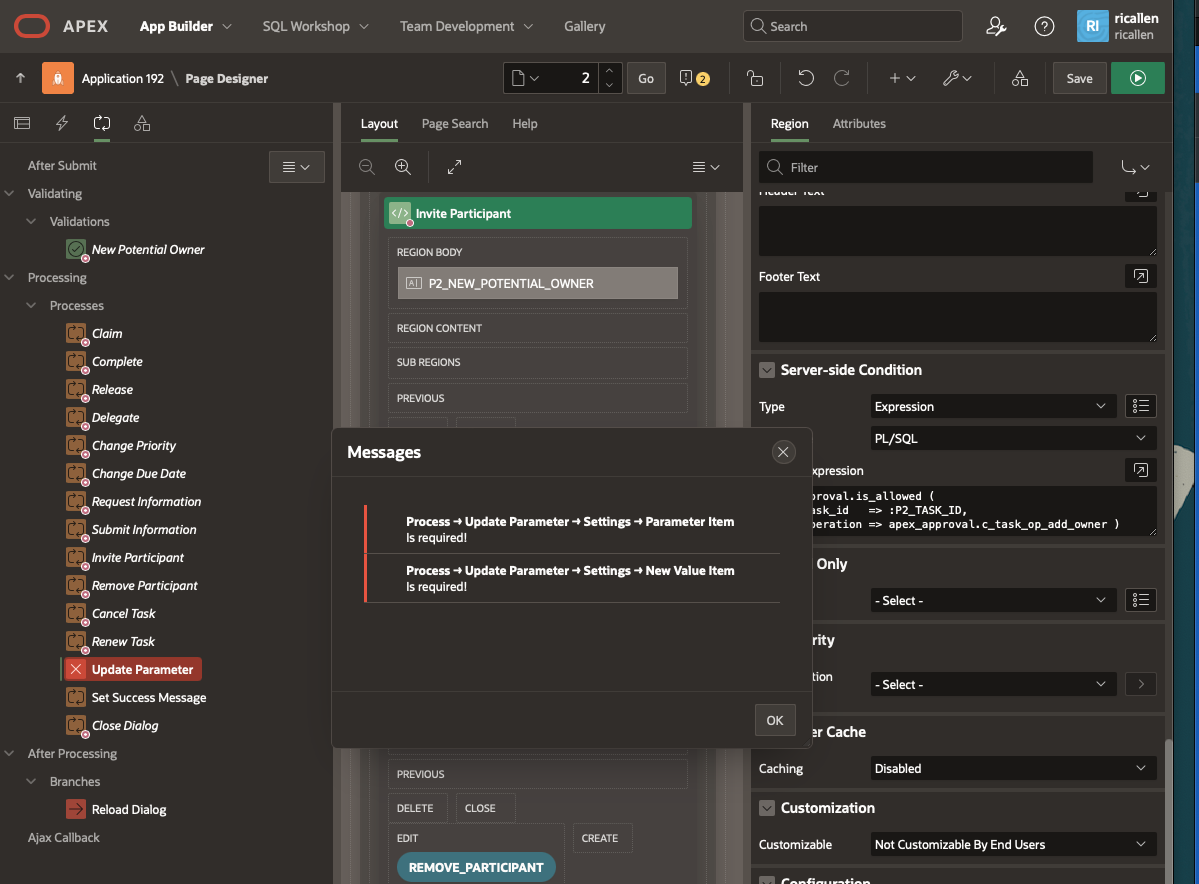
Remove the Unwanted Buttons
- Select the Developer Information Region, right-click, and Delete the Region.
- The Details region allows some of the Task Parameters to be edited. We won’t use that, so select the Details region, right-click, and Delete it.
- The Delegate Region. Go to Configuration. Select Commented Out.
- Also Invite Participant and Remove Participant. Go to Configuration. Select Commented Out.
-
- The removed buttons require you now to remove one of the page processes. Go to Page Processes. You will see Update Parameters showing an error. Right Click on Update Parameters, and Delete it.

Add Our Self Review Region
Select the Edt Task region, right-click, and select Create Region Below. We’ll use this New region for our Self Review Form.
Configure the Region as follows:
- Set Title to Self Review
- Change the Region Type to Form
- Source. Location: Local Database
- Type: Table
- Table Name: ACT_REVIEW
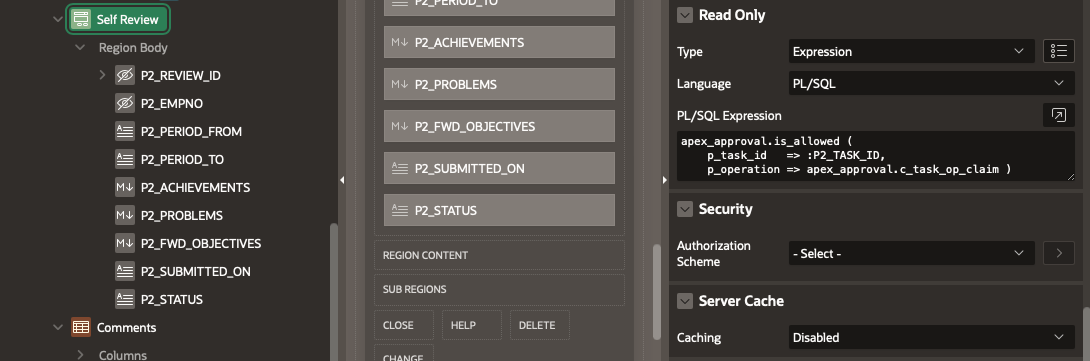
Now configure Items in the region as follows:
- P2_EMPNO: Type – Hidden
- P2_PERIOD_FROM: Type – Display Only. Adjust the format mask if you wish.
- P2_PERIOD_TO : Type – Display Only. Adjust the format mask if you wish.
- P2_ACHIEVEMENTS: Type – Markdown
- P2_PROBLEMS: Type – Markdown
- P2_FWD_OBJECTIVES: Type – Markdown. Title: Forward Objectives
- P2_SUBMITTED_ON: Type – Display Only
- P2_STATUS: Type – Display Only
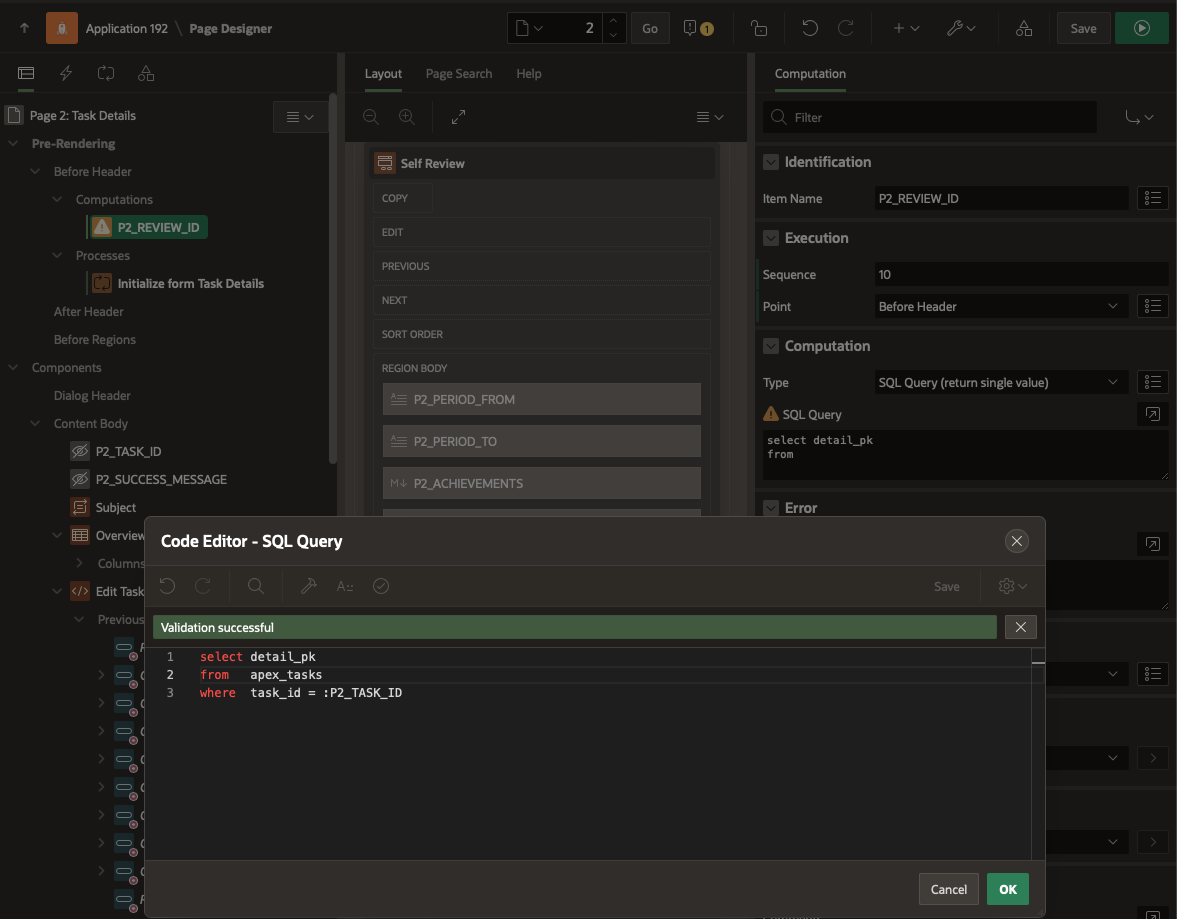
Add a Computation to get the REVIEW_ID
In order to populate the Form Region, we need to do a computation at page rendering time to get our REVIEW_ID from the APEX Task System, where it is held as a the APEX$TASK_PK.
Create a Computation by opening Pre-Rendering, right-click on Before Header, and select Computation.
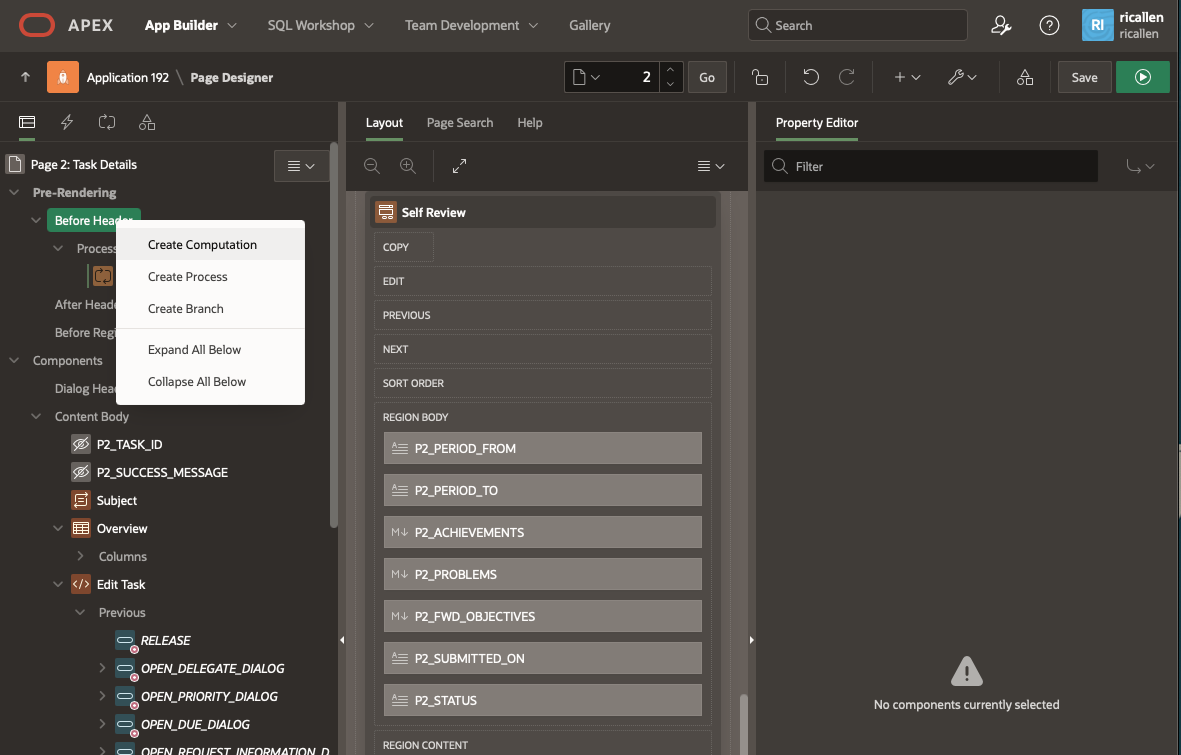
Configure the Computation as follows:
- Set the Item Name to P2_REVIEW_ID
- Point: Before Header
- Type: SQL Query (return single value)
- SQL Text:
select detail_pk
from apex_tasks
where task_id = :P2_TASK_ID
Make our Region Read-only if the task is not assigned
Our task is always auto-assigned, so is always available for just the one user. Many tasks, however, have more than one Potential User, and one user must claim the task before working on it. To prevent a user from doing work on the task before claiming it, then losing her changes when the page refreshes when they do claim it, it’s useful to make our Self Review region read-only if it has not been claimed. While we don’t need to do that in this form, it’s a good practice to get into, and so I will do it!
We have some conditional read-only logic in the generated form that we can re-use. The CLAIM button is only visible when the task is unclaimed. That is the same condition that we need for our region to be read-only.
Find the CLAIM button, then look for its Server Side Condition code. Copy it.
apex_approval.is_allowed (
        p_task_id => :P2_TASK_ID,
        p_operation => apex_approval.c_task_op_claim )
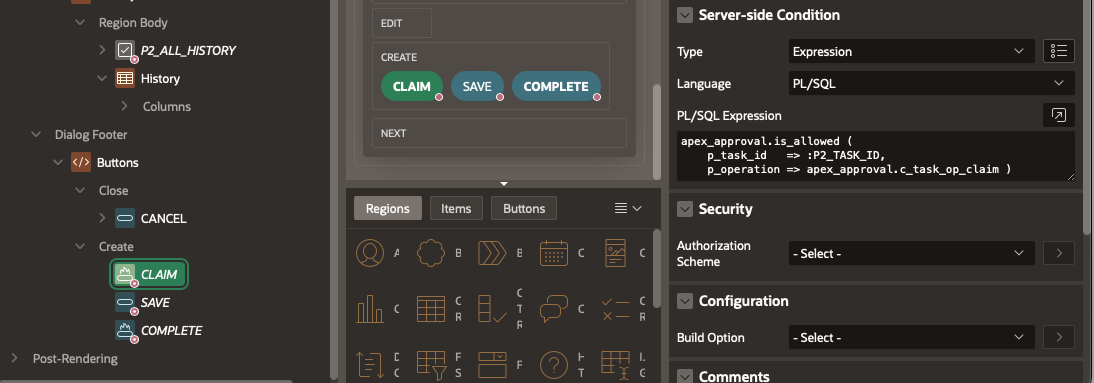
Now find our Self Review form region. On the Property Panel, find Read Only. Set the Type to Expression and paste the Condition from the CLAIM button into here.
Add Page Process for Task Completion
Our Task Detail Page has been generated with two buttons at the lower right corner.
- SAVE. We want this to just save any data that the user has entered, but not to mark the task as being complete.
- COMPLETE. We want this to save any data that the user has entered, and also mark the task as being complete.
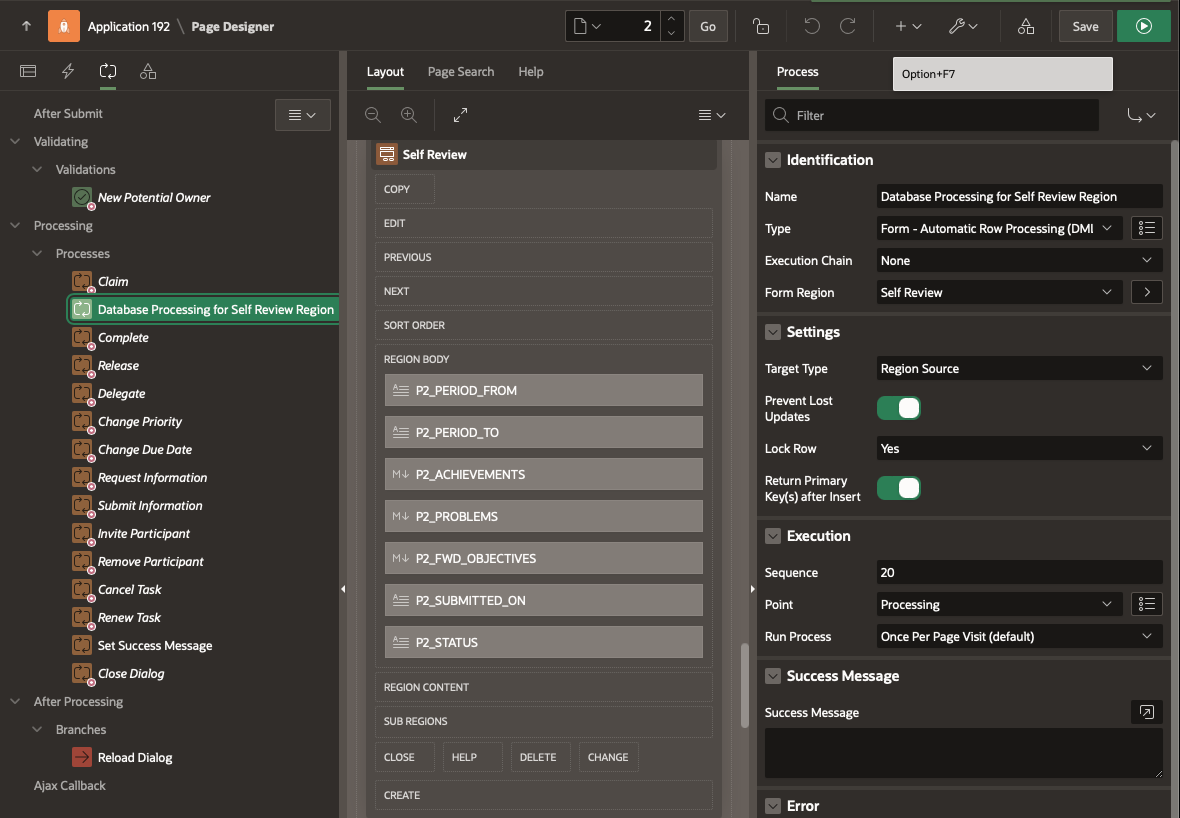
We need to add a page process for our new form region, and we need to make sure that Complete marks the task as being complete, before closing the page. So the order in which these processes occur will be important. We always want a database change to occur before the workflow task gets completed, so our DML Page Processing process must occur BEFORE the Human Task – Manage process is used to send a complete_task call to the APEX Task Manager.
Click on the icon at the top of the right hand panel to display Page Processes. You can see that APEX has generated a lot of page processes for you to handle all of the possible task actions.
- Right-click on the Processes heading, and select Create Process from the pop-up menu.
- Find the New process that was created at the bottom of the page processes list. Drag it up to above Complete.
- In the Properties Panel: Type : Form – Automatic Row Processing (DML)
- Form Region: Self Review
- Name: Database Processing for Self Review Region
- Target Type: Region Source
Running Our Task Detail Page
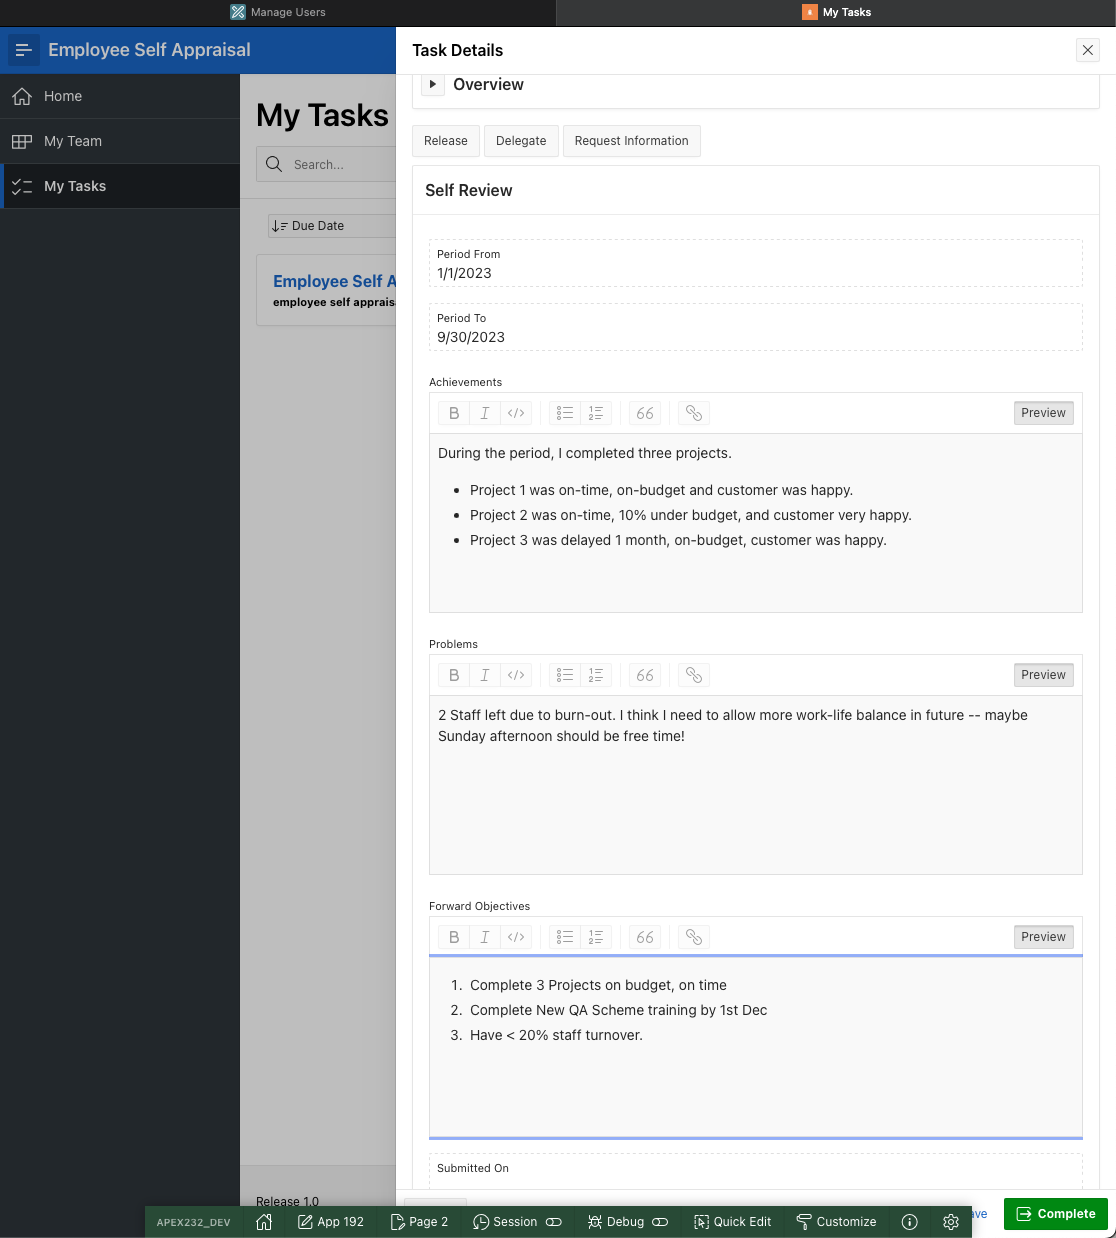
Let’s now try our application again. Start off by signing in as SOPHIE, and this time request that CLARA do a Self Review.
Sign out as SOPHIE. Sign in as CLARA. Open the Unified Task List.
AT-rt-clara-utl.png
Our Review Task for Clara is sitting in her Unified Task List, as expected. Click on the task title to open the Task Detail Page.
Note that the task is assigned solely to Clara, and so it has been auto-claimed for her. Our Self Review region is showing, and is not in read-only mode because Clara is the Task Owner.
You can go ahead and type into the 3 markdown regions.
If you click Save, then close the Task Detail Page, you will return to the Unified Task List.
Select our task again, you will return to the Task Detail Page and your previous work should be visible. So the work in a task can be saved as a draft, or an incomplete task, and it will remain in the Task List and still be editable when you return.
Make some more changes, then this time click Complete. The Task Detail Page will close, and the task is no longer available in the Unified Task List as it has been completed.
Summary
This example has shown you the basics of how to define an Action Task, how to configure the Task Detail Page, and how to build a basic Task-based application.
Remember that this has been a very simple demo, with a slighty contrived use-case. If you use APEX Human Tasks (Approvals and Actions) in many applications in yor workspace, remember that all of the users tasks from all applications in the workspace appear in the user’s Unified Task List – so you could have tasks in your task list that include expense claim approvals, self-review action tasks, actions to process an invoice, etc. all in the single Task List. Indeed, the more applications you have pushing Tasks into your task list, the more useful the Task List becomes. We could have assigned priorities or due dates or task expiration deadlines onto our tasks, to harness the power of the Human Tasks. Other blog posts on APEX Workflow and APEX Approval Tasks cover more of these details.
Our application has also been simple, and contained just a single task. Tasks can be standalone, and not need to be controlled as part of a larger process workflow. But with APEX Workflow, or if you are using BPMN, Flows for APEX, these tasks can be controlled by a workflow system as part of a more complex process flow.