![]()
Introduction
This article explains how to extract data from Object Storage, apply transformation logic, load the transformed data into Oracle Autonomous Data Warehouse (ADW) using Oracle Data Integration Service from Oracle Cloud Infrastructure (OCI), and ultimately create the analytics for better decision-making using Oracle Analytics Cloud (OAC).
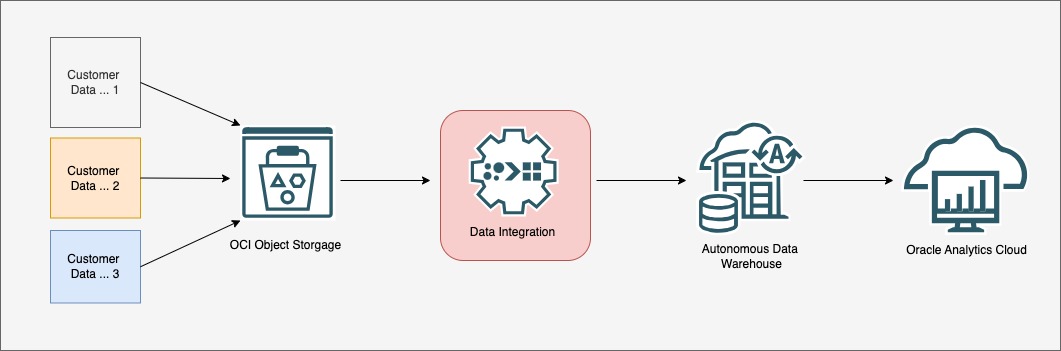
Services – High Level Overview
Data Integration Service
Oracle Data Integration Service is an ETL or ELT tool (i.e. Extract, Transform, Load or Extract, Load and Transform). It is a codeless graphical user interface to build, manage and maintain the data integration process with less effort.
Oracle Autonomous Data Warehouse
Oracle Autonomous Data Warehouse is a serverless, easy-to-use, fully autonomous database that scales elastically, delivers fast query performance, and requires no database administration.
Oracle Analytics Cloud
Oracle Analytics Cloud is a comprehensive analytics platform which empowers customers to quickly see data visualized, which helps the organization make more informed decisions and increase growth.
The steps to use these services are below.
1. Create an Object Storage Bucket
-
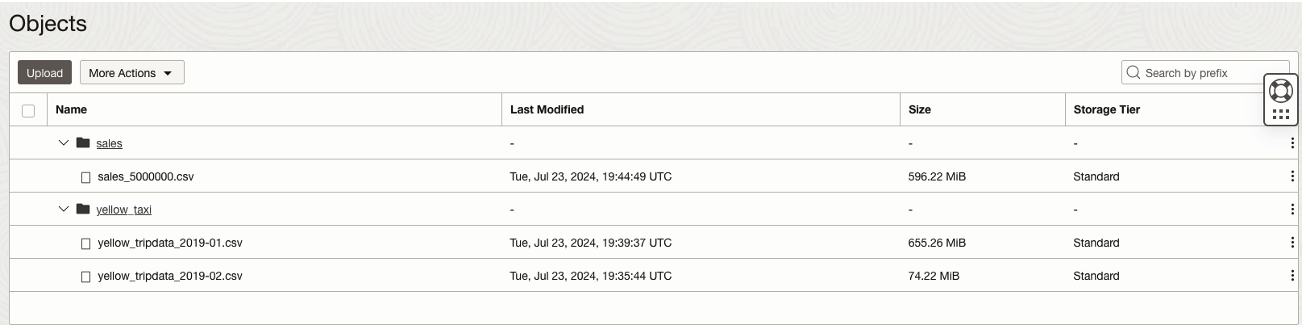
Create a bucket in Object Storage to store the data. If you are looking for test data, you can download sample data here.
- Copy the source data into the bucket as shown below.
2. Create an ADW Instance
Create an ADW instance in your compartment using the private subnet.
- Sign in to the OCI Console
- Navigate to Oracle Database à Autonomous Data Warehouse
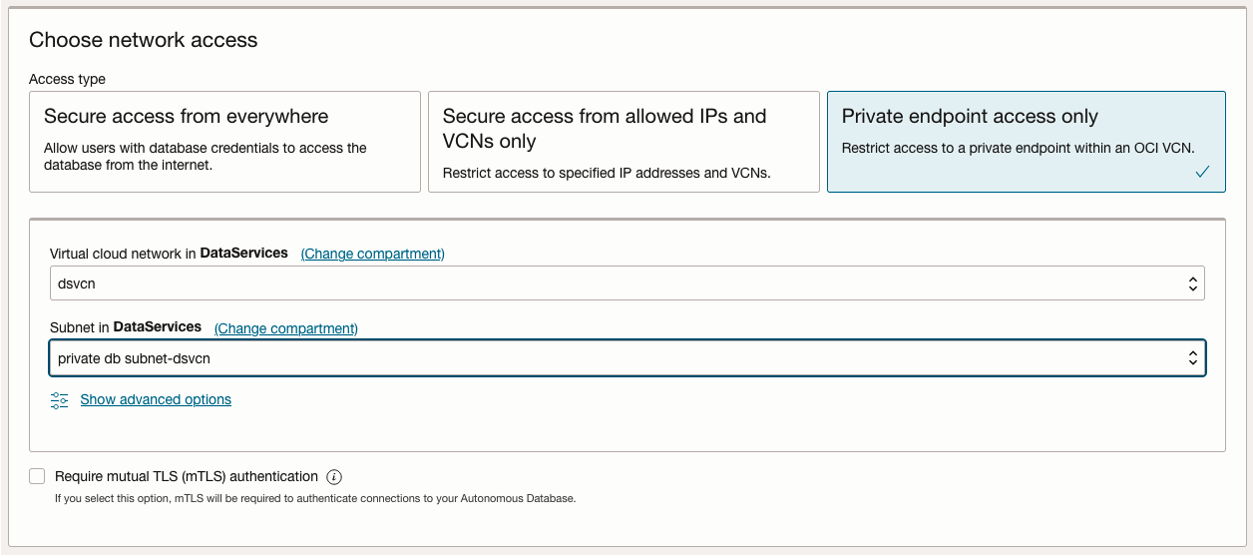
- Choose the Private Endpoint Access only and choose the appropriate VCN and Subnet for the database as shown below. You can choose the network access based on your network and use case. For more information on how to create VCNs and Subnets, you can refer to the OAC Disaster Recovery Technical Paper, Disaster Recovery Configuration for Oracle Analytics Cloud.
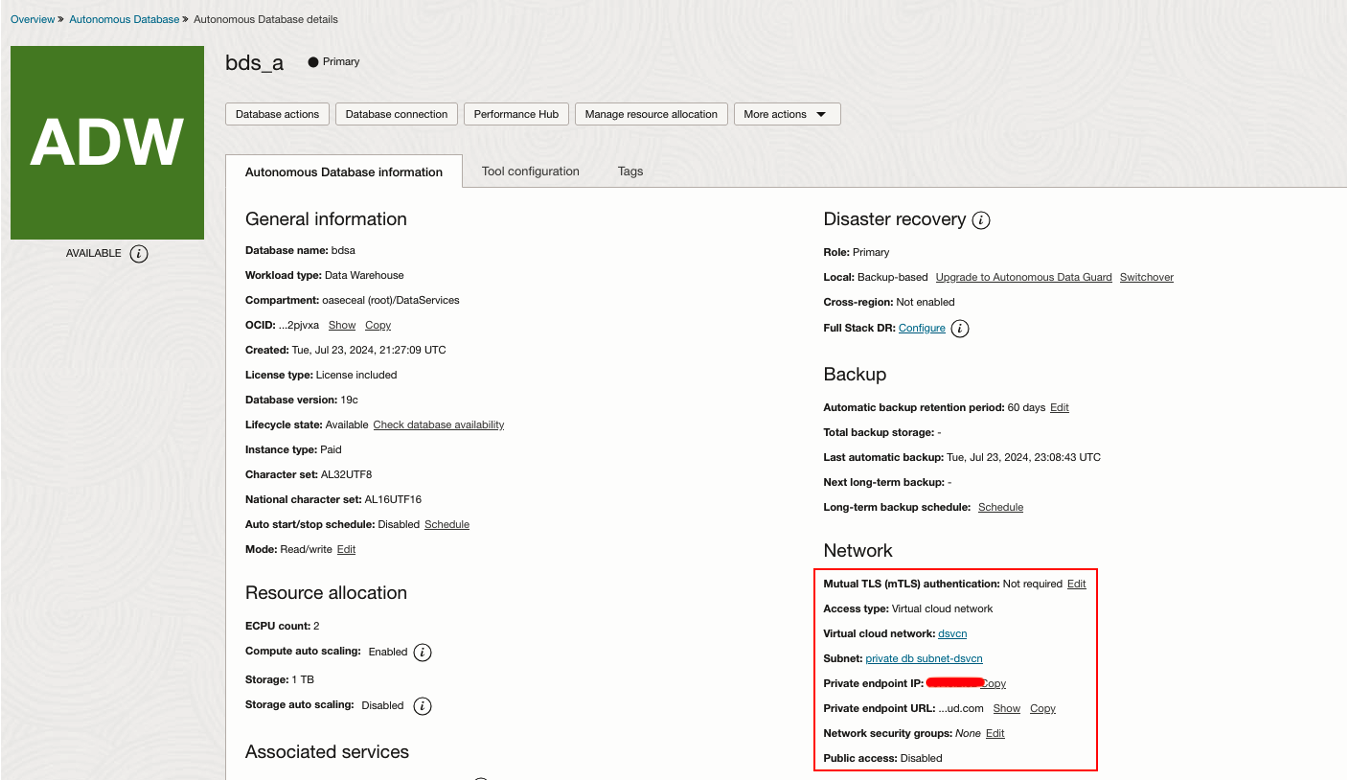
- Once the database is created, the confirmation page will be returned as shown below.
- Click the Database Connection tab to download the database wallet to connect through SQL Developer or any utility to run SQL queries.
- Keep a note of the DB admin password.
- Upon creating the database, create a database schema or user to store the database objects and data.
- Add the necessary roles to the user as given below to store data and process it from Oracle Cloud instances.
CREATE USER bds_user IDENTIFIED BY <user password>;
GRANT CONNECT, RESOURCE TO bds_user;
GRANT EXECUTE ON DBMS_CLOUD TO bds_user;
GRANT DWROLE TO bds_user;
ALTER USER bds_user QUOTA UNLIMITED ON <tablespace name>;  -- Set this limit based on your data volume
Data Integration
Prerequisites
The compartment needs to have the below permission set for the Data Loader to interact with the Object Storage location.
If the permission is not given, then users will receive an error message similar to “Cannot resolve schema <schema name> in connection <connection name>, while preparing operator <file name>”
allow any-user to manage object-family in compartment <compartment name> where ALL {request.principal.type = 'disworkspace', request.principal.id = '<workspace ocid>'}
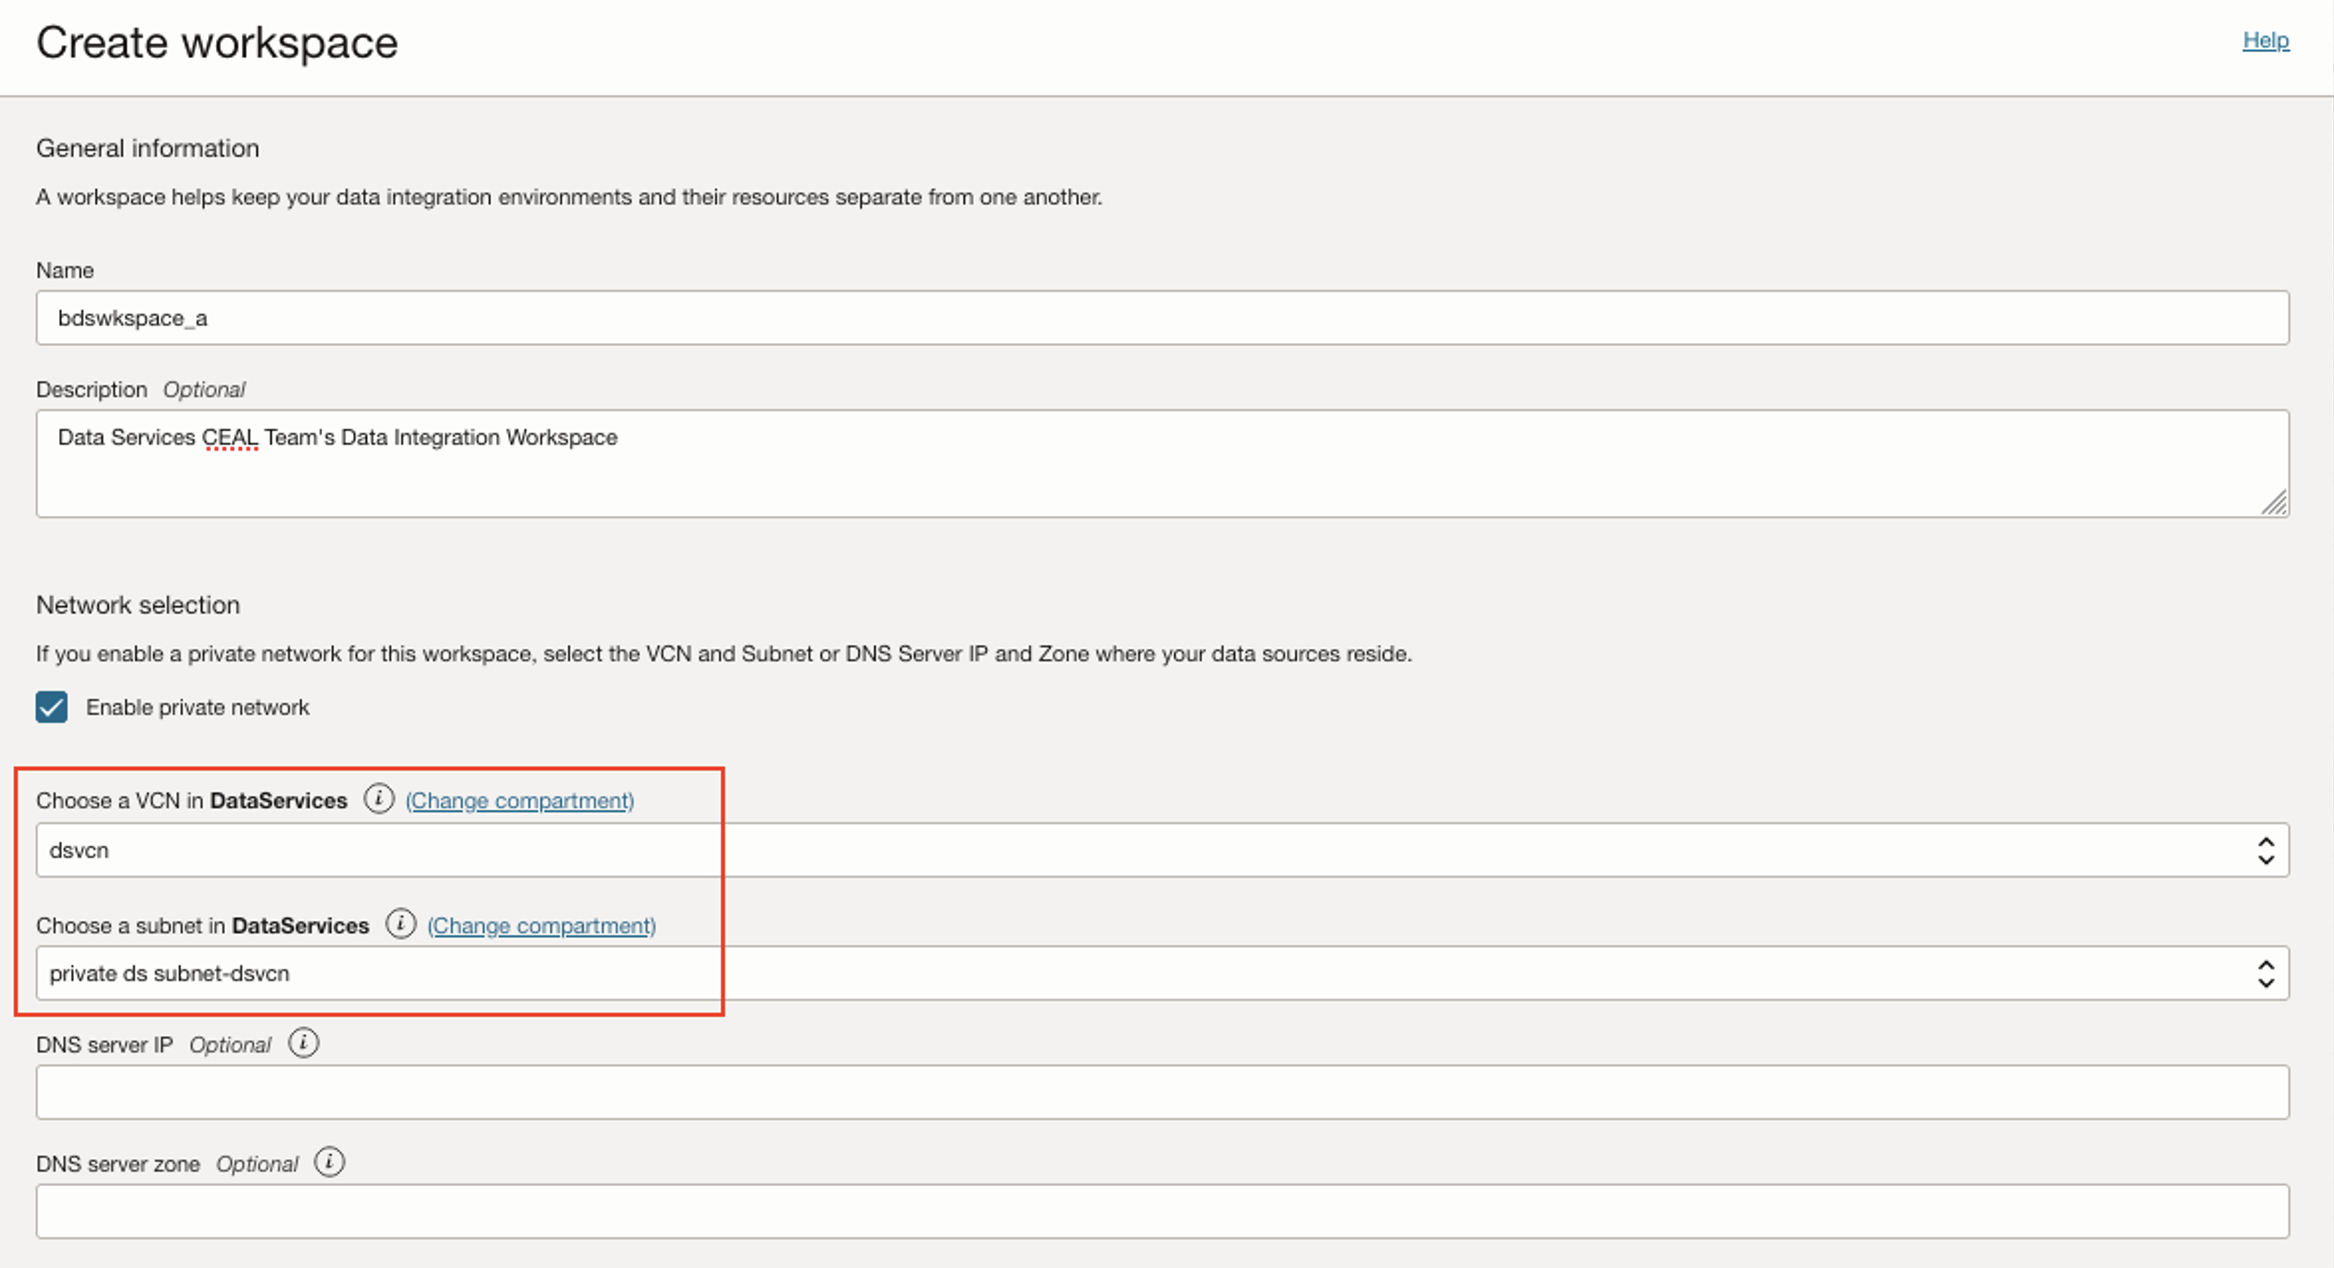
Create Your Workspace
A workspace is an organizational construct to keep multiple data integration projects and their resources (data assets, data flows, tasks, and so on) separate from each other, to help users stay organized.
- Sign in to the OCI console.
- Navigate to Analytics & AI à then under Data Lake, click Data Integration.
- Change the OCI region, e.g., US Phoenix. Best practice is for all services to be in the same region to achieve better latency, but this can vary based on use case requirements.
- Choose Workspaces and click “Create Workspace”.
- Create the workspace in the appropriate compartment, region, VCN, and Subnet. Again, refer to the OAC technical paper Disaster Recovery Configuration for Oracle Analytics Cloud for more details about compartment, VCN, and Subnet.
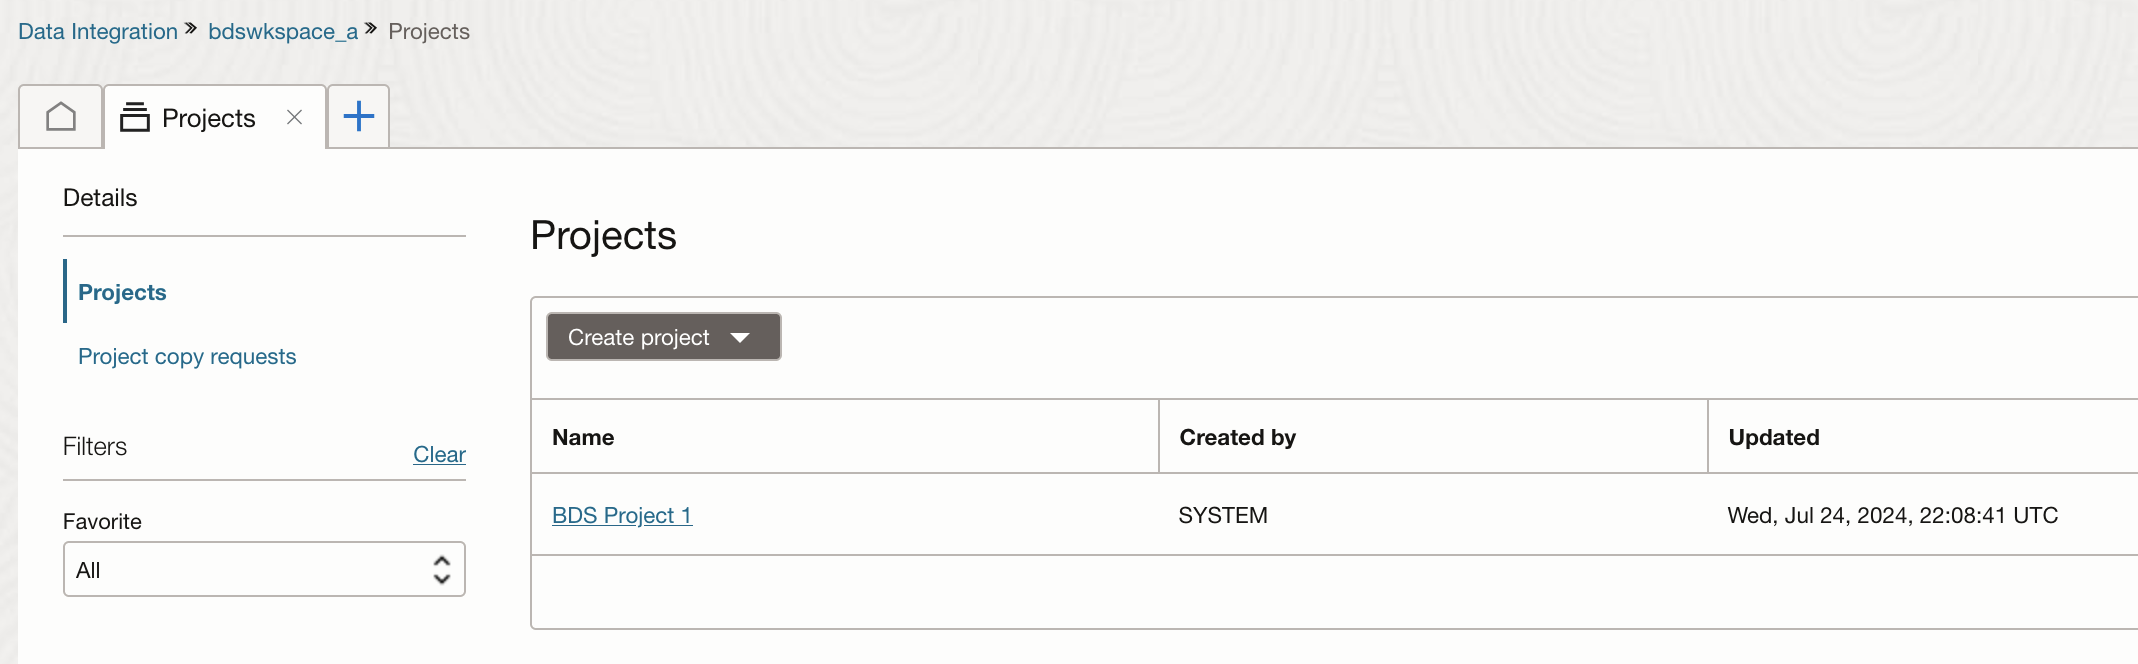
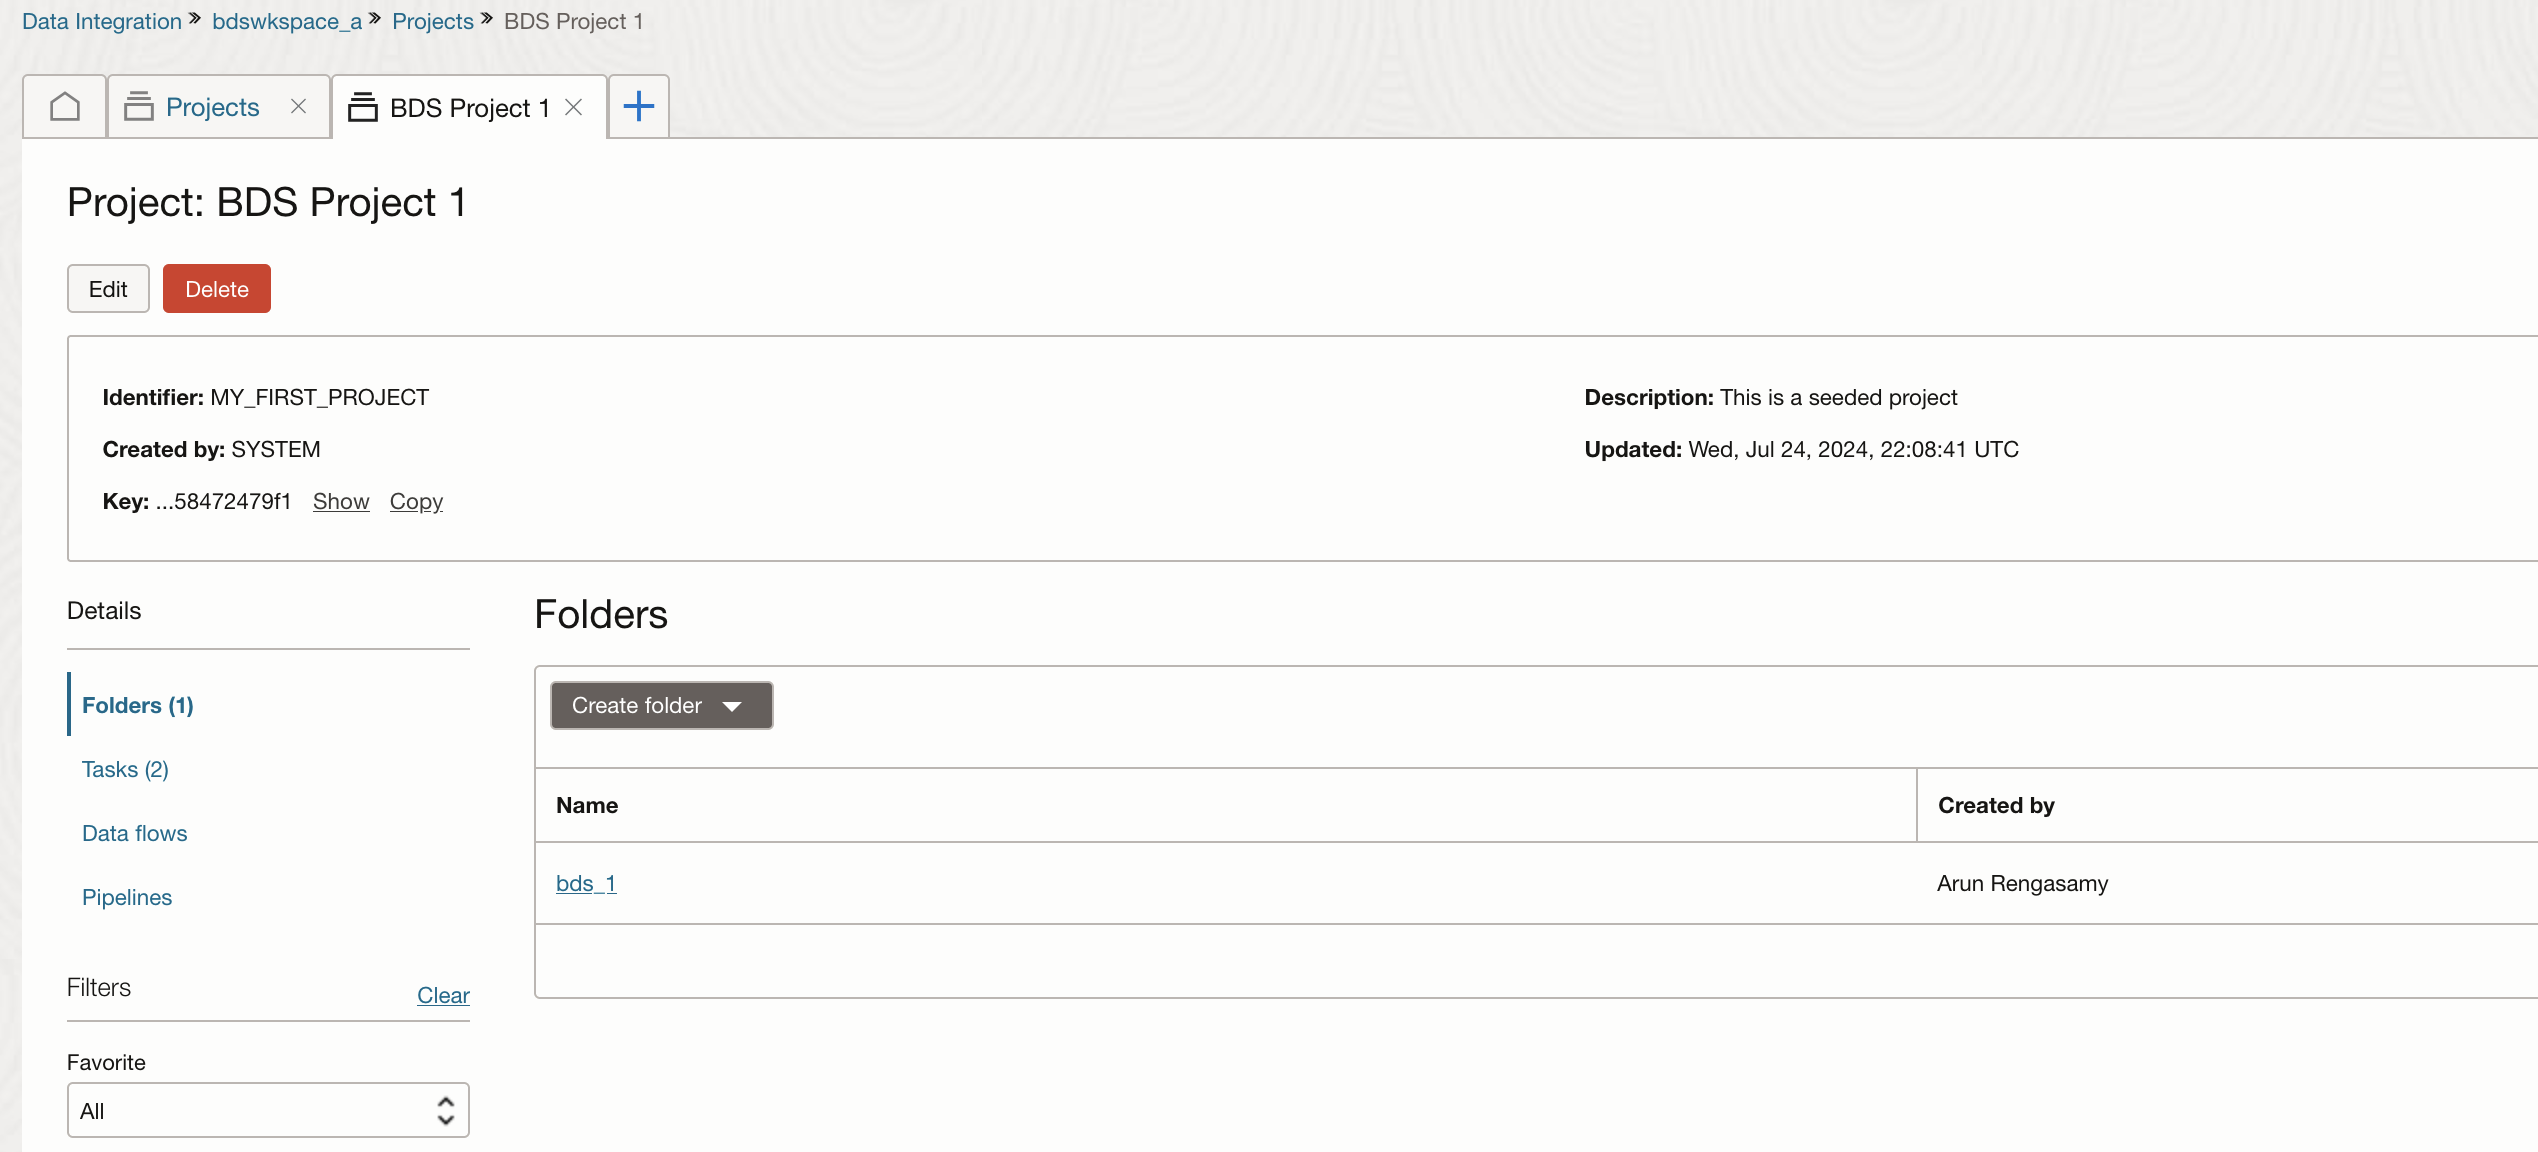
Create Projects & Folders
Projects are ways to organize resources within a workspace such as tasks or data flows. To further organize the resources into logical groups, create folders in the project.
Create Data Assets & Connections
You will need to create Data Assets for source and target locations of the data.
Create Data Assets for Object Storage
- Under Data Integration, choose the workspace that was created earlier.
- Click Create Data Asset.
- Choose OCI Object Storage as a Type for this data asset.
- Input Tenancy OCID, Namespace and OCI region.
- Click Test Connection at the bottom to test this connection.

Create Data Asset for ADW
- Under Data Integration, choose the workspace that was created earlier.
- Click Create Data Asset.
- Choose OCI ADW as a Type for this data asset.
- Provide ADW connection details.

Create a Data Loader Task
Prerequisites
Once the workspace is created, add the below policies (Identity & Security à Policies) at the root compartment for the workspace to interact with Object Storage.
Allow any-user to manage buckets in compartment <compartment name> where ALL {request.principal.type = 'disworkspace', request.principal.id = '<workspace ocid>', request.permission = 'PAR_MANAGE'}

Allow any-user to manage object-family in compartment <compartment name> where ALL {request.principal.type = 'disworkspace', request.principal.id = '<workspace ocid>', request.permission = 'PAR_MANAGE'}
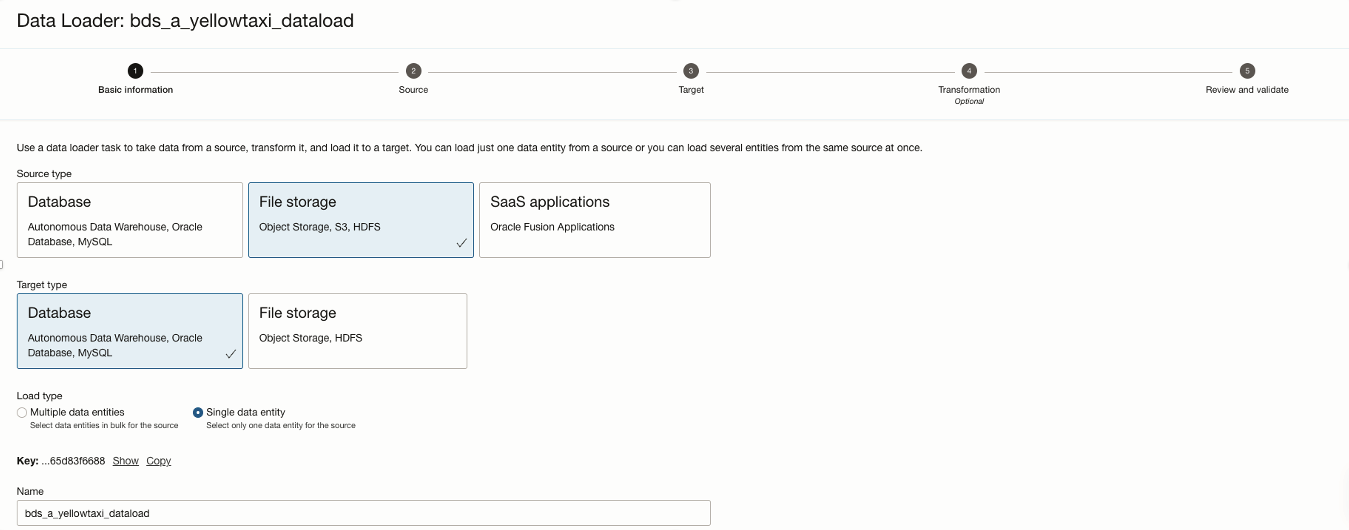
Create a Data Loader task to load the data from OCI Object Storage to ADW with transformations as shown below.
- Under Data Integration, choose the workspace that was created earlier.
- Click Create Data Loader task.
- Choose File Storage as Source Type and Database as Target Type.
- Select Single data entity. You can choose the Multiple data entities option to load data from multiple sources of object storage location.
- Name the Data Loader task.
- Click Next to provide the Details of source data.
- Choose the Object Storage Data Asset for Source.
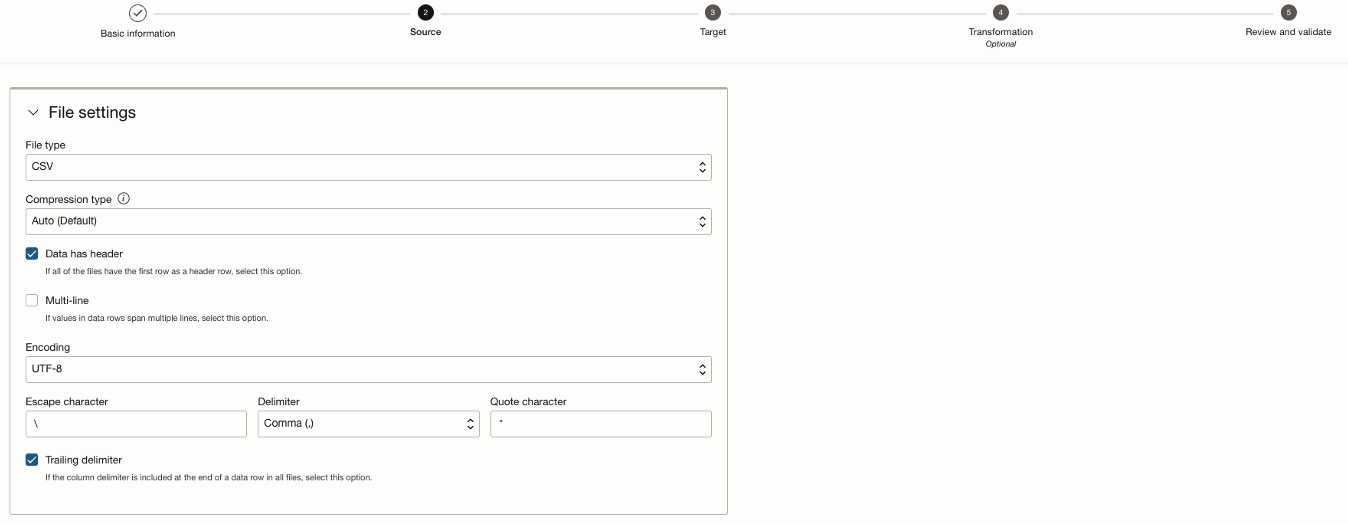
- Select the appropriate options for File Settings.
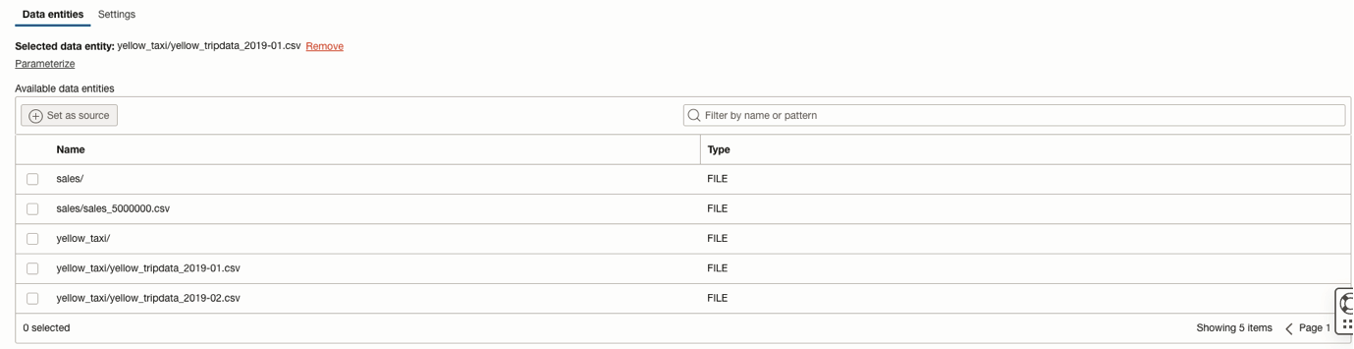
- Choose the right data entity to load into the database. If you opted for Multiple data entities in the previous stage, you will be able to choose the multiple sources from this data asset to process in bulk.

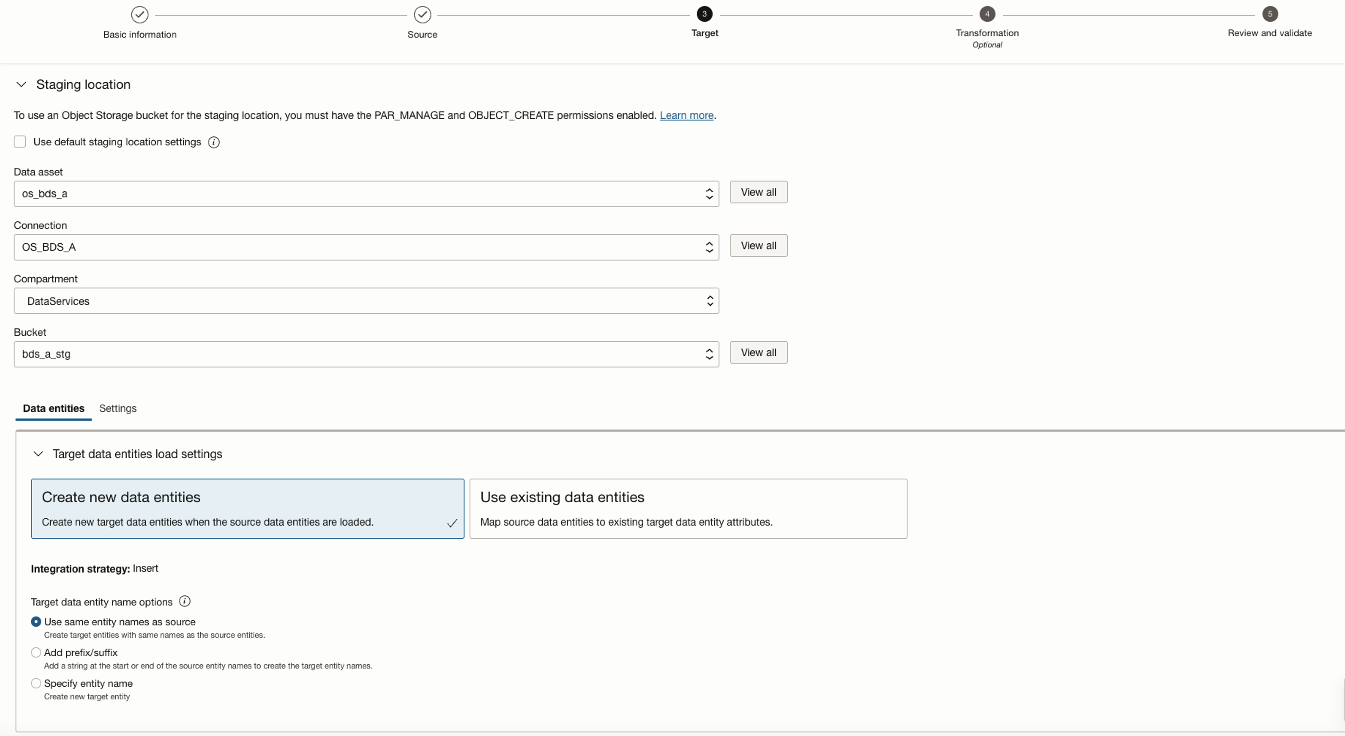
- Click Next to provide the Target database details where the data gets loaded.
- Choose the ADW Data asset that was created earlier as Target Data Asset.
- Provide the staging location for data processing. Here, the object storage data asset is used for staging location with a different bucket for staging.
- Click on “Create new data entities” for Target data. This will create a new table in the database. The “Use existing data entities” will give an option to choose the existing entity from the database to load the target data.

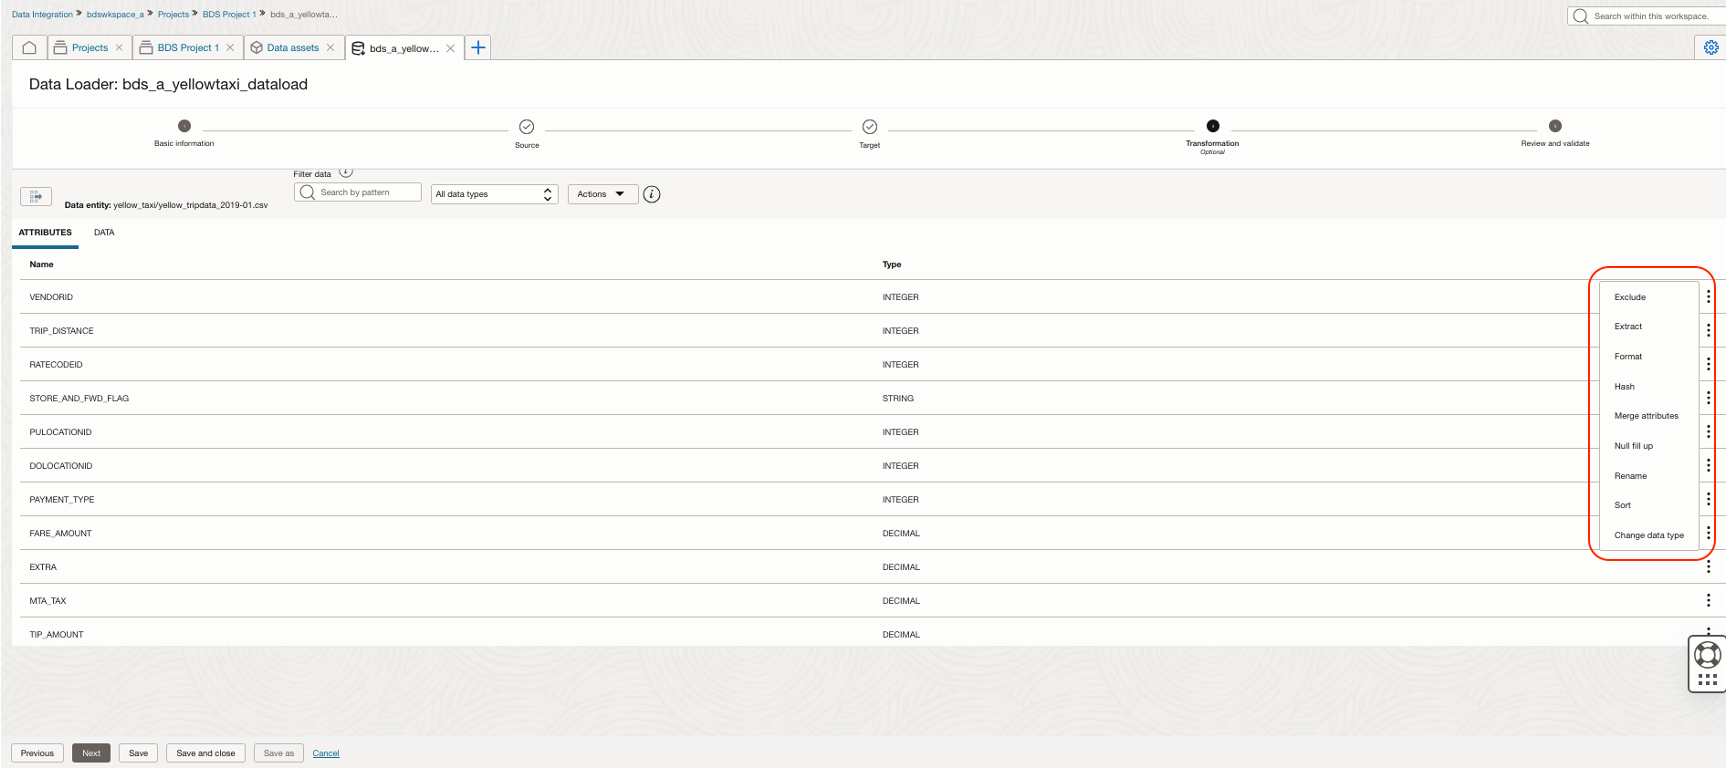
- Click Next to apply the transformation logic in the data loader task.
- Convert the VARCHARs to their respective data type as a simple transformation in this step.
- The screenshot below gives an idea of additional transformations that you can apply on the column data.
- Note: If you want to apply other transformations, create Integration or OCI Data Flow tasks or even Data Flow to achieve more complex transformations.
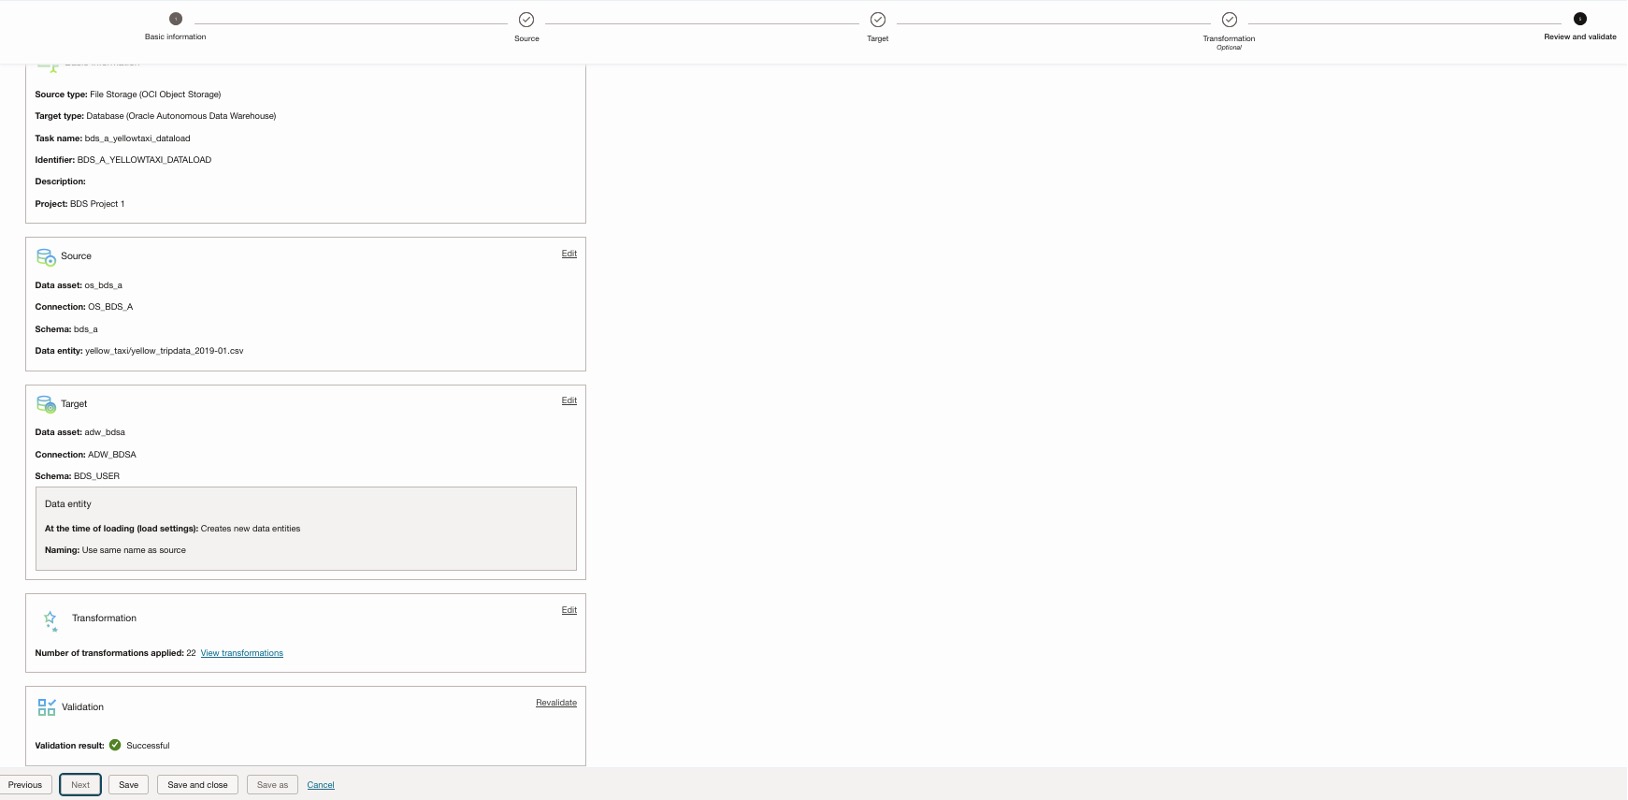
- Click Next to review the Data Loader process.
- This process runs the validation on this data loader task automatically.
- Validation results will be shown in this step to take necessary action.
Create Application & Publish Task
Before you run the task, you have to publish the task in an application.
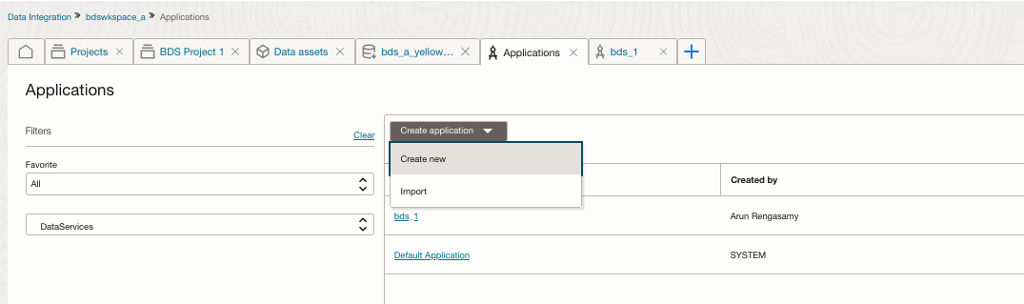
- Create an application under the workspace.
- Open the project tab and choose the data loader task that was created earlier.
- Now, click the three dots against the data loader task, click on “Publish to Application” option and then choose the application that is created in the previous step.

Run Task & Check Status
Run the task to complete the data load process.
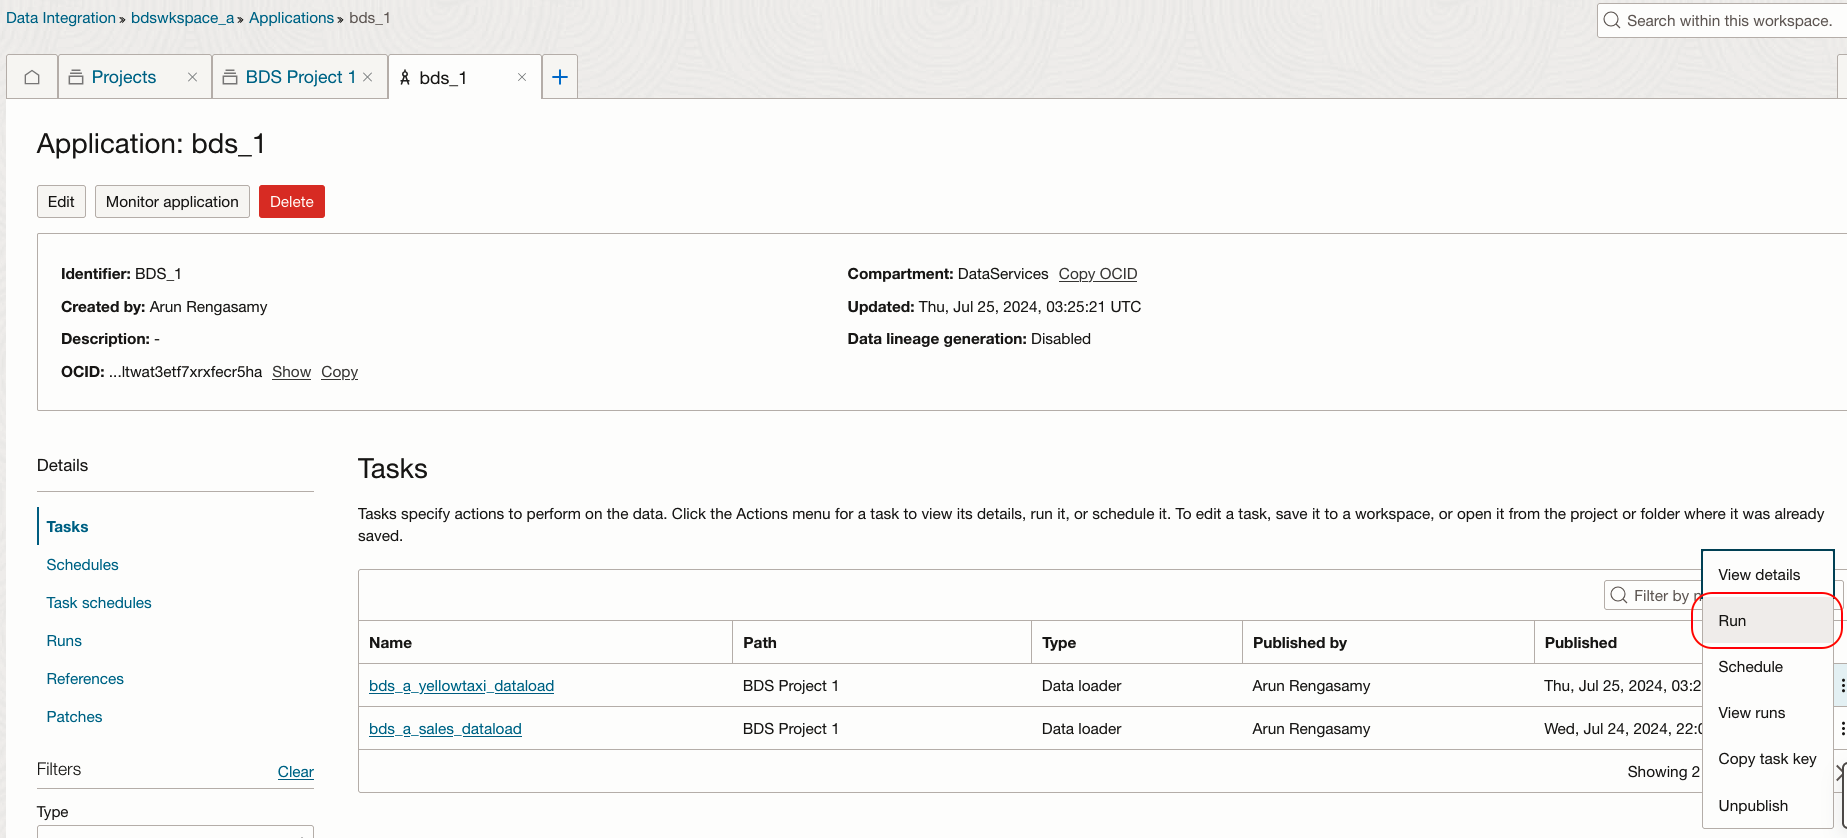
- Go to the application.
- Click Tasks, and you can see the task that is published to this application in the previous step.
- Click the three dots next to the task, then choose the Run option to execute the task. You can even schedule the task to run on a regular cadence.
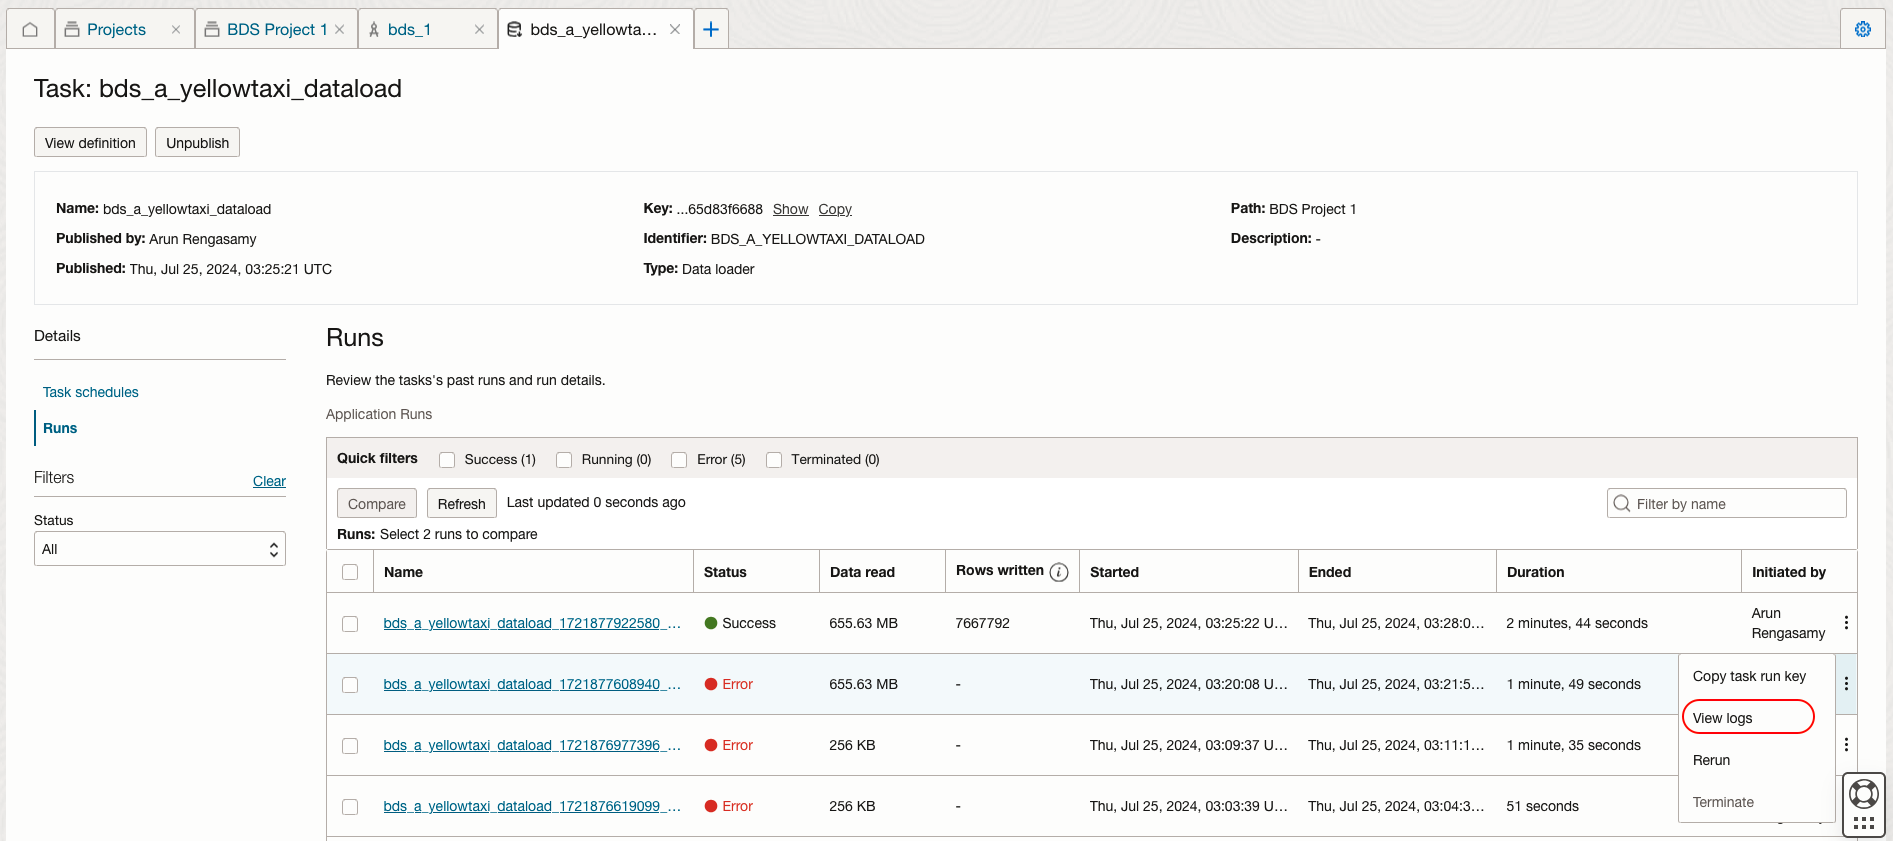
- Click on the task to view the status of latest run.
- Click on Runs option on the left pane to see the status of all the latest runs.
- You can choose the View logs option to view error message if the execution returns error.
Validate the Data Load in ADW
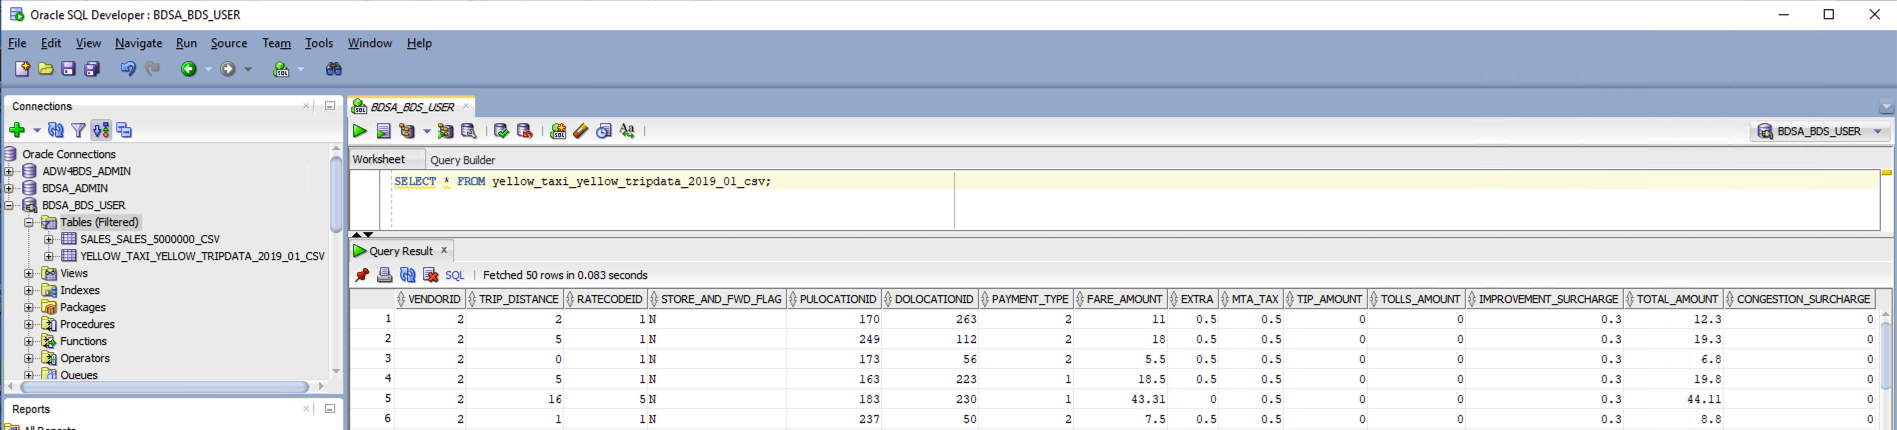
Upon completion of the task, log in to the ADW database and check the new table that is created through this data loader task.
Run the SELECT statement to validate the data that is loaded into the table.
Oracle Analytics Cloud
Now you can create an analysis to provide meaningful insights on the data that is extracted from Object Storage, transformed, and loaded into the target table in ADW.
Create Database Connection
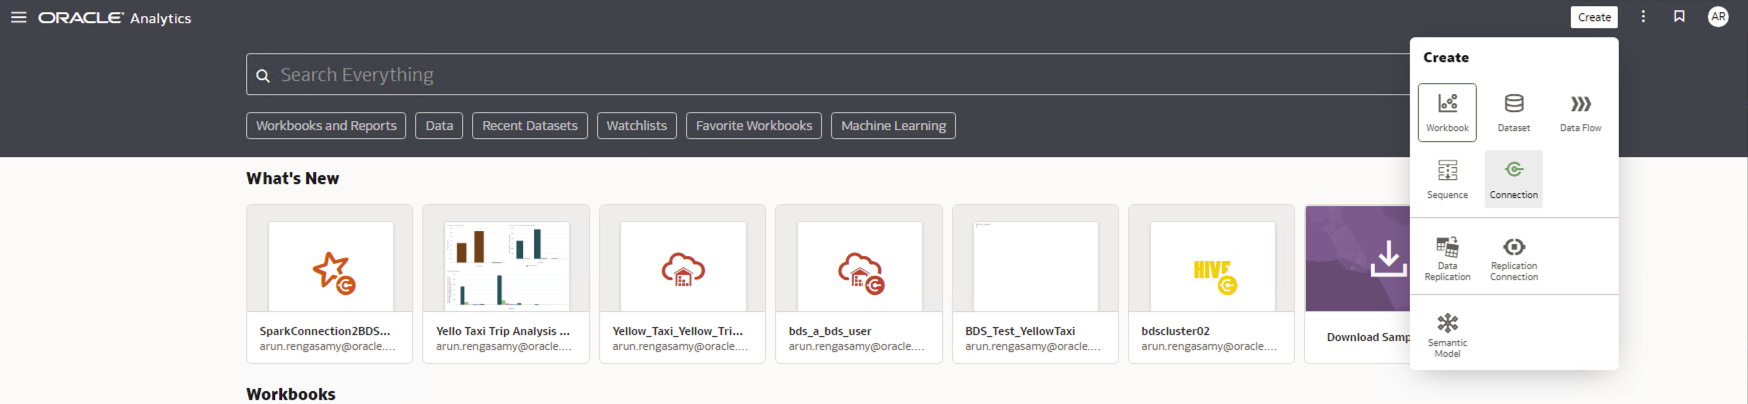
- Log in to your OAC instance.
- Click the Create icon on the top right, then click Connection.
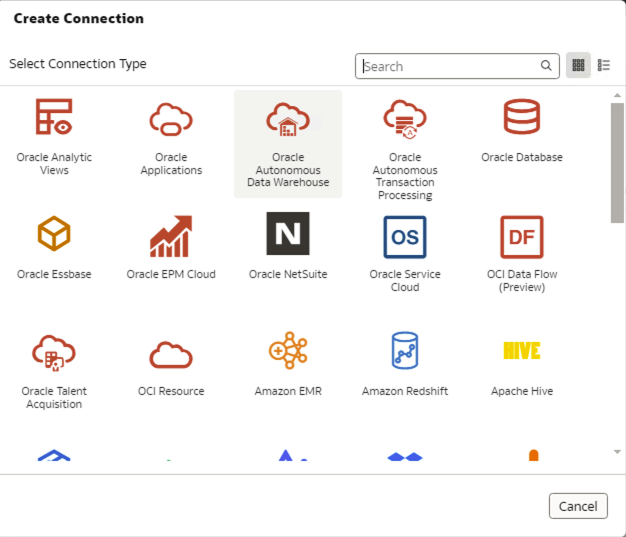
- Choose Oracle Autonomous Data Warehouse from the Connection Type.
- In the “Create Connection” screen, provide the connection details of ADW and click Save. This will test the connection and return a success or failure message for the connection.

Create a Dataset
Create a Dataset using below steps after you’ve created the connection.
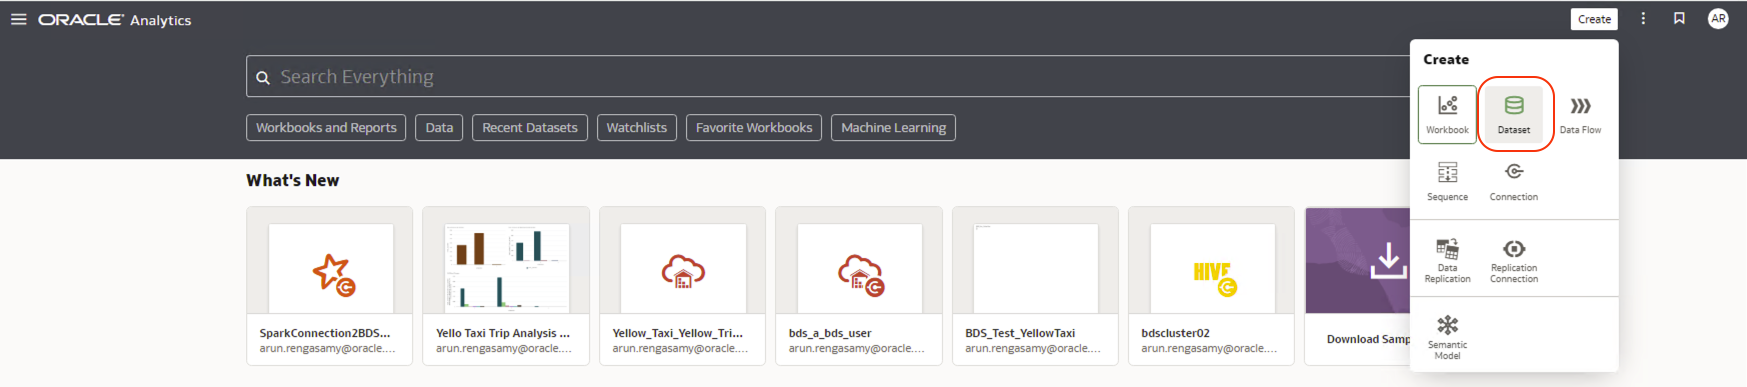
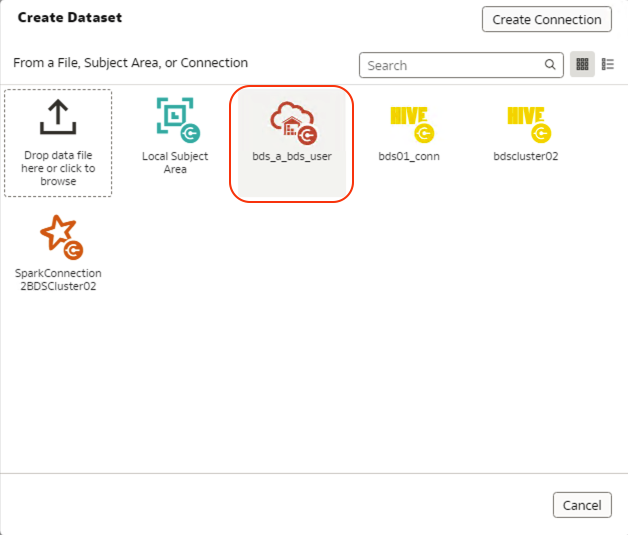
- Click the Create icon on the top right, and then click Dataset
- The Create Dataset screen shows all the connections in the system. Choose the connection to ADW which was created in the previous step.
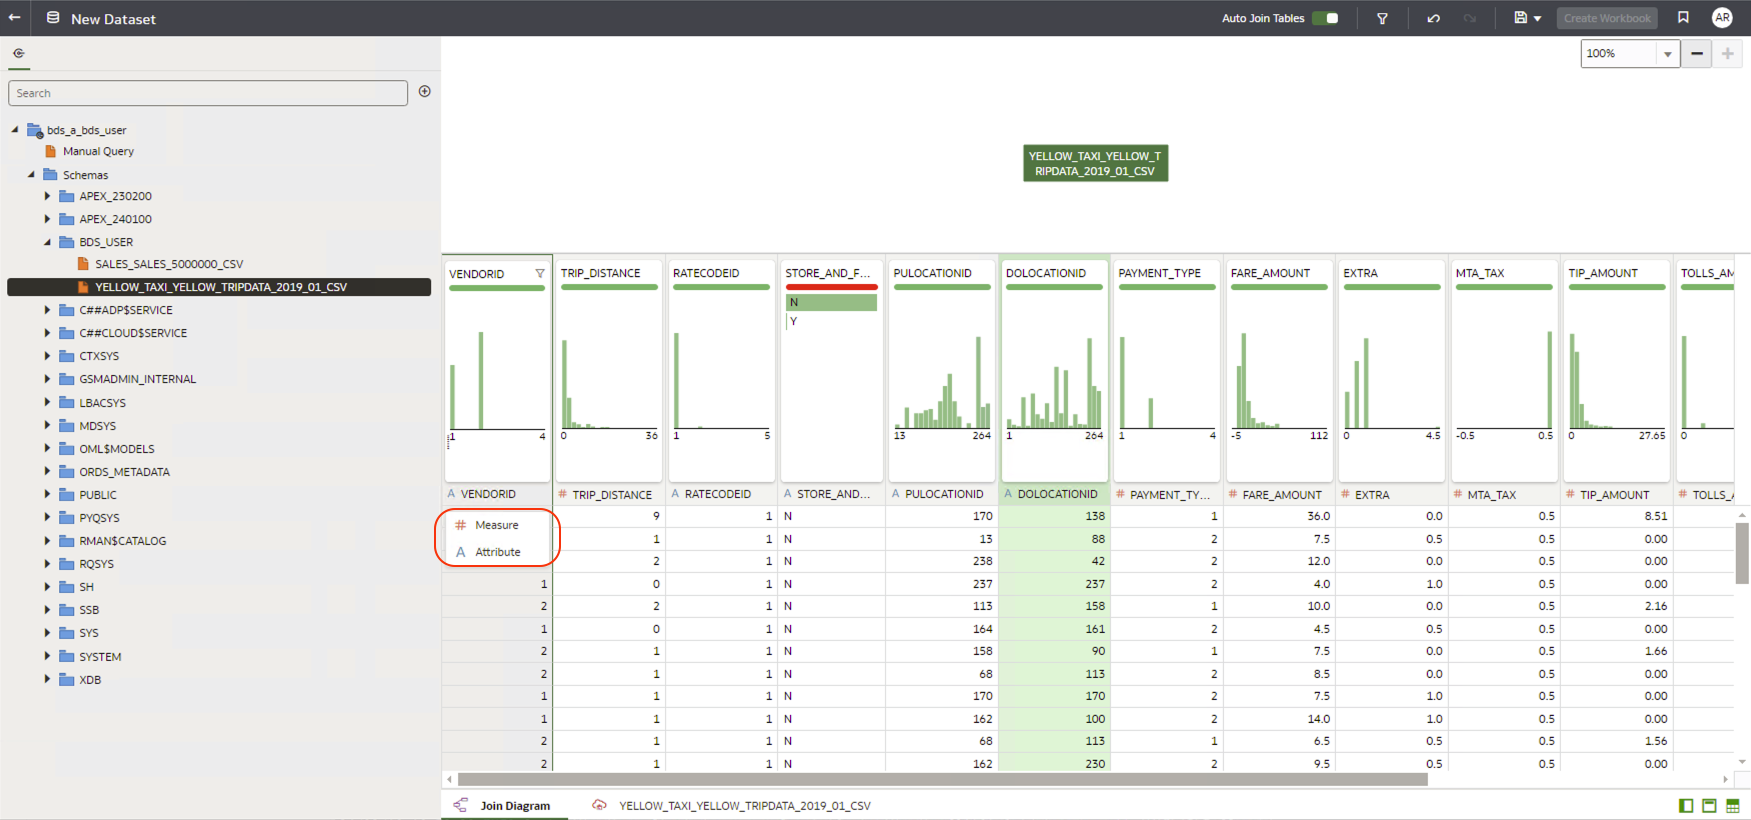
- While you are in New Dataset page, expand Schemas, expand the db user and then double click the table (or drag and drop to the right side panel), that was loaded earlier by the Oracle Data Integrator Data Loader job.
- Make sure to mark the column as Attribute or Measure by clicking the A or # symbol next to the column title. Name the Dataset and save to create your analysis.
Create a Data Visualization
Finally create a data visualization to see insights from your data.
- Click Data Option from the homepage to view all the datasets.
- Click the three dots next to the newly created dataset, then click Create Workbook.
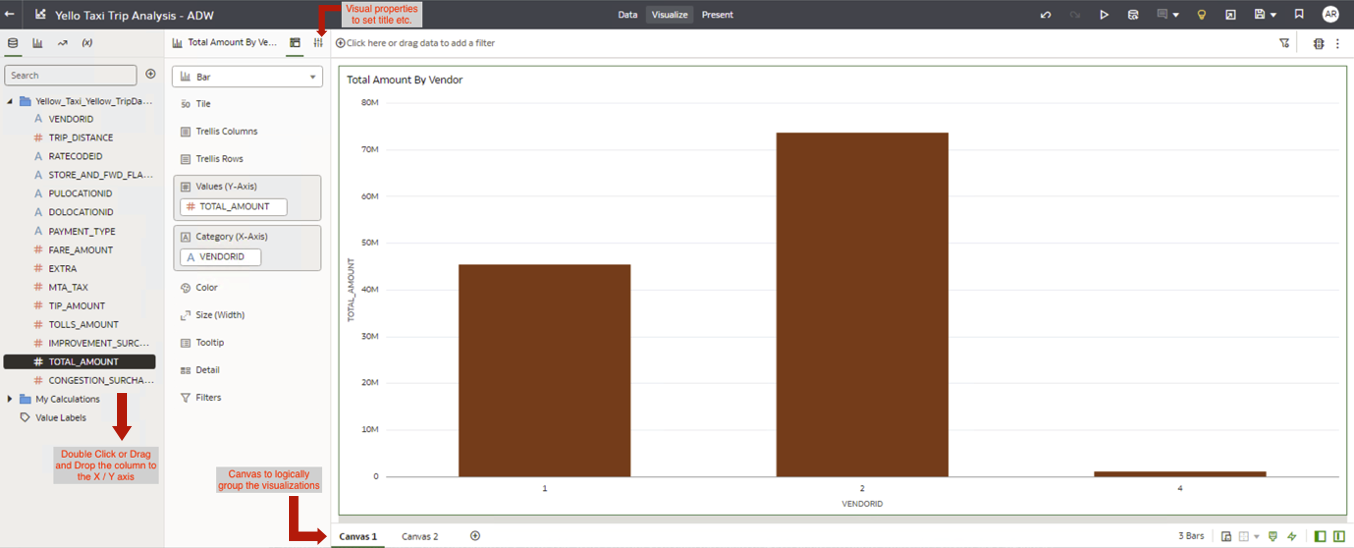
- This opens up the workbook edit page to create a new workbook from the dataset.
- Double click or drag and drop the columns to the canvas to create the visualizations.
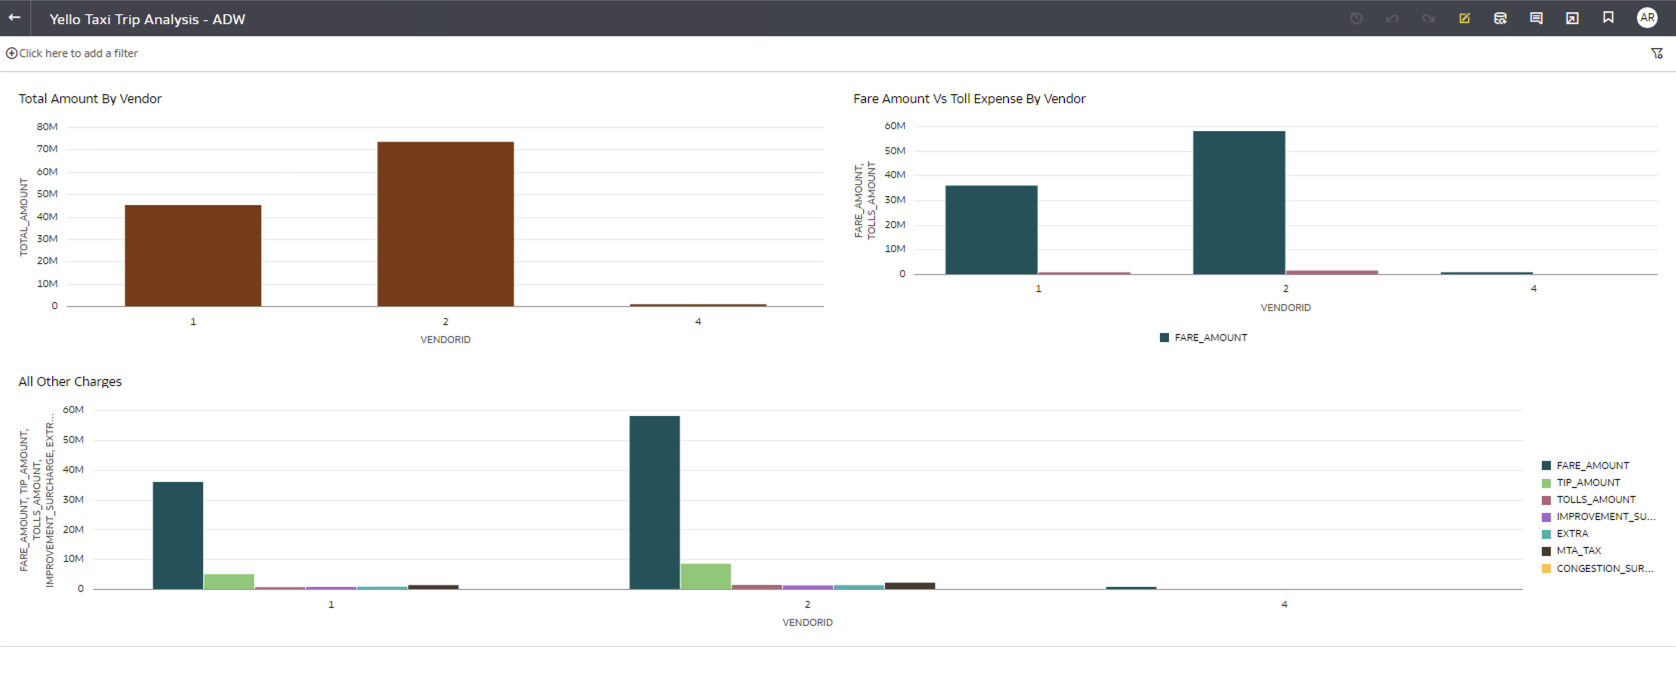
- You can logically group the visualizations to better organize information for visual storytelling.
- Upon completing the visualizations, click the Save button to save them in the shared location of catalog directory.
Call to Action
Data holds significant value for businesses. Employ the methodology described here to develop analytics by applying the necessary transformation logic within OCI Data Integration Services, utilizing either Data Loader or other methods. By leveraging this methodology and the appropriate tools, you can create a comprehensive analytics solution that enables the business to make informed decisions for scaling operations effectively.
Try using OCI Data Integration Services to transform your data and load it into ADW, which will serve as a data source for Oracle Analytics Cloud. We encourage you to share your insights and experiences in the Oracle Analytics Community.
If you have questions, post them in the Oracle Analytics Community and we’ll follow up with answers.
![]()