![]()
This blog describes how to scale out an Oracle Analytics Server (OAS) environment deployed on Oracle Cloud Infrastructure (OCI) using Oracle Cloud Marketplace, on OCI compute (Linux Server) and on premises (Linux Server).
Scale Out Oracle Analytics Server
Deploy OAS on OCI using Oracle Cloud Marketplace
Install OAS on Node 1 and Node 2
You can deploy Oracle Analytics Server on a private subnet (best practice) or on a public subnet. For detailed steps, see:
For Node 1 (BIHOST1), select both the install and Create Oracle Analytics Server Domain option when you deploy OAS using Oracle Cloud Marketplace.

For Node 2 (BIHOST2), select only the install option when you deploy OAS using Oracle Cloud Marketplace. Do not select Create Oracle Analytics Server Domain on Node 2.

Deploy OAS On Premises or On OCI Compute (Linux)
Install on Node 1
Install JDK, Oracle Fusion Middleware (FMW), FMW Critical Patch Set Updates, and Oracle Analytics Server.
Configure Oracle Analytics Server, that is, create the BI domain and components.
Install on Node 2
Install JDK, Oracle Fusion Middleware, FMW Critical Patch Set Updates, and Oracle Analytics Server.
Note: Install only the software, do not configure Oracle Analytics Server.
Configure the OAS Environment (Oracle Cloud or On Premises)
The steps in this section are the same in both environments, that is, Oracle Cloud an on-premises.
Set Up Shared Files and Directories Between the Two Nodes
The singleton data directory (SDD) stores the metadata. The default location is set to: $DOMAIN_HOME/bidata
The SDD path is defined in the file bi-environment.xml, located at /u01/data/domains/bi/config/fmwconfig/bienv/core/bi-environment.xml
Edit the bi-environment.xml file
<bi:singleton-data-directory>Node1_IP_address:/sdd/bidata/</bi:singleton-data-directory>
NOTE: Node1_IP_address will be the private IP address of the OAS instance.
To perform the above task, you need to create file system storage, mount the target on Node 1, and mount the same target on Node 2 with Read and Write permissions to the mount target on both the nodes.
Configure Security Rules for the Public or Private Subnet where OAS Instances are Running
For details, see: https://docs.oracle.com/en-us/iaas/Content/File/Tasks/securitylistsfilestorage.htm#Configuring_VCN_Security_Rules_for_File_Storage.
Ingress:

Create File System Storage and Mount Target on Node 1
SSH to Node 1
ssh -i path_to_private_key opc@ip_address_oas_node1
sudo su root
Open Required Ports on the System Firewall
sudo firewall-cmd –zone=public –permanent –add-port=2048/tcp
sudo firewall-cmd –zone=public –permanent –add-port=2049/tcp
sudo firewall-cmd –zone=public –permanent –add-port=2050/tcp
sudo firewall-cmd –zone=public –permanent –add-port=111/tcp
sudo firewall-cmd –complete-reload
mkdir -p /sdd/bidata
mount –bind /u01/data/domains/bi/bidata /sdd/bidata
vi /etc/fstab
/u01/data/domains/bi/bidata /sdd/bidata ext4 bind 0 0
mount -a
reboot (Restart the Instance)
Log back into Node 1 as oracle user and check if the mounted file system exists after restart
ls -l /sdd/bidata
Configure NFS Server on Node 1
yum install nfs-utils (already installed on the OAS instance)
vi /etc/exports
Enter the line:
/sdd/bidata 10.0.0.188(rw,async)
NOTE: 10.0.0.188 is the Node 2 private IP address.
systemctl start nfs-server
systemctl enable nfs-server
Mount the File System Storage Target on Node 2
SSH to Node 2
ssh -i path_to_private_key opc@ip_address_oas_node2
sudo su root
yum install nfs-utils (already installed on the OAS instance)
mount -t nfs -o rw,nosuid 10.0.0.45:/sdd/bidata /sdd/bidata
NOTE: 10.0.0.45 is the Node 1 private IP address.
vi /etc/fstab
10.0.0.45:/sdd/bidata /sdd/bidata nfs rw,nosuid 0 0
mount -a
reboot (Restart the Instance)
Log back into Node 2 as oracle user and check if the mounted file system exists after restart
ls -l /sdd/bidata
Also test if the oracle user of OAS Node 1 and Node 2 has both Read and Write permissions on the file system storage mount: /sdd/bidata
Edit bi-environment.xml
vi /u01/data/domains/bi/config/fmwconfig/bienv/core/bi-environment.xml
Use /sdd/bidata as this directory is the mounted directory in both nodes.
<bi:singleton-data-directory>/sdd/bidata/</bi:singleton-data-directory>
Set Up the Global Cache
In Oracle Enterprise Manager Fusion Middleware Control, enable Global Cache and set Global cache path.
Create the folder cache under /sdd/bidata and use the path: /sdd/bidata/cache
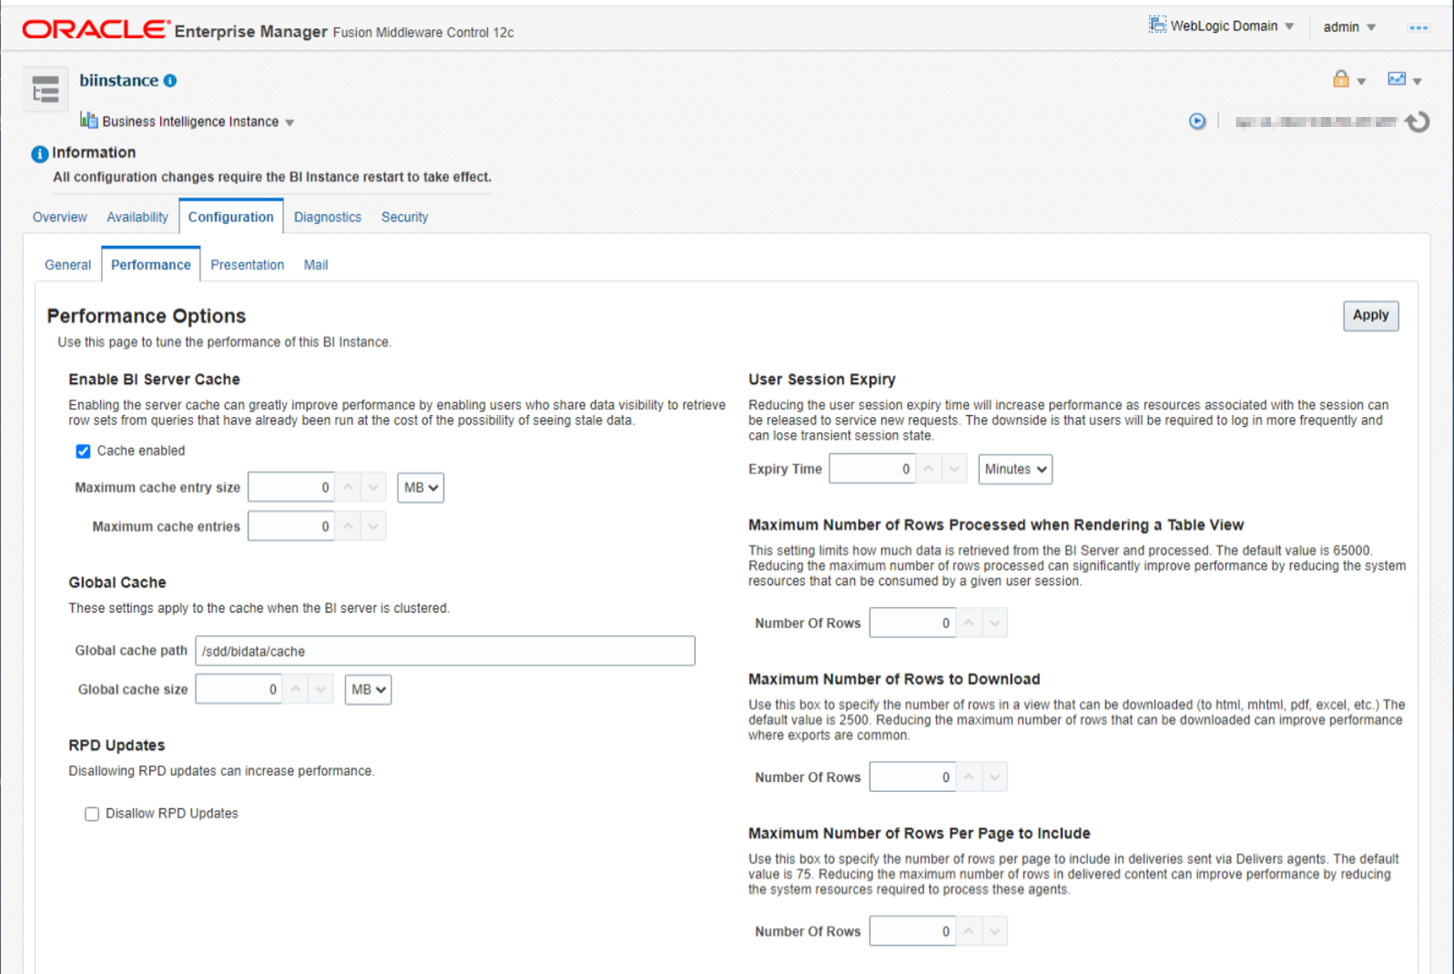
NOTE: You can also set global cache options in the OAS configuration files such as instanceconfig.xml.
Clone the Domain on Node 1 and Scale Out on Node 2
On Node 1
Shut down all services:
/u01/data/domains/bi/bitools/bin/stop.sh
Run the clone script:
/u01/data/domains/bi/bitools/bin/clone_bi_machine.sh -m oasn2 oasn2.sub030xxxxx390.oasvcn.oraclevcn.com /sdd/bidata/oasn2.jar
On Node 2
Run the unpack script:
/oas/oas_install/Oracle/Middleware/Oracle_Home/oracle_common/common/bin/unpack.sh -template=/sdd/bidata/oasn2.jar -domain=/u01/data/domains/bi -nodemanager_type=PerDomainNodeManager
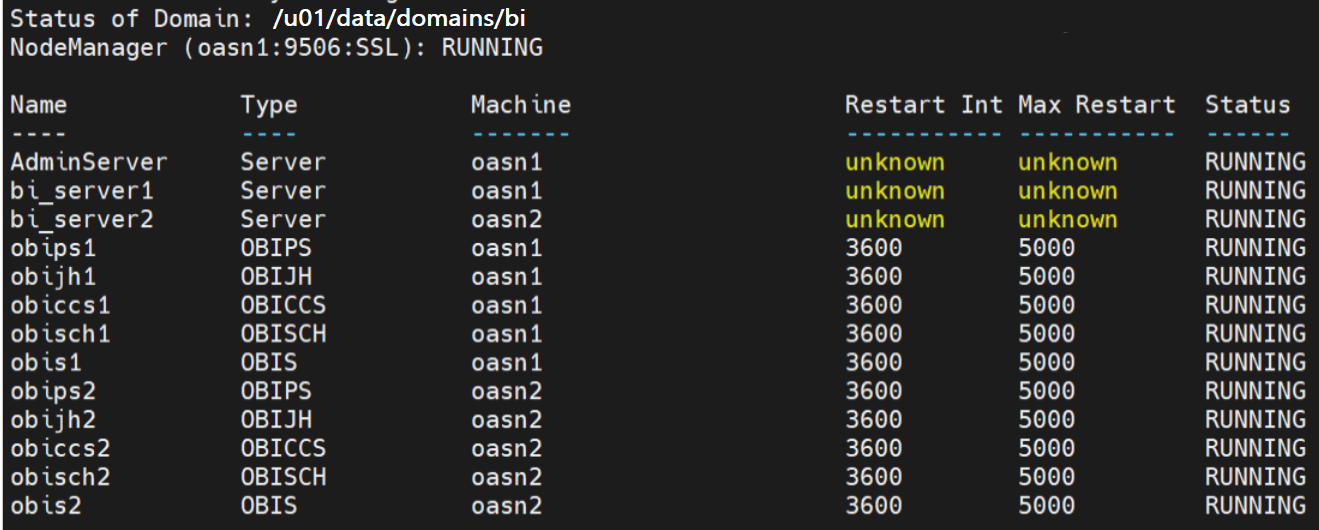
Start Components in Sequence
On Node 2
Start the NodeManager and Managed Server and let the system components remain down for now.
This is to create config.xml on node 2.
Open Required Ports for OAS on Node 2
Run as root user
cd /u01/app/oas-scripts
vi OASFirewallPortsFix.xml
Note: Ports defined to open are: 9500-9508, 7001, 9704, and 9556
Open Port 9506 for NodeManager on Node 2 Firewall
Add port 9506 to the file (OASFirewallPortsFix.xml) and run the script:
./open_oas_firewall_ports.sh
Alternatively, open port 9506 using the commands:
sudo firewall-cmd –zone=public –permanent –add-port=9506/tcp
sudo firewall-cmd –complete-reload
Start NodeManager
nohup /u01/data/domains/bi/bin/startNodeManager.sh &
NOTE: Start bi_server2 from Node 1 start.sh script.
On Node 1
cd /u01/data/domains/bi/bitools/bin
./start.sh -i AdminServer,bi_server1,obis1,obips1,obiccs1,obijh1,obisch1,bi_server2
On Node 2
Re-synchronize the data source on Node 2:
/u01/data/domains/bi/bitools/bin/sync_midtier_db.sh
On Node 1
cd /u01/data/domains/bi/bitools/bin
./start.sh -i obis2,obips2,obiccs2,obijh2,obisch2
Call to Action
Now you understand how to scale out Oracle Analytics Server in a cluster configuration, you can try it yourself. Once you’ve tried this yourself, share your results in the Oracle Analytics Community.
After configuring a clustered environment for Oracle Analytics Server, you must balance the load between the two nodes either using a Web server or a load balancer. For details, read the following blogs:
- Configure an OCI Load Balancer for Oracle Analytics Server on Oracle Cloud Marketplace and Offload SSL at the Load Balancer
- Configure a Web Server for Oracle Analytics Server
- Offload SSL at the Web Server for Oracle Analytics Server
![]()