Introduction
In this blog, you are going to learn how you can generate and store the OAC snapshot in Oracle Cloud Infrastructure (OCI) object storage using REST APIs. We will discuss the prerequisites and the steps involved in the entire process.
Before you start, we would cover the basic definition and terminology that you should be aware of.
Snapshot: A snapshot captures the state of your environment at a point in time but does not include data hosted on external data sources.
Purpose of Snapshot: The purpose of a snapshot is to backup and restore your OAC environment. Take a snapshot of your environment before user start using the system, and again at required intervals, so that we can restore the environment if something goes wrong. We can export and store snapshots on local file system or cloud storage and import them back to target environment if required to restore content. The snapshot file is a compressed archive file (BAR file).
REST APIs: Use the REST APIs for Oracle Analytics Cloud to automate processes and programmatically access features and functionality in Oracle Analytics Cloud.
OAC provides the Snapshot REST endpoints, which enables you to manage your snapshots (BAR files) programmatically.
You can learn more about REST APIs for OAC here
OAuth 2.0 Token Authentication: Authentication and authorization in Oracle Analytics Cloud is managed by Oracle Identity Cloud Service. To access the Oracle Analytics Cloud REST APIs, you need an OAuth 2.0 access token
This authentication type requires a bearer token. You can obtain bearer token using either Resource Owner or JWT Assertion grant type.
In this blog, we have used Resource Owner as a grant type to obtain the bearer token.
Prerequisites
- You must have BI Service Administrator role in Oracle Analytics Cloud to manage snapshots using REST APIs.
- Permissions to create an OCI object storage bucket for storing the snapshots
- API signing key that allows you to make REST calls to OCI Object Storage.
Once prerequisites are done, please follow the below steps
Create IDCS Local User
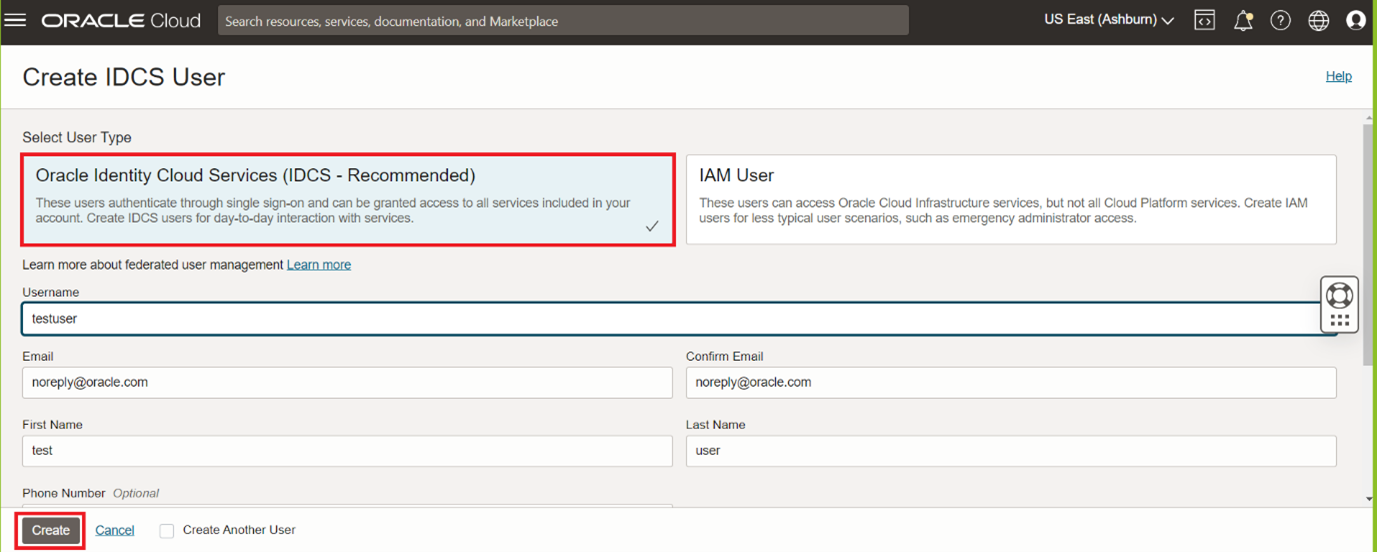
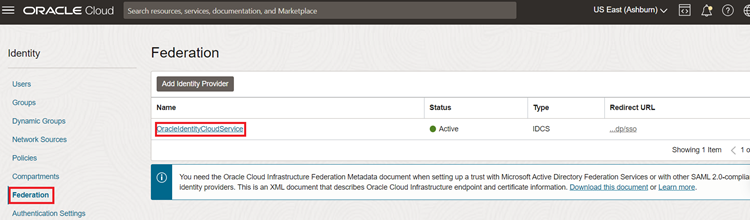
Navigate to Federation under Identity & Security and click on OracleIdentityCloudService
Under federation click on Groups and add user to OCI Administrator group and IDCS Administrator (Whatever the groups applicable in your case). Also ensure the user is added to BIServiceAdministrator role in your OAC instance.
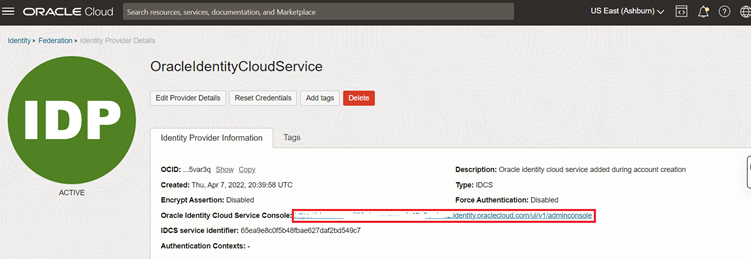
Click on Identity console URL in the same window
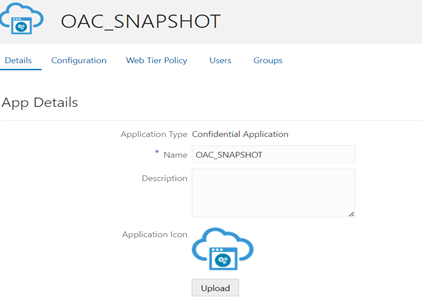
Create a Confidential Application
In the Identity Console navigate to menu and click on Applications and create Confidential Application

Enter Application name and click next
Under Client configuration select Register Client and select Resource Owner check box for Allowed Grant Types
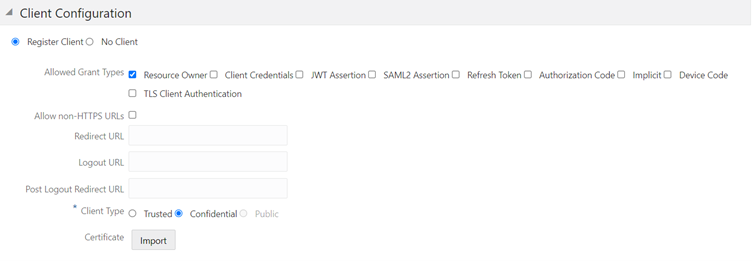
Scroll down to Token Issuance Policy and select the option All for Authorized Resources

Click on Add Scope button under Resources and select your Analytics Instance and click on Add button
Copy the scope URL that generates.
Click next and Finish. Copy the Client ID and Client Secret that generates and then activate the application.
Generate a Bearer Token
Launch Cloud Shell in OCI console and encode Client ID and Secret with Base 64 captured in the previous step.
Run the below command
echo -n ClinetID:ClientSecret | base64
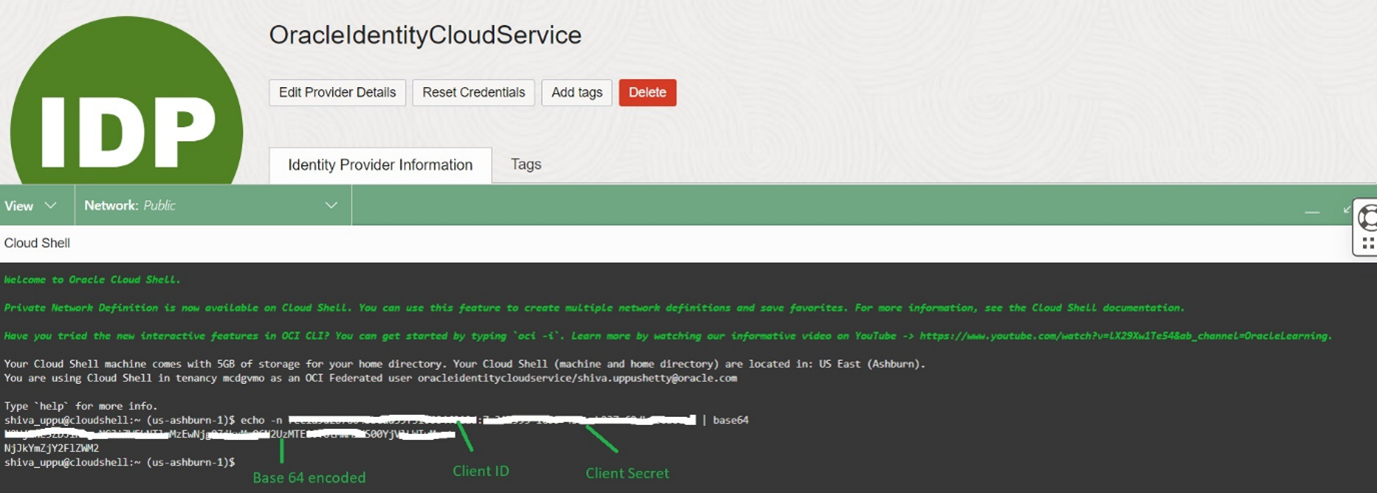
Copy the encoded string. Replace Base64 encoded string, username, password, scope in the below command and run it.
curl –request POST \
–url https://<IDCS-instance>.identity.oraclecloud.com/oauth2/v1/token \
–header ‘authorization: Basic <base64 encoded clientID:ClientSecret>’ \
–header ‘content-type: application/x-www-form-urlencoded;charset=UTF-8’ \
-d ‘grant_type=password&username=<username>&password=<password>&scope=<scope copied from resource section in IDCS confidential application>’
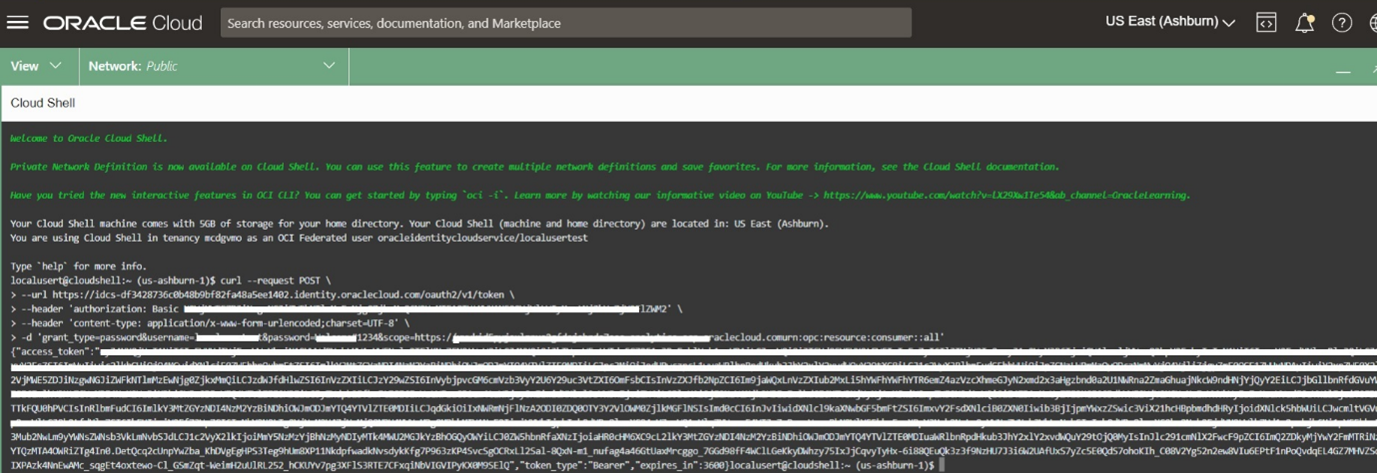
This generates a Bearer Token. By default, OAC service token expiry time is set to 100 seconds. Increase expiry time as per your requirement.
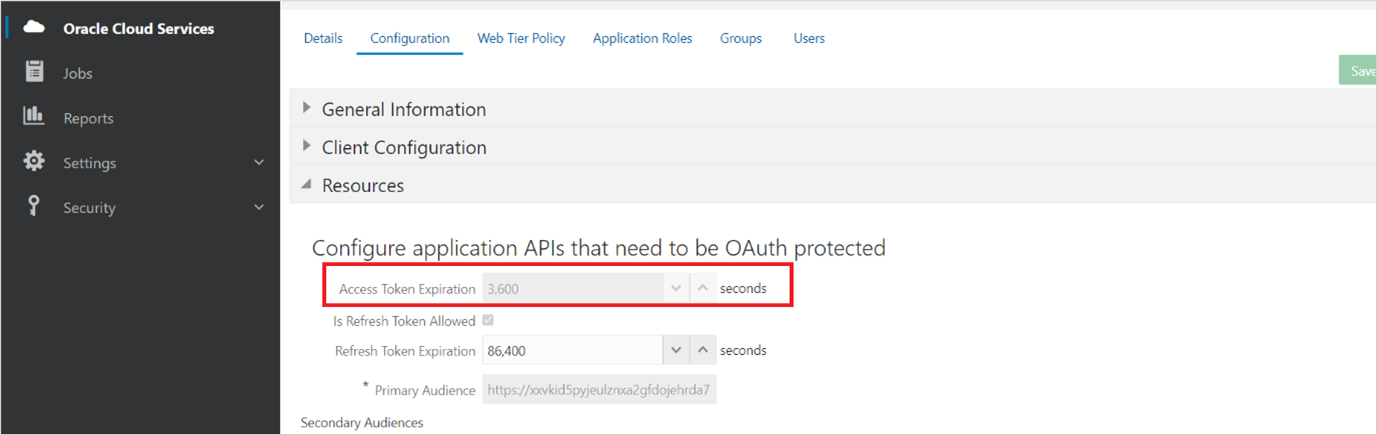
Steps to increase OAC service token expiry time
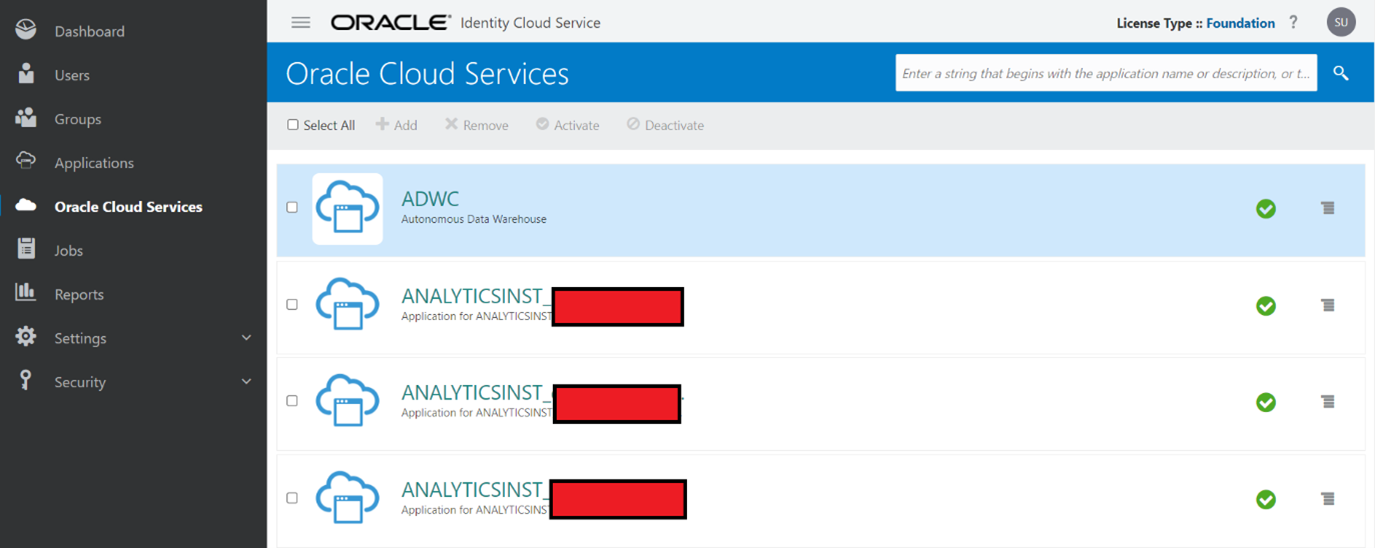
Navigate to IDCS console (you can refer in the above steps)
In IDCS console -> Menu -> Oracle Cloud Services -> Select your OAC service
Navigate to Configuration tab and expand Resources and increase the Access Token Expiration as required.
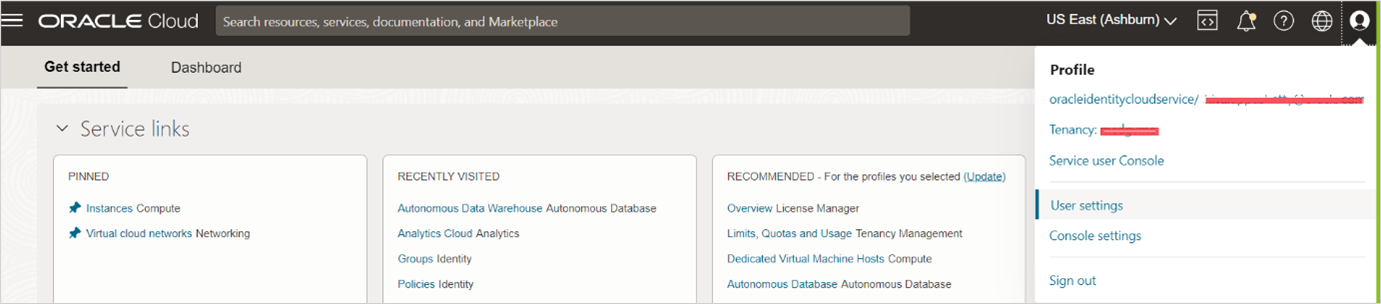
Generate an API Signing Key
In OCI home page, click on profile and open User Settings
Scroll down and click on API Keys
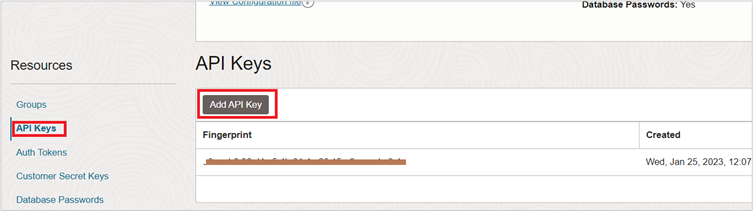
Download the Private Key and then click on Add button

This will generate the fingerprint. Copy the fingerprint to your notepad
You should encode the downloaded private key in Base64 format and then wrap it using the below command. You can also refer the documentation
cat myprivate-key.pem | base64 -w 0 > mywrapped-private-key.pem
Create OCI Object Storage Bucket
Create an object storage bucket with name “mysnapshot-bucket” (Name it as required but ensure same name is updated in the JSON file below)
Create a Snapshot
Now create snapshot JSON file with the below template and the configuration details captured in the above steps
{
“type”: “CREATE”,
“name”: “<myfirstsnapshot>”,
“storage”: {
“type”: “OCI_NATIVE”,
“bucket”: “<mysnapshot-bucket>”,
“auth”: {
“type”: “OSS_AUTH_OCI_USER_ID”,
“ociRegion”: “<us-ashburn-1>”,
“ociTenancyId”: “”,
“ociUserId”: “<your tenancy OCID>”,
“ociKeyFingerprint”: “<your fingerprint key>”,
“ociPrivateKeyWrapped”: “<your wrapped private key>”
}
},
“bar”: {
“uri”: “file:///myfolder/myfirstsnapshot.bar”,
“password”: “snapshotPassword123”
}
}
Run the below command to generate the BAR file. Replace the <token> with Bearer token generated in the above steps and replace <hostname with your OAC instance name>
curl -i –header “Authorization: Bearer <token>” –header “Content-Type: application/json” –request POST https://<hostname>/api/20210901/snapshots -d @new_snapshot.json
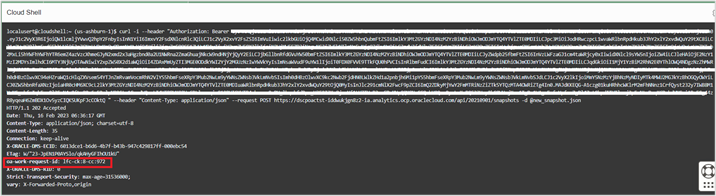
This will generate a Work Request ID on successful execution of the command.
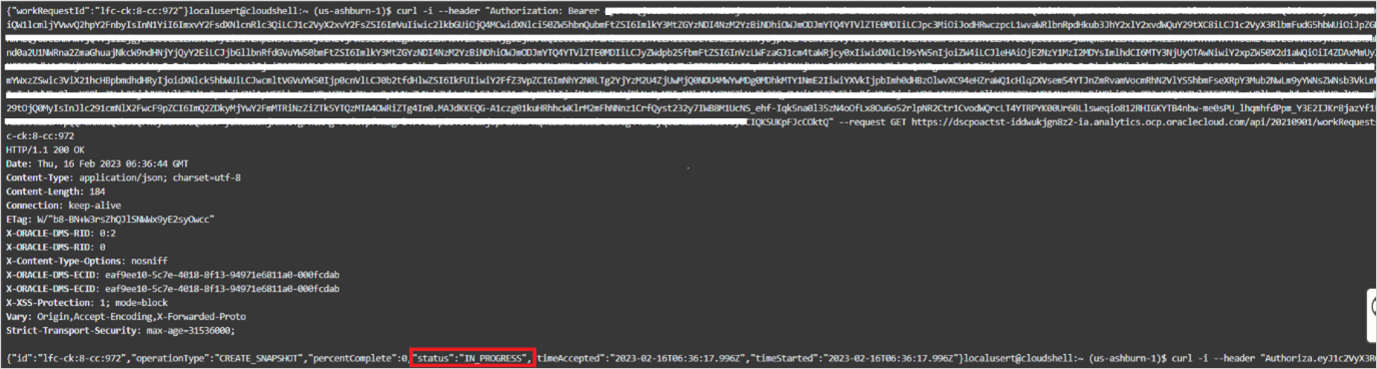
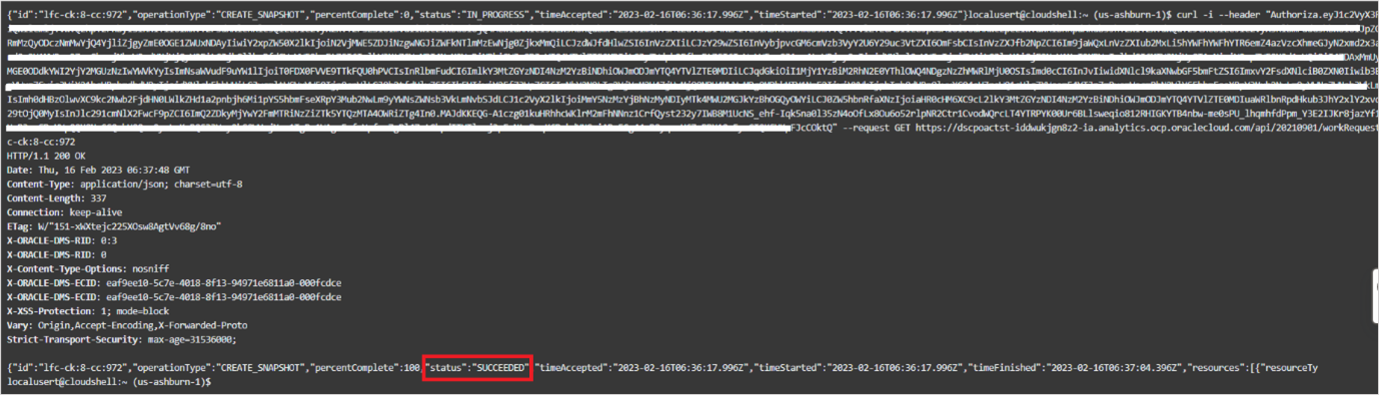
You can use Work Request ID and run below command to check the status
curl -i –header “Authorization: Bearer <token>” –request GET https://<hostname>/api/20210901/workRequests/lfc-ab:1-cd:2
Status In Progress
Status Succeeded
Open the object storage bucket and see if snapshot has been generated.

Conclusion
As you have seen in this blog, we can generate snapshots programmatically using OAC Rest APIs. We can extend it further to register and restore the snapshot programmatically.
For more information on OAC Snapshots REST Endpoints, click here
To explore more on Oracle Analytics Cloud, please visit Oracle.com/analytics