Oracle Analytics Cloud offers you the ability to directly consume Oracle Cloud Infrastructure (OCI) Data Science machine learning models within the Oracle Analytics Cloud (OAC) Data Flows interface. OCI Data Science models are first defined within the OCI DS machine learning platform, then deployed so they can be consumed by OAC.
In this blog, you will learn how to create new Projects and Notebooks directly in OCI Data Science and then build, train and save a machine learning model, which can be registered and invoked from OAC. This includes the following steps:
- Creating Project and Notebook sessions
- Create a Binary Classification Model
- Read the dataset
- Do data preparation
- Build and train a model
- Test the model
- Prepare and save the model
Creating Project and Notebook Sessions
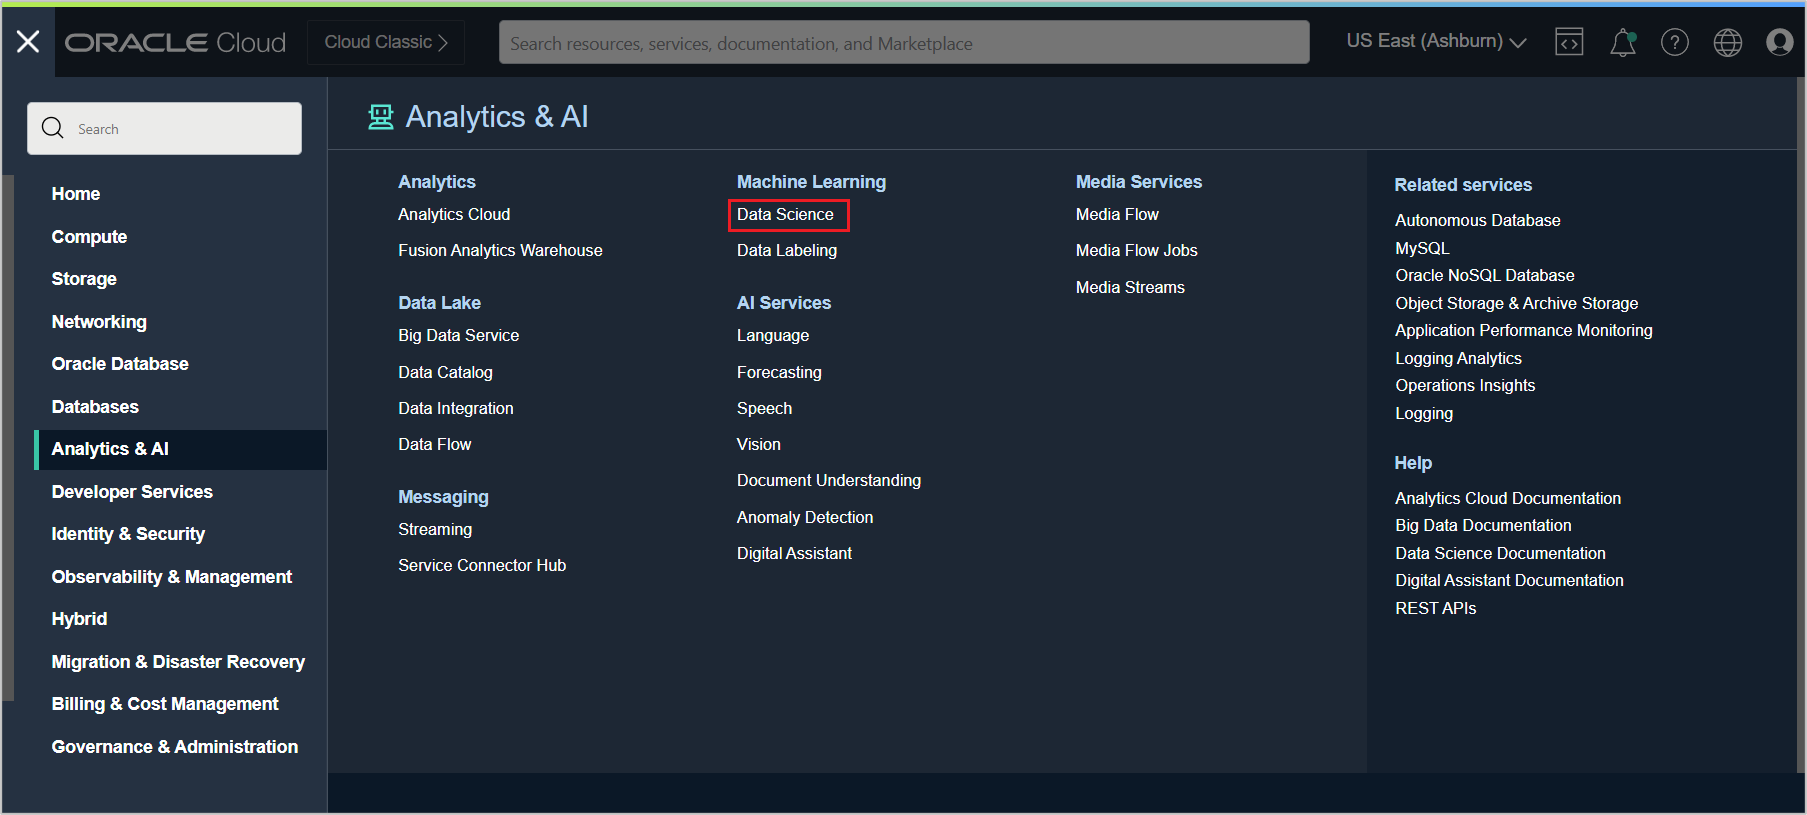
From the OCI home menu, click Analytics & AI and then Data Science under Machine Learning.
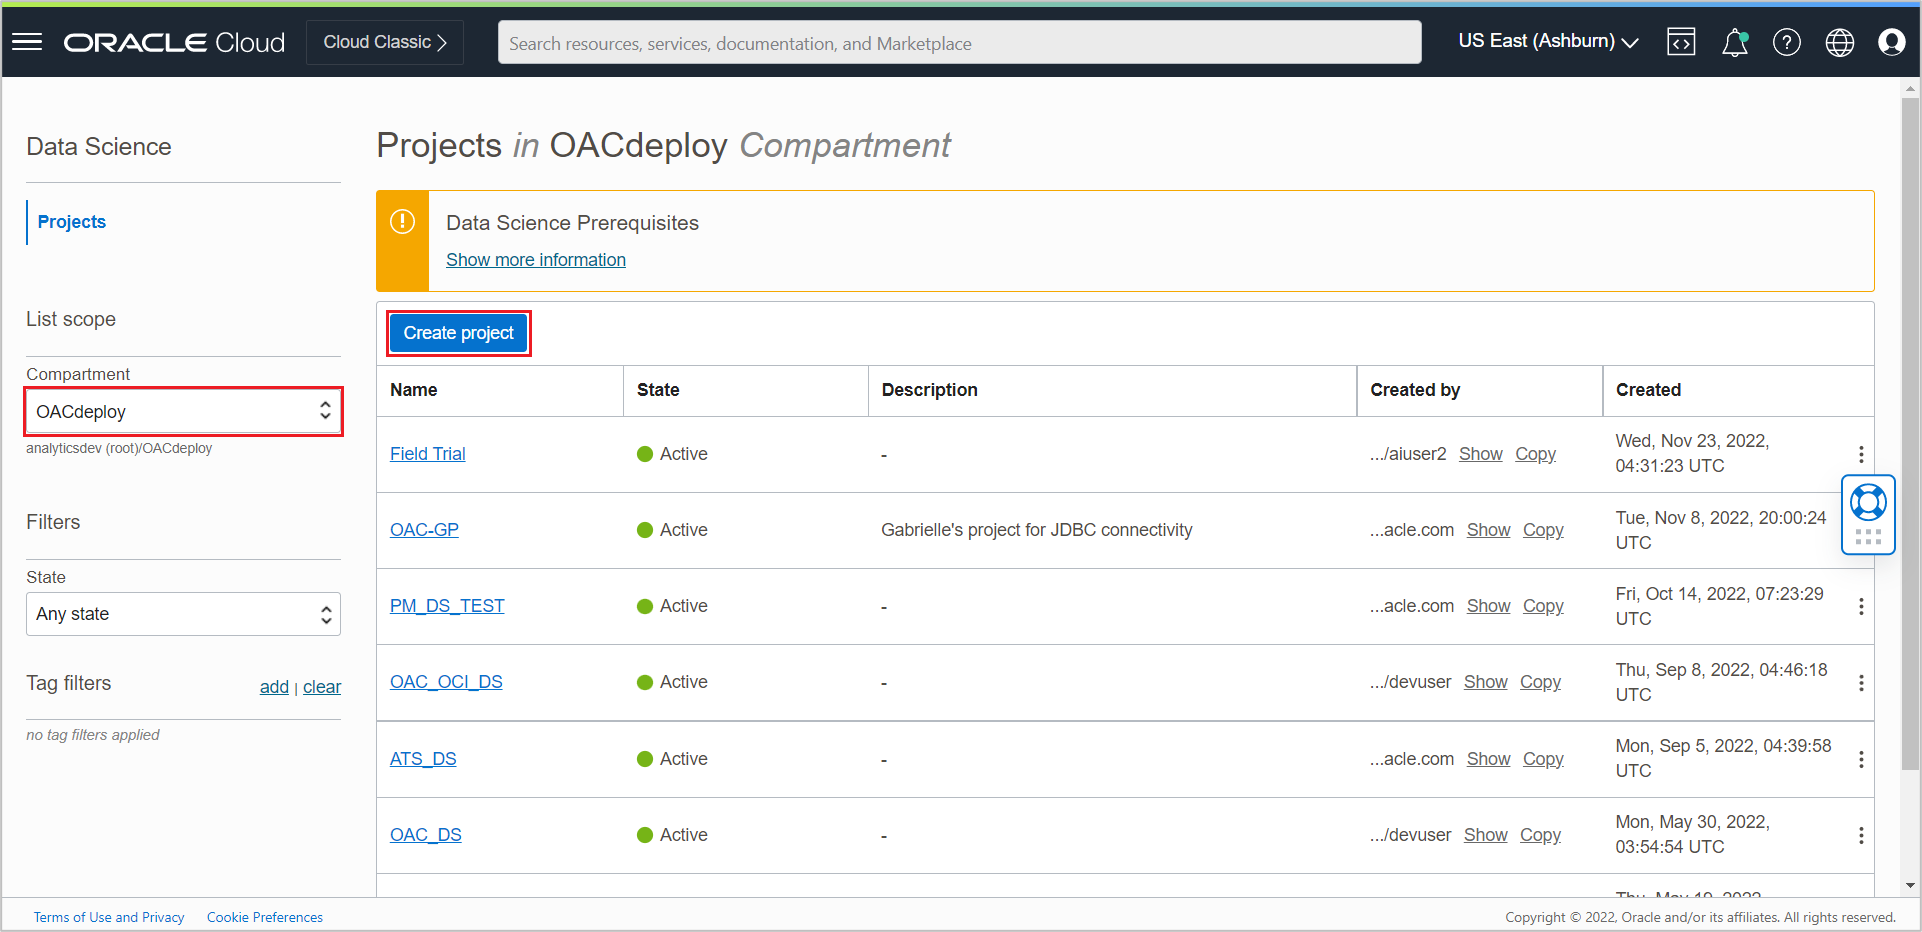
In the Data Science Projects page, select the compartment on the left and click the Create Project button.
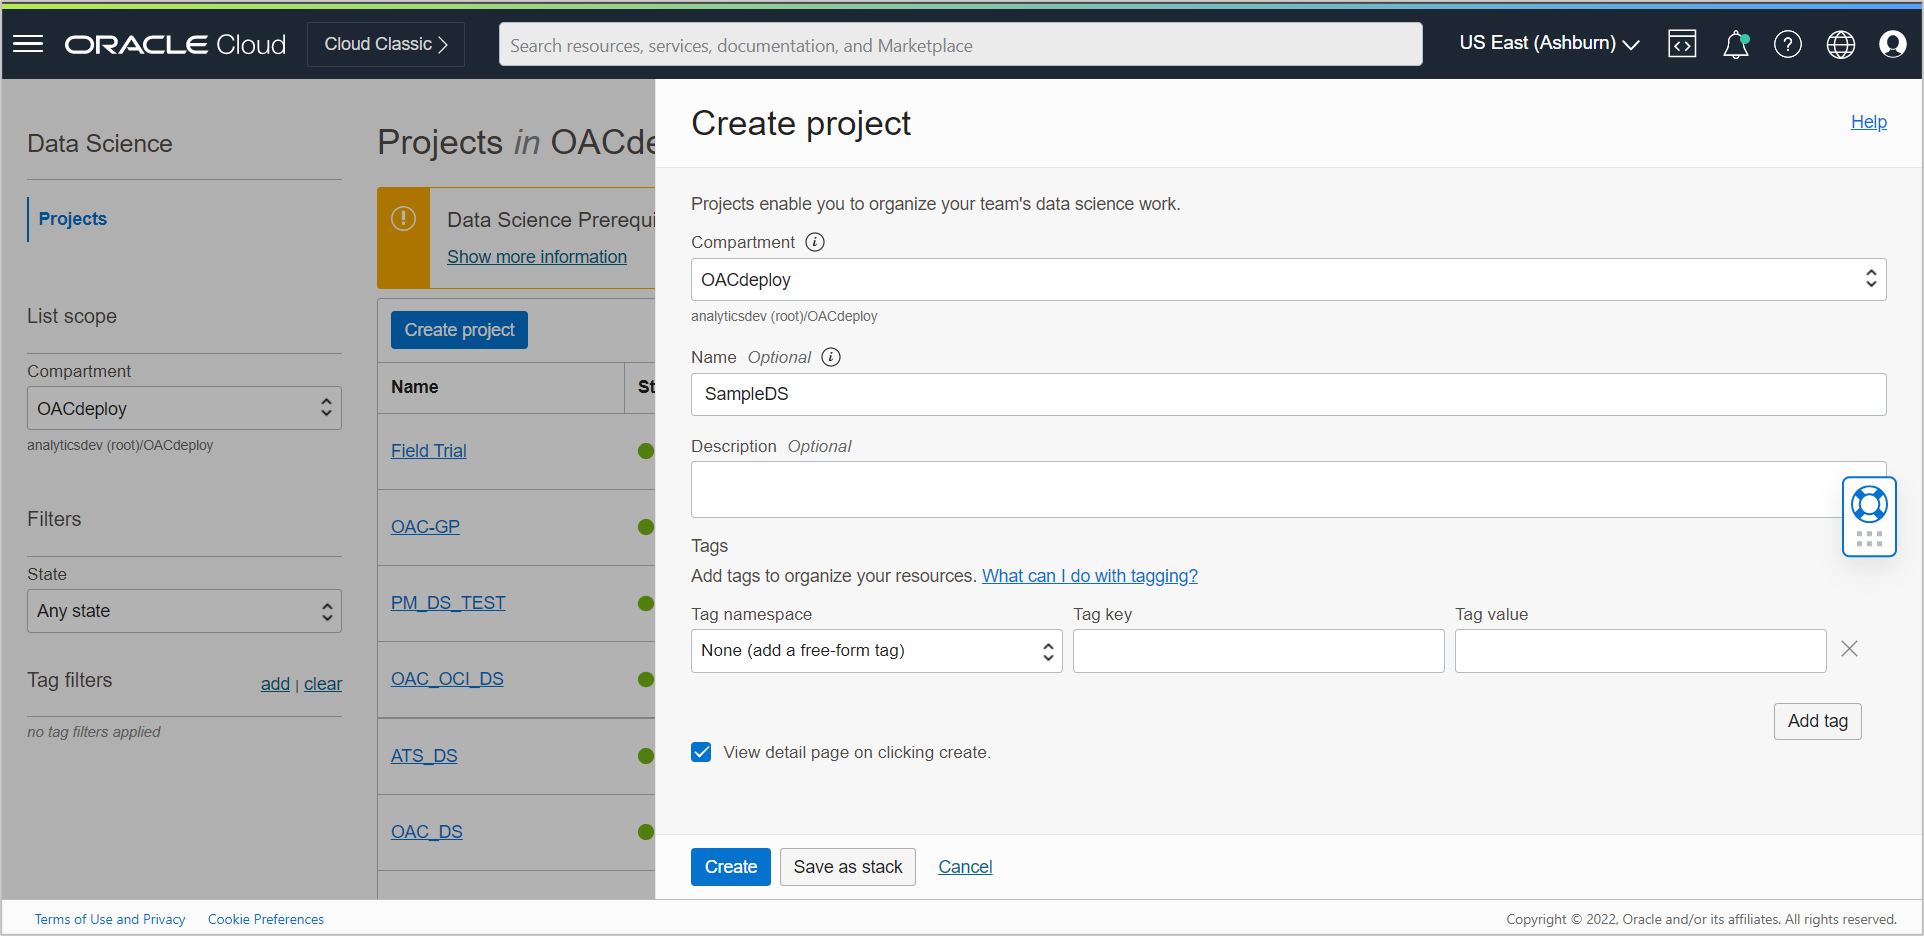
Provide a name (optional) and click Create project.
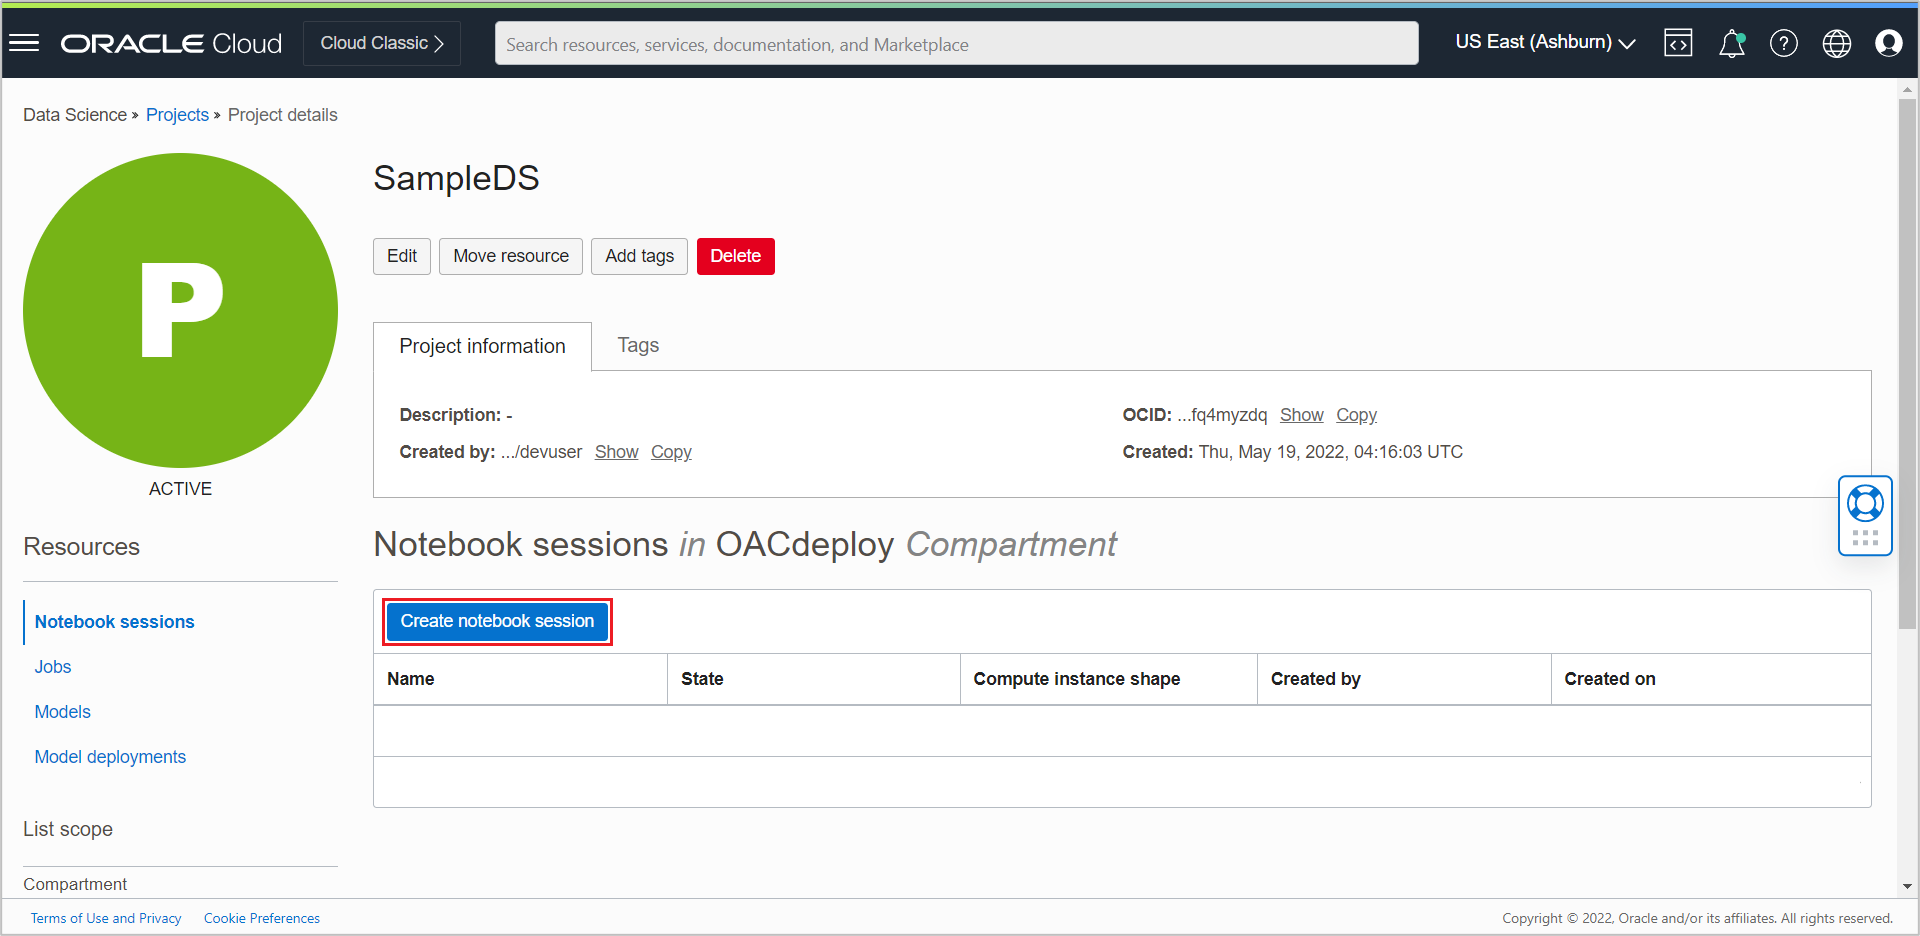
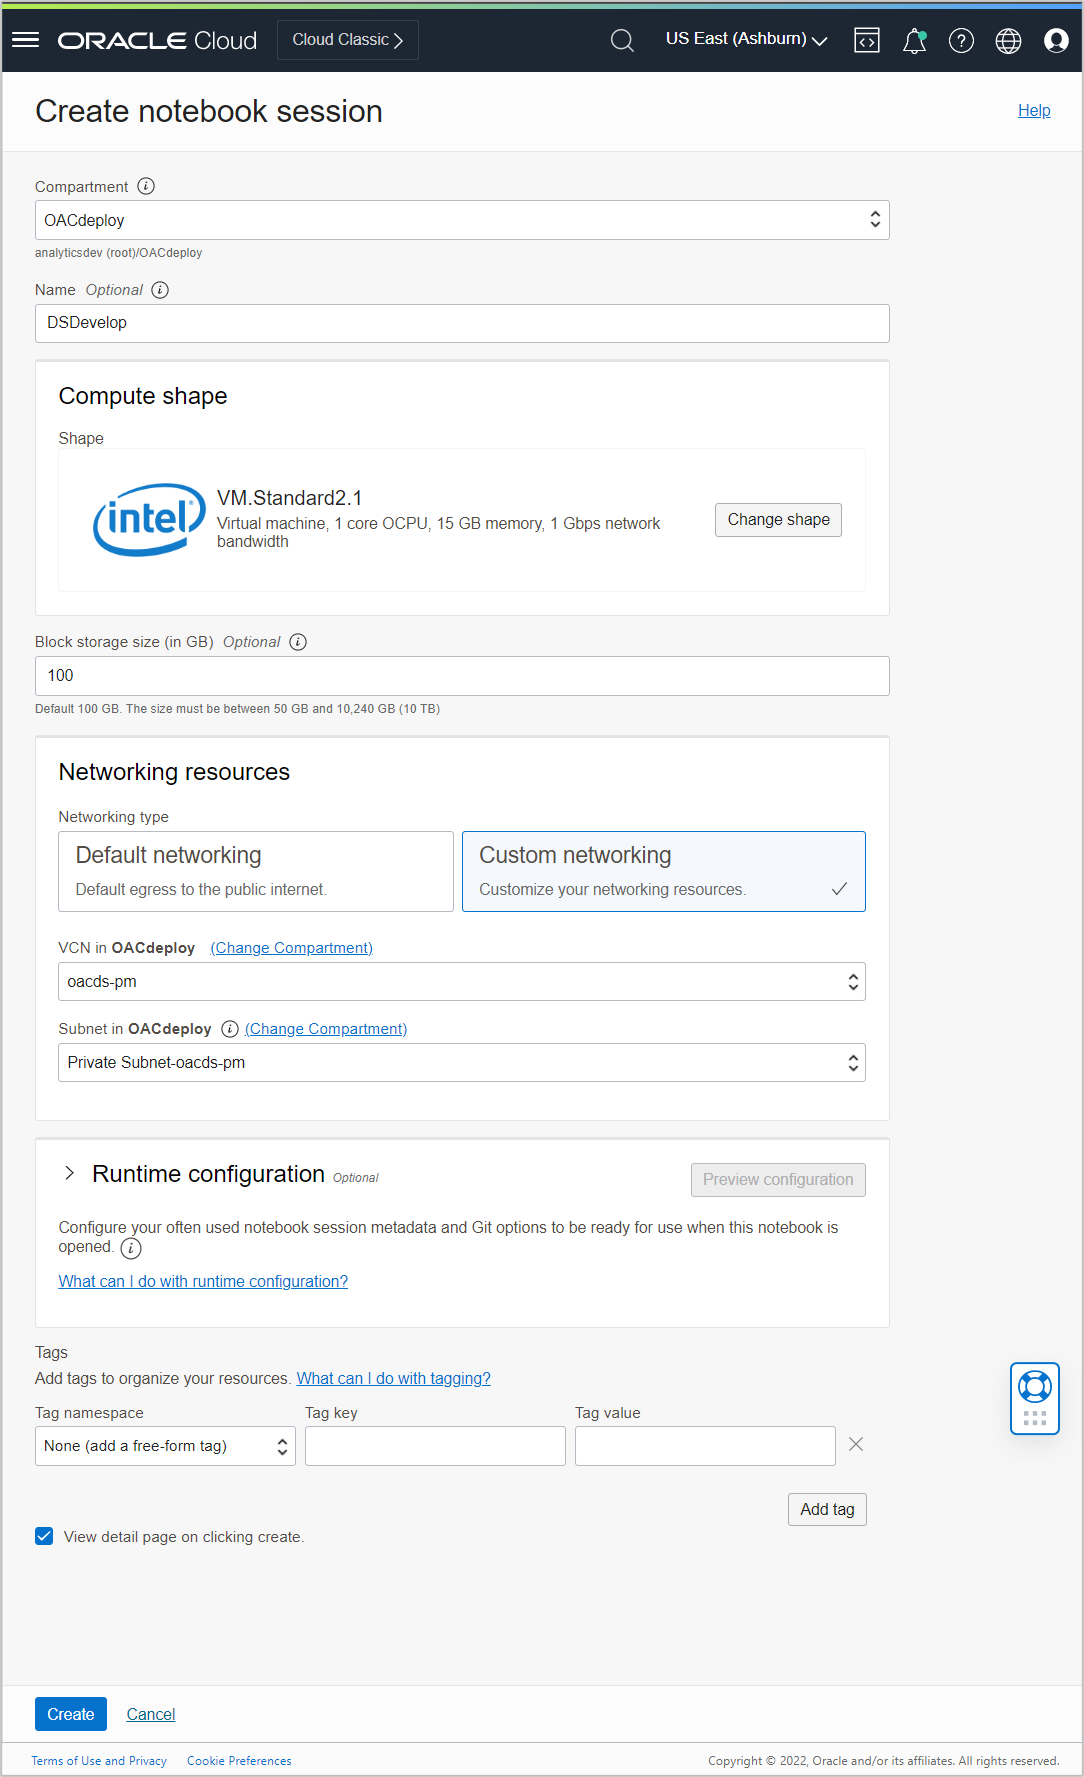
Once created, click the project and then click Create notebook session on the Project Details page.
Select Custom networking in Networking resources and select a VCN and a private subnet within your compartment. You can provide other parameters as required.
Once the created notebook session becomes active, you can open the notebook by clicking the Open button.
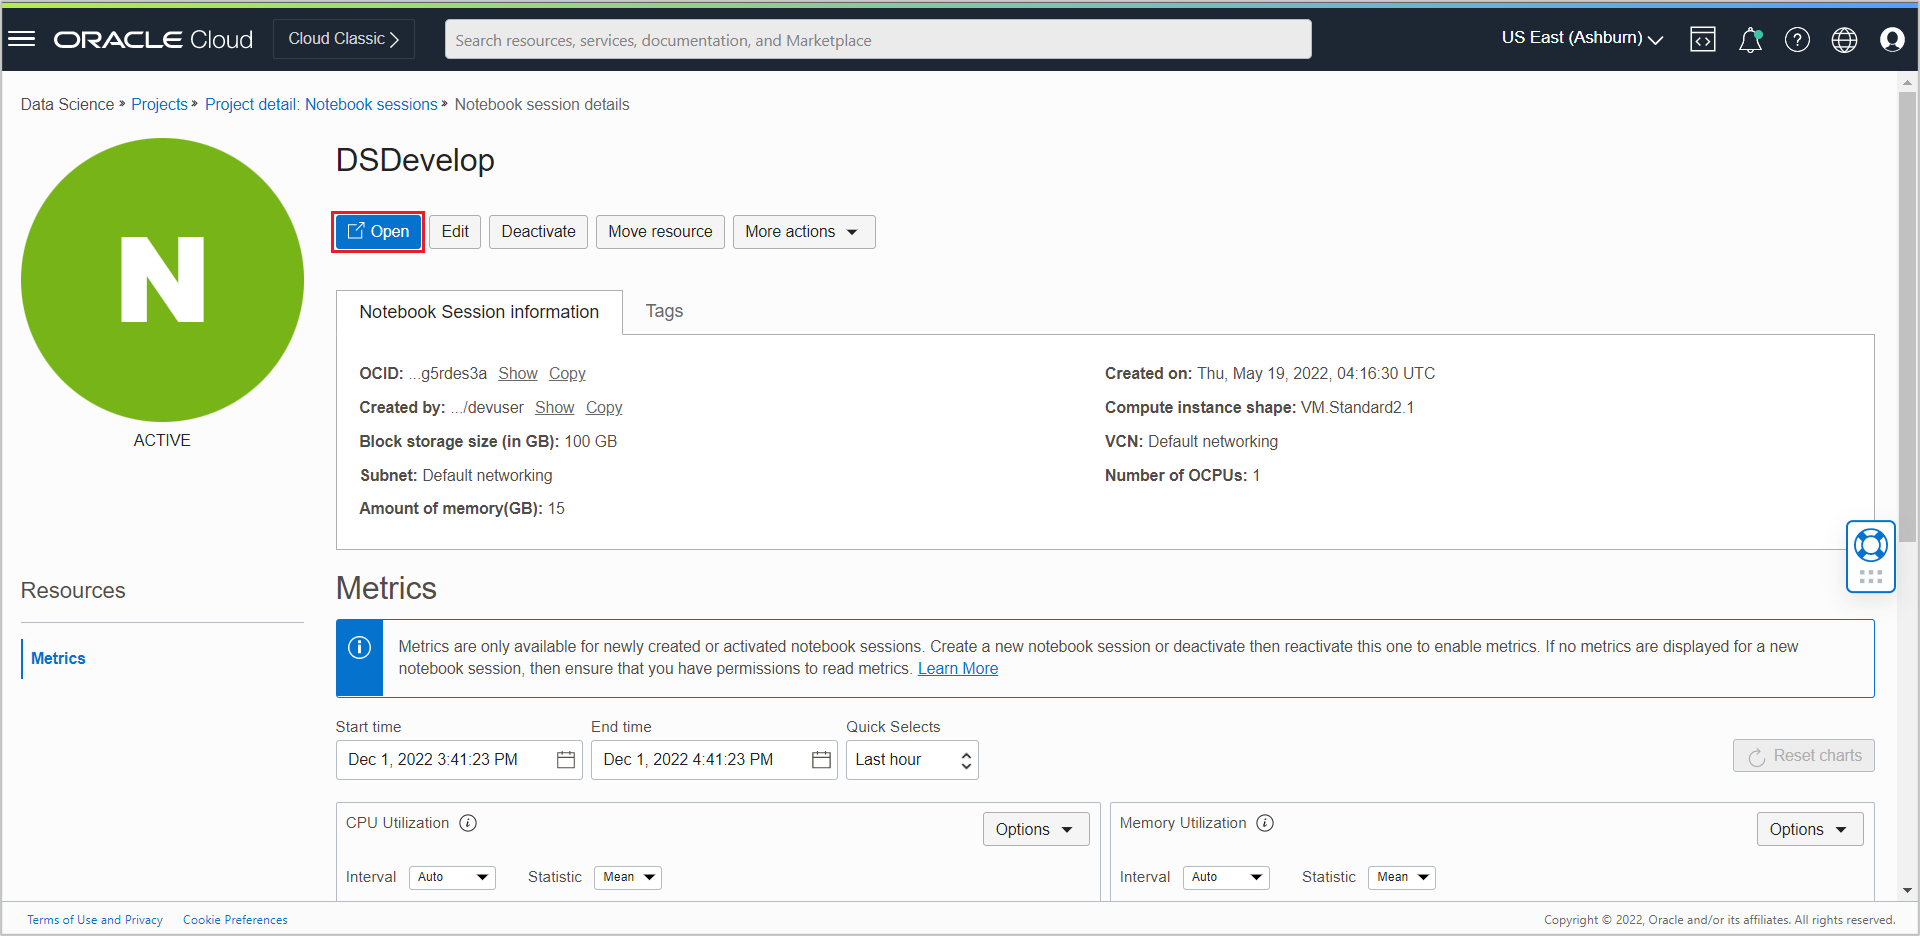
When you click the Open button, the notebook session’s JupyterLab interface opens in a new tab. Please provide tenancy and logon credentials when prompted.
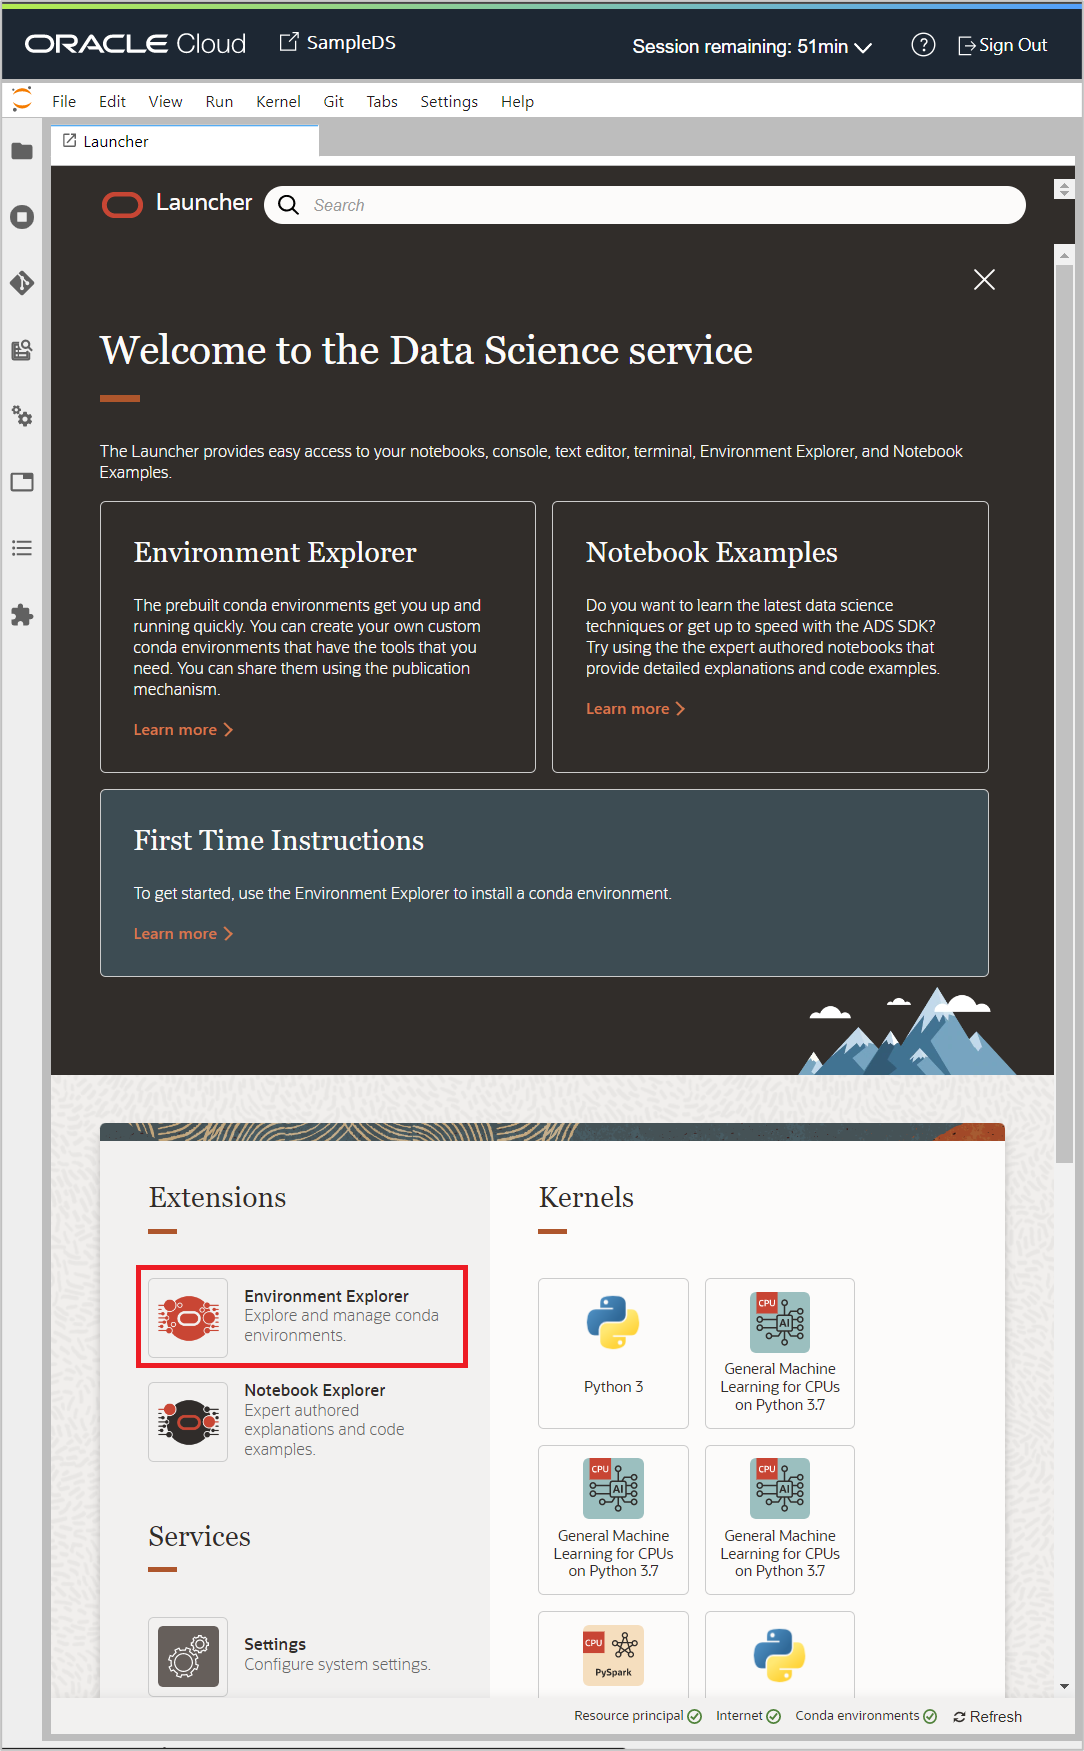
The Launcher tab is opened by default in the notebook session. Scroll down a bit in the Launcher page and click Environment Explorer.
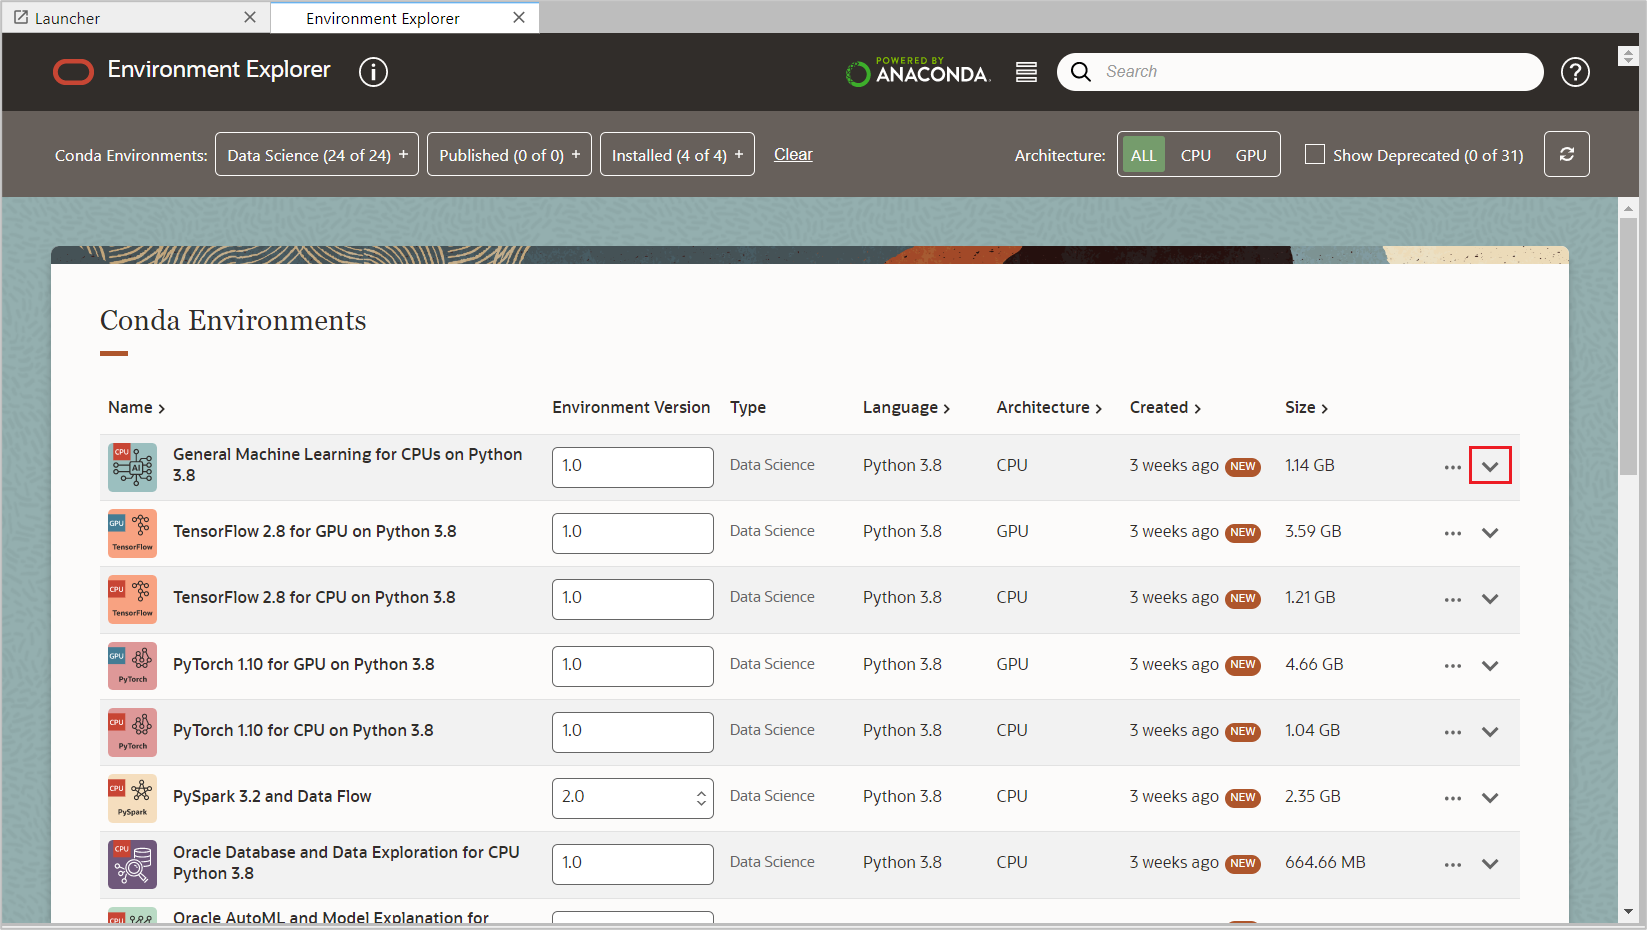
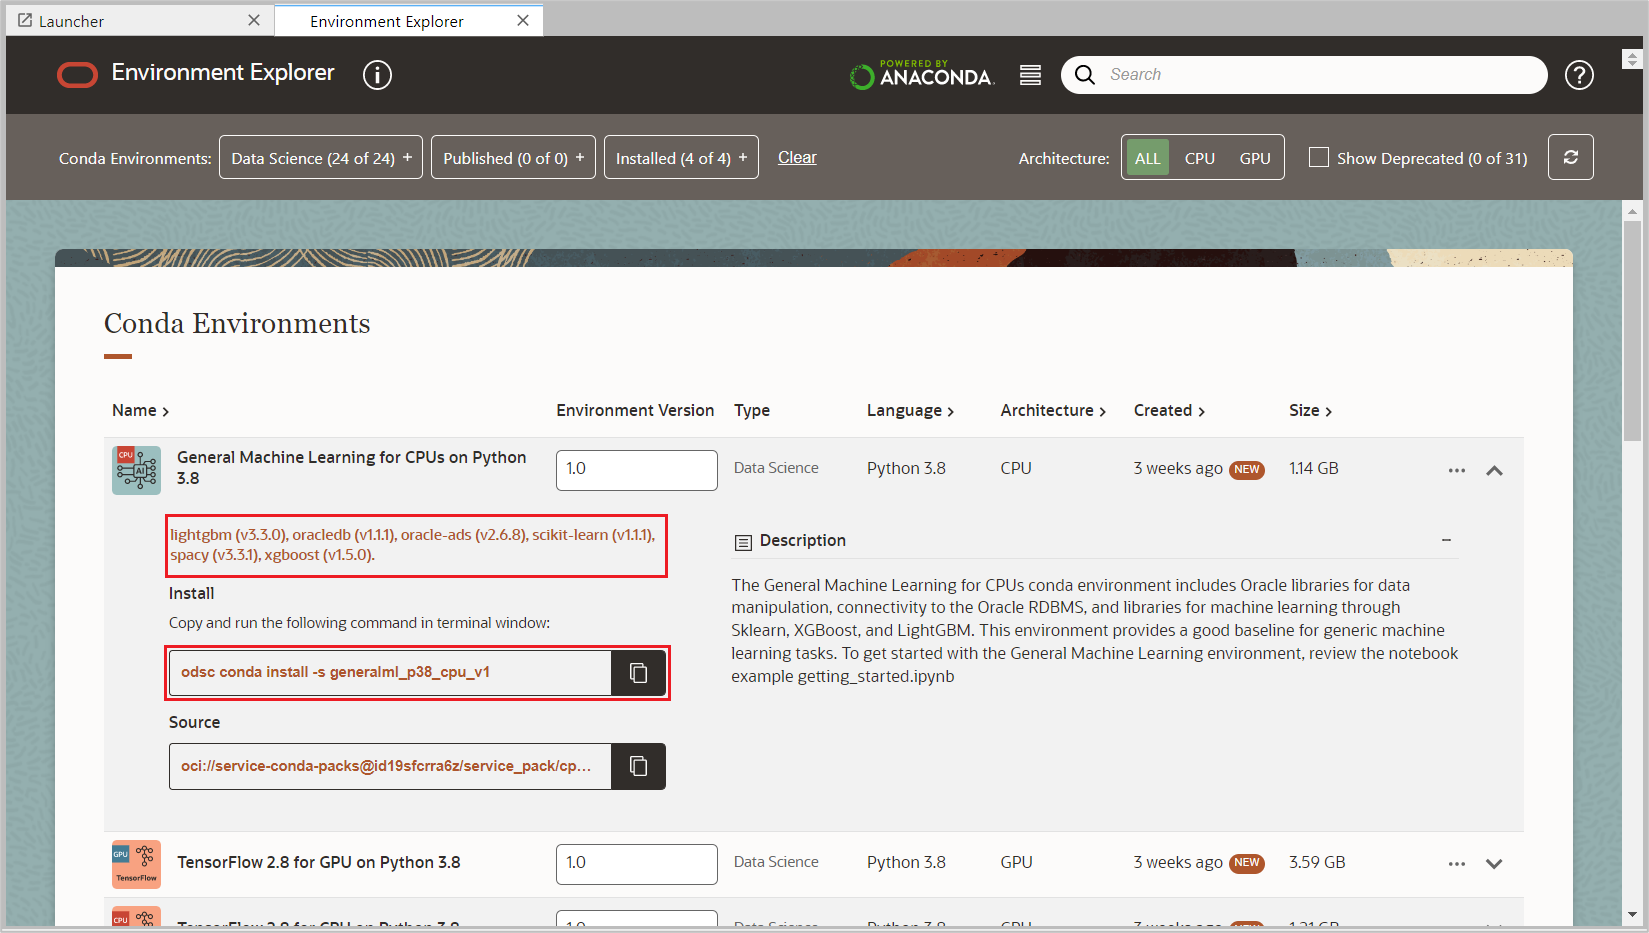
A list of pre-built conda environments is displayed. Conda environments are used to package your Python dependencies in the notebook sessions. Each conda environment that you create in your notebook session can correspond to a different notebook kernel in JupyterLab. Conda environments allow you to run notebooks in different kernels. Each kernel has a set of Python libraries associated with it. The base install has a very minimal set of libraries installed. The service is designed to use conda environments. Learn more about condas in About Conda Environments.
From the available list of conda environments, add a compatible conda pack which has ADS version 2.6.1 or higher installed, for example, General Machine Learning for CPUs on Python 3.8, to the notebook session.
Note: Conda environments are updated frequently. If the conda mentioned above does not work as expected, feel free to try out the latest conda environments according to your requirement. Please refer Data Science Environments for more details.
Click the down arrow of the conda environment to see a description and technical details about that environment.
Copy the Install command highlighted in the screen below to install the selected conda environment.
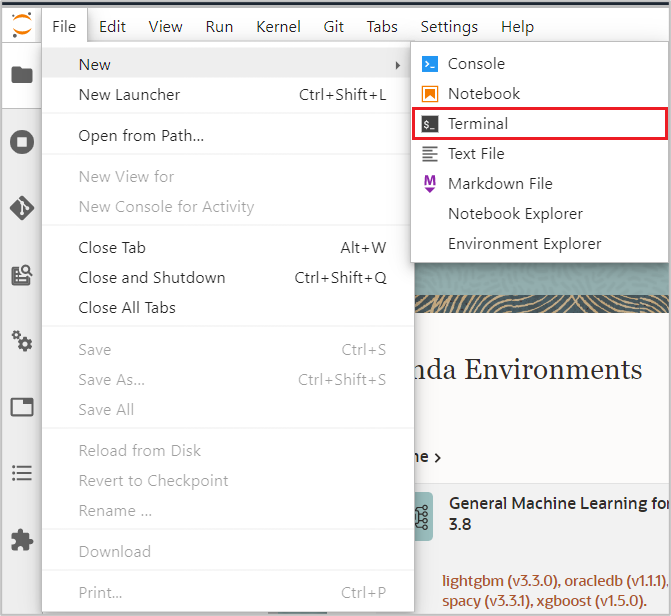
Open a new Terminal from the File > New menu.
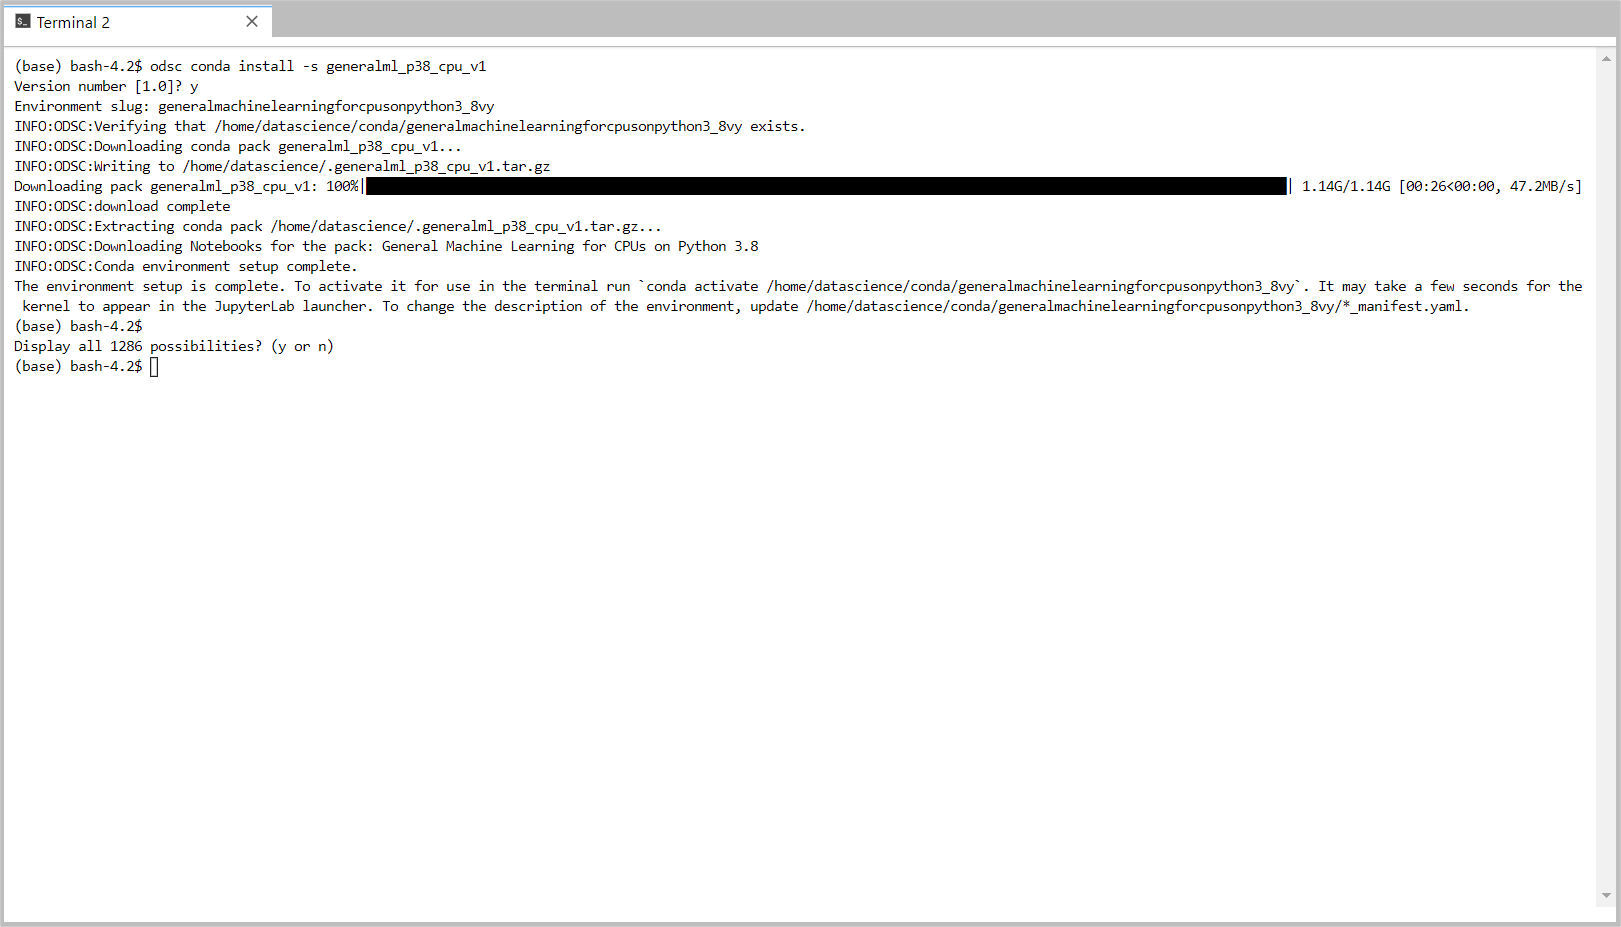
Paste the copied install command in the Terminal and hit enter to begin the conda installation. When version 1.0 is prompted, type ‘y’ and hit enter to continue. Once it is installed, you can start using the conda environment.
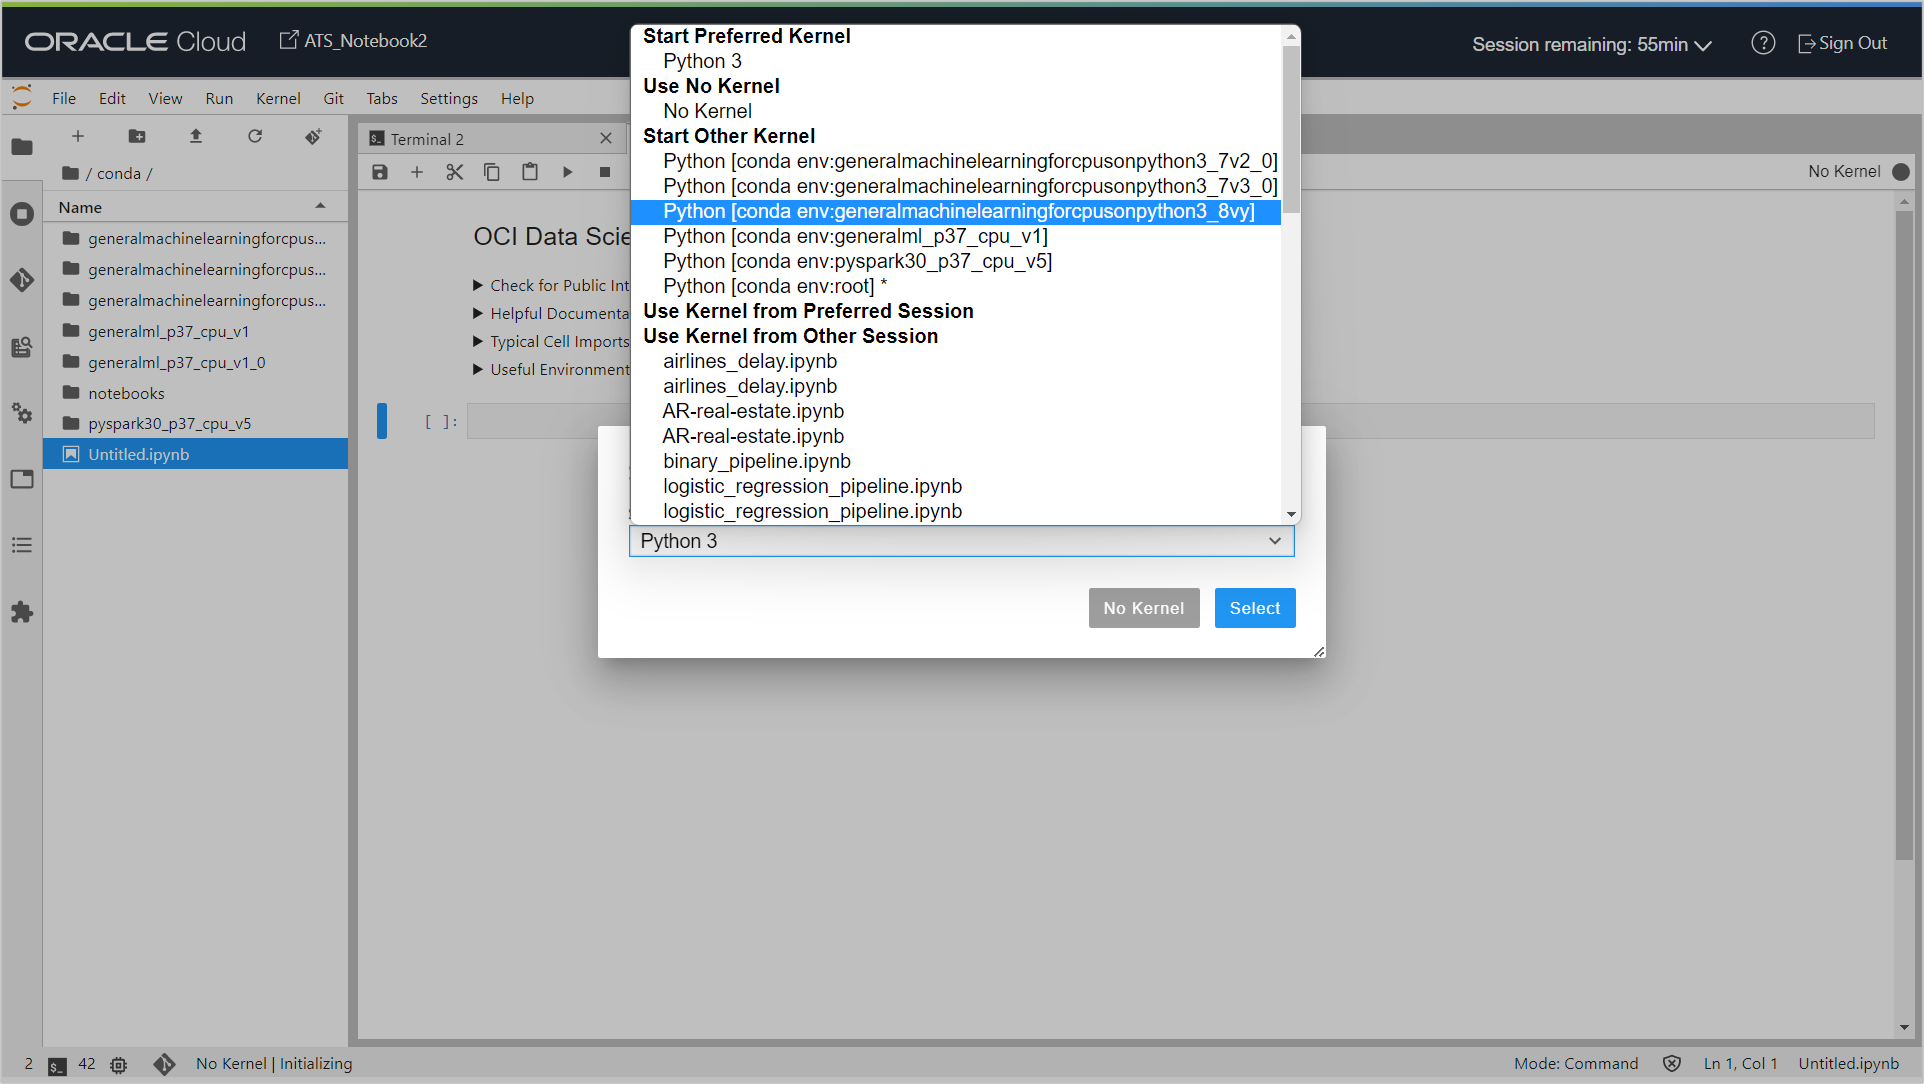
Create a new Notebook from the File > New menu.
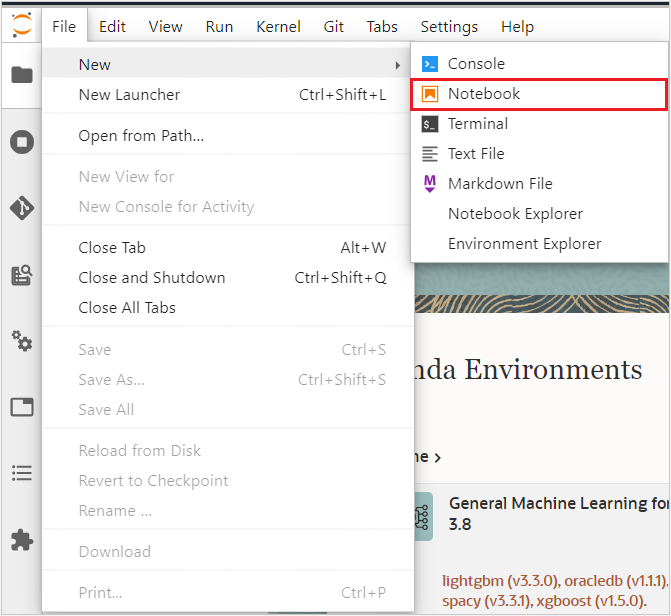
When ‘Select Kernel’ is prompted, select the conda environment (Python [conda env:generalmachinelearningforcpusonpython3_8vy]) you just created from the drop-down list.
The new notebook is saved as Untitled.ipynb in the selected folder, and it can be seen on the file explorer on the right. Now you can start writing python code in this notebook to create, build and train an ML model, and then save it to the Model Catalogue so it can be registered and invoked in OAC.
Create a Binary Classification Model
There are many ways to create a machine learning model in OCI Data Science notebooks using different Python libraries in combination with Oracle Accelerated Data Science (ADS) SDK. We will use the SklearnModel model with Pipeline to build, train and save a Random Forest Binary Classification model.
Read the Dataset
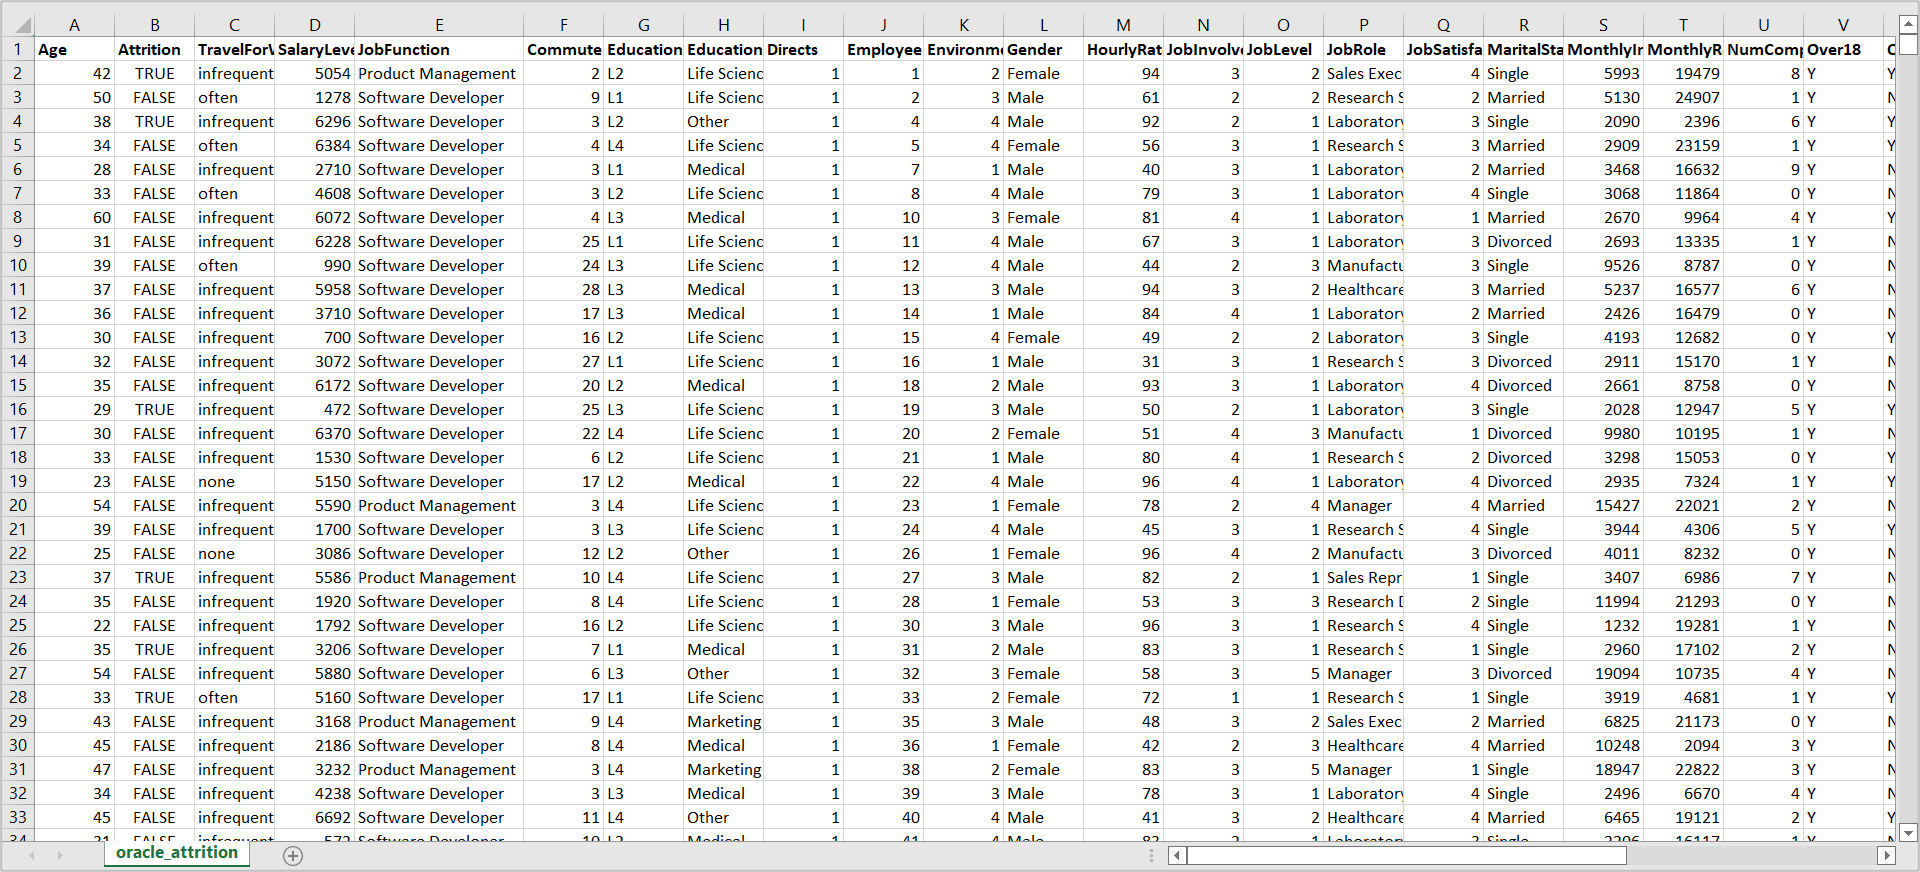
You will use the Employee Attrition dataset which has information about employees.
Now you can move on to see how to build a Random Forest Binary Classification model with Employee Attrition dataset.
The first step is to read and save the dataset:
import pandas as pd
df =pd.read_csv('oracle_attrition.csv')
df.head()
Data Preparation
Next, segregate and store the numeric and categorical columns separately:
from sklearn.pipeline import make_pipeline
from sklearn.preprocessing import FunctionTransformer
from sklearn.compose import ColumnTransformer
from sklearn.linear_model  import LogisticRegression
from sklearn.preprocessing import StandardScaler, OneHotEncoder
from sklearn.model_selection import train_test_split
from sklearn.pipeline import Pipeline

import ads
from ads.dataset.factory import DatasetFactory

ds = DatasetFactory.from_dataframe(df,target="Attrition")
train, test = ds.train_test_split(test_size=0.15)

import numpy as np

numeric_features = ds.select_dtypes(include=['int64', 'float64']).columns
categorical_features = ds.select_dtypes(include=['object']).columns
Then create a Transformer using Pipelines:
from sklearn.pipeline import Pipeline
from sklearn.impute import SimpleImputer
from sklearn.preprocessing import StandardScaler, OneHotEncoder
numeric_transformer = Pipeline(steps=[
    ('imputer', SimpleImputer(strategy='median')),
    ('scaler', StandardScaler())])
categorical_transformer = Pipeline(steps=[
    ('imputer', SimpleImputer(strategy='constant', fill_value='missing')),
    ('onehot', OneHotEncoder(handle_unknown='ignore'))])
Now create a preprocessor with ColumnTransformer:
from sklearn.compose import ColumnTransformer
preprocessor = ColumnTransformer(
    transformers=[
        ('num', numeric_transformer, numeric_features),
        ('cat', categorical_transformer, categorical_features)])
Build and Train a Model
Create the Pipeline for RandomForestClassifier:
from sklearn.ensemble import RandomForestClassifier
rf = Pipeline(steps=[('preprocessor', preprocessor),
                      ('classifier', RandomForestClassifier())])
Train the model with following command.
rf.fit(train.X, train.y)
Test the Model
You can test the model with following code.
y_pred = rf.predict(test.X)
y_pred
Check the accuracy
from sklearn.metrics import accuracy_score

accuracy = accuracy_score(test.y, y_pred)
accuracy
Prepare and Save the Model
Prepare the Model
import logging
import tempfile
import warnings

import os
from os import path

import ads
from ads.catalog.model import ModelCatalog
from ads.common.model import ADSModel
from ads.common.model_export_util import prepare_generic_model
from ads.common.model_metadata import (MetadataCustomCategory,
                                       UseCaseType,
                                       Framework)
from ads.dataset.factory import DatasetFactory
from ads.feature_engineering.schema import Expression, Schema
from ads.model.framework.sklearn_model import SklearnModel
from ads.common.model_metadata import UseCaseType


logging.basicConfig(format='%(levelname)s:%(message)s', level=logging.ERROR)
warnings.filterwarnings('ignore')

#set the authentication params
ads.set_auth('resource_principal')

path_to_ADS_model_artifact = tempfile.mkdtemp()
sklearn_model = SklearnModel(estimator=rf, artifact_dir=path_to_ADS_model_artifact)
model_artifact = sklearn_model.prepare(inference_conda_env="generalml_p38_cpu_v1", training_conda_env="generalml_p38_cpu_v1",
                      X_sample=train.X, y_sample=train.y, use_case_type=UseCaseType.BINARY_CLASSIFICATION)

print("Model Artifact Path: {}\n\nModel Artifact Files:".format(path_to_ADS_model_artifact))
Save to the Model Catalog
for file in os.listdir(path_to_ADS_model_artifact):
    if path.isdir(path.join(path_to_ADS_model_artifact, file)):
        for file2 in os.listdir(path.join(path_to_ADS_model_artifact, file)):
            print(path.join(file,file2))
    else:
        print(file)
name = str(rf.named_steps["classifier"])
name = name[0:name.find('(')]
print(name)
mc_model = sklearn_model.save(project_id=os.environ['PROJECT_OCID'],
                              compartment_id=os.environ['NB_SESSION_COMPARTMENT_OCID'],
                              training_id=os.environ['NB_SESSION_OCID'],
                              display_name=name,
                              description="A "+name+" classifier",
                              ignore_pending_changes=True,
                              timeout=100,
                              ignore_introspection=True,
                              freeform_tags={"key" : "value"}
                             )
mc_model
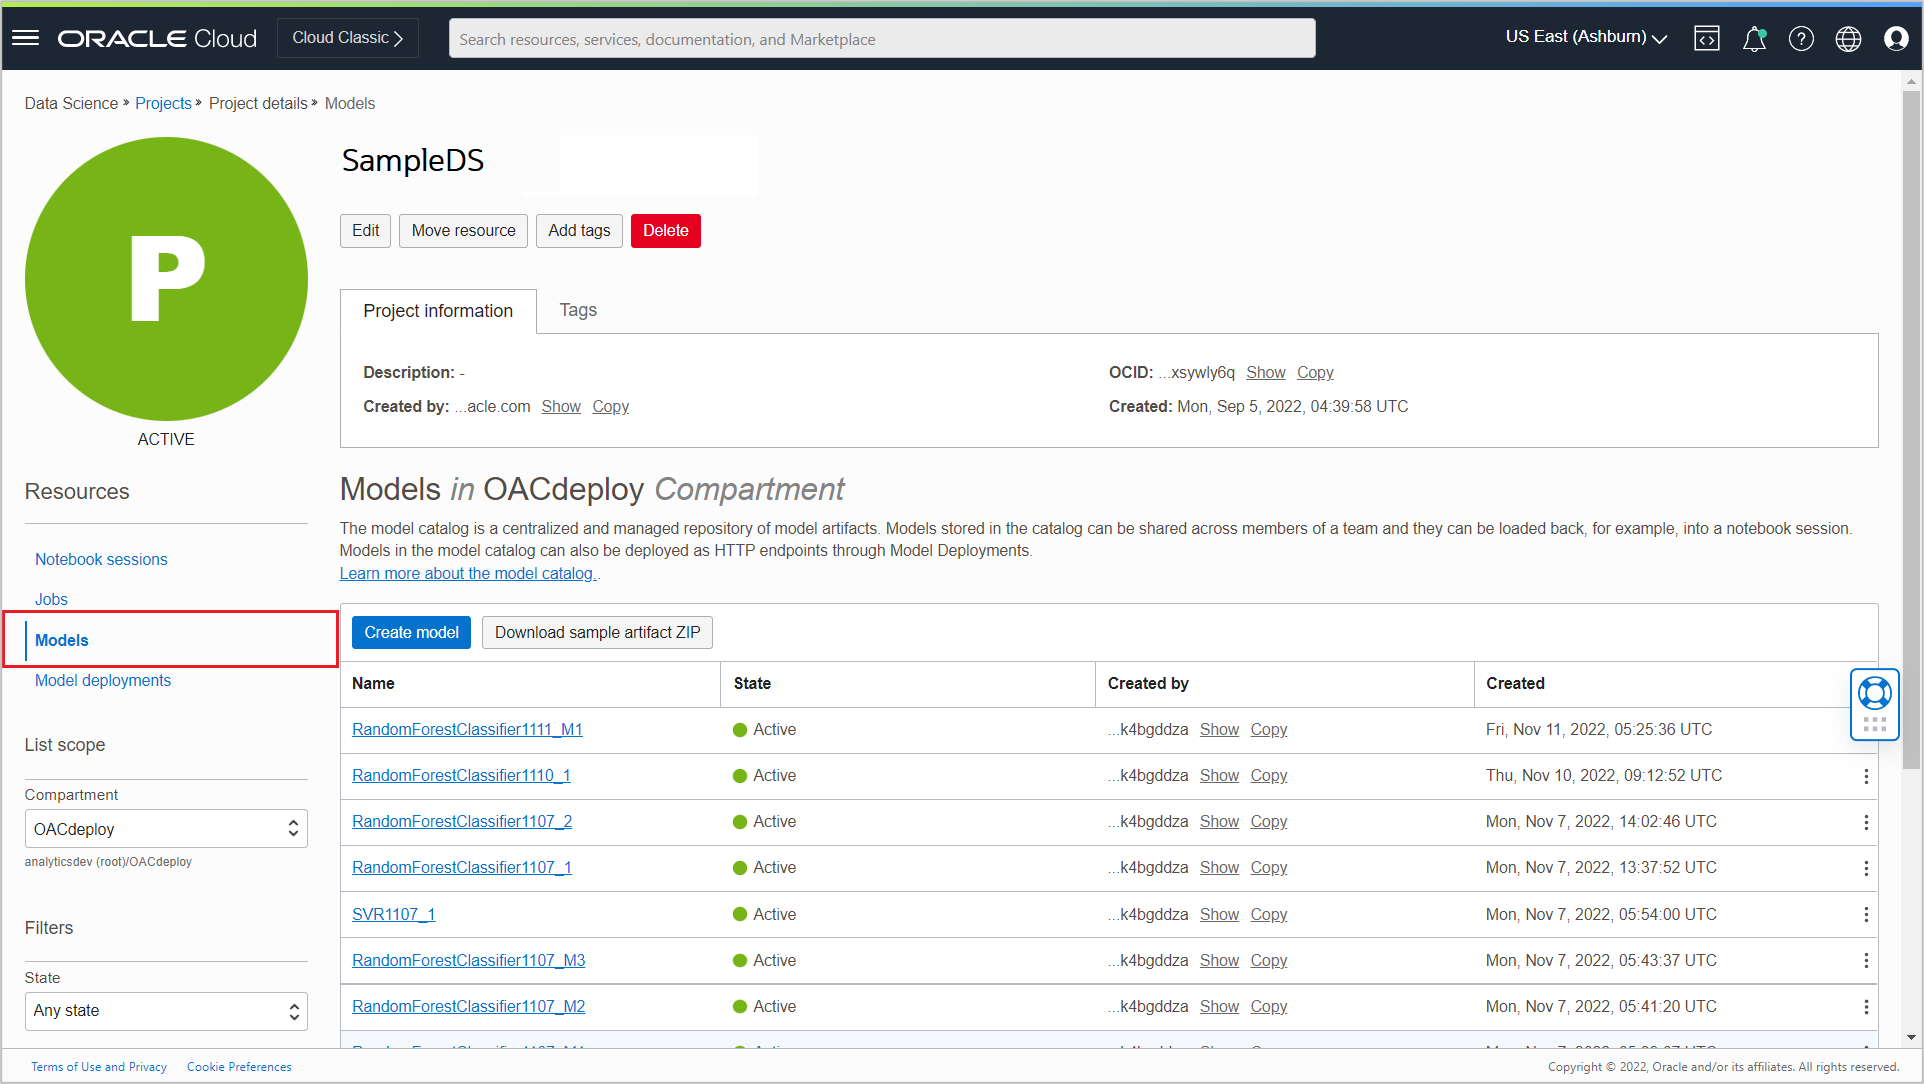
Once the model is saved successfully to the Model Catalog, it is listed in the Models section of the Project details page.
On the Model registration screen in OAC, all the models in the catalog are listed.
Summary
In this blog, you learned how to create a project, notebook session in OCI and how to build and train a simple binary classification model. The model can easily be used outside the OCI Data Science environment, especially it is registered in OAC and applied using OAC Dataflows. For more information, see the blogs Register a Data Science Model in OAC and Invoke a Data Science Model from OAC.
