Oracle Fusion Data Intelligence
Advanced Mode Security
Data Security in Nine Simple Steps
With Inputs From:
Veronica Dumitriu Principal Product Manager, Oracle Analytics
Nupur Joshi Principal Product Manager, Oracle Analytics
Ramamurthy Shankarachetty Senior Principal Product Manager, Oracle Analytics
Since its beginning, Oracle Fusion Data Intelligence (FDI) has included support for predefined data security, so users can be assigned data-level access for every module. Customers have requested the ability to customize data security to meet their specific business needs.
FAW Release 21.R1.P2 offers Security Extensibility, which allows security administrators to create custom duty and data roles to secure subject areas, front-end objects (decks, KPIs, data visualization projects, and classic dashboards and analyses), and row-level data, in addition to using pre-defined security.
This article provides the steps to enable custom data security and showcase custom security setup, using specific use cases for ERP and HCM.
Enabling Custom Data Security in Fusion Data Intelligence
In Fusion Data Intelligence, you enable custom data security by:
- Creating the custom data role (custom data role definition)
- Configuring the custom data role (configure the filter arguments and list the data elements that are filtered when the user has a group inheriting from the custom data role)
In the context of the custom data role, you can map users to security assignments driven by the custom data security to be applied on the data elements needing to be secured.
As a prerequisite to implementing custom data security, you must import the users to security assignment mappings in a custom security table in Oracle Autonomous Data Warehouse (either from a .csv file or by inserting the user-security assignments into a security table).
The following list outlines the nine steps involved in enabling custom data security in Fusion Data Intelligence. The steps are performed by various personnel.
- (Optional) As the administrator of Oracle Autonomous Data Warehouse (ADW), create an ADW custom schema, if one hasn’t already been created for other customizations. See the Appendix for the steps to create an ADW custom schema.
- As the ADW administrator, create a table for custom security and insert the user-security assignments either directly, from a .csv file or from Oracle Analytics Cloud data flows (template attached).
- As a FAW Security Administrator, log in to Fusion Data Intelligence, navigate to Console, click the Security tile and in the Application Roles tab, create a Custom Data Role.
- As a FAW Security Administrator, map the Custom Data role to one or more factory or custom groups by navigating to the Groups tab in the Security dialog and clicking Assign Data Role.
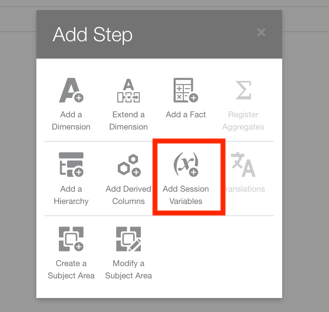
- As a FAW Modeler, access the Console in Fusion Data Intelligence and navigate to the Semantic Model Extensions. Create a Branch and an InitBlock with Session Variable.
Note: Variable names are expected to be upper-cased in the initialization block query.
- As a FAW Modeler Administrator, merge the branch with Main and Create a Version.
- As a FAW Modeler, configure the custom Data Role in Semantic Model Extensions.
- Select the list of objects (dimensions and facts) to be secured
- For each object to be secured by the custom data role, specify the filter arguments using an expression based on the session variable created earlier.
- As a FAW Modeler Administrator, Publish the versioned semantic model.
- As a FAW ERP or HCM Licensed Author, Test the newly created Custom Data Security.
Custom Data Security Use Case(s) for HCM
Use Case 1: Grant access to specific data points
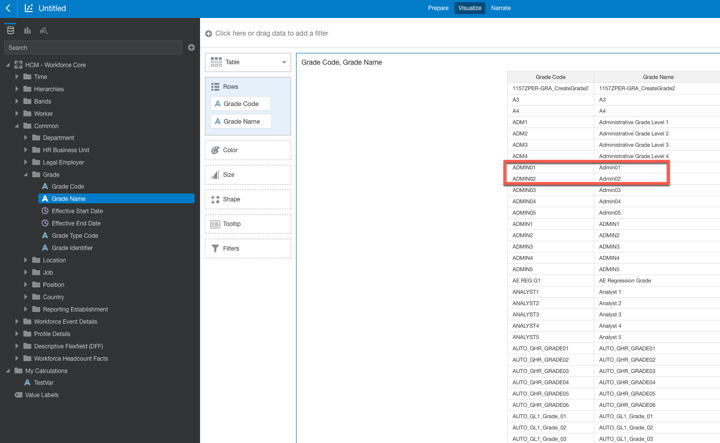
A User called HCM-User-1 can see only data corresponding to grades ADMIN01 and ADMIN02, from the list of all available grades in the HCM Workforce subject area, Grades dimension.
These are the end-to-end steps:
1. (Optional) Create a custom schema “CUSTOM_SECURITY” in ADW:
create user CUSTOM_SECURITY identified by <>;
grant resource, connect to CUSTOM_SECURITY;
grant unlimited tablespace to CUSTOM_SECURITY;
grant create session to CUSTOM_SECURITY;
grant create table to CUSTOM_SECURITY;
grant create synonym to CUSTOM_SECURITY;
2. Create a security table “HCM_USE_CASES” in the custom schema, provide the necessary grants, and load the user-security assignments data
In this case, two values are loaded for user HCM-User-1, in the HCM Grade context: ADMIN01 and ADMIN02.
- CREATE TABLE “CUSTOM_SECURITY”.”HCM_USE_CASES”
( “USERNAME” VARCHAR2(150 BYTE),
“PERID_VALUE” NUMBER,
“CONTEXT” NUMBER,
“ATTRVALUE” VARCHAR2(50 BYTE),
“CONTEXTNAME” VARCHAR2(100 BYTE)
)
GRANT SELECT ON CUSTOM_SECURITY.HCM_USE_CASES TO OAX$OAC;
b.Insert data into the HCM security table.
Load data from a .csv file to the “HCM_USE_CASES”security table.

3. Log in to FAW and from the Console, navigate to Security.
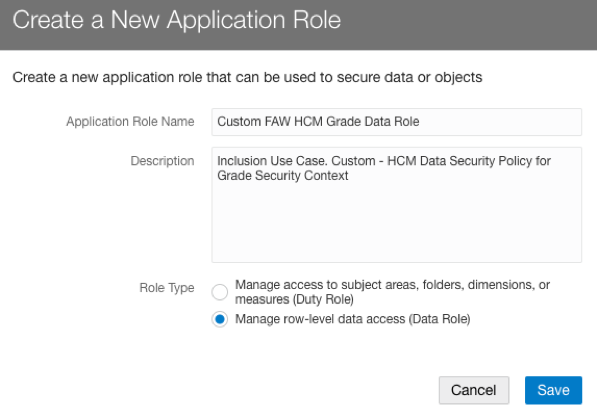
- In the Application Roles tab, click Create New Application Role.
-
- Specify a name for the new custom role “Custom FAW HCM Grade Data Role”.
- Select the Data Role role type.
- Save your changes.
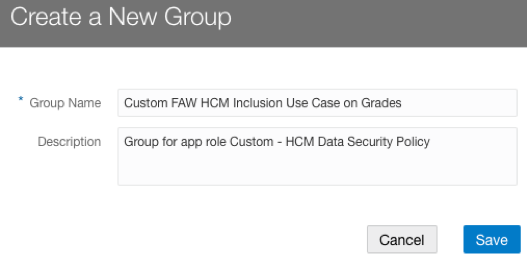
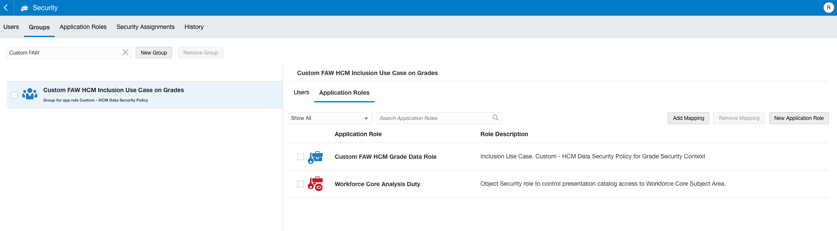
4. Assign the custom data role to one or more groups (in a factory group or a custom group).
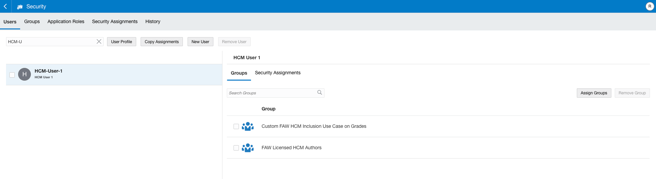
Create a group called “Custom FAW HCM Inclusion Use Case on Grades” and create a mapping between the custom group and the custom data role “Custom FAW HCM Grade Data Role” created in step 3:
Assign the custom group to the HCM-User-1 user:
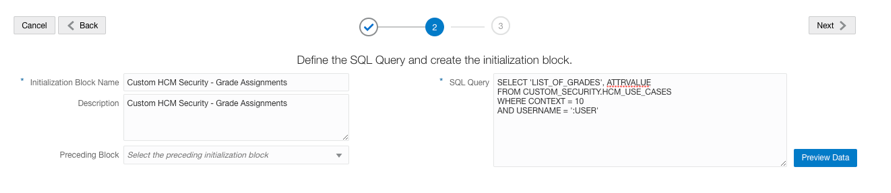
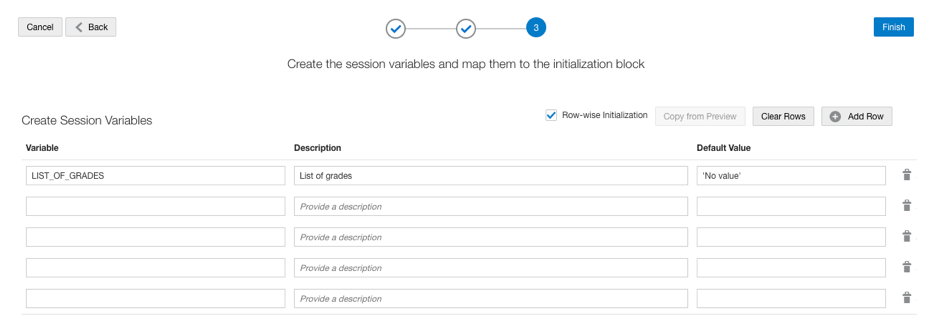
5. Use Semantic Model Extensions to Create a Branch and an InitBlock with Session Variable

Note: Variable names are expected to be upper-cased in the initialization block query.
e. Enable row-wise initialization.
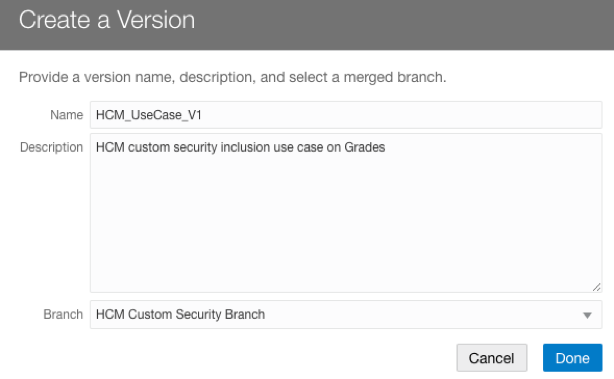
6. Merge and Create Version in Semantic Model Extensions.
7. Configure Data Security in Semantic Model Extensions.
Navigate to Semantic Model Extensions. Click Security Configurations, then click Add Configure Data Security in the top-right corner.

- Enter a name and a description for the step and select the Custom FAW HCM Grade Data Role application role from the drop-down list.
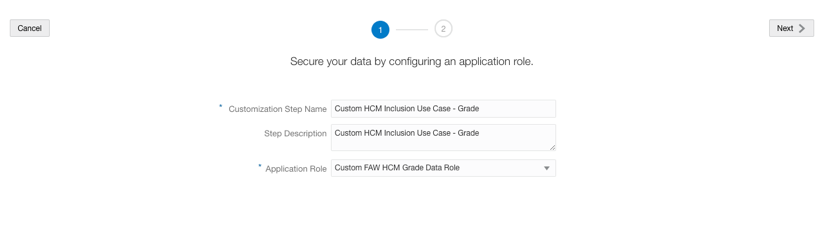
- Select the logical objects (dimensions, facts) that you need to secure.
Note: ONLY the selected dimensions and facts are secured by this data role.
- For each selected object use the expression editor to specify a filter argument. Use the variable created in step 5.
For example, filter the dimension Dim-Grade by grade code using the following expression in the filter argument.
‘Core’.’Dim-Grade’.’Grade Code’ = VALUEOF(NQ_SESSION.LIST_OF_GRADES)
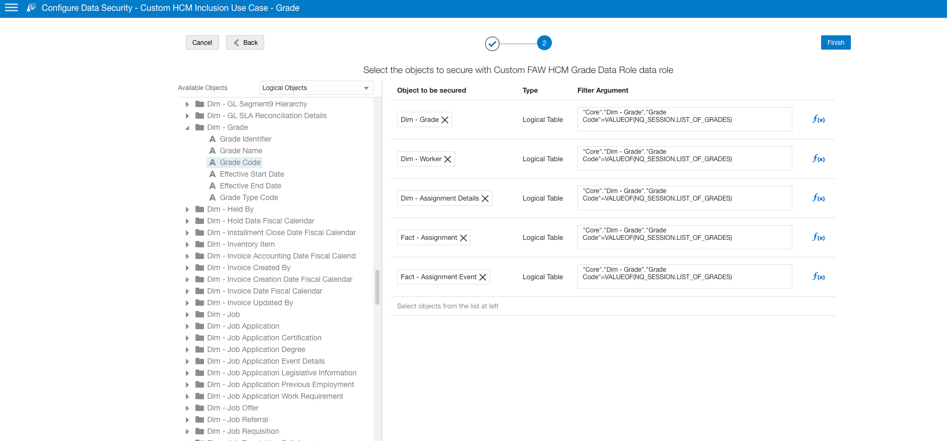
The filter argument uses the session variable defined in Step 5; and for each user session, it passes the grade codes that the user has access to as filter arguments.
For user HCM-User-1, the filter arguments translate during runtime to:
‘Core’.’Dim-Grade’.’Grade Code’ = (ADMIN01, ADMIN02)
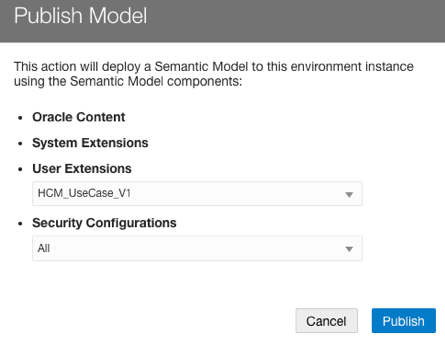
8. Publish the Version in Semantic Model Extensions.
In the Semantic Model Extensions area, navigate to Security Configurations and select Publish Mode. Select the latest version of the model and ALL for Security Configuration.
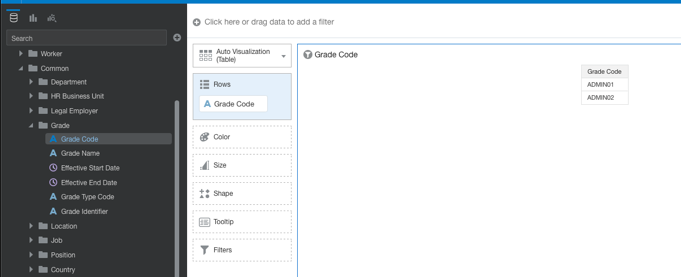
9. Verify and test the newly created Data Security.
Log in to Oracle Analytics Cloud and verify that the assigned roles are mapped to the user:
- Log in to FAW using the HCM-User-1 credentials.
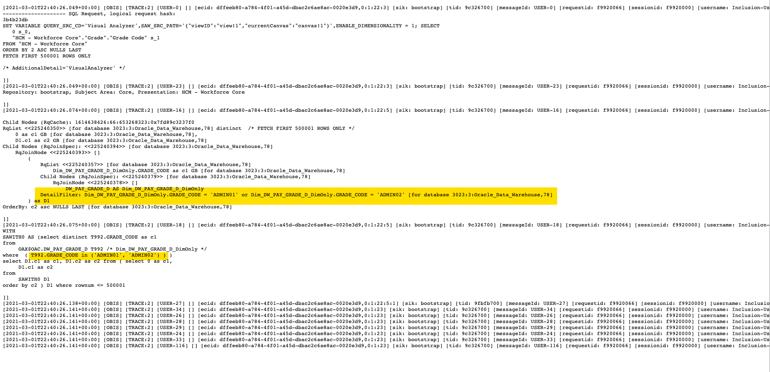
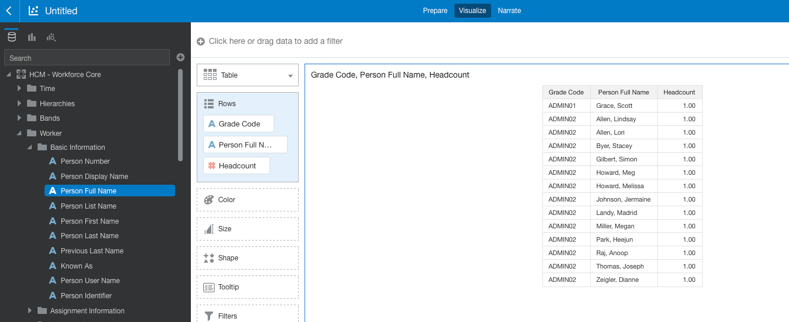
- Create a simple data visualization project to display the Grade Code and verify that the data security is applied to the user. ADMIN01 and ADMIN02 are the only Grade codes visible to user HCM-User-1.
- Verify that the data security filter is applied in the SQL query.
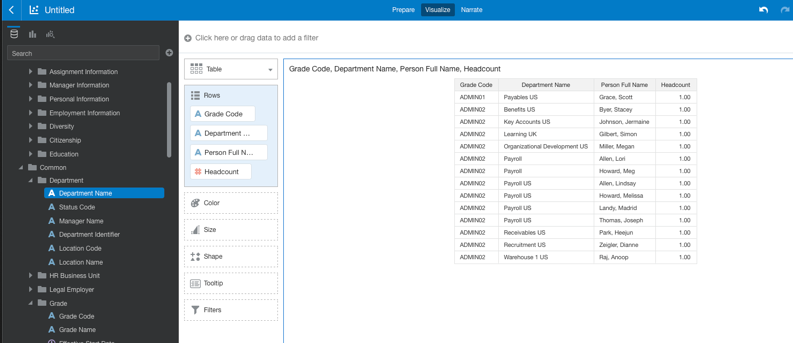
- Add some measures and other dimensional attributes to the project.
Custom Data Security Use Case(s) for ERP
Use Case 1: Grant access to specific data points
Use Case: Provide User FAWSecUser01 data access to specific Cost Centers and Balancing Segments.
These are the end-to-end steps to configure data security for both Cost Center and Balancing Segment.
1. (Optional) Create a schema CSECURITY in ADW
create user CSECURITY identified by <>;
grant resource, connect to CSECURITY;
grant unlimited tablespace to CSECURITY;
2. Insert the user-security assignments data into a security table.
a. Create a security table “CUSTOM_SEC_DETAILS” in the custom schema, provide the necessary grants.
CREATE TABLE CSECURITY.CUSTOM_SEC_DETAILS (
USERNAME VARCHAR2(100),
SEC_CONTEXT VARCHAR2(100),
SEC_VALUE VARCHAR2(100),
CREATION_DATE DATE DEFAULT sysdate
);
GRANT SELECT
ON CSECURITY.CUSTOM_SEC_DETAILS
TO OAX$OAC;
GRANT SELECT
ON CSECURITY.CUSTOM_SEC_DETAILS
TO OAX_USER;
b. Load data from the .csv file into the CUSTOM_SEC_DETAILS security table or manually load the user-security assignments data.
The following image shows a spreadsheet with user data that can be used to populate the CUSTOM_SEC_DETAILS table:

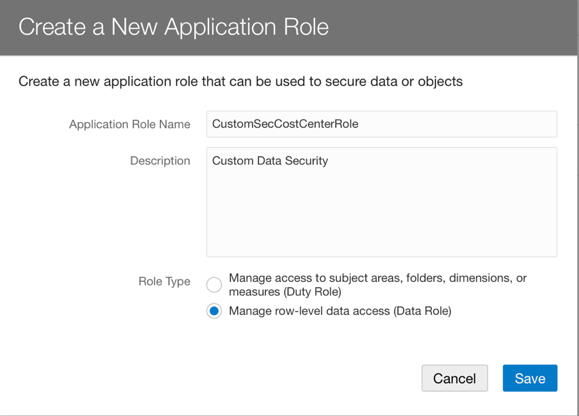
3. Log in to FAW and from the Console, navigate to Security. In the Application Roles tab, click Create New Application Role.
- Specify a name for the custom role: CustomSecCostCenterRole.
- Select Data Role type.
- Save your changes.
Create another Data Role called CustomSecBalSegmentRole:
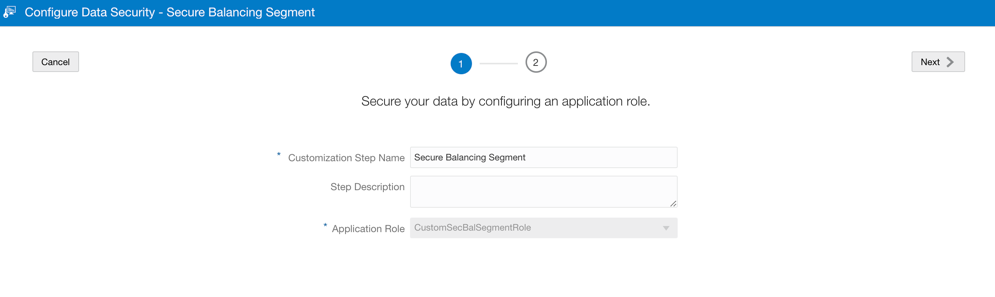
- Specify a name for the custom role: CustomSecBalSegmentRole.
- Select Data Role type.
- Save your changes.

4. Assign the custom data role to one or more groups (in a factory group or a custom group):
Create a group called FAWCustomSecGroup, and create a mapping between the custom group and the custom data roles CustomSecCostCenterRole and CustomSecBalSegmentRole created in Step 3.
In the FAW Console, navigate to Security, access the Groups tab and create a group called FAWCustomSecGroup. In the Application Roles tab for this group, click New Application Role and assign the custom data roles as shown in this screenshot:
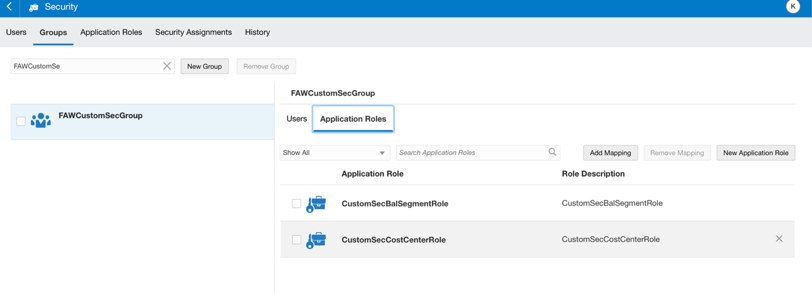
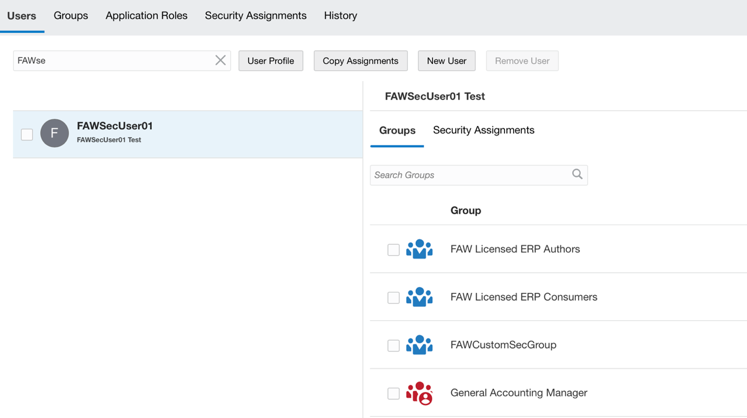
Assign the custom group FAWCustomSecGroup to the FAWSecUser01 user.
5. Use Semantic Model Extensions to Create a Branch and an InitBlock with Session Variable.

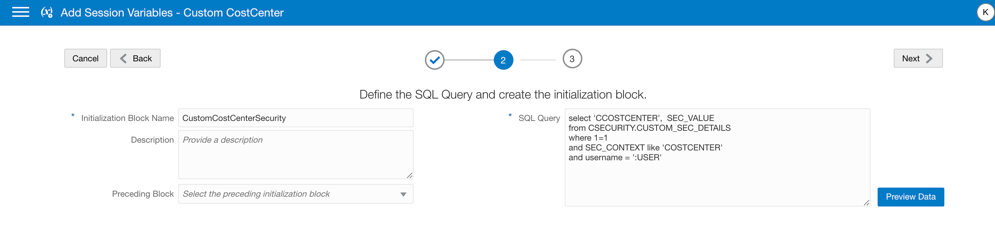
Note: Variable names are expected to be upper-cased in the initialziation block query.

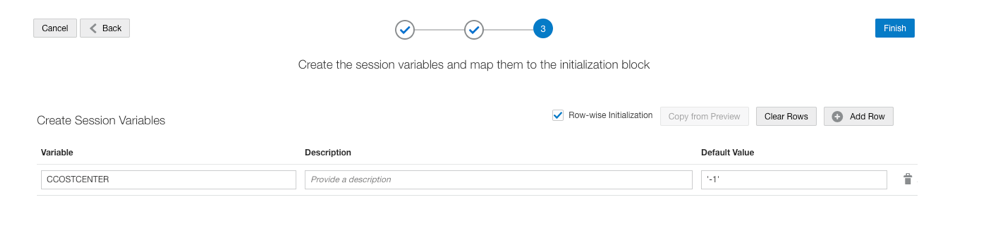
f. Enable row-wise initialization:
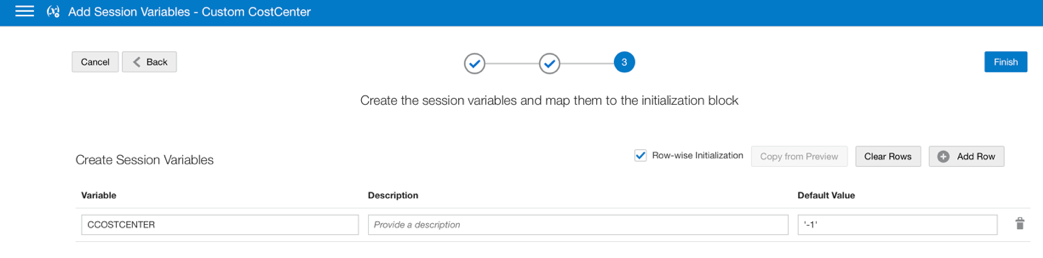
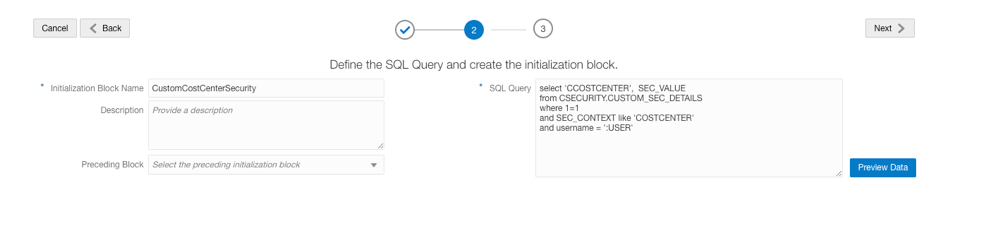
Use this SQL query:
select ‘CCOSTCENTER’, SEC_VALUE
from CSECURITY.CUSTOM_SEC_DETAILS
where 1=1
and SEC_CONTEXT like ‘COSTCENTER’
and username = ‘:USER’
Enable row-wise initialization:
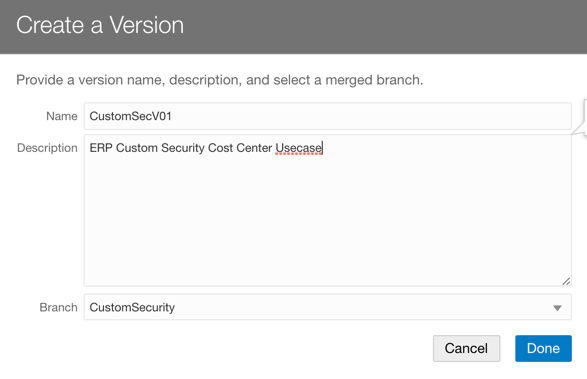
6. Merge and Create Version in Semantic Model Extensions.
7. Configure Data Security in Semantic Model Extensions.
Navigate to Semantic Model Extensions. Click Security Configurations, then click Add Configure Data Security in the top-right corner.

a. Enter a name and a description for the step and select the application role from the drop-down list.
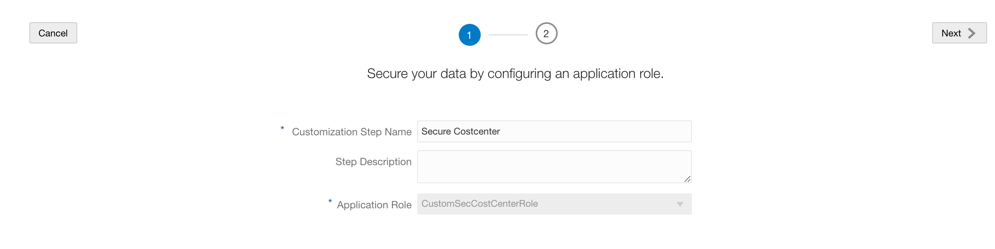
Secure Dim Cost Center as shown in these screenshots.
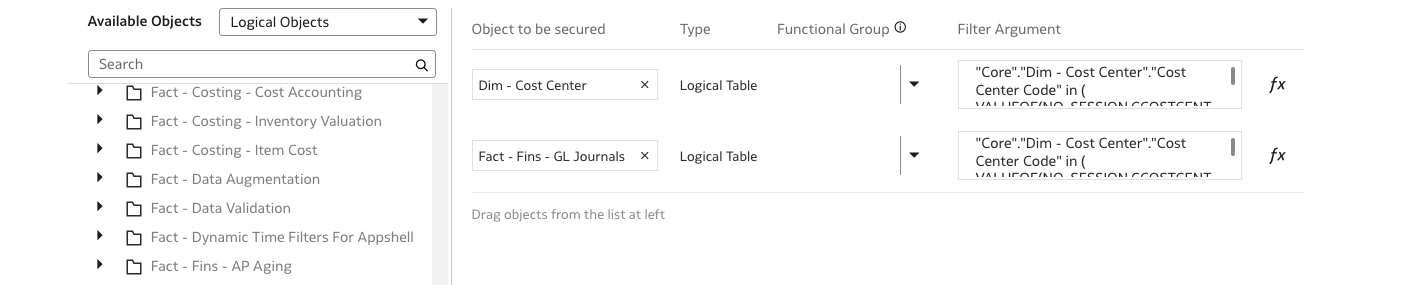
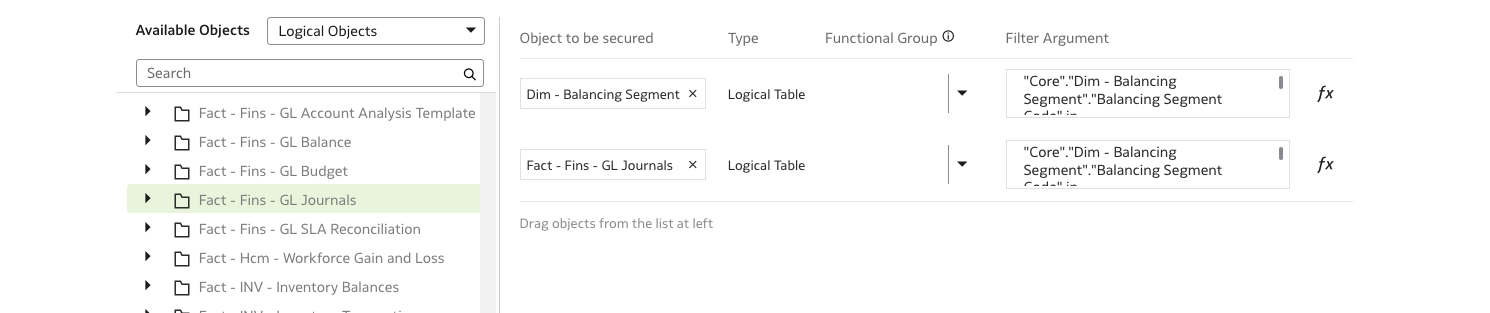
b. Select the logical objects (dimensions, facts) that you need to secure
Note: ONLY the selected dimensions and facts are secured by this data role.
c. For each selected object, use the expression editor to specify a filter argument. Use the variable created in Step 5.
“Core”.”Dim – Cost Center”.”Cost Center Code” in ( VALUEOF(NQ_SESSION.CCOSTCENTER))
i.e.: filter dimension ‘Dim-Cost Center by Cost Center Code using the following expression in the filter argument.
Repeat the process for Balancing Segment as shown in these screenshots:
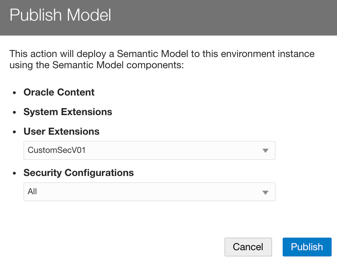
8. Publish the Version in Semantic Model Extensions.
In the Semantic Model Extensions are, navigate to Security Configurations and select Publish Model. Select the latest version of the model and ALL for Security Configuration:

9. Verify and test the custom data security.
a.Log in to Oracle Analytics Cloud and verify that the assigned roles are mapped to user.
b.Log in to FAW using the FAWSecUser01 credentials.
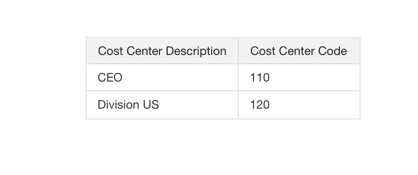
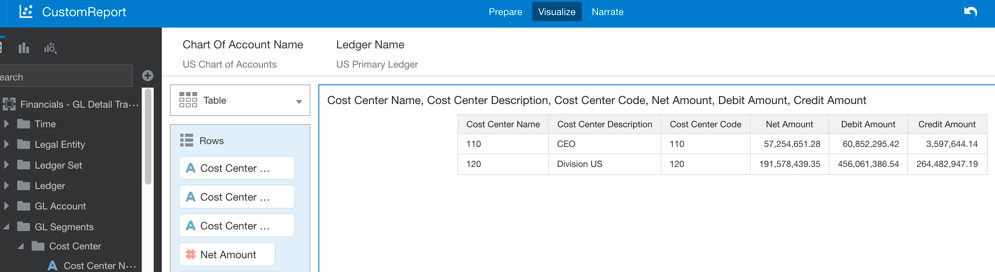
c.Create a simple data visualization project based on Cost Center and Balancing Segment with the custom data role, and verify that the data security is applied to the user: 120 and 110 = Cost Centers are visible to user FAWSecUser01. If you set up Balancing Segment Data Security, then verify that the data security is applied to the user: 310,101, 120 and 309 Balancing Segments are visible to the user FAWSecUser01.
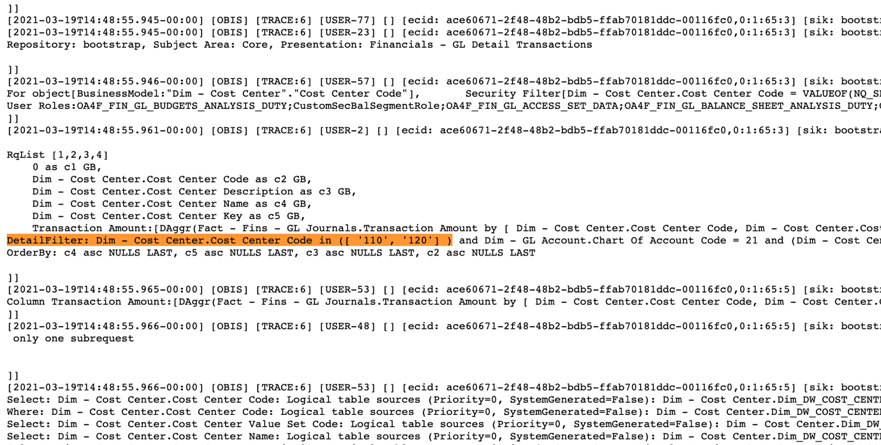
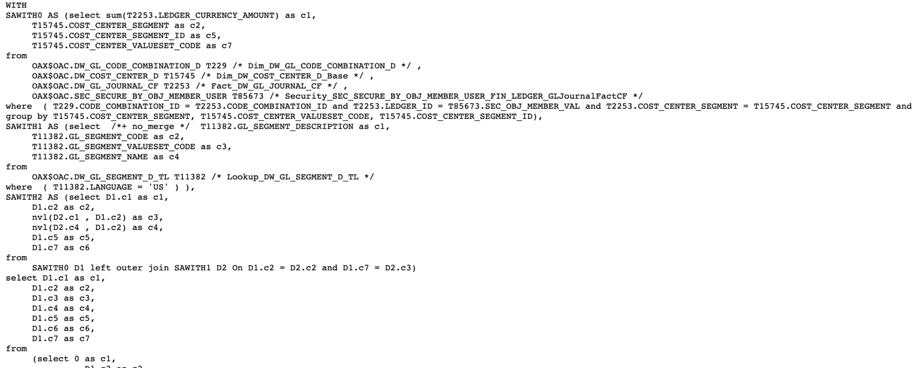
d. Verify that the data security filter is applied in the SQL query:

e. Add some measures and other dimensional attributes to the project:
Summary
Configuring Custom Data Security in FAW involves a hybrid approach executed by different people. In this article, we simplified the steps and identified the system roles needed to perform each step. To learn more about FAW, visit Oracle.com/analytics, and follow us on Twitter@OracleAnalytics.