
Introduction
AI Functions in Oracle Analytics Cloud (OAC) let workbook authors apply large language models directly to row-level data. Instead of exporting data to a separate application, authors can generate labels, summaries, classifications, filters, and group-level narratives inside analytics content.
This article covers an end-to-end example that connects OAC to an Oracle Autonomous AI Database, registers a DBMS_CLOUD_AI profile as a model asset, and uses AI functions in the OAC workbook calculations or data flows.
1. Configure Policies for OCI Generative AI Access
NOTE: OCI policies are required for OCI-sourced models. If you use only an Autonomous AI Database profile backed by OpenAI, Google, xAI, or another supported provider, continue with the database grants, credential, profile, and network steps.
In the OCI Console, open Identity & Security, select Policies, and create either an API-key policy for the OCI user group or a resource-principal policy scoped to the Analytics instance.
Allow group <group_name> to manage generative-ai-family in compartment <compartment_name>Allow any-user to manage generative-ai-family in compartment <compartment_name> where all {request.principal.id='<analytics_instance_ocid>'}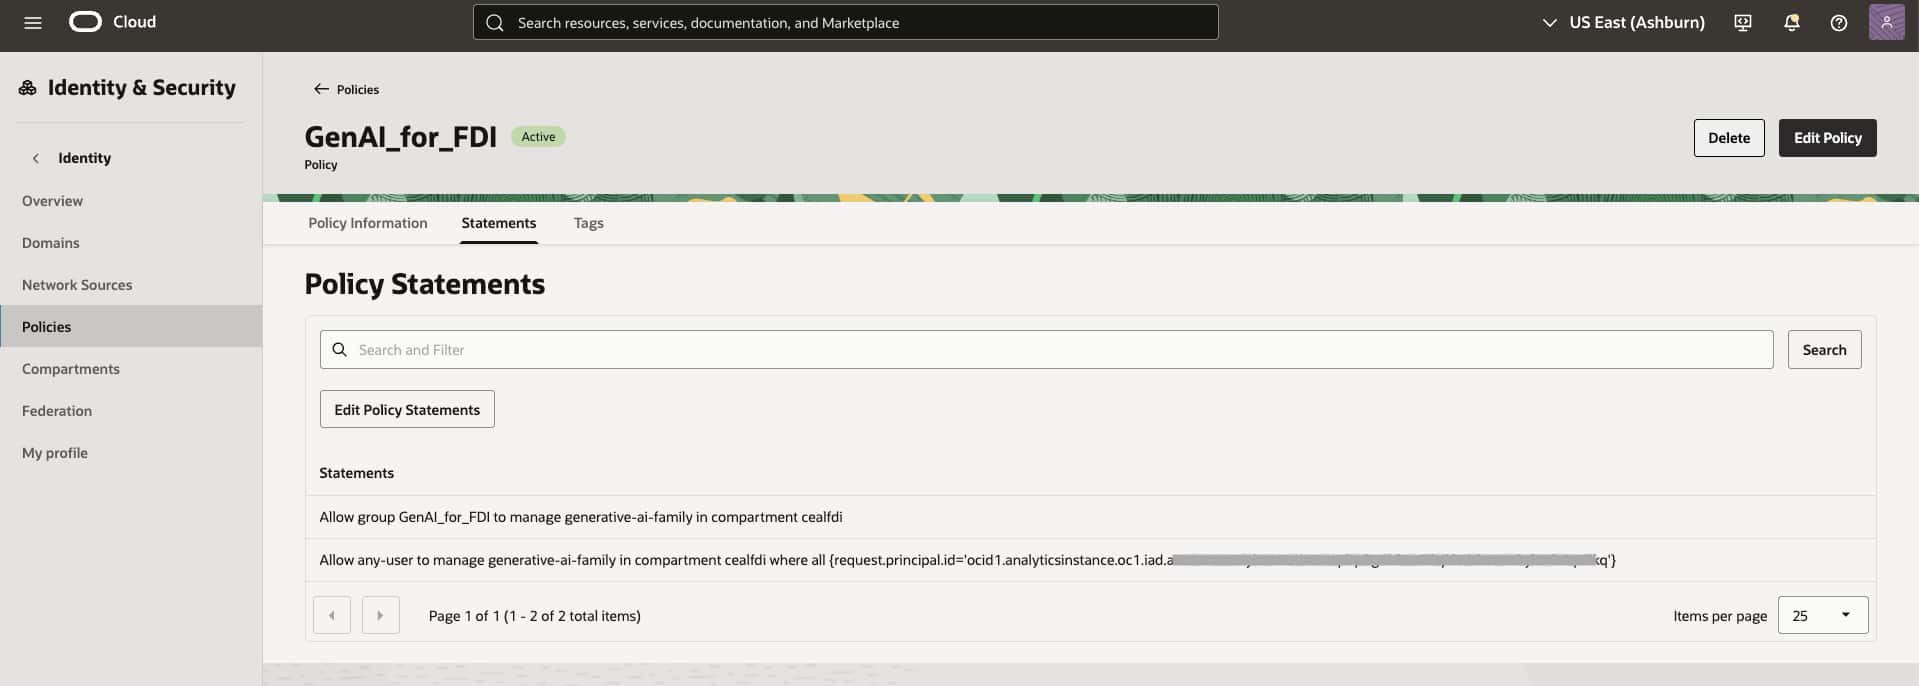
Figure 1. Policy to grant a user group and OAC resource principal access to OCI Generative AI family.
2. Prerequisites
- An Oracle Analytics Cloud environment with permission to create connections, register models, and author workbooks.
- An Oracle Autonomous AI Database that contains the source tables used by the workbook.
- An Autonomous AI Database schema for the AI profile; this example uses GENAIUSER.
- A supported model-provider API key; this example uses OpenAI.
- Database ADMIN access for grants and outbound network ACL configuration.
3. Grant the Database User Access to Select AI
Sign in to Database Actions as ADMIN and grant the profile owner permission to execute DBMS_CLOUD_AI. The source flow also grants DBMS_CLOUD_PIPELINE; retain the second grant only if your workload uses pipeline capabilities.
GRANT EXECUTE ON DBMS_CLOUD_AI TO GENAIUSER;GRANT EXECUTE ON DBMS_CLOUD_PIPELINE TO GENAIUSER;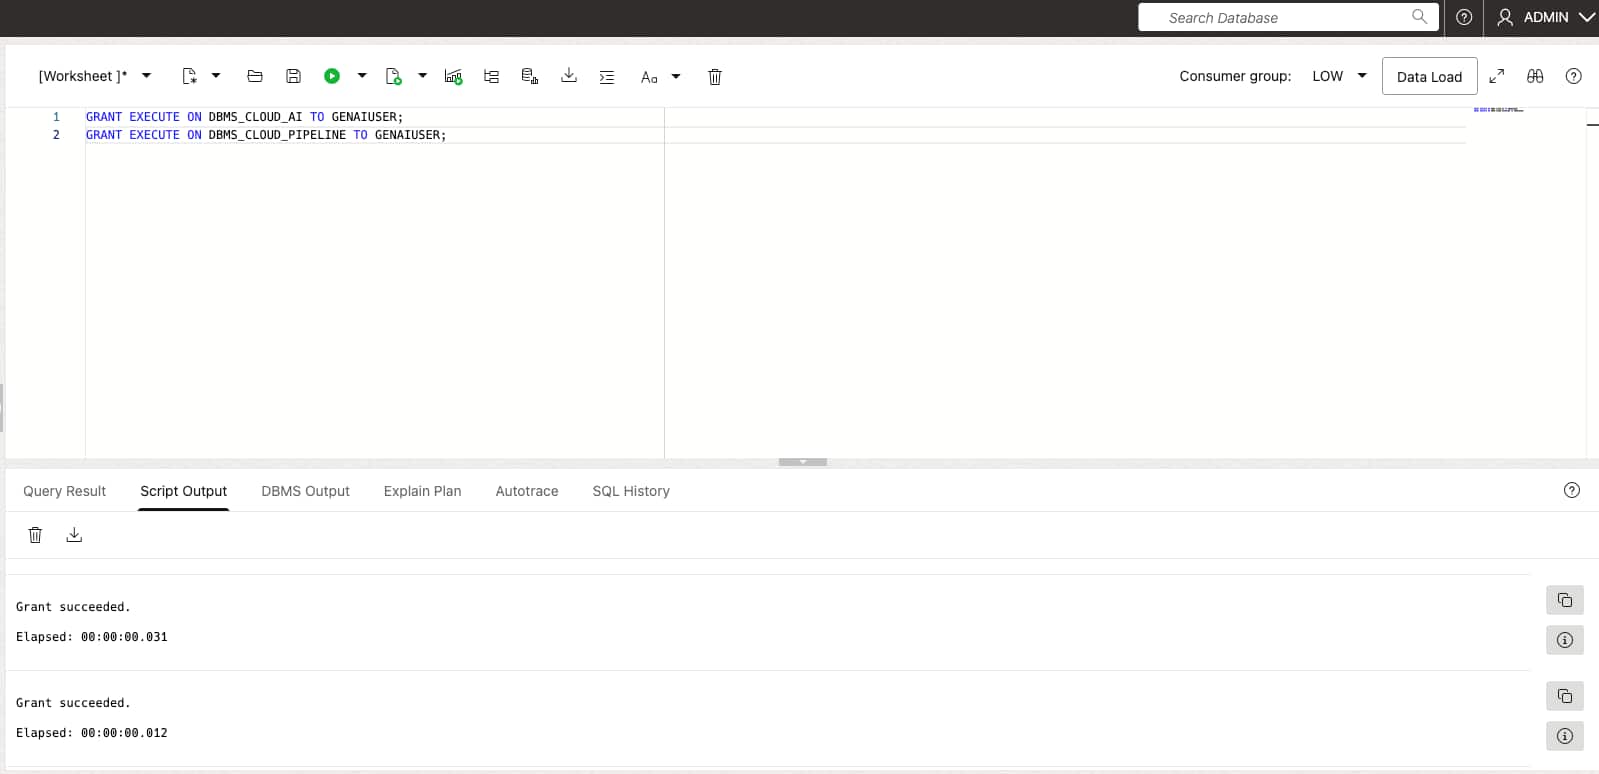
Figure 2. Privilege grants for GENAIUSER.
4. Allow Outbound Access to the Model Provider
As ADMIN, add a host access control entry for the provider endpoint. Use Manage AI Profiles page to get the hostnames and steps to retrieve API keys for the respective models.
BEGIN
  DBMS_NETWORK_ACL_ADMIN.APPEND_HOST_ACE(
    host => 'api.openai.com',
    ace  => XS$ACE_TYPE(
      privilege_list => XS$NAME_LIST('http'),
      principal_name => 'GENAIUSER',
      principal_type => XS_ACL.PTYPE_DB
    )
  );
END;
/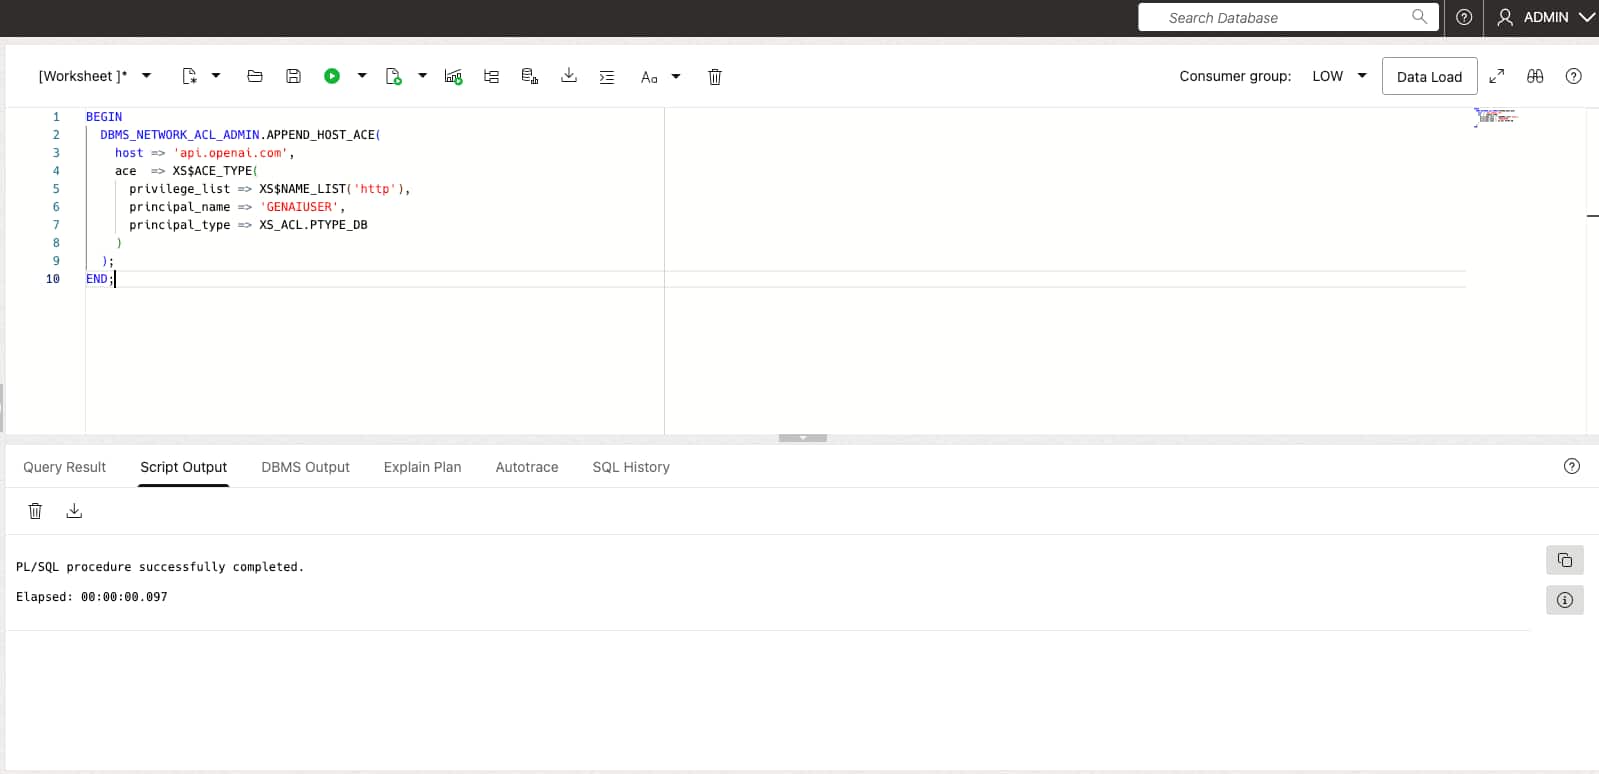
Figure 3. The host ACL permits GENAIUSER to call the OpenAI Generative Language endpoint.
Network note: If the database uses private networking or restricted egress, confirm that the database can resolve and reach the provider endpoint before troubleshooting the profile itself.
5. Create a Provider Credential
Switch to GENAIUSER and create a database credential.
SET DEFINE OFF;

BEGIN
  DBMS_CLOUD.CREATE_CREDENTIAL(
    credential_name => 'OPENAI_CRED',
    username        => 'OPENAI',
    password        => '<OPENAI_API_KEY>'
  );
END;
/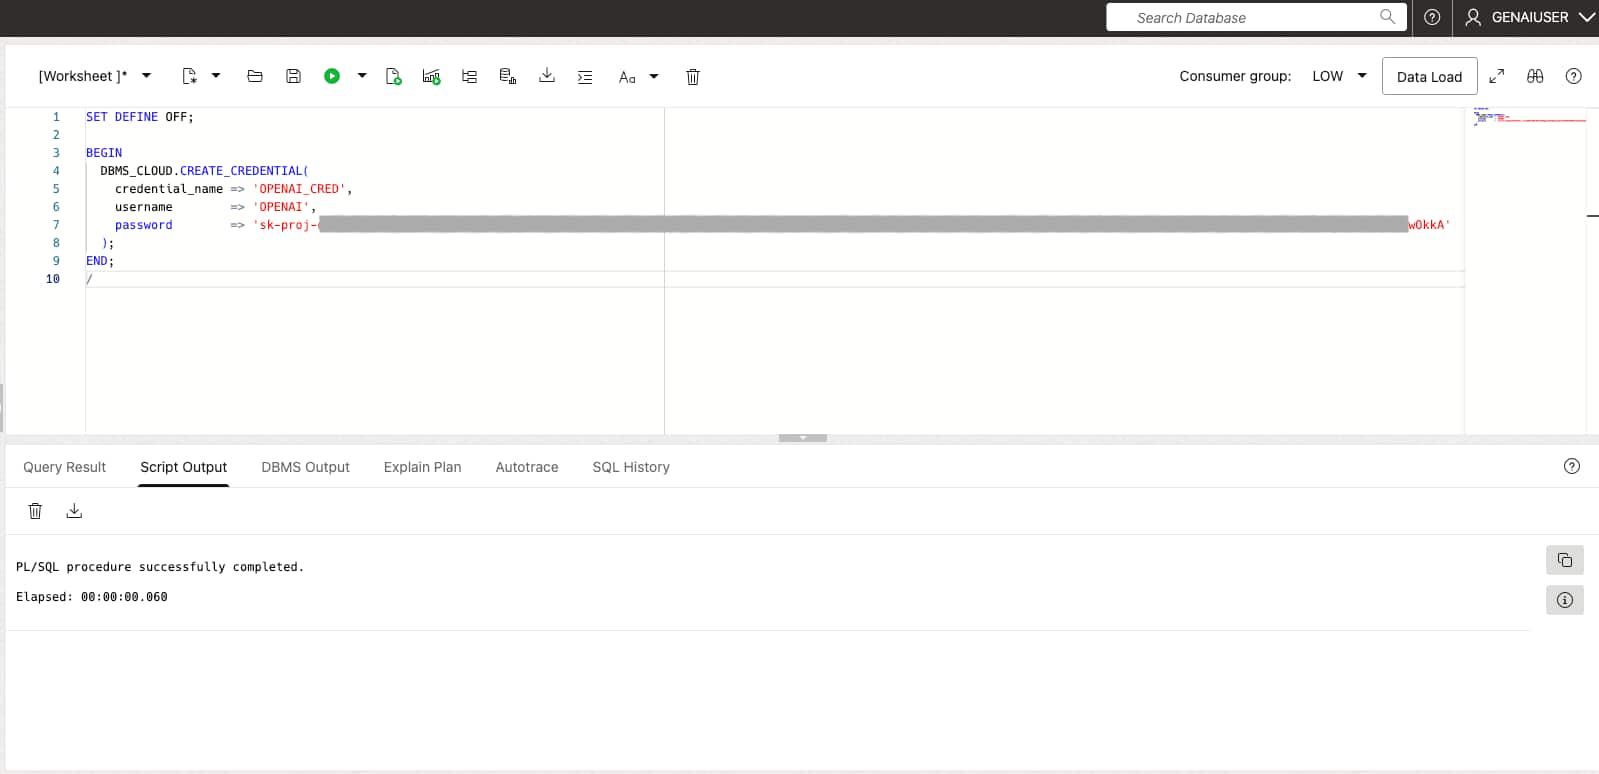
Figure 4. The database credential is created.
6. Create and Enable the AI Profile
Create a DBMS_CLOUD_AI profile that references the credential and the database objects the model is allowed to use. Adjust owner and object names to match your data. The example uses EMPLOYEE_EXPENSES and JOB_REQS tables owned by GENAIUSER.
You can create multiple credentials and profiles for different models.
Set the profile that you want to use for the database session.
BEGIN
  DBMS_CLOUD_AI.CREATE_PROFILE(
    profile_name => 'OPENAI',
    attributes   => '{
      "provider": "openai",
      "credential_name": "OPENAI_CRED",
      "object_list": [
        {"owner": "<schema_name>", "name": "<table_name>"},
        {"owner": "<schema_name>", "name": "<table_name>"}
      ]
    }',
    status => 'enabled'
  );
END;
/

BEGIN
  DBMS_CLOUD_AI.SET_PROFILE('OPENAI');
END;
/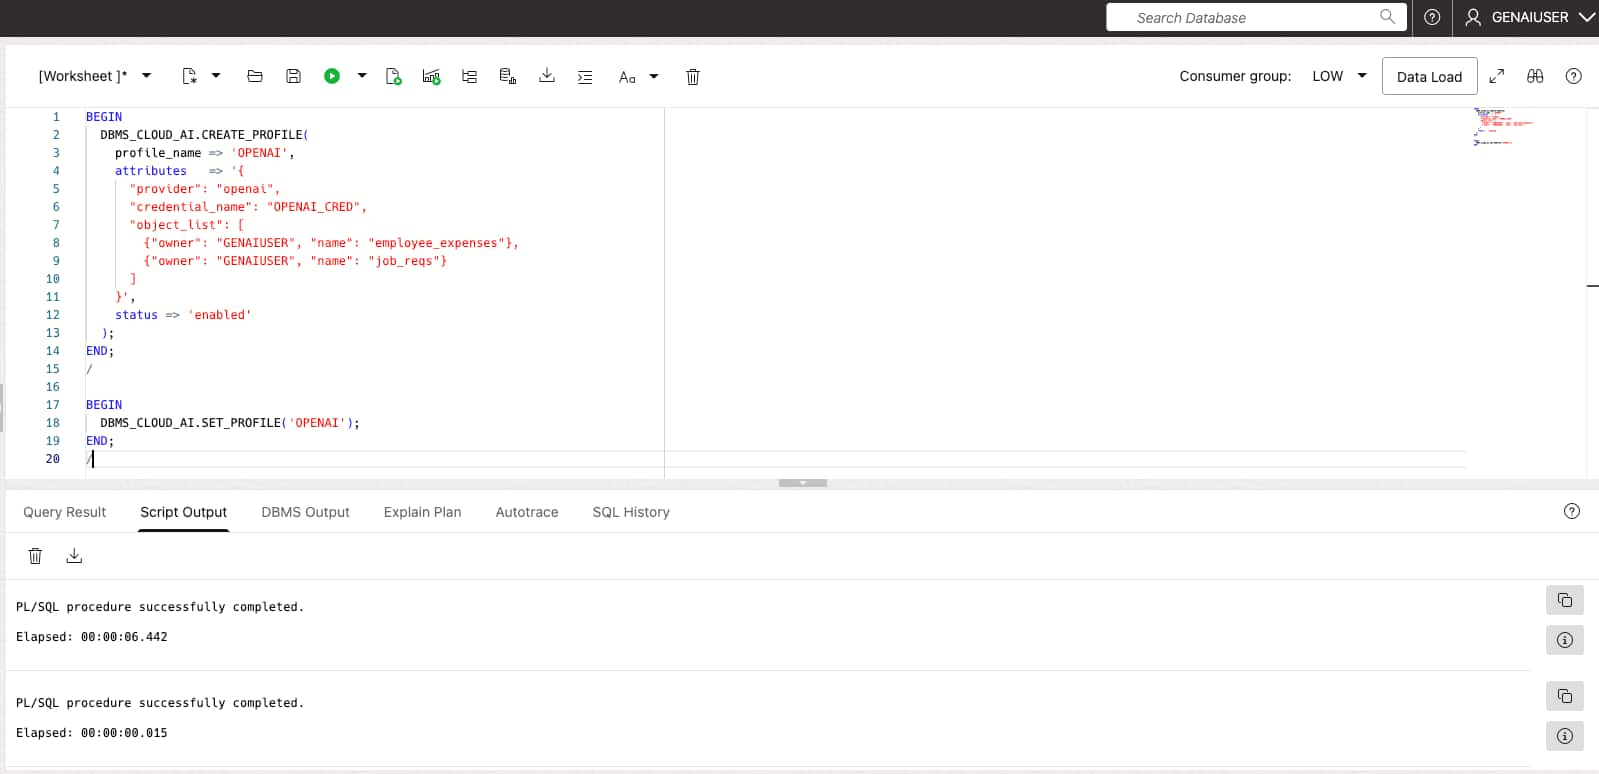
Figure 5. The OPENAI profile is created, enabled, and set for the current session.
NOTE: SET_PROFILE applies to the current stateful database session. For stateless tests, specify profile_name explicitly in DBMS_CLOUD_AI.GENERATE, as shown next.
7. Test the Profile
Before opening OAC, run a minimal chat request to test the profile and credentials created.
select DBMS_CLOUD_AI.GENERATE(
    prompt => 'Return OK',
    profile_name => 'OPENAI',
    action => 'chat'
)
from dual;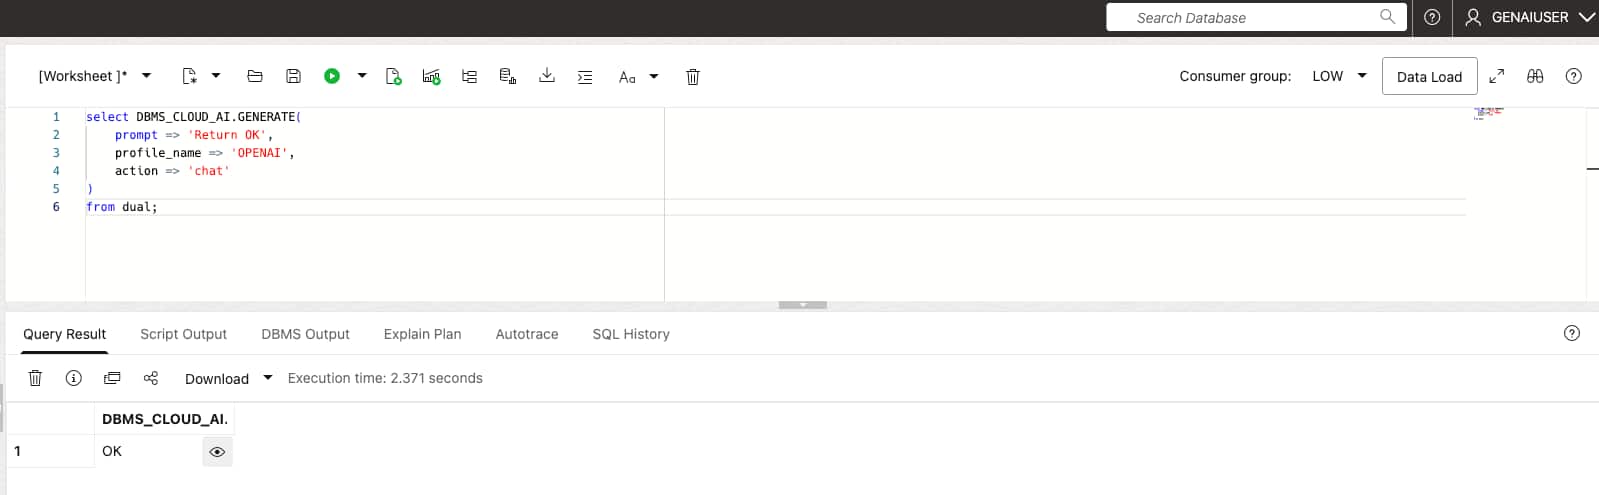
Figure 6. The profile test returns OK, confirming credential, network, and provider access.
Don’t proceed until this test succeeds. If it fails, validate the credential, outbound ACL, profile status, provider name, and provider-side quota first.
8. Register the AI Profile as a Generative AI Model
From the OAC home page, open the Page Menu, select Register Model/Function, and then select Generative AI Models.

Figure 7. Register Model Navigation.
In Select a Connection, choose the Oracle Autonomous AI Lakehouse connection that contains the profile, or Create a connection.
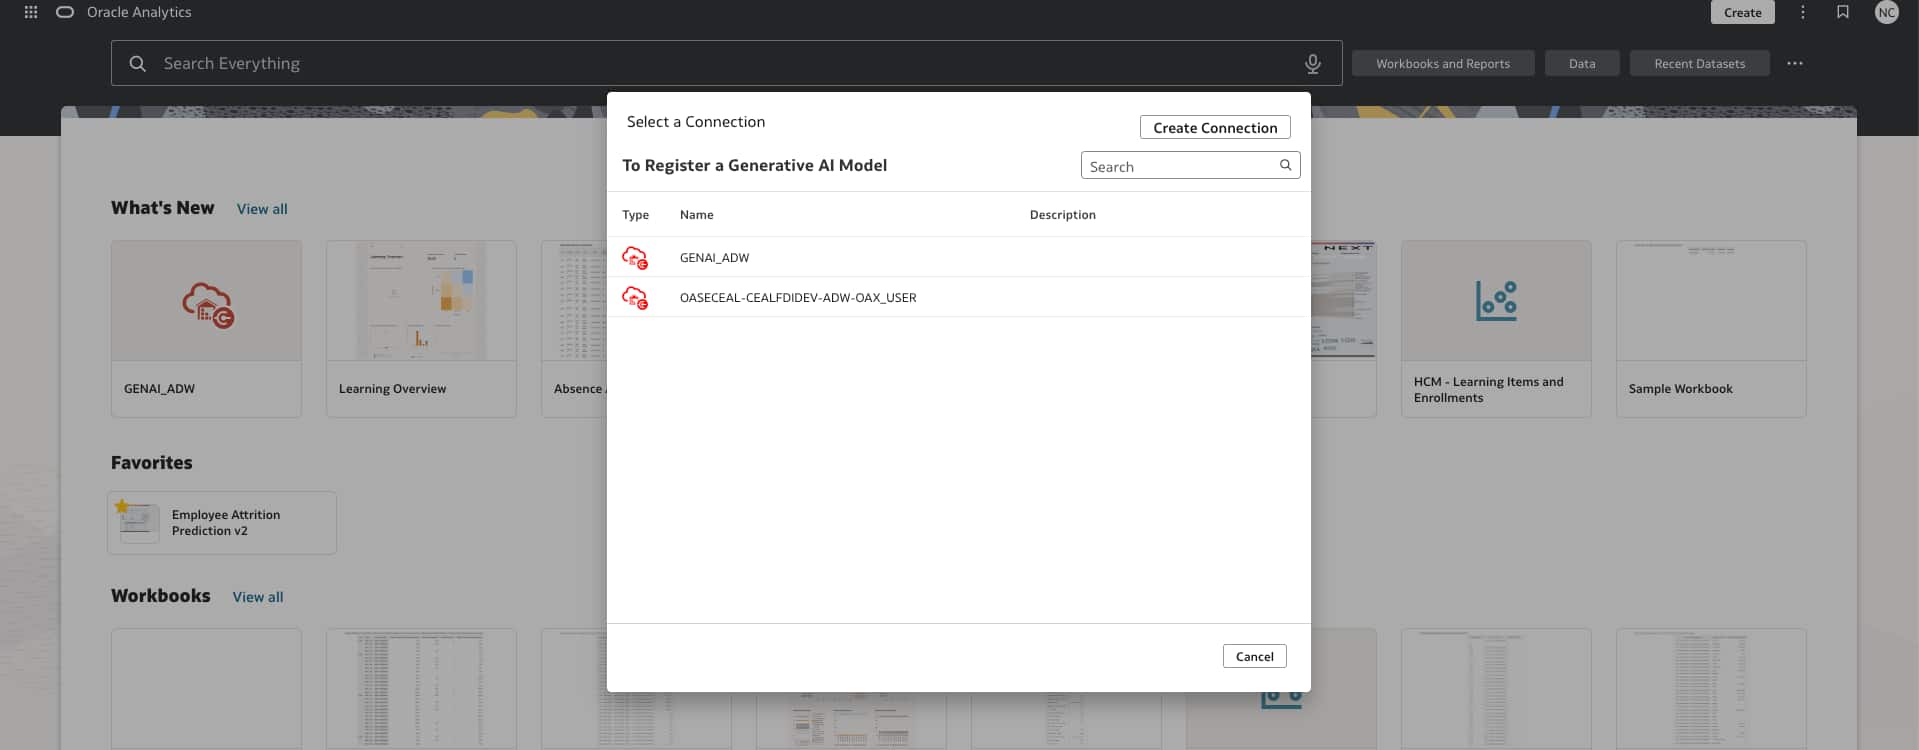
Figure 8. Choose the database connection containing the AI profile and source data.
OAC discovers enabled AI profiles. Select the profile you want to use. Enter a catalog name, optionally add a description, browse to a Shared Folders location, and click Register.
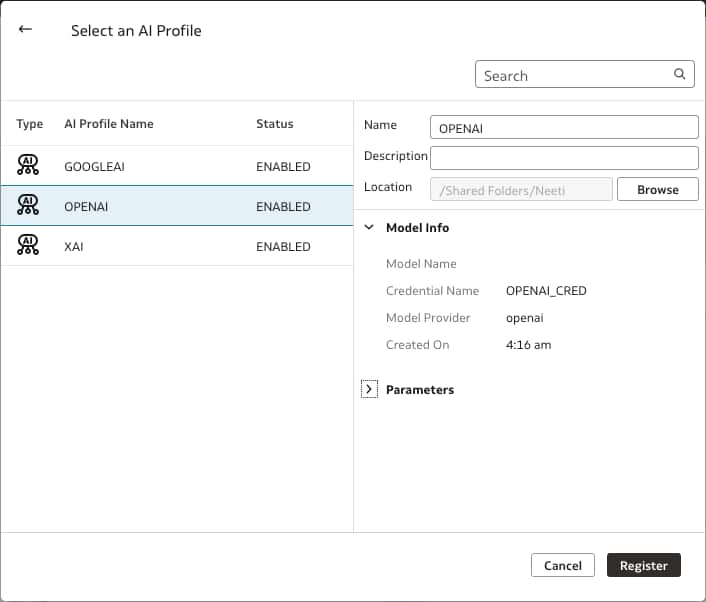
Figure 9. Select an AI profile.
Permissions: Authors need Read-Only or higher access to reference the model in expressions. Consumers need sufficient access to execute the workbook and its model calls. Model owners can manage these permissions by selecting Catalog, then Inspect, then Access.
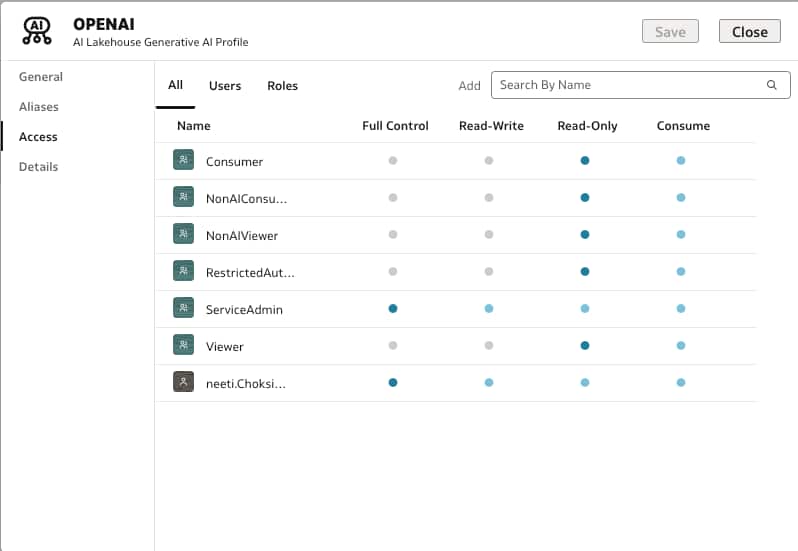
Figure 10. Manage permissions for the registered AI models.
9. Use AI Functions in a Workbook or Data Flow
Create a workbook using the dataset from the same database connection. Add a calculation, choose AI Generate from the AI Functions picker (AI_GENERATE, AI_AGG, or AI_FILTER), and provide input, prompt, and model ID.
NOTE: For the Autonomous AI Database path, the dataset and AI profile must reside in the same database and be accessed through the same OAC database connection.
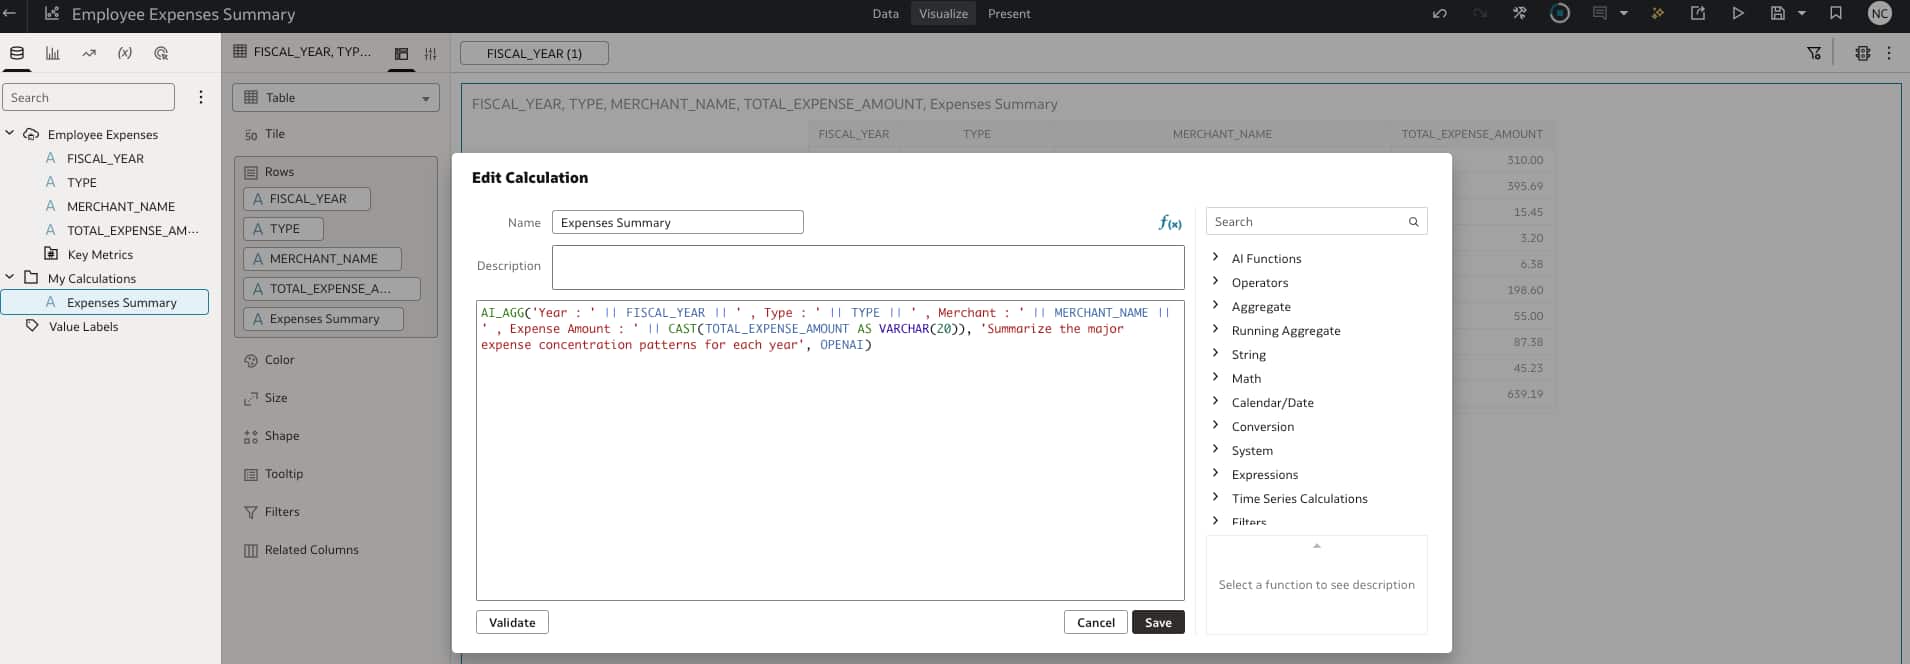
Figure 11. Create a workbook calculation with AI Function.
Validate the calculation and add it to the visualization. Refine the prompt to specify the required output format. A concise instruction produces a compact value that works better in tables, exports, and downstream calculations.
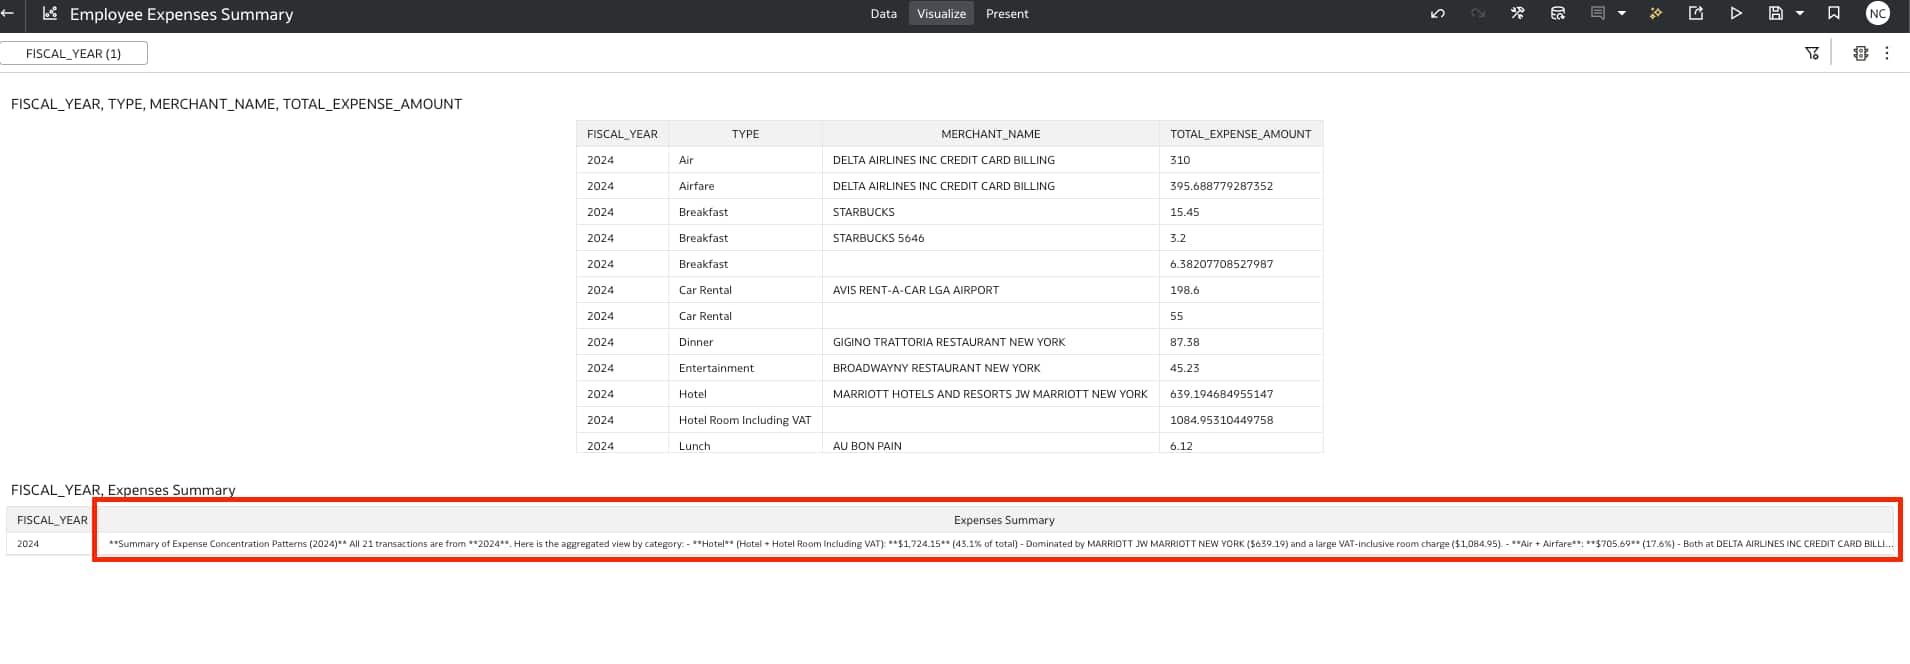
Figure 12. AI-Generated summary for employee expenses
You can also use the AI functions in data flows in OAC to generate the AI responses and store those in the datasets and tables.
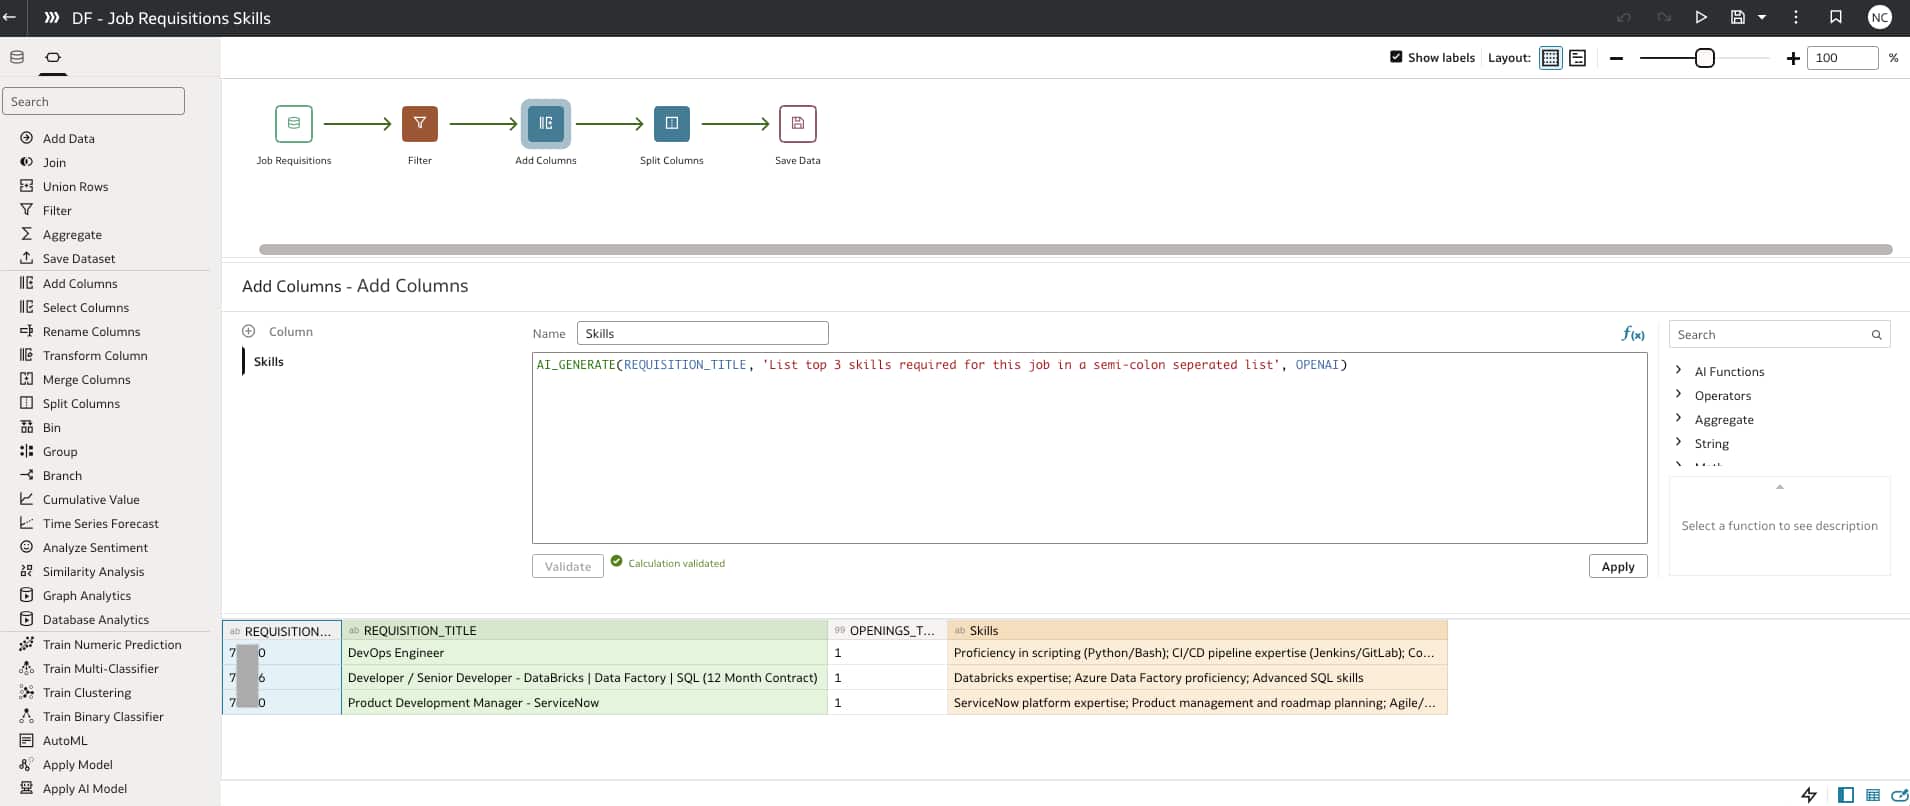
Figure 13. An explicit semicolon-separated format produces a concise result.
10. Call to Action
Start with a narrow enrichment use case and validate it on a small workbook sample. Once reliable, expand the pattern to data flows, preparation, and semantic-model calculations on your instance.
For tips and troubleshooting, refer to Tips and Troubleshooting for Using AI Functions in Oracle Analytics Cloud.
To learn more about AI Functions in OAC, watch the demo video. Find detailed information about functions in OAC on Oracle Help Center.
If you have questions, post them in the Oracle Analytics Community and we’ll follow up with answers.