With Contributions from
HiteshKumar Patel, Senior Principal Product Manager, Oracle Analytics
Piyush Jain, Principal Product Manager, Oracle CX Sales
Dayne Carley, Principal Solution Architect, Oracle Analytics
Introduction
Oracle Fusion Analytics Warehouse (Fusion Analytics), powered by Autonomous Data Warehouse and Oracle Analytics, is a family of prebuilt, cloud native analytics applications for Oracle Cloud Applications that provide line-of-business users with ready-to-use insights to improve decision-making.
A Digital Sales Oracle Application Cloud customer, who has also bought Oracle Fusion Analytics, may need to embed Fusion Analytics content into Oracle Application Cloud to provide contextual information about the primary Customer Experience (CX) application
Business Use Case
A Sales Vice President wants to see the Win Loss Analysis Data Visualization (DV) project and pipeline charts combined with Enterprise Resource Planning (ERP) data. The ERP report can be built in Fusion Analytics. The same report can then be embedded into the primary application (Digital Sales/Next Gen Sales) that the Sales Vice President uses. This makes the report very useful, as it is consumed with other CRM data.
Content created in Fusion Analytics can be embedded into the Sales Dashboard and any Visual Builder page in the Next Gen CX Sales/Digital Sales using Oracle Visual Builder Studio.
For more information about the Oracle Analytics embedding framework, see Embed with the JavaScript Embedding Framework in the Visualizing Data and Building Reports in Oracle Analytics Cloud guide.

Prerequisites
Perform the following steps before embedding:
1. Ensure that Fusion Analytics is set up with SSO and IDCS sync. Refer to – https://blogs.oracle.com/analytics/post/fusion-analytics-warehouse-idcs-sync-and-sso-enablement for guidance.
2. Retrieve the Object ID from the existing Fusion Analytics content.
a. Navigate to the Fusion Analytics Oracle Analytics Cloud instance where the analytics workbook is saved.
b. Click the Actions menu > Inspect.
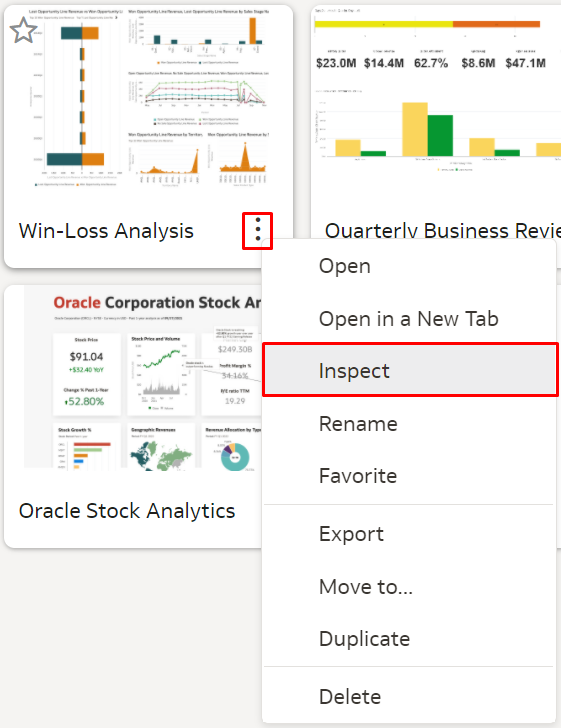
c. Next to the Object ID, click Copy.
d. Paste the Object ID and the Oracle Analytics Cloud URL into a separate file for later use. For example:
Oracle Analytics Cloud URL: https://oaxxx-px.analytics.ocp.oraclecloud.com/
Object ID: /@Catalog/users/oac01.user/Win-Loss Analysis
3. Create a workspace in Visual Builder Studio if you do not have one. Refer to the Create A Workspace section for more information.
4. Add the Analytics Canvas component to your workspace.
a. Click the Components side tab in Visual Builder Studio.
b. Use the search field to find the Analytics Canvas component.
c. Click Install.

5. Create a copy of the Sales Dashboard layout in Visual Builder Studio. See Duplicate the Predefined Sales Dashboard Layout.
Steps to Embed
1. Log in to the Digital Sales/Next Gen CX Sales application using a Sales Administrator user account.
2. In Digital Sales, navigate to the Sales Dashboard.
3. Under the Settings and Actions menu, select Edit Page in Visual Builder.

4. Select the project that’s already set up for you. If only one project exists, then you automatically land on that project.
5. If you’re working in an active sandbox when you launch Visual Builder Studio from Digital Sales, then Visual Builder Studio looks for a workspace associated with your sandbox. If you’re not working in a sandbox when you launch Visual Builder Studio, then Visual Builder Studio looks for a workspace without a sandbox. You might have to select a workspace if more than one workspace exists. If no workspace exists, then Visual Builder Studio automatically creates one for you.
6. When you enter your workspace in Visual Builder Studio, you land on the Page Designer. This is where you create your application extension.
7. The Sales Dashboard is displayed in the main design area called the canvas.
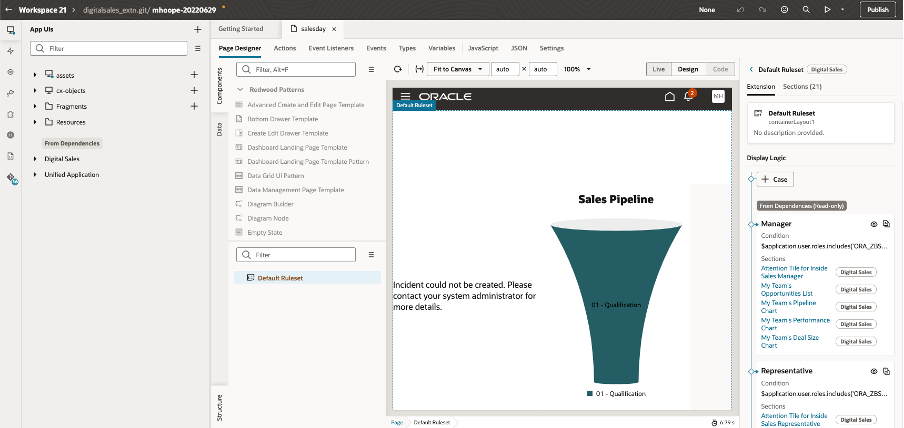
8. You can choose which role (case) to apply the changes on the right-hand side. If it is for a Sales Vice President, Sales Manager, or a custom role, copy the existing ‘Manager’ or other sections and then make changes.
9. After copying, we can provide the security role code in the Condition section to make it user-role specific.
10. On the Properties pane for the Manager (Copy) layout, click the + Add Section icon > + New Section.
11. In the Create Section dialog, enter a section title into the Title field. For example, OAC Section.
Then click OK.
12. Click OAC Section.
The template editor opens.
13. Click the Code button.
![]()
All custom sections you’ve created for this layout are displayed in the editor.
Your new OAC Section displays at the bottom with empty placeholder template tags.
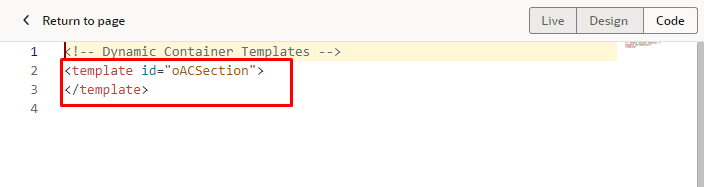
14. For an Analytics Canvas component, enter this code between the existing placeholder template tags.
<oj-cx-saleshub-tile size="8x5">
        <h2 class="oj-typography-heading-sm">Win Loss Analysis</h2>
        <oj-sp-analytics-canvas></oj-sp-analytics-canvas>
</oj-cx-saleshub-tile>
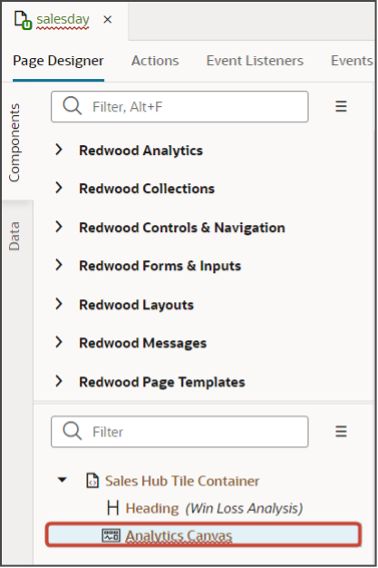
15. Click the Design button.
![]()
16. On the Structure pane, click Analytics Canvas.
17. On the Properties pane, enter the URL you previously saved in the Oracle Analytics Host field.
For example, https://oac01-gse00010001-px.analytics.ocp.oraclecloud.com/.
18. In the Project Path field, enter the repository path of the project to render, such as /@Catalog/users/oac01.user/Win-Loss Analysis.
This is the Object ID of the Oracle Analytics workbook stated in the prerequisite document.
19. Optionally click the Code button to view the template code. The code looks something like this:
      <oj-cx-saleshub-tile size="8x5">
        <h2 class="oj-typography-heading-sm">Win Loss Analysis</h2>
        <oj-sp-analytics-canvas host="https://oac01-gse00010001-px.analytics.ocp.oraclecloud.com/"
          project-path="/@Catalog/users/oac01.user/Win-Loss Analysis"></oj-sp-analytics-canvas>
      </oj-cx-saleshub-tile>
20. Click the Preview button to see your changes in your runtime test environment.
![]()
21. Click Publish to apply the changes to the Sales Dashboard.

To publish your updated dashboard, save your local changes to a remote branch, then merge that branch into the master branch. You can do all these steps at one time using the Publish action, or you can use Git commands in your workspace to do them individually. Then:
a. Open the Publish Changes dialog box from the header in the Designer.
The Publish operation combines Git operations (commit, push, merge) to merge the changes in your local repository branch into the master branch.
b. In the dialog box, enter a commit message describing the changes (add reviewers and the issue if you’re also creating a merge review request).
c. Click Publish Changes. The changes are merged immediately if you don’t create a merge review request.
Create a Workspace
Oracle Visual Builder Studio created a workspace when your administrator created the project. But, individual project members can also create workspaces. A workspace is a private work area that connects to a Git repository, environment, and an Oracle Cloud Applications sandbox. To create a private workspace:
1. Navigate to your instance of Visual Builder Studio using the URL provided to you.
2. Click the Workspaces tab on the left pane, then click Clone from Git.
3. In the Clone from Git dialog, enter these values:
| Field |
Value |
| Workspace name |
Enter the name of your workspace. |
| Repository Name |
Select the Git repository connected to your team’s project. Ask your administrator for this value. |
| Branch |
Select main. |
| “New branch from selected” check box |
Select this check box. |
| New branch name |
Enter a name for your branch. For example, <user_id>_<feature_name>. |
| Development Environment |
Select Development. |
| Sandbox (optional) |
Select a sandbox, or leave this blank and attach a sandbox to your workspace later. See “How do I change the sandbox associated with my workspace?” at the end of this chapter. |
4. Click Create.
When you enter into Visual Builder Studio from a Digital Sales page, a workspace is selected as follows:
- If your workspace is the only workspace in the project, then you enter the Page Designer and can start to create your application extension.
- If multiple workspaces exist, select your workspace before entering into the Page Designer.
- If you didn’t create a workspace and no other workspace exists, then Visual basic Studio automatically creates one for you.
Summary
For additional helpful information, refer to the following:
https://docs.oracle.com/en/cloud/saas/applications-common/22c/oaext/overview-of-using-visual-builder-studio.html#s20072861