![]()
Oracle Analytics Cloud (OAC) can host diverse customer data and reports within a single instance and ensure strict segregation to prevent inadvertent exposure of customer A’s information to customer B.
For example, consider a scenario where an organization hosting OAC handles administrative and content developmental duties, while report-consuming clients are only allowed to access and view reports.
Prerequisites
- Integrate OAC with each customer’s corporate Single Sign-On (SSO) identity provider.
- Ensure that only the organization hosting OAC has administrator or content author privileges.
- Grant DV Consumer privileges to customers accessing OAC.
- Don’t grant administrator or content author privileges to customers accessing OAC.
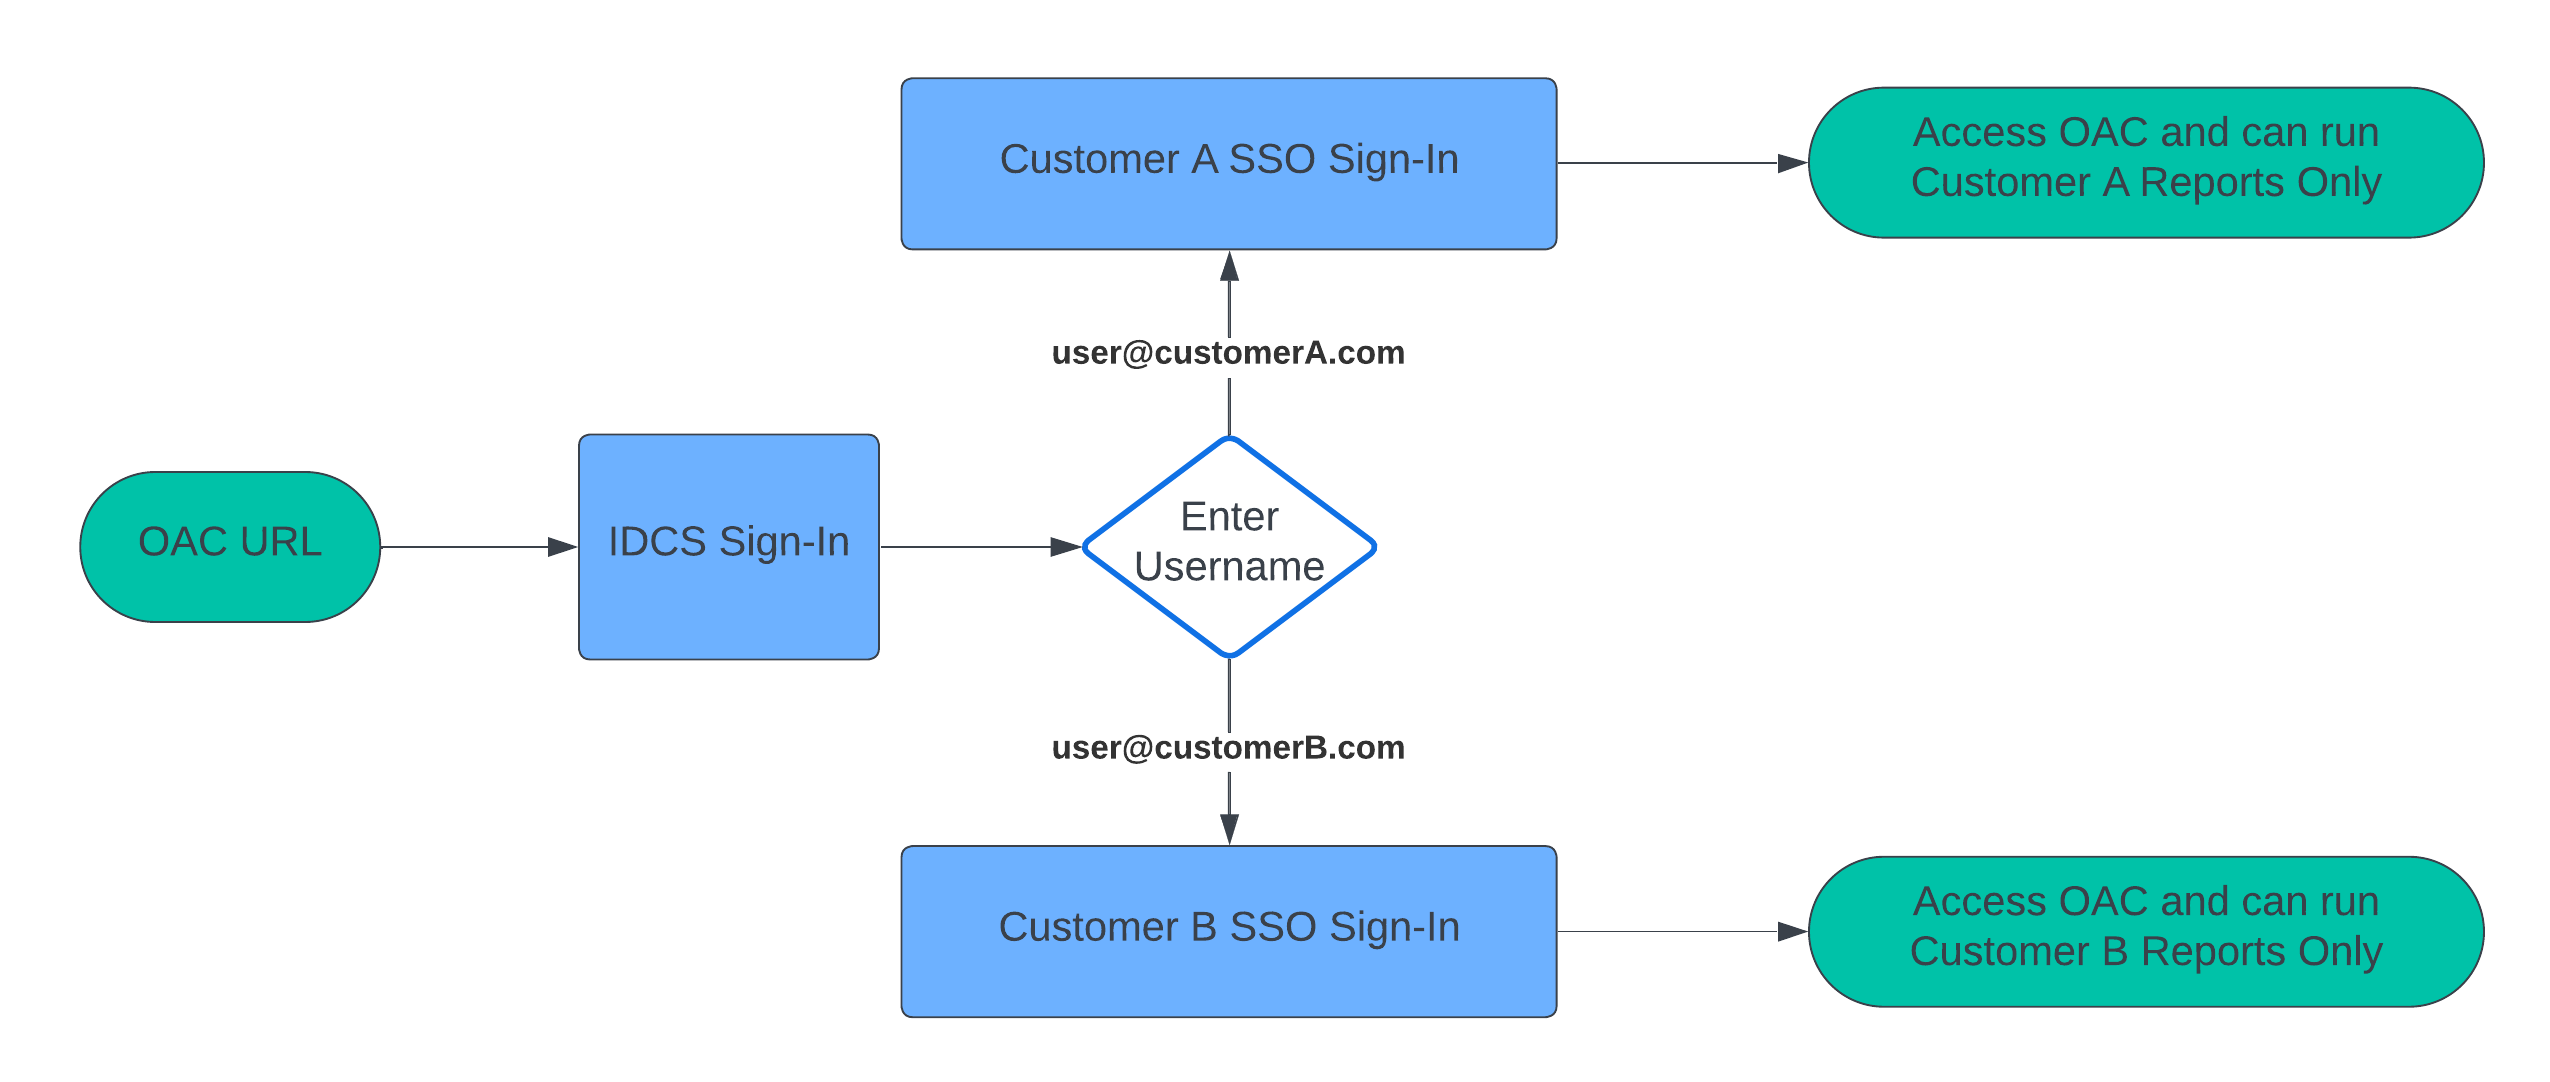
Sign-In Flow
Create an OAC Instance and Load Users and Groups in IDCS or OCI IAM Domain
The way you manage users for Oracle Analytics Cloud depends on whether Oracle Cloud Infrastructure Identity Access Management (OCI IAM) identity domains are available in your cloud account. If IAM identity domains aren’t available, your cloud account uses Oracle Identity Cloud Service (IDCS).
- Sign in to the Oracle Cloud Infrastructure (OCI) Console.
- Create a compartment with your desired name, for example “MUDOAC”.
- Create an OAC instance with public access.
- Load users for customer A into IDCS (or IAM Domain). For example:
- user1@ceal.com
- user2@ceal.com
- Create a group for customer A users in IDCS (or IAM Domain). For example:
- CustomerA_Consumer
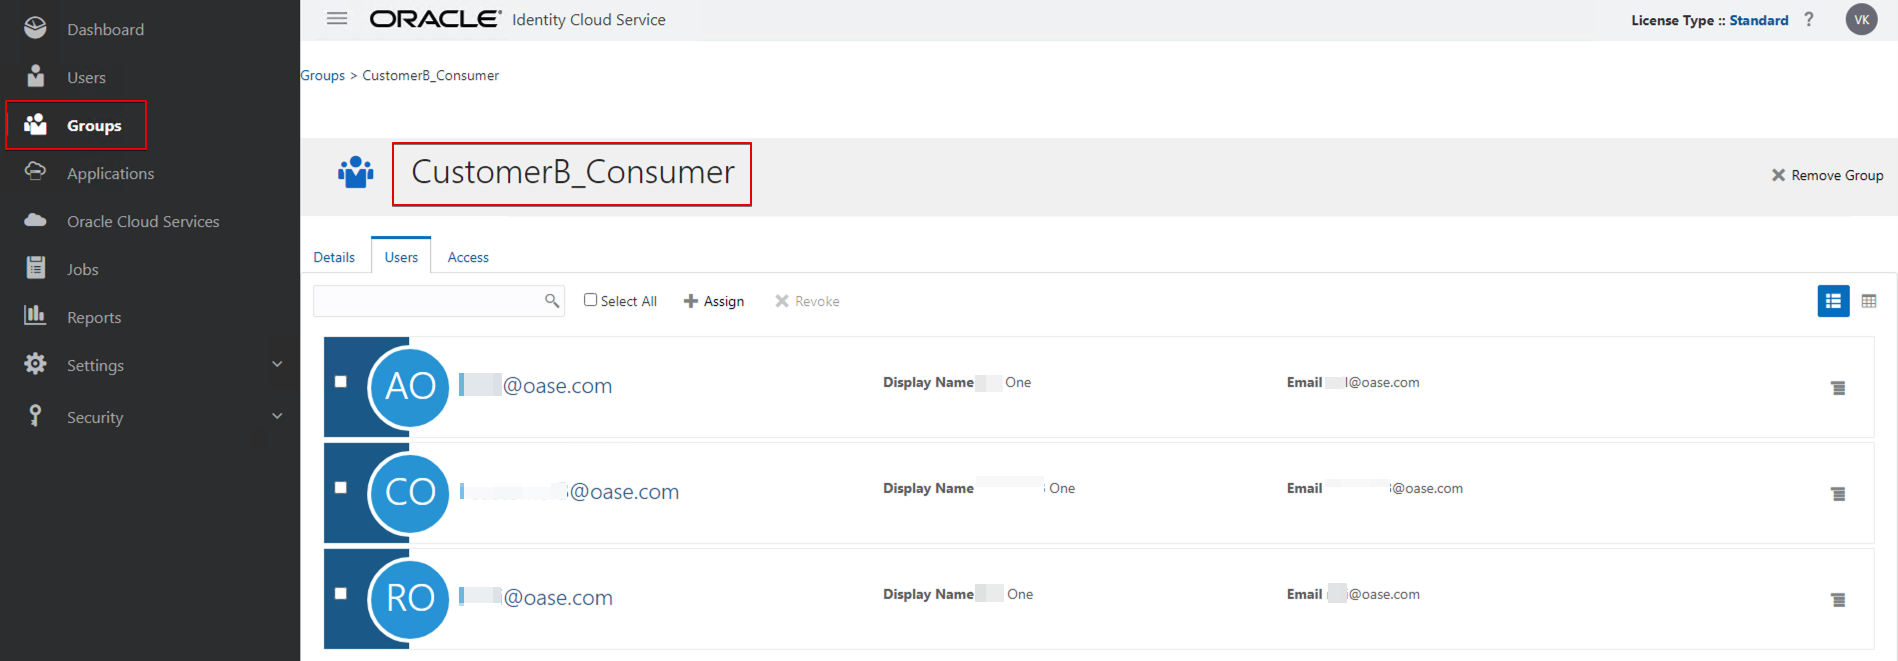
- Load users for customer B into IDCS (or IAM Domain). For example:
- user1@oase.com
- user2@oase.com
- Create a group for customer B users in IDCS (or IAM Domain). For example:
- CustomerB_Consumer
Note: The same usernames must exist in the customer’s SSO identity provider.

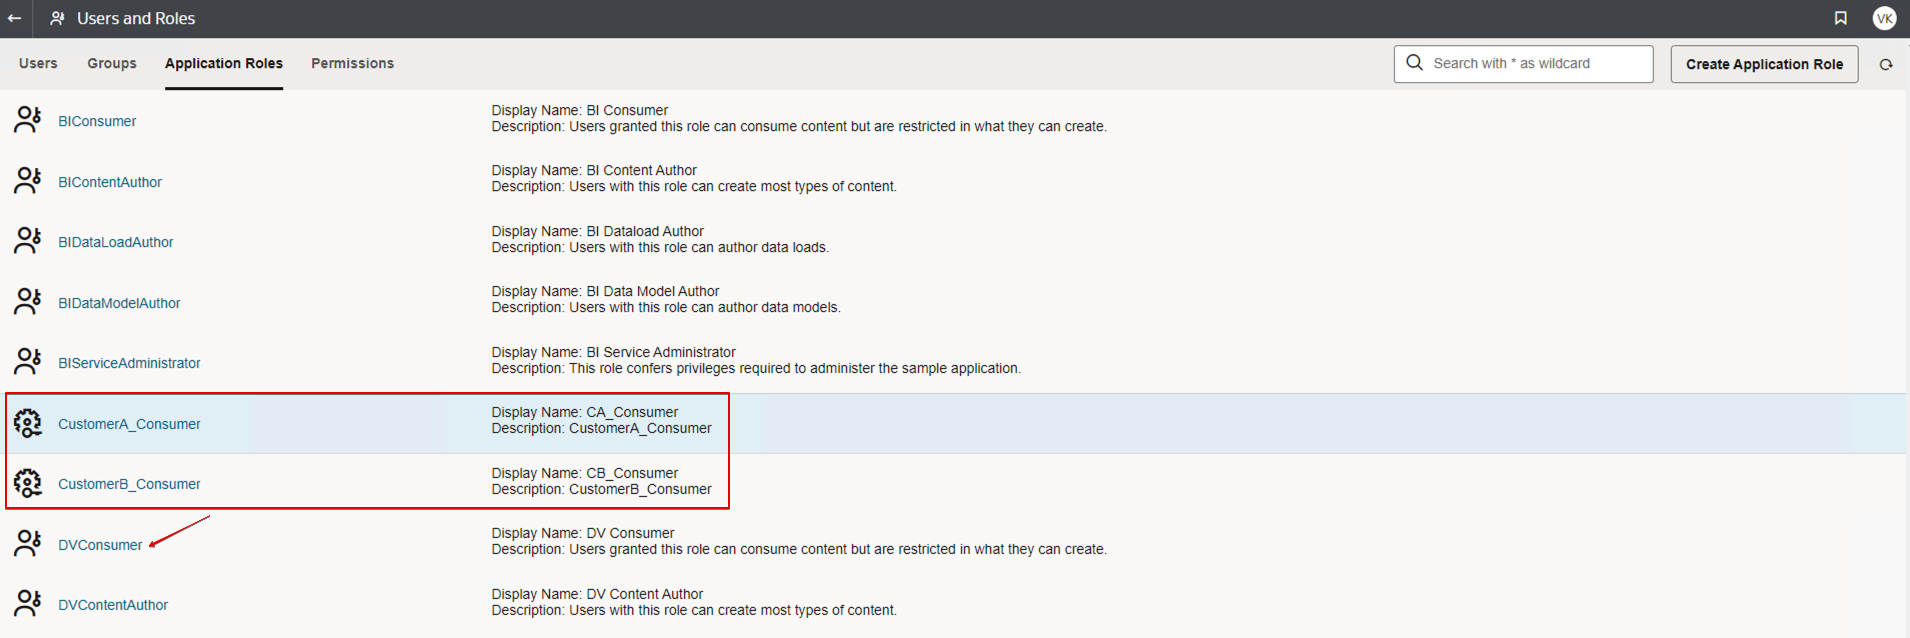
Create User-defined Application Roles
- Sign in to OAC.
- Navigate to the Console, and then click Users and Roles.
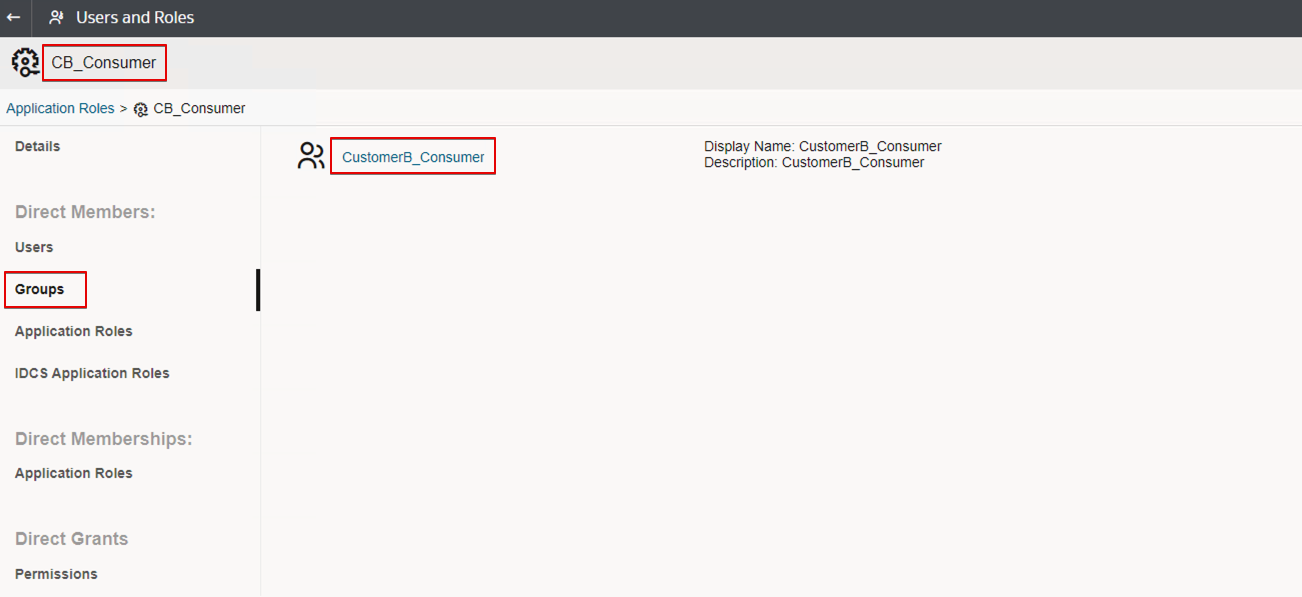
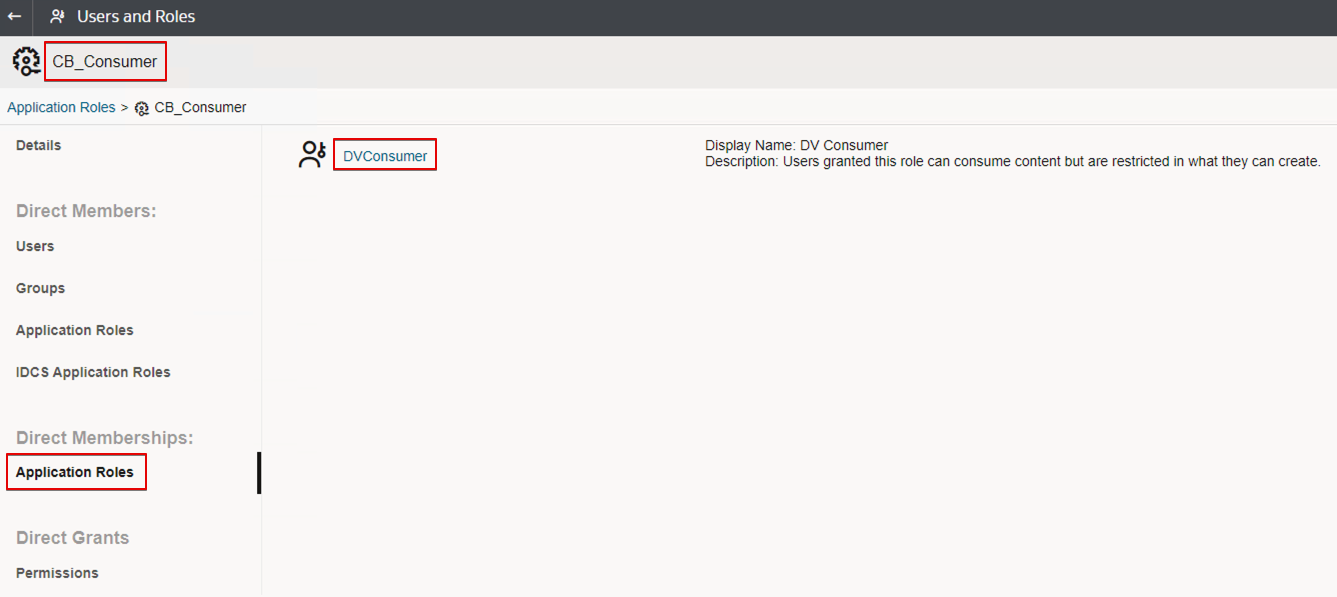
- Create two user-defined application roles. For example:
- CustomerA_Consumer
- CustomerB_Consumer
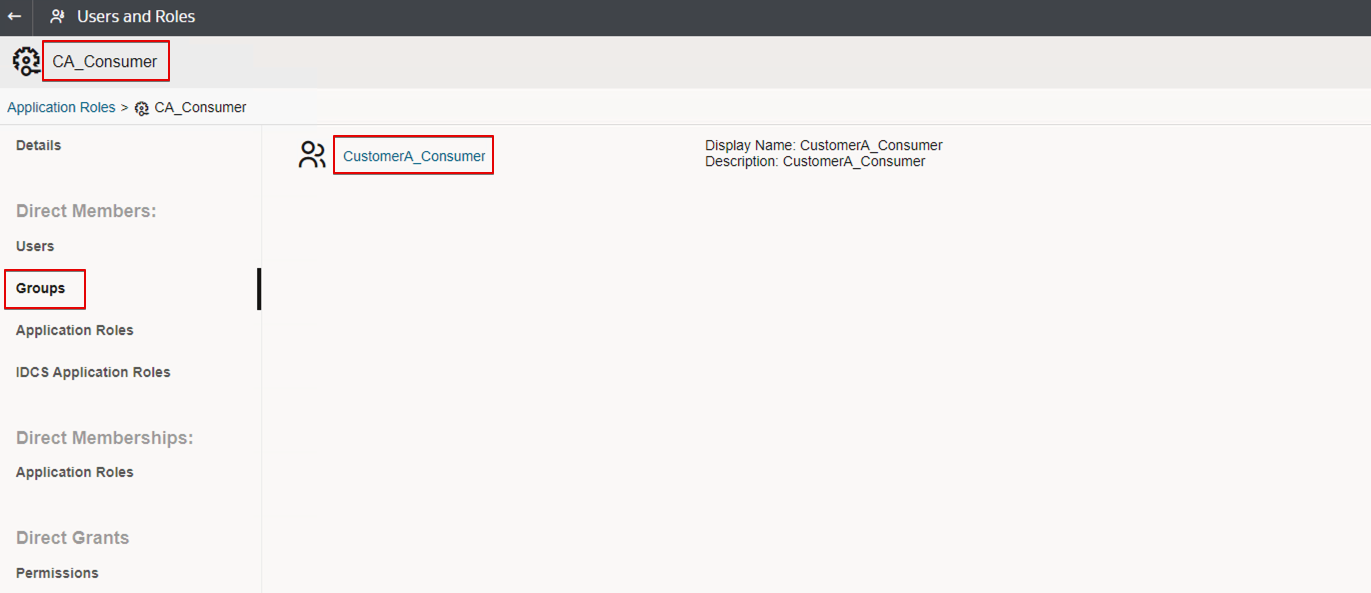
- Assign the predefined application role DVConsumer to each new application role.
- Assign the user groups you created earlier (in IDCS or IAM domain) to each new application role.
- CustomerA_Consumer (group) as member of CustomerA_Consumer (application role)
- CustomerB_Consumer (group) as member of CustomerB_Consumer (application role)
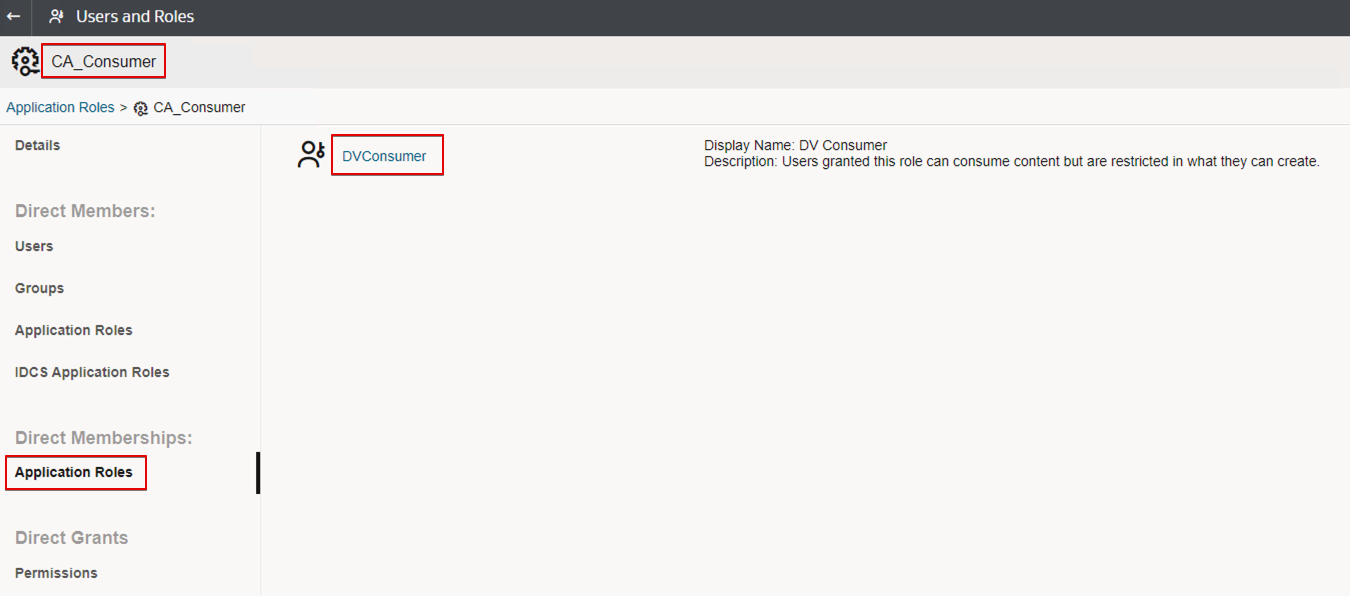
Similarly, for CustomerB_Consumer.
Create Catalog Folders, Set Permissions, and Load Content
- Sign in to OAC.
- Navigate to Classic Home.
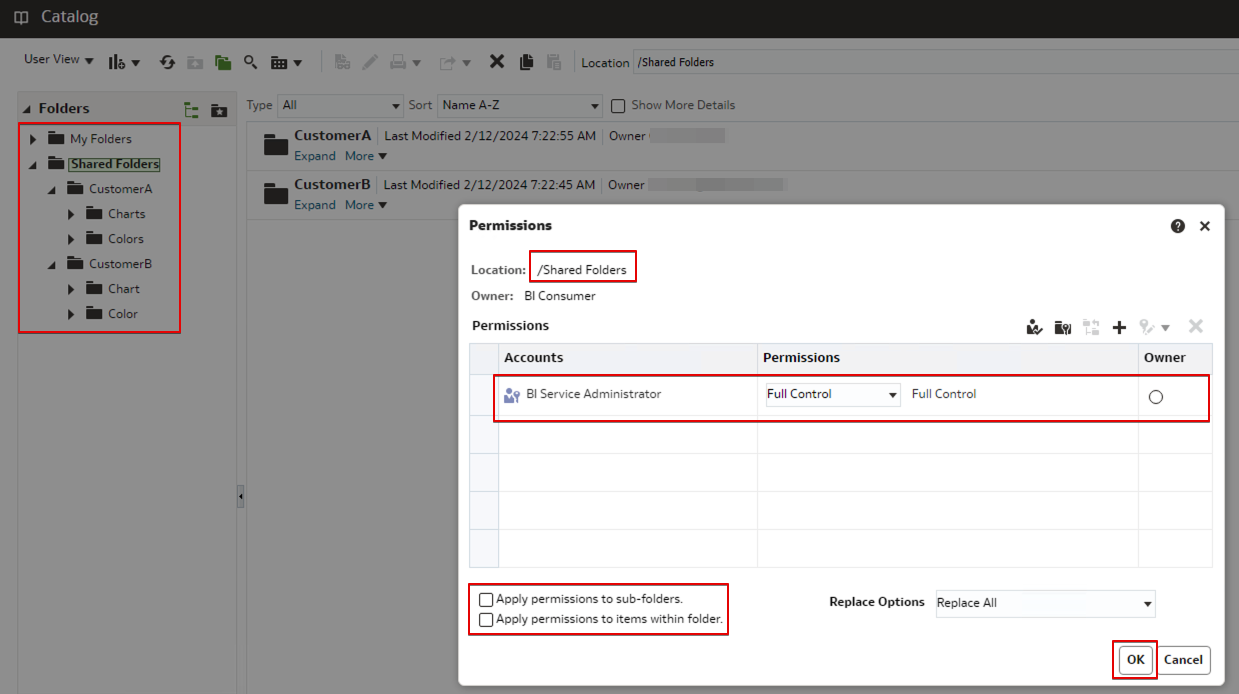
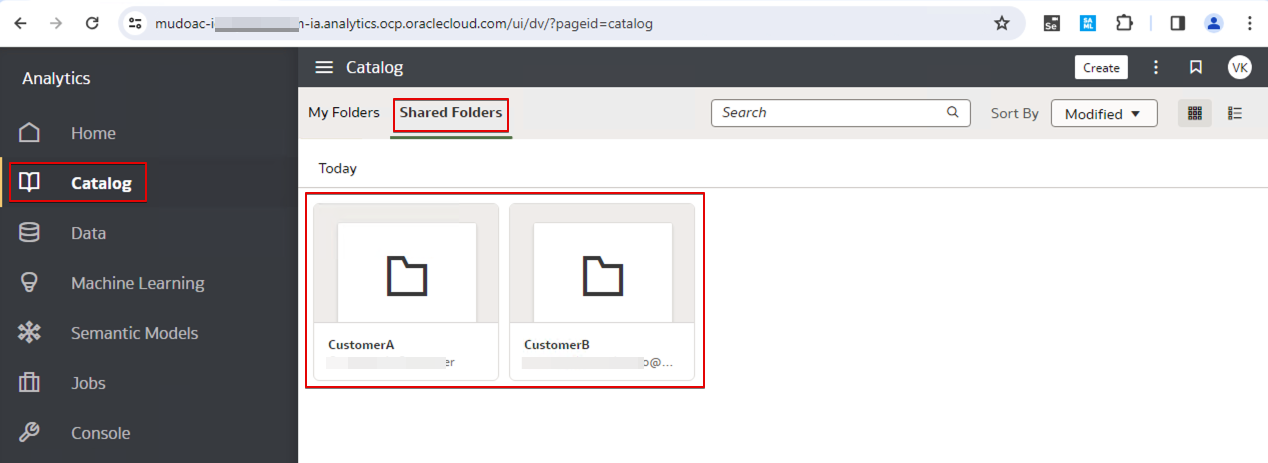
- Click Catalog, and then create a folder for each customer under Shared Folders. For example:
- CustomerA
- CustomerB
- Create additional folders under each customer folder, as required. For example: Shared Folder\CustomerA\Sales Reports, Shared Folder\CustomerA\Production Reports, and so on.
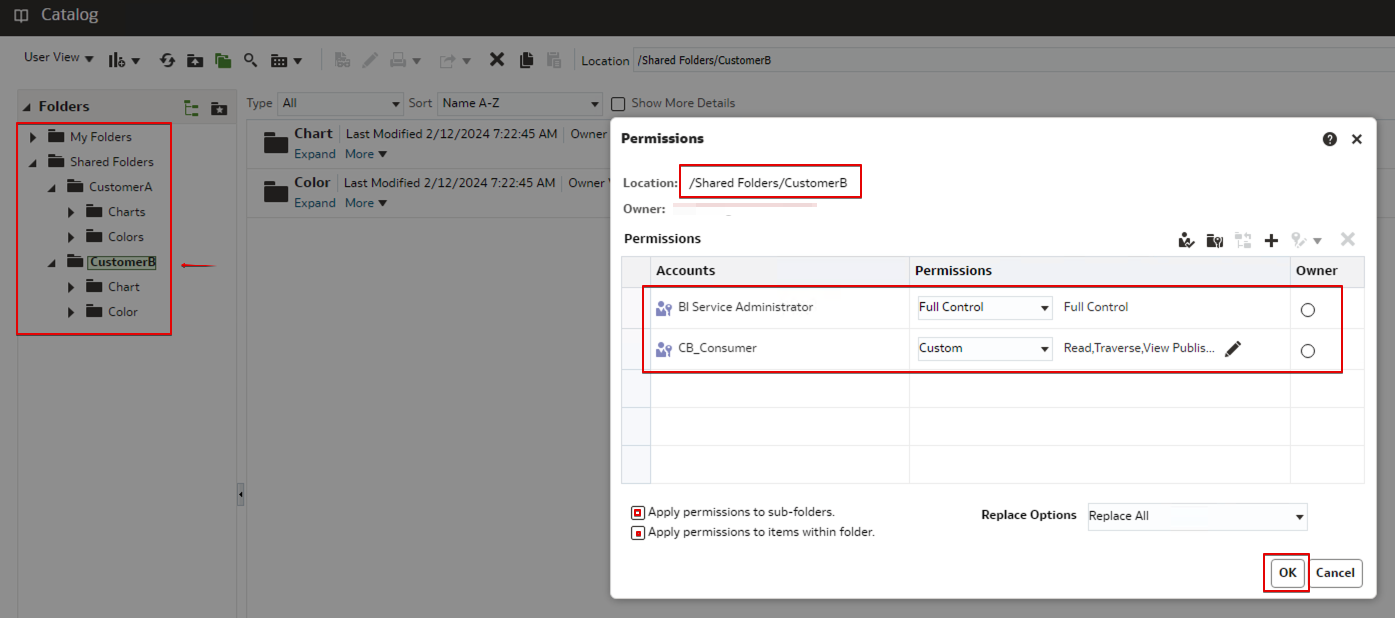
- On the Permissions page for the Shared Folder, delete the BI Consumer Role (recursively).
- On the Permissions page for the folder CustomerA, add the user-defined application role CustomerA_Consumer and allow the custom permissions Read and Traverse.
- On the Permissions page for the folder CustomerB, add the user-defined application role CustomerB_Consumer and allow the custom permissions Read and Traverse.

Create Content for Testing
- Sign in to OAC.
- For testing purposes, consider importing one or more DVA files containing content for testing (for example, datasets, workbooks, and so on) and store the workbooks in the respective customer catalog folder.
- If you don’t have any DVA files, import CSV and Excel files as datasets and create workbooks using the datasets and store the workbooks in the respective customer catalog folder.
- Alternatively, use an existing subject area to create datasets and workbooks for testing.
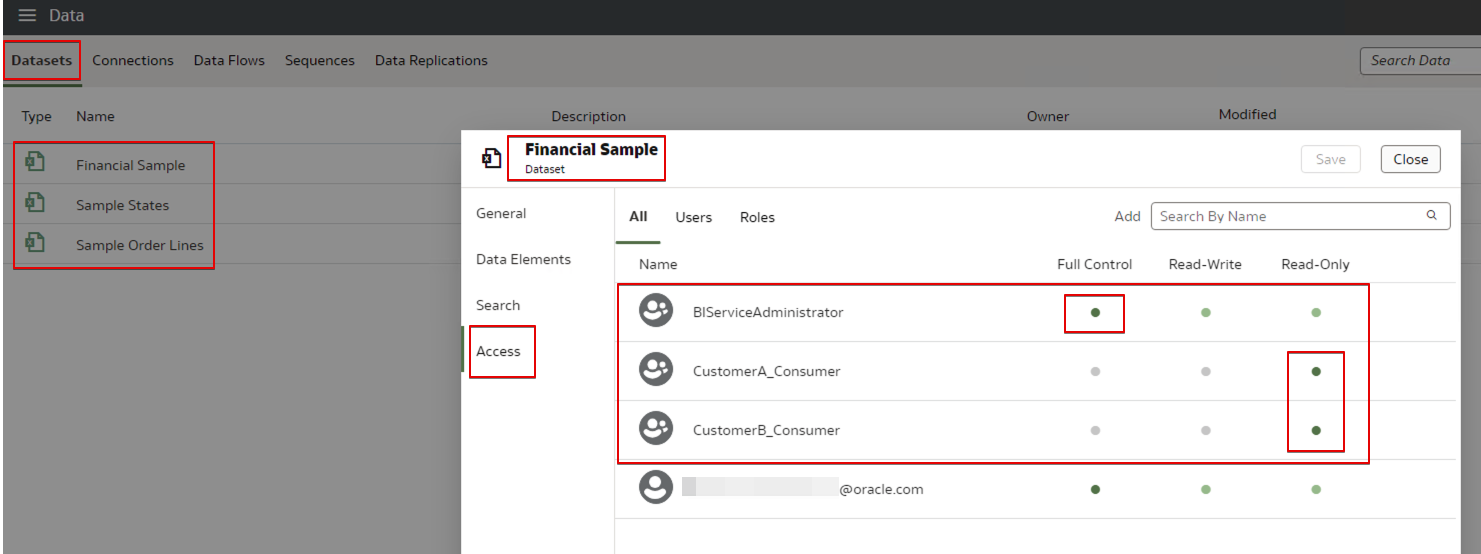
- Inspect the datasets and data connections and set their access permissions.
- Add the application role BIServiceAdministrator with Full Access to all the objects.
- Add the appropriate customer application roles (for example, CustomerA_Consumer) to the respective datasets and data connections and provide ReadOnly access.
- Ensure that only the organization hosting the OAC has content author and administrator roles.
- As an administrator, deploy the semantic model (RPD).

Configuration for User-Based Login
- Sign in to the administration console for your identity provider (IDCS Console or OCI Console IAM Domain).
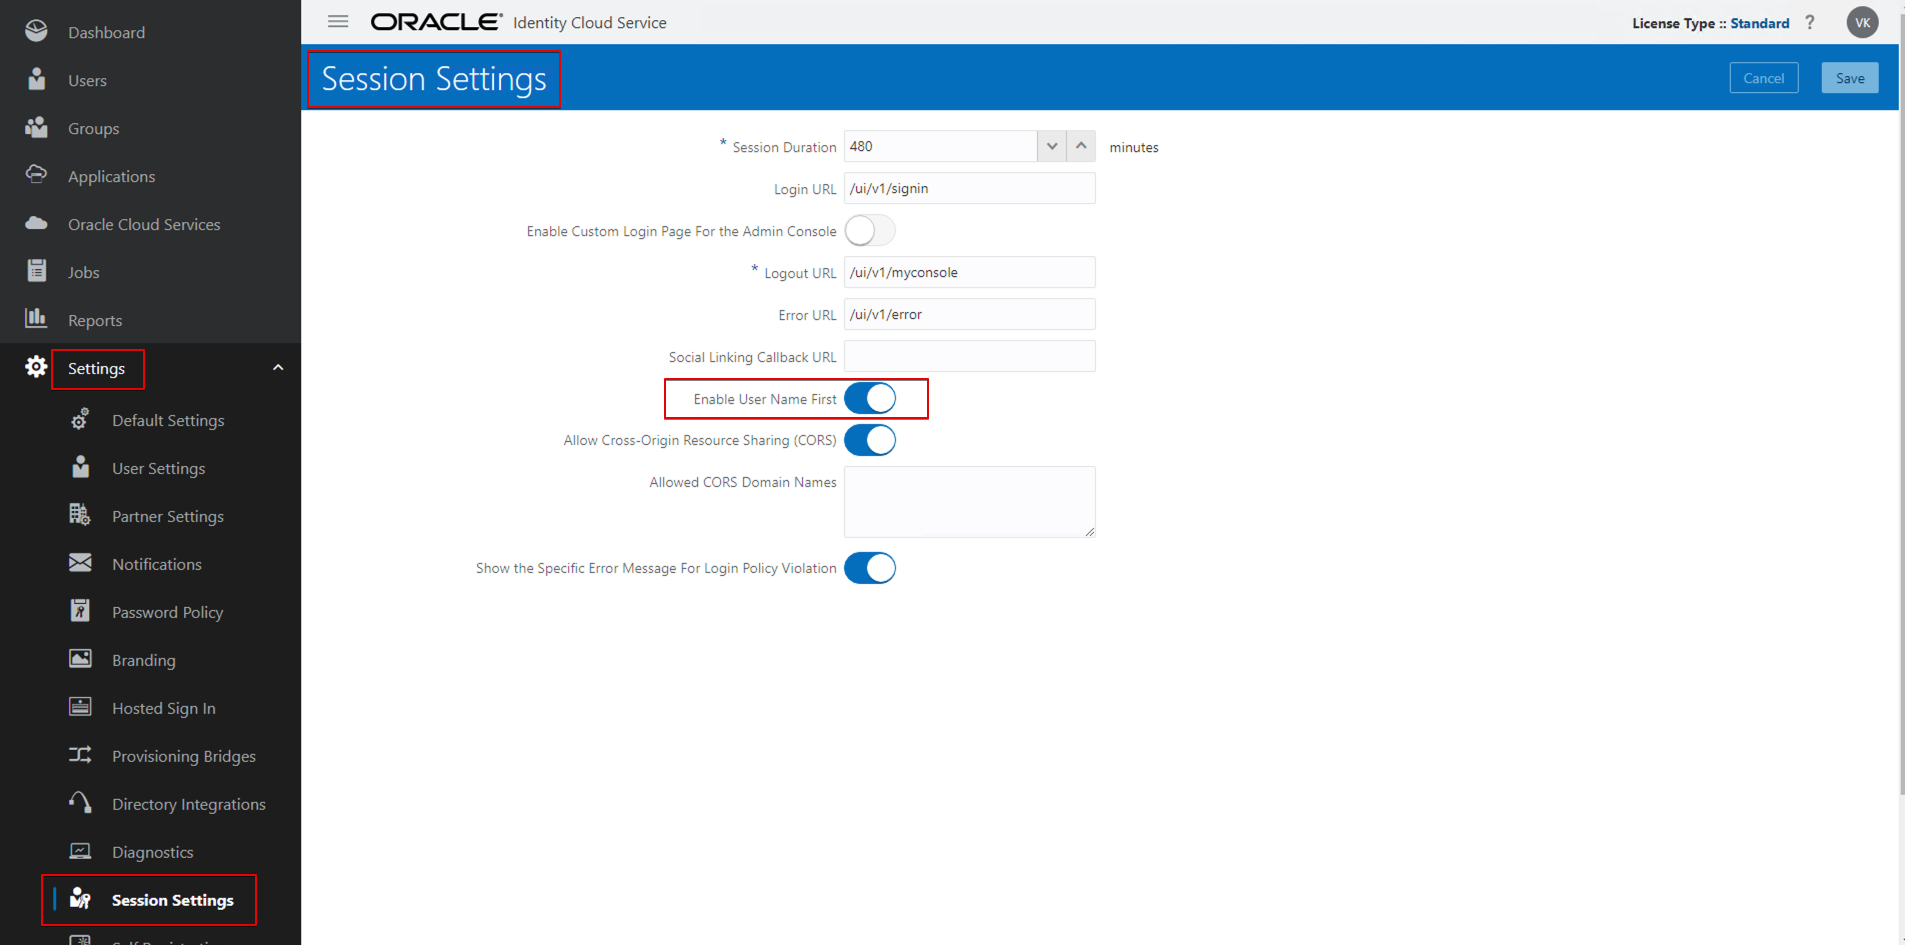
- Navigate to Settings –> Session Settings, enable the option “Enable User Name First” option, and click Save.
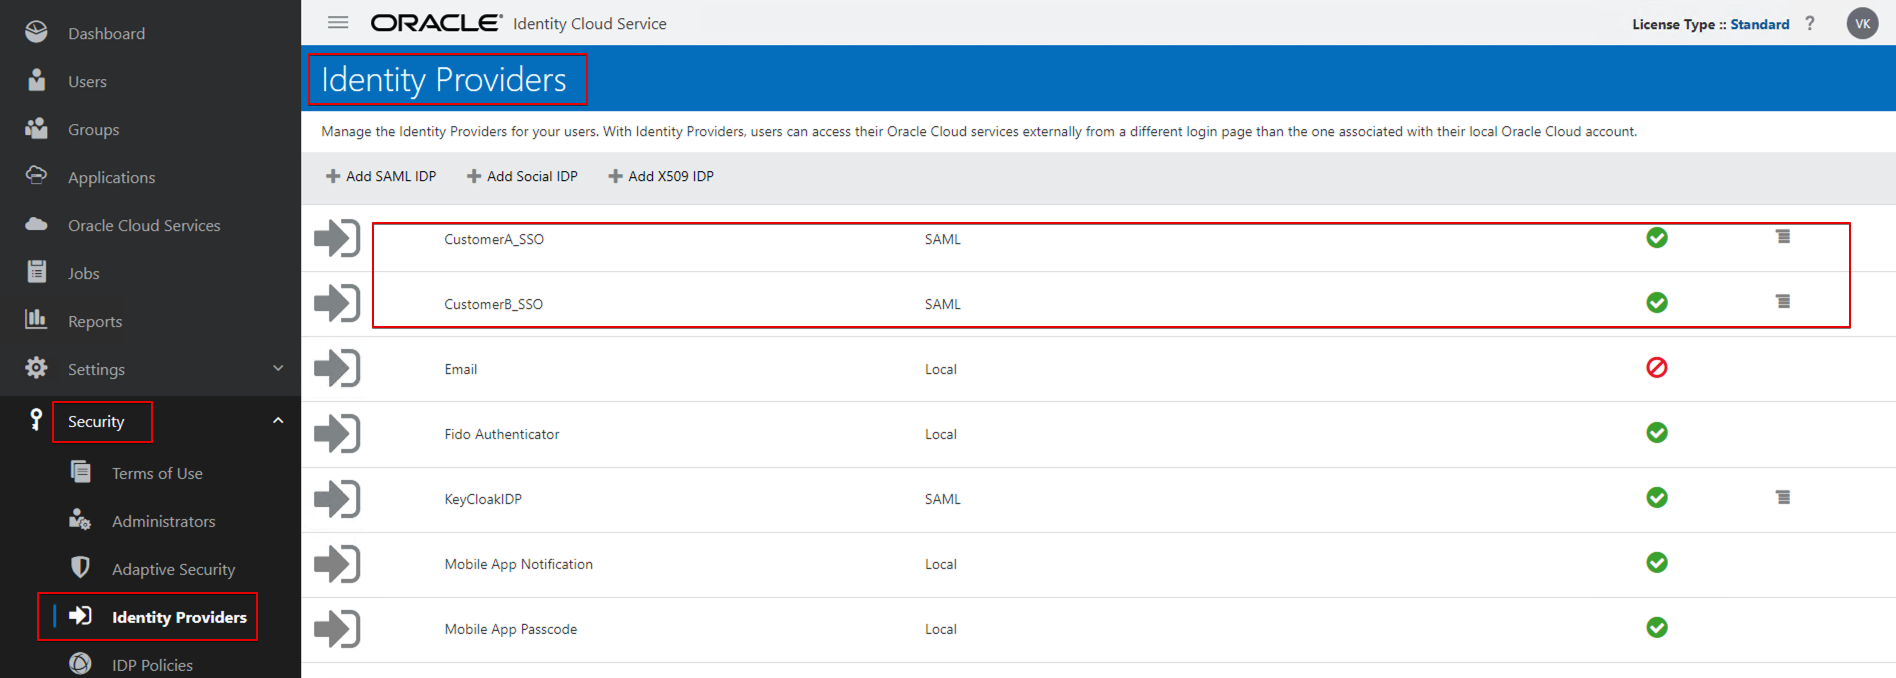
- Configure each customer’s SAML SSO identity provider for SSO.
- For example, the customer’s Azure, Okta, Ping Federate, or any SAML2 identity provider.
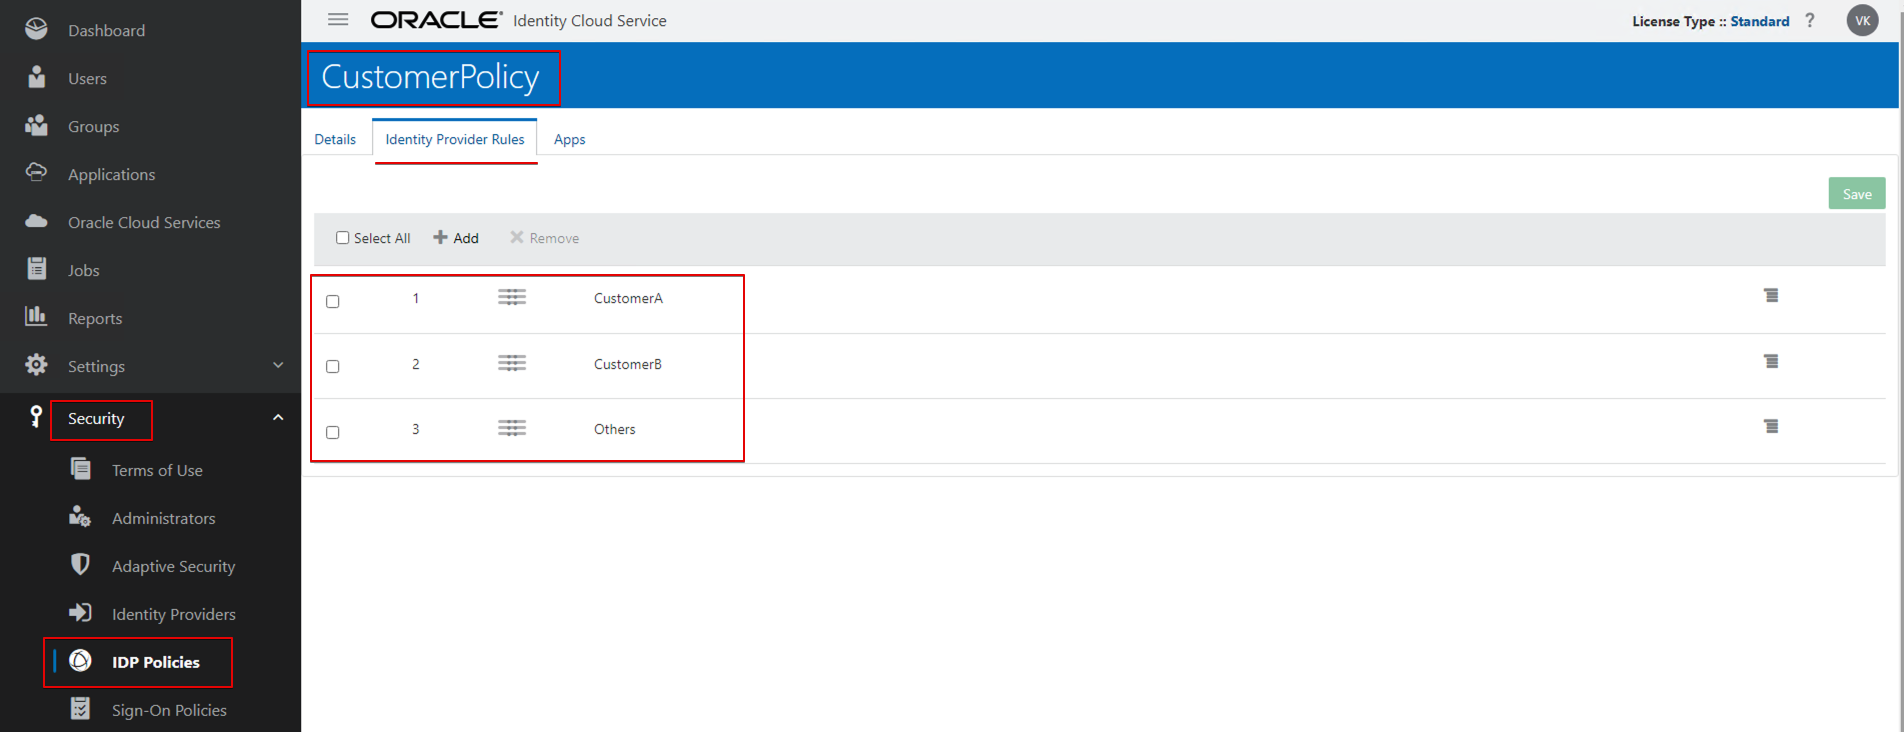
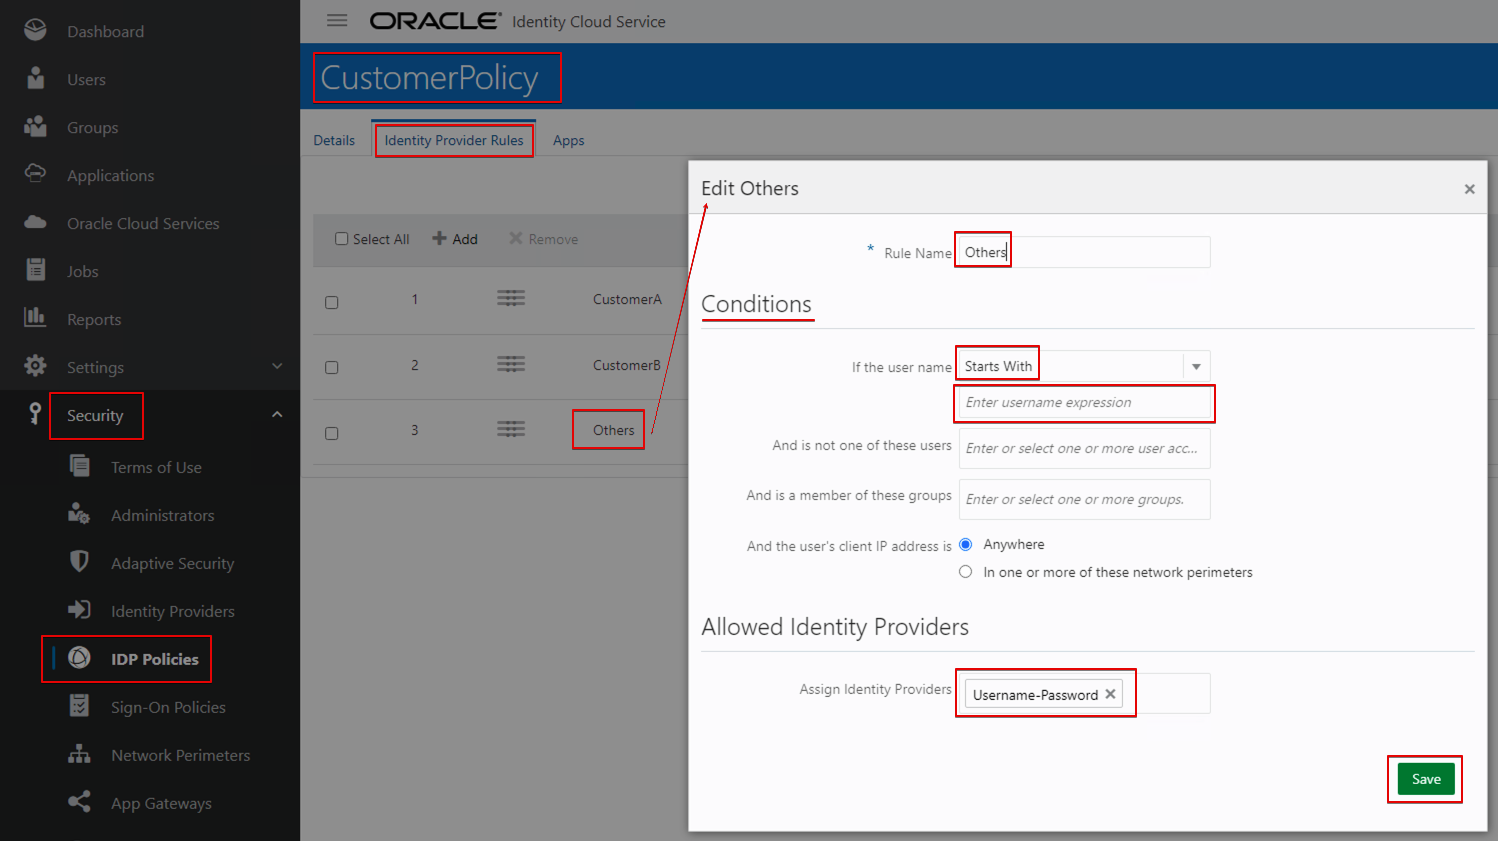
- Navigate to Security –> IDP Policy and create a policy.
- CustomerPolicy
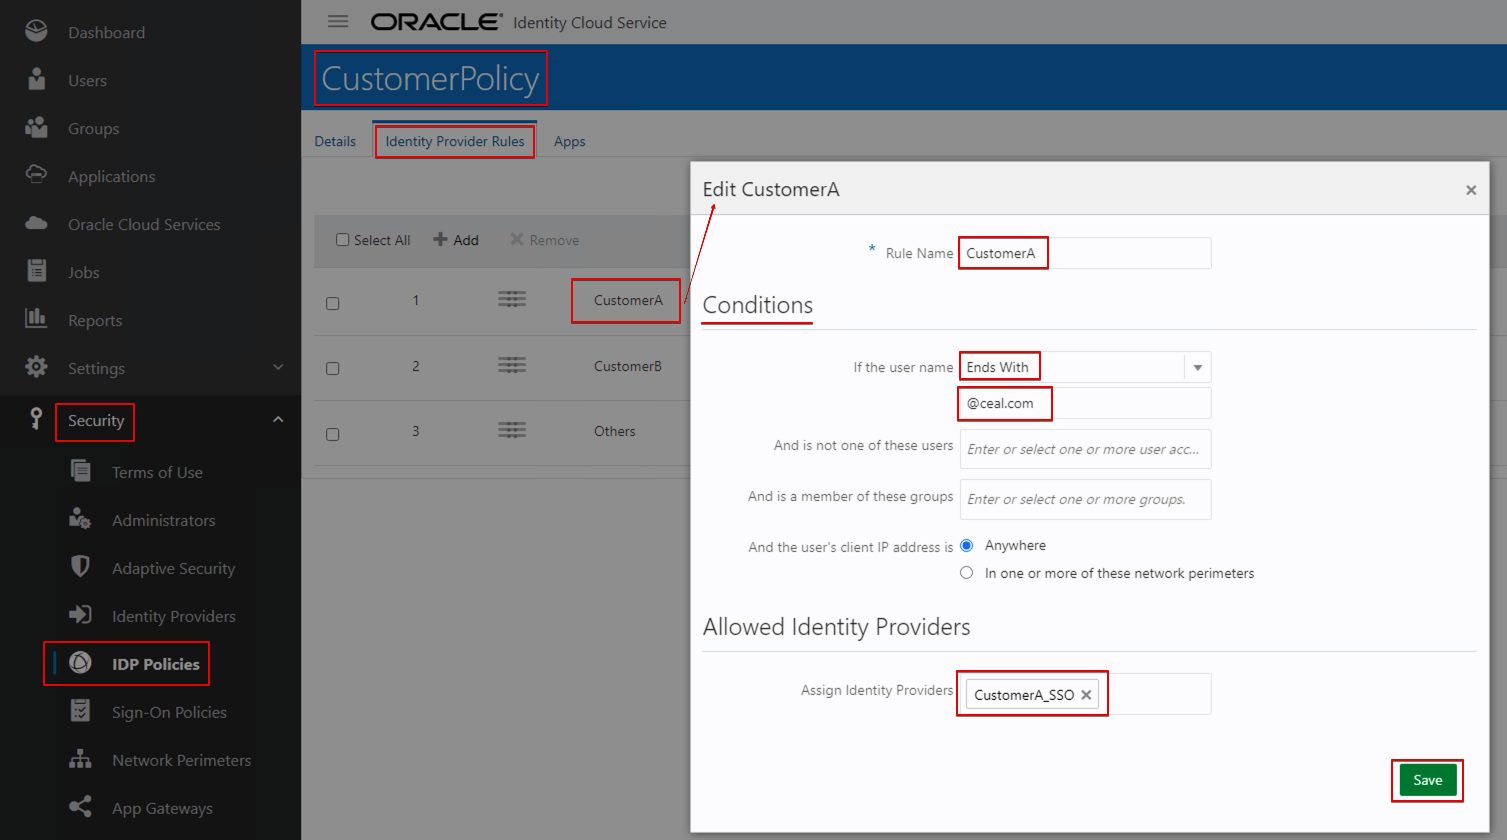
- Create a rule for CustomerA.
- Set the condition as below:
- If the user name Ends With @ceal.com Assign Identity Providers CustomerA_SSO_IDP.
- Set the condition as below:
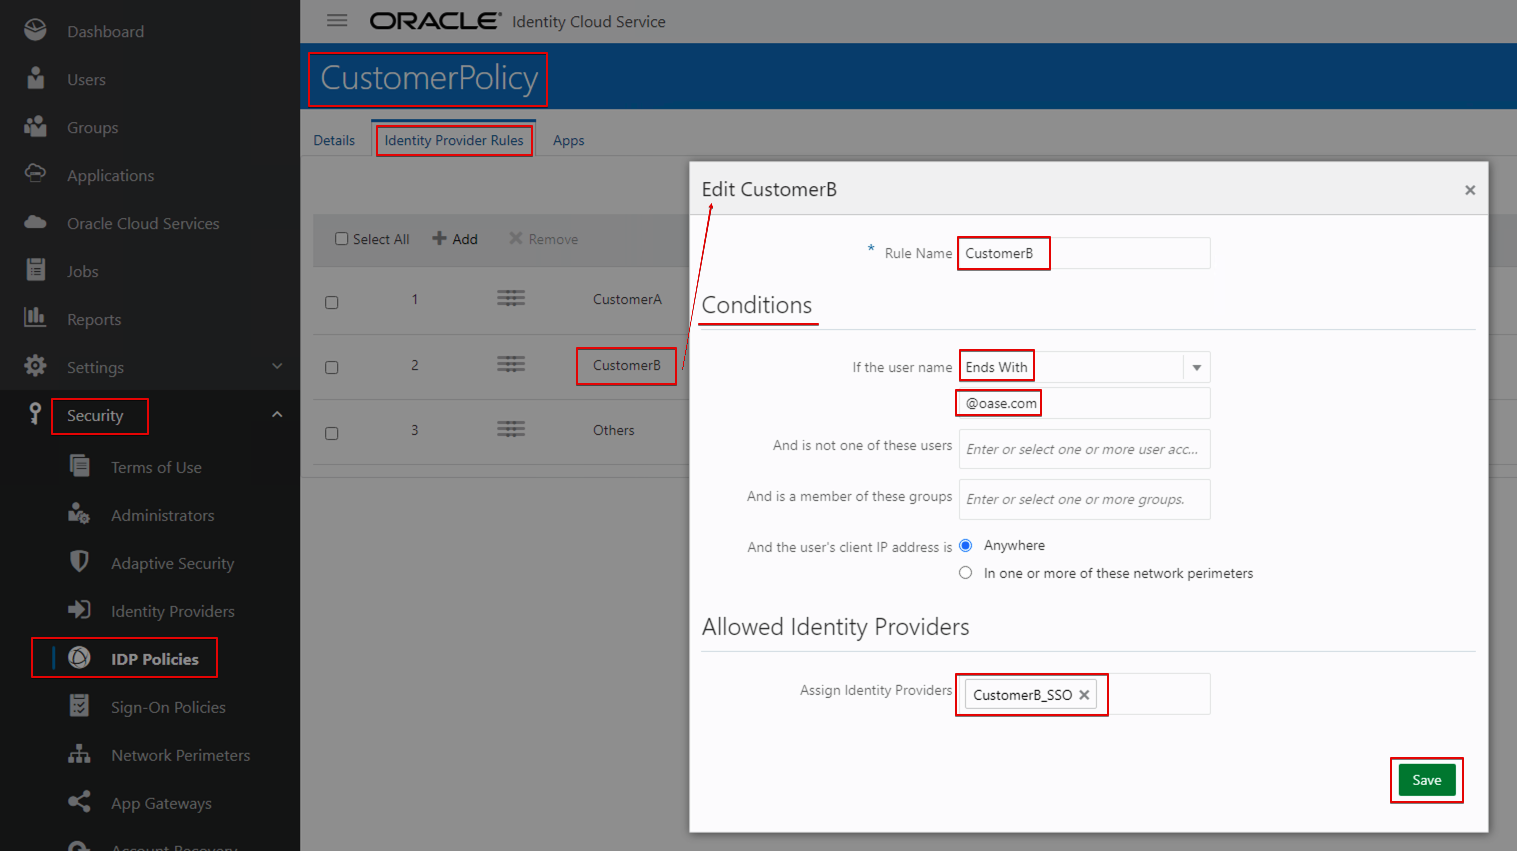
- Create a rule for CustomerB.
- Set the condition as below:
- If the user name Ends With @oase.com Assign Identity Providers CustomerB_SSO_IDP.
- Set the condition as below:
- Create a rule for others.
- Set the condition as below:
- If the user name Starts With ” “ Assign Identity Providers Username-Password.
- Set the condition as below:
- Create a rule for CustomerA.
- CustomerPolicy
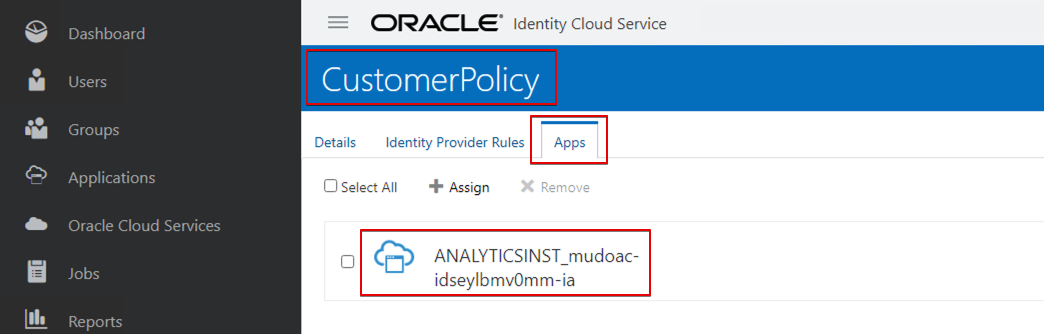
- Add the OAC application in the Apps tab of the IDP Policy.
![]()
Note: In this example, we use another tenancy’s IAM domain as the SAML IDP for each customer (instead of Azure, Okta, and so on).
Test Security
OAC URL
For example: https://mudoac-xxxxxxxxxxxx-ia.analytics.ocp.oraclecloud.com/ui
Customer A
- user1@ceal.com
- user2@ceal.com
Customer B
- user1@oase.com
- user2@oase.com
Others
- user1@oracle.com
To test:
Enter a user name. For example, sign in with a customer A user name.
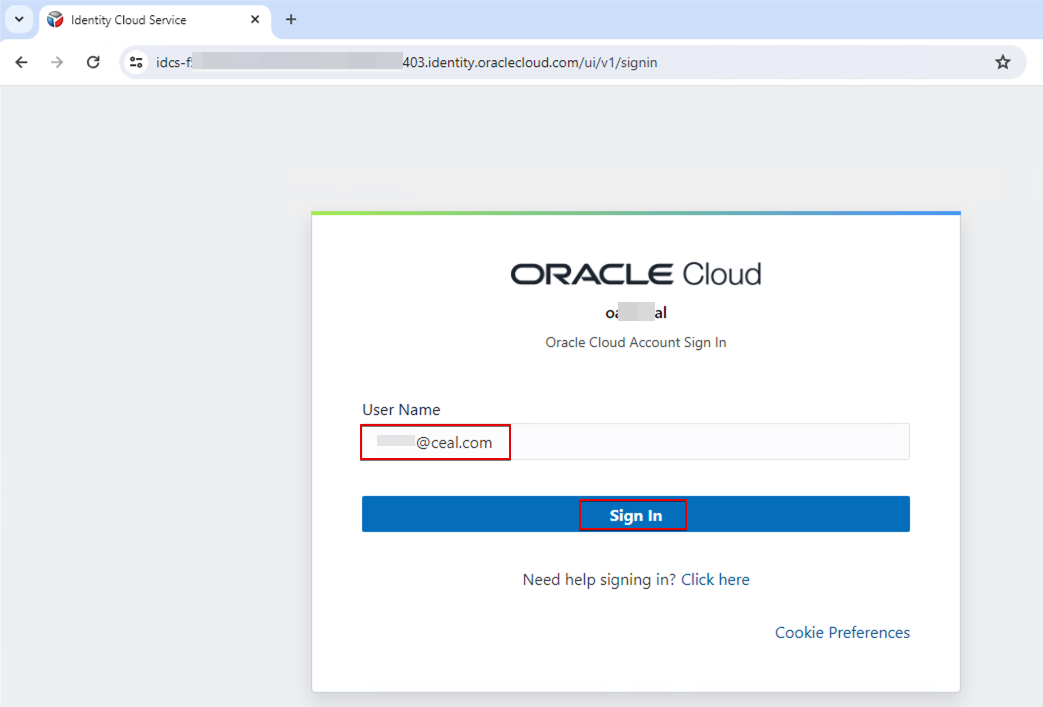
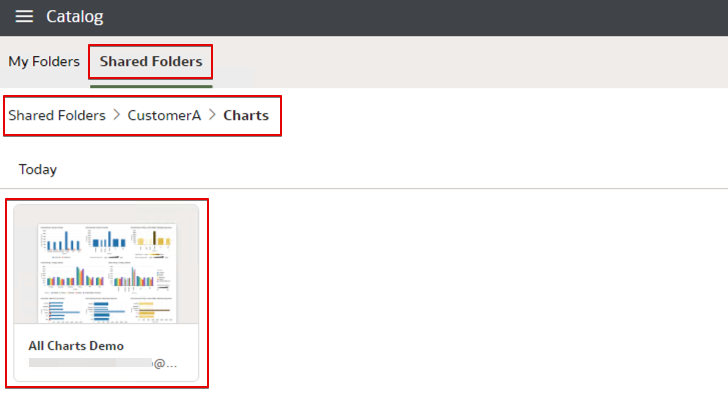
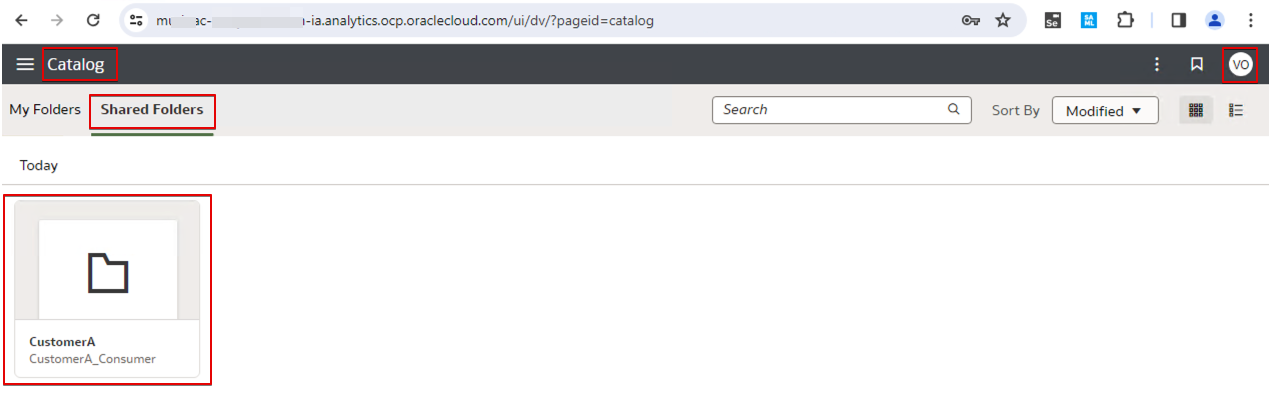
Since the login user belongs to customer A, the user only sees the Customer A folder.
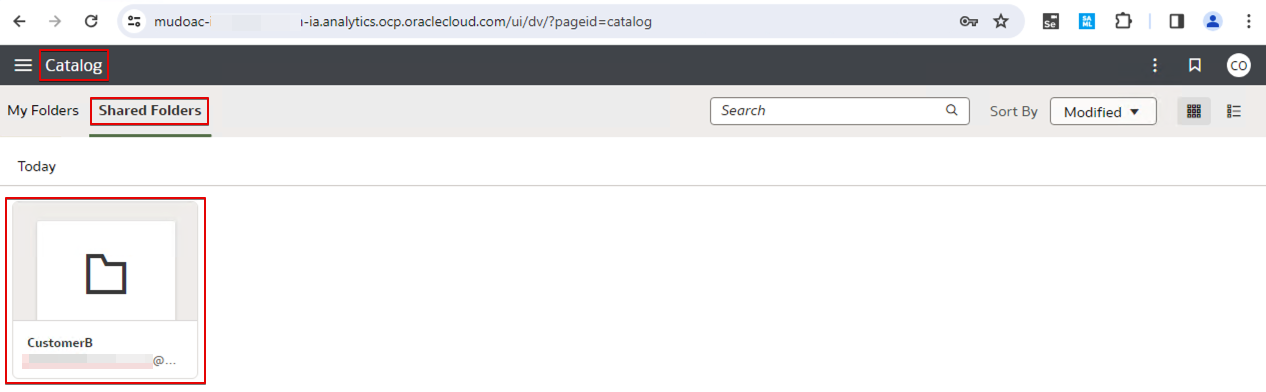
Similarly, sign in as a user from Customer B. This user only sees the Customer B folder.
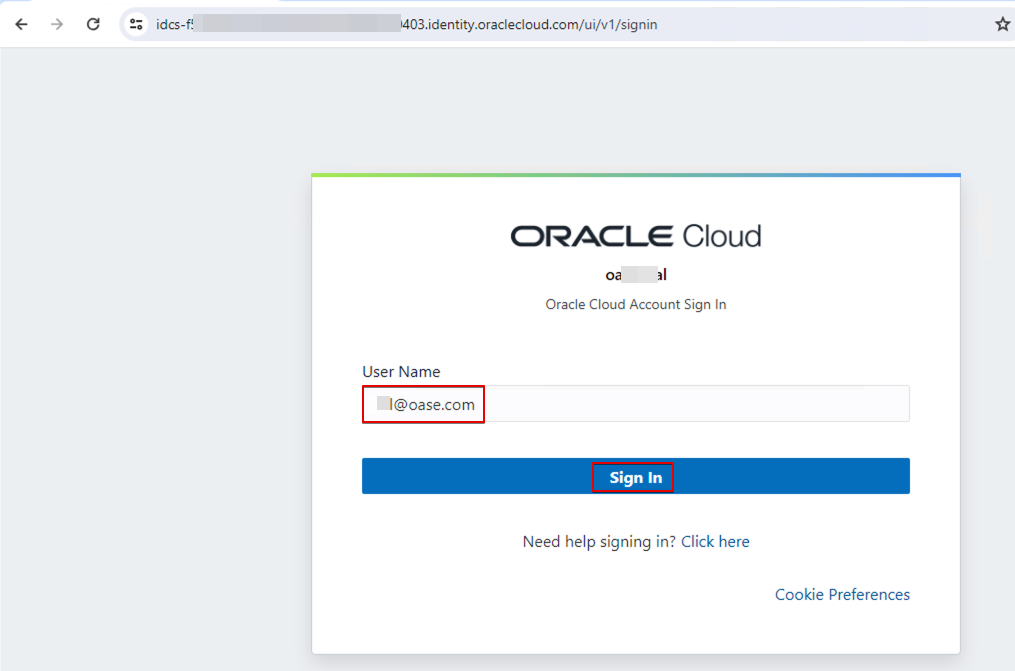
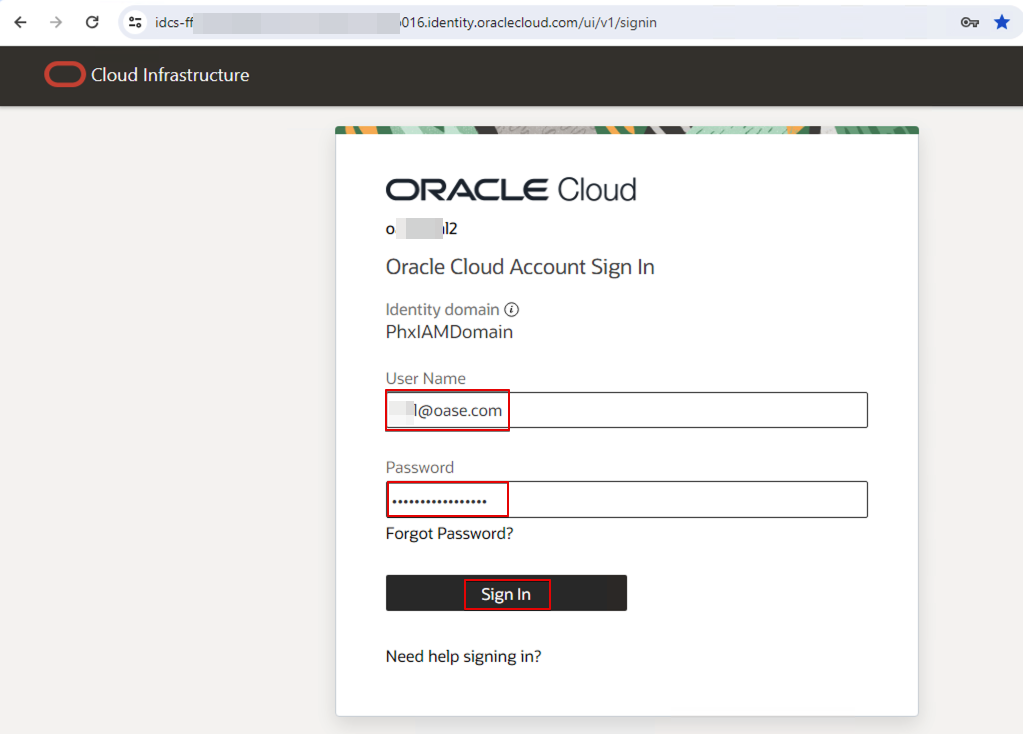
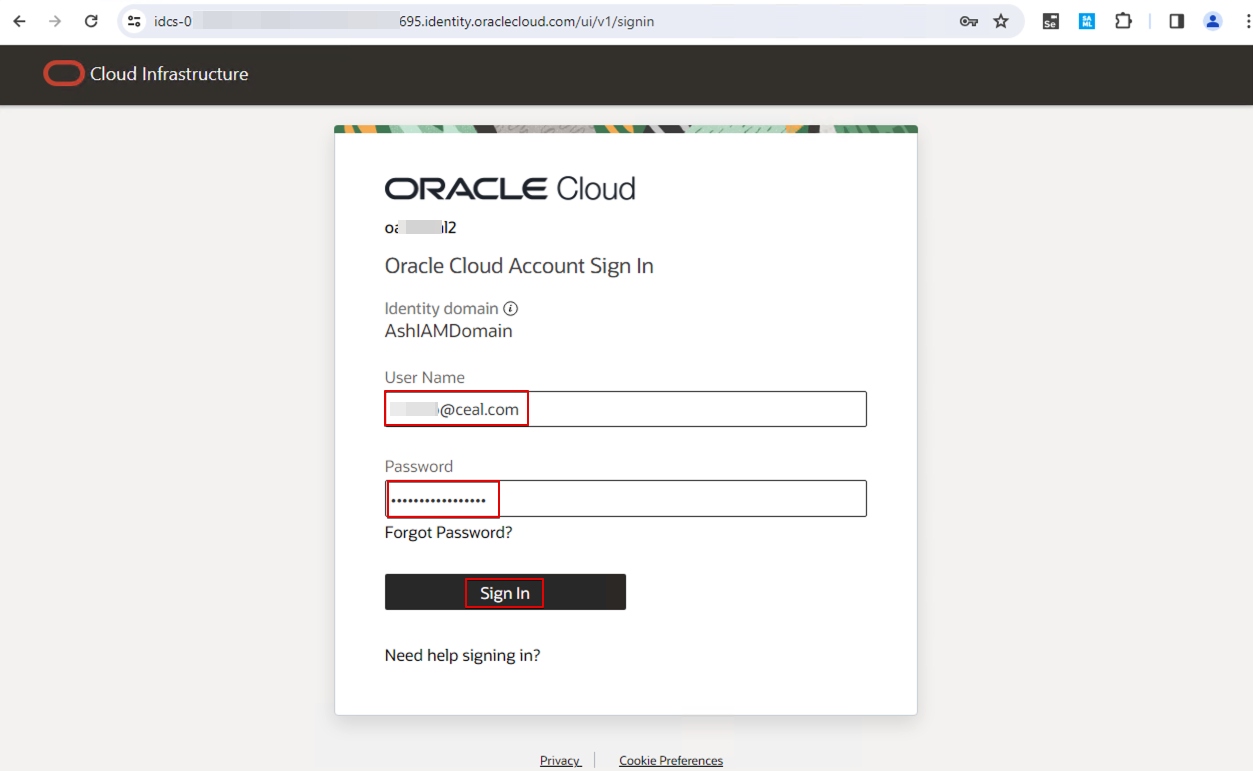
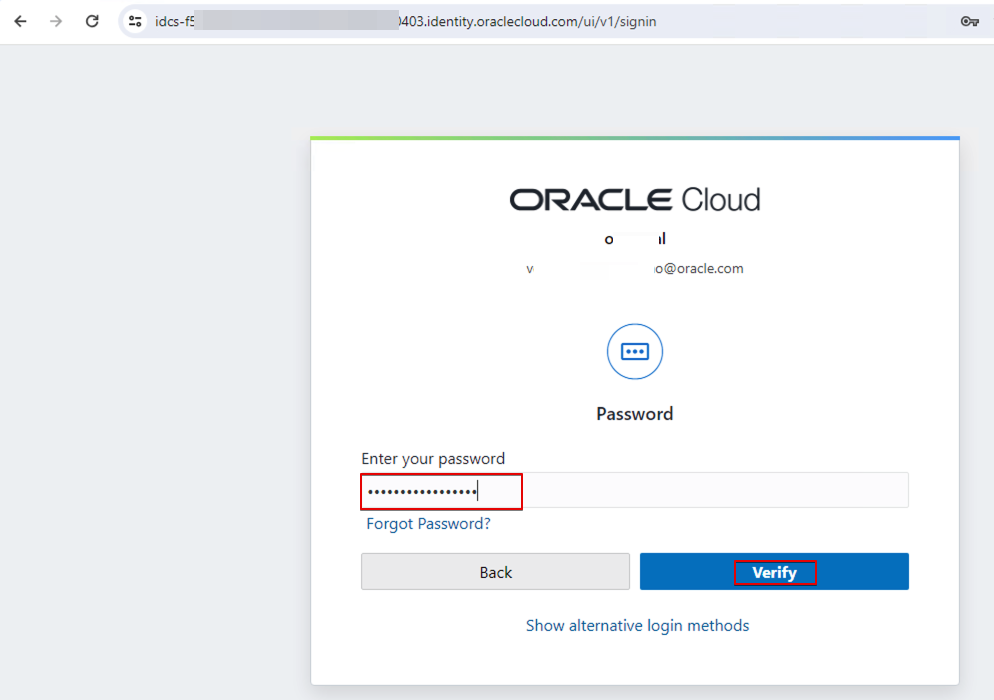
When the username domain doesn’t match the IDP policy rules, the user is prompted to enter the password. On successful authentication, the user can access OAC as the host organization user.
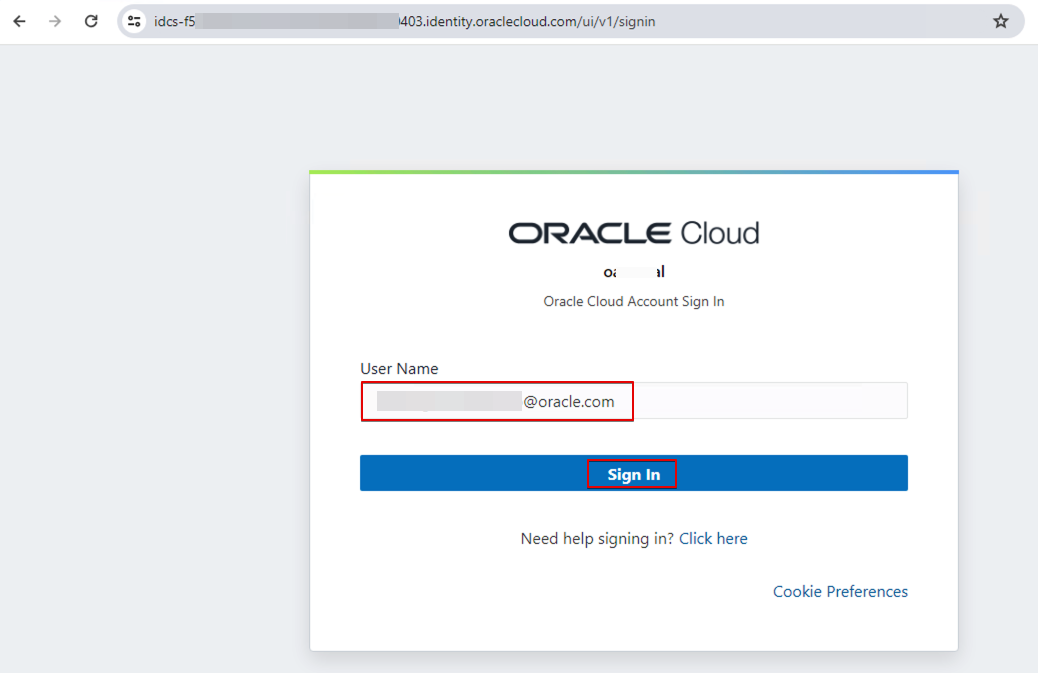
For example, this login is from the organization hosting OAC (it doesn’t match any email domain).
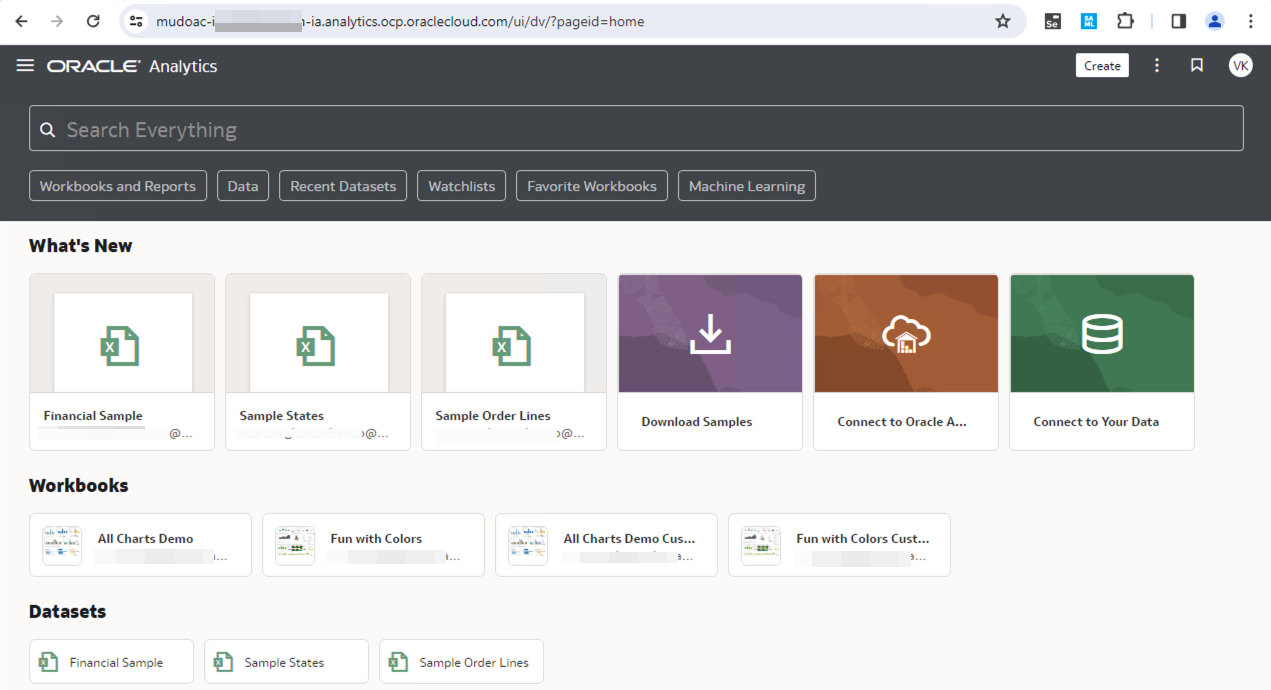
This user is an administrator user, a content author, and can see all the catalog folders.
Explore More
This blog describes how you can implement a multi-tenant model using a single OAC instance for multiple customers.
Refer to these security topics to understand more about Oracle Analytics Cloud: Securing Oracle Analytics Cloud Content, Manage Data-Level Security for Oracle Analytics Cloud, and Add Your Own Application Roles.
![]()