Oracle Cloud Infrastructure (OCI) superclusters consisting of powerful NVIDIA GPUs and low-latency, high-bandwidth RoCE v2 networks provides an ideal platform for high performance computing (HPC) and machine learning (ML) workloads. To add on that, OCI HPC Marketplace images with Terraform and Ansible scripts make it smooth to quickly deploy a cluster with SLURM, NVIDIA Pyxis, Enroot, and HPCX packages.
ML applications implemented with PyTorch distributed data parallel (DDP) model and CUDA support can run on a single GPU, on multiple GPUs from single node, and on multiple GPUs from multiple nodes. PyTorch provides launch utilities—the deprecated but still widely used torch.distributed.launch module and the new command named torchrun, which can conveniently handle multiple GPUs from single node. To run jobs on multiple GPUs from different nodes, we recommend using message passing interface (MPI) or a job scheduler, such as SLURM.
In this blog, we show how easy and versatile it is to use the preinstalled SLURM to run PyTorch DDP jobs on OCI GPU instances. This can be done with or without the PyTorch launch utilities. We will also show how to run these jobs using Miniconda environment, Docker Containers and Nvidia Pyxis.
The OCI systems
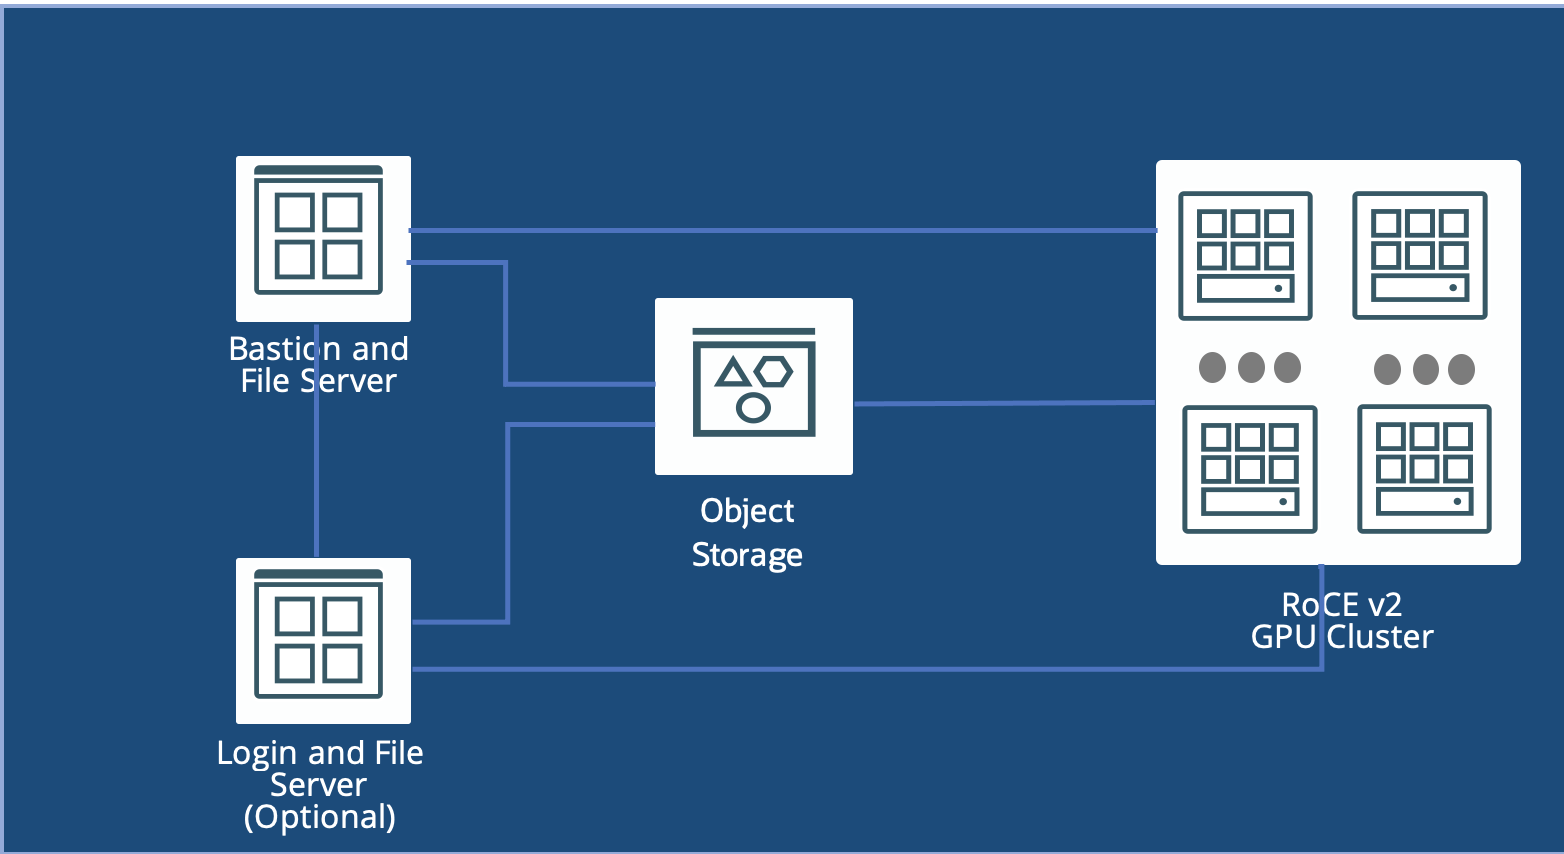
With a few clicks in the Oracle Cloud Marketplace or some configuration variables customized for Terraform and Ansible scripts, you can quickly deploy a working cluster, as illustrated in the following figure:
Simple example with SLURM and Miniconda
The PyTorch example, pytorch_sendrecv.py, comes from GitHub. This example script assigns GPUs to tasks or processes and then broadcasts from the root process to all others using send and receive functions.
Job script without using PyTorch launch utility
The following scripts to run this PyTorch DDP job without using PyTorch launch utilities.
sendrecv_direct.slm
#!/bin/bash # #SBATCH --exclusive --nodes=2 --ntasks-per-node=8 --gres=gpu:8 #SBATCH --job-name=pytohch_sendrecv srun -l direct.sh |
direct.sh
#!/bin/bash # source /nfs/scratch/miniconda3/etc/profile.d/conda.sh conda activate pytorch_cuda118 LOCAL_RANK=$SLURM_LOCALID WORLD_SIZE=$SLURM_NTASKS RANK=$SLURM_PROCID\ MASTER_ADDR=$SLURM_LAUNCH_NODE_IPADDR MASTER_PORT=6000\ python pytorch_sendrecv.py |
The SLURM script asks for two nodes to run a total of 16 SLURM tasks with eight per node. Each node has eight GPUs. To submit this job, run the following command from a SLURM submission node, either the bastion node or any of the GPU Compute nodes:
sbatch send_recv.slm
The shell script provides the required environment variables at the task level. Each task has its unique RANK. SLURM srun provides all of them.
Job script using PyTorch launch utility
The following script pair shows how to use torchrun and SLURM:
sendrecv_torchrun.slm
#!/bin/bash # #SBATCH --exclusive --nodes=2 --ntasks-per-node=8 --gres=gpu:8 #SBATCH --job-name=pytohch_sendrecv srun -l --ntasks-per-node=1 torchrun.sh |
torchrun.sh
#!/bin/bash # source /nfs/scratch/miniconda3/etc/profile.d/conda.sh conda activate pytorch_cuda118 torchrun --nnodes=$SLURM_NNODES --node_rank=$SLURM_NODEID\ --nproc_per_node=$SLURM_GPUS_ON_NODE \ --master_addr=$SLURM_LAUNCH_NODE_IPADDR --master_port=6000 \ pytorch_sendrecv.py |
We can notice the following differences:
- We added –ntasks-per-node=1 to the srun command. torchrun handles jobs at node level. So, we want srun to start one SLURM task per node, and torchrun starts eight ($SLURM_GPUS_ON_NODE) PyTorch DDP tasks per node.
- torchrun starts the jobs at node level and has its own command line options.
In the background, torchrun converts the node-level command line parameters to PyTorch DDP task level environment variables.
The following code block uses torchrun with rendezvous module:
#!/bin/bash # source /nfs/scratch/miniconda3/etc/profile.d/conda.sh conda activate pytorch_cuda118 torchrun --nnodes=$SLURM_NNODES --node_rank=$SLURM_NODEID\ --nproc_per_node=$SLURM_GPUS_ON_NODE \ --rdzv_endpoint=$SLURM_LAUNCH_NODE_IPADDR:1234 \ --rdzv_id=123 --rdzv_backend=c10d \ pytorch_sendrecv.py |
The SLURM driving script is the same as sendrecv_torchrun.slm. You just need to change torchrun.sh to rdzv.sh.
Switching from torchrun to torch.distributed.launch is straightforward: Replace torchrun in the torchrun.sh script by python -m torch.distributed.launch.
The examples shown in this section re mostly for illustration purposes. They show the fundamentals of handling PyTorch DDP jobs, and you can easily test them out. In the next section, we show a practical use case: Megatron-LM pretraining with PubMed datasets. This process involves setting the optimal NVIDIA Collective Communications Library (NCCL) and process binding parameters for performance and using Pyxis, which integrates NVIDIA container toolkit with SLURM.
Megatron-LM with SLURM and Docker Container (Pyxis)
The following pair of scripts requests SLURM resources and launches the Megatron-LM pre-training job. For more details of Megatron-LM, refer to Megatron LM on GitHub.
submit_direct.slm
#!/bin/bash
#
#SBATCH --exclusive --nodes=2 --ntasks-per-node=8 --gres=gpu:8
#SBATCH --job-name=megatron_bert
DIR=`pwd`
PDIR=${DIR%/*}
CONTAINER_MAPDIR=/workspace/megatron
CONTAINER_WKDIR=${CONTAINER_MAPDIR}/Megatron-LM
DATETIME=`date +'date_%y-%m-%d_time_%H-%M-%S'`
mkdir -p $DIR/logs
srun --ntasks=$SLURM_JOB_NUM_NODES --ntasks-per-node=1 \
  --container-image="nvcr.io#nvidia/pytorch:23.08-py3" \
  true

srun -l \
  --container-image="nvcr.io#nvidia/pytorch:23.08-py3" \
  --container-name=bert \
  --container-mounts "$PDIR:$CONTAINER_MAPDIR" \
  --container-workdir="$CONTAINER_WKDIR" \
  --output=$DIR/logs/%x_%j_$DATETIME.log \
./run_direct.sh |
run_direct.sh
#!/bin/bash
#
# The run script for Megatron-LM on OCI HPC Cluster of BM.GPU4.8
# Launched by sbatch submit_direct.slm
#
VOCAB_FILE=../data/pubmed6B/bert-large-uncased-vocab.txt
DATASET=../data/pubmed6B/pubmed6B_bert_text_sentence
CHECKPOINT_PATH=experiments/pubmed6B_bert
app_options=" \
  --num-layers 24 \
  --hidden-size 1024 \
  --num-attention-heads 16 \
  --micro-batch-size 16 \
  --global-batch-size 256 \
  --seq-length 512 \
  --max-position-embeddings 512 \
  --train-iters 1000 \
  --save $CHECKPOINT_PATH \
  --load $CHECKPOINT_PATH \
  --data-path ${DATASET} \
  --vocab-file $VOCAB_FILE \
  --data-impl mmap \
  --split 949,50,1 \
  --lr 0.0001 \
  --lr-decay-style linear \
  --min-lr 1.0e-5 \
  --lr-decay-iters 990000 \
  --weight-decay 1e-2 \
  --clip-grad 1.0 \
  --lr-warmup-fraction .01 \
  --log-interval 100 \
  --save-interval 10000 \
  --eval-interval 1000 \
  --eval-iters 10 \
  --distributed-backend nccl \
  --DDP-impl local \
  --num-workers 4 \
  --fp16 "

export NCCL_DEBUG=INFO
export NCCL_IB_HCA="=mlx5_6,mlx5_7,mlx5_8,mlx5_9\
  ,mlx5_0,mlx5_1,mlx5_2,mlx5_3\
  ,mlx5_14,mlx5_15,mlx5_16,mlx5_17\
  ,mlx5_10,mlx5_11,mlx5_12,mlx5_13"
export NCCL_IB_GID_INDEX=3
export NCCL_IB_SL=0
export NCCL_IB_TC=41
export NCCL_IB_QPS_PER_CONNECTION=4
export CUDA_DEVICE_MAX_CONNECTIONS=1
export MASTER_ADDR=$SLURM_LAUNCH_NODE_IPADDR
export MASTER_PORT=6000
export WORLD_SIZE=$SLURM_NTASKS
export RANK=$SLURM_PROCID
export LOCAL_RANK=$SLURM_LOCALID
cpus=(24-27 28-31 8-11 12-15 56-59 60-63 40-43 44-47)
taskset -c ${cpus[$LOCAL_RANK]} \
python pretrain_bert.py $@ ${app_options} |
Let’s look at the submission script submit_direct.slm. After the resource requests (#SBATCH statements), we define some file folders, which pass to Docker containers where they’re used in the pretraining job. Then, we invoke the srun command twice: First to potentially pull the Docker container image if it hasn’t been cached by using one SLURM task per node. The second srun starts the Docker container and launches a shell script inside each container. The container image is specified as <Registry>#<image name>.
The run script – run_direct.sh, contains the following major parts:
- Application (Pretraining job) options, which are relatively independent to running environment.
- NCCL environment variables for correctly and optimally handle communications among all DDP tasks. The settings in this case apply to OCI instance shape BM.GPU4.8.
- PyTorch DDP settings, like in the previous example.
With changes similar to the simple example case, you can integrate the PyTorch launch utilities (torchrun and torch.distributed.launch) with SLURM. You can also run Docker containers with SLURM without using Pyxis, though we strongly recommend using Pyxis.
Conclusion
We’ve shown how easy it is to run PyTorch DDP jobs on OCI GPU cluster in shape BM.GPU4.8 using SLURM. This shape has eight NVIDIA A100 40-GB GPUs per node. You can customize the scripts to other shapes, such as BM.GPU.A100-v2 and the bare metal or virtual machine (VM) shapes of the A10 GPUs with minimal effort. For more details on OCI GPU offerings, see GPU instances.
The Oracle Cloud Marketplace HPC cluster network comes with OpenMPI and NVIDIA HPCX too, which you can also use to run PyTorch DDP jobs with or without SLURM. PyTorch DDP has three communication backends implemented: GLOO, MPI, and NCCL. We used NCCL because it’s the top choice for GPU for performance.
Start deploying your Oracle Cloud Infrastructure cluster with the free Marketplace high-performance computing cluster network to run your PyTorch DDP jobs with the convenience of the integrated SLURM and NVIDIA Pyxis.