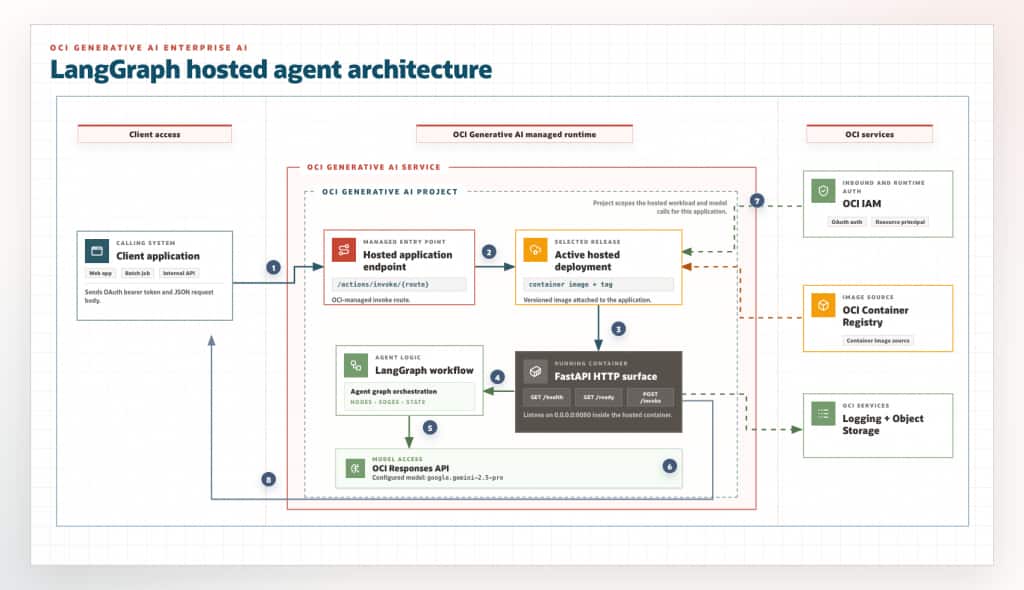
Agentic workflows become enterprise systems when they begin serving real workflows. A LangGraph proof of concept can validate state transitions, model calls, and routing logic quickly, but production deployment adds a different contract: an HTTP endpoint, runtime identity, environment-specific configuration, versioned releases, and scaling controls. OCI Generative AI hosted applications provide that managed runtime layer, allowing platform teams to deploy the agent as a containerized service while application teams keep the graph logic focused and portable.
OCI Generative AI, Oracle Cloud Infrastructure’s Enterprise AI platform, provides a managed path for building, deploying, and governing AI applications at scale. For agentic applications, two OCI building blocks matter here: projects and hosted applications with deployments. Projects organize agent-related artifacts and settings. Applications define how a hosted agent workload runs and how clients reach it. Deployments release a specific container image into that application runtime. See the OCI Generative AI overview, projects, and hosted applications and deployments documentation.
From prototype to managed service
LangGraph is useful because it makes agent workflow explicit: nodes hold work, edges hold flow, and state moves through the graph. That is valuable for support triage, document processing, human-review routing, tool orchestration, or any workflow where the model is only one step in a larger process.
But enterprise teams need more than graph logic. They need a managed HTTP endpoint, identity controls, scaling settings, environment variables, versioned releases, and a clear way to connect to other OCI resources. OCI Generative AI hosted applications give that operational layer while letting teams keep their agent code in a standard container. The result is a cleaner ownership split: developers own the Python graph and API contract; OCI manages the hosted runtime concerns.
How OCI organizes the hosted agent
OCI Generative AI turns that operational wrapper into three concrete resources: a project, an application, and a deployment.
The project comes first. It organizes agent-specific artifacts such as responses, conversations, files, and containers. At runtime, the app uses the project OCID to send OCI OpenAI-compatible API calls in the right project context. Projects also help isolate artifacts for lifecycle and compliance boundaries.
The application defines the managed runtime for the workload, including scaling, managed storage, networking, authentication, and runtime environment variables. This is where platform teams make deployment-time decisions such as public or private endpoint access, replica limits, and which environment variables the container receives.
The deployment is the versioned release of that application, based on a container image and tag. Within a hosted application, one active deployment serves the application endpoint at a time. This is the part that lets teams roll forward to a new image without changing the application identity that clients call.
Turn LangGraph into a hosted service
The key engineering step is to give the graph a small HTTP contract. In this implementation, FastAPI provides that wrapper. The application code in code/oci-langgraph-hosted-agent/src/sample_langgraph_fastapi_agent.py uses:
GET /healthfor a basic liveness responseGET /readyto confirm required runtime configuration is presentPOST /invoketo run the LangGraph workflow
The app listens on 0.0.0.0:8080, which gives the hosted runtime a predictable container port for HTTP traffic. The graph has three nodes: classify a support ticket, route the state, then either draft a customer reply or create an urgent handoff. The model node calls the OCI Responses API through OCI’s OpenAI-compatible endpoint using IAM-based authentication:
import httpx
from openai import OpenAI
from oci_openai import OciResourcePrincipalAuth

client = OpenAI(
    base_url=f"https://inference.generativeai.{region}.oci.oraclecloud.com/openai/v1",
    api_key="not-used",
    project=os.environ["OCI_GENAI_PROJECT_OCID"],
    http_client=httpx.Client(auth=OciResourcePrincipalAuth(), timeout=30.0),
)

response = client.responses.create(
    model=model,
    store=False,
    input=prompt,
)
return response.output_text.strip()
The api_key="not-used" value is only a placeholder required by the OpenAI client constructor. The request is signed by the http_client through OciResourcePrincipalAuth, so the container does not carry a long-lived model credential.
OCI Responses API is the primary OpenAI-compatible API for interacting with supported models and agentic workflows. It supports structured outputs, supported tools, and project-scoped calls through the /responses endpoint. The OpenAI-compatible base URL is https://inference.generativeai.${region}.oci.oraclecloud.com/openai/v1. See the OCI Responses API and OCI OpenAI-compatible endpoints documentation.
For local development, the application can run with stub mode for offline testing or session mode, where OciSessionAuth signs OCI requests through an OCI CLI profile. In the hosted deployment, set OCI_GENAI_AUTH_MODE=resource_principal so OciResourcePrincipalAuth signs requests with the resource principal provided by OCI. The deployment flow includes the dynamic group and policies for that runtime identity. See Generative AI IAM-based authentication.
Deployment flow
The operational flow is:
- 1. Create or reuse an OCI Generative AI project.
- 2. Build the FastAPI + LangGraph application in
code/oci-langgraph-hosted-agentinto a Linux container image. - 3. Push the image to OCIR.
- 4. Configure IAM for deployment automation and for the hosted runtime identity.
- 5. Create an OCI Generative AI hosted application with scaling, networking, authentication, storage, and environment variables.
- 6. Create a hosted deployment that points to the container image and tag.
- 7. Invoke
/health,/ready, and then the agent endpoint.
The OCI CLI exposes this flow directly. The following shell variables keep environment-specific values reusable across commands:
> export OCI_COMPARTMENT_OCID="ocid1.compartment.oc1..exampleuniqueID"
> export OCI_REGION="us-ashburn-1"
> export OCI_REGION_KEY="iad"
> export OCI_TENANCY_NAMESPACE="exampletenancy"
> export OCI_GENAI_MODEL="google.gemini-2.5-pro"
> export ENTERPRISE_AI_PROJECT_NAME="langgraph-agent-project"
> export ENTERPRISE_AI_HOSTED_APPLICATION_NAME="langgraph-agent-app"
> export ENTERPRISE_AI_HOSTED_DEPLOYMENT_NAME="langgraph-agent-v1"
> export ENTERPRISE_AI_HOSTED_IDENTITY_DOMAIN_URL="https://idcs-<identity-domain-id>.identity.oraclecloud.com:443"
> export ENTERPRISE_AI_HOSTED_IDENTITY_DOMAIN_AUDIENCE="https://langgraph-agent-app"
> export ENTERPRISE_AI_HOSTED_IDENTITY_DOMAIN_SCOPE="invoke"
> export ENTERPRISE_AI_OCIR_REPOSITORY_NAME="oci-langgraph-hosted-agent"
> export ENTERPRISE_AI_DOCKER_IMAGE_URI="${OCI_REGION_KEY}.ocir.io/${OCI_TENANCY_NAMESPACE}/${ENTERPRISE_AI_OCIR_REPOSITORY_NAME}"
> export ENTERPRISE_AI_DOCKER_IMAGE_TAG="0.1.0"
> export ENTERPRISE_AI_DOCKER_BUILD_PLATFORM="linux/amd64"
This article uses google.gemini-2.5-pro as the example model ID. For other environments, confirm the target model and region in the current OCI documentation for offered pretrained foundational models and Generative AI models by region.
Create the project:
> export ENTERPRISE_AI_PROJECT_OCID="$(oci generative-ai generative-ai-project create \
  --compartment-id "$OCI_COMPARTMENT_OCID" \
  --display-name "$ENTERPRISE_AI_PROJECT_NAME" \
  --region "$OCI_REGION" \
  --query 'data.id' \
  --raw-output)"
The create command stores the project OCID in ENTERPRISE_AI_PROJECT_OCID. Print the value and fetch the resource to confirm its lifecycle state:
> printf 'Project OCID: %s\n' "$ENTERPRISE_AI_PROJECT_OCID"
> oci generative-ai generative-ai-project get \
> --generative-ai-project-id "$ENTERPRISE_AI_PROJECT_OCID" \
> --region "$OCI_REGION" \
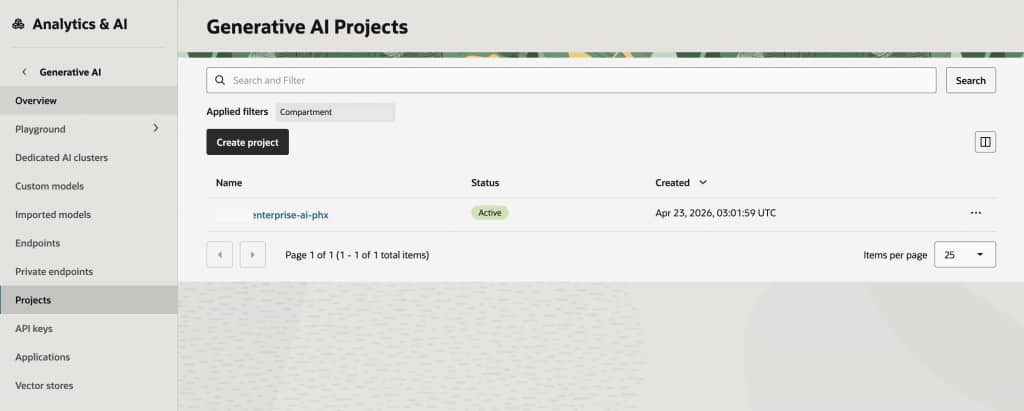
> --query 'data.{id:id,displayName:"display-name",lifecycleState:"lifecycle-state"}'To verify the project in the OCI Console, open the navigation menu, select Analytics & AI, then Generative AI, and open Projects. Select the target compartment to view the project and its lifecycle state.
The example application is available in the oci-langgraph-hosted-agent GitHub repository. Clone the repo, then build the application image from the repo folder:
The build command requires Docker to be installed and running on the local machine. On macOS or Windows, start Docker Desktop before running the command. Build the image for the Linux platform expected by the hosted runtime:
> git clone https://github.com/srikanth311/oci-langgraph-hosted-agent.git
> cd oci-langgraph-hosted-agent
> docker build --platform "$ENTERPRISE_AI_DOCKER_BUILD_PLATFORM" \
>   -t oci-langgraph-hosted-agent:latest .
The relevant FastAPI routes are small. /ready checks runtime configuration before traffic reaches the agent, and /invoke passes request state into the compiled LangGraph graph:
@app.get("/health")
def health() -> dict[str, str]:
    return {"status": "ok"}


@app.get("/ready")
def ready():
    missing = _missing_ready_values()
    if missing:
        return JSONResponse(
            status_code=503,
            content={"status": "not_ready", "missing": missing},
        )
    return {"status": "ready", "auth_mode": _auth_mode()}


@app.post("/invoke", response_model=InvokeResponse)
def invoke(payload: InvokeRequest) -> InvokeResponse:
    run_id = str(uuid4())
    final_state = agent_graph.invoke(
        {
            "run_id": run_id,
            "customer_id": payload.customer_id,
            "ticket": payload.ticket,
            "trace": [],
        }
    )
    return InvokeResponse(
        run_id=run_id,
        category=final_state["category"],
        severity=final_state["severity"],
        routed_to=final_state["routed_to"],
        response=final_state["response"],
        trace=final_state["trace"],
    )
Existing LangGraph applications can use the same hosted-service contract: expose GET /health, GET /ready, and POST /invoke, read runtime settings from environment variables, and make the container listen on 0.0.0.0:8080.
Tag and push the image to OCIR:
> docker tag oci-langgraph-hosted-agent:latest \
>  "$ENTERPRISE_AI_DOCKER_IMAGE_URI:$ENTERPRISE_AI_DOCKER_IMAGE_TAG"
> docker push     "$ENTERPRISE_AI_DOCKER_IMAGE_URI:$ENTERPRISE_AI_DOCKER_IMAGE_TAG"
Confirm that the exact repository name and tag are visible in OCIR before creating the hosted deployment. An empty result here means the deployment will not be able to pull the image:
> oci artifacts container image list \
>  --compartment-id "$OCI_COMPARTMENT_OCID" \
>  --repository-name "$ENTERPRISE_AI_OCIR_REPOSITORY_NAME" \
>  --image-version "$ENTERPRISE_AI_DOCKER_IMAGE_TAG" \
>  --region "$OCI_REGION" \
>  --query 'data.items[].{displayName:"display-name",version:version,digest:digest,lifecycleState:"lifecycle-state"}'
To verify the pushed image in the OCI Console, open Developer Services, then Containers & Artifacts, then Container Registry. Select the same region and compartment, open the repository named in ENTERPRISE_AI_DOCKER_IMAGE_URI, and inspect the image tag. The repository list shows aggregate repository details; the image tag and digest are visible inside the repository. See Viewing image details.
IAM and runtime access
Before creating the hosted application and deployment, configure IAM for two paths: the deployment automation that creates OCI Generative AI resources, and the hosted runtime that pulls the image and calls OCI services after the container is running. OCI IAM does not require a role embedded in the container. Instead, use policies for the deployment group and a dynamic group for hosted applications and deployments so the running workload can act as a resource principal.
The IAM commands use sample values for the tenancy OCID, group name, dynamic group name, policy name, and compartment names. Replace them with tenancy-specific values before running the commands:
OCI_TENANCY_OCID: Use the tenancy OCID from the Console Tenancy Details page. OCI documents where to find it in Resource Identifiers.PLATFORM_ENGINEERS_GROUP_NAME: Use the IAM group that should create and manage the OCI Generative AI project, hosted application, and hosted deployment. Create or review groups with Managing Groups.PLATFORM_ENGINEERS_POLICY_NAMEandHOSTED_AGENT_POLICY_NAME: Use policy names approved by the tenancy IAM naming standard. Policies are created and updated with Managing Policies.HOSTED_AGENT_DYNAMIC_GROUP_NAME: Use an approved runtime dynamic group when one already covers OCI Generative AI hosted applications and deployments. Otherwise, create the dynamic group shown below. Dynamic groups and matching rules are described in Managing Dynamic Groups.APP_COMPARTMENT_NAME,IMAGE_COMPARTMENT_NAME, andDATA_COMPARTMENT_NAME: Use the compartments that contain the hosted application resources, the OCIR repository, and any data resources the agent reads. Policy statements can use compartment names, orid <compartment_ocid>when automation should avoid name ambiguity. See Managing Compartments.
> export OCI_TENANCY_OCID="ocid1.tenancy.oc1..exampleuniqueID"
> export PLATFORM_ENGINEERS_GROUP_NAME="ai-platform-engineers"
> export PLATFORM_ENGINEERS_POLICY_NAME="ai-platform-engineers-genai-policy"
> export HOSTED_AGENT_DYNAMIC_GROUP_NAME="hosted-agent-runtime-dg"
> export HOSTED_AGENT_POLICY_NAME="hosted-agent-runtime-policy"
> export APP_COMPARTMENT_NAME="AIApplications"
> export IMAGE_COMPARTMENT_NAME="ContainerImages"
> export DATA_COMPARTMENT_NAME="AgentData"
For deployment automation that creates projects, applications, and deployments, grant the required Generative AI permissions in the target compartment. A broad sandbox policy can use manage generative-ai-family; production policies should usually narrow access to the specific resource types and operations:
> allow group ai-platform-engineers to manage generative-ai-project in compartment AIApplications
> allow group ai-platform-engineers to manage generative-ai-hosted-application in compartment AIApplications
> allow group ai-platform-engineers to manage generative-ai-hosted-deployment in compartment AIApplications
Create that policy in the tenancy:
> oci iam policy create \
>   --compartment-id "$OCI_TENANCY_OCID" \
>   --name "$PLATFORM_ENGINEERS_POLICY_NAME" \
>   --description "Allow platform engineers to manage OCI Generative AI hosted agent resources" \
>   --statements "[
>     \"allow group ${PLATFORM_ENGINEERS_GROUP_NAME} to manage generative-ai-project in compartment ${APP_COMPARTMENT_NAME}\",
>     \"allow group ${PLATFORM_ENGINEERS_GROUP_NAME} to manage generative-ai-hosted-application in compartment ${APP_COMPARTMENT_NAME}\",
>     \"allow group ${PLATFORM_ENGINEERS_GROUP_NAME} to manage generative-ai-hosted-deployment in compartment ${APP_COMPARTMENT_NAME}\"
>   ]"
For the running hosted agent, use a dynamic group that includes OCI Generative AI hosted applications and deployments. Dynamic groups let OCI resources act as principal actors, and matching rules determine group membership. OCI documents a tenancy maximum of 50 dynamic groups, so governed tenancies often reuse approved runtime dynamic groups instead of creating a new group for every test. See Managing Dynamic Groups.
any {resource.type='generativeaihostedapplication',
     resource.type='generativeaihosteddeployment'}
List existing dynamic groups before creating another tenancy-level identity object:
oci iam dynamic-group list \
  --compartment-id "$OCI_TENANCY_OCID" \
  --all \
  --query "data[].{name:name,id:id,state:\"lifecycle-state\"}" \
  --output table
Inspect the matching rule for a candidate group:
> oci iam dynamic-group get \
>   --dynamic-group-id "<dynamic-group-ocid>" \
>   --query "data.{name:name,rule:\"matching-rule\",state:\"lifecycle-state\"}" \
>   --output table
If a dedicated runtime dynamic group already includes hosted applications and deployments, set HOSTED_AGENT_DYNAMIC_GROUP_NAME to that group name and continue with the policy statement. Create a new dynamic group only when no approved reusable group exists:
> oci iam dynamic-group create \
>   --compartment-id "$OCI_TENANCY_OCID" \
>   --name "$HOSTED_AGENT_DYNAMIC_GROUP_NAME" \
>   --description "OCI Generative AI hosted agent runtime identities" \
>   --matching-rule "any {resource.type='generativeaihostedapplication', resource.type='generativeaihosteddeployment'}"
If creation returns You have reached the object limit of DynamicResourceGroups, the tenancy has reached its dynamic-group quota. Reuse an approved existing dynamic group, or have an IAM administrator retire unused groups or request the needed limit change before retrying.
Then grant that dynamic group only the access the container needs. At minimum, deployments need image access through OCIR and access to vulnerability scan results so OCI can validate the image before deployment. If the agent calls OCI Generative AI with OciResourcePrincipalAuth, grant access to the Generative AI resources used for inference. If the agent reads Object Storage, add Object Storage read access:
> allow dynamic-group hosted-agent-runtime-dg to read repos in compartment ContainerImages
> allow dynamic-group hosted-agent-runtime-dg to read container-scan-results in compartment ContainerImages
> allow dynamic-group hosted-agent-runtime-dg to use generative-ai-family in compartment AIApplications
> allow dynamic-group hosted-agent-runtime-dg to read object-family in compartment AgentData
Create the policy with the same statements only when the selected policy name does not already exist:
> oci iam policy create \
>   --compartment-id "$OCI_TENANCY_OCID" \
>   --name "$HOSTED_AGENT_POLICY_NAME" \
>   --description "Allow hosted agent deployments to pull images and call OCI services" \
>   --statements "[
>     \"allow dynamic-group ${HOSTED_AGENT_DYNAMIC_GROUP_NAME} to read repos in compartment ${IMAGE_COMPARTMENT_NAME}\",
>     \"allow dynamic-group ${HOSTED_AGENT_DYNAMIC_GROUP_NAME} to read container-scan-results in compartment ${IMAGE_COMPARTMENT_NAME}\",
>     \"allow dynamic-group ${HOSTED_AGENT_DYNAMIC_GROUP_NAME} to use generative-ai-family in compartment ${APP_COMPARTMENT_NAME}\",
>     \"allow dynamic-group ${HOSTED_AGENT_DYNAMIC_GROUP_NAME} to read object-family in compartment ${DATA_COMPARTMENT_NAME}\"
>   ]"
If the policy already exists, inspect its statements and add only the missing permissions through the standard IAM change process instead of creating a duplicate policy:
> oci iam policy list \
>   --compartment-id "$OCI_TENANCY_OCID" \
>   --all \
>   --query "data[?name=='${HOSTED_AGENT_POLICY_NAME}'].{name:name,id:id,state:\"lifecycle-state\"}" \
>   --output table
See permissions for deploying applications and IAM policies for OCI Generative AI.
For outbound access from the hosted agent to OCI services, authorize the deployed agent application with IAM policies as a resource principal. The platform injects a Resource Principal Session Token into the container runtime, avoiding long-lived credentials in the container. See Authentication for hosted agents.
Create the hosted application and deployment
The hosted application command accepts a compartment, display name, environment variables, scaling config, networking config, inbound auth config, and storage config. The file:// values in the command point to local JSON payload files. Create those files in the same directory where the OCI CLI command runs.
Inbound authentication uses an OCI Identity Domain confidential application configured for OAuth client credentials. In the Console, open Identity & Security, then Domains, select the identity domain, open Integrated applications, and create or select a confidential application. Use its domain URL, primary audience, and scope in the ENTERPRISE_AI_HOSTED_IDENTITY_DOMAIN_* variables. See Adding a confidential application.
One prerequisite in the inbound authentication setup is access to the identity-domain signing certificate/JWKS endpoint. Enterprise AI uses this endpoint to validate OAuth bearer-token signatures before forwarding a request to the hosted container. If client access is disabled, the request can fail at the platform layer before the FastAPI app receives it. Enable this access up front and verify it with curl before creating or invoking the hosted application.
In OCI Console, use this path:
- Open Identity & Security, then Domains.
- Select the identity domain used for the hosted application’s inbound authentication.
- Open Settings.
- Open Access signing certificate.
- Enable client access to the signing certificate/JWKS endpoint.
- Save the change and allow it to propagate.
Then verify that the endpoint returns HTTP 200:
> curl -k -I "${ENTERPRISE_AI_HOSTED_IDENTITY_DOMAIN_URL%:443}/admin/v1/SigningCert/jwk"The expected result is HTTP 200. If the endpoint returns HTTP 401, client access is still disabled or the URL points to a different identity domain than the one used by inbound_auth.json.
env.json injects runtime settings into the container. For this sample, those settings tell the app which OCI region, project, model, and authentication mode to use:
> cat > env.json <<EOF
> [
>   {"name": "OCI_GENAI_REGION", "type": "PLAINTEXT", "value": "$OCI_REGION"},
>   {"name": "OCI_GENAI_PROJECT_OCID", "type": "PLAINTEXT", "value": "$ENTERPRISE_AI_PROJECT_OCID"},
>   {"name": "OCI_GENAI_MODEL", "type": "PLAINTEXT", "value": "$OCI_GENAI_MODEL"},
>   {"name": "OCI_GENAI_AUTH_MODE", "type": "PLAINTEXT", "value": "resource_principal"}
> ]
> EOF
scaling.json sets the initial replica limits and autoscaling metric for the hosted application:
> cat > scaling.json <<EOF
> {
>   "minReplica": 1,
>   "maxReplica": 2,
>   "scalingType": "CONCURRENCY",
>   "targetConcurrencyThreshold": 4
> }
> EOF
networking.json selects a public inbound endpoint and OCI-managed outbound networking for the hosted application:
> cat > networking.json <<EOF
> {
>   "inboundNetworkingConfig": {
>     "endpointMode": "PUBLIC"
>   },
>    "outboundNetworkingConfig": {
>    "networkMode": "MANAGED"
>   }
> }
> EOF
inbound_auth.json binds the hosted application endpoint to the identity-domain OAuth settings used by client applications:
cat > inbound_auth.json <<EOF
{
  "inboundAuthConfigType": "IDCS_AUTH_CONFIG",
  "idcsConfig": {
    "domainUrl": "$ENTERPRISE_AI_HOSTED_IDENTITY_DOMAIN_URL",
    "audience": "$ENTERPRISE_AI_HOSTED_IDENTITY_DOMAIN_AUDIENCE",
    "scope": "$ENTERPRISE_AI_HOSTED_IDENTITY_DOMAIN_SCOPE"
  }
}
EOF
> export ENTERPRISE_AI_HOSTED_APPLICATION_OCID="$(oci generative-ai hosted-application create \
> --compartment-id "$OCI_COMPARTMENT_OCID" \
> --display-name "$ENTERPRISE_AI_HOSTED_APPLICATION_NAME" \
> --environment-variables file://env.json \
> --scaling-config file://scaling.json \
> --networking-config file://networking.json \
> --inbound-auth-config file://inbound_auth.json \
> --region "$OCI_REGION" \
> --query 'data.id' \
> --raw-output)"The create command stores the hosted application OCID in ENTERPRISE_AI_HOSTED_APPLICATION_OCID. Print the value and fetch the resource to confirm its lifecycle state:
> printf 'Hosted application OCID: %s\n' "$ENTERPRISE_AI_HOSTED_APPLICATION_OCID"
> oci generative-ai hosted-application get \
>   --hosted-application-id "$ENTERPRISE_AI_HOSTED_APPLICATION_OCID" \
>   --region "$OCI_REGION" \
>   --query 'data.{id:id,displayName:"display-name",lifecycleState:"lifecycle-state"}'
If the application already exists, query the hosted application collection by display name:
> export ENTERPRISE_AI_HOSTED_APPLICATION_OCID="$(oci generative-ai hosted-application-collection list-hosted-applications \
>   --compartment-id "$OCI_COMPARTMENT_OCID" \
>   --display-name "$ENTERPRISE_AI_HOSTED_APPLICATION_NAME" \
>   --sort-by timeCreated \
>   --sort-order DESC \
>   --region "$OCI_REGION" \
>   --query 'data.items[0].id' \
>   --raw-output)"
Then create a hosted deployment with the application OCID and container image:
> export ENTERPRISE_AI_HOSTED_DEPLOYMENT_OCID="$(oci generative-ai hosted-deployment create-hosted-deployment-single-docker-artifact \
>   --hosted-application-id "$ENTERPRISE_AI_HOSTED_APPLICATION_OCID" \
>   --compartment-id "$OCI_COMPARTMENT_OCID" \
>   --display-name "$ENTERPRISE_AI_HOSTED_DEPLOYMENT_NAME" \
>   --active-artifact-container-uri "$ENTERPRISE_AI_DOCKER_IMAGE_URI" \
>   --active-artifact-tag "$ENTERPRISE_AI_DOCKER_IMAGE_TAG" \
>   --region "$OCI_REGION" \
>   --query 'data.id' \
>   --raw-output)"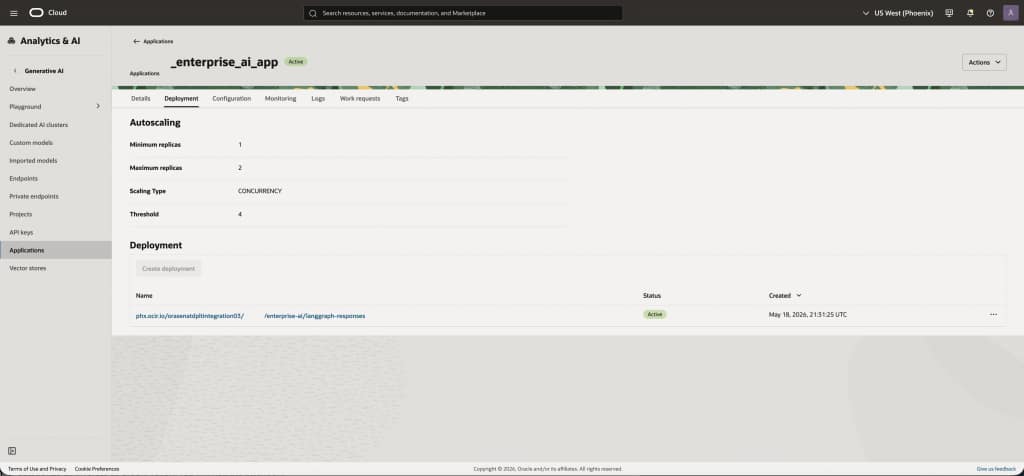
The create response can show the deployment in CREATING while OCI prepares the artifact. Print the deployment OCID and check the lifecycle state:
> printf 'Hosted deployment OCID: %s\n' "$ENTERPRISE_AI_HOSTED_DEPLOYMENT_OCID"
> oci generative-ai hosted-deployment get \
>   --hosted-deployment-id "$ENTERPRISE_AI_HOSTED_DEPLOYMENT_OCID" \
>   --region "$OCI_REGION" \
>   --query 'data.{id:id,displayName:"display-name",lifecycleState:"lifecycle-state",artifactStatus:"active-artifact".status,tag:"active-artifact".tag}'
If the deployment artifact shows Failed with an image-pull error, first verify that the pushed OCIR tag exists and that the hosted runtime dynamic group has read repos and read container-scan-results access in the image compartment. After correcting the image tag or IAM policy, push a new tag and add it as a new artifact on the same hosted deployment:
> export ENTERPRISE_AI_DOCKER_IMAGE_TAG="$(date +%Y%m%d%H%M%S)"
> docker build --platform "$ENTERPRISE_AI_DOCKER_BUILD_PLATFORM" \
>   -t oci-langgraph-hosted-agent:latest .
> docker tag oci-langgraph-hosted-agent:latest \
>   "$ENTERPRISE_AI_DOCKER_IMAGE_URI:$ENTERPRISE_AI_DOCKER_IMAGE_TAG"
> docker push "$ENTERPRISE_AI_DOCKER_IMAGE_URI:$ENTERPRISE_AI_DOCKER_IMAGE_TAG"
> oci generative-ai hosted-deployment add-artifact-create-single-docker-artifact-details \
>   --hosted-deployment-id "$ENTERPRISE_AI_HOSTED_DEPLOYMENT_OCID" \
>   --artifact-container-uri "$ENTERPRISE_AI_DOCKER_IMAGE_URI" \
>   --artifact-tag "$ENTERPRISE_AI_DOCKER_IMAGE_TAG" \
>   --region "$OCI_REGION"
For complete CLI parameter details, see the OCI CLI references for creating hosted applications and creating single-Docker-artifact hosted deployments.
Validate the hosted agent
After the deployment becomes active, run two checks before handing the endpoint to client applications. The first check confirms the container is reachable and the runtime configuration is complete.
The OAuth flow has two separate responsibilities. During application setup, inbound_auth.json passes the identity domain URL plus the OAuth audience and scope for the hosted application. Oracle defines the audience as the service or API that the access token is intended for, and the token is accepted only when its audience claim matches the target resource server. Oracle defines scope as the permissions or actions the access token allows. During invocation, a client application requests an access token from that same identity domain by using the confidential application’s client ID, client secret, grant_type=client_credentials, and scope, then sends the returned token to the hosted application endpoint in the HTTP Authorization: Bearer ... header. This inbound OAuth step is separate from outbound resource-principal authentication, which the container uses later when it calls OCI services.
The following OAuth inputs are needed only by the client or deployment automation that invokes the hosted application. They are not container runtime settings and should not be baked into the image. In the OCI IAM identity domain used by the hosted application, open the integrated confidential application configured for the hosted application, confirm that OAuth client credentials are enabled, activate the application, and open OAuth configuration:
ENTERPRISE_AI_HOSTED_OAUTH_CLIENT_ID: Copy the confidential application’s client ID.ENTERPRISE_AI_HOSTED_OAUTH_CLIENT_SECRET: Copy the client secret and store it in deployment automation or a secret store, not in source control.ENTERPRISE_AI_HOSTED_OAUTH_TOKEN_SCOPE: Use the exact scope value accepted by the confidential application, typically the primary audience plus the configured scope name.ENTERPRISE_AI_HOSTED_TOKEN_URL: Append/oauth2/v1/tokento the identity domain URL associated with the hosted application.
See Setting up Authentication for Agentic Support, Creating an Application, and Invoking Applications.
> export ENTERPRISE_AI_HOSTED_INVOKE_BASE="https://application.generativeai.${OCI_REGION}.oci.oraclecloud.com/20251112/hostedApplications/${ENTERPRISE_AI_HOSTED_APPLICATION_OCID}/actions/invoke"
> export ENTERPRISE_AI_HOSTED_OAUTH_CLIENT_ID="<identity-domain-confidential-app-client-id>"
> export ENTERPRISE_AI_HOSTED_OAUTH_CLIENT_SECRET="<identity-domain-confidential-app-client-secret>"
> export ENTERPRISE_AI_HOSTED_OAUTH_TOKEN_SCOPE="<identity-domain-confidential-app-token-scope>"
> export ENTERPRISE_AI_HOSTED_TOKEN_URL="${ENTERPRISE_AI_HOSTED_IDENTITY_DOMAIN_URL%:443}/oauth2/v1/token"
> export ENTERPRISE_AI_HOSTED_ACCESS_TOKEN="$(
>   curl -sS -X POST "$ENTERPRISE_AI_HOSTED_TOKEN_URL" \
>     -H "Content-Type: application/x-www-form-urlencoded" \
>     --data-urlencode "client_id=${ENTERPRISE_AI_HOSTED_OAUTH_CLIENT_ID}" \
>     --data-urlencode "client_secret=${ENTERPRISE_AI_HOSTED_OAUTH_CLIENT_SECRET}" \
>     --data-urlencode "grant_type=client_credentials" \
>     --data-urlencode "scope=${ENTERPRISE_AI_HOSTED_OAUTH_TOKEN_SCOPE}" \
  | python3 -c 'import json,sys; print(json.load(sys.stdin)["access_token"])'
)"
> curl -fsS \
>   -H "Authorization: Bearer ${ENTERPRISE_AI_HOSTED_ACCESS_TOKEN}" \
>   "${ENTERPRISE_AI_HOSTED_INVOKE_BASE}/health"
> curl -fsS \
>   -H "Authorization: Bearer ${ENTERPRISE_AI_HOSTED_ACCESS_TOKEN}" \
>   "${ENTERPRISE_AI_HOSTED_INVOKE_BASE}/ready"
The second check sends a representative support ticket through the LangGraph workflow and verifies that the application route returns the expected response shape. The sample application in this post exposes POST /invoke. For an existing container image, keep ENTERPRISE_AI_HOSTED_INVOKE_BASE as the hosted application invoke base and set ENTERPRISE_AI_HOSTED_APP_ROUTE to the HTTP route exposed by that container. The OCI HTTP invocation guide shows the same pattern by appending a container-defined route, such as /chat, to the hosted application URL.
> export ENTERPRISE_AI_HOSTED_APP_ROUTE="/invoke"
> curl -fsS \
>   -X POST \
>   -H "Authorization: Bearer ${ENTERPRISE_AI_HOSTED_ACCESS_TOKEN}" \
>   -H "Content-Type: application/json" \
>   -H "Accept: application/json" \
>   "${ENTERPRISE_AI_HOSTED_INVOKE_BASE}${ENTERPRISE_AI_HOSTED_APP_ROUTE}" \
>   -d '{
>     "ticket_id": "TICKET-1001",
>     "customer_tier": "enterprise",
>     "message": "Production checkout is failing after the latest release."
>   }'
Successful responses from /health and /ready validate the service contract. A successful response from the application route validates the deployed image, environment variables, resource-principal authentication, model access, and the LangGraph path used by the sample request.
Conclusion
With this pattern, a LangGraph proof of concept can become a managed, governed, versioned service while preserving the agent logic that developers already built. The HTTP wrapper gives the graph a service contract; FastAPI keeps that wrapper small in this implementation. OCI Generative AI projects give model and agent calls an organizational boundary. Hosted applications and deployments give platform teams a managed runtime for scaling, networking, authentication, environment variables, and release control.
The FastAPI + LangGraph application under code/oci-langgraph-hosted-agent gives teams a concrete starting point: configure OCI Responses API settings, build the container, and deploy it as a hosted application. From there, extend the graph one node at a time: add tools, add review routing, connect Object Storage or a system of record, and measure the workflow before making it more complex.