WebLogic Kubernetes Operator 4.1.0 has been released; one of the features in this release is simplifying creating WebLogic domain on persistent volume.   This feature is useful for the JRF domain since this type of domain requires file system storage.   In the past, the customer had to deploy a separate Kubernetes Job that created the WebLogic domain on a persistent volume and then deploy the WebLogic domain with a custom resource YAML.

With this new feature, all the necessary information are specified in the domain custom resource YAML file.  There is no need to have a separate Kubernetes Job.  WebLogic Kubernetes Operator will optionally create the persistent volume and claim, then create the WebLogic domain on the persistent volume, if needed, prior to starting the servers.
 
In this blog entry,  I will show you how to deploy a new JRF domain on persistent volume in an existing Oracle Kubernetes Engine (OKE) cluster.  The domain will use an existing Oracle Autonomous Transaction database for the RCU schema.


Preparation for infrastructure


We will not cover how to provision an OKE cluster or Autonomous Transaction Database (ATP) which are beyond the scope.  In this section, we will
 
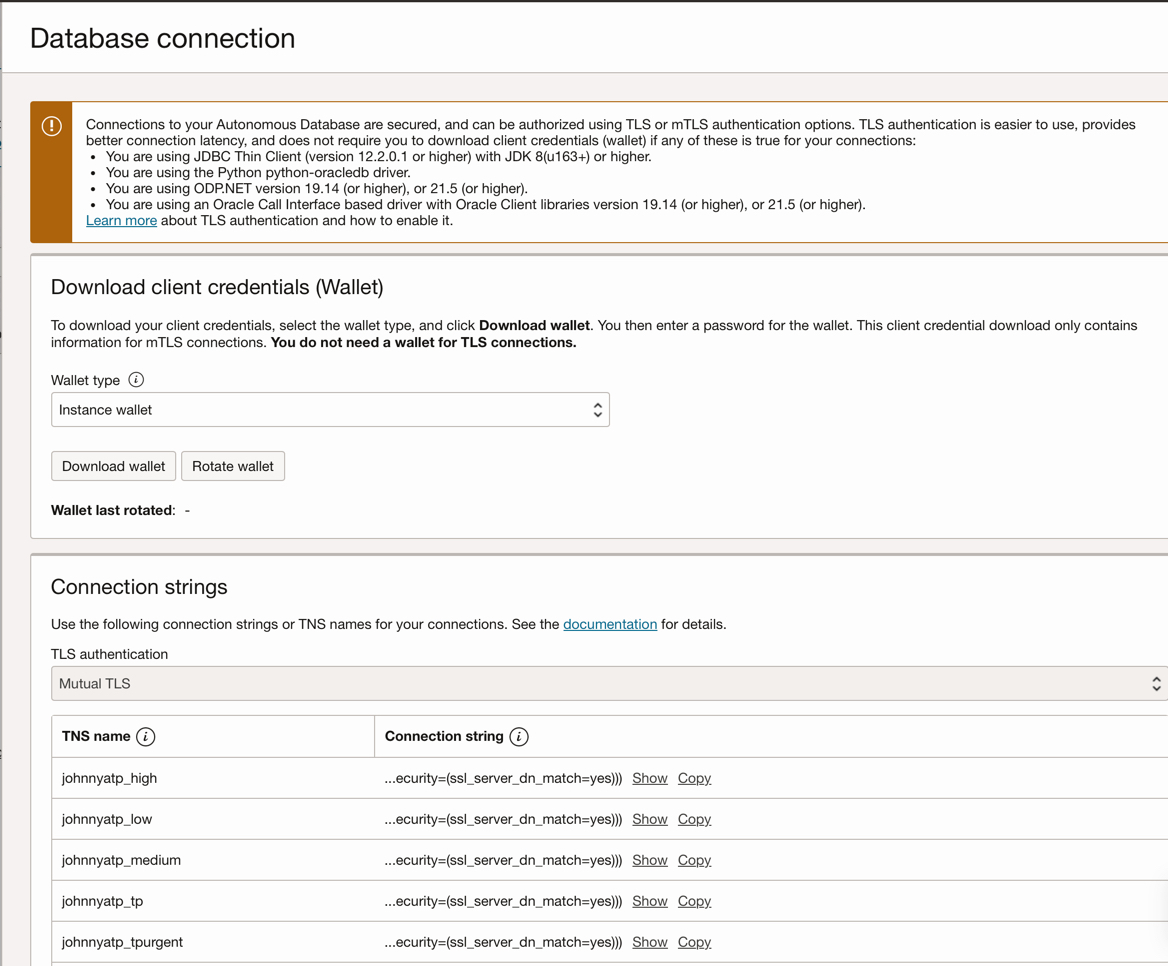
  • Gather database wallet and connection information
  • Create file system storage objects for persistent storage

First, we download the database wallet required to access the ATP database, login to the OCI cloud console and navigate to the ATP database instance, click the “Database connection” tab and follow the instruction to download the wallet, also make a note of the database TNS name to use.
 
atp-db-conn
 
 
Next, create a file system for the persistent volume.  WebLogic domain requires a file system during its lifecycle.  Block storage system provides read write once operation, and therefore not compatible with WebLogic domain operation.   In order to use persistent storage,  we need to:
 
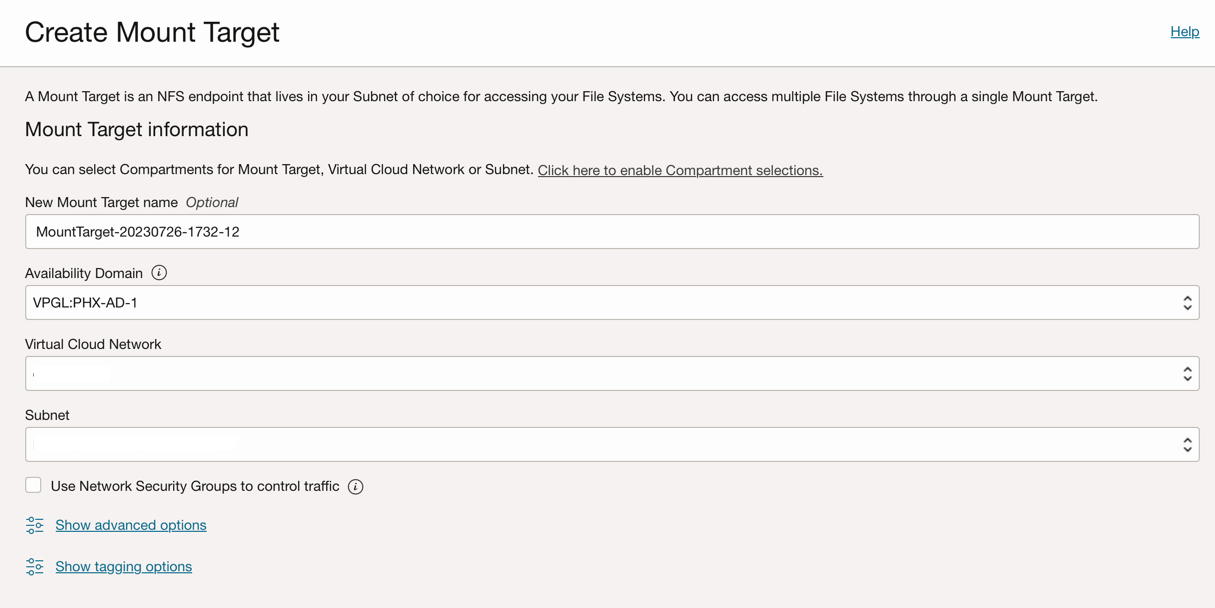
  1. Create a Mount Target
  2. Create a Storage class
  3. Create a persistent volume claim that use the Storage class

Note:  Both OKE cluster and Mount Target must use the same Virtual Cloud Network, otherwise it will not work. 


This step usually requires administrative privileges; work with your administrator if you do not have the required privileges.  See Setting up file storage in OKE


For example,  login to the cloud console, navigate to Storage -> Mount Target, use the same Virtual Cloud Network as the OKE cluster to create a Mount Target.  Once the mount target is successfully created, make a note of the OCID of the Mount Target. 

create-mt-dialog

 
mount-target-info
 
Next,  create a storage class for the persistent volume using the Mount Target.  For example:
 
kind: StorageClass
apiVersion: storage.k8s.io/v1
metadata:
   name: wko-domain-in-pv-sc-new
   namespace: sample-domain1-ns
provisioner: fss.csi.oraclecloud.com
parameters:
   availabilityDomain: PHX-AD-1
   mountTargetOcid: <your mount target OCID saved earlier>
   exportPath: /mynew-fs07202023
 
Next, create a PersistentVolumeClaim to use this storage class for allocating storage.
 
apiVersion: v1
kind: PersistentVolumeClaim
metadata:
  name: wko-domain-inpv-pvc-new
  namespace: sample-domain1-ns
spec:
  accessModes:
    – ReadWriteMany
  storageClassName: “wko-domain-in-pv-sc-new”
  resources:
    requests:
      storage: 10Gi
 
You can verify the PersistentVolumeClaim status by
 
kubectl -n sample-domain1-ns get pvc wko-domain-inpv-pvc-new
NAME                      STATUS   VOLUME                                         CAPACITY   ACCESS MODES   STORAGECLASS              AGE
wko-domain-inpv-pvc-new   Bound    csi-fss-0bb79…             10Gi       RWX            wko-domain-in-pv-sc-new   10m


Once the status is in Bound state,  this means the storage has been successfully allocated,   we can delete this PersistentVolumeClaim,  we will let the Operator to create the claim later.
 

kubectl -n sample-domain1-ns delete pvc wko-domain-inpv-pvc-new


Preparing domain resources


Now, we have the basic infrastructure to suport creating a JRF domain on persistent volume in your cluster, next we will proceed to create the domain resources.  The Operator creates the WebLogic domain using the WebLogic Deploy Tooling Documentation.

In this section, we will:

  • Create the WDT models to describe JRF domain,  we will only setup the topology,  but other resources and application deployment can also be setup.
  • Create a domain creation image hosting the WDT models and the WebLogic Deploy Tool installation.
  • Create domain resource YAML to deploy the JRF domain.
     

First, create an empty directory and copy the ATP database wallet into a separate directory

mkdir -p $HOME/models/rcu
cp  <wallet zip file> -d $HOME/models/rcu
   
Next, create a WDT model file called model1.yaml in $HOME/models
 
 
 domainInfo:
    AdminUserName: ‘@@SECRET:__weblogic- credentials__:username@@’
    AdminPassword: ‘@@SECRET:__weblogic- credentials__:password@@’
    RCUDbInfo:
     databaseType: ATP
    #
    #  RCU prefix
    #
     rcu_prefix: ‘@@SECRET:rcu-schema-secret: rcu_prefix@@’      
     #
     #  RCU schema password to be used for creating RCU schema      
     #
     rcu_schema_password: ‘@@SECRET:rcu-schema-secret: schema_password@@’ 
     #
     # RCU database dba user name and password, required since we are going to let the Operator create the RCU schema
     #
     rcu_admin_password: ‘@@SECRET:rcu-schema-secret: dba_password@@’    
     rcu_db_user: ‘@@SECRET:rcu-schema-secret: dba_user@@’  
     #
     # TNS name to be used for the ATP database
     #
     tns.alias: ‘@@SECRET:rcu-schema-secret: tns_alias@@’      
     #
     #  We are going to use the single signon wallet       
    #
     javax.net.ssl.keyStoreType: SSO
     javax.net.ssl.trustStoreType: SSO
     javax.net.ssl.keyStore: cwallet.sso
     javax.net.ssl.trustStore: cwallet.sso
 topology:
   Name: ‘sample-domain1’
   AdminServerName: “admin-server”
   Cluster:
     ‘cluster-1’:
   Server:
     ‘admin-server’:
        ListenPort: 7001
     ‘managed-server1’:
        ListenPort: 8100
        Cluster: ‘cluster-1’
     ‘managed-server2’:
        ListenPort: 8100
        Cluster: ‘cluster-1’
 
 
The RCU information is specified under the   domainInfo.RCUDbinfo    section,  check the comments for their purposes.  The actual values of several entries are stored in a single k8s secret named rcu-schema-secret, they are referenced by different literal key names following the pattern. 
 
@@SECRET:<secret name>:<literal key name>@@
 
Create a Kubernetes secret to hold their values by:
 
kubectl -n sample-domain1-ns create secret generic rcu-schema-secret \
–from-literal=rcu_prefix=<rcu prefix you choose> \
–from-literal=schema_password=<rcu schema password you choose for the rcu schemas to be created> \
–from-literal=dba_password=<dba user password – supplied when creating the ATP instance> \
 –from-literal=dba_user=<dba user name – supplied when creating the ATP instance> \
 –from-literal=tns_alias=<found it in the database connection page>
 
 
Next, use the WebLogic Deploy Tooling  (download) to create a WDT archive .   A JDK 8 installation is required and JAVA_HOME must be set first.
 
mkdir -p $HOME/weblogic-deploy
unzip weblogic-deploy.zip -d  $HOME/weblogic-deploy
cd $HOME/weblogic-deploy/bin
./archiveHelper.sh add databaseWallet  -archive_file $HOME/models/atparchive.zip \
  -source $HOME/models/rcu/<wallet file name> \
  -wallet_name rcu  
 

Next, use the WebLogic Image Tool  (download) to create  a domain creation image.   The domain creation image contains the WebLogic Deploy Tooling installation and models for the domain; the Operator use this image to create the WebLogic domain.
 
 
mkidr -p $HOME/imagetool
unzip imagetool.zip -d $HOME/imagetool
cd  $HOME/imagetool/bin
./imagetoo.sh cache addInstaller –type  wdt  –version latest –path <path of the WDT installer>
./imagetool.sh createAuxImage –tag <image name and tag> \
  –wdtModel $HOME/models/model1.yaml \
  –wdtArchive $HOME/models/atparchive.zip \
  –wdtVersion latest
docker push <image name and tags>
 
Next, specify which WebLogic Infrastructure image to use,  we recommend using a patched image from oracle container registry,  if you have an active Oracle Support agreement”.  In order to do that, login to oracle container registry
 
  • Click on Middleware
  • Click on fmw-infrastructure_cpu
  • Accept the license
  • Get the docker image tag information.  For example: container-registry.oracle.com/middleware/fmw-infrastructure_cpu:<latest tag>
 
Next, we will create a domain resource YAML, specify for the Operator to:
 
  1. Create the Persistent Volume Claim.  

     
      initializeDomainOnPV:
           persistentVolumeClaim:
              metadata:
                 name: wko-domain-inpv-pvc-op
              spec:
                  storageClassName: “wko-domain-in-pv-sc-new”
                  resources:
                      requests:
                           storage: 10Gi


  2. Create the RCU schema

     
       initializeDomainOnPV:
           …
       domain:
             #  DomainAndRCU – operator will create the RCU schema for us.
             #  Domain – operator will use the RCU schema created manually by other means.
             createIfNotExists: DomainAndRCU
  3. Create the WebLogic JRF domain
     
         domainCreationImages:
              #   TODO:  change the name to match yours
              – image: <domain creation image tag>
                imagePullPolicy: Always
                domainType: JRF
                opss:
                    walletPasswordSecret: sample-domain1-opss-wallet-password-secret
The entire domain resource YAML


apiVersion: weblogic.oracle/v1
kind: Cluster
metadata:
  name: sample-domain1-cluster-1
  namespace: sample-domain1-ns
spec:
  clusterName: cluster-1
  replicas: 2
  serverStartPolicy: IfNeeded
apiVersion: “weblogic.oracle/v9”
kind: Domain
metadata:
  name: sample-domain1
  namespace: sample-domain1-ns
  labels:
    weblogic.domainUID: sample-domain1
spec:
  # The WebLogic Domain Home
  domainHome: /share/domains/sample-domain1
  domainHomeSourceType: PersistentVolume
  # The WebLogic Server Docker image that the Operator uses to start the domain, collected earlier
  # TODO:  change to match the image you want to use
  image: “container-registry.oracle.com/middleware/fmw-infrastructure_cpu:12.2.1.4-jdk8-ol8-221014”
  # imagePullPolicy defaults to “Always” if image version is :latest
  imagePullPolicy: “IfNotPresent”
  # Identify which Secret contains the credentials for pulling an image
  imagePullSecrets:
  – name: ocr-regcred
  – name: ocir-regcred
  # Identify which Secret contains the WebLogic Admin credentials
  webLogicCredentialsSecret:
    name: sample-domain1-weblogic-credentials
  # Whether to enable overrding the home directory of your log files
  logHomeEnabled: true
  # The in-pod location for domain log, server logs, server out, and Node Manager log files
  logHome: /share/logs/sample-domain1
  # Set which WebLogic Servers the Operator will start up when it discovers this Domain
  serverStartPolicy: “IfNeeded”
 
  serverPod:
    #  How to mount the persistent storage ,  we are using the pvc
    #  Make sure the domainHome is under the mountPath
    # and we will reuse the same PersistentVolumeClaim name further down.
    volumes:
    – name: weblogic-domain-storage-volume
      persistentVolumeClaim:
        claimName: wko-domain-inpv-pvc-op
    volumeMounts:
    – mountPath: /share
      name: weblogic-domain-storage-volume
 
    # an (optional) list of environment variable to be set on the servers
    env:
    – name: JAVA_OPTIONS
      value: “-Dweblogic.StdoutDebugEnabled=false -Dweblogic.security.SSL.ignoreHostnameVerification=true”
   
  # clusters is used to configure the desired behavior for starting member servers of a cluster.  
  # If you use this entry, then the rules will be applied to ALL servers that are members of the named clusters.
  clusters:
   – name: “sample-domain1-cluster-1”
  replicas: 2
  configuration:
    # secret to hold the rcu schema values
    secrets: [ rcu-schema-secret ]
    introspectorJobActiveDeadlineSeconds: 9000
    # let operator to create the pvc for us using the storage class that we created earlier
    initializeDomainOnPV:
       persistentVolumeClaim:
         metadata:
            name: wko-domain-inpv-pvc-op
         spec:
            storageClassName: “wko-domain-in-pv-sc-new”
            resources:
              requests:
                storage: 10Gi
       domain:
         #  DomainAndRCU – operator will create the RCU schema for us.
         #  Domain – operator will use the RCU schema created manually by other means.
         createIfNotExists: DomainAndRCU
         domainCreationImages:
          #   TODO:  change the name to match yours
         – image: <domain creation image tag>
           imagePullPolicy: Always
         domainType: JRF
         opss:
           walletPasswordSecret: sample-domain1-opss-wallet-password-secret


Next, create the secrets used by this YAML and update the image names before applying the YAML.
 
 
# weblogic domain administrator credentials.   This is used when creating the domain and login to the admin console
#  This is referenced by  domain.spec.webLogicCredentialsSecret  in the domain resource YAML

kubectl -n sample-domain1-ns create secret generic sample-domain1-weblogic-credentials  –from-literal=password=<weblogic administrator password> \
   –from-literal=username=<weblogic administrtor user name>


# passphrase to use when operator exporting the opss wallet.   This is the passphrase used to encrypt a special key used for domain recovery when the
# domain home is corrupted and cannot be recovered,  so that it can reuse the existing RCU schema in the database
#  This is referenced by  domain.spec.configuration.initializeDomainOnPV.domain.opss.wallePasswordSecret  in the domain resource YAML

kubectl -n sample-domain1-ns create secret generic sample-domain1-opss-wallet-password-secret \
–from-literal=walletPassword=<passphrase to be used when exporting encryption wallet key>

# docker registry image pull secrets.  This is the image pull secret for the base weblogic image,  you will need to login to container-registry.oracle.com and navigate to # # the image page and accept the license first
#  This is referenced by  domain.spec.imagePullSecret  in the domain resource YAML

kubectl create secret docker-registry ocr-regcred –docker-server=container-registry.oracle.com \
–docker-username= \
–docker-password= \
–docker-email= \
-n sample-domain1-ns

#  This is the image pull secret for domain creation image
#  This is referenced by  domain.spec.imagePullSecret  in the domain resource YAML

kubectl create secret docker-registry ocir-regcred \
–docker-server= \
–docker-username= \
–docker-password= \
–docker-email= \
-n sample-domain1-ns
 
 
Next, apply the domain and wait for it to finish.
 
 
kubectl -n sample-domain1-ns get pods
NAME                             READY   STATUS    RESTARTS   AGE
sample-domain1-admin-server      1/1     Running   0          72m
sample-domain1-managed-server1   1/1     Running   0          70m
sample-domain1-managed-server2   1/1     Running   0          70m
 
 
Next, exec into the pod to check the contents of the log home diretoryto check out log files.
 
kubectl -n sample-domain1-ns exec -it sample-domain1-admin-server
cd /share/logs/sample-domain1
ls
 
 
There is also use a domain lifecycle script  pv helper script  to create a different pod that use the same PersistentVolumeClaim for debugging purposes.
 
 
./pv-pvc-helper.sh -n sample-domain1-ns -c wko-domain-inpv-pvc -m /share
[2023-07-25T16:49:44.901377606Z][INFO] Creating pod ‘pvhelper’ using image ‘ghcr.io/oracle/oraclelinux:8-slim’, persistent volume claim ‘wko-domain-inpv-pvc’ and mount path ‘/share’.
pod/pvhelper created
[pvhelper] already initialized ..
Checking Pod READY column for State [1/1]
NAME       READY   STATUS    RESTARTS   AGE
pvhelper   1/1     Running   0          10s
[2023-07-25T16:50:04.280416748Z][INFO] Executing ‘kubectl -n sample-domain1-ns exec -i pvhelper — ls -l /share’ command to print the contents of the mount path in the persistent volume.
[2023-07-25T16:50:06.265086186Z][INFO] =============== Command output ====================
total 1
drwxr-xr-x. 4 1000 1000 2 Jul 25 15:15 domains
drwxr-xr-x. 3 1000 1000 1 Jul 25 15:06 logs
[2023-07-25T16:50:06.268284134Z][INFO] ===================================================
[2023-07-25T16:50:06.271104233Z][INFO] Use command ‘kubectl -n sample-domain1-ns exec -it pvhelper — /bin/sh’ and cd to ‘/share’ directory to view or delete the contents on the persistent volume.
[2023-07-25T16:50:06.273991178Z][INFO] Use command ‘kubectl -n sample-domain1-ns delete pod pvhelper’ to delete the pod created by the script.
 
 
Next, add an ingress controller and ingress to access the FMW Control console
 
helm repo add ingress-nginx https://kubernetes.github.io/ingress-nginx –force-update
kubectl create namespace nginx
helm install nginx-operator ingress-nginx/ingress-nginx –namespace nginx
 
kubectl -n nginx get services
NAME                                                TYPE           CLUSTER-IP      EXTERNAL-IP       PORT(S)                      AGE
nginx-operator-ingress-nginx-controller             LoadBalancer   10.96.230.218   <real ip address>   80:31343/TCP,443:30894/TCP   29s
nginx-operator-ingress-nginx-controller-admission   ClusterIP      10.96.7.35      <none>            443/TCP                      29s
 
Note the EXTERNAL-IP  address of the nginx controller.   This is used to access the ingress
 
apiVersion: networking.k8s.io/v1
kind: Ingress
metadata:
  name: http-route-em
  namespace: sample-domain1-ns
  annotations:
    kubernetes.io/ingress.class: nginx
spec:
  rules:
  – host:
    http:
      paths:
      – path: /em
        pathType: Prefix
        backend:
          service:
            name: sample-domain1-admin-server
            port:
              number: 7001
 
 
  Access the FMW Control console using the EXTERNAL-IP address for the nginx controller.    
 
  http://<EXTERNAL IP of the nignx conroller>/em


Post actions:
 

Set up other ways to access the domain for other daily operations.  Use other tools such as WebLogic Console,  WLST,  and FMW Control console to make changes to the domain instead of changing the domain creation image,  any subsequent updates to the domain creation image are ignored.

Back up the persistent volume,  Oracle Cloud Infrastructure provides high reliability for the persistent storage,  make sure the domain home is always backed up by taking snapshots of the file system, replicating to a different region, or backing up to the  premise storage.  

Follow the steps outlined in Best practices immediately,  it outlined the steps to safe guide the recovery of a domain home directory in case of disaster.

We have created a JRF domain on PV in OKE cluster.  For more information, visit Domain on PV documentation for details.