Introduction
Oracle WebLogic Server instances setup through OCI Marketplace stacks need to be patched regularly to update the existing domain to match the latest release, or to match a specific supported release, or at times apply a one-off patch for any feature enhancements. Oracle WebLogic Servers might also require to be patched with a newer Java version to avail the new features. It’s also required to ensure that the application continues to serve the requests while patches are being installed. Patching of Oracle WebLogic Servers can be commenced from the Administration server node which would sequentially patch the Administration node and the remaining instances. This is achieved through the patching tool installed within the WebLogic Server VM’s to download the patches.
This blog will describe the steps to apply patches to the WebLogic servers with no downtime using a script attached to this blog.
Pre-requisites
Following are the pre-requisites for automatic patching of the nodes –
- Oracle WebLogic Server stack offerings from OCI Marketplace ( 12c and 14c WebLogic version) with a minimum of 2 WebLogic Server nodes.
- Patches must be labelled – FMW_ROLLING_ORACLE_HOME or FMW_ROLLING_SESSION. To verify the same, open up patchdeploy.xml in the PATCH_HOME/etc/config directory, where PATCH_HOME is the location of the patch directory that contains the patch.
- WebLogic Server instances should have patch-utility installed and configured. Refer to https://docs.oracle.com/en/cloud/paas/weblogic-cloud/user/patches.html
- Ssh access using oracle user from Administration server node to other nodes should be possible
- WebLogic Server names are unchanged and no additional servers are added to the nodes.
- Copy the following script – patching.sh to Administration server node
Patching Script Design
During the patching process, either ORACLE_HOME or JAVA_HOME can be updated or both ORACLE_HOME and JAVA_HOME can be patched together. To prevent the domain being corrupted and for best practice, its safer to start the patching process from the node where AdminServer is running. Once the Administration node is patched, then all the remaining nodes in the stack would be processed sequentially.
Implementation Logic –
1. Get the user inputs to execute the script.
2. Validate the user inputs
3. If Oracle_Home needs to be patched, then download the patches using patching tool
4. Set the backend set of the node in OCI Loadbalancer to offline state
5. Stop the servers on the node
6. If Java installer is provided, then backup the existing JAVA_HOME and update the JAVA_HOME. If cacerts needs to be preserved, then replace the cacerts with the existing cacerts.
7. If patches are provided, then backup the existing ORACLE_HOME, patch the ORACLE_HOME. Patching logs each patch will be saved in the files of format – /u01/opatch_patches/opatch_<patch_id>.log. If patching fails, then rollback the ORACLE_HOME with the backup.
8. Start the servers on the node.
9. Set the backend set of the node in OCI Loadbalancer to online state

Usage of patching.sh script
sh patching.sh -h Usage: patching.sh [-p PATCH_LIST] [-j JDK_INSTALLER] [-r PRESERVER_CACERTS] [-l LB_OCID] [-n NUM_INSTANCE S] [Mandatory] -n Provide the number of Managed Servers to be patched [Optional] -p Comma separated list of patches -j Location of JDK installer in the format jdk-<version>-linux-x64.tar.gz -r Preserve the cacerts present in the existing Java Home [ yes or no ](Required if JDK installer is pro vided to patch JAVA) -l LB_OCID Provide the LoadBalancer OCID if its either configured manually or added during reapply |
Script Usage
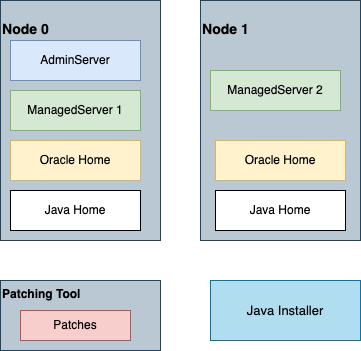
Initial WLS for OCI instance with 2-node setup would be as depicted below:
Follow the below steps on the Administration Server node –
1. Identify the IP address of the Admin node in the domain –
- The public IP address of the Administration Server node.
- The public IP address of the bastion and the private IP address of the Administration Server node.
2. From your computer, execute the ssh command to connect to the domain’s Administration Server node as the opc use
ssh -i <path_to_private_key> opc@<node_IP_address> Or, ssh -i <path_to_private_key> -o ProxyCommand="ssh -W %h:%p -i <path_to_private_k ey> opc@<bastion_public_ip>" opc@<node_private_ip> |
3. Switch to oracle user and copy the script patching.sh to tmp folder.
NOTE: Ensure that oracle user has permission for the file and they are copied to /tmp folder with the same filename.
If Java_Home also needs to be updated with the new Java version, then download the java installer of format “jdk-<version>-linux-x64.tar.gz” and copy that to the Administration node. Also ensure that the oracle user has permissions to access the installer.
[opc@ociwls-wls-0 ~]$ sudo su oracle [oracle@ociwls-wls-0 ~]$ ls -ltrh /tmp -rwxr-xr-x. 1 oracle oracle 1.7K Apr 28 06:54 patching.sh -rw-r--r--. 1 oracle oracle 140M Apr 28 06:57 jdk-8u311-linux-x64.tar.gz |
4. Setup the Patching tool utility config file as shown below. This is a pre-requisite to be performed on only the Administration node before starting the patching process.
NOTE: Ensure to run the patch-utils command as oracle user
[oracle@ociwls-wls-0 ~]$ patch-utils setup Enter middleware home if applicable (default: /u01/app/oracle/middleware): Choose oci region for patch download ['us-ashburn-1', 'eu-frankfurt-1','ap-mumba i-1', 'ap-tokyo-1', 'us-phoenix-1', 'sa-saopaulo-1']: us-phoenix-1 Created config file [/home/oracle/.patchutils/config] |
5. Run the patch-utils list command to get the list the patches that could be applied using the patching tool
[oracle@ociwls-wls-0 ~]$ patch-utils list |
6. Execute the script patching.sh. Following are the user inputs required for starting the patching process –
For an instance with 2 managed servers, applying the patches – 33727616,33791665, JDK installer at location – /u01/installer/jdk-8u311-linux-x64.tar.gz, if the existing cacerts need to be preserved and OCI Loadbalancer OCID if configured manually
[oracle@ociwls-wls-0 ~] sh patching.sh -p 33727616,33791665 -l <ocid.loadbalance r........> -j /u01/installer/jdk-8u311-linux-x64.tar.gz -r yes -n 2 |
NOTE: “-n” is a mandatory field which specifies the number of WebLogic Managed Servers.
“-r” is a mandatory field if the JDK installer is provided.
Once the user provides all the required inputs then sequentially all the WebLogic Servers nodes will be patched.
After the Administration Server node is patched, the WLS for OCI instance with Patched Oracle Home

WLS for OCI instance with Java Home patched:
NOTE: While applying the patches, if the patching fails due to the Opatch utility being of a lower version. For instance, while applying patch ID 33791665, opatch fails with the following error –
Prerequisite check CheckMinimumOPatchVersion failed. The details are: The OPatch being used has version 13.9.4.0.0 while the following patch(es) require higher versions: Patch 33791665 requires OPatch version 13.9.4.2.7. Please download latest OPatch from My Oracle Support. |
Update the Opatch utiltity version to that latest version by applying the Patch ID – 28186730 which can also be achieved using the same utility script patching.sh
[oracle@ociwls-wls-0 ~] sh patching.sh -p 28186730 -n 2 |
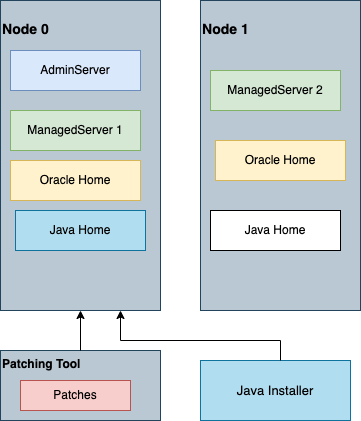
Once all the nodes in the WLS for OCI instance is patched, it would be as depicted below:

References
To learn more about Weblogic for OCI and Patching Tool utility, refer to the following pages: