Let’s use the Jakarta NoSQL module in your application to manage data in Oracle NoSQL Database Cloud Service.
The sample application will show how to store, retrieve, update, query, and delete records in a NoSQL Database using Jakarta NoSQL.
Do you want your Java application to access data with predictable single-digit millisecond response times at a massive scale in a highly available elastic scaling store? Do you want to be able to move your application between on-premises and the cloud at a moment’s notice? Then, let’s embark together on a 15-minute tutorial to untangle these mysteries.
We recommend reading the following article written by Otavio Santana, which explores the new features in Eclipse JNoSQL Version 1.1.0.
Understanding Eclipse JNoSQL
Eclipse JNoSQL is a Java-based framework that facilitates seamless integration between Java applications and nosql databases. It leverages Java enterprise standards, specifically Jakarta NoSQL and Jakarta Data, to simplify working with NoSQL databases. The primary objective of this framework is to reduce the ramp-up associated with using NoSQL databases while harnessing the full power of Jakarta EE and Eclipse MicroProfile.
With Eclipse JNoSQL, developers can easily integrate NoSQL databases into their projects using Widfly, Quarkus, Helidon, or other Java platforms. This framework bridges the Java application layer and various NoSQL databases, making it easier to work with these databases without having a dive-deep knowledge of them. The beauty of this framework is it can work with many nosql databases, including our favorite, Oracle NoSQL Database.
You need 15 minutes and
- Java 17 or later installed on your system
- Maven 3.9 or later installed on your system
- Oracle Cloud Service account – Try Oracle NoSQL Database Cloud Service in Phoenix for free
This tutorial will use Oracle NoSQL Database Cloud Service; if you don’t already have an account, you can sign up and try the Oracle NoSQL Database Cloud Service with a 30-day trial.
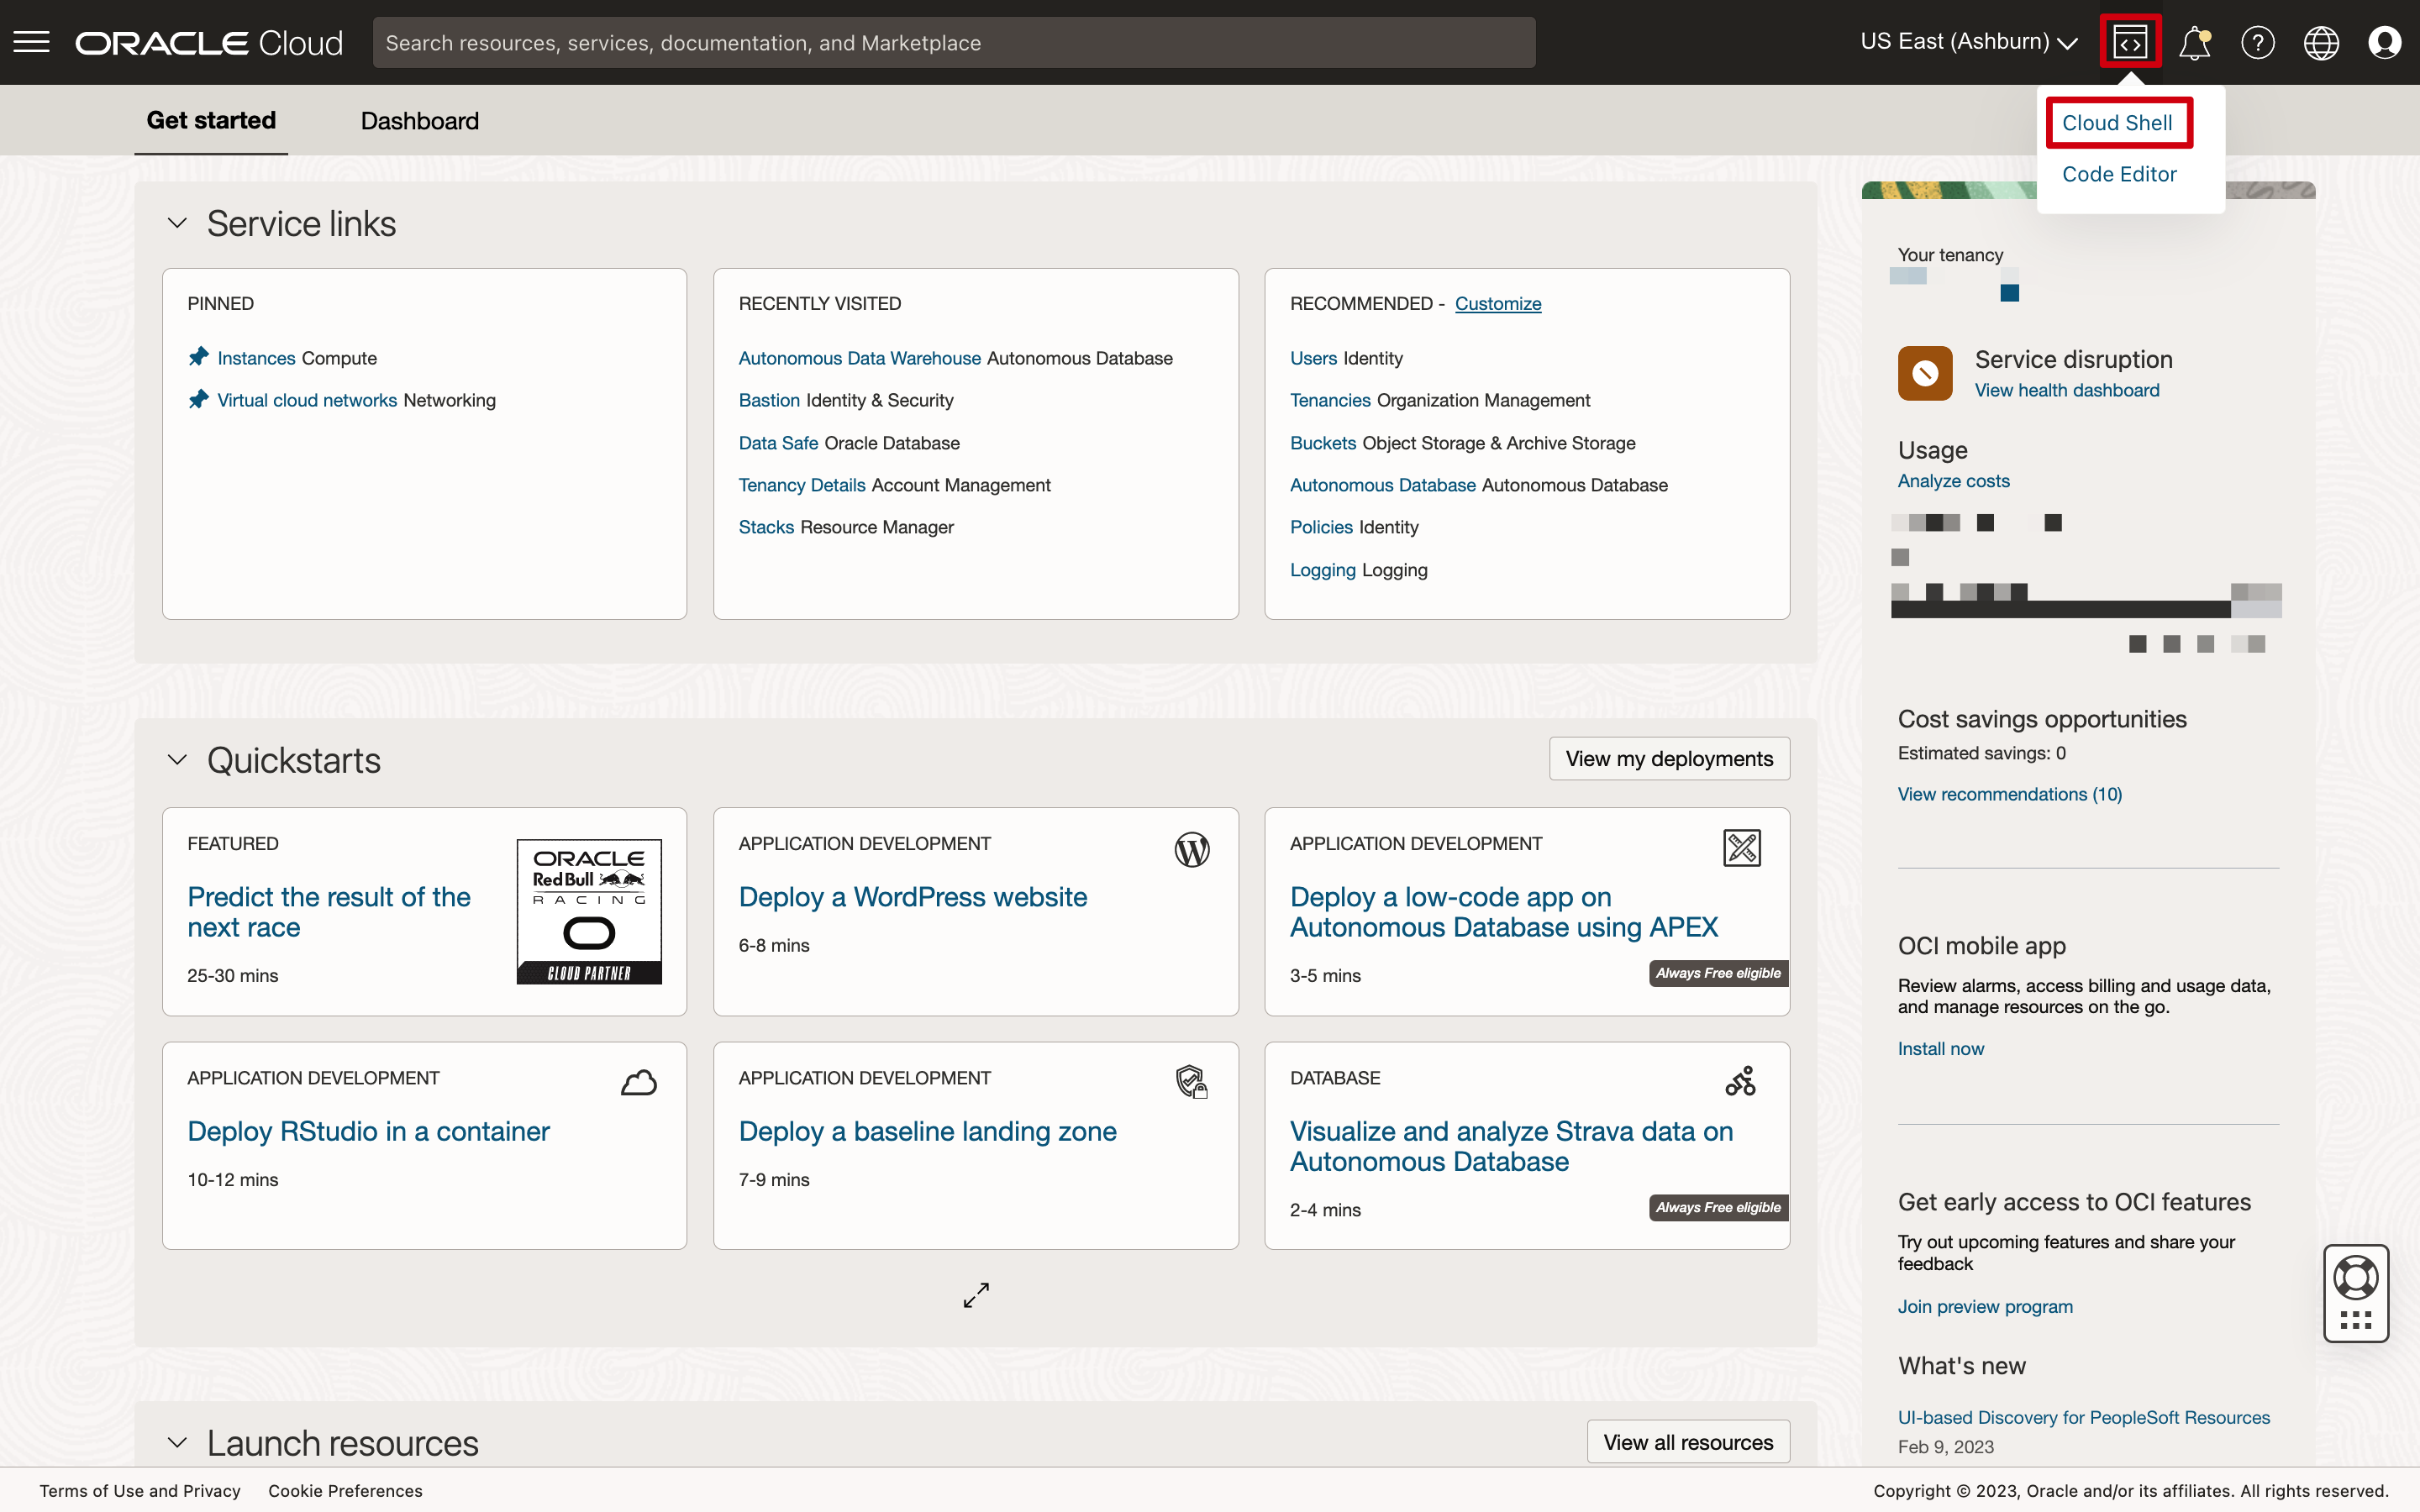
You can use OCI Cloud Shell which is a Linux shell accessible from the Oracle Cloud Console. Cloud Shell is free to use and comes pre-built with a pre-authenticated Oracle Cloud Infrastructure CLI, a pre-authenticated Ansible installation, and the tools needed to execute this tutorial.Your Cloud Shell will appear in the Oracle Cloud Console as a persistent frame of the Console and will stay active as you navigate to different pages of the Console.
Note: To set the appropriate Java version use the command csruntimectl (more here).
Preparation
If you already have a Java application, you can skip this step; otherwise, create a Java SE project using the Maven Quickstart Archetype to keep things simple. It will give us a basic project structure to work with.
Setup dependencies
For Eclipse JNoSQL to work with Oracle NoSQL, we must include a specific dependency, namely, the Eclipse JNoSQL driver for Oracle NoSQL. We’ll also include a “data faker” for generating sample data.
Add the following dependencies inside the pom.xml file:
<dependencies>
    <dependency>
        <groupId>org.eclipse.jnosql.databases</groupId>
        <artifactId>jnosql-oracle-nosql</artifactId>
        <version>1.1.0</version>
    </dependency>
    <dependency>
        <groupId>net.datafaker</groupId>
        <artifactId>datafaker</artifactId>
        <version>2.0.2</version>
    </dependency>
</dependencies>
Configuration
Eclipse JNoSQL relies on configuration properties to establish a connection to the database. This is where the flexibility of Eclipse MicroProfile Config shines. You can conveniently define these properties in your application.properties or application.yml file, allowing for easy customization of your database settings. Remarkably, Eclipse JNoSQL caters to key-value and document databases, a testament to its adaptability. Despite Oracle NoSQL’s support for both data models, the seamless integration and configuration options provided by Eclipse JNoSQL ensures a smooth experience, empowering developers to effortlessly switch between these database paradigms to meet their specific application needs. Eclipse JNoSQL allows you to connect on-premises or to the cloud using method properties in your application.properties or application.yml file (learn more here).
When you sign up for Oracle Cloud Infrastructure, Oracle creates your tenancy with a root compartment that holds all your cloud resources. You then create additional compartments within the tenancy (root compartment) and corresponding policies to control access to the resources in each compartment. Before you create an Oracle NoSQL Database Cloud Service table, Oracle recommends that you set up the compartment that will own the table. Use the following property to indicate a Jakarta NoSQL the compartment to use to create the table.
- jnosql.oracle.nosql.compartment: Compartment name or Compartment identifier (ocid) in Oracle Cloud Infrastructure.
When you use Oracle NoSQL Database Cloud Service, you don’t need to provision CPU, memory, or storage IOPS, but instead, you must specify your requirements for write, read, and storage activity when creating the table (referred to as provisioning). Throughput is specified in terms of write and read units and storage is specified in gigabytes (GB). Use the following properties to indicate a Jakarta NoSQL the values that you want to use when provisioning the table.
- jnosql.oracle.nosql.table.read.limit: Desired throughput of read operations when creating tables with Eclipse JNoSQL.
- jnosql.oracle.nosql.table.write.limit: Desired throughput of write operations when creating tables with Eclipse JNoSQL.
- jnosql.oracle.nosql.table.storage.gb: Maximum storage in gigabytes for tables created with Eclipse JNoSQL.
Oracle NoSQL Database Cloud Service scales to meet application throughput performance requirements with low and predictable latency. As workloads increase with periodic business fluctuations, applications can increase their provisioned throughput to maintain a consistent user experience. You can choose between an on-demand capacity allocation or a provisioned-based capacity allocation:
- With on-demand capacity, you don’t need to provision the read or write capacities for each table. You only pay for the read-and-write units that are actually consumed. Oracle NoSQL Database Cloud Service automatically manages the read and write capacities to meet the needs of dynamic workloads.
- With provisioned capacity, you can increase or decrease the throughput using the Oracle Cloud Infrastructure Console or programmatically.
- You can also modify the capacity mode from Provisioned Capacity to On-Demand Capacity and vice-versa.
Oracle NoSQL Database Cloud Service uses Oracle Cloud Infrastructure Identity and Access Management which enables you to create user accounts and control access to cloud resources. With respect to Oracle NoSQL, you can give users permission to inspect, read, use, or manage NoSQL tables. There are 5 authentication methods available (using the property jnosql.oracle.nosql.deployment)
- CLOUD_API_KEY: Represents a cloud deployment using an API key for authentication and authorization.
- CLOUD_INSTANCE_PRINCIPAL: Represents a cloud deployment using instance principal for authentication and authorization.
- CLOUD_RESOURCE_PRINCIPAL: Represents a cloud deployment using resource principal for authentication and authorization.
- CLOUD_INSTANCE_OBO_USER: Represents a cloud deployment using instance principal for delegation with an OBO token. It is a pre-authenticated option available in the Cloud Shell.
- CLOUD_SECURITY_TOKEN: Represents a “Cloud” deployment using Token-based Authentication.
In this example, we will use CLOUD_INSTANCE_OBO_USER, a pre-defined and automatic connection option when using OCI Cloud Shell.
# Oracle NoSQL Table Configuration
jnosql.keyvalue.database=beers
jnosql.document.database=beers
jnosql.oracle.nosql.compartment=test
jnosql.oracle.nosql.table.read.limit=10
jnosql.oracle.nosql.table.write.limit=10
jnosql.oracle.nosql.table.storage.gb=1
# Oracle NoSQL Connection
jnosql.oracle.nosql.host=https://nosql.${OCI_REGION:us-ashburn-1}.oci.oraclecloud.com
jnosql.oracle.nosql.deployment=CLOUD_INSTANCE_OBO_USER
To learn more about here.
Model your data in Eclipse JNoSQL
After setting up the database configuration, the next step is to define the data model to be stored in it. The process of defining a model is consistent across all databases in Eclipse JNoSQL. For instance, in this example, we will form a data model for beer using a basic Beer class.
@Entity
public class Beer {

    @Id
    private String id;

    @Column
    private String style;

    @Column
    private String hop;

    @Column
    private String malt;

    @Column
    private List<String> comments;

    @Column
    private List<Crew> crew;

    @Column
    private Map<String, Object> data;


    public String id() {
        return id;
    }

    public String style() {
        return style;
    }

    public String hop() {
        return hop;
    }

    public String malt() {
        return malt;
    }

    public List<String> comments() {
        return comments;
    }

    public List<Crew> crew() {
        return crew;
    }

    public Map<String, Object> data() {
        return data;
    }

    @Override
    public String toString() {
        return "Beer{" +
                "id='" + id + '\'' +
                ", style='" + style + '\'' +
                ", hop='" + hop + '\'' +
                ", malt='" + malt + '\'' +
                ", comments='" + comments + '\'' +
                ", crew='" + crew + '\'' +
                ", data='" + data + '\'' +
                '}';
    }

    @Override
    public boolean equals(Object object) {
        if (this == object) {
            return true;
        }
        if (object == null || getClass() != object.getClass()) {
            return false;
        }
        Beer beer = (Beer) object;
        return Objects.equals(id, beer.id);
    }

    @Override
    public int hashCode() {
        return Objects.hashCode(id);
    }

    public static Beer of(Faker faker){
        var beer = faker.beer();
        Beer entity = new Beer();
        entity.hop = beer.hop();
        entity.malt = beer.malt();
        entity.style = beer.style();
        entity.id= UUID.randomUUID().toString();
        entity.comments  = List.of("comment1", "comment2");
        entity.crew  = List.of(new Crew("Otavio"), new Crew("Dario"));
        entity.data = Map.of("name", "beer", "price", 50);
        return entity;
    }

}
In the Beer class, you can use annotations to define how the class and its fields should be persisted in the database:
- @Entity: This annotation marks the class as an entity to be stored in the database.
- @Id: Indicates that the id field will serve as the unique identifier (a primary key) for each Beer entity.
- @Column: Annotations like @Column specify that a field should be persisted as a column in the database. In this case, we annotate each field we want to store in the database.
Additionally, we provide methods for getters, setters, equals, hashCode, and toString for better encapsulation and compatibility with database operations. We also include a factory method Beer.of(Faker faker), to generate random beer data using the “datafaker” library.
This data model encapsulates the structure of a beer entity, making it easy to persist and retrieve beer-related information in your Oracle NoSQL database using Eclipse JNoSQL.
To showcase the flexibility of the data model, we add some properties using complex types:
- List<String>
- List<Crew>
- Map<String, Object>
Let’s show the code for the Crew Class.
import jakarta.nosql.Column;
import jakarta.nosql.Entity;

import java.util.Objects;

@Entity
public class Crew {

    @Column
    private String name;

    public String name() {
        return name;
    }


    public Crew() {
    }

    Crew(String name) {
        this.name = name;
    }

    @Override
    public boolean equals(Object o) {
        if (this == o) {
            return true;
        }
        if (o == null || getClass() != o.getClass()) {
            return false;
        }
        Crew crew = (Crew) o;
        return Objects.equals(name, crew.name);
    }

    @Override
    public int hashCode() {
        return Objects.hashCode(name);
    }

    @Override
    public String toString() {
        return "Crew{" +
                "name='" + name + '\'' +
                '}';
    }
}
Define a simple repository
Eclipse JNoSQL allows storing and retrieving data to/from the Oracle NoSQL Database, this is done using the CRUD (create, read, update, delete) methods in OracleNoSQLRepository.
Eclipse JNoSQL also allows the developer to define special methods that will generate derived Oracle Nosql queries.
import jakarta.data.repository.Query;
import jakarta.data.repository.Repository;
import org.eclipse.jnosql.databases.oracle.mapping.OracleNoSQLRepository;

@Repository
public interface BeerRepository extends OracleNoSQLRepository<Beer, String> {

    Set<Beer> findByStyle(String style);

    @Query("select * from Beer")
    Set<Beer> query();
}
Executing Database Operations With Oracle NoSQL
Now that our entity and repository are set up let’s create classes to execute the application. These classes will initialize a CDI container and use the repository to interact with the Oracle NoSQL database.
import jakarta.data.Sort;
import jakarta.data.page.Page;
import jakarta.data.page.Pageable;
import jakarta.enterprise.inject.se.SeContainer;
import jakarta.enterprise.inject.se.SeContainerInitializer;
import net.datafaker.Faker;
public class App {
    public static void main(String[] args) {
        Faker faker = new Faker();
        try (SeContainer container = SeContainerInitializer.newInstance().initialize()) {
            BeerRepository repository = container.select(BeerRepository.class).get();
            for (int index = 0; index < 100; index++) {
                Beer beer = Beer.of(faker);
                repository.save(beer);
            }
            Pageable page = Pageable.ofPage(1).sortBy(Sort.desc("style"));
            Page<Beer> page1 = repository.findAll(page);
            System.out.println("The first page");
            page1.forEach(System.out::println);
            System.out.println("The second page");
            Pageable secondPage = page.next();
            Page<Beer> page2 = repository.findAll(secondPage);
            page2.forEach(System.out::println);
            System.out.println("The query result: ");
            repository.query().forEach(System.out::println);
        }
    }
    private App() {
    }
}
You can also use the Document Template to insert random beers into the Oracle NoSQL database, retrieve and print all beers, and execute specific queries based on the field malt or style.
import jakarta.data.Sort;
import jakarta.data.page.Page;
import jakarta.data.page.Pageable;
import jakarta.enterprise.inject.se.SeContainer;
import jakarta.enterprise.inject.se.SeContainerInitializer;
import jakarta.nosql.document.DocumentTemplate;
import net.datafaker.Faker;

public class App {
    public static void main(String[] args) {
        Faker faker = new Faker();
        try (SeContainer container = SeContainerInitializer.newInstance().initialize()) {
            DocumentTemplate template = container.select(DocumentTemplate.class).get();
            for (int index = 0; index < 100; index++) {
                Beer beer = Beer.of(faker);
                template.insert(beer);
            }

            template.select(Beer.class).stream().toList().forEach(System.out::println);

            System.out.println("Selecting malt by Chocolate");
            template.select(Beer.class).where("malt").eq("Chocolate").orderBy("malt").desc()
                    .stream().forEach(System.out::println);

            System.out.println("Selecting style by Stout");
            template.select(Beer.class).where("style").eq("Stout").orderBy("malt").desc()
                    .stream().forEach(System.out::println);
        }

        System.exit(0);
    }
    private App() {
    }
}
Conclusion
This article has covered the critical aspects of Eclipse JNoSQL’s interaction with Oracle NoSQL, including setting up configurations, creating data models, and executing various database operations.
To dive deeper into the capabilities of Eclipse JNoSQL and explore more code samples, check out the official repository. There, you will find a wealth of information, examples, and resources to help you leverage the power of Eclipse JNoSQL in your Java applications.
Eclipse JNoSQL empowers developers to harness the flexibility and scalability of nosql databases while adhering to Java enterprise standards, making it a valuable tool for modern application development.
Oracle NoSQL Database Cloud Service makes it easy for developers to build applications using document, fixed schema, and key-value database models, delivering predictable single-digit millisecond response times with data replication for high availability. The service offers active-active regional replication, ACID transactions, serverless scaling, comprehensive security, and low pay-per-use pricing for both on-demand and provisioned capacity modes, including 100% compatibility with on-premises Oracle NoSQL Database.
Enjoy and let us know how it went!
If you want to find out more about the Oracle NoSQL Database Cloud Service, please visit this page.