This blog is mainly intended for Oracle WebLogic administrators familiar with high availability concepts and with the Enterprise Deployment Guides (EDG). It applies to an Oracle WebLogic domain with High Availability requirements running in Oracle Cloud Infrastructure.
Although this blog focuses on the use of Virtual IPs (VIPs) in WebLogic environments, the steps for managing VIPs in OCI compute instances apply to any scenario, component, or product that requires a VIP in OCI.
Virtual IP addresses
The term Virtual IP address (VIP) refers to an IP address that does not correspond to a single physical network interface.
Virtual IP (VIP) addresses serve multiple application purposes, primarily connection redundancy and load balancing. For redundancy, a VIP can float between hosts, failing over to an available machine if the primary goes down. For load balancing, a VIP acts as a client’s single point of contact, directing traffic to backend servers via an algorithm.
This blog focuses on using a VIP for failover purposes.
WebLogic and Virtual IP addresses
Some components of WebLogic can benefit from using a VIP as a listening address. The VIPs are primarily utilized in WebLogic to ensure high availability for the Administration Server. While using a VIP is not mandatory for this purpose (you can use a physical IP instead and perform a DNS update, see blog https://blogs.oracle.com/maa/post/wls-admin-server-failover-without-a-floating-ip for more details), the VIP still offers some advantages over a physical IP.
This blog explains how to attach, configure, and failover a Virtual IP (VIP) for the WebLogic Administration server in Oracle Cloud Infrastructure.
Note that other WebLogic components can also listen to a VIP. For example, when using the Automatic Whole Server Migration feature. This feature provides failover protection for WebLogic managed servers by automatically moving them from one host to another. To accomplish this, the Managed Servers must listen on a VIP. Oracle recommends, however, that you use the Automatic Service Migration feature instead of Whole Server migration for managed server’s failover protection. The Service Migration feature requires fewer resources, provides a better RTO, is supported by most Fusion Middleware products, and does not require a VIP. Hence, using a VIP for the WebLogic Managed Servers is not addressed in this blog.
WebLogic Administration Server use case
The scenario described in this blog is a WebLogic domain running in Oracle Cloud Infrastructure compute instances (for example, apphost1 and apphost2). The WebLogic Administration server runs normally in the apphost1 compute instance and listens on a virtual name (for example, adminvip.example.com), which is resolved to a VIP instead of a physical IP. This facilitates the failover of the Administration Server to another compute instance, as described in the Enterprise Deployment Guide.
Hence, the VNIC of the apphost1 compute instance has an additional IP (the VIP) attached. This secondary IP address (the VIP) must come from the CIDR of the VNIC’s subnet. Although this IP is normally attached to the apphost1 compute instance, you can move this VIP to a VNIC on another instance if both VNICs belong to the same subnet for Administration Servers failover.
The following points describe how to configure the VIP in apphost1 and how to move it to apphost2.
Create and configure a VIP in OCI
To assign an additional IP (a VIP) to the VNIC of the apphost1 compute instance, you first need to attach the new IP to the VNIC using the OCI Console. Then, use operating system commands to configure it on the host in a non-persistent mode, because this IP can be moved from apphost1 to apphost2. Perform the following steps:
- Assign the VIP address to the VNIC of the apphost1 compute instance.
a) Connect to the OCI Console. In your region and compartment, select the compute instance to which you want to add the VIP.
b) Click on Compute Instance’s Networking tab, and scroll down to Attached VNICs.
c) You don’t need to create an additional VNIC; you can add the VIP to the existing primary VNIC. Click on the VNIC that you’re interested in.
d) Click on the IP Administration tab, and you will see the IPs assigned to this VNIC.
e) Click on Assign Secondary Private IP Address and then enter the requested information:- Private IP Address: (Optional) Unless you want to use a specific IP, leave this blank. The private IP address value is automatically assigned.
- Unassign if already assigned to another VNIC: (Optional) Only relevant if you specify a private IP address in the preceding field.
- Hostname: (Optional) Provide a value in the hostname that helps you to identify it as a virtual IP whithin the subnet. For example, adminwls-vip.
- Public IP Type: Only available if the VNIC is in a public subnet. Select the “No public IP” if the IP will be used internally only. Otherwise, a public IP will be assigned too.
- Route Table: You can leave the default value.
- Click on Assign. The list of IPv4 Addresses of the VNIC must now show an additional IP. Note down the value, it is the VIP value. For example, 100.10.10.10.
- Configure the new IP address in the OS in a non-persistent mode, because the IP can move from apphost1 to apphost2.
a) Connect with SSH to apphost1.
b) Show the network interfaces and the attached IP addresses of the apphost1 compute instance. In this example, the VIP will be assigned to the network interface ens3, which has the IP 100.10.10.5 as the primary IP. The VIP is not yet assigned to the interface:
c) As root, add the virtual IP to the interface as an additional IP by setting a sequence number in the label. The mask must be the same as the mask of the primary IP. For example:[opc@apphost1~]$ ip addr
1: lo: <LOOPBACK,UP,LOWER_UP> mtu65536qdisc noqueue state UNKNOWN groupdefaultqlen1000
link/loopback00:00:00:00:00:00brd00:00:00:00:00:00
inet127.0.0.1/8scope host lo
valid_lft forever preferred_lft forever
inet6 ::1/128scope host
valid_lft forever preferred_lft forever
2: ens3: <BROADCAST,MULTICAST,UP,LOWER_UP> mtu9000qdisc pfifo_fast state UP groupdefaultqlen1000
link/ether00:00:17:00:05:87brd ff:ff:ff:ff:ff:ff
inet100.10.10.5/20brd100.70.10.255scope global dynamic ens3
valid_lft 60218sec preferred_lft 60218sec
inet6 fe80::200:17ff:fe00:587/64scope link
valid_lft forever preferred_lft forever
3: virbr0: <NO-CARRIER,BROADCAST,MULTICAST,UP> mtu1500qdisc noqueue state DOWN groupdefaultqlen1000
link/ether52:54:00:c0:ed:c1 brd ff:ff:ff:ff:ff:ff
inet192.168.122.1/24brd192.168.122.255scope global virbr0
valid_lft forever preferred_lft forever
d) Verify that the new IP is now attached to the network interface. For example:[root@apphost1~]# ip addr add100.10.10.10/20dev ens3 label ens3:1[opc@apphost1~]$ ip addr1: lo: <LOOPBACK,UP,LOWER_UP> mtu65536qdisc noqueue state UNKNOWN groupdefaultqlen1000
link/loopback00:00:00:00:00:00brd00:00:00:00:00:00
inet127.0.0.1/8scope host lo
valid_lft forever preferred_lft forever
inet6 ::1/128scope host
valid_lft forever preferred_lft forever
2: ens3: <BROADCAST,MULTICAST,UP,LOWER_UP> mtu9000qdisc pfifo_fast state UP groupdefaultqlen1000
link/ether00:00:17:00:05:87brd ff:ff:ff:ff:ff:ff
inet100.10.10.5/20brd100.70.10.255scope global dynamic ens3
valid_lft 59873sec preferred_lft 59873sec
inet100.10.10.10/20scope global secondary ens3:1
valid_lft forever preferred_lft forever
inet6 fe80::200:17ff:fe00:587/64scope link
valid_lft forever preferred_lft forever
3: virbr0: <NO-CARRIER,BROADCAST,MULTICAST,UP> mtu1500qdisc noqueue state DOWN groupdefaultqlen1000
link/ether52:54:00:c0:ed:c1 brd ff:ff:ff:ff:ff:ff
inet192.168.122.1/24brd192.168.122.255scope global virbr0
valid_lft forever preferred_lft forever - If you provided a hostname for the IP address in step 1 (for example, adminwls-vip), the complete FQDN (for example, adminwls-vip.midsubnet.myvcn.oraclevcn.com) is now resolved within the VCN’s DNS, pointing to the VIP. You may want to use another name to resolve the VIP, for example, a virtual hostname such as adminvip.example.com. In this case, add this name to your custom DNS zone “example.com“, pointing to the VIP value.
- If the compute instance is rebooted, the VIP will be automatically attached at the OCI level, but you will need to run the ip addr add command again to add the VIP to the network interface at the operating system level. Create a script with the command so you can re-run it after a compute instance’s reboot.
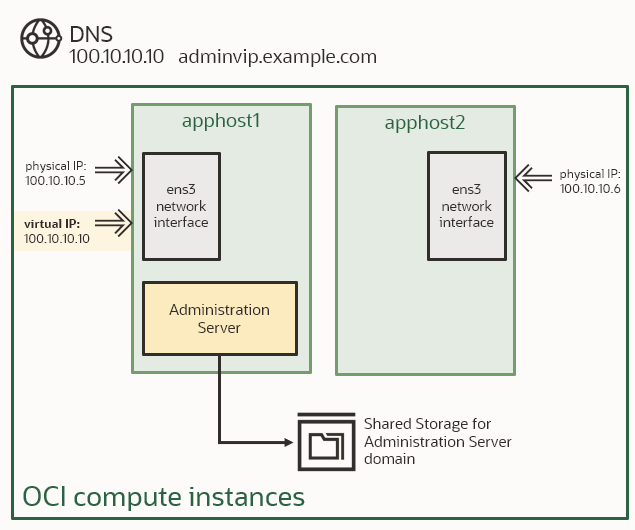
Figure 1. VIP address attached to the ens3 interface of the apphost1
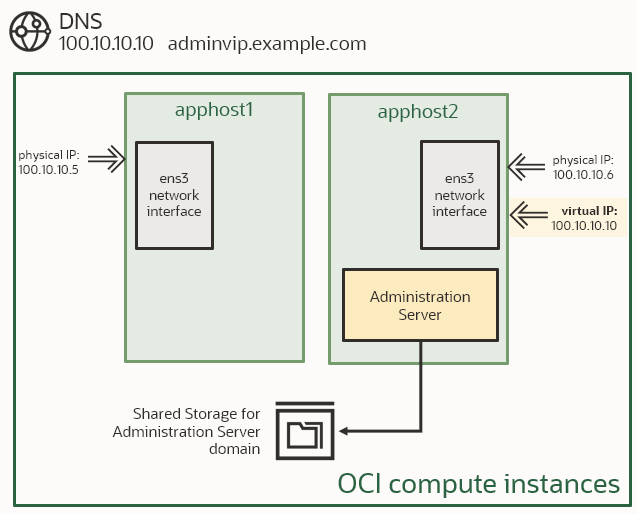
Failover the VIP to another compute instance in OCI
The procedure in Verifying Manual Failover of the Administration Server explains how to perform a failover of the WebLogic Administration Server to another host when using a VIP. When you run it in OCI, additional actions are required to migrate the Virtual IP address to the second compute instance. Perform the following steps to detach the VIP from the host where the Administration Server was running (apphost1) and to attach it to the host where the WebLogic Administration server is being moved (apphost2):
- Connect to apphost1 as the root user, and run the following commands to remove the Administration Server’s VIP from the network interface.
a) Stop the Administration Server in case it is still running.
b) Show the network interfaces and identify where the VIP is running. In this example, the VIP 100.10.10.10 is attached to the “ens3” network interface:
c) Remove the IP from the network interface. For example:[root@apphost1]# ip addr del100.10.10.10/20dev ens3 - Detach the Administration Server’s VIP from apphost1 in the OCI Console:
a) Connect to the OCI Console. In your region and compartment, select the compute instance apphost1.
b) Click on Compute Instance’s Networking tab, and scroll down to Attached VNICs.
c) Select the VNIC in which the Administration Server VIP is attached.
d) Click IP Administration tab and note down the VIP address and FQDN name in the subnet (for example: 100.10.10.10, adminwls-vip.midsubnet.myvcn.oraclevcn.com).
e) Click Delete Private IP to remove the VIP from the VNIC. - Attach the Administration Server’s VIP to apphost2 in the OCI Console.
a) In your region and compartment, select the compute instance apphost2.
b) Click on Compute Instance’s Networking tab, and scroll down to Attached VNICs.
c) Select the VNIC in which the VIP will be attached.
d) Click Assign secondary private IP address.
e) Provide the Private IP address and hostname values that were used before. For example: 100.10.10.10 for the IP and adminwls-vip as the hostname. - Connect to apphost2 as the root and run the following commands to attach the VIP to the network interface.
a) Show the network interfaces using the ip addr command.[root@apphost1]# ip addr show
1: lo: <LOOPBACK,UP,LOWER_UP> mtu65536qdisc noqueue state UNKNOWN groupdefaultqlen1000
link/loopback00:00:00:00:00:00brd00:00:00:00:00:00
inet127.0.0.1/8scope host lo
valid_lft forever preferred_lft forever
inet6 ::1/128scope host
valid_lft forever preferred_lft forever
2: ens3: <BROADCAST,MULTICAST,UP,LOWER_UP> mtu9000qdisc mq state UP groupdefaultqlen1000
link/ether02:00:17:04:2c:fc brd ff:ff:ff:ff:ff:ff
altname enp0s3
inet100.10.10.5/20 brd10.3.90.127scope global dynamic ens3
valid_lft 58307sec preferred_lft 58307sec
inet100.10.10.10/20 scope global secondary ens3:1
valid_lft forever preferred_lft forever
inet6 fe80::17ff:fe04:2cfc/64scope link
valid_lft forever preferred_lft forever
3: virbr0: <NO-CARRIER,BROADCAST,MULTICAST,UP> mtu1500qdisc noqueue state DOWN groupdefaultqlen1000
link/ether52:54:00:c0:ed:c1 brd ff:ff:ff:ff:ff:ff
inet192.168.122.1/24brd192.168.122.255scope global virbr0
valid_lft forever preferred_lft foreverb) Add the VIP to the appropriate network interface as an additional IP by setting a sequence number in the label. Use the same mask as the primary IP of the network interface. For example:
[root@apphost2]# ip addr add100.10.10.10/20dev ens3 label ens3:1
Conclusion
Oracle Cloud Infrastructure provides the ability to create, attach, and detach Virtual IPs to the compute instances. The products and components that use Virtual IPs for failover purposes, such as the WebLogic Administration Server, can benefit from this feature.
References
To assign a new secondary private IP to a VNIC
Linux: Details about Secondary IP Addresses.
Fusion Middleware Enterprise Deployment Guides:
SOA Enterprise Deployment Guide 12.2.1.4
SOA Enterprise Deployment Guide 14.1.2
Administration Server Failover Procedures in the Enterprise Deployment Guides:
SOA EDG 12.2.1.4 “Verifying Manual Failover of the Administration Server”
SOA EDG 14.1.2 “Verifying Manual Failover of the Administration Server”