Oracle Cloud
To perform the configuration suggested in this tutorial, it will be necessary to use the OCI Vault, OCI Secrets Management, OCI Tagging, IAM Policies, Dynamic Groups services, and finally, OCI Data Science as a consumer of protected secrets.
The goal of this solution is to prevent passwords and confidential data from being hardcoded into the OCI Notebook Sessions code. To achieve this, we will create secrets via OCI Secret Management and, using Dynamic Groups and Defined Tags, create IAM policies that will provide regulated and individual access to the secrets, preventing cross-access between the various data scientists in the environment.
Important:
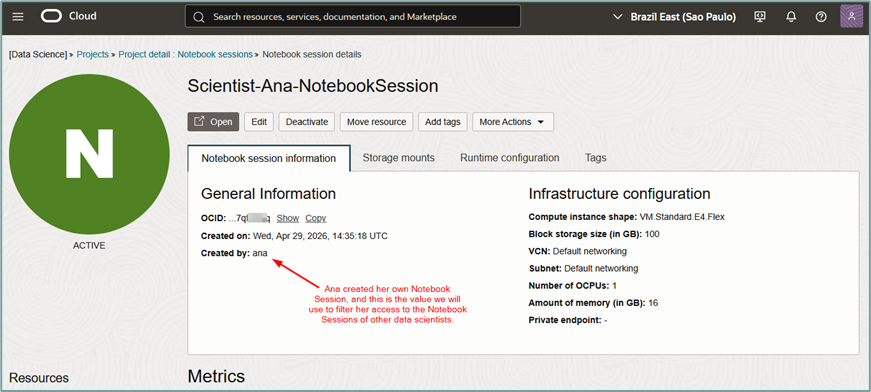
- One requirement for this lab to function is that the data scientists must have permission to create their own Notebook Session. This is because the ‘Created by’ tag will be used in the IAM policy that controls each data scientist’s access to their own Notebook Session. This is a mandatory condition for this tutorial to work.
- This tutorial does not aim to provide a step-by-step guide on creating OCI DataScience Notebook Sessions. Notebook Sessions must already exist in your environment to follow this tutorial.
OCI Secrets Management
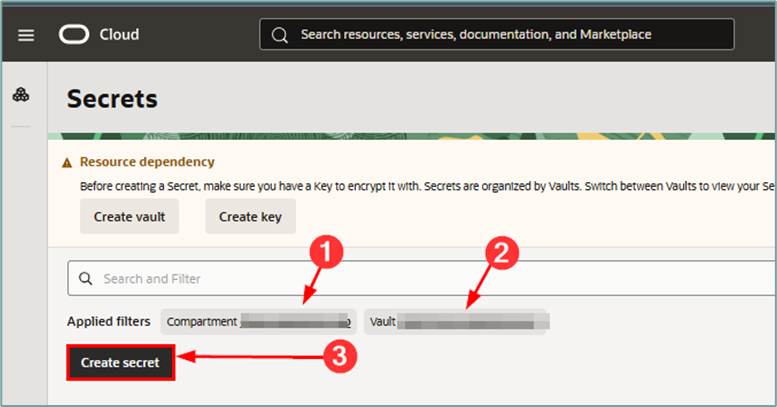
Before you begin, you need to create a Secret or retrieve the OCID of a Secret already created in the OCI Secrets Management service.
For this to work, an OCI Vault must be created in the tenancy so that this Vault can be used to generate the Secret. It is not within the scope of this tutorial to show the steps for creating an OCI Vault.
Once inside the OCI Secrets Management services page, select the compartment and Vault where the secret will be created and click the “Create secret” button to create a new secret:
Once inside the Secret creation workflow, fill in the required information:
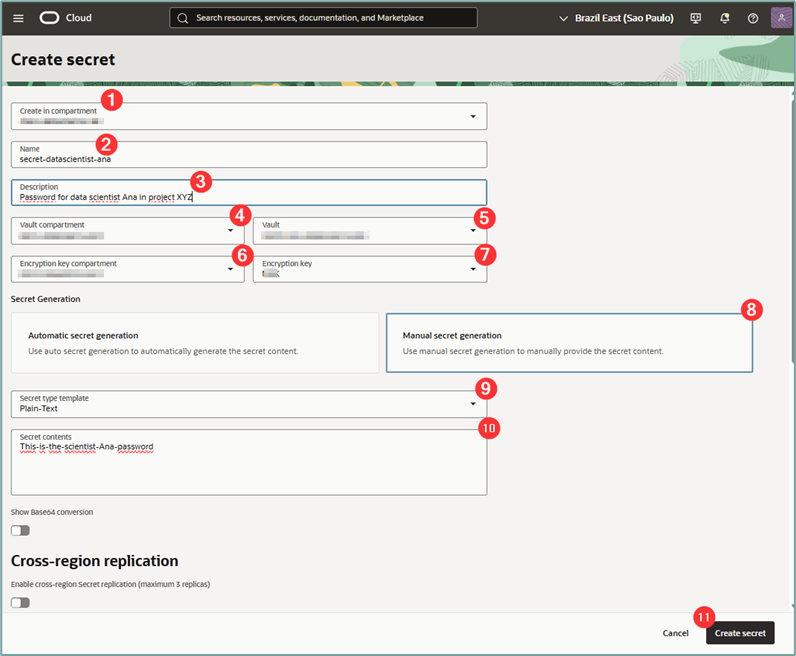
where:
- Create in compartment: Select the compartment where the Tag Namespace will be created.
- Name: Enter a name for the secret.
- Description: Enter a description for the secret.
- Vault compartment: Select the OCI Vault compartment that will be used to create the secret.
- Vault: Select the OCI Vault that will be used to create the secret.
- Encryption key compartment: Select the compartment where the OCI Vault encryption key was created.
- Encryption key: Select the encryption key to be used for creating the secret.
- Secret generation: Select “Manual secret generation”.
- Secret type template: Select “Plain-Text”.
- Secret contents: Enter the secret to be protected. This can be a password or any type of text that needs to be protected by OCI Vault.
After filling in all the fields correctly, click the “create secret” button.
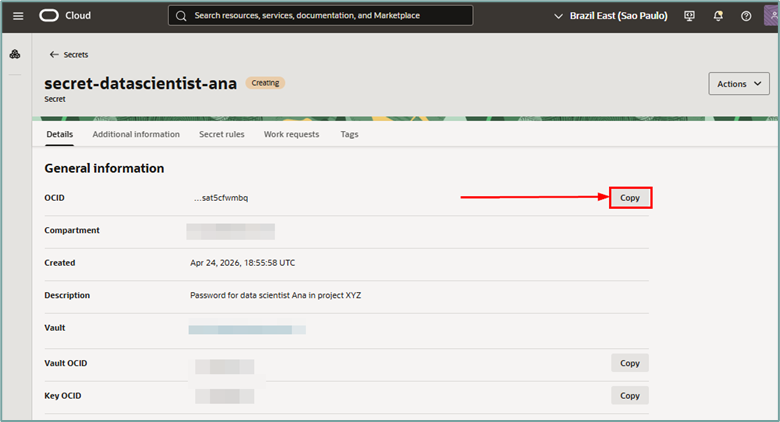
When you click the button to create the secret, a new window will open. This window will contain the data for the new secret. Then click the “copy” button to copy the OCID value of the newly created secret. Note this value for future use.
The next step will be to create the tags that will be used to protect each data scientist’s secret.
OCI Tagging
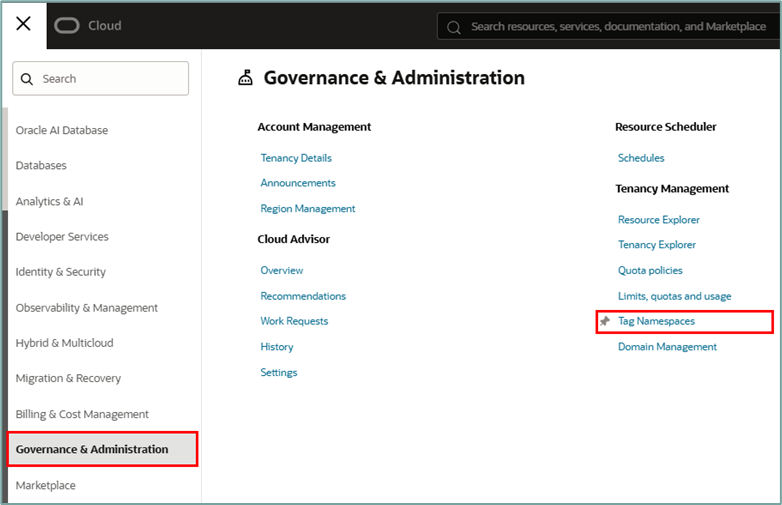
To create the Tags, access the menu “Governance & Administration -> Tag Namespaces”:
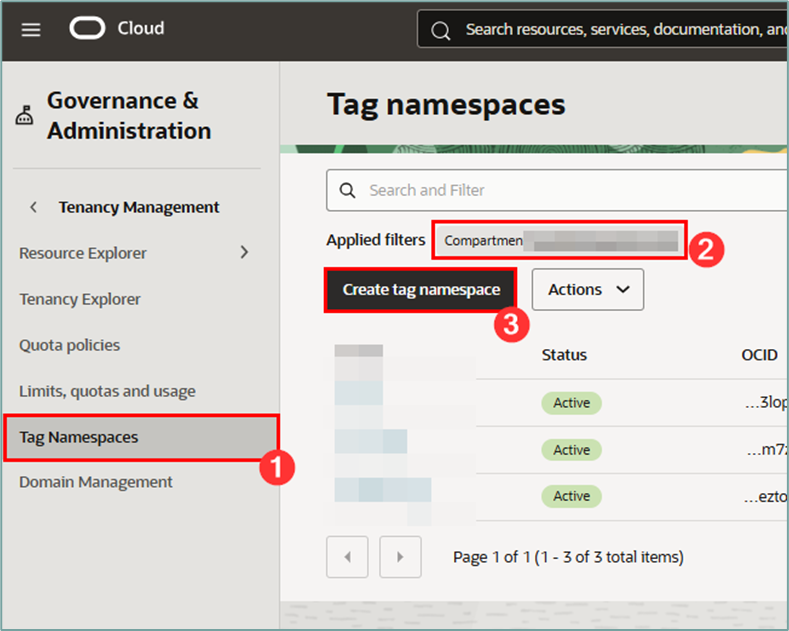
Once inside the Tagging service, select the compartment where the Defined Tag will be created and click the “Create tag namespace” button:
When loading the Tag Namespace creation page, fill in the required information:
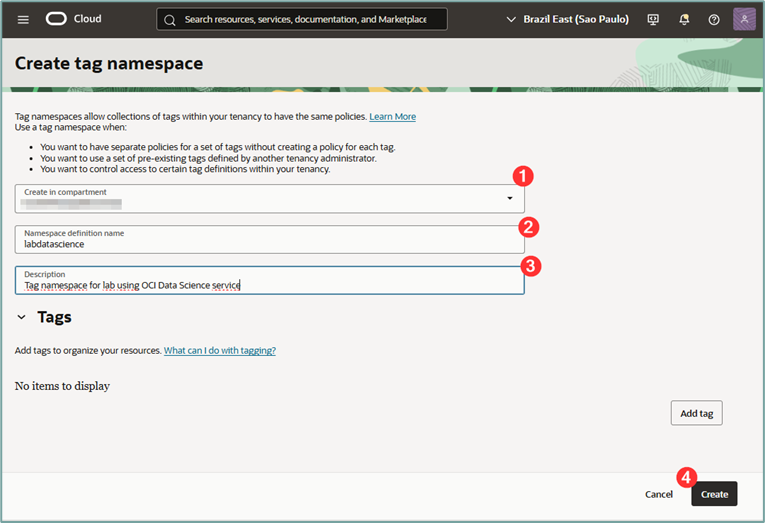
where:
- Create in compartment: Select the compartment where the Tag Namespace will be created.
- Namespace definition name: Enter a name for the namespace to be created
- Description: Enter a description for the namespace to be created.
After filling everything out, click the “Create” button.
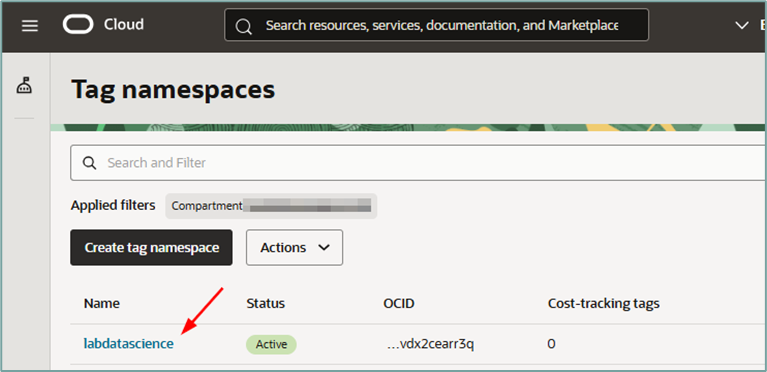
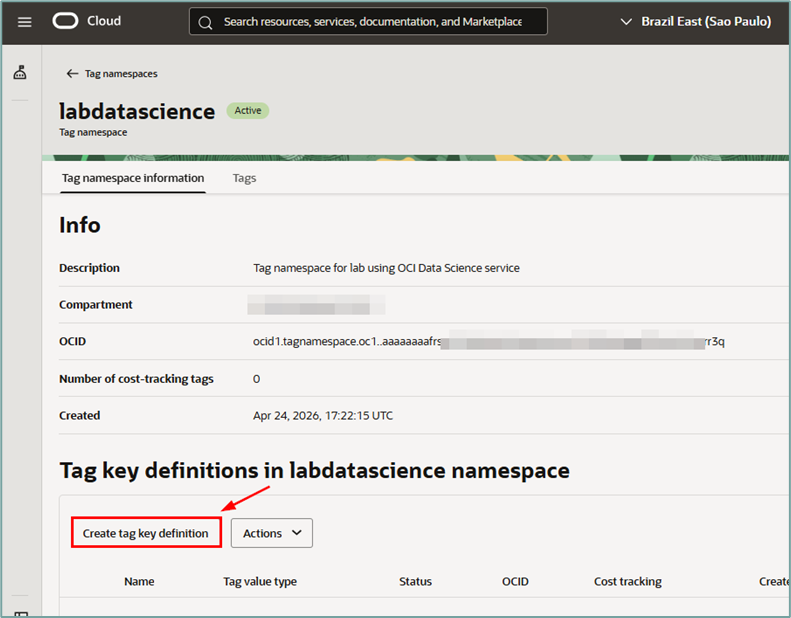
Once the tag namespace is created, click on its name to enter the details page.
When accessing the created namespace tag page, you will need to create a Tag Key Definition. This key will be applied to Notebook Sessions and used later to filter access to secrets via OCI IAM Policy.
To create the key, click the “Create tag key definition” button:
Clicking the button will open the key creation workflow. Fill in the information as required:
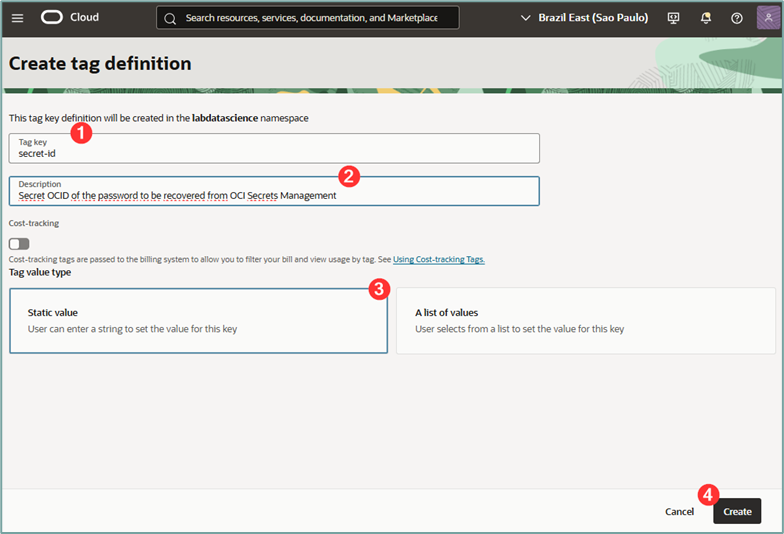
After filling everything out, click the “Create” button.
where:
- Tag key: Enter a name for the key to be created. This tag will have the OCID of the secret to be accessed by the Notebook Session. So here we’ve called it ‘secret-id’.
- Description: Enter a description for the tag key to be created.
- Static Value: Select the “Static value”
Once created, the key will be displayed on the details page of the created Namespace.
OCI Notebook Session
Important: One requirement for this lab to function is that the data scientists must have permission to create their own Notebook Session. This is because the ‘Created by’ tag will be used in the IAM policy that controls each data scientist’s access to their own Notebook Session. This is a mandatory condition for this tutorial to work.
To allow each data scientist to create their own Notebook Session, the following policy must be applied in the environment beforehand:
Allow group <GROUP> to {DATA_SCIENCE_NOTEBOOK_SESSION_CREATE} in compartment <COMPARTMENT>After creating the Defined Tag, you must create the Dynamic Group that will be used for authorization via Service Principal. This Dynamic Group will be responsible for capturing the access request to the Secret coming from the OCI Data Science
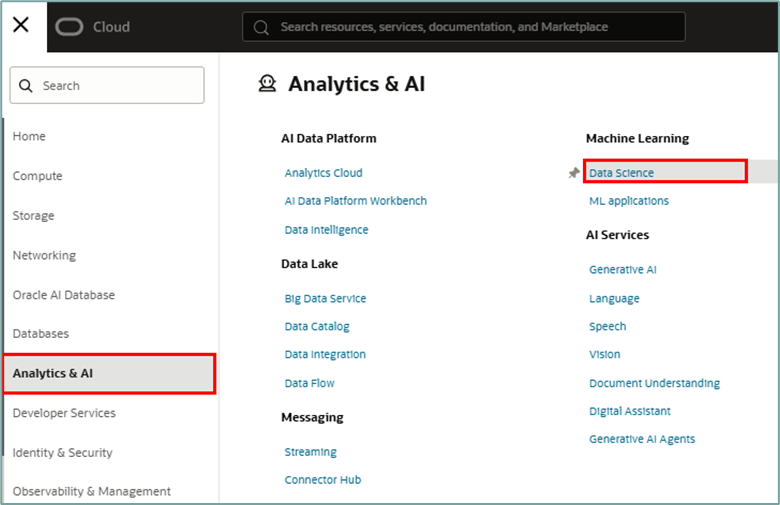
To do this, it will be necessary to capture the OCID of the Notebook Session created by the data scientist. Then, access the menu “Analytics & AI -> Data Science”:
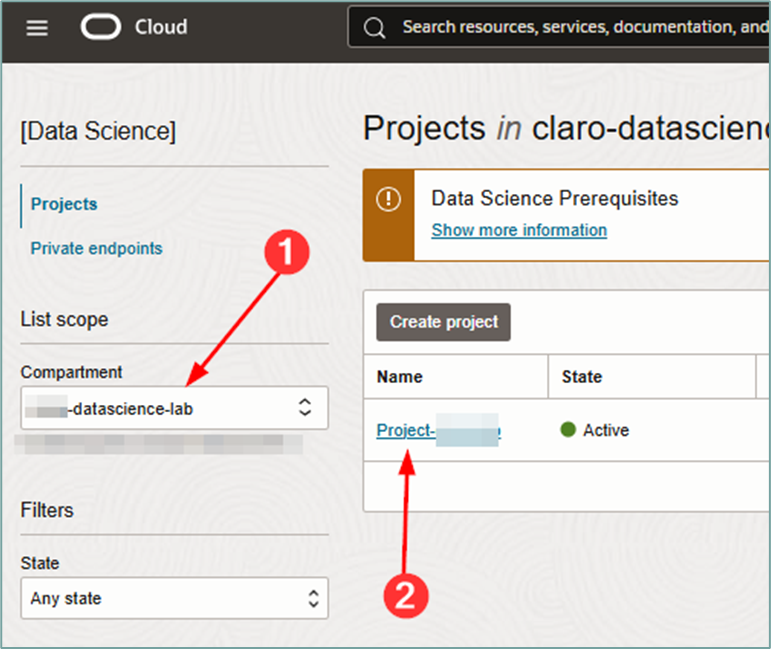
Once inside the OCI Data Science page, select the compartment where the Data Science project is created and then click on the project name to access its details and view all its notebooks:
Once inside the page containing all notebook sessions, select the desired notebook session and click on its name.
Note: The notebook session must be active for this procedure to be performed. If it is not active, activate it.
Once inside the OCI Notebook Session details page, click “copy” next to the OCID value:
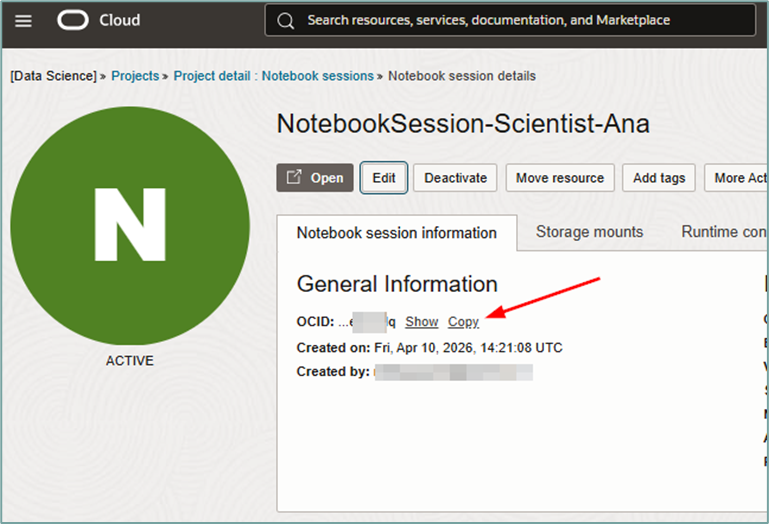
the next step.
OCI Dynamic Groups
After capturing the OCID value of the Notebook Session that was created by the data scientist, you must create the Dynamic Group that will be used for authorization via Service Principal. This Dynamic Group will be responsible for capturing the access request to the Secret coming from the OCI Data Science Notebook Session.
Important: It is important to emphasize that to ensure that cross-access to secrets does not occur (data scientist A cannot access the secret of data scientists B, C, D, etc), it will be mandatory for each OCI Notebook Session to have its own Dynamic Group.
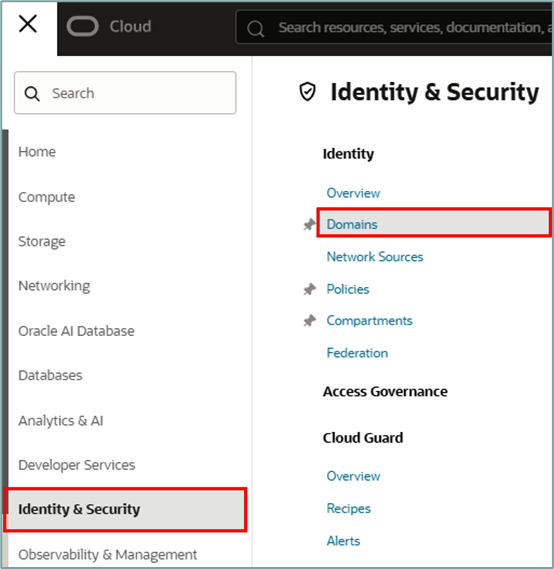
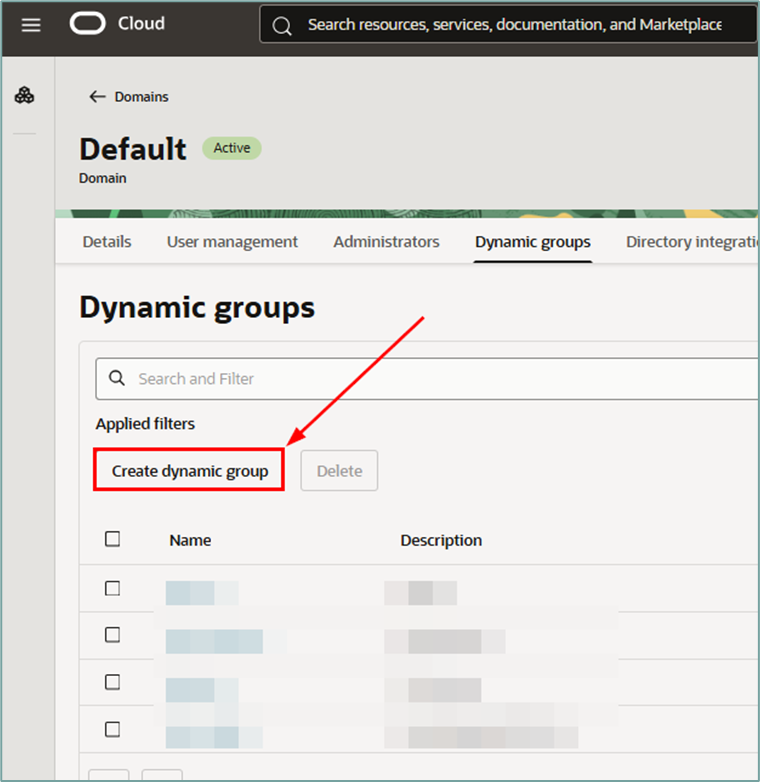
To create the Dynamic Group, access the menu “Identity & Security -> Domains”:
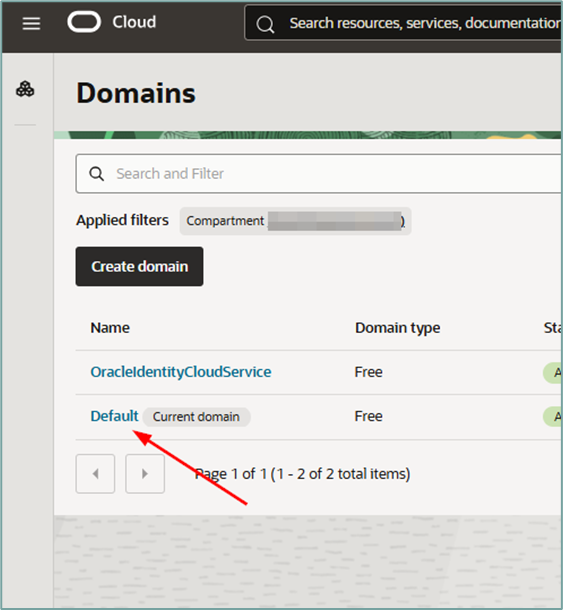
Once inside the Domains page, click on the domain where Dynamic Groups will be used. In this tutorial, we will use the “Default” domain.
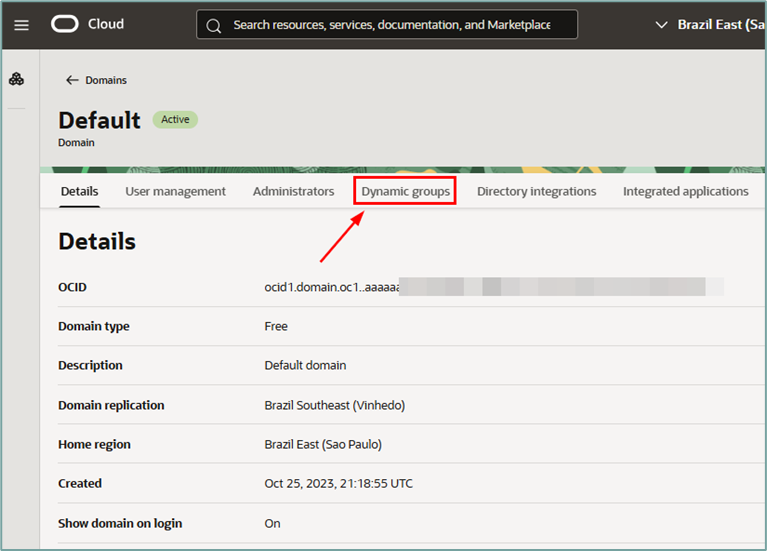
Once inside the window for the selected domain, click on the “Dynamic groups” menu:
Then, click the “Create dynamic group” button:
The Dynamic Group will be defined by 2 matching rules. One of them will have a criterion stating that only resources of the type “datasciencenotebooksession” will be listed, and the second criterion will be to exclusively identify the data scientist’s notebook belonging to only 1 data scientist.
Therefore, we will have the following matching rules that should be applied to each Dynamic Group:
Rule #1 – Matching rule to isolate resources of the type “data science notebook session”
all { resource.type = 'datasciencenotebooksession' }
Rule #2 – Matching rule to isolate the unique Notebook Session ID of the data scientist
all { resource.id = 'ocid1.datasciencenotebooksession.oc1.sa-saopaulo-1.<NOTEBOOK-SESSION-OCID>' }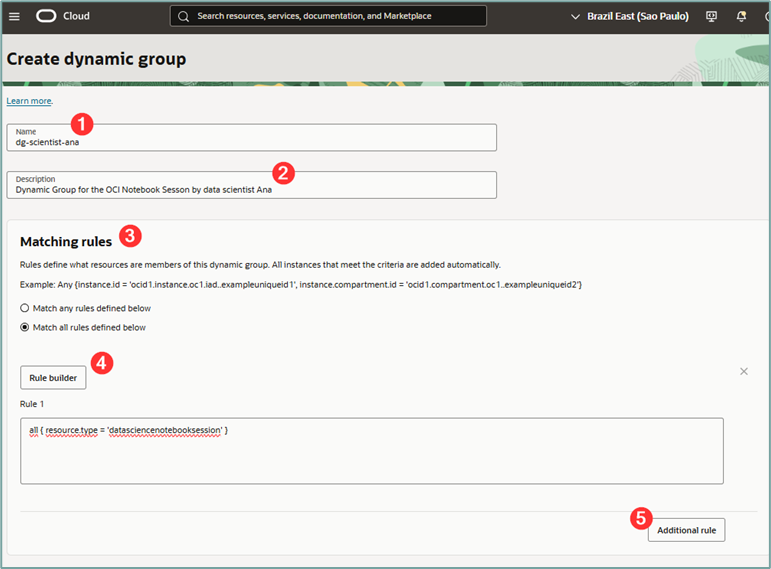
where:
- Name: Enter a name for the Dynamic Group to be created.
- Description: Enter a description for the Dynamic Group to be created.
- Matching Rule: Select the “Match all rules defined below”.
- Rule 1: Enter the content from Rule #1 above.
After completing Rule #1, scroll down and click the “Additional rule” button (bubble 5 above). This button will open the field where Rule #2 can be entered. To do this, copy the content of Rule #2 shown above and enter the OCID of the previously captured Notebook Session.
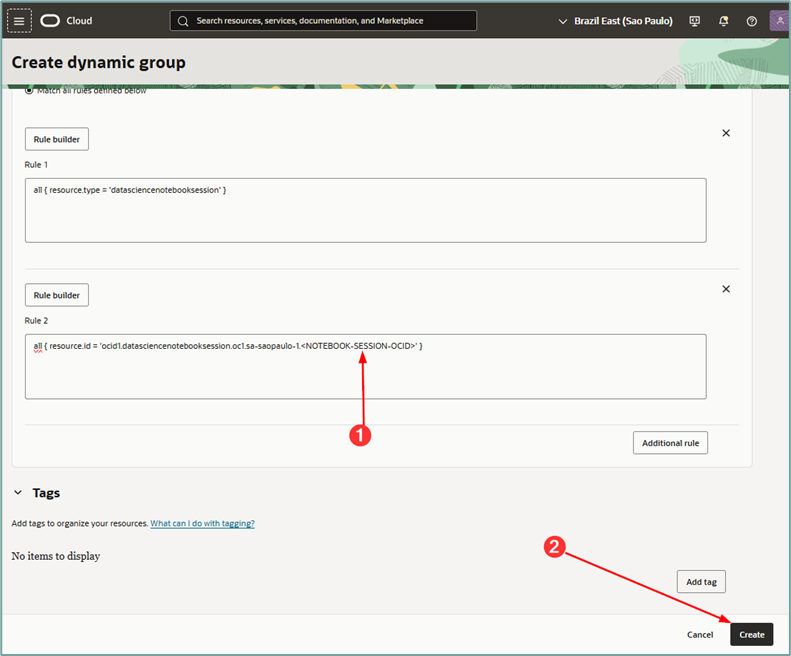
Once you have completed filling in the fields required to create the Matching Rule, click the “Create” button.
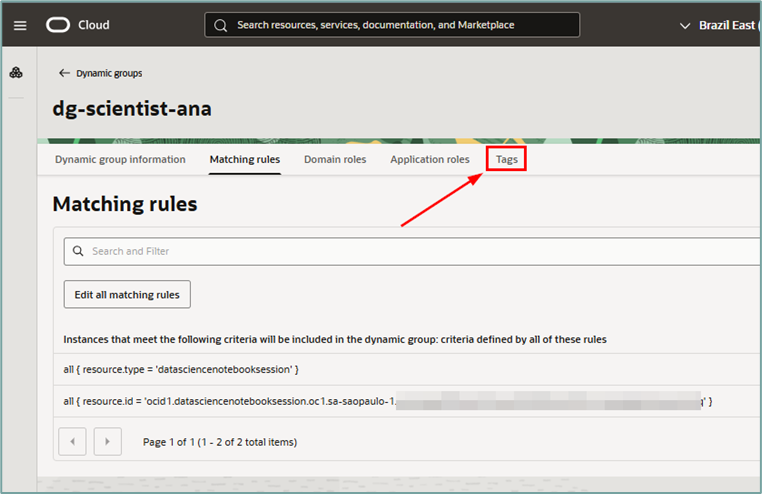
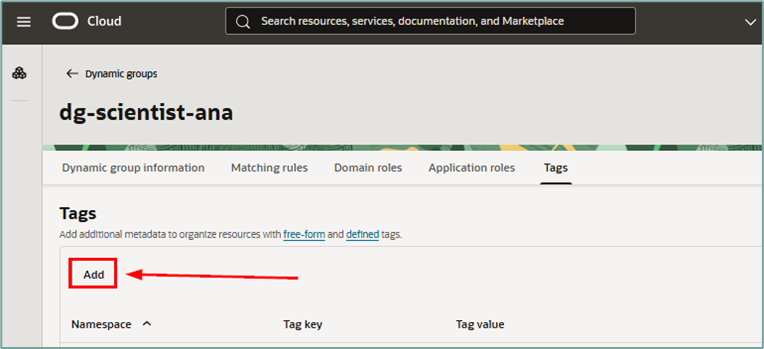
After completing the creation of the Dynamic Group, click on the “Tags” menu to insert the tag that will allow this Dynamic Group to have exclusive access to the Secret value created in the previous steps.
Once inside the “Tags” menu, click the “Add” button to add a new tag to the Dynamic Group:
Clicking the “Add” button will open a new window. Fill in the required fields:
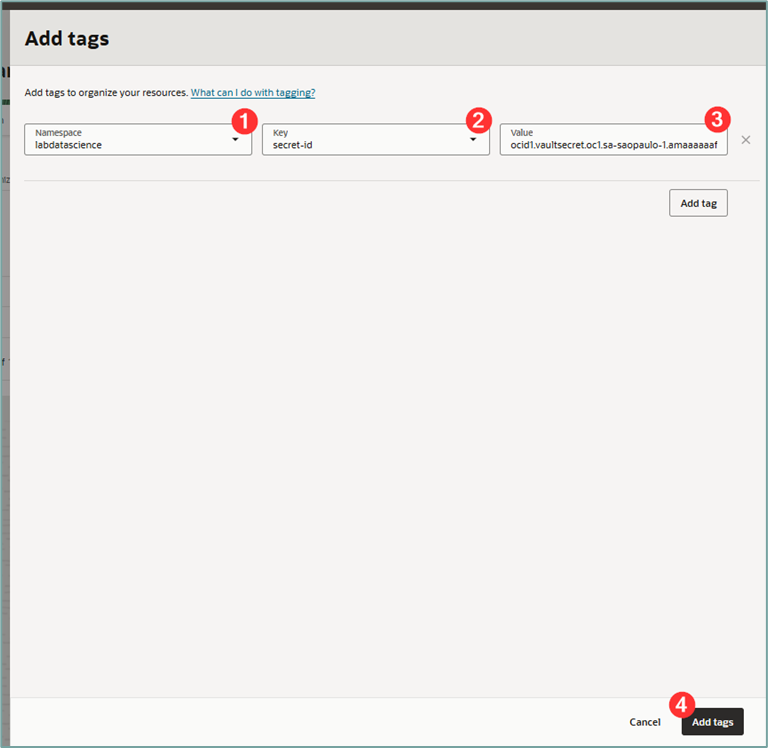
where:
- Namespace: Select the tag namespace created earlier.
- Key: Select the key of the tag created previously (here the key is called ‘secret-id’).
- Value: Enter the OCID of the protected secret that this Dynamic Group should have access to.
After filling in the fields, click the “Add tags” button to add the tag to the Dynamic Group.
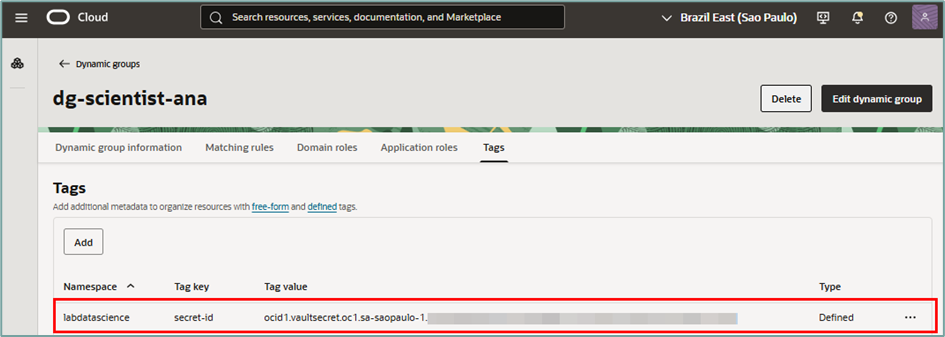
Up to this point, we have created all the necessary infrastructure to configure individual access to the secret via Notebook Session.
We now have all the resources prepared for the final creation of the policies that will correctly authorize access in the environment. To do this, we will now create the corresponding IAM policy.
OCI IAM Policy
It is important to emphasize that only one IAM Policy will be needed to authorize each data scientist’s access to their individual secret and Notebook Session. Since access management will be done via tagging (matching the Dynamic Group’s tag value and Secret OCID), and the tags will have the same key for all data scientists, varying only in content, this will be sufficient to ensure that cross-access to secrets does not occur.
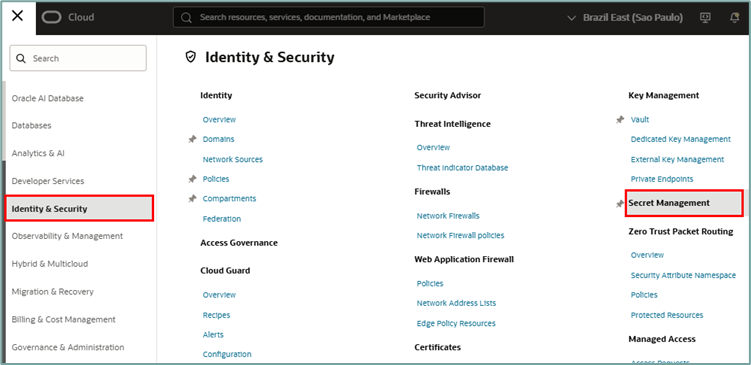
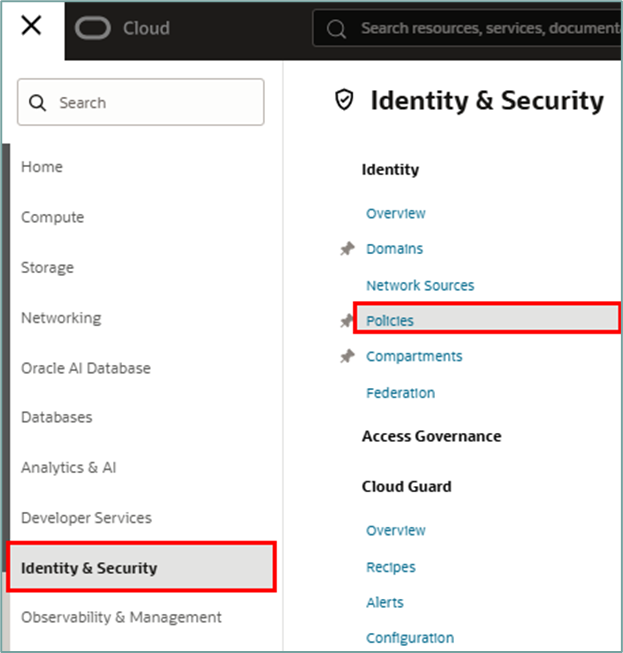
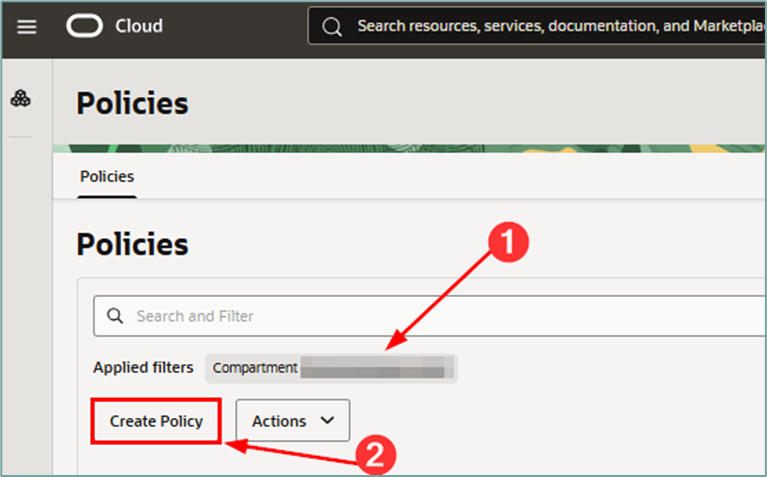
Once the resources have been created, the IAM policy can be created. To do this, access the menu “Identity & Security -> Policies”:
When you enter the Policies page, select the compartment where the IAM policy will be created, and then click the “Create Policy” button:
Statement #1 – Secret policy
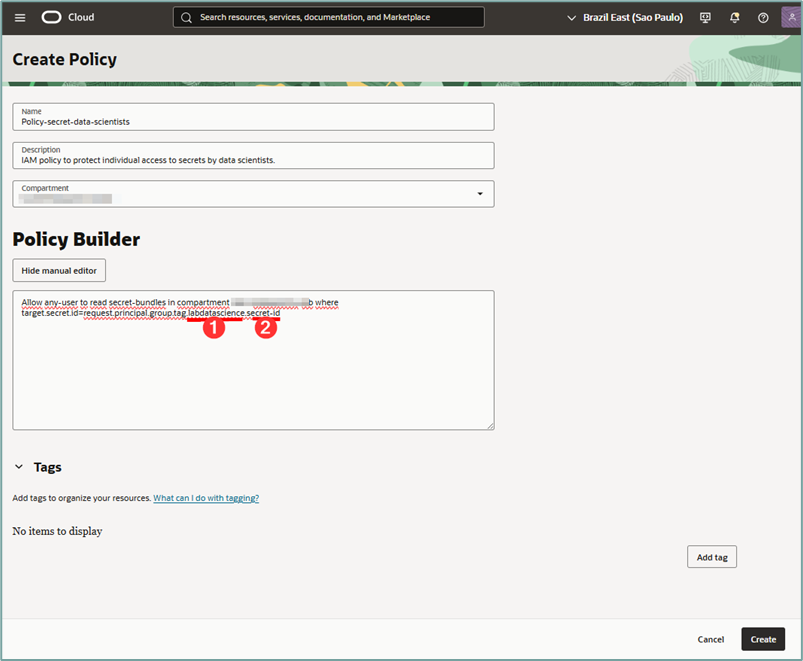
When accessing the workflow page for creating the IAM policy, fill in the required data and in the “Policy Builder” click the “Show manual editor” button:

where:
- Name: Give your policy a name.
- Description: Give a description for your policy.
- Compartment: Select the compartment where your policy will be created.
- Show manual editor: Click this button.
To continue, click the “Show manual editor” button. This button will open a window where you can write the policy manually (advanced mode). Fill in the policy.
Allow any-user to read secret-bundles in compartment <COMPARTMENT> where target.secret.id=request.principal.group.tag.<TAG-NAMESPACE>.<TAG-KEY>Important: From the statement above, change the values for COMPARTMENT, TAG-NAMESPACE, and TAG-KEY to reflect the values that were created in your environment.
where:
- Tag namespace: Insert the created namespace into your environment.
- Tag-key: Insert the tag key created in your environment.
Note: We’ve created the “secret-id” key inside the “labdatascience” namespace in the steps above.
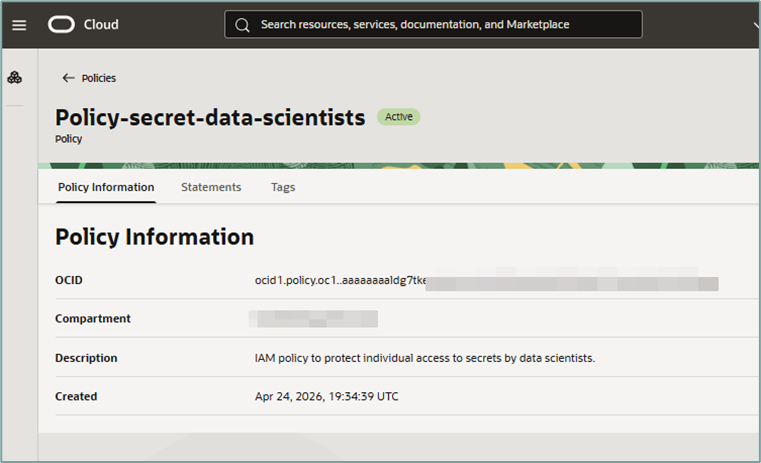
After entering all the information, click the “Create” button. The details page for the newly created policy will then be displayed.
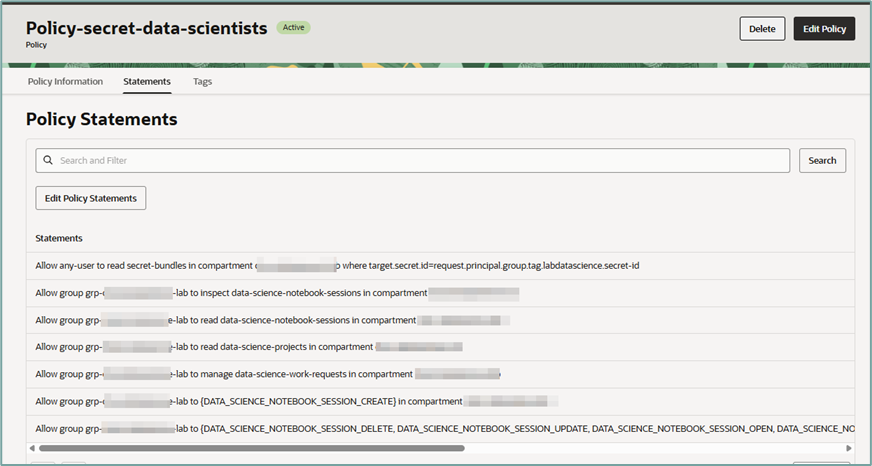
Important: Because data scientists will need to access the OCI Data Science Notebook Sessions service via the OCI Console, the following IAM policies will be required:
Allow group <GROUP> to inspect data-science-notebook-sessions in compartment <COMPARTMENT>Allow group <GROUP> to read data-science-notebook-sessions in compartment <COMPARTMENT>Allow group <GROUP> to read data-science-projects in compartment <COMPARTMENT>Allow group <GROUP> to manage data-science-work-requests in compartment <COMPARTMENT>Statement #2 – Notebook Session’s policy
This policy is intended to allow only one data scientist to access their individual Notebook Session. This will be done by allowing the data scientist’s group to access only the specified notebook session using the notebook session’s OCID as a filter.
To do this, we will use the tag inserted in the user group (where we will have 1 user group per data scientist) and, through its tag, we will filter the appropriate access.
Therefore, in the already created IAM policy, insert the statement below:
Allow group <GROUP> to {DATA_SCIENCE_NOTEBOOK_SESSION_CREATE} in compartment <COMPARTMENT>Allow group <GROUP> to {DATA_SCIENCE_NOTEBOOK_SESSION_DELETE, DATA_SCIENCE_NOTEBOOK_SESSION_UPDATE, DATA_SCIENCE_NOTEBOOK_SESSION_OPEN, DATA_SCIENCE_NOTEBOOK_SESSION_ACTIVATE, DATA_SCIENCE_NOTEBOOK_SESSION_DEACTIVATE} in compartment <COMPARTMENT> where target.notebook-session.createdBy = request.user.idwhere:
- Group: The user group where the data scientists are. There’s no need to have one group per data scientist.
- Tag-key: Insert the tag key created in your environment.
Note: Here we connect the dots because we will use IAM Policy to allow only the data scientist to access the Notebook Session that they themselves created.
Therefore, in the already created IAM policy, insert the statement below:
Testing access
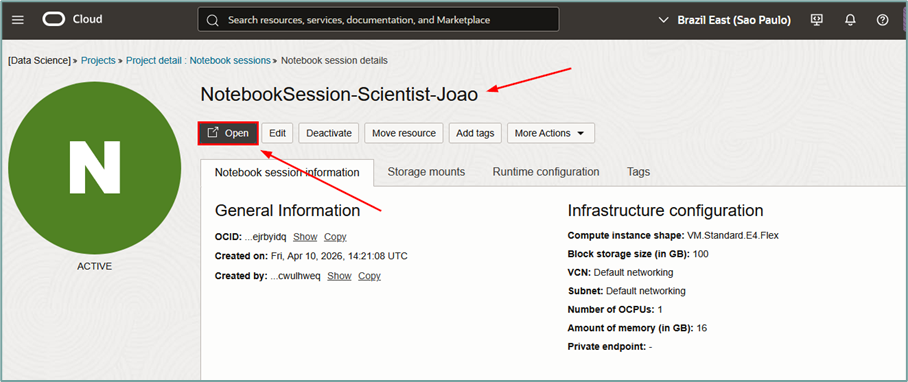
Once the policies are created, it’s possible to test access with a data scientist user (The data scientist must be able to activate, deactivate, and open the Notebook Session):
And finally, the data scientist will be able to open their Notebook Session without any problems:
And access will be granted correctly:
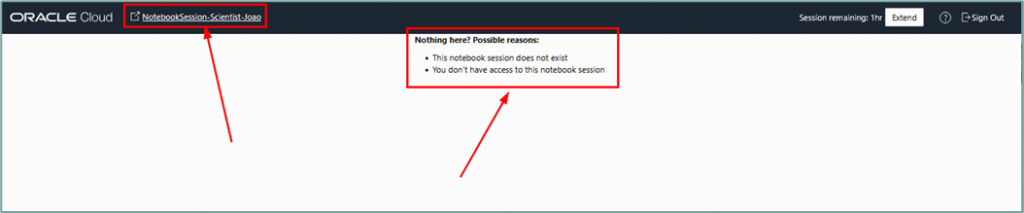
If a data scientist attempts to access another scientist’s notebook sessions, access will be denied.
Access denied.
Validating cross-access of secrets
When a data scientist is developing their code, they should only have access to their specific secret and should not have access to the secrets of other data scientists.
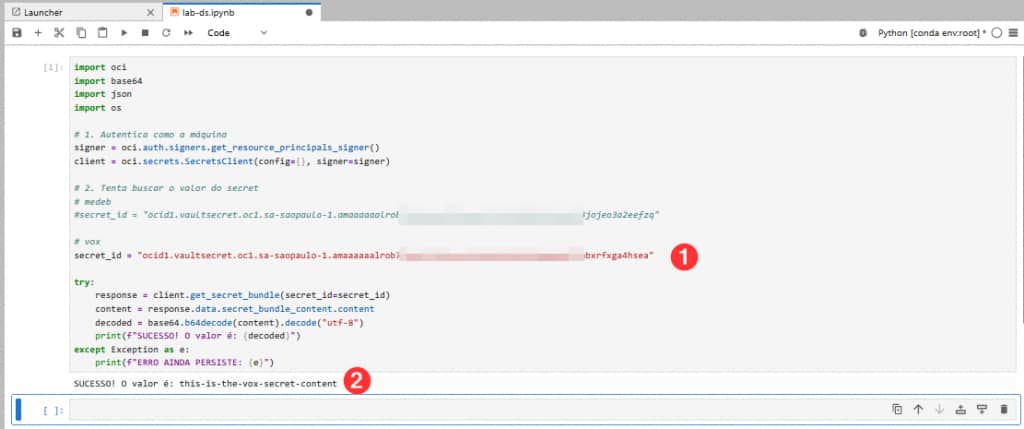
To validate this scenario, we accessed an OCI Notebook Session with the user called ‘vox’, where he deliberately tried to access, via Python code, the secret of another user called ‘medeb’.
When the user called ‘vox’ accesses the ocid of their secret (1), the return (2) is successfully obtained and the contents of the secret can be viewed.
However, if the user named ‘vox’ has access to the OCID of the secret of the user named ‘medeb’ and references this OCID in their code, the function returns a permission error:
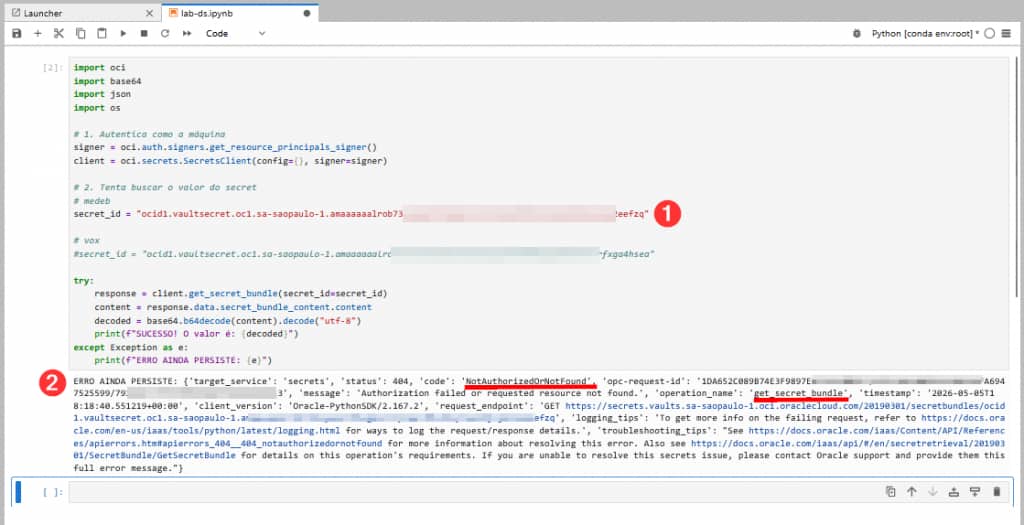
Thus, protecting individual secrets is possible even via OCI Notebook Sessions.
