The Oracle Database Backup Cloud Service is becoming a valuable backup location for customers requiring a DR site that can be stood up if needed.
OCI is the perfect location for a cold DR site because you can provision Oracle Database Cloud Services when needed.
In this post, I will go through the steps needed to configure your first Oracle Database Backup Cloud Service backup.
First here are some resources to help get you started.
Oracle Database Backup Cloud Service “Get Started” site
This site has many valuable resources
- Short video giving you an overview of the service, and what it offers.
- Link to a FAQ document on My Support answering most questions on the service.
- Documented typical workflow when using the service
- List of tasks with detail on how to utilize the features available with the service
Now to go through the checklist, and I will point to useful documentation for each step.
1. Create a new group for DB backups
In order to configure policies it is best to create new group and grant members of that group limitted permissions.
2. Create/identify the compartment for DB backups
Decide the compartment you want the backups to be stored in. Depending on the way your company is using compartments, you may want to create a new compartment for backups.
Compartments are very helpful to
- organize applications or environments in the console
- control permissions
- separate billing by application or environment to better control costs
Once you identifiy the compartment, you should save the OCID of the compartment.
3. Create a policy and set permissions for the policy
Allow group ‘{identity domain}’/'{group name}’ to inspect compartments in tenancy | Enables the group to see the list of compartments in the tenancy |
| Policy Statement | Purpose |
|---|---|
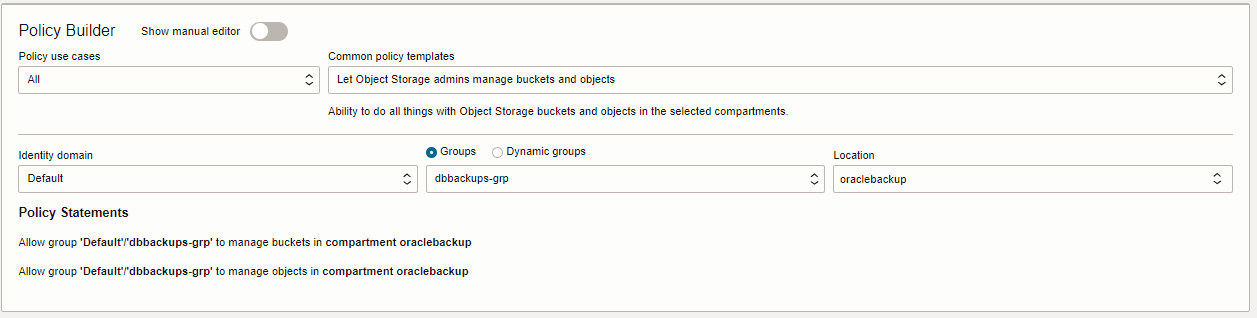
| Allow group ‘{identity domain}’/'{group name}’ to manage buckets in compartment {compartment} | Enables the group to create buckets to store backups, and update the Bucket information. |
| Allow group ‘{identity domain}’/'{group name}’ to manage objects in compartment {compartment} | Enables the group to upload/download/delete objects in the compartment |
| Allow service objectstorage-{region} to manage object-family in compartment {compartment} | Enables the use of lifecycle management and retention rules for object storage. |
NOTE: Most of these statements can be created using the Policy Builder (see screenshot below), if you chose the “Let Object Storage admins manage buckets and objects” policy template.
4. Create/identify the user that will be used to send/receive backups
When sending backups to object storage, most customers chose to use a specific user for backups that has limited permissions granted through a group.
Create this user, if it doesn’t exist and ensure this user is added to the group above.
5. Add an API key for the new user
When connecting to object storage with this user, an API key will be used. A new API key can be added by updating the users settings under “RESOURCES”.
In the bottom left corrner there is a section for “API Keys”, and you need to add a new API key for this user.
It is best to generate a new Public/Private key pair (if you don’t have one) during this step. Ensure you save both keys. If you already have a key pair you can upload it in this step.
6. Save the API key information for this user.
At the bottom of the window under API keys select the 3 dots to the right of the fingerprint associated with the API key you wish to use.
Select “View Configuration File” and this will bring up a window.
Save the information that appears on the screen as you will need this when configuring the database with these credentials.
In this popup you will see
- User OCID
- Fingerprint
- Tenancy OCID
- Region
Along with this information you will need the Compartment OCID from step #2, and the private key from step #5
7. Download the Cloud installer
8. Run the installer
I am not going to go into detail in this blog on the parameter for the installer. The instructions above do a good job of explaining the parameters, and I go through them in my blog which can be found here. If you are going to be sending backups to archive storage, it is best to create the bucket and lifecycle settings when running the installer.
Once you complete this step you should have the following items on your DB client
- The cloud backup library (libopc.so) in the directory specified during the install
- The wallet file containing the credentials to connect to object storage
- The configuration file used by the RMAN channel to communicate with object storage
9. Configure the channel and run the backup
Following the instructions in step #7 you configure a tape channel to OCI. The channel configuration contains the lbrary location and SBT_PARMS points to the configuration file for the database. The configuration file contains the auto-login wallet location (and entry name in the wallet), the bucket name, and the region.
RMAN> CONFIGURE CHANNEL DEVICE TYPE ‘SBT_TAPE’ PARMS ‘SBT_LIBRARY={backup library path}/libopc.so, ENV=(OPC_PFILE={config file path}/{configuration file})’;
When running the backup, RMAN encryption MUST be enabled.
RMAN> set encryption on;
If you don’t have an encryption key for your database (wallet or OKV), you can use a password to encrypt the backups.
It is also recommended to use compression to decrease the size of the backup, and network traffic.
BACKUP AS COMPRESSED BACKUPSET DATABASE PLUS ARCHIVELOG;
NOTE: ASO and ACO licenses are not needed to use RMAN encryption/compression when running backups with the Backup Service.
10. Backup your wallet file and logs
Along with the backup, to facilitate restoration you will need the encryption key (if you didn’t use a passworded backup), and the log file from the backup.
The logfile will help identify the name/location of the controlfile backup, and all the backup pieces included in the backup.
I would recommend including these in a different bucket from the backups, and put a retention lock on these backups.
If you are using a wallet, only upload the non-autologon wallet. If using OKV, you can upload the backup of OKV since the backup is encrypted.
The methods you can use to upload these files depend on how comfortable you are working with object storage.
My suggestions are.
- rclone – This is simple client tool that will upload objects to any S3 compatible bucket (and an OCI bucket). You can configure it with the OCI credentials or create new S3 credentials.
- oci cli – There is a client tool that allows you to communicate with OCI. This tool utilizes python, and is the most complicated to install and configure.
- preauthenticated URL – You can generate a unique URL that allows you only upload objects to a specified bucket without authentication. This is done with a simple Curl command using the URL. SInce the URL cannot be used to list, or download the wallet/log files, it is secure.
BONUS : Making your cloud backups “immutable” with retention lock.
After configuring your backups to go to OCI object storage, it is recommended to configure a retention lock on the bucket which provides immutability. Below is a link to documentation. Make sure you are using two buckets (one for backups and one for metadata) when configuring a retention lock on the bucket.
https://docs.oracle.com/en-us/iaas/Content/Object/Tasks/usingretentionrules.htm
Below is the checklist of steps to perform
Short checklist
Create a new group (if necessary) with limited privileges to manage backups
Identify the compartment to store the backups (bucket will be created later)
Create the policy for the group with permissions necessary to manage backups.
Create the user which will mange backups
Add the API key for the user to send backups
Save the login information for the user
Download the Oracle Database Cloud Backup Service installer
Run the installer and create the backup
Configure the channel for object storage, and run the backup
Securely upload and save the encryption key along with backup logs.