Utilizing the Autonomous Recovery Service for your Oracle Databases in OCI (or multicloud) is the best method for backing up your Oracle databases.
The documentation for configuring the Recovery Service can be found Here.
In this blog post I will go through the steps required to successfully implement this service.
FIRST – the most common issue we see with customers configuring backups is opening network ports for the Autonomous Recovery Service.
There are 2 ports that need to be configured for the Autonomous Recovery Service .
- 2484 – This port is used for the SQL*Net connection to the RMAN catalog which is utilized by the Autonomous Recovery Service
- 8005 – This port is used for the backup pieces themselves
You can configure these security rules either by using a Security List or an NSG.
Security lists are the easiest to implement and they are the recommended method when backing up databases hosted in OCI.
An NSG is typically used when backing up databases in a Multicloud environment. Many NSGs are created automatically in Multicloud environment.
Below is a checklist of steps to get you started.
Start by completing the steps for either OCI native databases (Section 1) or Multicloud databases (Section 2) then continue with the common steps.
Section 1 – OCI native databases
1.1 Create a security list for your database backups
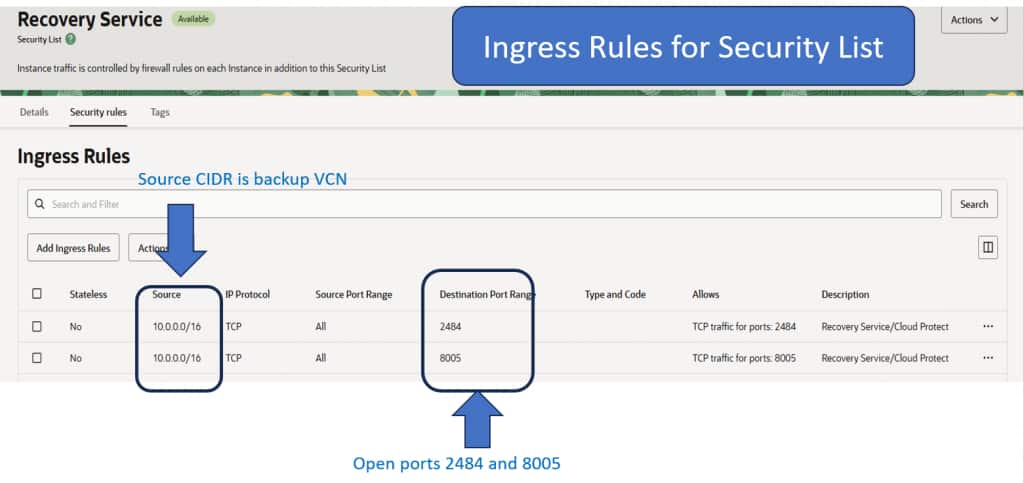
Security Lists are the easiest to use, and they can control the traffic for the recovery service subnet. They must include stateful ingress rules to allow destination ports 8005 and 2484.
Checklist for Security rules in the security list
Ingress
1. Rule 1 – Ingress. Allow HTTPS backup traffic from within the Database VCN
- Stateless: No (All rules must be stateful)
- Source Type: CIDR
- Source CIDR : CIDR of the VCN where the database resides
- IP Protocol: TCP
- Source Port Range: All
- Destination Port Range: 8005
2. Rule 2 – Ingress. Allow SQLNet traffic from from within the Database VCN
- Stateless: No (All rules must be stateful)
- Source Type: CIDR
- Source CIDR : CIDR of the VCN where the database resides
- IP Protocol: TCP
- Source Port Range: All
- Destination Port Range: 2484
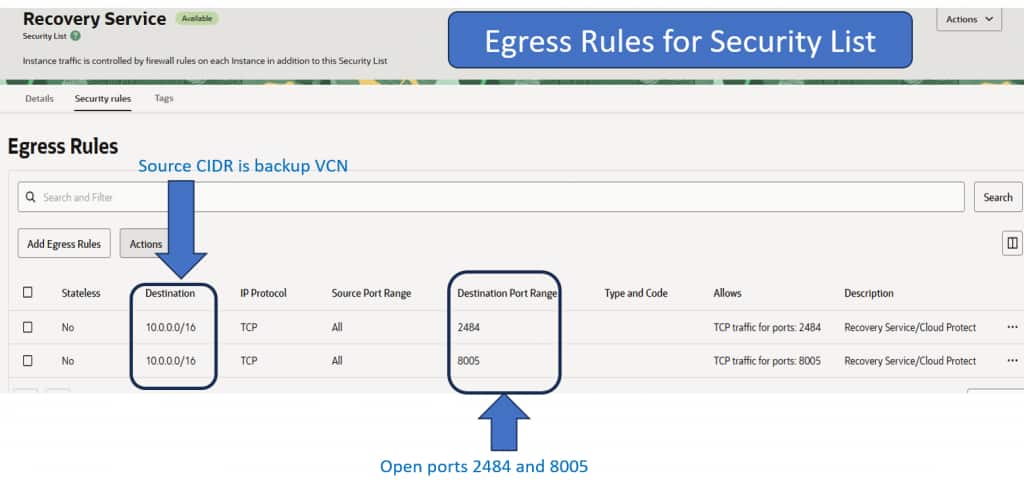
Egress
Security lists typically default to Egress rules of 0.0.0.0/24, all ports, all protocols. You want to make sure if Egress rules are restricting traffic, it does allow ports 2484 and 8005. Also If your VCN restricts network traffic between subnets and you are using a dedicated subnet for backups, ensure to add an egress rule for ports 2484, and 8005 from the database subnet to the Recovery Service subnet that you create. Traffic must be able to flow within the VCN to any Recovery Service Subnet registered.
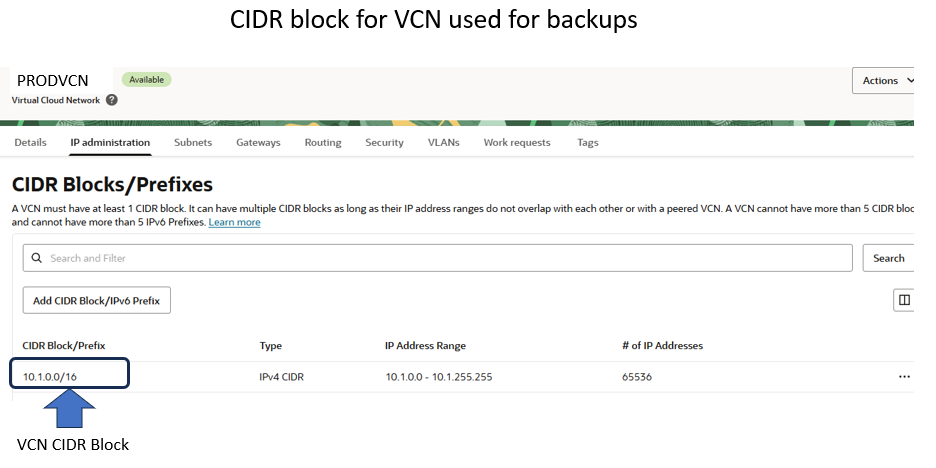
Below is an example of the configuration for my VCN (My CIDR block is 10.1.0.0/16 for this example).
NOTE: I configured the Security List for my full VCN CIDR block. This allows backup traffic from any subnet within my VCN. If you wish to limit traffic to a single subnet in your VCN you can narrow the CIDR block to just include the subnet(s) registered with the Autonomous Recovery Service (which could include the default backup subnet). However, if you do migrate to using other/additional subnets, you will have to adjust your Security List appropriately.
The Autonomous Recovery Service will automatic use and register a default backup subnet based on the Database service utilized.
- On Exadata Database service the backup subnet is used for the Autonomous Recovery Service
- On Base Database Service the Database subnet is also used for the Autonomous Recovery Service
NOTE: If you are backing up a large number of database and/or you have a small number of IPs available in the CIDR block used within the default backup subnet, you should consider creating a separate subnet for the service. This is documented in the optional section toward the end.
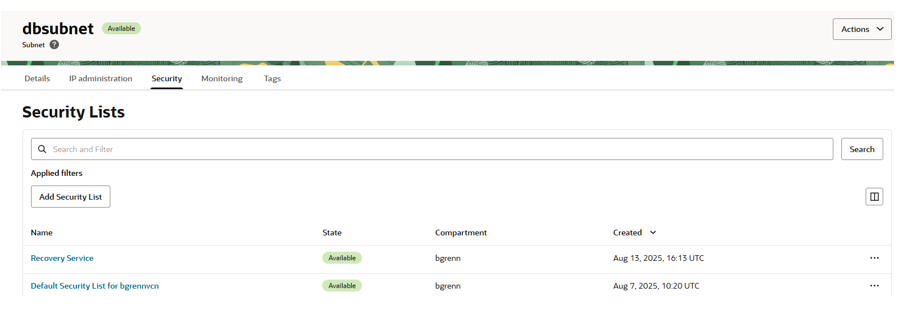
1.2 Assign the security list to your backup subnet
Below is a screen shot of my subnet “dbsubnet” which is the network I am using for my Base Database service.
I added my security list named “Recovery Service” to this subnet under the security section.
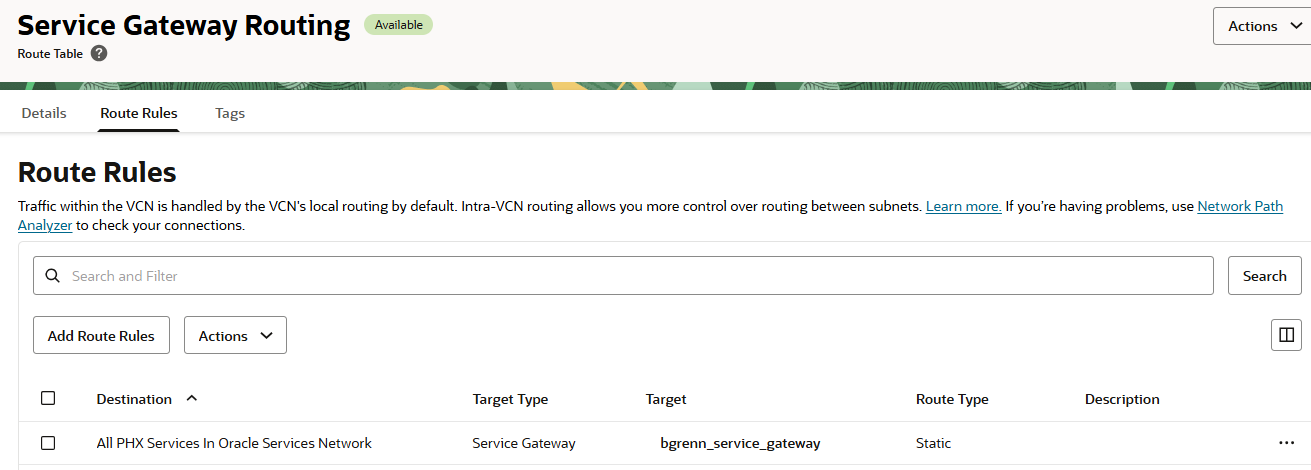
1.3 Ensure the Autonomous Recovery Service Subnet can route to the Oracle Services Network
Ensure the routing rules for your Default Recovery Service subnet include a route to the Oracle Services network. Below is a screenshot of the routing rules that I configured and attached to my subnet. I had previous created a service gateway that am including in the routing rules.
Section 2 – Multicloud databases
NOTE: At this time new AWS Multicloud environments includes some automation pre-staged and you can skip some steps if using AWS as a partner cloud..
- Creates a Recovery Service Subnet with the new NSG
-
Creates a Recovery Service Subnet with the new NSG
-
Setup the rules for the NSG
-
Adds the needed IAM policy for subscription
2.1 Configure a Network Security Group (NSG) for the recovery service
With Multicloud there are already default NSGs created when you create the VCN. It is best to continue this strategy by creating an NSG for the recovery service.
Network Security Groups control the traffic for the recovery service subnet and they must include stateful ingress rules to allow ingress ports 8005 and 2484.
Checklist for Security rules in the NSG
Ingress
1. Rule 1 – Ingress. Allow HTTPS backup traffic from within the Database VCN
- Stateless: No (All rules must be stateful)
- Source Type: CIDR
- Source CIDR : CIDR of the VCN where the database resides
- IP Protocol: TCP
- Source Port Range: All
- Destination Port Range: 8005
2. Rule 2 – Ingress. Allow SQLNet traffic from from within the Database VCN
- Stateless: No (All rules must be stateful)
- Source Type: CIDR
- Source CIDR : CIDR of the VCN where the database resides
- IP Protocol: TCP
- Source Port Range: All
- Destination Port Range: 2484
Egress
3. Rule 1 – Egress. Allow HTTPS backup traffic from within the Database VCN
- Stateless: No (All rules must be stateful)
- Source Type: CIDR
- Source CIDR : CIDR of the VCN where the database resides
- IP Protocol: TCP
- Source Port Range: All
- Destination Port Range: 8005
4. Rule 2 – Ingress. Allow SQLNet traffic from from within the Database VCN
- Stateless: No (All rules must be stateful)
- Source Type: CIDR
- Source CIDR : CIDR of the VCN where the database resides
- IP Protocol: TCP
- Source Port Range: All
- Destination Port Range: 2484
NOTE: If your VCN restricts network traffic between subnets, and you are not using the default subnet, ensure to add an egress rule for ports 2484, and 8005 from the database subnet to the Recovery Service subnet that you create.
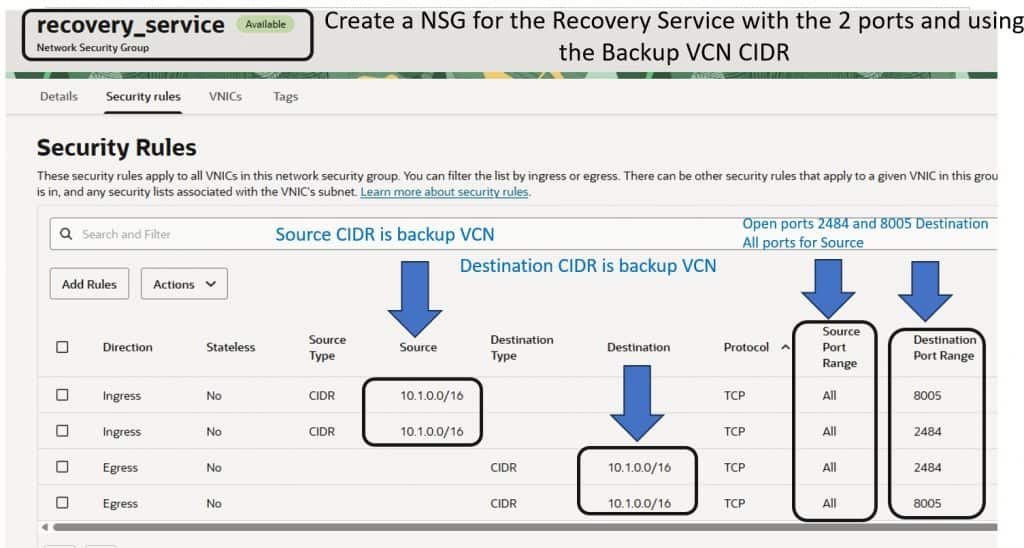
Below is an example of the configuration for my VCN (note the CIDR Block is 10.1.0.0/16).
NOTE: I configured the NSG for my full VCN CIDR block. This allows backup traffic from any subnet within my VCN. If you wish to limit traffic to a single subnet in your VCN you can narrow the CIDR block to just include the subnet(s) registered with the Autonomous Recovery Service (which could include the default backup subnet). However, if you do migrate to using other/additional subnets, you will have to adjust your NSG appropriately.
Below is the NSG I created to be used for the Autonomous Recovery Service subnet.
2.2 Register the Autonomous Recovery Service subnet
The Autonomous Recovery Service will automatic use a default backup subnet based on the Database service utilized.
- On Exadata Database service the backup subnet is used for the Autonomous Recovery Service
- On Base Database Service the Database subnet is also used for the Autonomous Recovery Service
NOTE: If you are backing up a large number of database and/or you have a small number of IPs available in the CIDR block used as the default backup subnet, you should consider creating a separate subnet for the service. This is documented in the option section toward the end.
If you are using the default network for backups you would register this subnet, otherwise you will be registering subnet(s) that you identified as Autonomous Recovery Service subnets.
Below is a screen show showing where you would register the backup subnet.
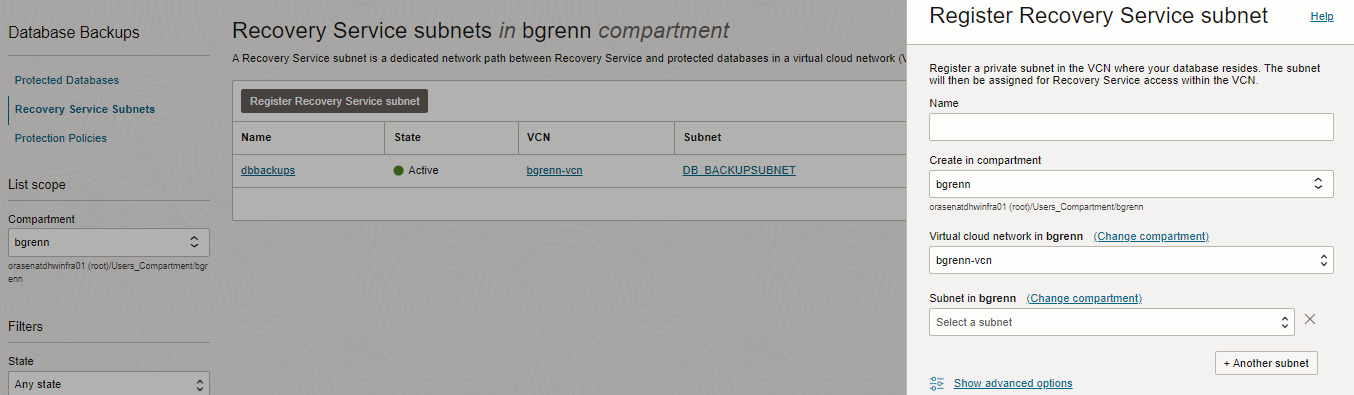
2.3 Register the NSG with the Recovery Service Subnet
When registering your Recovery Service subnet also make sure you register the NSG along with your subnet. The screen shot below shows my NSG associated with my subnet being registered with the Recovery Service.

2.4 Decide where the backups will be stored
By default backups created in a Multicloud environment will be stored in the paired OCI region where the database is hosted. If you wish to store the database backups in OCI, then the default Protection Policies can be used.
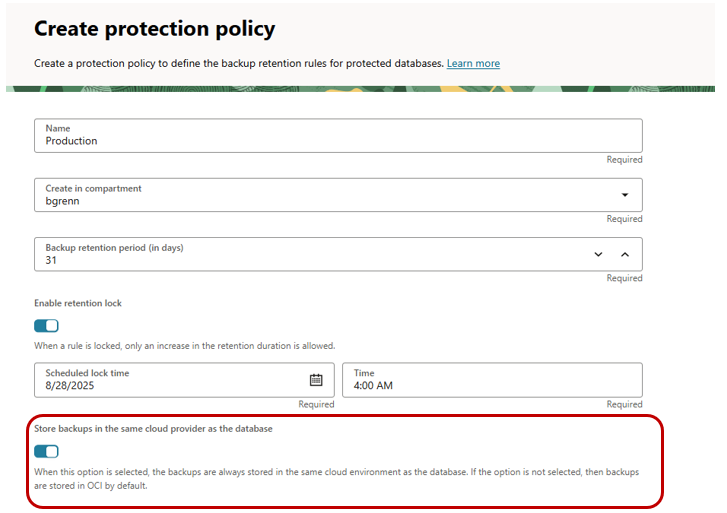
If you wish to store the Autonomous Recovery Service backups in the same cloud provider where the database is hosted, you must create a custom protection policy.
Below shows creating a custom protection policy, and you can see at the bottom you are given the ability to store the backups in the same cloud provider as the database. Change this setting and create a custom policy. Ensure your databases are configured using this custom policy when configuring your backups.
Section 3 – Common steps for both OCI and Multicloud databases
3.1 Ensure your tenancy’s resource limits are adequate (Including Multicloud if applicable)
Before implementing the Recovery Service, you first must see what the resource settings are for the region your database resides in your tenancy. You want to make sure that the “Space Used for Recovery Window (GB)” and “Protected Database Count” allow for the number of databases, and backup size of the databases you want to utilize the service for.
NOTE: With a paid tenancy there are default limits that are set for the tenancy.
- 10 Protected Databases
- 10 TB of storage
They allow you leverage the service for a few small databases.
Below is what you would see in the console for the Autonomous Recovery Service. This is a screen shot from my tenancy showing the limits for the US-EAST-1 region in my tenancy. In your tenancy, for each region, you should see what the current limits are, the current usage, and available resources. When looking at the root compartment, this will show you the Limits and usage for the whole tenancy within that region.
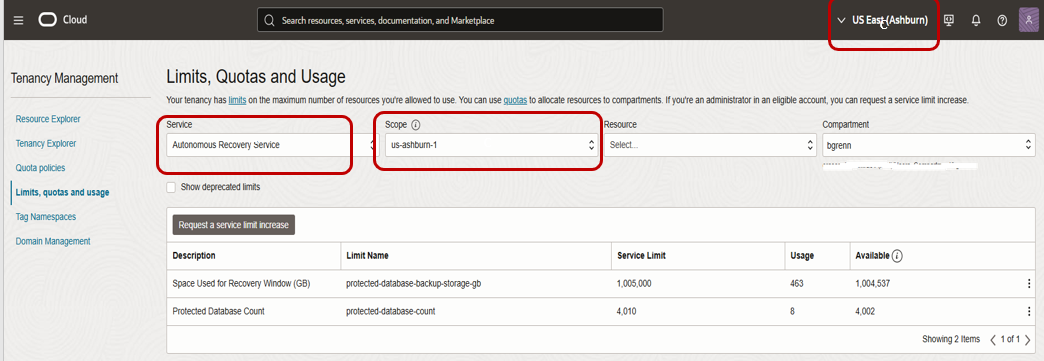
If you need to increase the limits for your tenancy click on the 3 dots to the right of the limit you want to increase. It will bring up a choice to “Open Support Request”. After choosing “Open Support Request” you will see a window that allows you to request a limit increase for your tenancy.
NOTE: There is a second choice when clicking on the 3 dots to “Create Quota Policy Stub”. Using the stub displayed you can limit the quota of specific compartments. This can be used to limit the usage for your “dev” compartment for example, ensuring there is space within your limits for production.
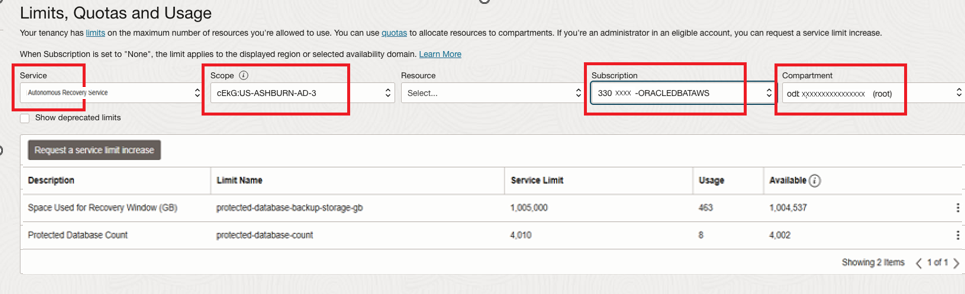
Multi-cloud Limits : When configuring the Autonomous Recovery Service for in a multicloud environment, you must review and request an changes to your resource limits for your multicloud subscription. On the “Limits, Quotas and Usage” above, you will also have a selection for “Subscription”, and you will be able to choose your multicloud subscription and adjust the limits for your subscription.
Below shows you where you would see the subscription section of limits in a multi-cloud environment.
3.2 Configure the policies for the tenancy
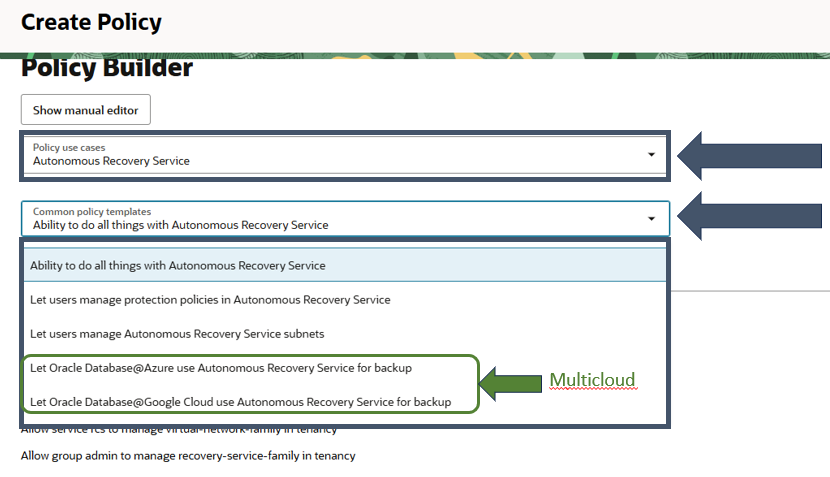
It is recommended to use policy builder when adding the policies for the recovery service. This will ensure that you have the most current applicable policies set.
Below is a screen showing how to do this
When adding the policy, you should select “Autonomous Recovery Service” under policy.
Then under “Common Policy Templates” chose the template that matches your environment.
NOTE: If using Multicloud ensure you pick the appropriate policy for your partner cloud hosting environment.
If you are using DB@AWS and you paired an AWS tenancy to an OCI tenancy prior to AI World 2025 you need to set the policy below
Allow service database to use organizations-assigned-subscription in tenancy where target.subscription.serviceName = 'ORACLEDBATAWS'
Create the policy after assigning the group.
Note: One of the Policies grants permissions for the group “admin” to manage the recovery service. If your administration group is not “admin” update this policy and replace “admin” with your administrator group.
3.3 Ensure the Autonomous Recovery Service is supported for your database Release
You can use Oracle Database Autonomous Recovery Service as the backup destination for Oracle Cloud databases provisioned with the following Oracle Database releases.
| Oracle Database Edition and Version | More Information |
|---|---|
| Oracle Database 19c Release 16 (19.16) or later | To use the Real-time data protection feature, your database must be provisioned with: Oracle Database 19c Release 18 (19.18) or later |
| Oracle Database 21c Release 7 (21.7) or later | To use the Real-time data protection feature, your database must be provisioned with: Oracle Database 21c Release 8 (21.8) or later |
| Oracle Database 23ai | To use the Real-time data protection feature, your database must be provisioned with: Oracle Database 23ai Release 4 (23.4) or later |
3.4 Ensure your COMPATIBLE initialization parameter is current
Your COMPATIBLE parameter needs to be set to 19.0.0 or above in order to use the Autonomous Recovery Service. This parameter is typically not updated during the upgrade process, so it is important to ensure that it is set to a high enough value.
Below is the type of message you will see if it is not set correctly.
Database job: Failure. DBAAS-10327 : Minimum required COMPATIBLE version is 19.0.0. Current database COMPATIBLE version is: 12.1.0.2.0.
3.5 Ensure your database has TDE fully configured
When using the Autonomous Recovery Service, you must have your database fully TDE encrypted. For new databases that are born in the cloud, this should already be done. But if you creating a stub database in OCI and migrating a database to an Oracle Database Service from on-premises, or somewhere else, you might not meet all the criteria. For these databases you should verify that you meet the prerequisites for a backing up to the recovery service. I have a blog post you can find here that will outline what to check for with queries to execute.
From a high level you should meet these 3 criteria.
- You need to have WALLET_ROOT configured in the database. If you are still using sqlnet.ora you need to use the tooling (see below) to properly set WALLET_ROOT for all databases that will be utilizing the Recovery Service. Note: Setting the ENCRYPTION_WALLET_LOCATION in the sqlnet.ora is not supported and will be depricated.
dbaascli tde enableWalletRoot – enable wallet_root spfile parameter for existing database.
- You need to have an encryption key set for the CDB and ALL PDBs in your database.
- ALL tablespaces must be TDE encrypted before executing your first backup.
           Usage: dbaascli tde enableWalletRoot --dbname <value> [--dbRestart <value>] [--precheckOnly]
                     Where:
                          --dbname - Oracle database name.
                          [--dbRestart - database restart option. Valid values : full|rolling ]
                          [ --precheckOnly - run the prerequisite checks and report the results. ]
                          [--resume - to resume the previous operation]

            NOTE: In order for this change to take effect you need to have a restart of the database. The default is a rolling bounce of the database.
3.6 Turn off any manual operational backups
In some cases, OCI users are executing manual operationational backups. These are backups which are run outside the tooling and support a point-in-time recovery (non-KEEP backups).
If you are running any of these types of operational backups, it is critical that you turn them off at this point. Executing operational backups to two different locations can cause issues with both backups.
NOTE: if you are using the tooling for object storage backups, and switch to the Recovery Service, the switchover will be automated by the tooling, and all of the previous backups will remain available.
3.7 Ensure cloud providers DNS entries are resolved
This Autonomous Recovery Service uses endpoints and DNS entries within the Cloud are assigned to those endpoints. If you customize your DNS resolution, and cloud DNS entries are not also resolved you may get errors from the Recovery Service when it executes backup jobs. If you receive TNS errors resolving the host name, review your DNS configuration, and ensure cloud entries are resolvable.
When the Autonomous Recovery Service is unable to resolve the DNS entries you see the error below when performing a tnsping. If this occurs you must ensure that the private DNS resolver for the DB host is used. This error often occurs when the default DNS resolver is changed in the /etc/resolve.conf file from 169.254.169.254. The IP address 169.254.169.254 automatically points to the private DNS resolver in the VCN. If using Cloud Protect, or if using a different primary DNS resolver you must create a private endpoint IP address for the private DNS resolver, and forward DNS to that endpoint IP address. The private DNS resolver for the VCN must be used with the Autonomous Recovery Service.
tnsping dbrs
TNS-12545: Connect failed because target host or object does not exist
Section 4 – Optional
4.1 Create a subnet for the Autonomous Recovery Service (Optional)
The Autonomous Recovery Service will automatic use a default backup subnet based on the Database service utilized.
- On Exadata Database service the backup subnet is used for the Autonomous Recovery Service
- On Base Database Service the Database subnet is also used for the Autonomous Recovery Service
NOTE: If you are backing up a large number of database and/or you have a small number of available in the CIDR block used as the default backup subnet, you should consider creating a separate subnet for the service.
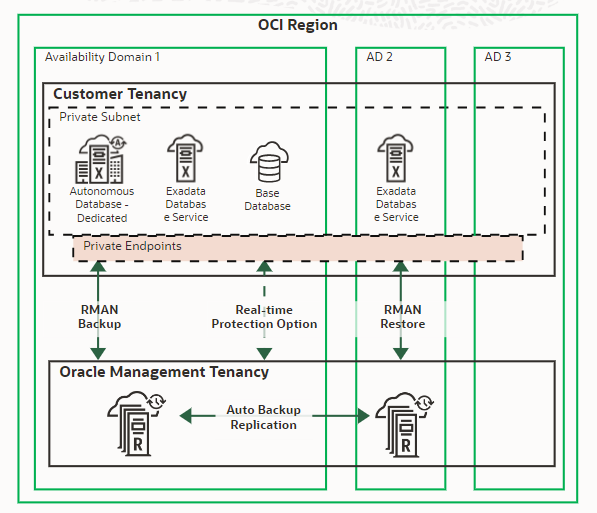
The Auonomous Recovery Service uses Private endpoints to control backup traffic between your database and the recovery service. Below is the architecture.
Steps to create a separate subnet for backups..
Each Recovery service private subnet needs to be created within the VNC where your database resides.
NOTE: You can use a public subnet, but it is not recommended for security reasons.
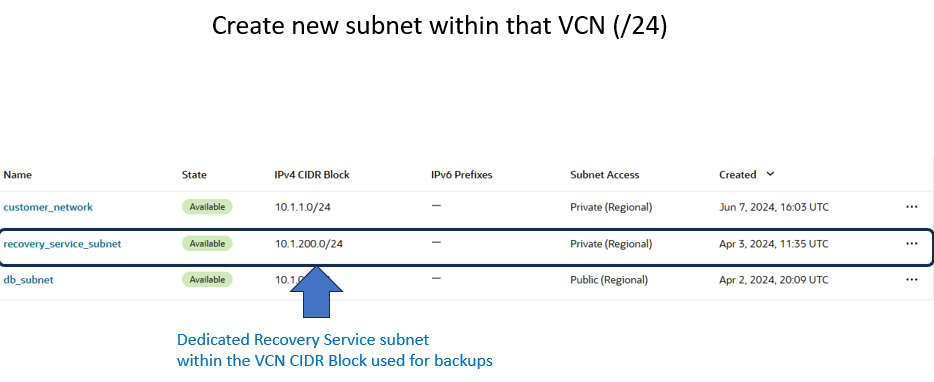
The recommended size of the subnet is /24 (256 IP addresses). You can create a new subnet, or use an preexisting subnet in your database’s VCN. This subnet must be IPv4.
Below is a screenshot of my dedicated Recovery Service subnet.
Clarifications
There has been many questions around how many free IP addresses you need, and if you can multiple subnets.
- When IP addresses are assigned to the Recovery Service, they are assigned as a “Chunk” of IP addresses. This is similar to what you expect for a database and scan listeners. At this point, a chunk consists of 6 IP address that do not have to be concurrent IPs, or even in the same subnet. Keep in mind the “Chunk” size (number of IP addresses in a chunk) may change with future releases.
- The number of “chunks” needed is managed by the recovery service, and may change as the service dynamically manages backup locations over time.
- The number of “chunks” needed would only increase when adding new databases. If there is not enough free IP addresses to allocate the next chunk, adding a new database will fail and you will be alerted to add free IP addresses.
- Additional IP addresses can be added to the Recovery Service by adding subnets. You can use multiple subnets, and subnets do have to be publicly routable.
- Subnets can be removed and it’s IP addresses will be moved to the other existing subnets.
- If you are limited on available IP addresses It is recommended to start with a minimum of a /27 CIDR which will allow for 32 IP addresses.
Short checklist
Section 1 – OCI Native databases
Create a security List for your database backups
Assign the security list to your backup subnet
Ensure the Auonomous Recovery Service subnet has access to Oracle Services
Section 2 – Multicloud databases
Configure a network security group (NSG) for the recovery service
Register the backup subnet as a Recovery Service Subnet
Register the NSG with the recovery service subnet
Decide where to store your backups
Section 3 – For all databases
Check your limits and quotas for the Recovery Service (including your subscription for Multicloud)
Create the policies for the Recovery Service.
Check your release version and availability for the Recovery Service
Check the COMPATIBLE inititialization parameter
Ensure you are using WALLET_ROOT for the location of the encryption wallet
Ensure all tablespaces are TDE encrypted
Disable any existing operational backups that were not executed through the tooling
Ensure Cloud DNS entries are resolvable
Section 4 – Optional
Create a new subnet for recovery service backups
If your backups are still failing check your Security List and/or NSG to ensure you have the ports open properly for the Recovery Service. There are many prechecks that occur, including checking limits, but port issues cannot be detected until the backups are configured.
NOTE: If you follow this checklist and the configuration of the Autonomous Recovery Service fails onboarding your first database, follow the steps below when you open up an SR
1. Open the SR for the database service you are using
– Oracle Cloud Infrastructure -Exadata Cloud Service
Problem type should be Patching issues & Tools –> Cloud Tools
– Oracle Database Cloud Service
Problem type should be DBCS Tools –> Using Cloud Toolset
– Autonomous Database Dedicated
Problem type should be Database Administration –> Backup and Recovery
2. Include the following information when opening up the SR.
- Workrequest error OCID that appeared in the console.
- Database OCID.
- VM Cluster OCID.
- Screenshots of the error.
- Region.
Cloning Issues
When cloning the backups to another environment, it can be either
- Another VCN within the same region
- A VCN in another region
You will need to ensure that the ports requried by the Autonomous Recovery Service are open to restore the database.
In these other environments you might not have configured the Autonomous Recovery Service. In that case you need to ensure that both ports, 2484 and 8005, required for restores are open by either adding them to a secury list (typically for OCI backups), or adding them to a Network Security Group (Typically for multicloud).
Similar to backups, restores will create an endpoint on the “backup subnet” in order to perform the restore operation. The Security list or NSG would be added to the Subnet typically used for backups.