Connect Your AI Agent to the Real World — Instantly ⚡ Real-Time APIs 🔒 Secure Auth 🤖 Oracle Fusion 🔄 Live Workflows
OVERVIEW
What is the External REST Tool?
Oracle AI Agent Studio lets you build agents that go beyond chat. The External REST Tool bridges your agent to any live API — HCM, CRM, custom microservices — fetching real-time data and triggering actions, secured by Oracle’s infrastructure.
⚡Real-Time & Actionable Fetch live data, trigger workflows, update records — the moment a user asks.
🔒Secure & Centralized Auth (API Key / OAuth) is configured once at tool level and applied to all calls automatically.
HOW IT WORKS
Four Steps to Go Live
- Create & Authorize Tools → + Add → External REST. Enter the Base API URL and configure auth (API Key / OAuth) in the Authorization tab.
- Define Functions Functions tab: set HTTP method, resource path, parameters, and headers. Function name: alphanumeric, _ and – only.
- Assign & Prompt Add the tool to your agent. Write a system prompt mapping user inputs to parameters and instructing how to parse the JSON response.
- Test & Deploy Use the Chat Debugger to confirm the agent retrieves correct live data. Iterate on the system prompt until accurate.
HANDS-ON WALKTHROUGH
Salary Comparison Agent
An agent that fetches market salary data by location and job code and compares it with current employee salaries — all in one conversation.

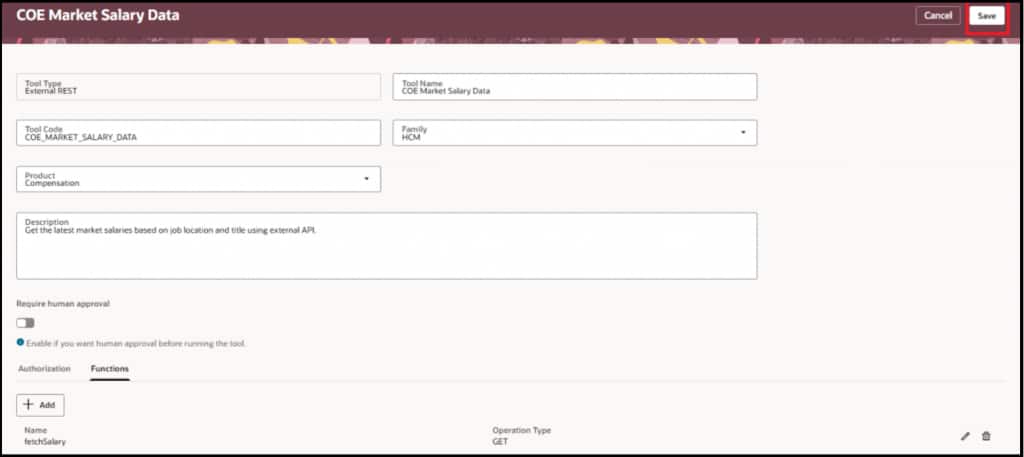
Tools tab → + Add → Type: External REST. Fill in Name, Family, Product, and Description. In the Authorization tab enter the Base API URL and credentials.
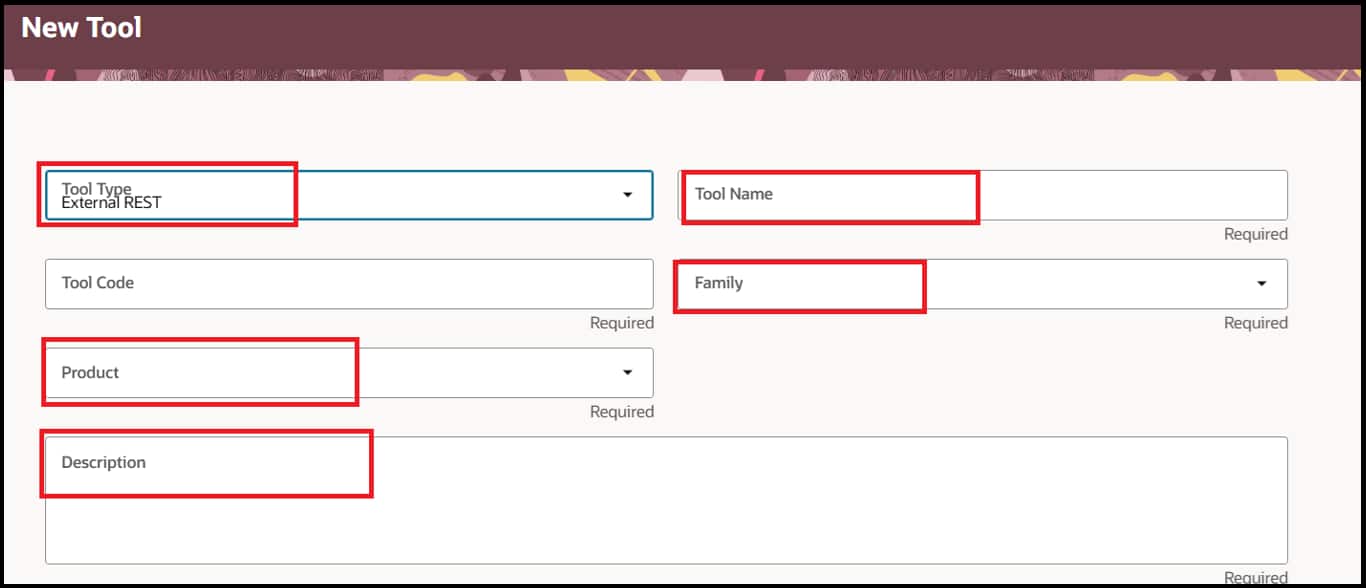
Tool type, metadata, and authorization setup
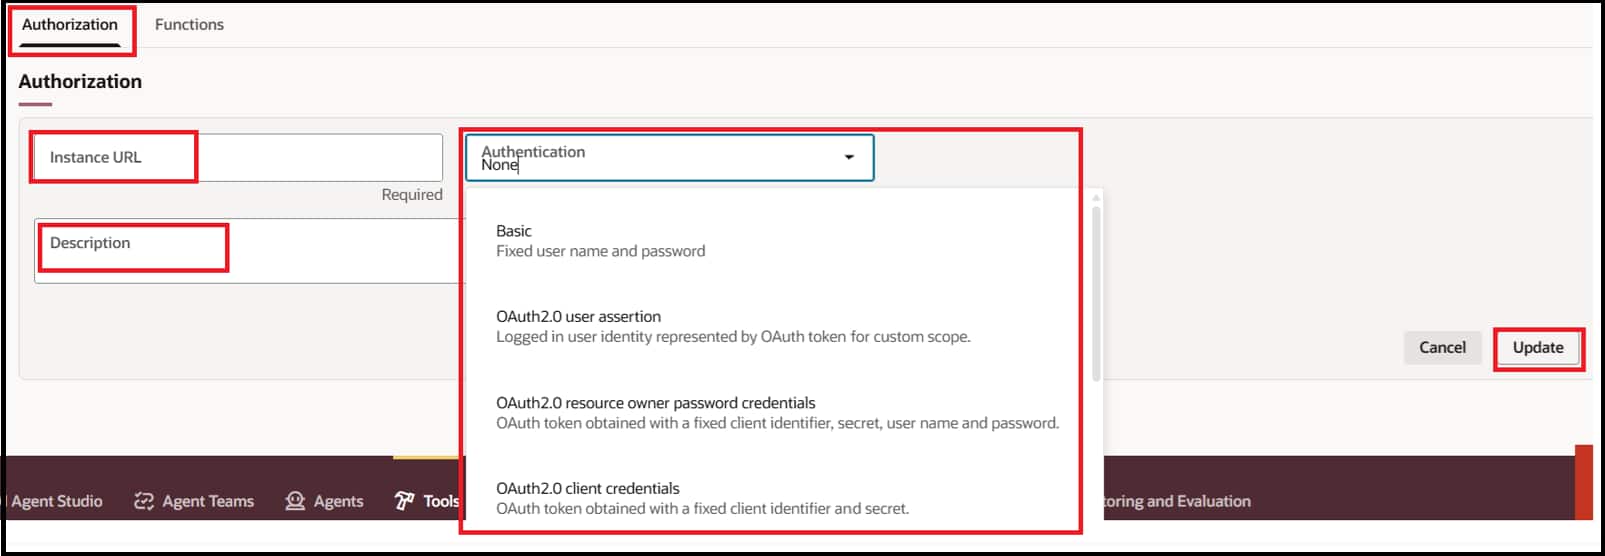
Authorization tab — Base URL and auth credentials

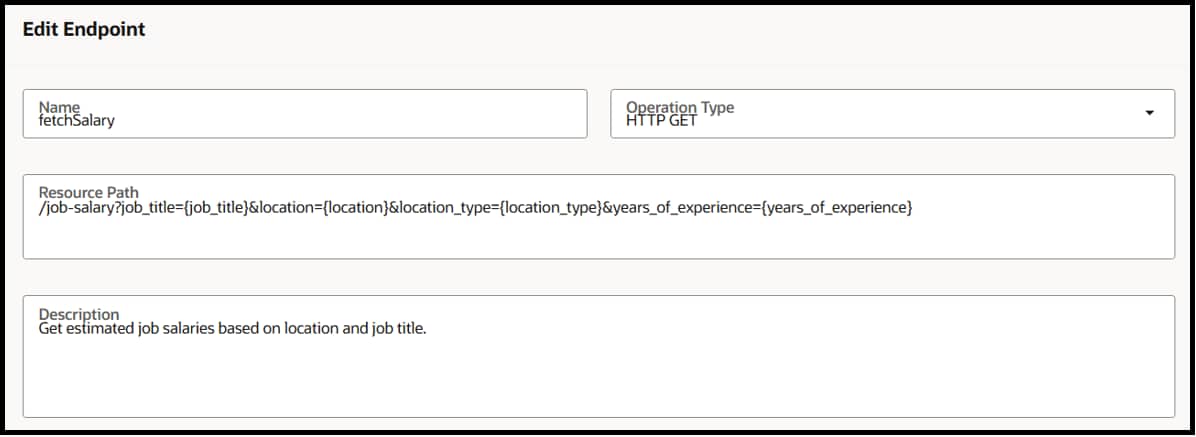
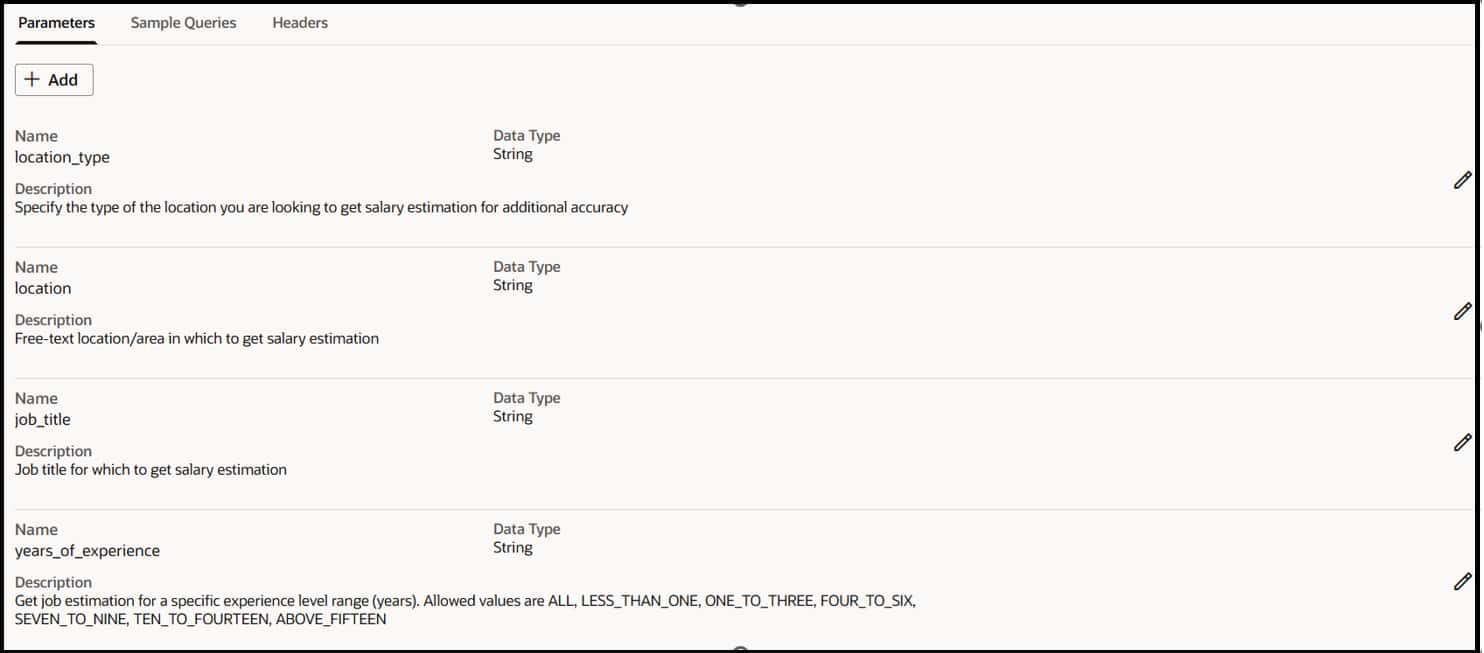
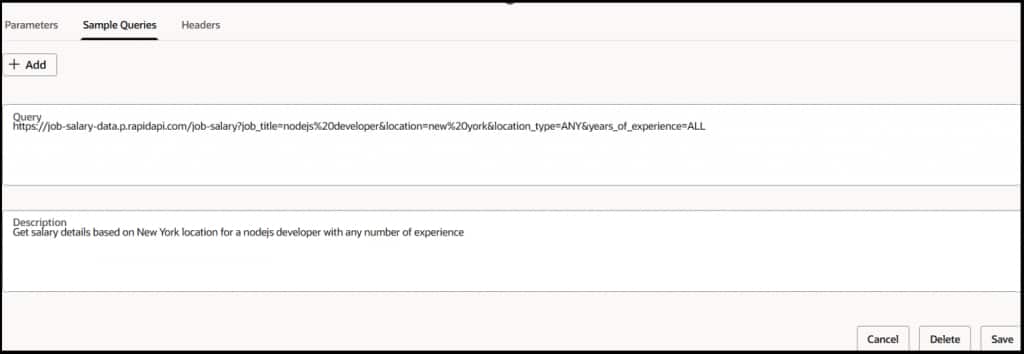
Add the resource path and HTTP method. In Parameters tab define query/body inputs. In Headers tab add required headers. Add Sample Queries to guide the LLM.
Function definition — path, method, and parameters
Parameters tab — input variables or body (in case of POST command)
Sample Queries tab — Sample queries for testing
Headers tab — add required header parameters

Completed tool configuration

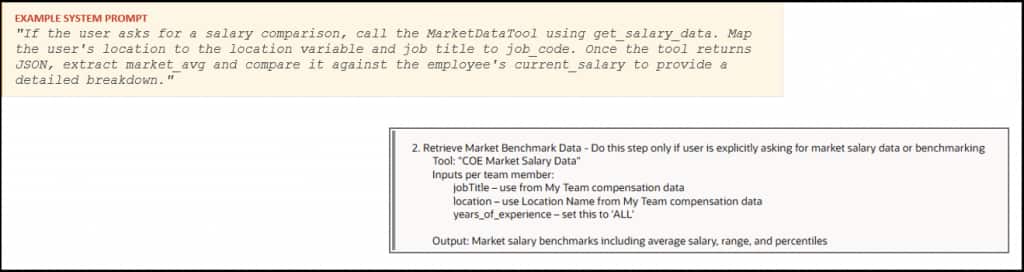
Write a system prompt telling the agent when to call the tool and how to parse the response. Assign to the agent and verify in the Chat Debugger.

Agent running with REST tool assigned

Agent response — live salary comparison data
Best Practices
- 🌐Base URL Only — No Trailing Slash Enter only the root domain in the main tool config (e.g., https://api.example.com). Resource paths like /v1/salaries belong in the Function definition.
- 🔤Clean Function Names Use only alphanumeric characters, underscores (_), and hyphens (-). Spaces or special characters will cause execution errors.
- 💾Save After Every Tab Click Save/Update after configuring each tab — Authorization, Functions, Parameters — to avoid losing changes.
- 📝Write Precise System Prompts Tell the agent exactly when to call the tool, which variables to map, and how to interpret the JSON response.
| Ready to Build Smarter Oracle AI Agents? Start connecting your agents to the real world using the External REST Tool in Oracle AI Agent Studio. |
POSTMAN → AI AGENT STUDIO
Configuration Mapping
Already tested your API in Postman? Every Postman setting maps directly to AI Agent Studio. Validate in Postman first — then replicate with confidence.
| Postman | AI Agent Studio | Note |
| Full URL in address bar | Base URL (Auth tab) + Resource Path (Function) | Split into 2 fields |
| Method dropdown (GET / POST) | Operation dropdown inside Function | Identical options |
| Auth tab → API Key / OAuth 2.0 | Auth tab at tool level | Set once, all functions inherit |
| Headers tab | Headers tab inside Function | Same key-value pairs |
| Params tab → query params | Parameters tab → Type: Query | Same values, different UI |
| Send → inspect JSON response | System prompt parses JSON fields | LLM parses; no manual trigger |

POST REQUEST EXAMPLE
Mapping a POST + Request Body: Postman vs AI Agent Studio
A POST request with a JSON body is the most common pattern for create/update operations — such as submitting a leave request, creating a job requisition, or enrolling an employee in a benefit plan. Here’s exactly how to set it up in both tools.

Step 1 — Set Up the POST Request in Postman
In Postman, create a new request. Set the method to POST, enter the full URL, configure auth in the Authorization tab, and build the JSON body in the Body tab.

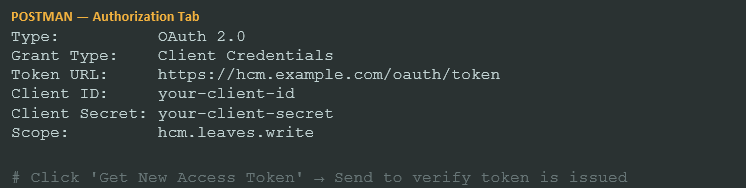
In the Authorization tab of Postman, configure OAuth 2.0 (most HCM APIs require this):
Step 2 — Build the Request Body in Postman
Switch to the Body tab, select ‘raw’ and set the type to JSON. Build the payload with all required fields:
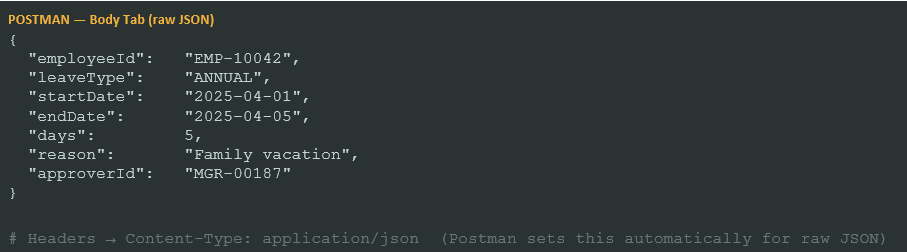
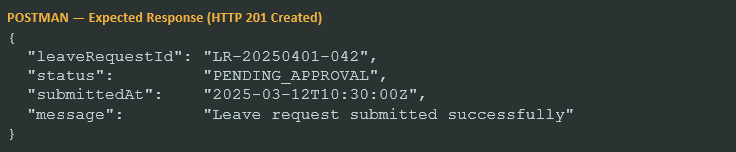
Click Send. Confirm HTTP 201 Created and note the exact field names — you’ll use these in AI Agent Studio.
Step 3 — Replicate in Oracle AI Agent Studio
Once Postman confirms the call works, replicate each setting in AI Agent Studio. The key difference: body fields are defined as individual Parameters, not as a raw JSON blob.
| Postman Setting | AI Agent Studio — Where to Configure |
| Method: POST | Function → Operation dropdown → POST |
| URL path: /api/v1/leaves | Function → Resource Path: /api/v1/leaves |
| Auth: OAuth 2.0 + Token URL + Scope | Authorization tab → Type: OAuth → fill Token URL, Client ID, Secret, Scope |
| Body field: employeeId (string) | Parameters tab → Type: Body → Name: employeeId → Required: Yes |
| Body field: leaveType (string) | Parameters tab → Type: Body → Name: leaveType → Required: Yes |
| Body field: startDate (string) | Parameters tab → Type: Body → Name: startDate → Required: Yes |
| Body field: endDate (string) | Parameters tab → Type: Body → Name: endDate → Required: Yes |
| Body field: days (number) | Parameters tab → Type: Body → Name: days → Required: Yes |
| Body field: reason (string) | Parameters tab → Type: Body → Name: reason → Required: No |
| Body field: approverId (string) | Parameters tab → Type: Body → Name: approverId → Required: Yes |
| Header: Content-Type: application/json | Headers tab → Name: Content-Type → Value: application/json |
Each JSON body field from Postman becomes a separate row in the Parameters tab with Type set to Body. Oracle AI Agent Studio assembles them back into a JSON payload automatically at runtime.
Side-by-Side: Full Configuration Comparison

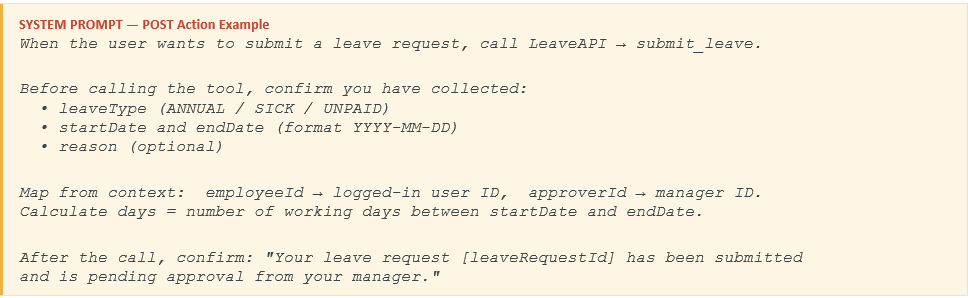
Step 4 — System Prompt for a POST Action
POST calls are actions, not lookups — the system prompt must clearly tell the agent to collect all required fields before submitting, and confirm the outcome to the user.
- ⚠️Key Difference: Body Fields vs Raw JSON In Postman you paste a full JSON object in the Body tab. In AI Agent Studio, each body field is a separate parameter row (Type: Body). The Studio assembles the JSON automatically — never paste raw JSON into the Studio.
- 💡Tip: Required vs Optional Parameters Mark fields as Required in the Parameters tab only if the API truly needs them. Optional fields let the agent submit partial requests without asking the user for every detail.