Suite Analytics Connect
The SuiteAnalytics Connect Service empowers you to archive, scrutinize, and generate reports on NetSuite data. Whether you’re using a third-party tool or a bespoke application, compatibility is ensured across devices running on Windows, Linux, or OS X operating systems. Once your organization activates the Connect Service, NetSuite provides a suite of drivers – ODBC, JDBC, and ADO.NET – available for download and seamless integration with the service.
SuiteAnalytics Connect provides a gateway to NetSuite data via the NetSuite2.com data source, often referred to as the analytics data source. This data source ensures uniformity across the SuiteAnalytics Workbook, addressing past discrepancies between saved searches, reports, and the NetSuite user interface. Additionally, it incorporates role-based access control, enhancing security measures
Accessing SuiteAnalytics Connect can be achieved in multiple ways. You have the option to log in using your NetSuite account email and a valid password, although this method is discouraged for SDN SuiteApps because customer credentials would have to be stored outside NetSuite. Alternatively, for enhanced system security, you can opt for one of two industry-standard authentication methods: OAuth 2.0 or token-based authentication (TBA). Of the two methods, OAuth 2.0 is the favored approach and will be the focus of this article
Setting up OAuth2 M2M in NetSuite
The first step to setup a NetSuite account to work with OAuth2 is to understand how it works, why it is so important and what it consists of.
OAuth 2.0 is a protocol that allows third-party applications to access user data without exposing the user’s password. One of the OAuth 2.0 grant types is the “Client Credentials” grant, which is designed for machine-to-machine (M2M) authentication, where a client application needs to access a service without user intervention
For this purpose the following steps must be followed:
Client Registration
Before anything else, the client application (machine) must be registered with the authorization server. During this registration, the client is provided with a client_id and a client_secret. These credentials are used to authenticate the client application during the token request.
In order to do this in NetSuite, we must first enable the a feature to let the system know we will work with OAuth2. This step is accomplished by creating a new Integration Record in NetSuite.
Steps
-
Go to Setup -> Company -> Enable Features -> SuiteCloud
-
Under Manage Authentication make sure the OAUTH 2.0 checkbox is checked
-
Click save.
After this you must create an Integration Record that will provide you with a set of credentials.
Steps
-
Go to Setup -> Integration -> Manage Integrations -> New.
-
Enter a name for this integration along with a description.
-
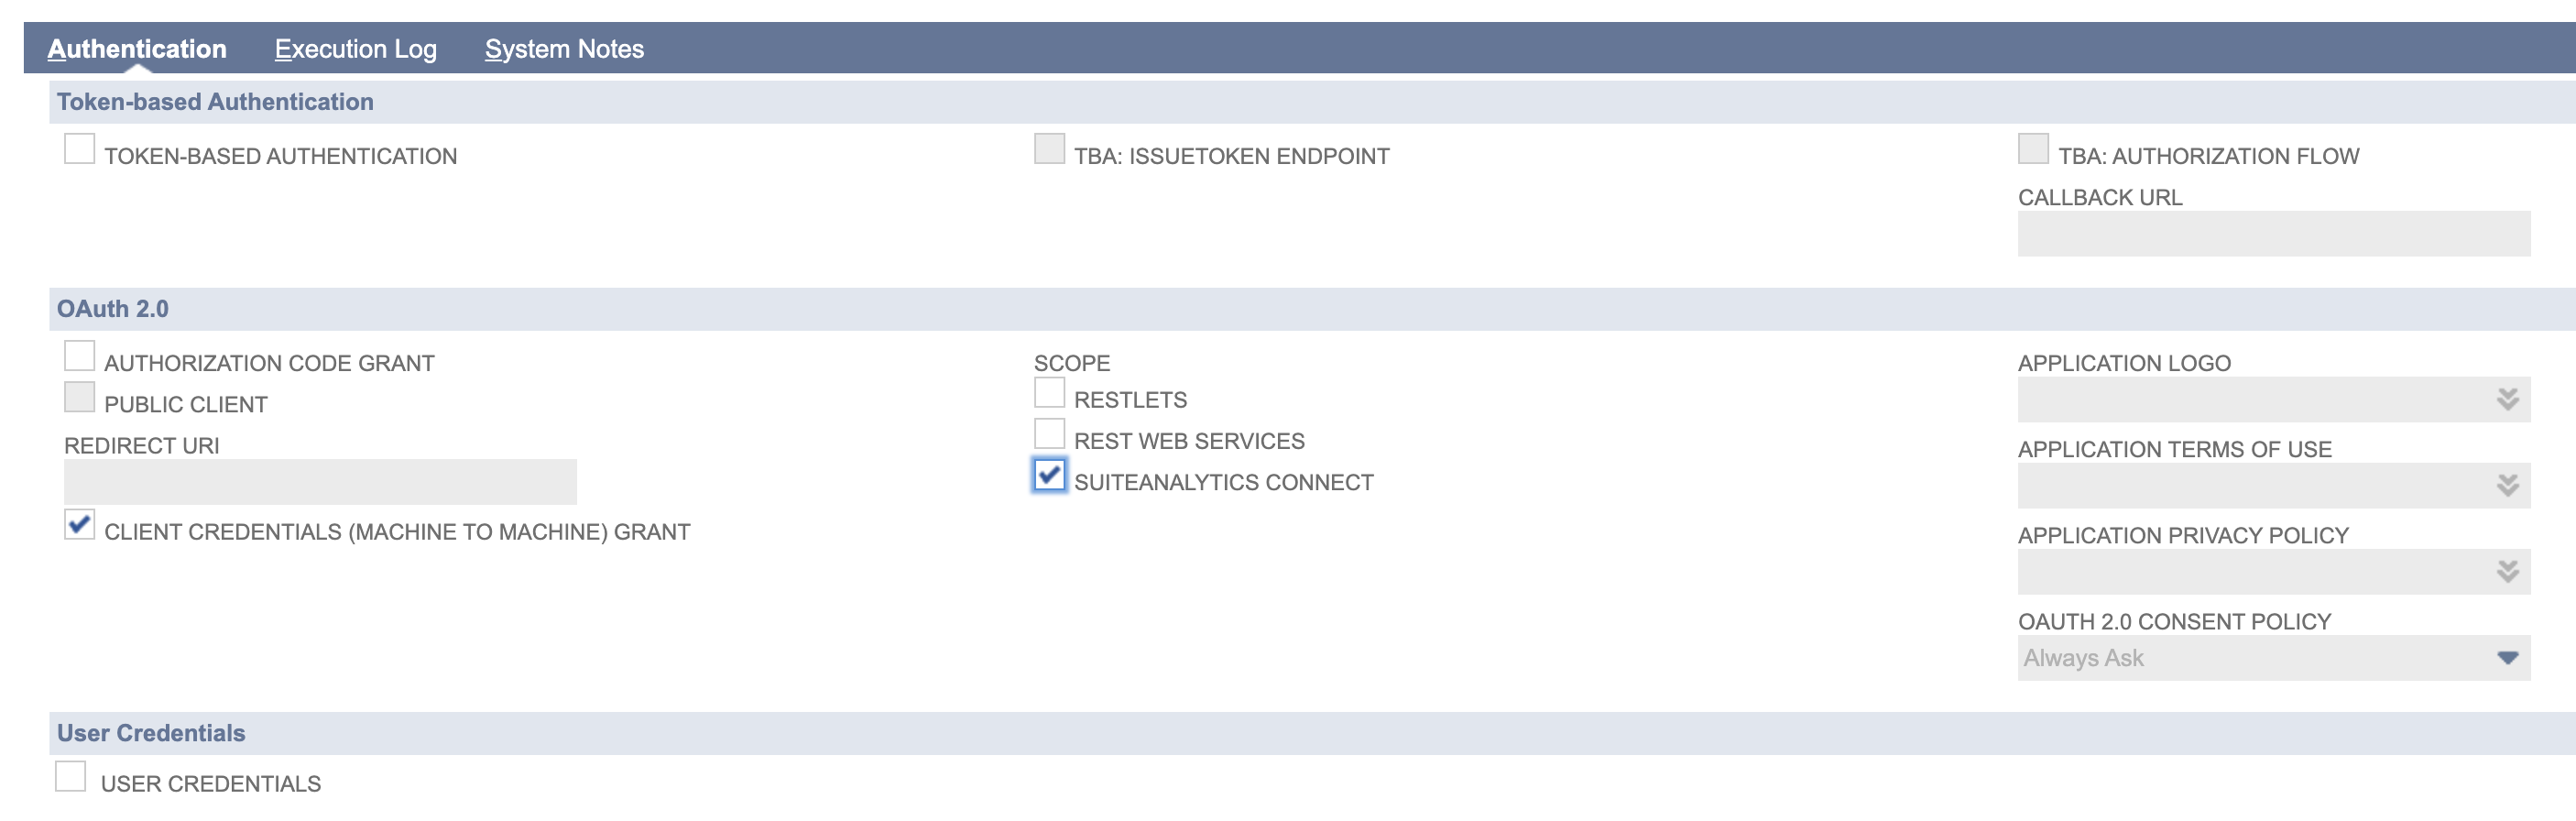
Under the Authentication tab only focus on the OAuth 2.0 section
-
Check CLIENT CREDENTIALS (MACHINE TO MACHINE GRANT)
-
Select the scope of your application. If you are only OAuth 2.0 for SuiteAnalytics Connect, then only the SUITE ANALYTICS CONNECT option should be checked.
All the other options under TOKEN BASED AUTHENTICATION, USER CREDENTIALS and AUTHORIZATION CODE GRANT checkbox under oAUTH 2.0, should be left unchecked.
After you save the form you will be provided with a set of credentials corresponding to the CLIENT ID and CLIENT SECRET that will only be visible during that instance so you must safely store them before you leave this page.
Certificate Creation
Having a set of credentials is only part of the process. In order to establish a secure connection with NetSuite we need to request a token using this set of credentials along with the private key part of a RSA Certificate, that also needs to be generated and uploaded to NetSuite.
Previous to this step we must define the user that will be connecting along with the level of clearance this user will have for this connection. Therefore you must define a user and assign a role for them.
Steps
-
Go to Setup -> User/Roles -> Manage Roles -> New
-
create a role that allows the user to access the records you need them to access to, along with the SuiteAnalytics Connect permission set under SETUP.
IMPORTANT: SuiteAnalytics connect is a paid feature so before going any further, make sure this feature is enabled either in your TESTDRIVE account or/and the PRODUCTION account you will connect to.
After configuring the user, the next step is to generate the certificate. To create this certificate, utilize the openssl tool
From the COMMAND LINE you must type the following instruction:
openssl req -x509 -newkey rsa:4096 -sha256 -keyout auth-key.pem -out auth-cert.pem -nodes -days 730The execution of this command will prompt a series of questions about your company that are not relevant for the connection but must be entered.
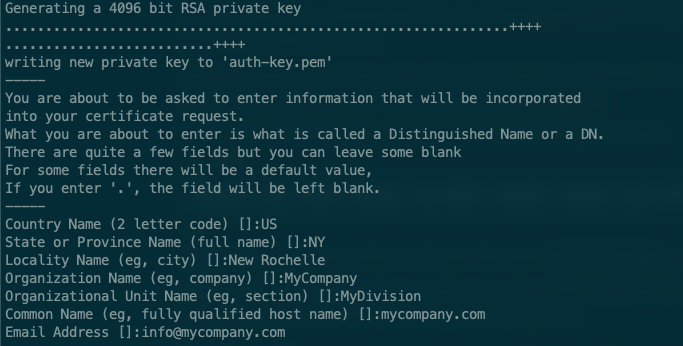
At the end, a RSA certificate file called auth-key.pem valid up to 2 years and a private key file called auth-key.pem will be created.
Now we can upload the certificate to NetSuite.
Steps
-
Go to Setup -> Integrations -> OAuth 2.0 Client Credentials (M2M) Setup.
-
Click on Create New and complete the fields as follows:
ENTITY: The user you created before
ROLE: The role you defined for the desired access
APPLICATION: The Integration Record you created for OAuth 2.0 M2M
CERTIFICATE: The auth-cert.pem file you have created with the openssl tool.
Finally, once the certificate has been uploaded you need to keep the CERTIFICATE ID key because you will need it for the next step.
Requesting an Access Token
The next step consists of using all the previous credentials and key to generate what is called a JWT (Json Web Token) that will be used during the connection phase to NetSuite, in order to obtain a token that will be actually used for subsequent requests.
A JWT is a compact, URL-safe means of representing claims to be transferred between two parties. The claims in a JWT are encoded as a JSON object that is used as payload of a JSON Web Signature structure or as the plaintext of a JSON Web Encryption structure, enabling the claims to be digitally signed or integrity protected with a Message Authentication Code and/or encrypted.
A JWT is composed by 3 sections:
Header
The header typically consists of two parts: the type of the token, which is JWT, and the signing algorithm being used, such as HMAC SHA256 or RSA. This header must be base64URL encoded and we will be using RSA for the signature.
{
    "typ": "JWT",
    "alg": "RS256",
    "kid": "<CERTIFICATE ID>"
}
In the header we must include the CERTIFICATE ID value we obtained out of the uploaded RSA certificate we previously uploaded to NetSuite.
Payload
The payload contains the claims. Claims are statements about an entity (typically the user) and additional data. In our case the payload must contain the following data:
{
    "iss": "<CLIENT ID>",
    "aud": "https://<account>.suitetalk.api.netsuite.com/services/rest/auth/oauth2/v1/token",
    "scope": ["suite_analytics"],
    "exp": "<exp timestamp>",
    "iat": "<timestamp>"
}iss: Client ID you obtained from the Integration Record
aud: NetSuite endpoint to obtain a new token
scope: Array with scope options also defined in the Integration Record. These options might be: suite_analytics, restlets and rest_webservices.
exp: This is the expiration time for the token which is usually 1 hour
iat: This corresponds to the token’s creation timestamp
Signature
The signature has to be done using an RS256 algorithm on the following concatenation of strings (where secret corresponds to the content to the auth-key.pem file we generated when creating the certificate):
RSA256 Signature(
  base64UrlEncode(header) + "." +
  base64UrlEncode(payload),
  secret)
Once we have the JWT we are able to request the OAuth2 token that will be used when getting a new connection from JDBC.
In our SDN Technical Onboarding website you could download several samples of code for generating and using JWT to obtain an access token. These samples have been developed in different programming languages.
SuiteAnalytics connect via JDBC using an OAuth 2.0 token
After requesting the access token, you could use it as part of your SA Connect request to get a DB Connection. In order to do this, along with the token you will also need the following data:
dataSource=NetSuite2.com
serverHost=<accountID>.connect.api.netsuite.com
port=1708
accountId=<accountID>
roleId=<user's role id>
With all these properties you should be able to make the following request:
String token = requestOAuth2Token(); //This method must be implemented by you
OpenAccessDataSource oa = new OpenAccessDataSource();
oa.setServerDataSource(dataSource);
oa.setServerName(serverHost);
oa.setPortNumber(port);
oa.setCustomProperties(String.format("(AccountID=%s;RoleID=%s;Uppercase=1;StaticSchema=1;OAuth2Token=%s)", accountId, roleId, token));
oa.setEncrypted(1);
oa.setNegotiateSSLClose("false");

Connection conn = sds.getConnection("login", "password");
The connection string necessitates the inclusion of the token. However, it is crucial to understand that while this connection method doesn’t demand a user and password, the getConnection() method still does. As a result, even if they are placeholders, both parameters must be supplied to the method
Final Comments
Embracing the latest SuiteAnalytics schema clearly streamlines the integration process, especially when paired with the robustness of OAuth 2.0 Machine-to-Machine access in NetSuite. I hope that by following the steps outlined in this post, you will be able to successfully accomplish this goal.