In the realm of high availability, there exist two prominent models: active-active and active-passive. At their core, these models dictate the role and behavior of redundant nodes within a system, ensuring seamless failover and uninterrupted service. In an active-active configuration, all nodes are simultaneously operational and bear the load of handling tasks and requests. This setup provides optimal resource utilization, as it harnesses the collective power of multiple nodes, enhancing performance and scalability. Conversely, in an active-passive mode, only one node actively shoulders the workload while the others remain idle, serving as backups. This design offers a simpler implementation and reduced complexity, making it an attractive choice for Session Initiation Protocol (SIP) servers.
SIP servers are often deployed in an active-passive mode for simplified call control, efficient network utilization and ease of implementation and management. Based on a recent UCaaS customer implementation of their Voice over IP solution, in this blog we walk you through the failover setup for high availability using Keepalived and VRRP.
What is Keepalived and VRRP?
Keepalived is an open-source software solution that provides routing and load-balancing capabilities with a focus on high availability. It is commonly used in Linux-based environments and offers a robust framework for detecting and handling failures. You can refer to keepalived documentation for learn more about it.
VRRP (Virtual Router Redundancy Protocol) is a network protocol designed to ensure redundancy and seamless failover in routing. It is typically implemented by routers to provide high availability and minimize downtime. Please refer to the IETF documentation for VRRP protocol for more information.
Keepalived, with its VRRP implementation, is a powerful tool for achieving high availability and reliable network routing. It is widely used in data centers, cloud environments, and other mission-critical deployments where uninterrupted service and redundancy are essential.
For this blog we will follow a setup like below where we have a primary and a secondary server and we setup a secondary IP that can float around on SIP nodes.
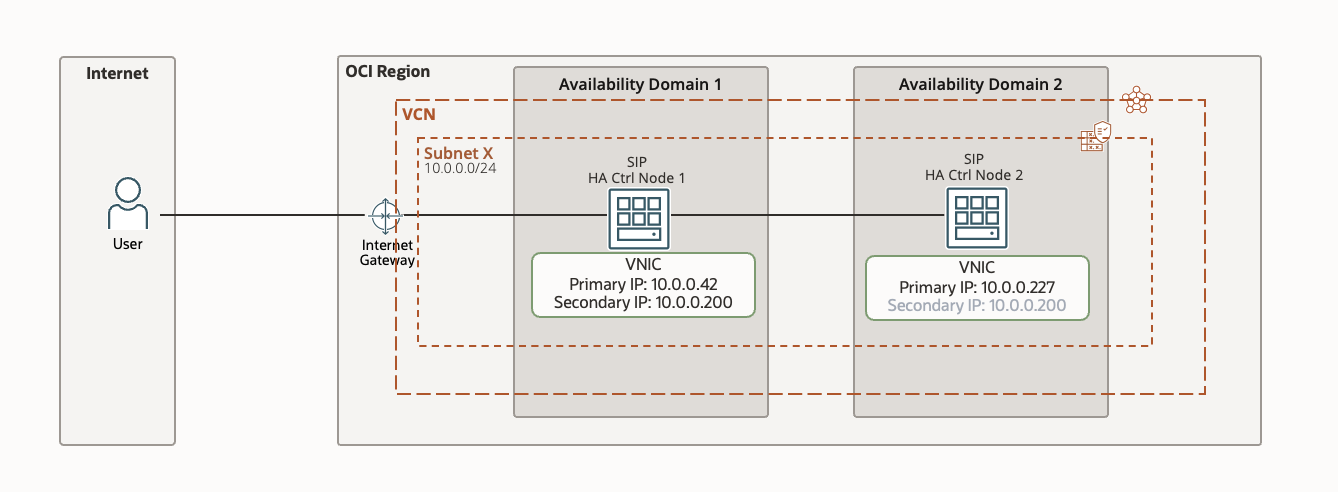
Fig 1: HA deployment of SIP nodes on OCI
Pre-requisites:
- Primary and secondary SIP server nodes are already created. Note: Setting up a SIP server is out of context for this blog as we focus only on failover setup.
- For maximum redundancy I have setup my nodes in 2 different availability domains (AD) in the region. OCI provides you regional subnets making it easy to float over your IP address from one AD to another AD.If you are setting this up in a region with only one AD then you can spread your nodes across 2 fault domains (FD’s).
Task 1: Add secondary IP to primary SIP server
- Navigate to the OCI Menu Compute Instances Sever 1 node.
- Select Attached VNIC’s by scrolling down on compute page and selecting in left sub menu.

Fig 2: Attached VNIC’s page on Virtual Machine on OCI
- Select the primary VNIC and navigate to IPV4 addresses in the left sub menu.
- Click Assign Secondary Private IP address and assign a unique IP address which will be your floating IP. If you have external client that need to access the SIP server the public IP address should also be assigned to the secondary IP. You can use an ephemeral or a reserved public IP here.
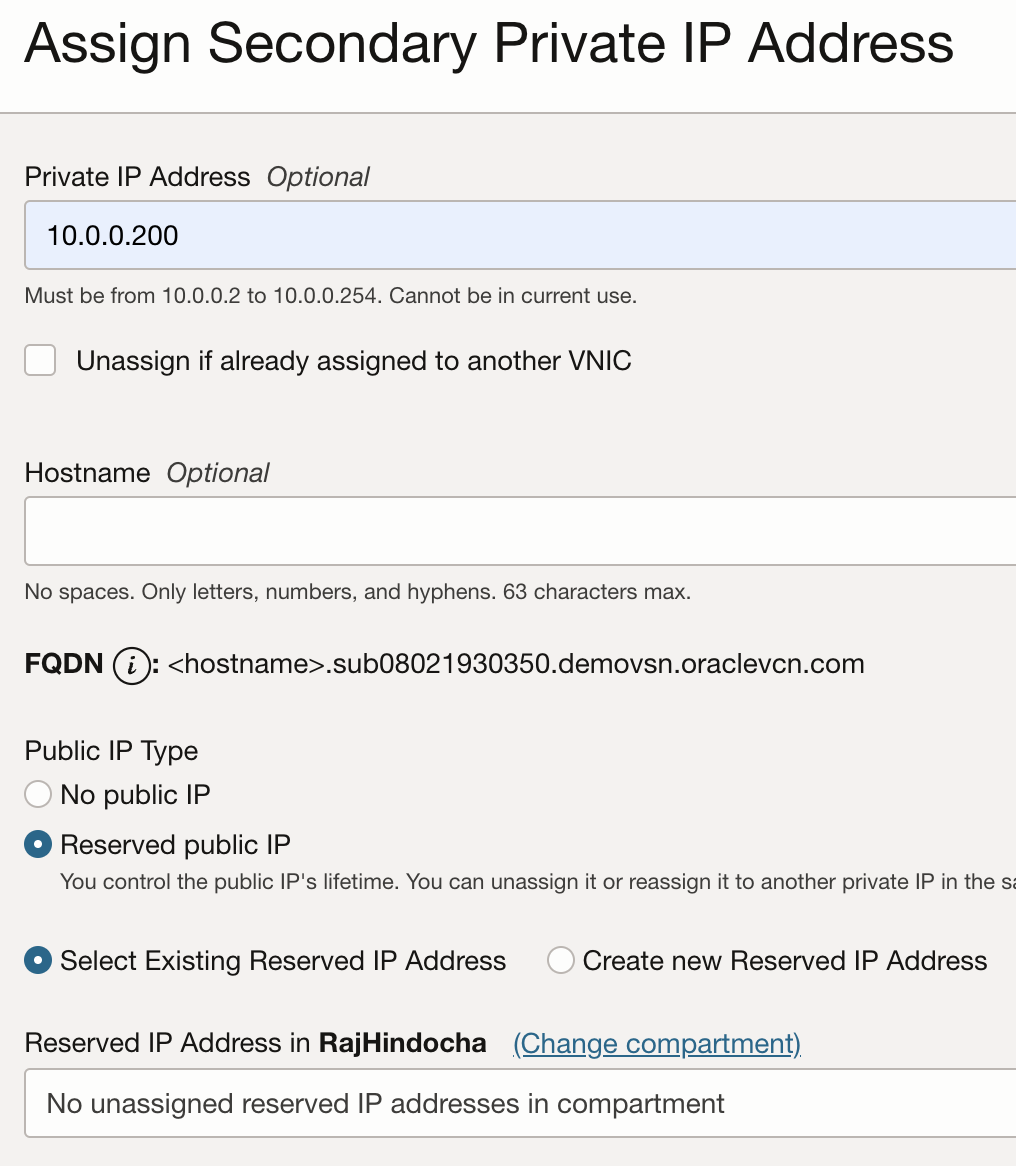
Fig 3: Assign Secondary IP page on VNIC on a Virtual Machine on OCI
Note: OCI internally creates a mapping of private IP to public IP. When you float the private IP from the primary server to the secondary server the public IP moves along with it.
We do not assign a secondary IP to server-2 node. We will failover the server-1’s secondary IP to server-2 using OCI CLI when the server 1 goes down.
Task 2: Setup secondary IP on OS
Below is just one way of adding secondary Ips on Ubuntu. You can explore OS specific options to add secondary IP addresses.
- To configure the secondary IP on OS run the below command, where the IP is the secondary IP private IP address and /n is the subnet mask
ip addr add 10.0.0.200/24 dev ens3 label ens3:0
- This setting does not survive reboots, so let’s add to rc.local file. Switch to root user and create a shell script at /root/set-ip.sh with contents as below.
#!/bin/bash
ip addr add 10.0.0.200/24 dev ens3 label ens3:0
- Make the file executable by running below command.
chmod +x /root/set-ip.sh
- Now modify your rc.local file (if already created) to execute the above script or create a new file at /etc/rc.local as below
#!/bin/bash
/root/set-ip.sh
exit 0
- Make the file executable by running below command.
chmod +x /etc/rc.local
- Execute steps 1-5 on both server nodes.
Task 3: Setup keepalived on both nodes
Keepalived will track the interfaces on each server and will elect one node as master and the other as backup using VRRP.
- You need sudo access to install the application.
- Install keepalived on both nodes.
- Run the following commands on the VM
sudo su
apt-get install -y keepalived
- Let’s create a new config file for keepalived with the below code. Remember to add the primary IP of the respective node and peer node. In the config file below there is no configuration for the VIP as in the cloud the VIP is handled differently so you need to use scripting tools to interact with the cloud and move the Virtual IP (VIP) from one node to the other. When Keepalived detects failures on the nodes it will call a script to move the VIPs. This is defined by the last statement in the config “notify_master /root/claim-vips-notify-master.sh”
- In the config below priority is used to determine who is the master. Higher priority equals master.
- VRRP is configured on the primary interface only (ens3)
- unicast_src_ip and unicast_peer_ip is important for VRRP to create the peering relationship.
- The configuration is using authentication between the two HACTRL’s. In the example below I’m using “zoom-test” as the password. Whenever you want to change it, you will need to edit the config file on both HACTRL’s and re-start the service.
- If you are interested to learn more, please visit the keepalived website.
server-1 /etc/keepalived/keepalived.conf code:
global_defs {
enable_script_security
script_user root
}
#VRRP configuration for the VNIC in the transit subnet
vrrp_instance ISV {
state MASTER
interface ens3
track_interface {
ens3
}
virtual_router_id 51
priority 200
unicast_src_ip 10.0.0.42
unicast_peer {
10.0.0.227
}
authentication {
auth_type PASS
auth_pass oci-test
}
notify_master /root/claim-vips-notify-master.sh
}
server-2 /etc/keepalived/keepalived.conf code:
global_defs {
enable_script_security
script_user root
}
#VRRP configuration for the VNIC in the transit subnet
vrrp_instance ISV {
state BACKUP
interface ens3
track_interface {
ens3
}
virtual_router_id 51
priority 100
unicast_src_ip 10.0.0.227
unicast_peer {
10.0.0.42
}
authentication {
auth_type PASS
auth_pass oci-test
}
notify_master /root/claim-vips-notify-master.sh
}
- Start keepalived service.
service keepalived start
- Check keepalived status. When running this command on both nodes, per the config above node 1 should say “Entering MASTER STATE” while node 2 should say “Entering BACKUP STATE”
- Make keepalived service to start at boot.
chkconfig keepalived on
- You can use the commands below to manage keepalived.
service keepalived stop
service keepalived start
service keepalived status
Task 4: Setup Identity for VM’s to run CLI commands
You need to provide permissions to the two nodes for it to be able to execute scripts to interact with the oracle cloud and move the VIPs. In the next steps you will create the IAM policy using Instance Principles. Instance Principles is an IAM service feature that enables instances to be authorized actors (or principals) to perform actions on service resources. Each compute instance has its own identity, and it authenticates using the certificates that are added to it. These certificates are automatically created, assigned to instances, and rotated, preventing the need for you to distribute credentials to your hosts and rotate them.
- Create a Dynamic Groups in the Oracle Console. A Dynamic group can be created by explicitly adding objects or using tags. In this case because there are only two objects it is easier to specify them.
- Select Identity from the main menu and select Dynamic Groups. Click Create Dynamic Group (ex.
oci-vip-DG) and add the servers.
Use the OCID for each server:
server-1 OCID – ocid1.instance.oc1…………pruscpq
server-2 OCID – ocid1.instance.oc1……….d4ebx24q
- Create a Policy in the Oracle Console. Select Identity from the main menu and select Policies create Policy.
The statements in the policy use the Dynamic Group created in the previous step and the compartment name where the HACTRL’s are deployed.
Allow dynamic-group oci-vip-DG to use private-ips in compartment ISV
Allow dynamic-group oci-vip-DG to use vnics in compartment ISV
Task 5: Setup OCI-CLI on server nodes
As stated above, keepalived can’t move the VIPs in the cloud as the VIPs are owned by the cloud so you need an external application that can interact with the cloud. This can be accomplished via some scripting tool like Python or the OCI CLI or some other tool. Keepalived will execute claim-vips-notify-master.sh when it detects failures on the nodes.
- Setup OCI CLI by following this document.
- After you complete CLI setup, verify you get a response to below command
oci os ns get --auth instance_principal
Task 6: Setup the claim IP script
- Create a file on each server as /root/claim-vips-notify-master.sh and each file will have the command to claim the VIPs for its VNICs. The OCIDs in the commands are the VNICs for each server.
#!/bin/sh
oci network vnic assign-private-ip --vnic-id <VNIC OCID> --ip-address <VIP IP address> --unassign-if-already-assigned –auth instance_principal
- Make the file executable.
claim-vips-notify-master.sh
Task 7: Restart the keepalived service on both nodes
service keepalived restart
Task 8: Test the setup
- To test open your Oracle Console, navigate to server-1 instance, VNICs, select VNIC, select IP Addresses on the left menu.
- You should see two ip addresses assigned to this VNIC, the primary IP and VIP IP.
- Open two terminal windows one to server-1 and another to server -2.
- Execute command service keepalived status.
- server-1 should be in MASTER state and server-2 should be in BACKUP state.
- Now turn off the server-1 node
- After couple seconds in the Oracle Console, note how the VIP IP disappears from the screen. If this is not happening review the script to make sure it is interacting with the OCI API and can move the VIP
- If you run service keepalived status on both servers again, server-1 should be in FAULT state and server-2 should be in MASTER state. If this is not the case review the configuration for keepalived to make sure both servers are configured properly
- Start the server-1 again,
- In the console the VIP should appear again
- If you run service keepalived status on both nodes again, server-1 should be in MASTER state and server-2 should be in BACKUP state.
Conclusion
Using the above simple steps, you can easily setup failover for your SIP servers. Although the above setup was done for SIP server you can use this HA solution with any application server where you have a primary and a fallback server and need to float over the IP address. Like the simplicity in network configuration in cloud, OCI makes it very easy to build, run and manage your applications on cloud with best performance and lowest price. Check out the reasons for why customers choose to run their applications on OCI and economics of OCI when compared to other cloud providers.