Multi-tenancy is a software architecture where a single instance of an application serves multiple customers, known as tenants, while keeping their data and configurations isolated from each other. This approach allows efficient resource utilization and cost savings.
The three multi-tenant models are:
1. Separate Database: Each tenant has its own dedicated database, ensuring strong isolation and customization. With a container database, each tenant can have its own PDB which makes the “Separate Database” model more scalable and maps well with the polyglot Microservices architecture as each service may be using a different data model.
2. Shared Database, Separate Schema: Tenants share a database, but each has its own schema (a separate set of tables and structures). This balances resource efficiency and customization.
3. Shared Database, Shared Schema: Tenants share both the database and schema, often using identifiers to separate data. This model is resource-efficient but can pose challenges in terms of data isolation and customization.
In this blog, we will be implementing the Separate Database model or Database per tenant model, using Spring Boot (The spring Boot version should be 2.4 or above) JPA with Hibernate,Oracle DB, OJDBC+ UCP(23C jars).
Database per Tenant Architecture

Maven Dependencies
We, need to Add the spring-boot-starter-data-jpa dependency in a Spring Boot application in the project’s pom.xml.
<!--Spring Starter Dependency-->
<dependency>
      <groupId>org.springframework.boot</groupId>
      <artifactId>spring-boot-starter-data-jpa</artifactId>
</dependency>
We also need to add the Dependencies for OJDBC and UCP Jars.
 <!--The artifact ojdbc8-production with grab the UCP jar as well-->
<dependency>
    <groupId>com.oracle.database.jdbc</groupId>
    <artifactId>ojdbc8-production</artifactId>
    <version>23.2.0.0</version>
    <type>pom</type>
</dependency>
Project application.yml file
# application.yml
spring:
 datasource:
  oracleucp:
   min-pool-size: 2
   max-pool-size: 7
   max-idle-time: 300
   initial-pool-size: 2
   max-statements: 20
   connection-factory-class-name: oracle.jdbc.pool.OracleDataSource
   inactive-connection-timeout: 300
 jpa:
  properties:
   hibernate:
    dialect: org.hibernate.dialect.Oracle12cDialect
    ddl-auto: create

tenant:
 default-tenant-id: DS_1
 datasources:
  -
   tenant-id: DS_1
   url: jdbc:oracle:thin:@//phoenix99166.dev3sub2phx.databasede3phx.oraclevcn.com:5521/cdb1_pdb1.regress.rdbms.dev.us.oracle.com
   username: tenantuser_ds1
   password: user1password
   driver-class-name: oracle.jdbc.OracleDriver
   type: oracle.ucp.jdbc.PoolDataSourceImpl
  -
   tenant-id: DS_2
   url: jdbc:oracle:thin:@//phoenix91547.dev3sub2phx.databasede3phx.oraclevcn.com:5521/cdb1_pdb1.regress.rdbms.dev.us.oracle.com
   username: tenantuser_ds2
   password: user2password
   driver-class-name: oracle.jdbc.OracleDriver
   type: oracle.ucp.jdbc.PoolDataSourceImpl
The datasources, 2 in our case have been listed under tenant.datasources.<datasources-list> …. and the common UCP properties have been defined under spring.datasource.oracleucp.<ucp-properties>. So we will build the Datasources and apply the Common UCP properties that we have defined above like min-pool-size, max-pool-size, initial-pool-size, max-statements, connection-factory-class-name and inactive-connection-timeout to the datasources. We will be creating 2 UCP Pools for the DataSources.
Hibernate’s DataSourceProperties reads the basic datasource properties like url, username, password, driver-class-name, type etc. We will need to inject the UCP Datasource properties to the datasources, which will be done in the following section.
Reading the custom Tenant properties defined in application.yml file
In order to read the properties we have defined in the application.yml file, we need to define a class and annotate it with @ConfigurationProperties(prefix = “tenant”). The implementation is as follows:
// This class will store the tenant properties in application.yml
@ConfigurationProperties(prefix = "tenant")
public class MultiTenantProperties {

    private String defaultTenantId;

    private List<TenantDataSourceProperties> dataSources;

   @Configuration
   @Primary
    public static class TenantDataSourceProperties extends DataSourceProperties {

      private String tenantId;

      public String getTenantId() {
         return tenantId;
      }

      public void setTenantId(String tenantId) {
         this.tenantId = tenantId;
      }
    }

   public String getDefaultTenantId() {
      return defaultTenantId;
   }

   public void setDefaultTenantId(String defaultTenantId) {
      this.defaultTenantId = defaultTenantId;
   }

   public List<TenantDataSourceProperties> getDataSources() {
      return dataSources;
   }

   public void setDataSources(List<TenantDataSourceProperties> dataSources) {
      this.dataSources = dataSources;
   }

}
The inner class TenantDataSourceProperties reads the properties tenant-id, url, username, password, driver-class-name and type for each tenant. The List<TenantDataSourceProperties> stores the properties for the datasources. At this point, the UCP properties have not been applied to the datasources. Now, let’s build the DataSource and apply the UCP properties in our DataSourceConfiguration Class.
@Configuration
@EnableConfigurationProperties({MultiTenantProperties.class})
public class DataSourceConfig {

   @Autowired
   private MultiTenantProperties multiTenantProperties;

   // The beans below are annotated with @ConfigurationProperties(prefix = "spring.datasource.oracleucp")
   // spring Injects the properties under spring.datasource.oracleucp into the built datasource.
   @Bean
   @ConfigurationProperties(prefix = "spring.datasource.oracleucp")
   public PoolDataSource tenantTwoDatasourceBuilder() {
      for(TenantDataSourceProperties dataSourceProperties: multiTenantProperties.getDataSources()){
         if (dataSourceProperties.getTenantId().equals(Constants.DATASOURCE_TWO)) {
            return (PoolDataSource) dataSourceProperties.initializeDataSourceBuilder().build();
         }
      }
      return null;
   }

   @Bean
   @ConfigurationProperties(prefix = "spring.datasource.oracleucp")
   public PoolDataSource tenantOneDatasourceBuilder() {
      for(TenantDataSourceProperties dataSourceProperties: multiTenantProperties.getDataSources()){
         if (dataSourceProperties.getTenantId().equals(Constants.DATASOURCE_ONE)) {
            return (PoolDataSource) dataSourceProperties.initializeDataSourceBuilder().build();
         }
      }
      return null;
   }

   @Bean(name = "dataSourceMap")
   @Primary
   public MultiTenantDataSources dataSourceInitialiser(){
      // The MultiTenantDataSources class stores the default tenant-id and Map<String, DataSource> for each tenant-ID.
      MultiTenantDataSources multiTenantDataSources = new  MultiTenantDataSources(multiTenantProperties.getDefaultTenantId());
      multiTenantDataSources.add(Constants.DATASOURCE_ONE,tenantOneDatasourceBuilder());
      multiTenantDataSources.add(Constants.DATASOURCE_TWO,tenantTwoDatasourceBuilder());

      return multiTenantDataSources;
   }
}
The MultiTenantDataSources class:
public class MultiTenantDataSources {

    private Map<String, DataSource> dataSources = new HashMap<>();

    private String defaultTenantId;


    public MultiTenantDataSources(String defaultTenantId) {
        Assert.hasText(defaultTenantId, "Default Tenant Id is required");
        this.defaultTenantId = defaultTenantId;
    }


    public void add(String tenantId, DataSource dataSource) {
        dataSources.put(tenantId, dataSource);
    }


    public void remove(String tenantId) {
        dataSources.remove(tenantId);
    }


    public DataSource get(String tenantId) {
        return dataSources.get(tenantId);
    }


    public DataSource getDefault() {
        return dataSources.get(defaultTenantId);
    }


    public Collection<DataSource> getAll() {
        return dataSources.values();
    }

}
Hibernate JPA Configuration for Multi-Tenancy
When configuring multi-tenancy with Hibernate, we need to provide the implementation for Environment.MULTI_TENANT_CONNECTION_PROVIDER and Environment.MULTI_TENANT_IDENTIFIER_RESOLVER.
Let’s create the implementation for the above.
@Component
public class CurrentTenantIdentifierResolverImpl implements CurrentTenantIdentifierResolver {

    private static final String DEFAULT_DB = "DS_1";

    @Override
    public String resolveCurrentTenantIdentifier() {
        if(StringUtils.isEmpty(TenantContext.getDbName())){
            return DEFAULT_DB;
        } else{
            return TenantContext.getDbName();
        }
    }

    @Override
    public boolean validateExistingCurrentSessions() {
        return true;
    }
}
@Component
public class MultiTenantConnectionProviderImpl extends AbstractDataSourceBasedMultiTenantConnectionProviderImpl {

    @Autowired
    private DataSourceDiscovery dataSourceDiscovery;

    @Override
    public DataSource selectAnyDataSource(){
        return dataSourceDiscovery.getDefaultDataSource();
    }

    @Override
    public DataSource selectDataSource(String dbName) {
        return dataSourceDiscovery.getDataSource(dbName);
    }
}
The DataSourceDiscovery is a Service class that returns the Datasource based on the tenant-id.
@Service
public class DataSourceDiscovery {

   @Autowired
   private MultiTenantDataSources multiTenantDataSource;

   public DataSource getDataSource(String dbName) {
      return this.multiTenantDataSource.get(dbName);
   }

   public DataSource getDefaultDataSource(){
      return this.multiTenantDataSource.getDefault();
   }
}
Now, let’s configure Hibernate with the CurrentTenantIdentifierResolver and AbstractDataSourceBasedMultiTenantConnectionProviderImpl instances.
@Configuration
public class EntityConfig {

   @Autowired
   private CurrentTenantIdentifierResolverImpl currentTenantIdentifierResolver;

   @Autowired
   private MultiTenantConnectionProvider multiTenantConnectionProvider;

   @Autowired
   private DataSourceDiscovery dataSourceDiscovery;

   @Autowired
   private ConfigurableListableBeanFactory beanFactory;

   @Bean
   @Primary
   @DependsOn("dataSourceMap")
   public LocalContainerEntityManagerFactoryBean entityManagerFactoryBean() {
      LocalContainerEntityManagerFactoryBean emf = new LocalContainerEntityManagerFactoryBean();
      HibernateJpaVendorAdapter jpaVendorAdapter = new HibernateJpaVendorAdapter();
      jpaVendorAdapter.setDatabase(Database.ORACLE);
      emf.setPersistenceUnitName("default");
      emf.setJpaVendorAdapter(jpaVendorAdapter);
      emf.setPackagesToScan("com.oracle.multitenant.entity");
      emf.setJpaPropertyMap(createProps());
      return emf;
   }

   private Map<String, Object> createProps(){
      Map<String,Object> property= new LinkedHashMap();
      property.put(Environment.SHOW_SQL,false);
      property.put(Environment.GENERATE_STATISTICS,false);
      property.put(Environment.USE_SECOND_LEVEL_CACHE,false);
      property.put(Environment.USE_QUERY_CACHE,false);
      property.put(Environment.FORMAT_SQL,true);
      property.put(Environment.MULTI_TENANT, MultiTenancyStrategy.DATABASE);
      property.put(Environment.MULTI_TENANT_CONNECTION_PROVIDER,this.multiTenantConnectionProvider);
      property.put(Environment.MULTI_TENANT_IDENTIFIER_RESOLVER,this.currentTenantIdentifierResolver);
      property.put(Environment.FLUSH_BEFORE_COMPLETION,true);
      property.put(Environment.BEAN_CONTAINER, new SpringBeanContainer(beanFactory));
      property.put(Environment.DIALECT, Oracle12cDialect.class.getName());
      return property;
   }
}
Entity / DAO / Services Setup
Entity
Let’s create a Entity class Employee and setup DAO and services to add/ find employees.
@Entity(name="EMPLOYEE")
@Table(name="EMPLOYEE")
public class Employee {

    @Id
    @Column(name="EMP_ID")
    private String empId;

    @Column(name="NAME")
    private String name;

    @Column(name="PLACE")
    private String place;

   public String getEmpId() {
      return empId;
   }

   public void setEmpId(String empId) {
      this.empId = empId;
   }

   public String getName() {
      return name;
   }

   public void setName(String name) {
      this.name = name;
   }

   public String getPlace() {
      return place;
   }

   public void setPlace(String place) {
      this.place = place;
   }
}
DAO
public interface EmployeeDao{

   public Employee find(EntityManager em, String empId);

   public void add(EntityManager em, Employee employee);
}
@Component
public class EmployeeDaoImpl implements EmployeeDao {

   @Override
   public Employee find(EntityManager em, String empID) {
      return em.find(Employee.class, empID);
   }

   @Override
   public void add(EntityManager em, Employee employee) {
      EntityTransaction transaction = em.getTransaction();
      try {
         transaction.begin();
         em.persist(employee);
         transaction.commit();
      }catch(Exception ex) {
         transaction.rollback();
         em.close();
         ex.printStackTrace();
      }
   }
}
Services
public interface EmployeeService {

   public Employee getEmployee(String empId);

   public String add(Employee employee);
}
@Service
public class EmployeeServiceImpl implements EmployeeService {

   @Autowired
   private LocalContainerEntityManagerFactoryBean entityManagerFactoryBean;

   @Autowired
   private EmployeeDao employeeDao;

   @Override
   public Employee getEmployee(String empId) {
      return this.employeeDao.find(getEntityManager(),empId);
   }

   @Override
   public String add(Employee employee) {
      this.employeeDao.add(getEntityManager(), employee);
      return employee.getEmpId();
   }

   private EntityManager getEntityManager(){
      EntityManagerFactory emf = this.entityManagerFactoryBean.getObject();
      return emf.createEntityManager();
   }
}
Now, let’s define a REST controller, to receive requests
@RestController
public class ApplicationController {

   private static final Logger LOGGER = LoggerFactory.getLogger(ApplicationController.class);

   @Autowired
   private EmployeeService employeeService;

   @RequestMapping(path="/",method = RequestMethod.POST, produces=MediaType.APPLICATION_JSON_VALUE)
    public String index(@RequestBody Employee employee, @RequestHeader("DATABASE") String dbName) {
      LOGGER.info("Message from controller.");
      TenantContext.setDbName(dbName);
      String id = employeeService.add(employee);
      String message = "[EMPID="+id+" NAME="+employee.getName()+" PLACE="+employee.getPlace()+"] [DATABASE="+dbName+"]";
      return message;
    }
}
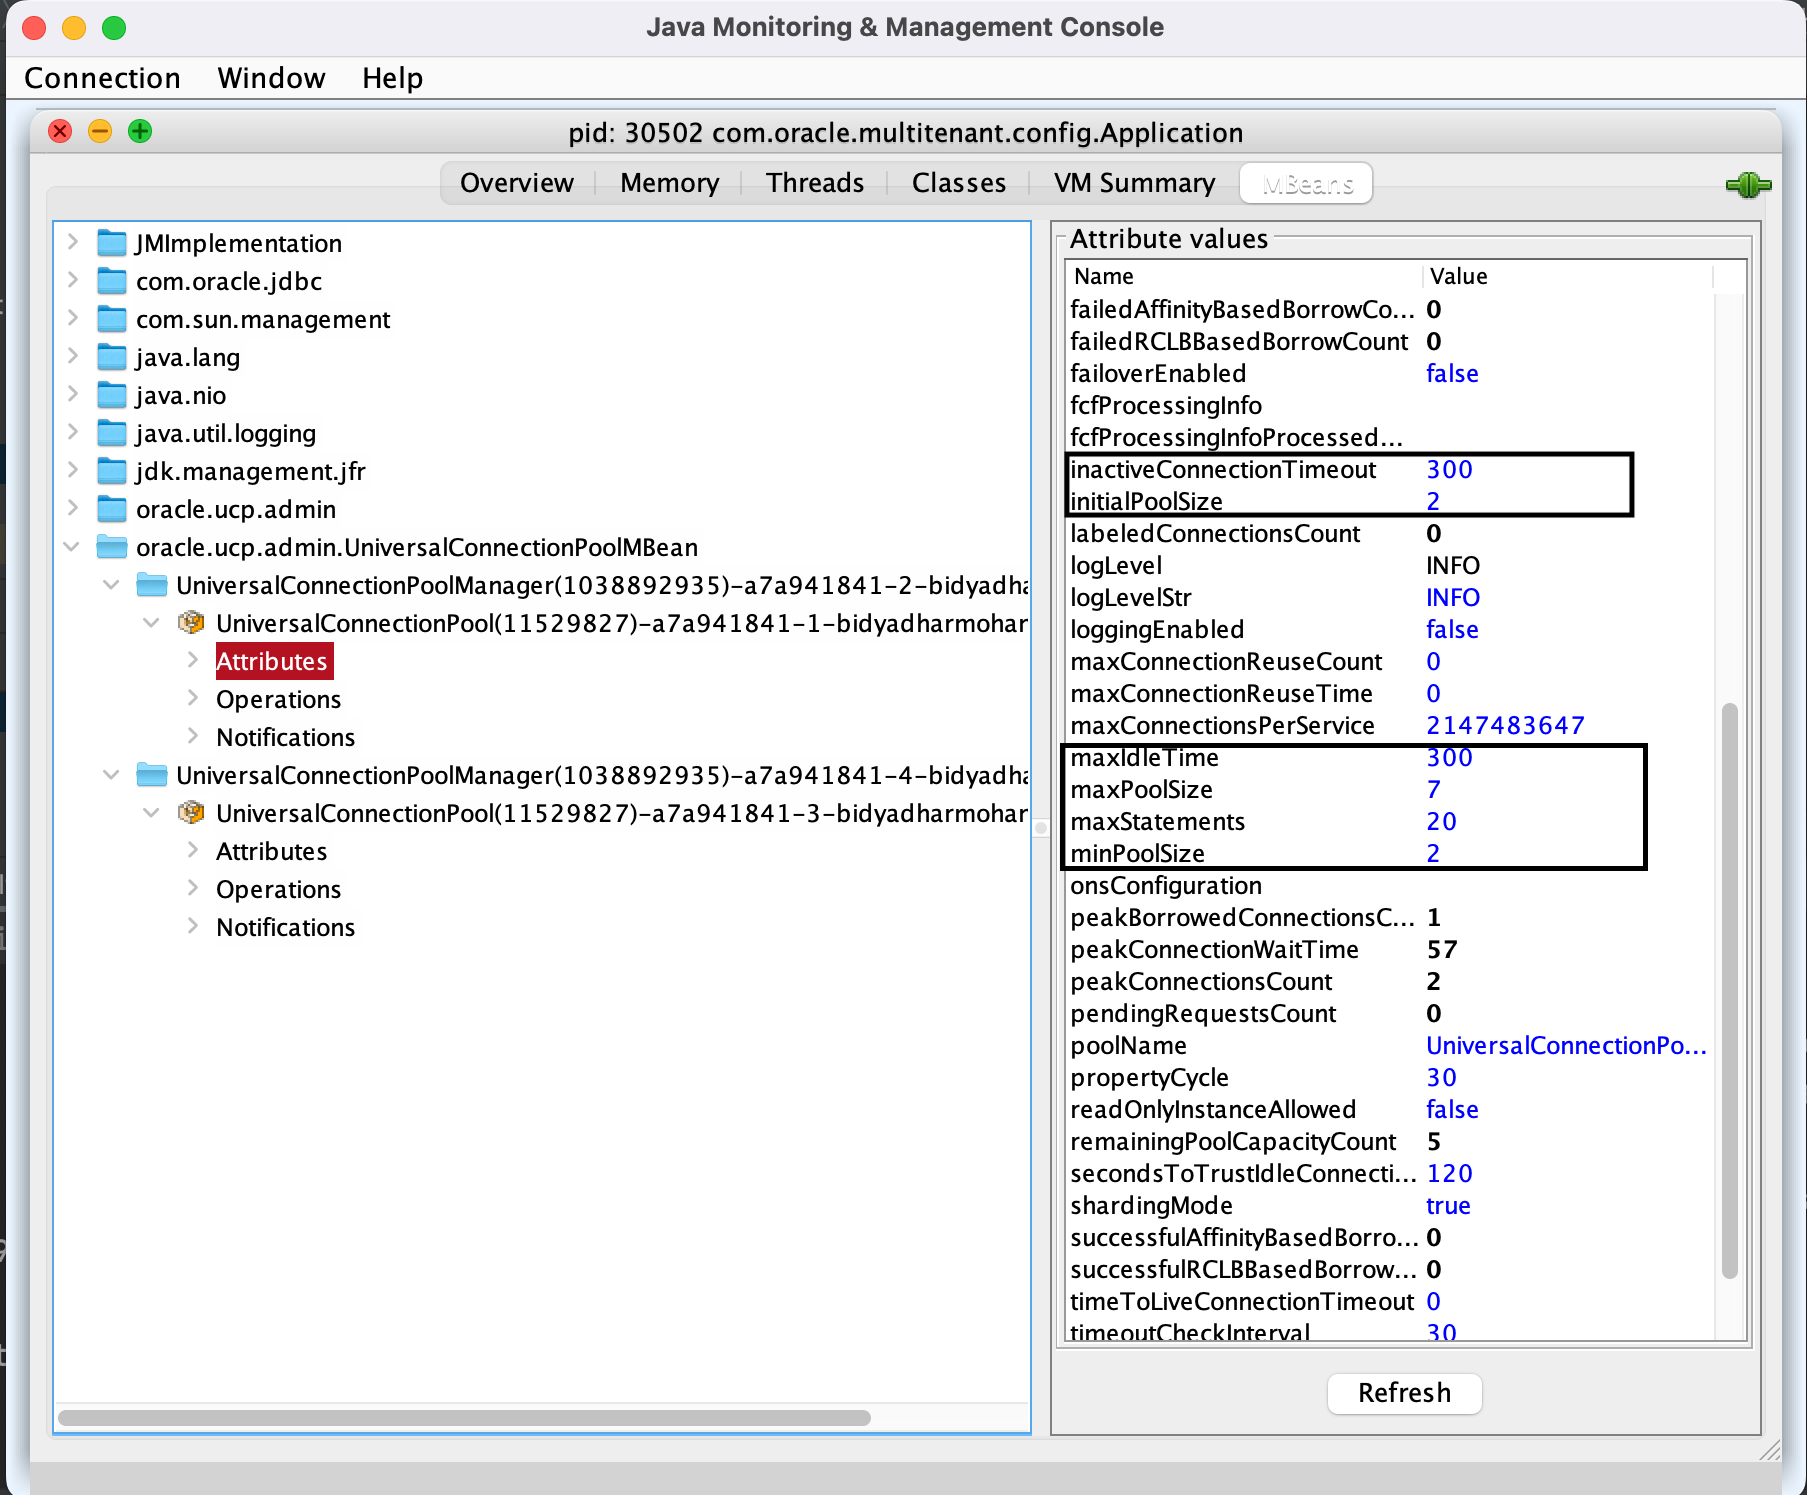
Verifying UCP Configuration
We can verify that the UCP properties that we have supplied in the application.yml file is applied properly using JConsole. As we can see in the image below, two pools are started for the two tenants and that the properties are applied correctly.
Testing the application
Let’s write a simple test to send a POST request with tenant-id in the http-header
public class TestMultiTenant {

    public static void main(String args[]){
        RestTemplate rt = new RestTemplate();

        Employee employee = new Employee();
        employee.setEmpId(System.currentTimeMillis()+"");
        employee.setName("Bidyadhar");
        employee.setPlace("India");

        HttpHeaders headers = new HttpHeaders();
        headers.set("DATABASE","DS_2");
        headers.setContentType(MediaType.APPLICATION_JSON);

        HttpEntity entity= new HttpEntity(employee,headers);

        ResponseEntity<String> out = rt.exchange("http://localhost:8080/", HttpMethod.POST, entity, String.class);
        System.out.println(out);

    }
}
Conclusion
In conclusion, building a multi-tenant application with Spring Boot, Hiberate, and Oracle JDBC and UCP allows us to efficiently manage and scale our applications for multiple tenants. Through this blog we have explored the steps required to achieve the same. In future, we will explore other multi-tenants architectures to create robust and flexible multi-tenant systems.