Introduction
For many years, Outbound Single Sign-on, or what we call SuiteSignOn in NetSuite, has been the authentication method for users who want to access an external web application via connection points (or links) in the NetSuite interface, without the need for additional authentication. As we are closing into the end of support (2024.2) for SuiteSignOn, NetSuite is providing an alternative based on Open ID Connect (OIDC) Single Sign-On. Say hello to the NetSuite as OIDC Provider feature.
The NetSuite as OIDC Provider feature enables users to sign-in to an external application using their NetSuite user credentials, with NetSuite acting as an OIDC Provider. User credentials and policies are managed by NetSuite and uses OAuth 2.0 as an authorization framework. NetSuite as OIDC Provider access is based on the OAuth 2.0 authorization code grant flow for the generation of access tokens, refresh tokens, and ID tokens.
Getting your NetSuite Account Ready
The following are required in the NetSuite account to properly setup and use the NetSuite as OIDC Provider feature. Apart from enabling certain NetSuite features, roles must be created or modified to utilize OAuth2.0 access tokens and the authorization code grant flow.
First, we must enable the following NetSuite account features for NetSuite as OIDC Provider feature to work. You can go to Setup > Company > Enable Features and click on the SuiteCloud subtab. Tick on the features indicated below and click on the Save button.
• NetSuite as OIDC Provider
• Client SuiteScript
• Server SuiteScript
• OAuth 2.0
The next step is to create or modify a role to add the Log in using OAuth 2.0 Access Tokens permission. It is a necessary role for any user who wants to sign in using the NetSuite as OIDC Provider feature. Below are the steps to customize and existing role.
Steps:
1. Go to Setup > Users/Roles > User Management > Manage Roles.
2. Select a role to customize.
3. On the Permissions > Setup subtab, choose the Log in using OAuth 2.0 Access Tokens permission from the list and click Add.
4. Click Save.
Now that you have the necessary role to log in using OAuth 2.0 access tokens, you need to create an Integration Record (IR) for use in your application. This is an important step for OAuth 2.0 authorization code grant flow to be initiated. Only administrators and users with the Integration Application permission can create IRs.
Steps:
1. Go to Setup > Integration > Integration Management > Manage Integrations > New.
2. Enter a name for your application in the Name field.
3. Select Enabled in the State field.
4. Tick on the Authorization Code Grant checkbox on the Authentication tab.
5. Enter an URI in the Redirect URI field. (Enter a valid redirect URI, where your application will handle the code.)
6. Click on the Save button when done.
And finally, you need to setup the authentication to configure audiences for your application.
Steps:
1. Go to Setup > Integration > Manage Authentication > NetSuite as OIDC Provider Setup.
2. Click the link in the Integration Name column.
3. In the window, select Entities and Roles you want to enable for this application
4. Click Save.
Use the NetSuite as OIDC Provider in Development
OIDC Configuration Metadata
You can find the OIDC configuration metadata on the NetSuite as OIDC Provider Setup page. The metadata file is accessible through the Metadata URL link at the top of the page. This file is specific for each account and contains all data needed to complete the setup of the relying party. It includes multiple endpoints for authenticating, and JWKs/alg for verifying tokens. You need to invoke the metadata URL and use those values in your application with the NetSuite as OIDC Provider feature.
Metadata URL
https://<accountID>.suitetalk.api.netsuite.com/.well-known/openid-configuration
Setting Up the OAuth 2.0 Authorization Code Grant Flow
Step One: GET Request to the Authorization Endpoint
In the first step of the OAuth 2.0 authorization code grant flow, your application needs to send a GET request to the authorization endpoint. This request must include the required parameters in the request header.
Authorization Endpoint
https://<accountID>.app.netsuite.com/app/login/oauth2/authorize.nl
Sample GET Request
https://<accountID>.app.netsuite.com/app/login/oauth2/authorize.nl?scope=openid+email+rest_webservices&redirect_uri=https%3A%2F%2Fmyapplication.com%2Fnetsuite%2Foauth2callback&response_type=code&client_id=6794a3086e4f61a120350d01b8527aed3631472ef33412212495be65a8fc8d4c&state=ykv2XLx1BpT5Q0F3MRPHb94j&nonce=ym1W7YfRHweT46AcCX8MFajz&code_challenge=Who5QBshz2Mu1Mq6GuAknYA5TnjA-0z7VhAgLloec1s&code_challenge_method=S256
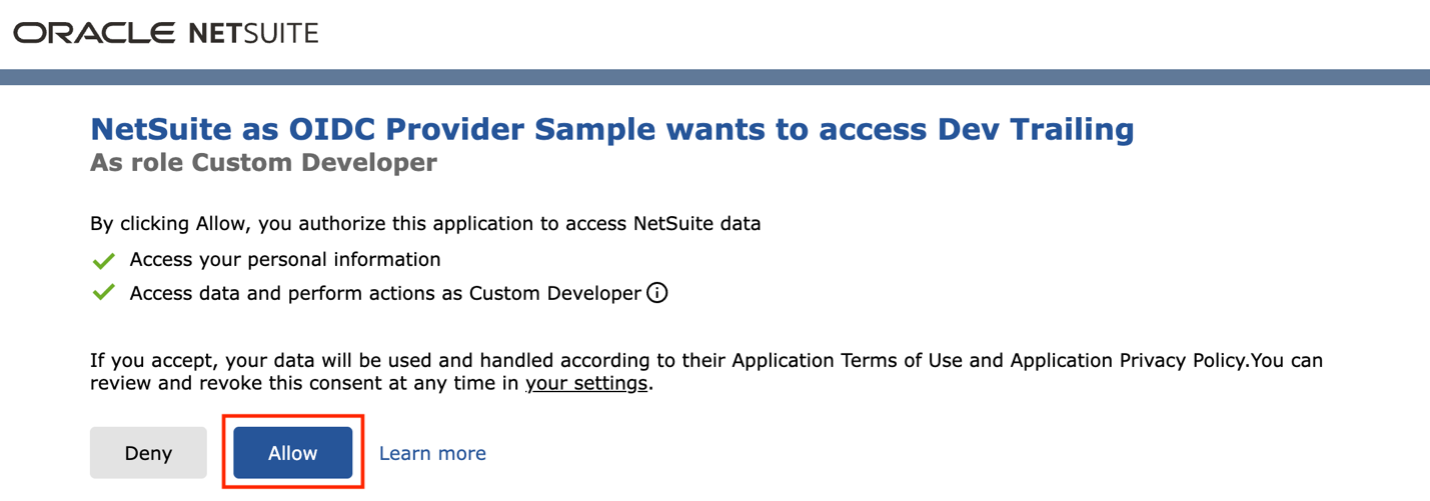
When your application sends the GET request to the authorization endpoint, NetSuite displays the consent screen, where a user authorizes your application to access into a NetSuite account.
After authorization, NetSuite initiates a redirect to the Redirect URI
Sample Redirect: Successful Authorization
https://localhost:4443/login/callback?state=ykv2XLx1BpT5Q0F3MRPHb94j&role=1000&entity=12&company=1234567&code=70b827f926a512f098b1289f0991abe3c767947a43498c2e2f80ed5aef6a5c50
Sample Redirect: Authorization Failed
https://localhost:4443/login/callback?state=ykv2XLx1BpT5Q0F3MRPHb94j&role=1000&entity=12&company=1234567&error=access_denied
After the request to the redirect URI is sent, the flow proceeds to Step Two: POST request to the token endpoint.
Step Two: POST Request to the Token Endpoint
In the next step of the OAuth 2.0 authorization code grant flow, your application needs to send a POST request to the token endpoint. The request must include client credentials in the HTTP authorization request header and the required parameters in the request body. At the end of this step, the access token, refresh token, and ID token are granted.
Token Endpoint
https://<accountID>.suitetalk.api.netsuite.com/services/rest/auth/oauth2/v1/token
Sample Authorization Header
Content-Type: application/x-www-form-urlencoded
Authorization: Basic <Base64Encoded (ClientID:ClientSecret)>
After sending the POST request, NetSuite responds with the access token, refresh token, and ID token.
Sample Response in JSON JWT Format
{
 "access_token": "xxxxxxxx",
"refresh_token": "yyyyyyyy",
"id_token": "zzzzzzzz",
"expires_in": "3600",
"token_type": "bearer"
}
What Can I Do with the Access Token?
1. To Obtain User Information
You can use access token to obtain the authenticated user information, send a GET request to the userinfo endpoint.
Userinfo Endpoint
https://<accountID>.suitetalk.api.netsuite.com/services/rest/auth/oauth2/v1/userinfo
NOTE: You can get the token endpoint from the OIDC Configuration Metadata.
Sample Authorization Header
Content-Type: application/json
Authorization: Bearer <access token>
2. To Invoke REST API
You can also use access token to invoke NS Rest API endpoint, here is the sample to obtain an employee information.
REST API Endpoint
https://<accountID>.suitetalk.api.netsuite.com/services/rest/record/v1/employee/<entityID>
NOTE: To find available REST API endpoints, please refer to the REST API Browser.
Sample Authorization Header
Content-Type: application/json
Authorization: Bearer <access token>
3. To Refresh Access Token
When the access token expires, your application can send the refresh token POST request to the token endpoint to obtain a new access token.
Token Endpoint
https://<accountID>.suitetalk.api.netsuite.com/services/rest/auth/oauth2/v1/token
Sample Authorization Header
Content-Type: application/x-www-form-urlencoded
Authorization: Basic < Base64Encoded (ClientID:ClientSecret)>
After sending the POST request, NetSuite responds with the access token.
Sample Response in JSON JWT Format
{
"access_token": "xxxxxxxx",
"expires_in": "3600",
"token_type": "Bearer"
}